New Beading Journey with Jesse James Beads
For a couple of years now I have had friends and clients tell me I needed to start working with supplies from Jesse James Beads. In particular their online exclusive collections of beads and supplies. So in July I started ordering from them, and after I received the first package, I was hooked. Their color and style selection was just what I needed to break my inspiration block! All the beads were packed well, shipping was fast and they even included some free tassels!
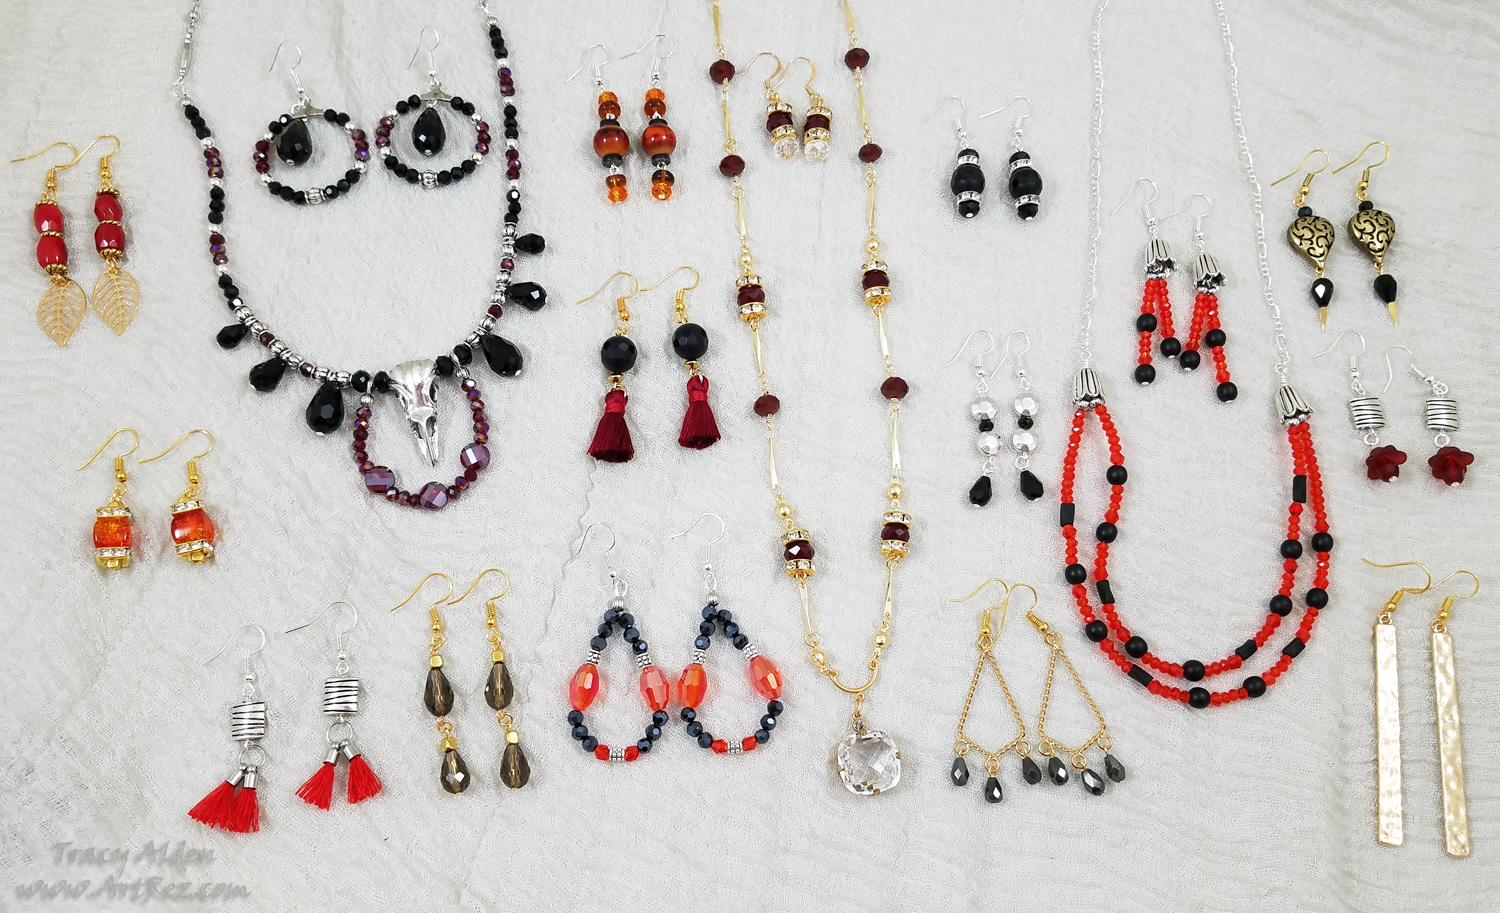
Mauna Loa Bead Mix What caught my eye was their limited edition Destination Hawaii bead mixes and strands. I bought several packs for gifts and the Mauna Loa 2-Tier Bead Mix for myself. It contained a lovely collection of metal, acrylic, crystal, glass, fiber and semi precious stones. The colors brought to mind the island of Mauna Loa, which is home to one of the five volcanoes that make up the Hawaiian islands. Vibrant red and oranges for lava and stunning sunsets. Black and grey for the volcanic rocks and smoke from the volcano. Metallics and tassels reminiscent of the Polynesian regalia and pageantry.
*If you hurry you might still be able to get one of these lovely bead mixes before they sell out.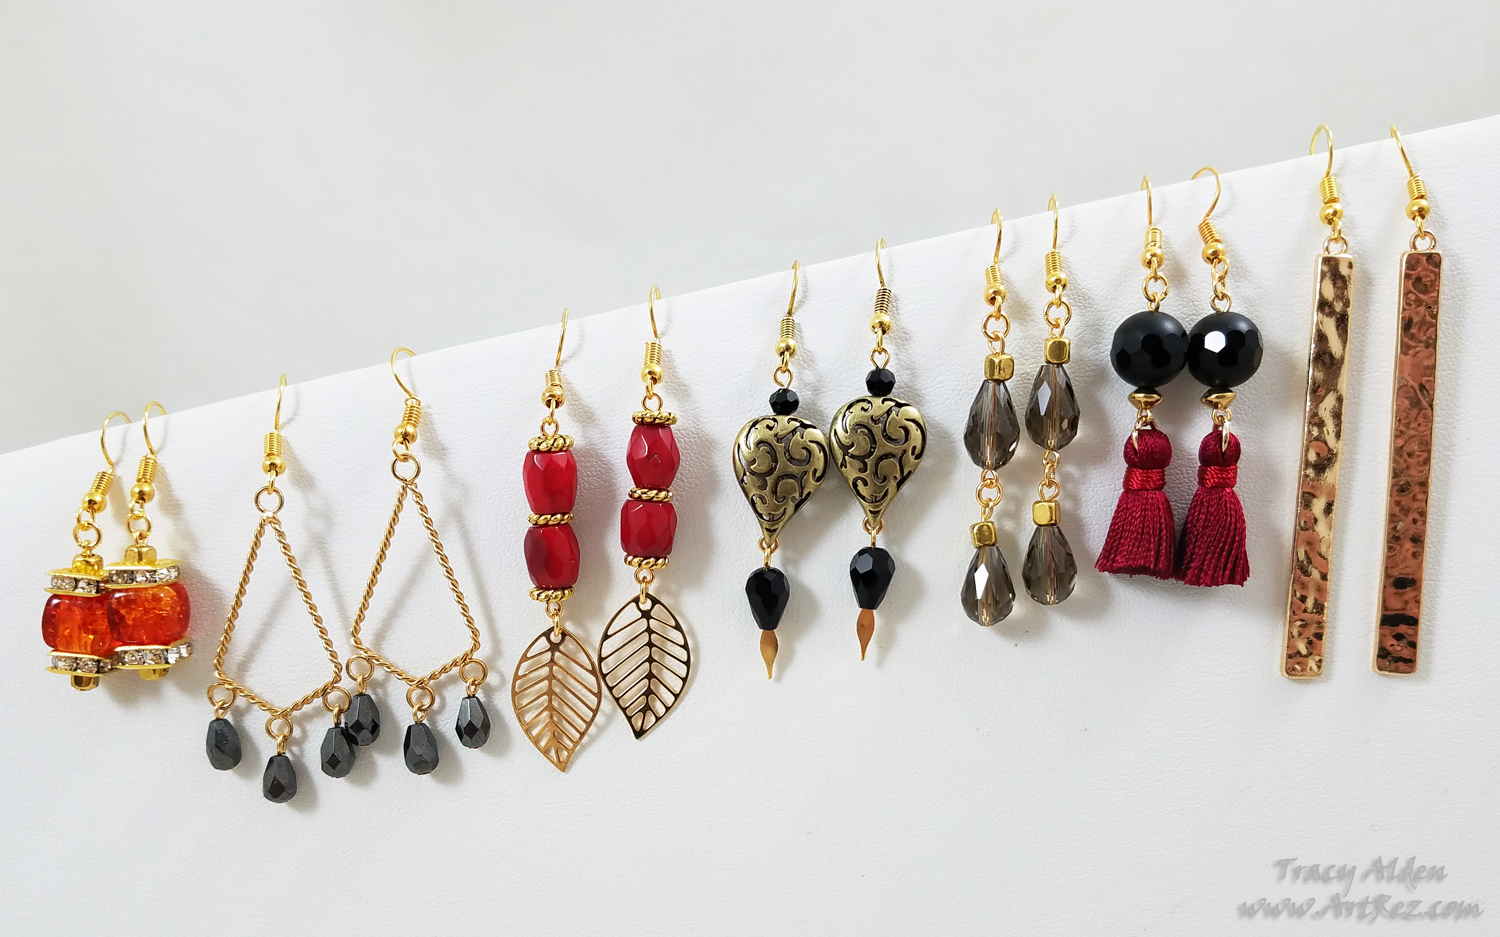
Gold Assortment Starting with my personal collection of gold findings I selected beads that brought to mind the warmth of sunsets and bonfires by the beaches. In most, if not all Jesse James Beads mixes you will find two to even six beads of the same type, making earrings and symmetrical jewelry making a breeze.
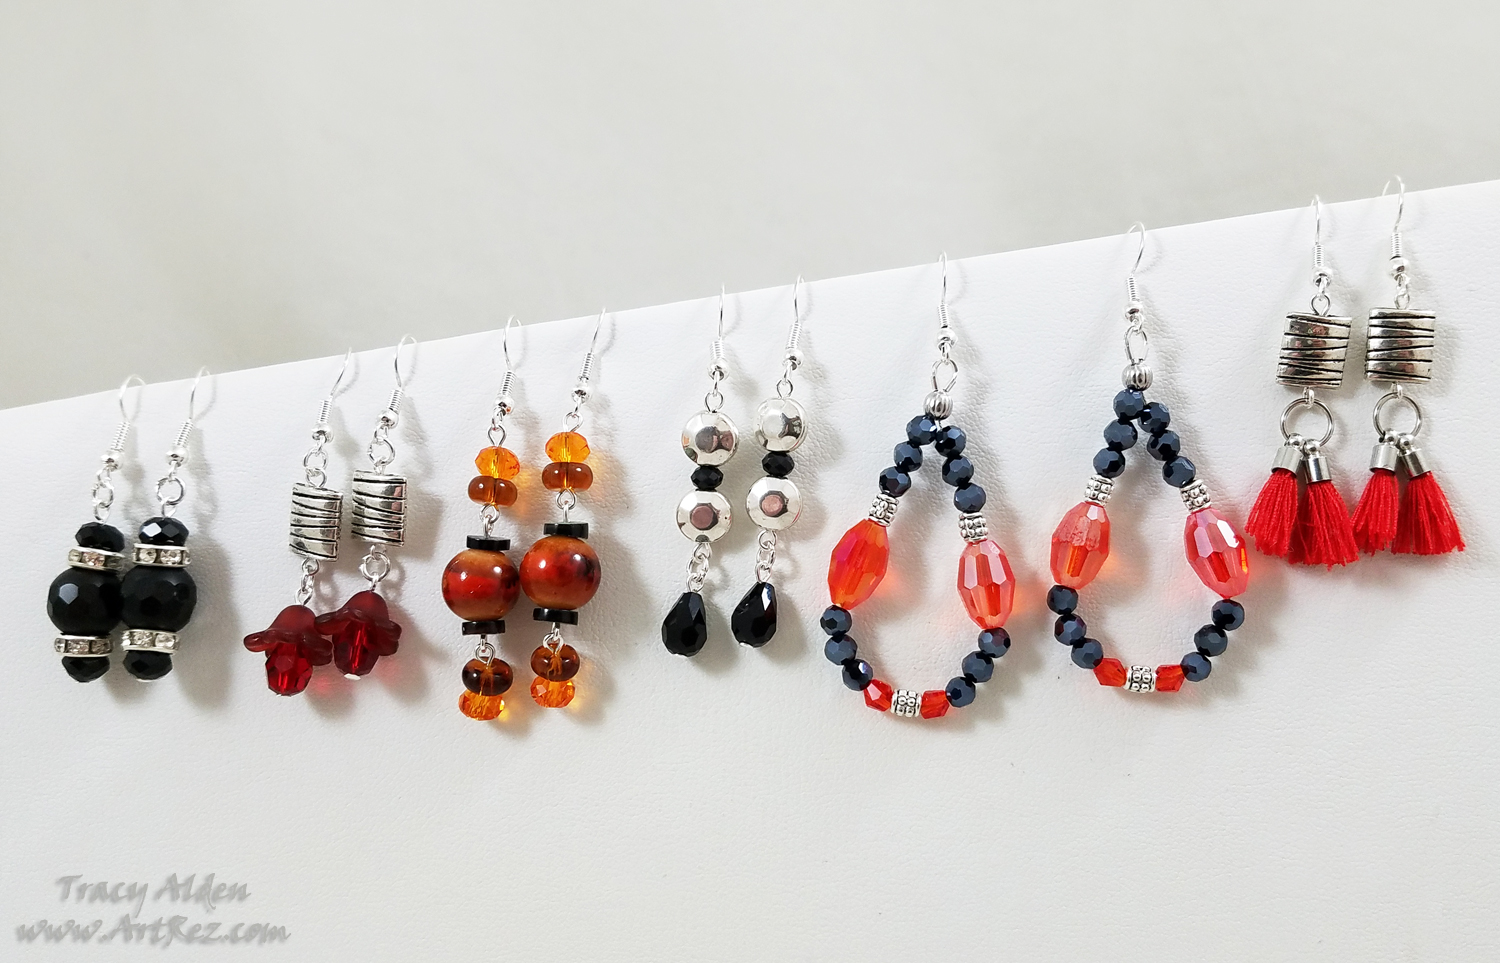
Silver Assortment I felt certain beads lent themselves to the cooler tone of silver, thinking of cooling breezes among the palms with bright glow of lava at night. Digging through my collection of crystals, fire glass and silver findings I found just the right combinations to go with the bead mix.

Lava Flower There was a selection of black matte beads in the mix that immediately reminded me of cooled lava flow. I thought of ʻōhiʻa lehua, a species of evergreen myrtle found in Hawaii, that often is the first plants to grow on new lava flows. With some additional matte beads, Swarovski crystals and silver findings I created this earring and necklace set.
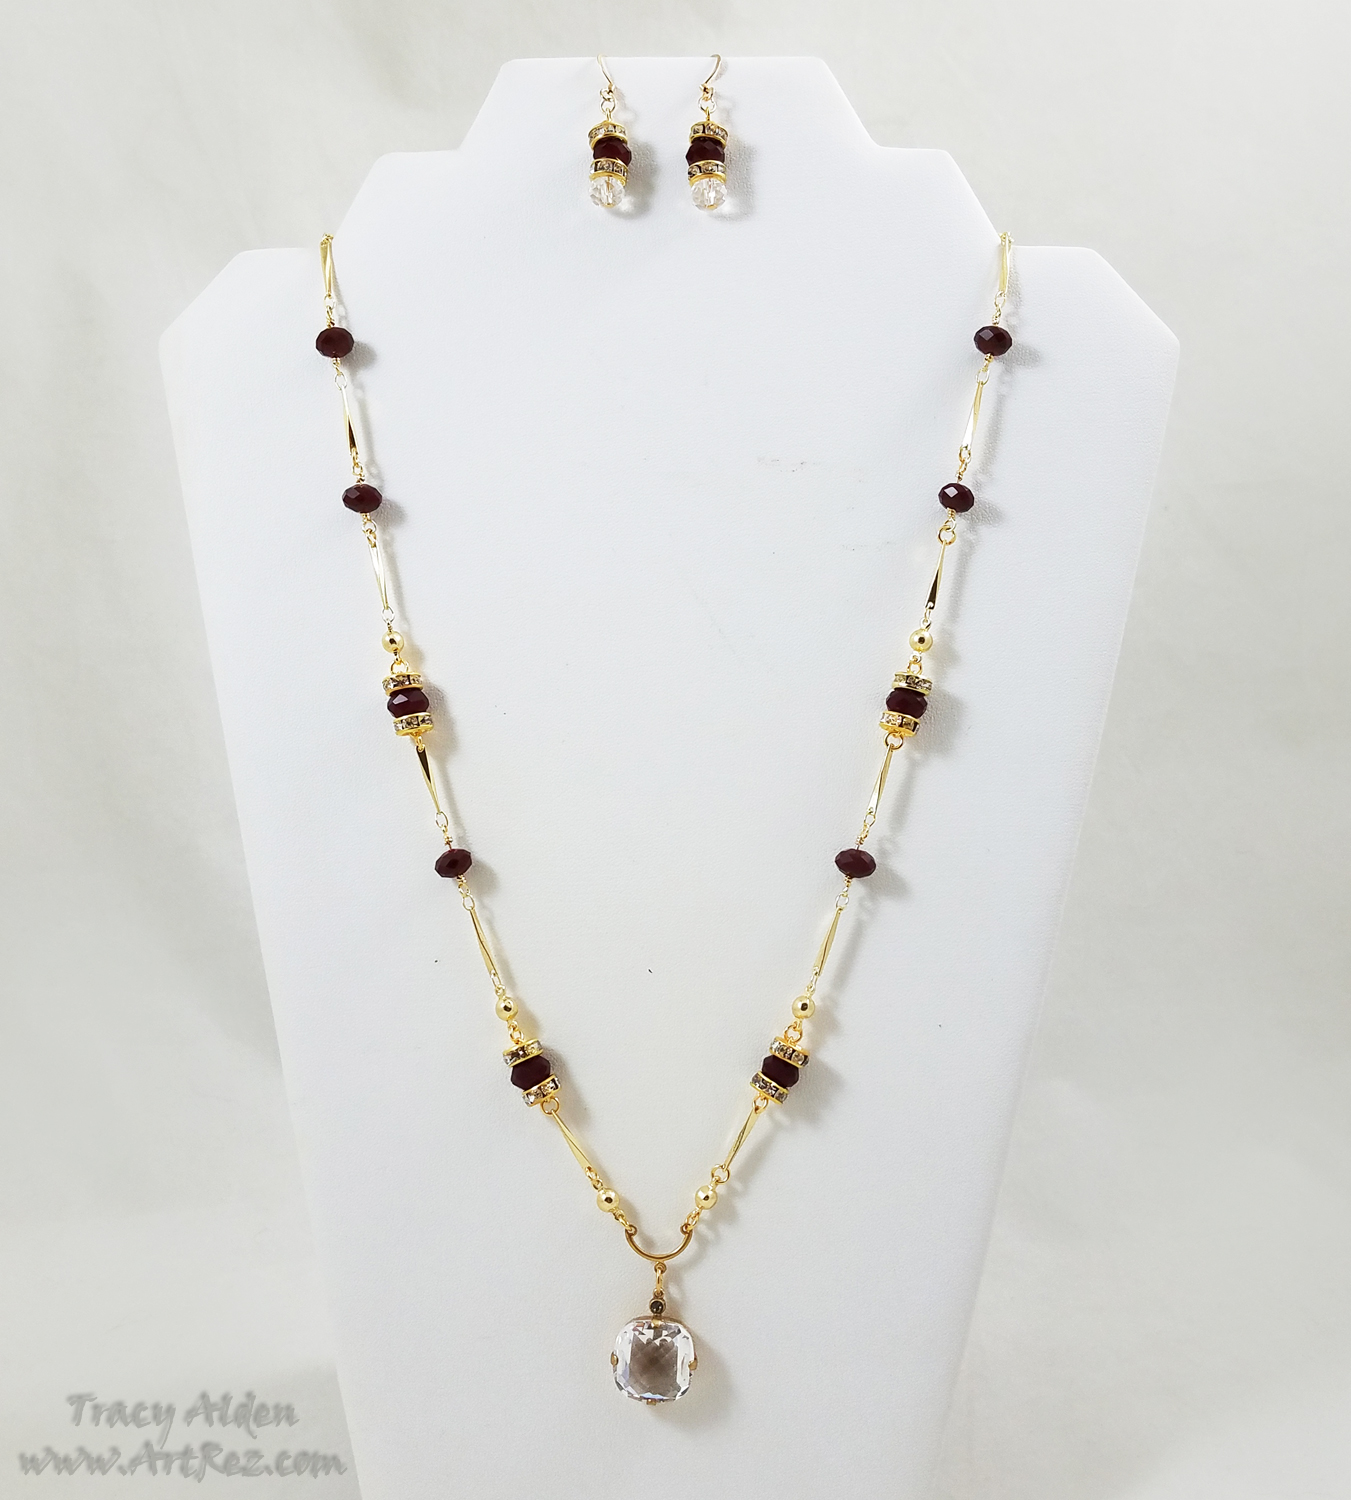
Last Dance Queen Liliʻuokalani was the last sovereign monarch of the Hawaiian Kingdom, a woman of talent, tolerance and intelligence who advocated for a free Hawaii until her death in 1917 at the age of 79.
In honor of Queen Liliʻuokalani I created a vintage design using the deep red crystals from the Maua Loa bead mix, one Ruby Red JJB Chain Reaction, and vintage findings.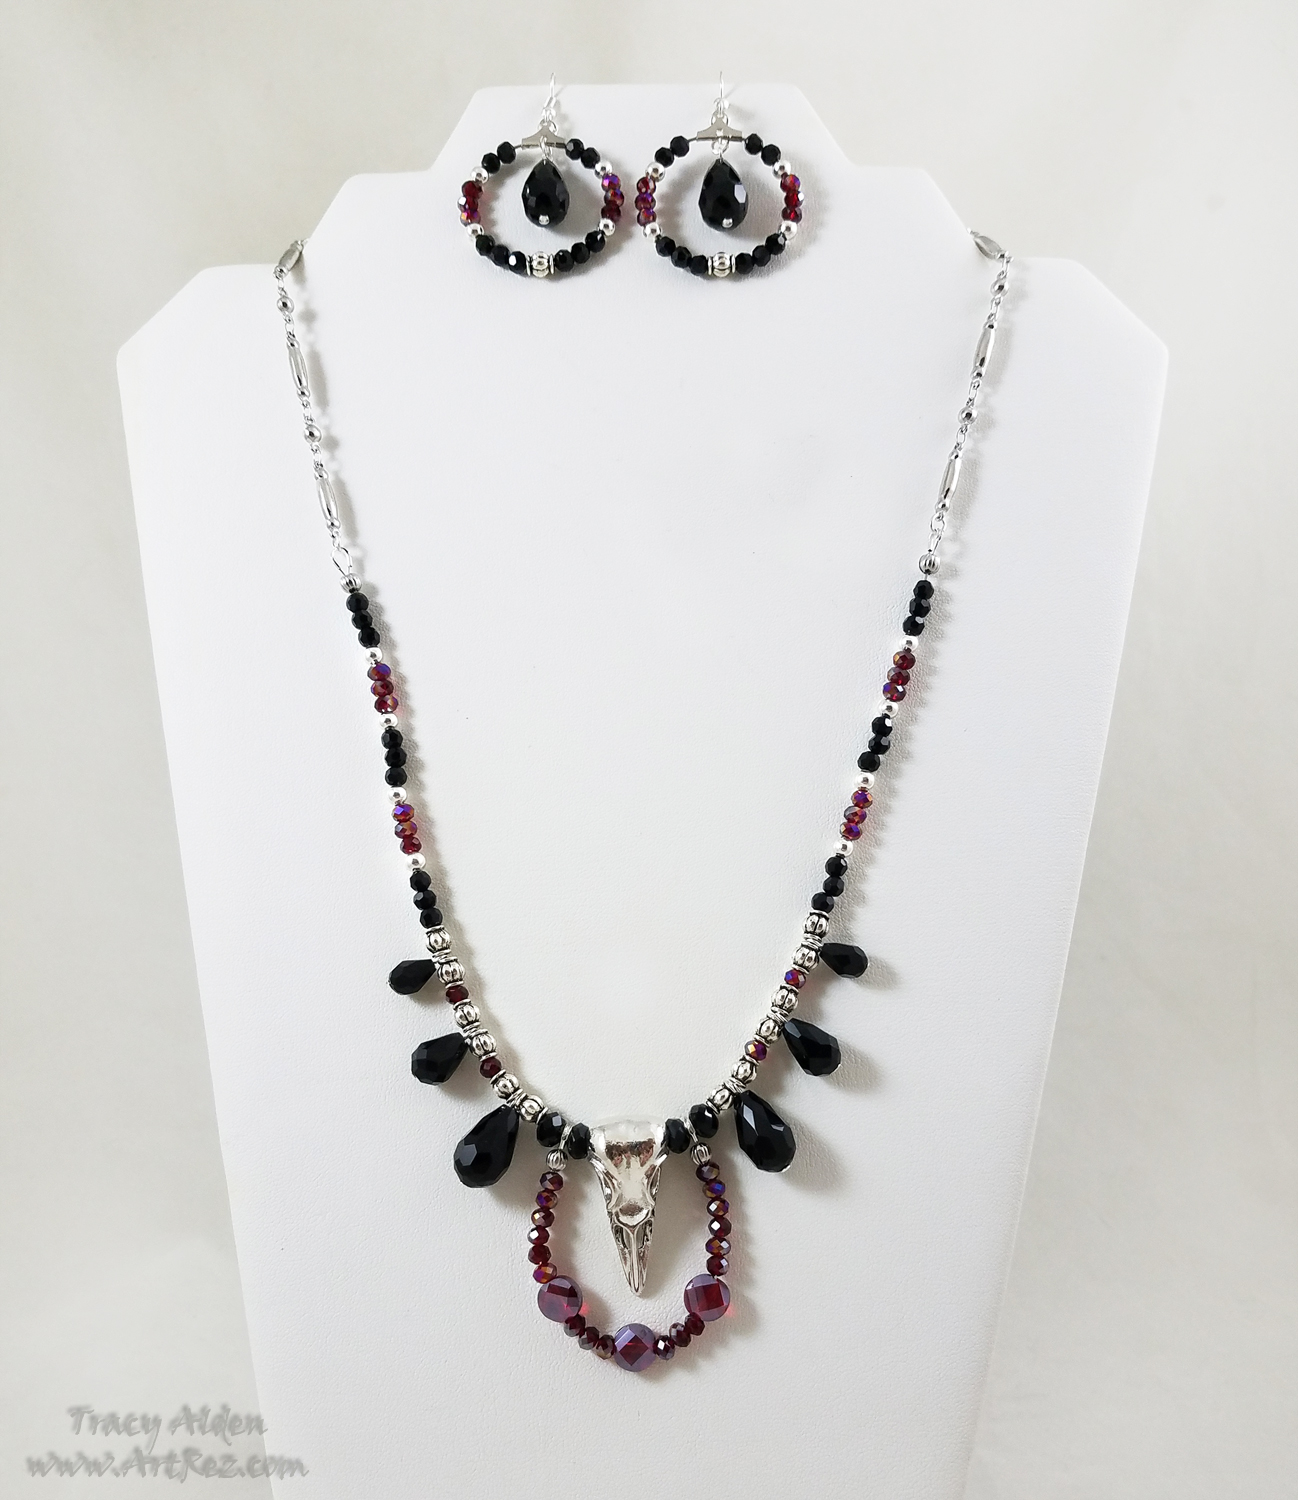
Hawaiian Crow Last but not least I created a set highlighting the Hawaiian Crow, extinct in the wild, with reintroduction programs being started. Culturally significant to Hawaiian mythology this beneficial omnivore known to both prey on pest animals and spread seeds of native plants.
In hopes this wonderful creature has a brighter future, that from death there might be life, I designed this set with crystals from the bead mix, a raven skull pendant and supplies from my personal collection.
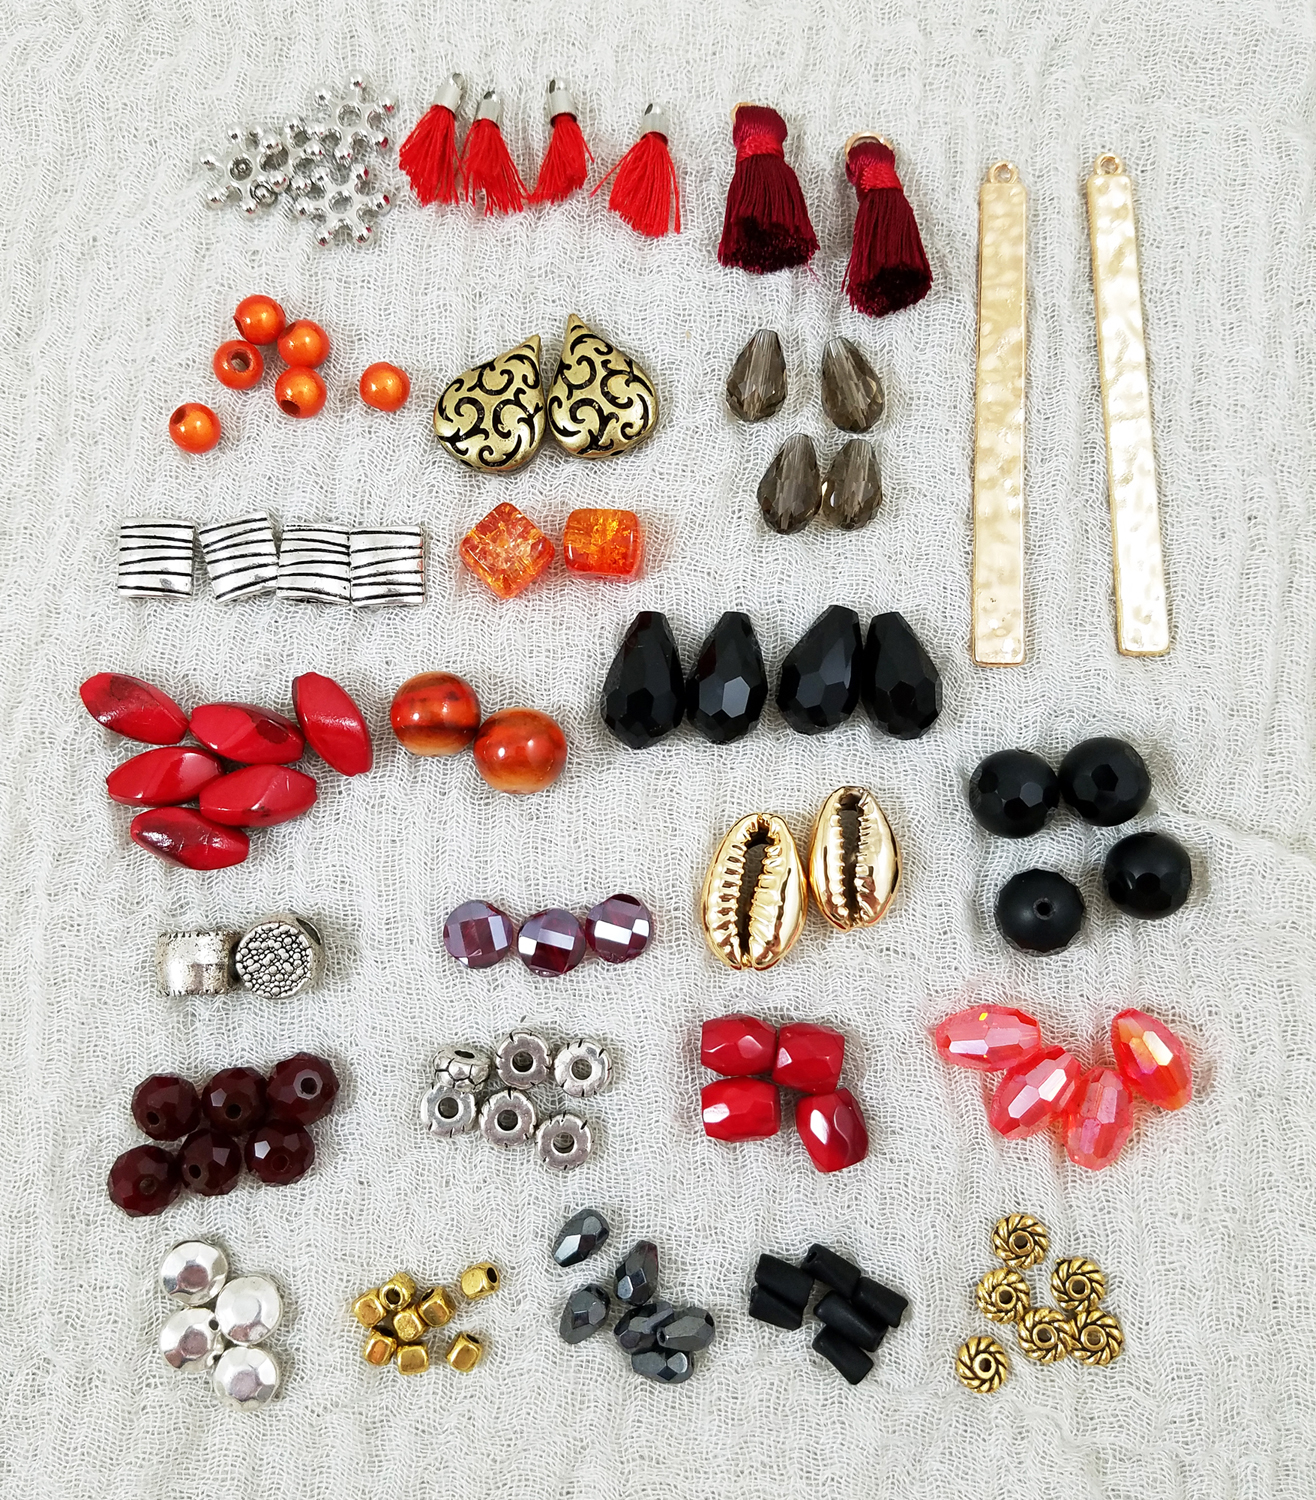
More bead goodness.. Even after all of those creations I still have beads left over to use.
The quality and diversity of the beads Jesse James Beads offer, along with their ever changing color pallets of the limited editions has made me a fan!
Until Next Time, Safe Travels!Spring Bo-Ho Fire-Polished Earrings
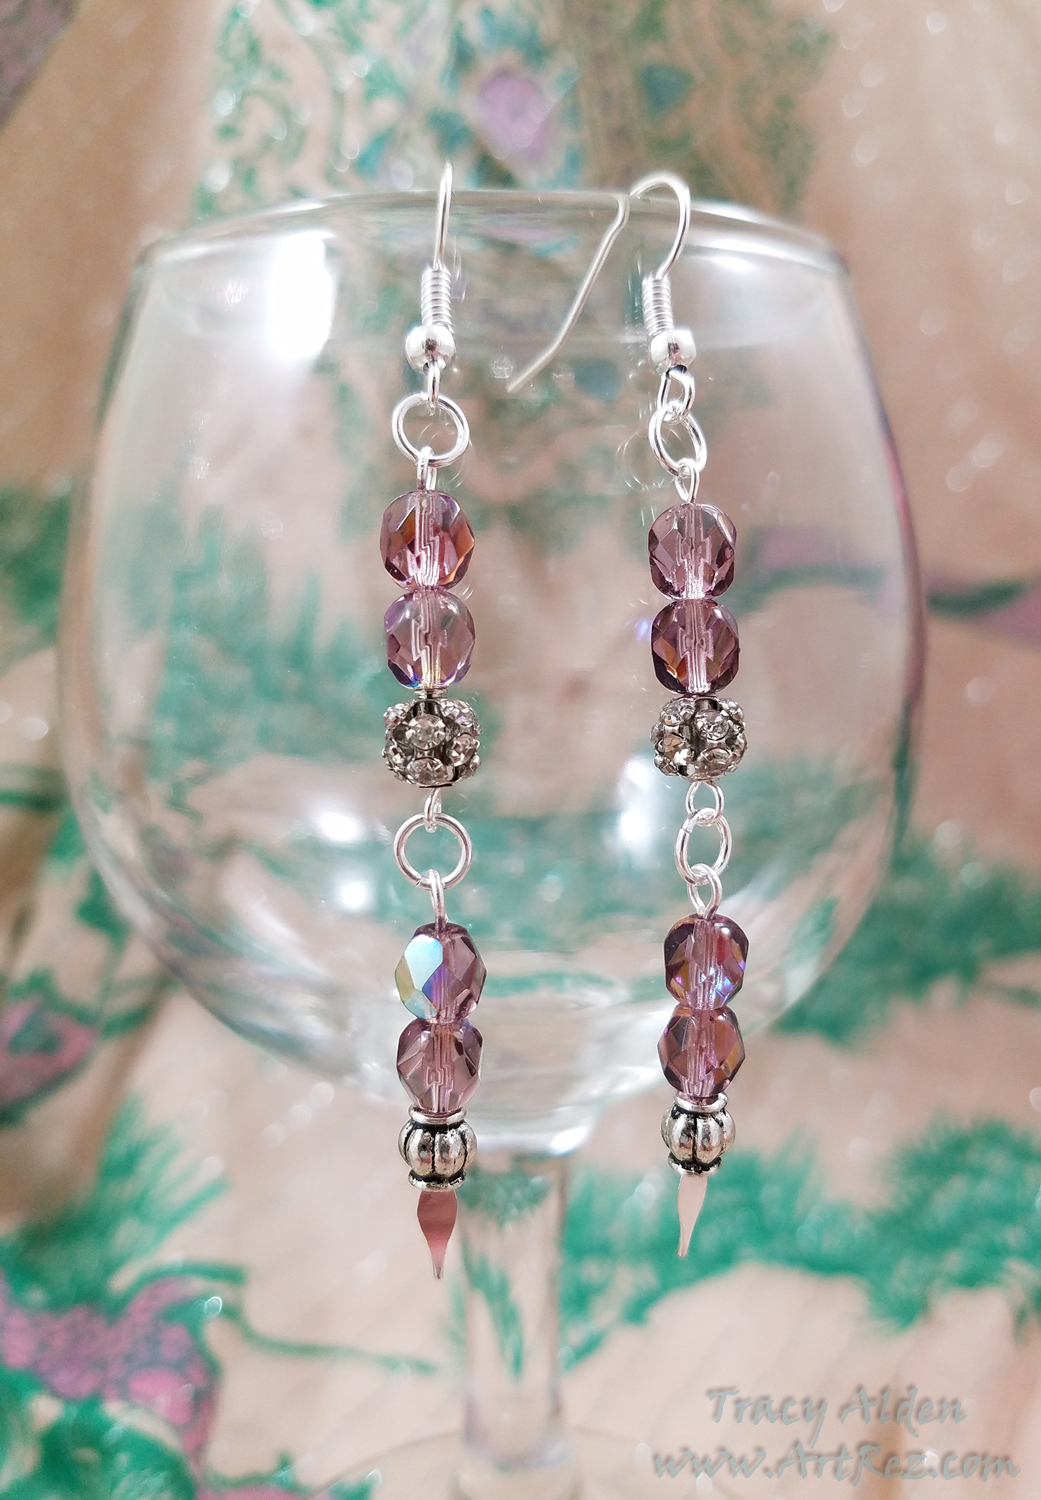
With Spring cleaning in full swing in my household, pulling out beads and findings I might have forgotten is a yearly ritual. This time I found one of my favorite types of beads, Czech Fire-Polished!
Here is a quick way to use up some of your jewelry supplies sitting around to make a fun, yet elegant pair of earrings.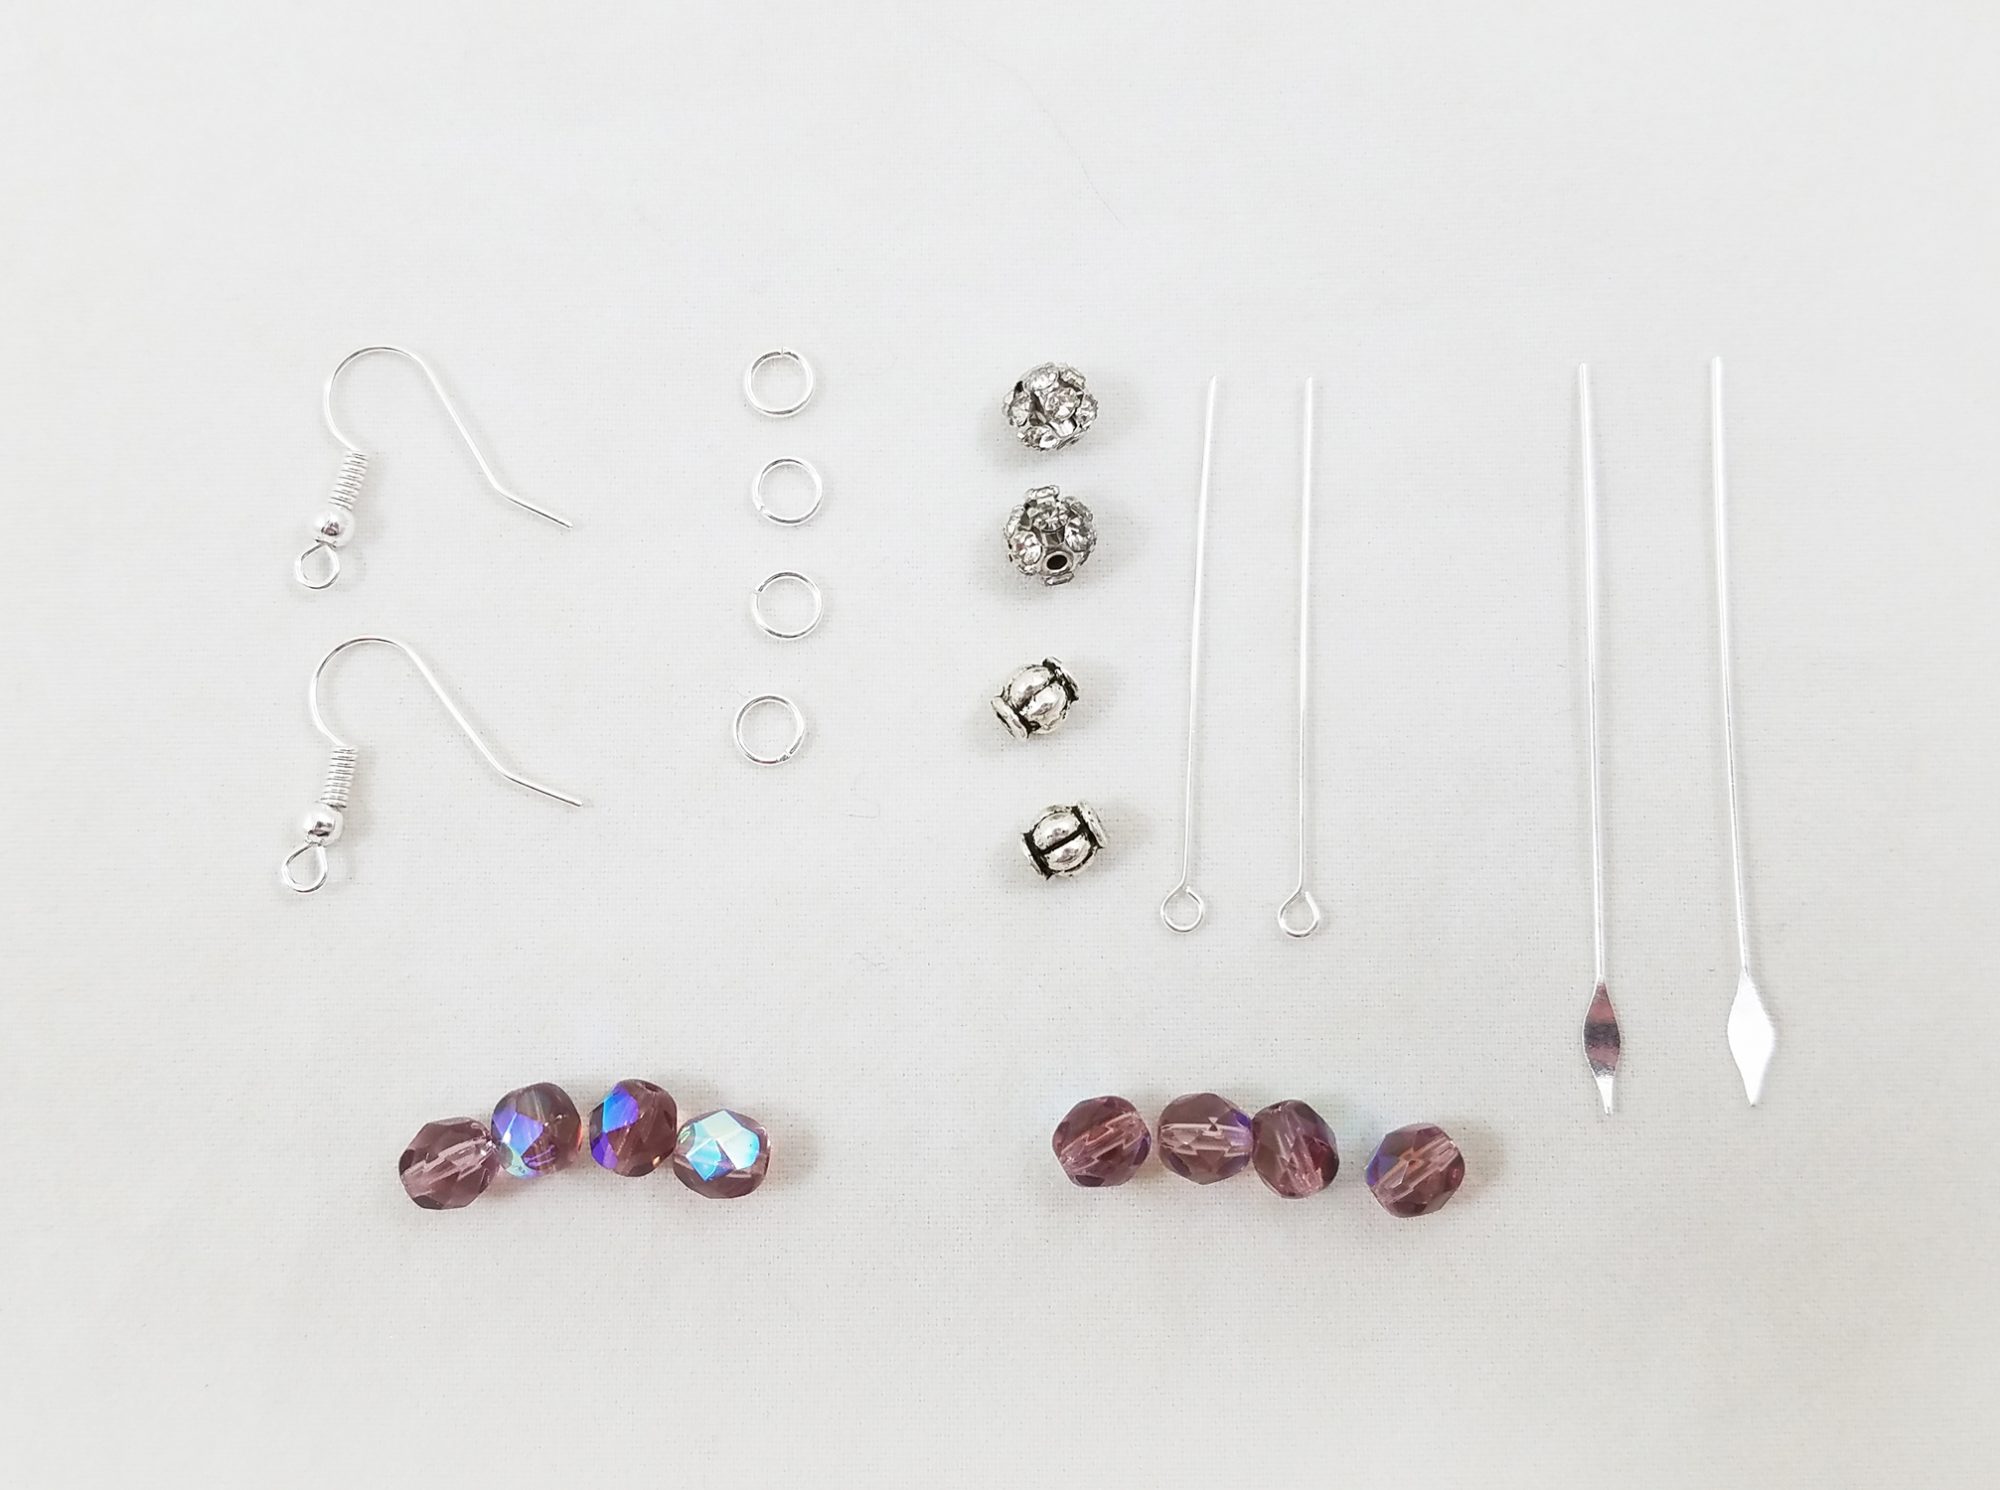
Supplies:
2 Silver Plated Fish Hook Earring Wires 19mm
4 Silver plated 5mm Jump Rings
2 1 1/2 inch Silver Plate Eye Pins 22 gauge
2 2 inch Silver Plate Paddle Pins 22 gauge
8 Czech Fire-Polished Beads in Pale Purple 6mm
2 Silver Plated Lantern Beads 4x6mm
2 Rhinestone Metal Ball Beads 6mm
1 Pair of Jewelry Wire Cutters
2 Pairs of Chain-Nose Pliers
1 Pair of Round-Nose Pliers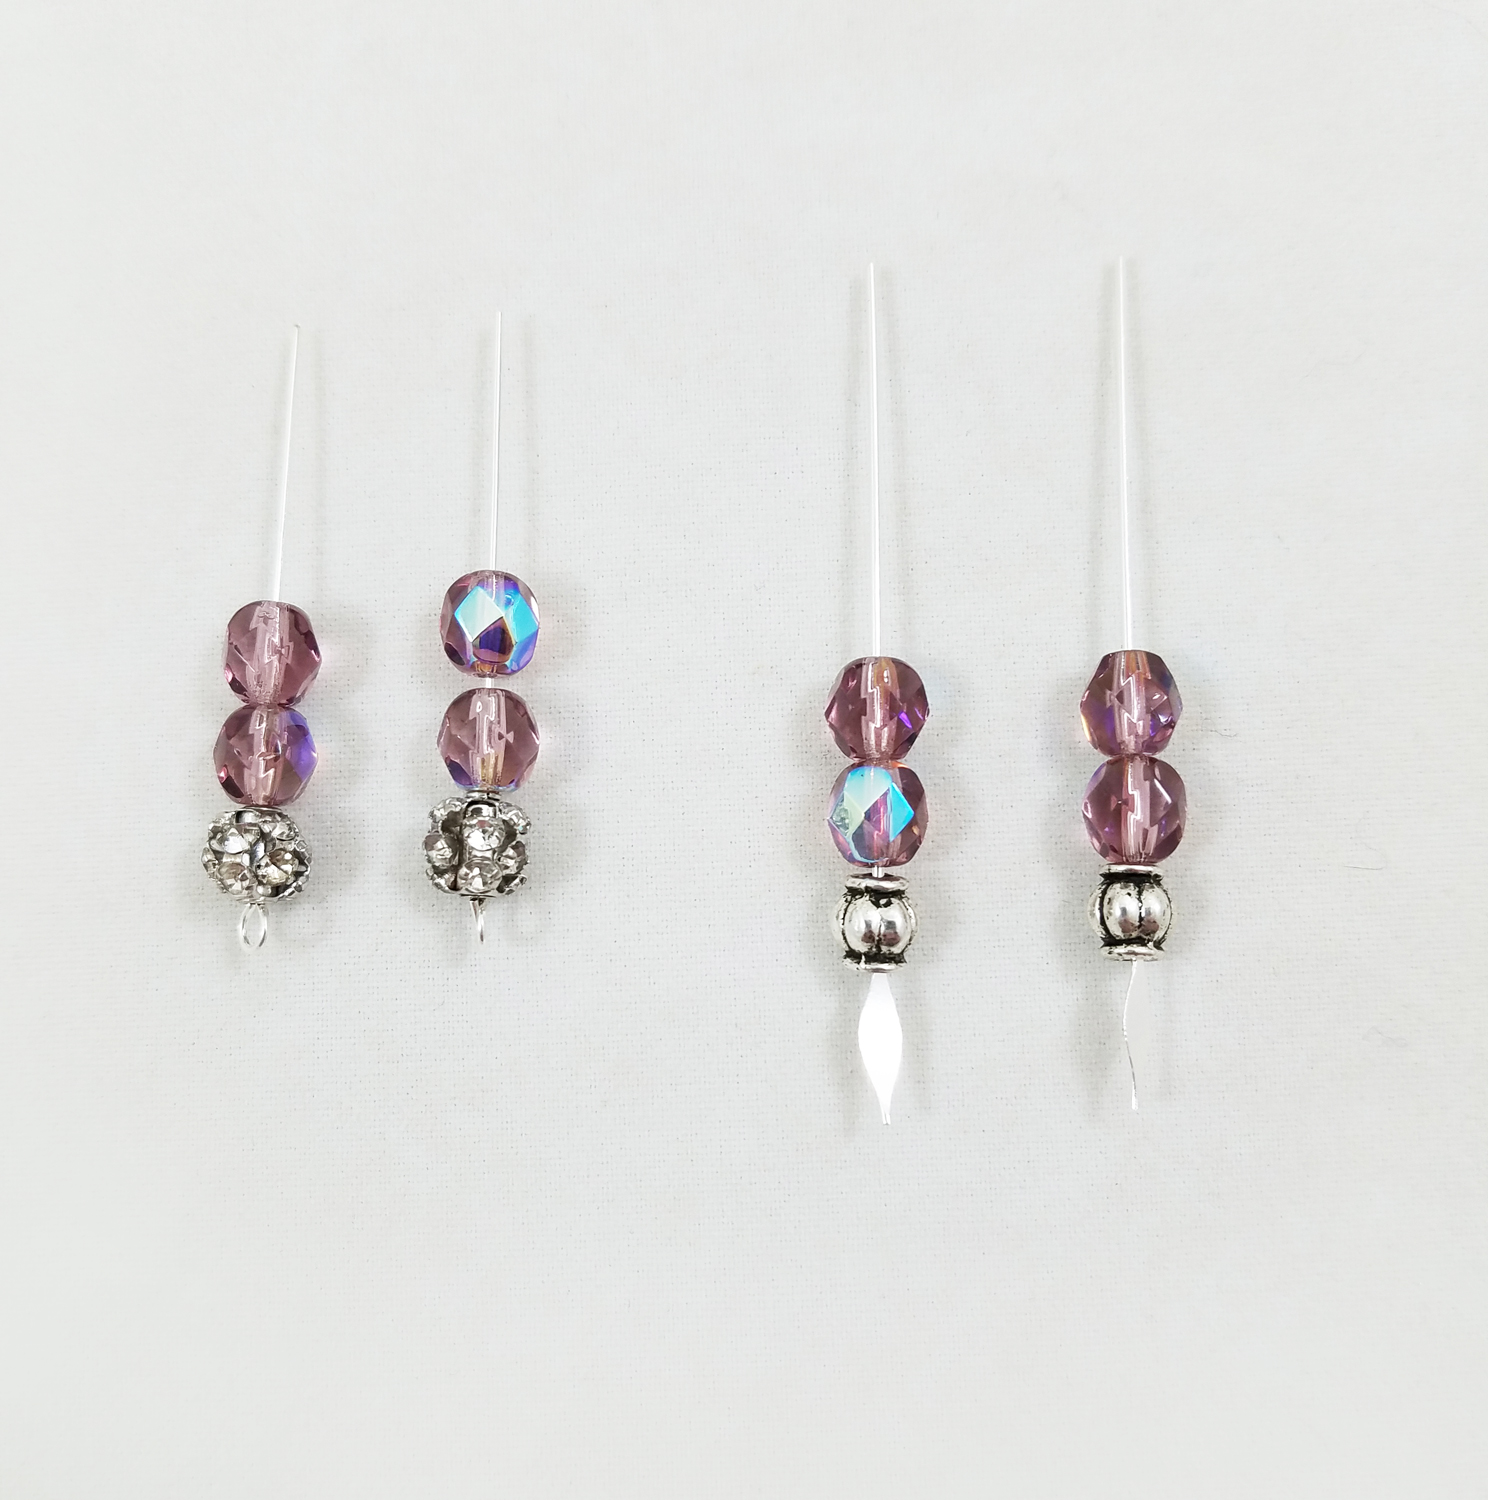
Carefully thread two Czech fire-polished beads and one rhinestone metal ball bead on each 1 1/2 inch silver plate eye pins.
Thread onto each 2 inch silver plate paddle pins two Czech fire-polished beads and one silver plated lantern bead.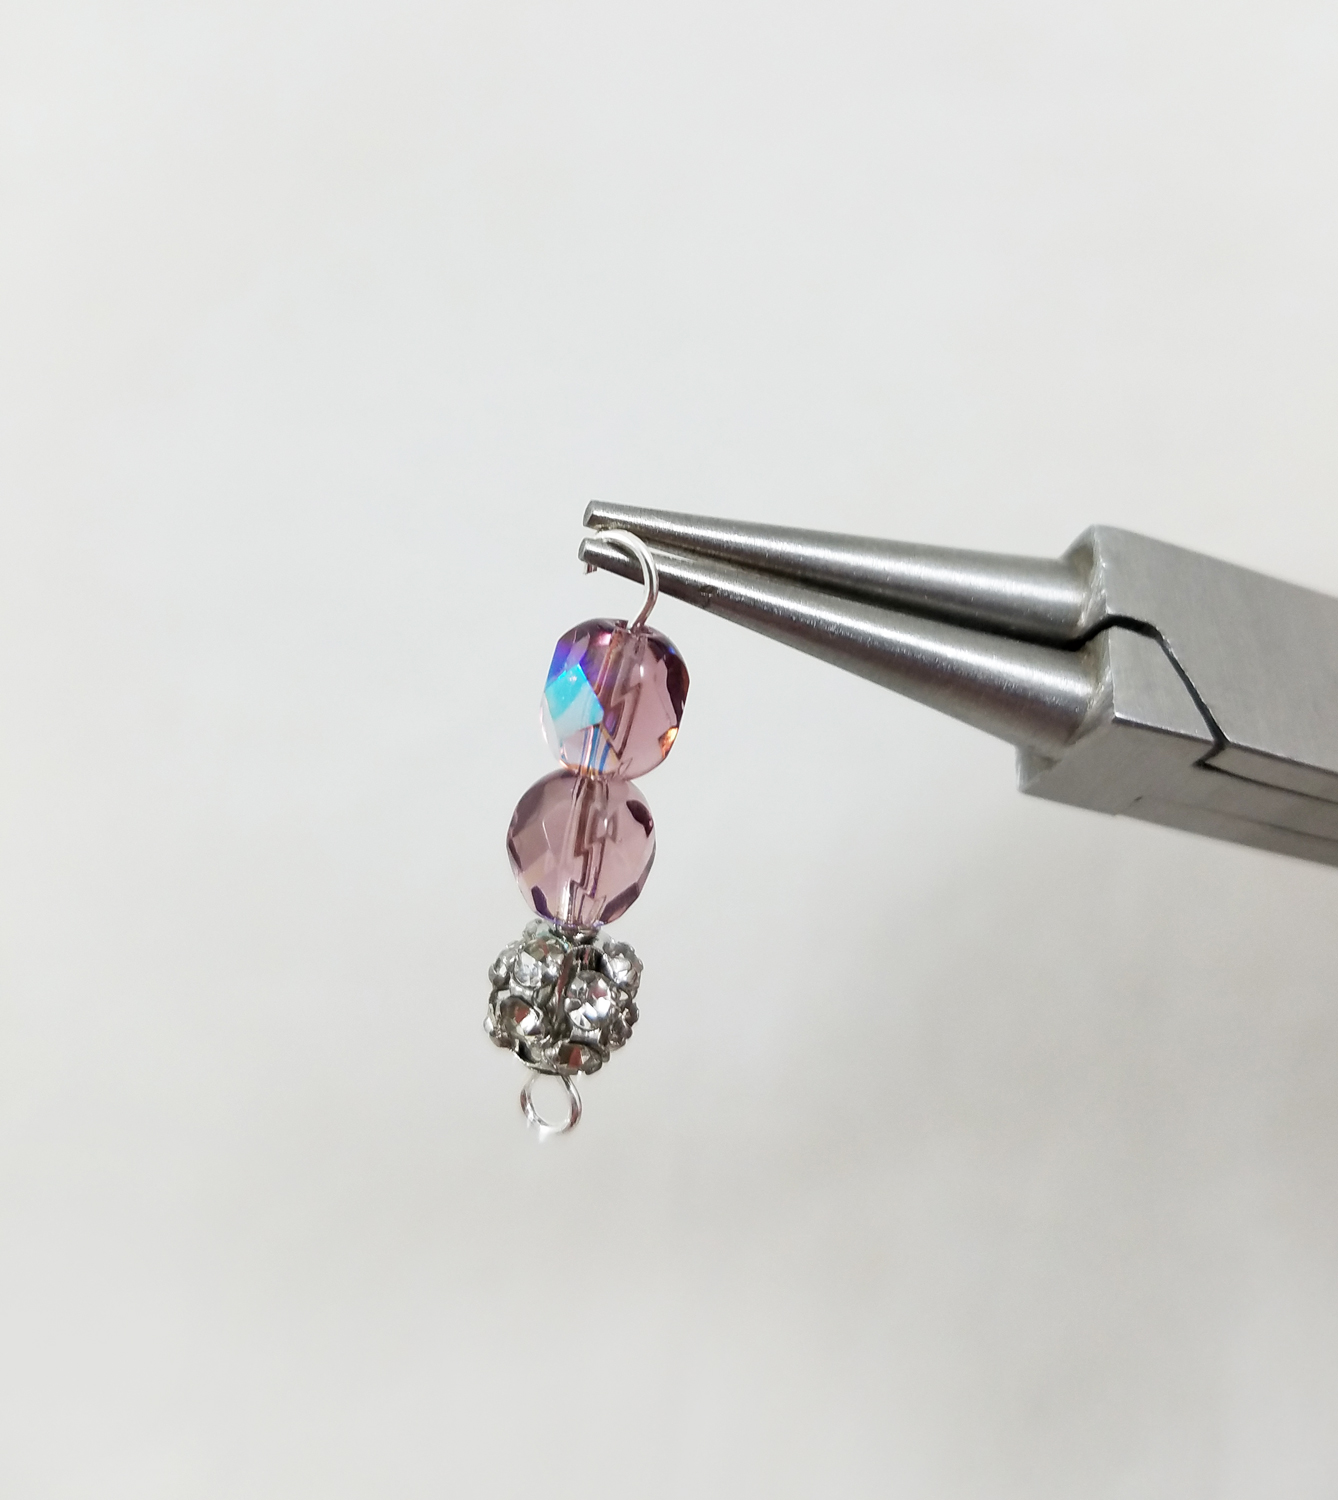
Using the jewelry wire cutters, trim off the excess wire of the eye pin with two fire-polished beads and rhinestone metal ball bead. Using the
round-nose pliers, curl over wire into complete loop by rotating your wrist forward. Close the loop, snug to the bead and repeat these steps with the second eye pin.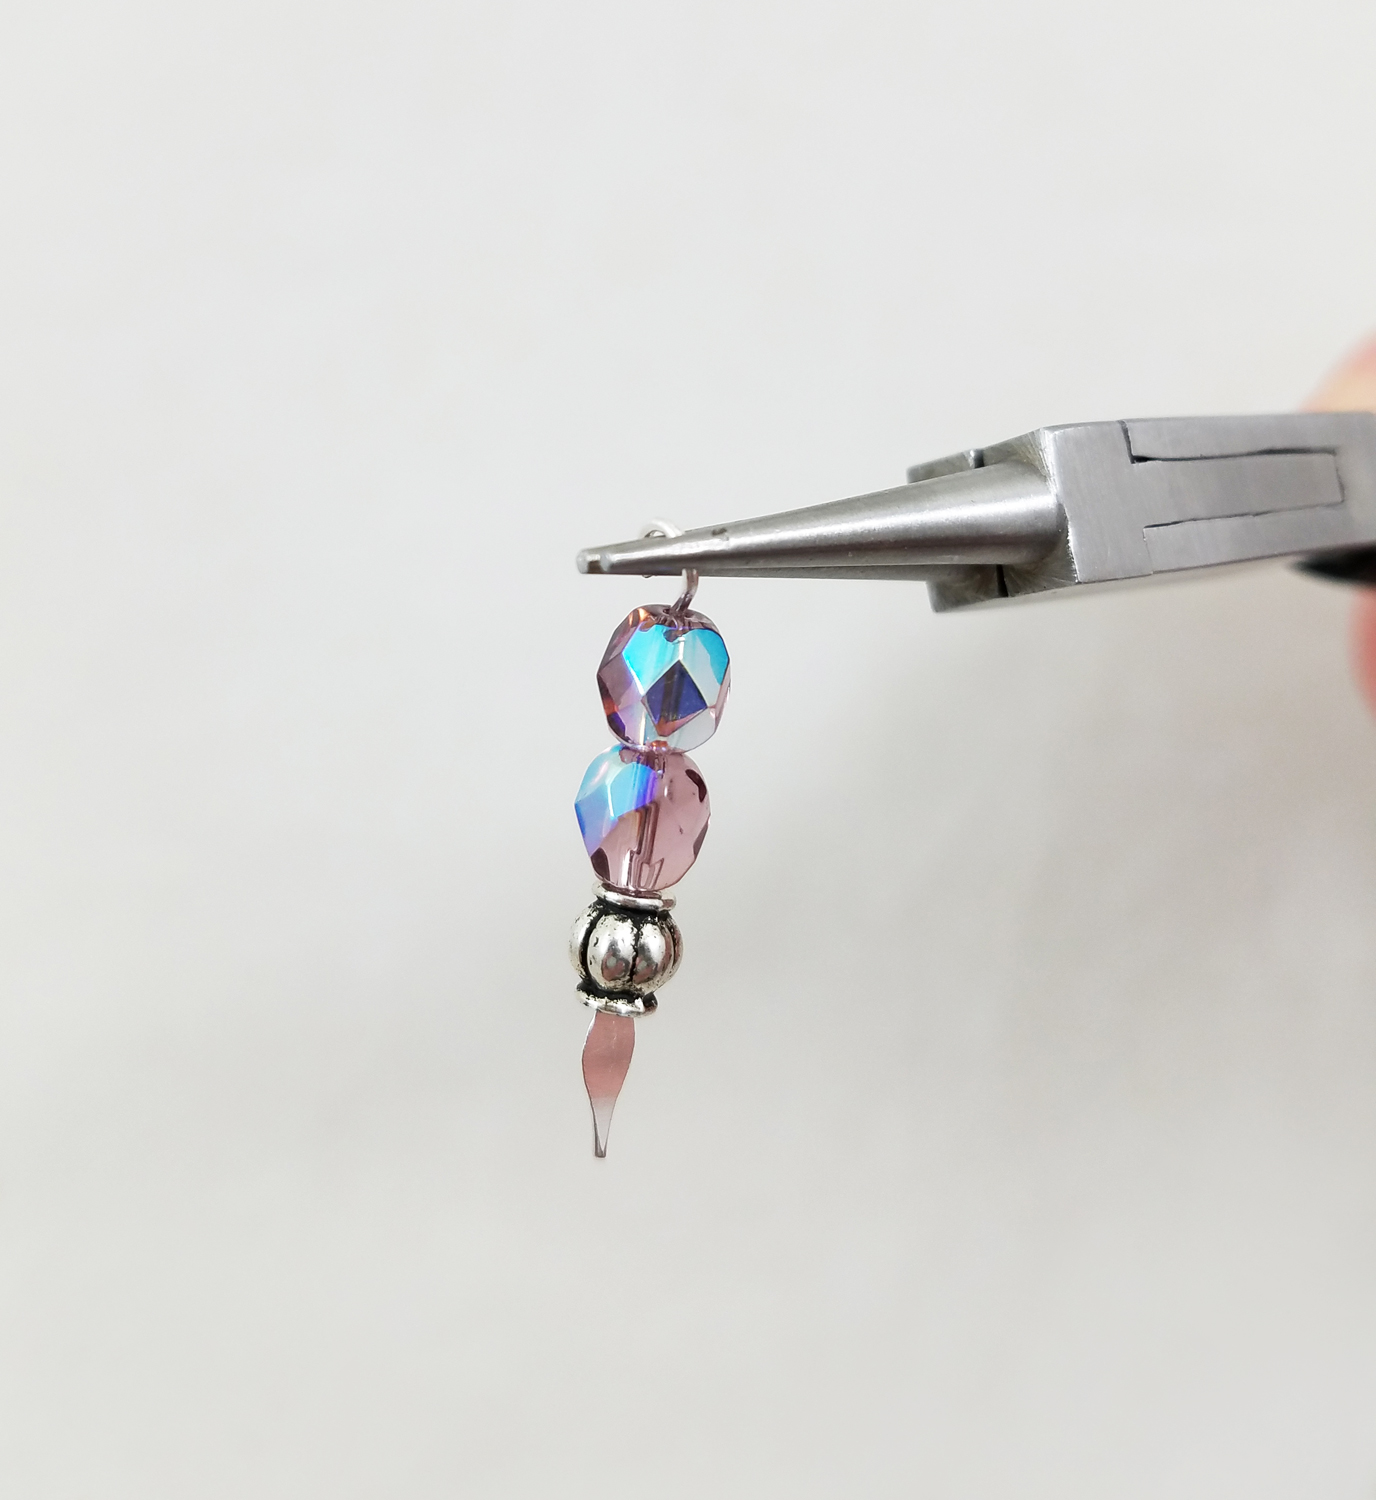
Using the jewelry wire cutters, trim off the excess wire of the
silver plate paddle pin with two fire-polished beads and one silver plated lantern bead. Making sure the flat side of the paddle pin is facing you curl over the wire into complete loop with the
round-nose pliers by rotating your wrist forward. Close the loop, snug to the bead and repeat these steps with the second paddle pin.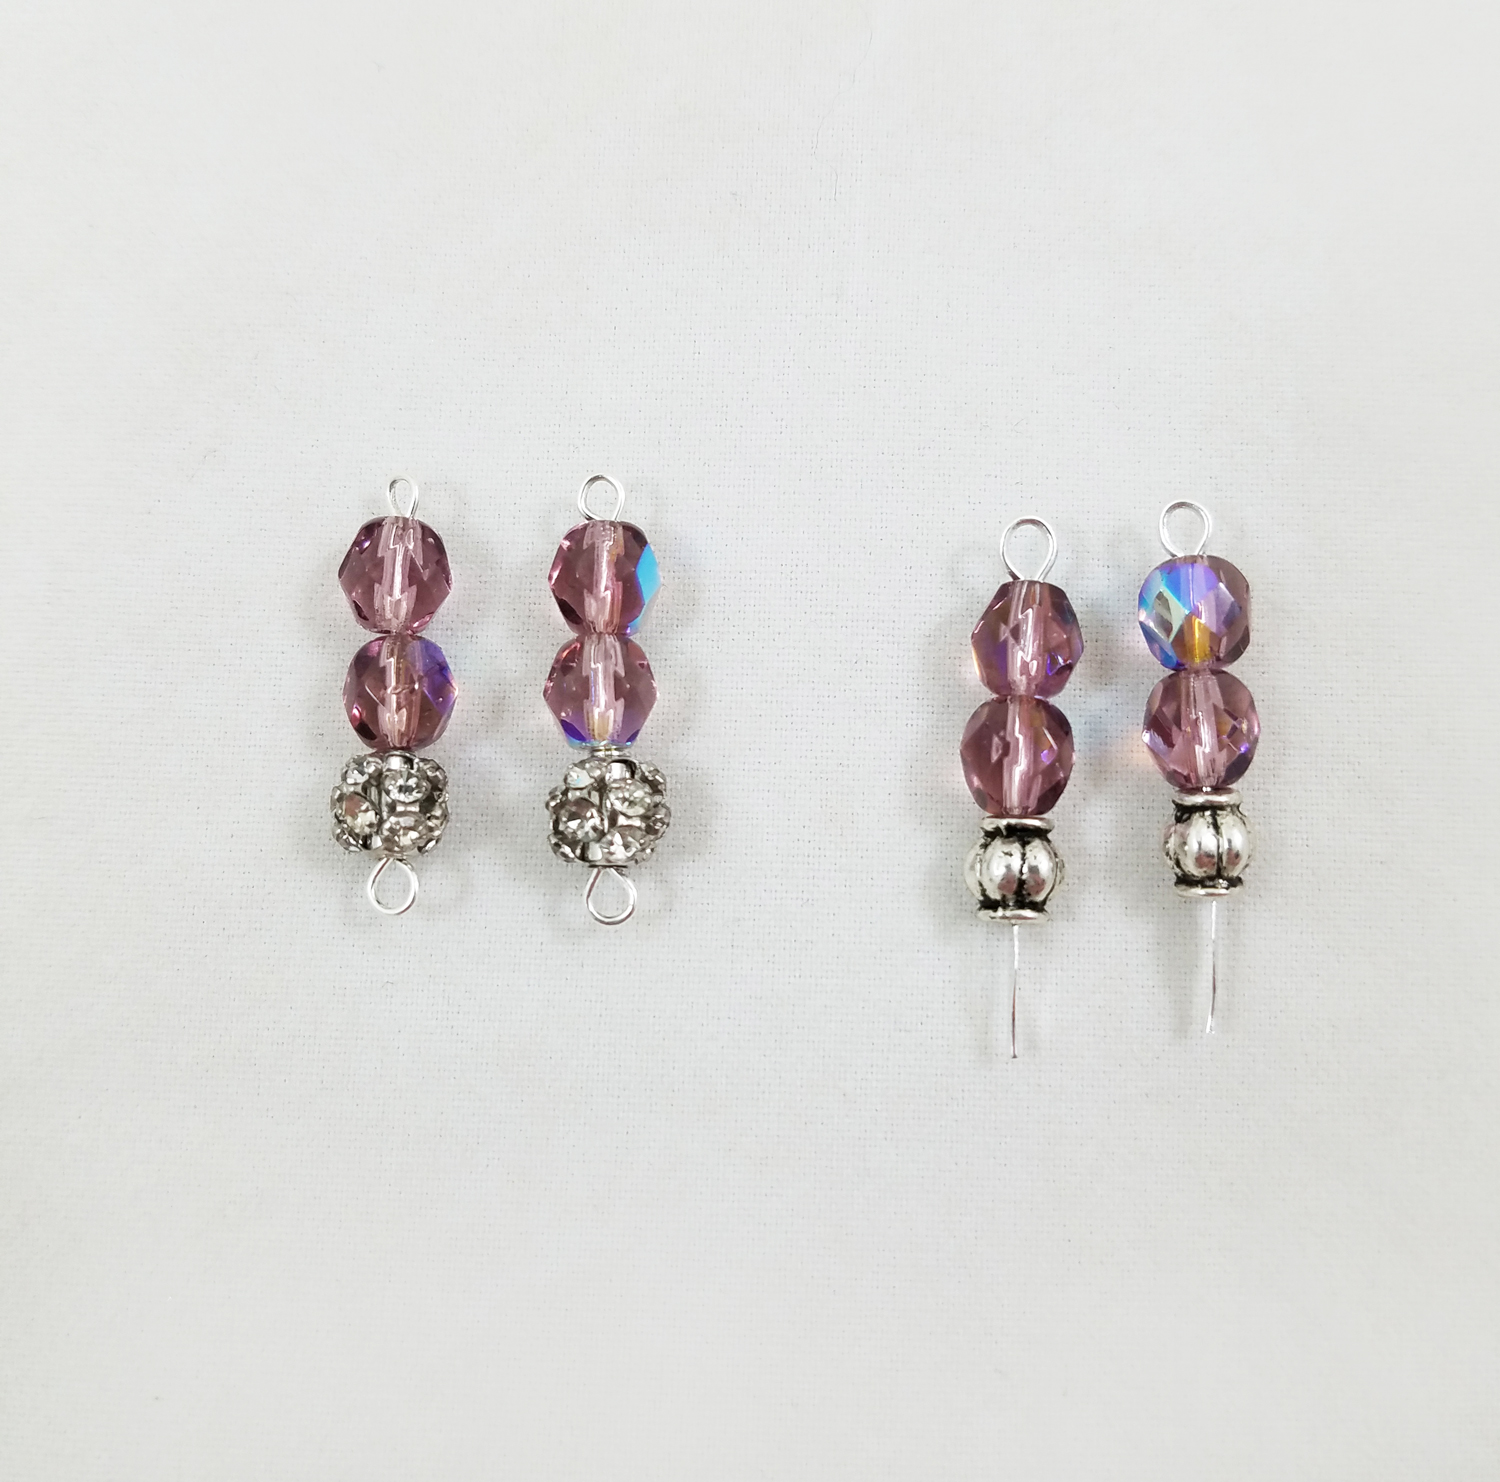
Both of the eye pins and paddle pins should look like the photo above.
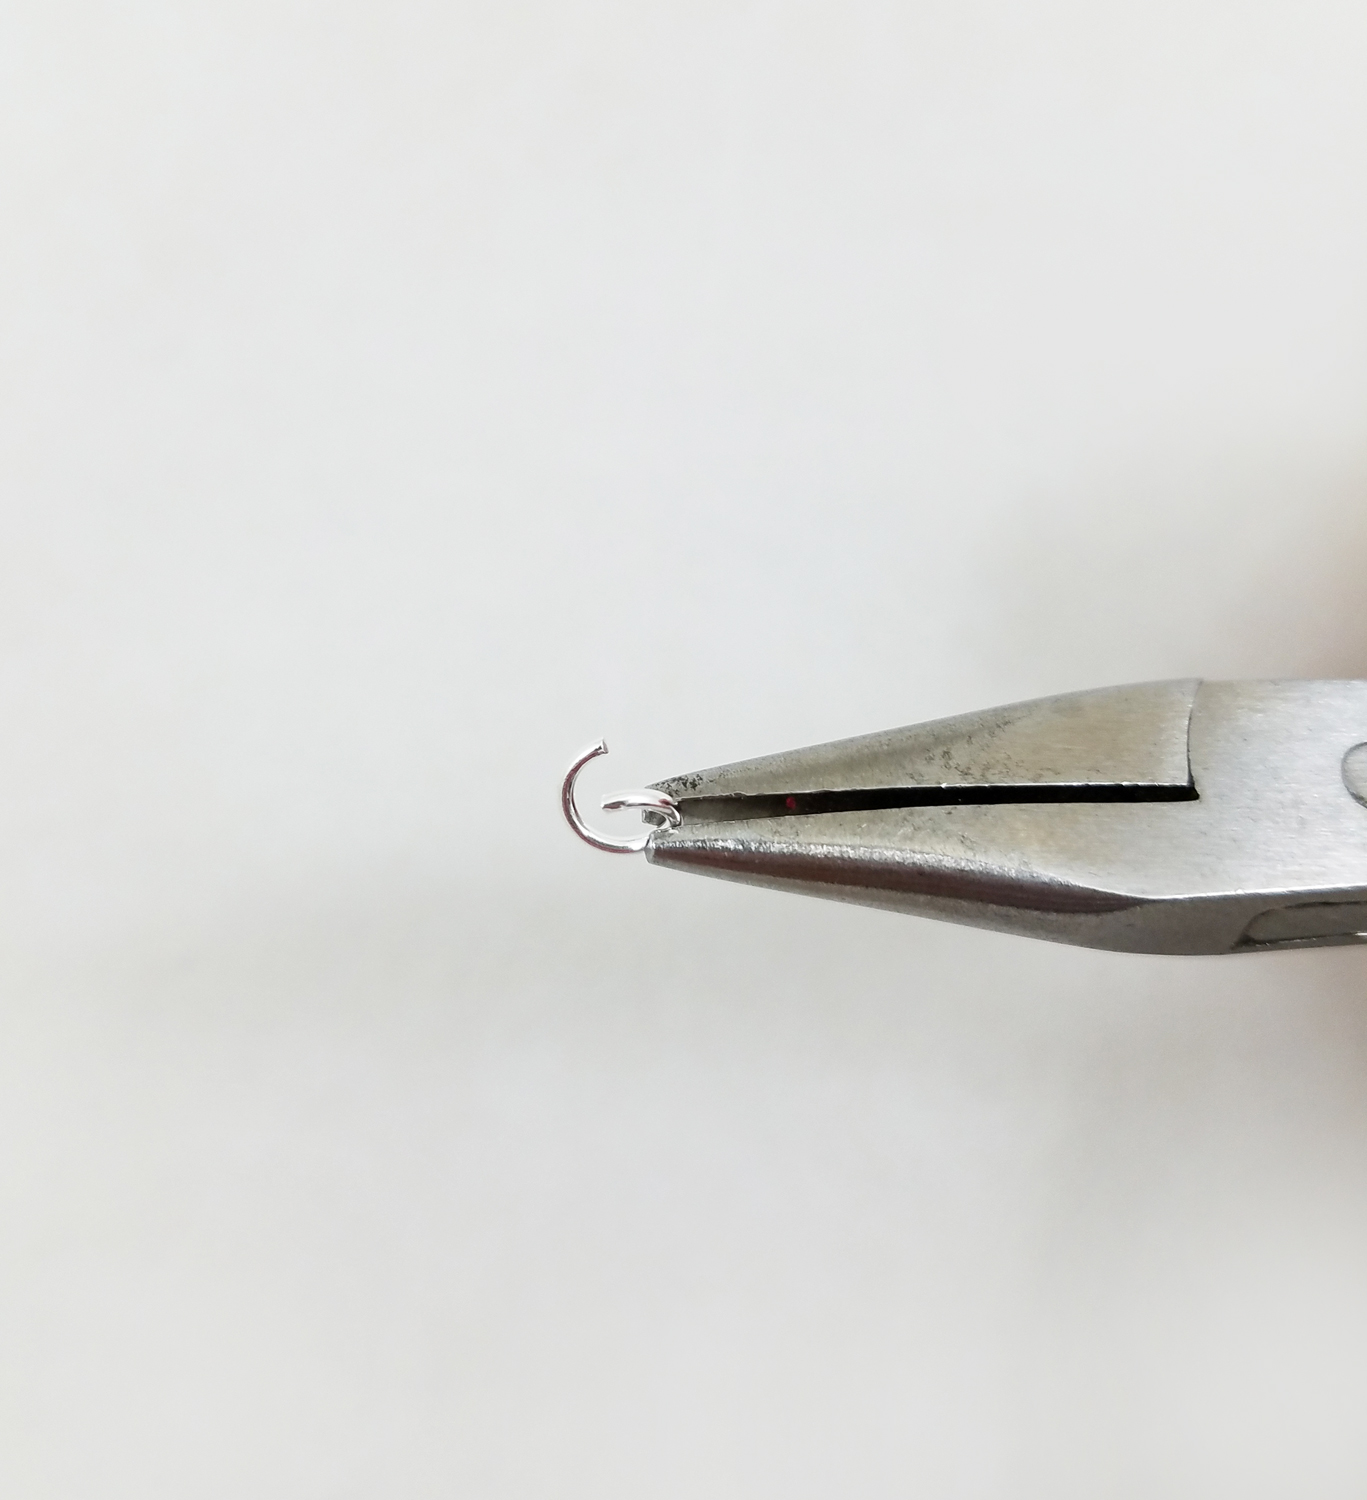
Using two pairs of chain nose pliers start twisting the jump ring until the required opening is achieved.
*Do not pull open jump rings as this will distort them.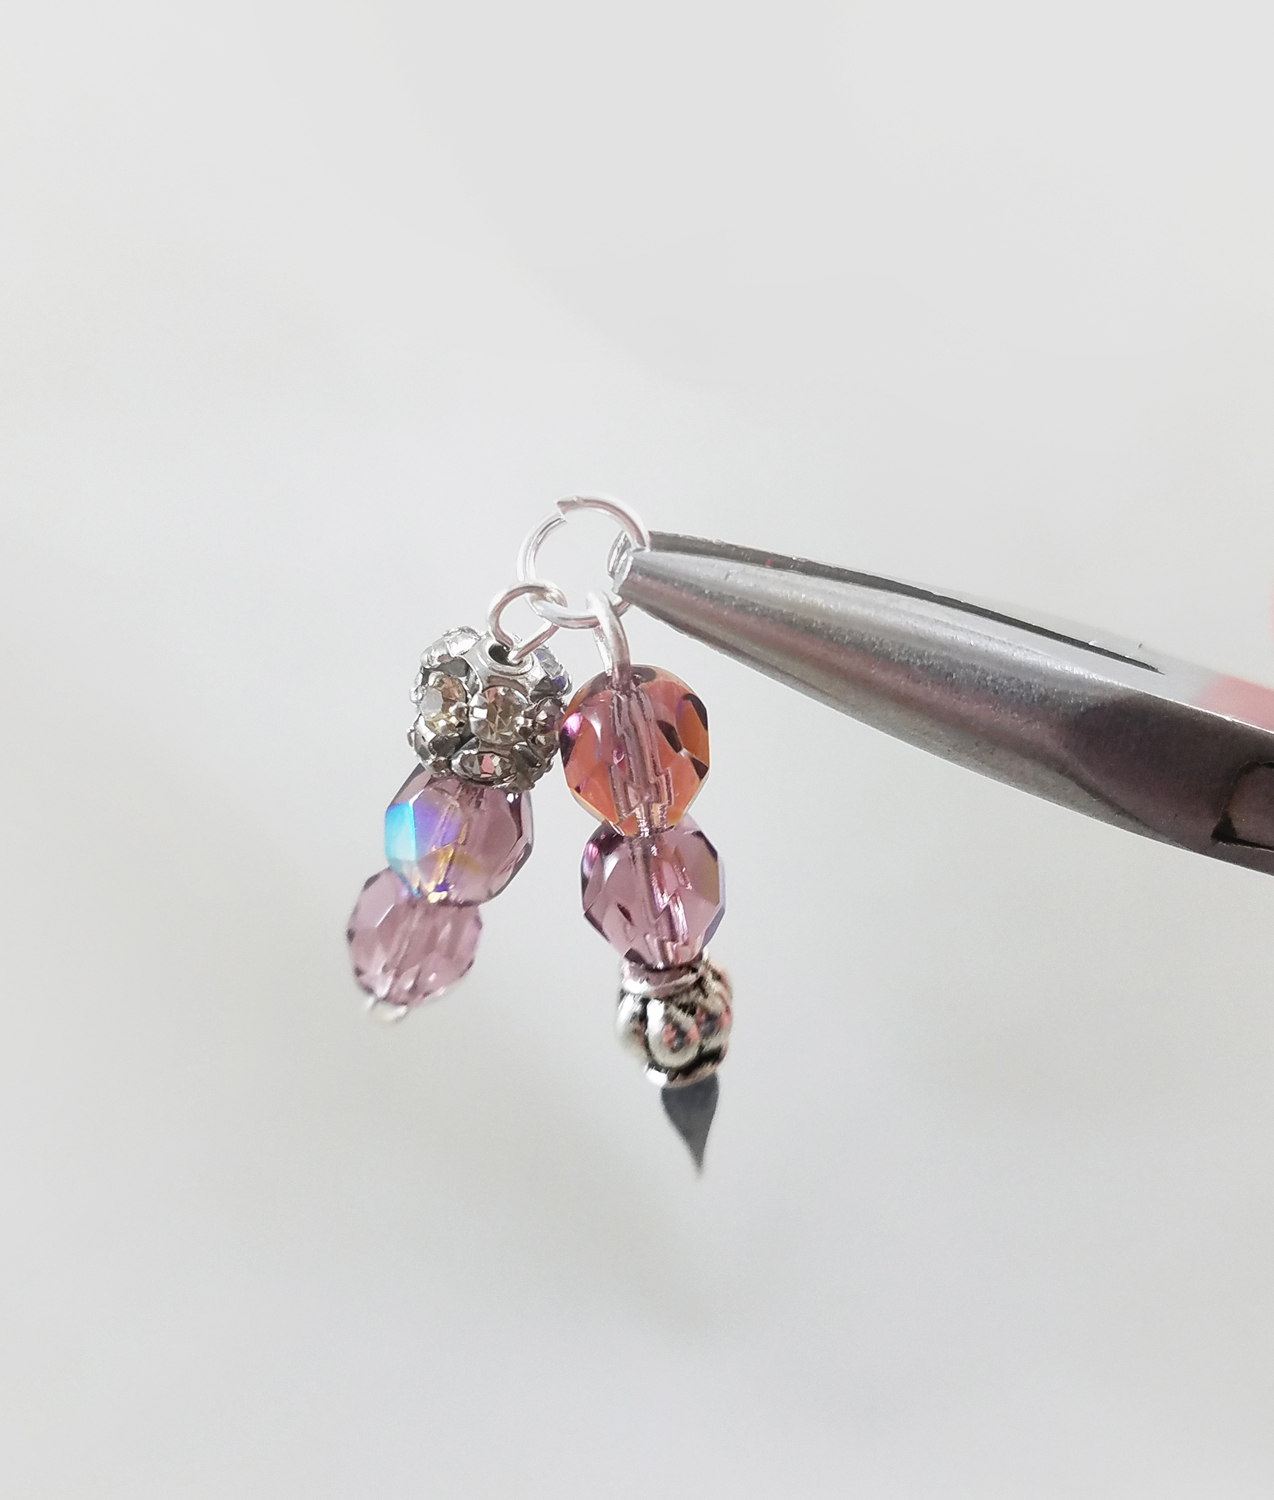
Thread both the eye pin and paddle pins on the open jump ring and close the jump ring with the two pairs of chain nose pliers by twisting the jump ring closed. Repeat this process for the second set of pins.
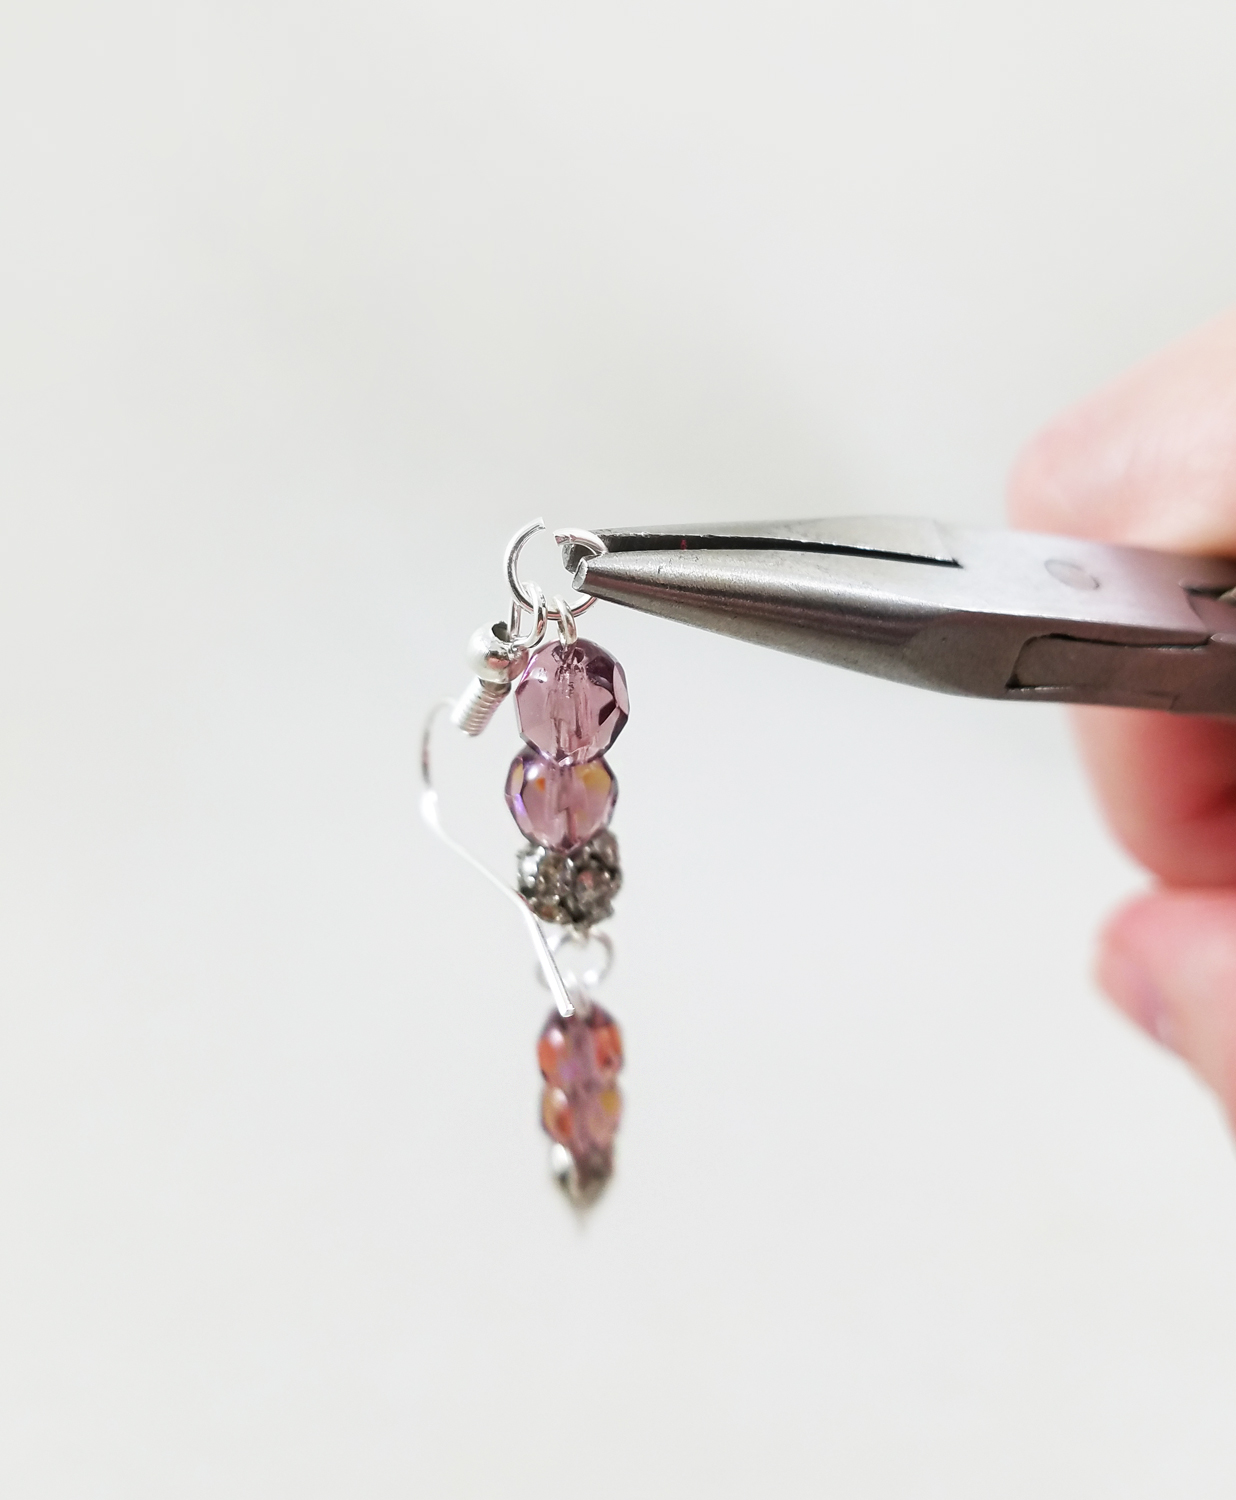
Open another jump ring and add a fish hook earring wire and close the jump ring. Repeat this process for the second earring.
Now you have the perfect pair of earrings for a casual or dressy occasion.
Until Next Time, Safe Travels!The Mermaid’s Necklace, a #Cre8time fish-tale
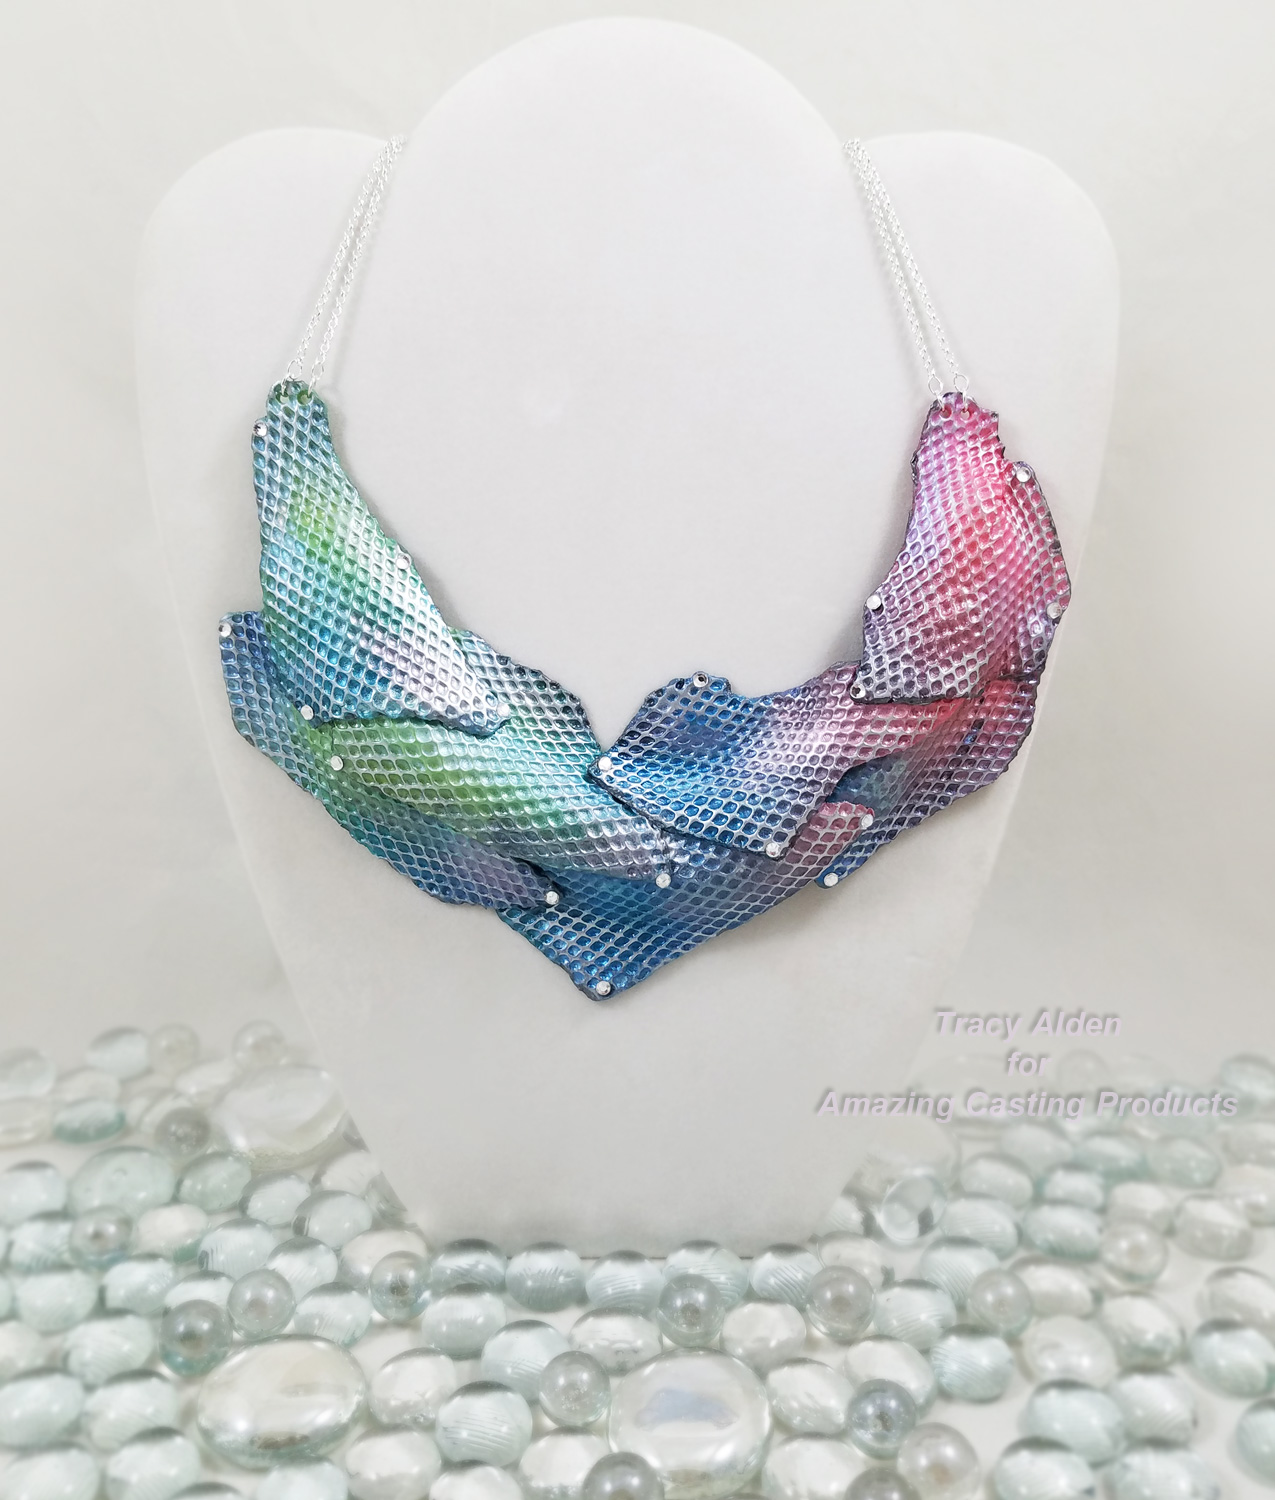
A great inspiration for my art is looking for and finding textures to duplicate and/or mold. While my project might look like something from the sea it started in a by far more mundane environment, my office. My metal pen, paper and paperclip holder is made out of mesh, a delicate diamond pattern, reminiscent of tiny fish scales. With the help of Amazing Mold Putty I could transfer this lovely pattern to Premo Accents polymer clay to create a necklace fit for a mermaid!
Supplies:
Amazing Mold Putty
Alumidust
Alumilite Metallic Powder
Premo Sculpey Accents Multipack 12 pc Mixed Effects(using Bright Green Pearl, Sunset Pearl, Peacock Pearl from this pack)
Premo Sculpey Accents Translucent
Sculpey Glaze Gloss
Acrylic Roller
Stylus (small sizes)
Pasta Machine (optional but helpful)
Ceramic Tiles
Craft Knife
Small Paint or Makeup Brush
Beacon Gem-Tac Glue
Rhinestones
Silver tone jewelry chain and jumprings
Metal mesh office pen and note holder or a piece of heavy weight mesh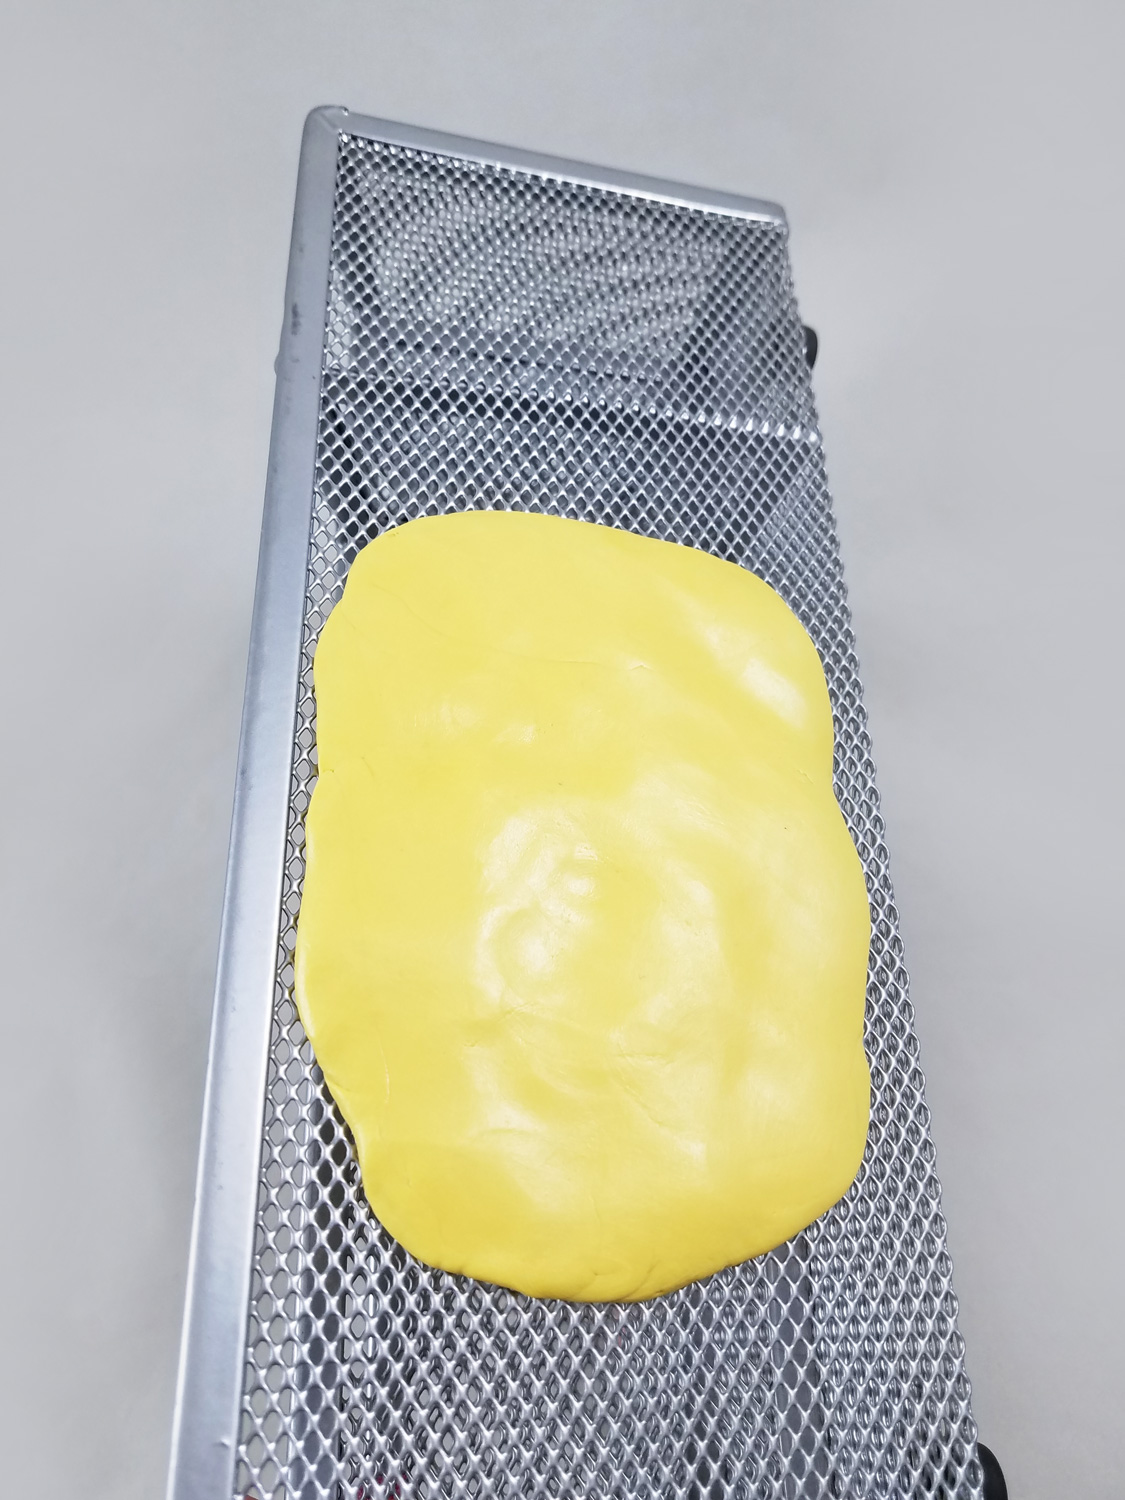
I mixed up some Amazing Mold Putty {CLICK HERE to view mixing/preparation}, and applied it to the largest open part of the mesh office supply holder. I was careful to press the Mold Putty through the mesh to get detail, but not too far that the mold putty would seep through creating weak points and holes in the mold.
Once the Mold Putty was cure I carefully peeled it off the wire mesh. Now I had a perfect texture plate that had a close resemblance to tiny fish scales.
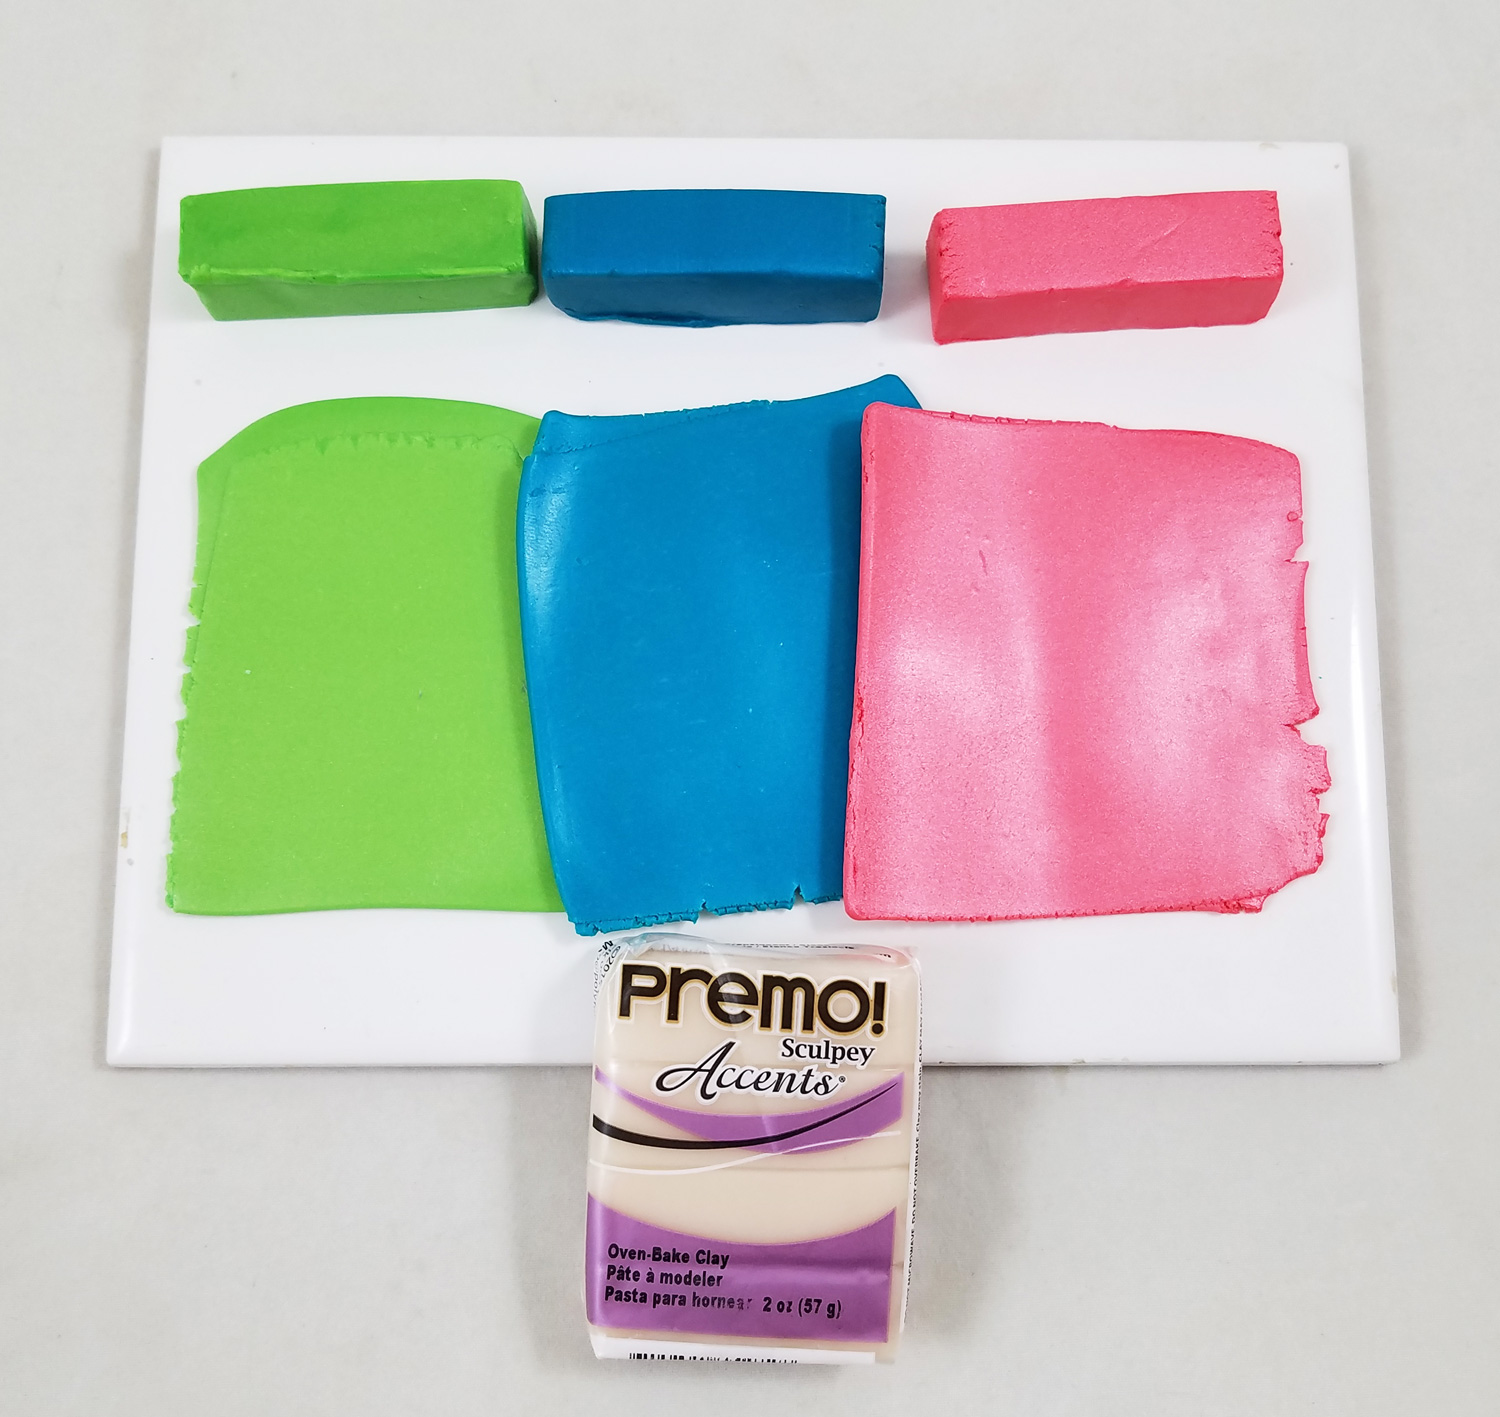
Using a pasta machine (devoted to craft use only) set on the thickest setting, I conditioned some Premo Accents Translucent polymer clay. I added the translucent clay to one half of the Bright Green Pearl, Sunset Pearl, Peacock Pearl clay bricks found in the Premo Accents Multipack.
*The addition of the translucent clay to the colored clay creates a look of slightly translucent fish scales once the clay is baked.
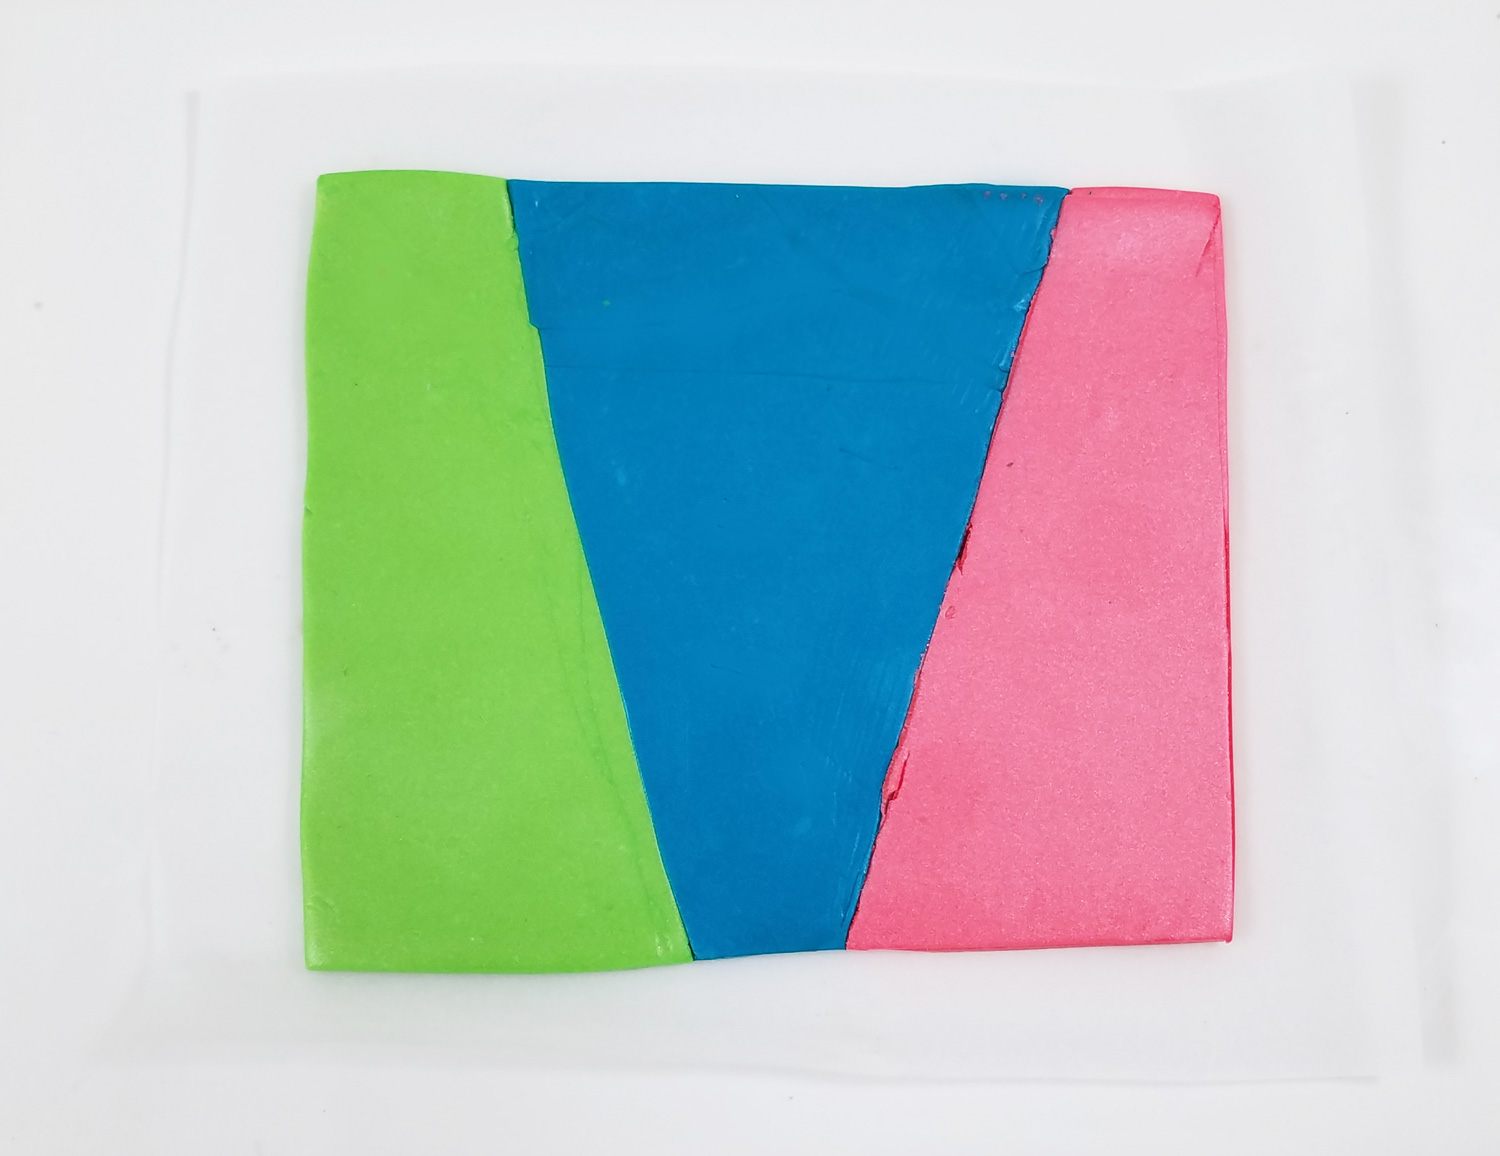
Next I cut my conditioned clay into wedges and pushed the edges together as seen in the above photo. What I created is the start of what is call an Offset Skinner Blend technique. This technique was developed by a talented polymer clay artist named Judith Skinner in the 1990s, which creates a stunning and smooth blend of colors in polymer clay when clay is cut into triangles and then run through a pasta machine multiple times. In the photo you can see those are not triangles, those are purposefully offset and trimmed so that it will create areas of pure unblended color with the blended portions, giving a more vibrant contrast in the final blend.
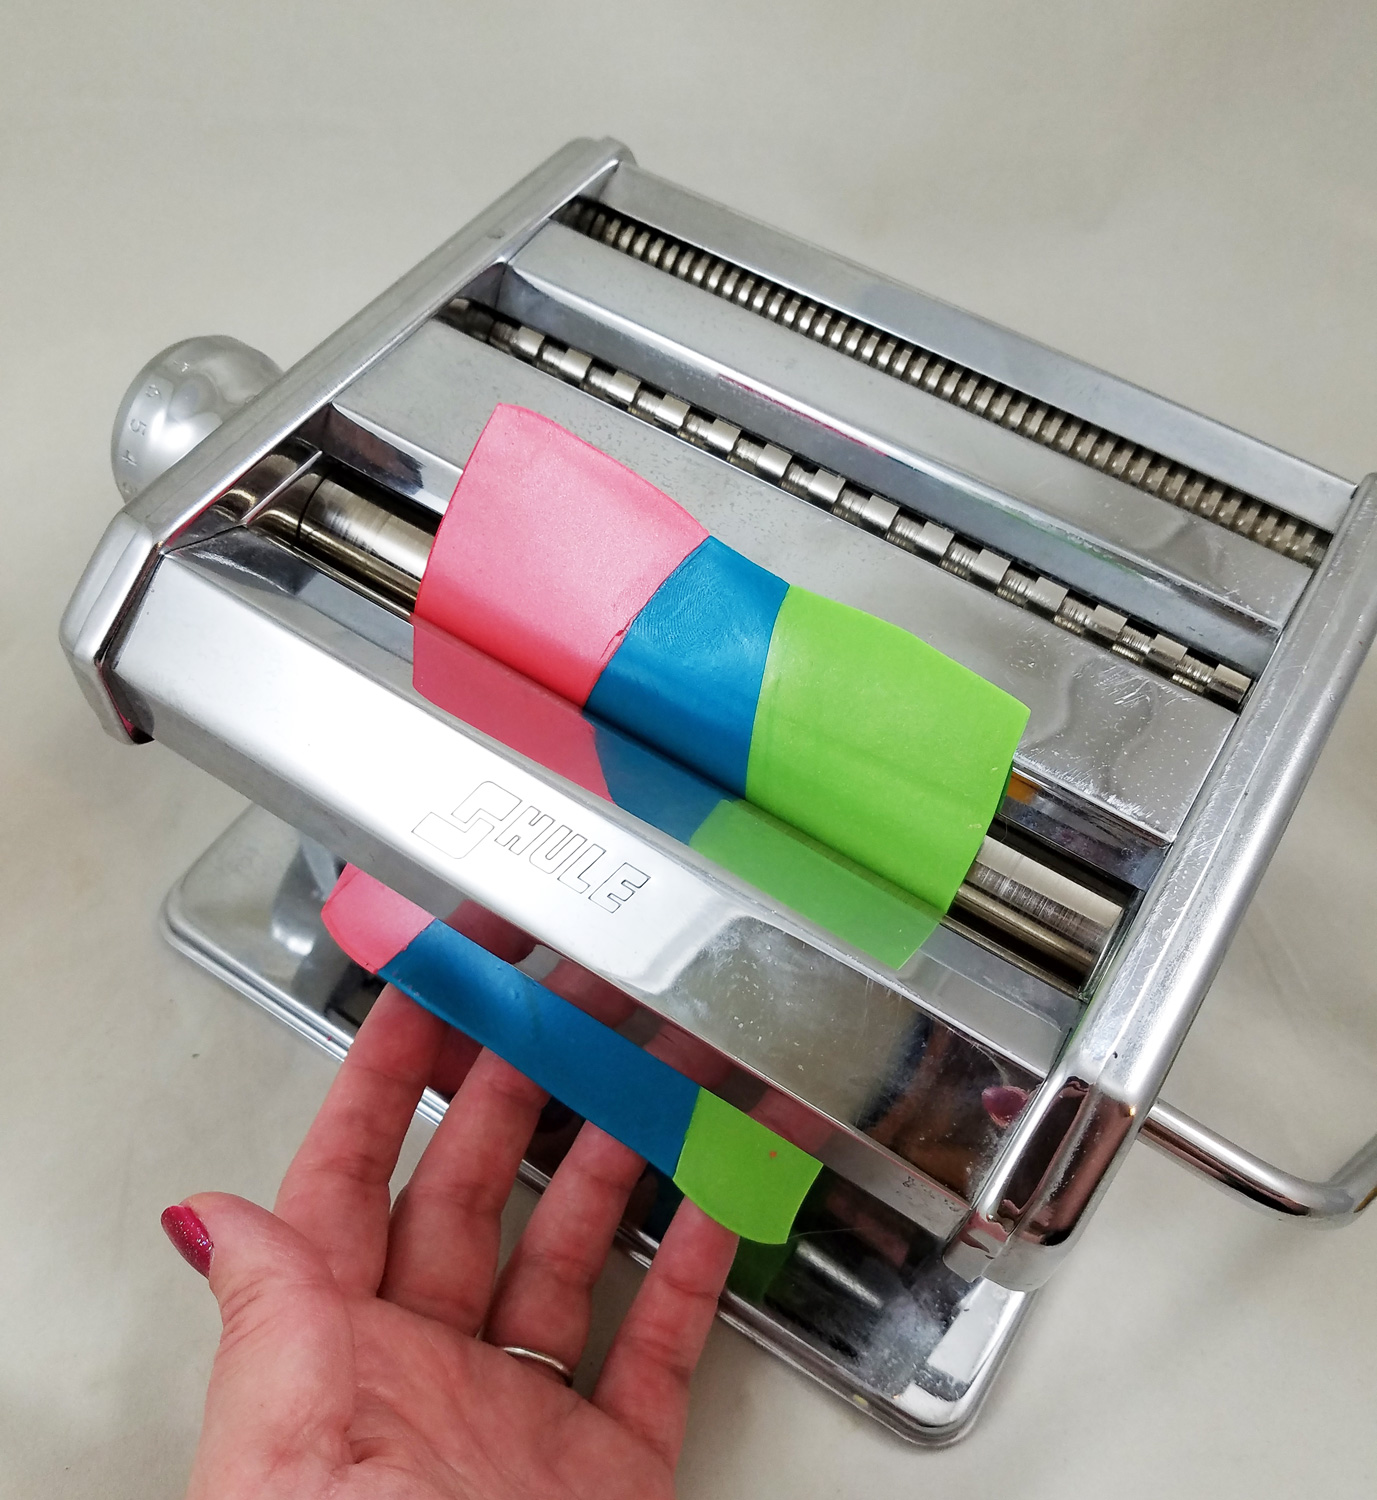
Using the thickest setting of the pasta machine I inserted the clay sheet, with the edge of of all three colors first; this made sure all the seams are pressed lightly together. I caught the clay sheet as it came out of the pasta machine.
I then folded in half, top to bottom, the clay sheet making sure to match the colors on the sheet edges and once again run it through the pasta machine. I did that 10 more times, folding and rolling the clay sheet in the same direction.
*If you are new to trying this technique try it first with scrap clay to practice. Polyform Products has great video on how to create a Skinner Blend HERE.
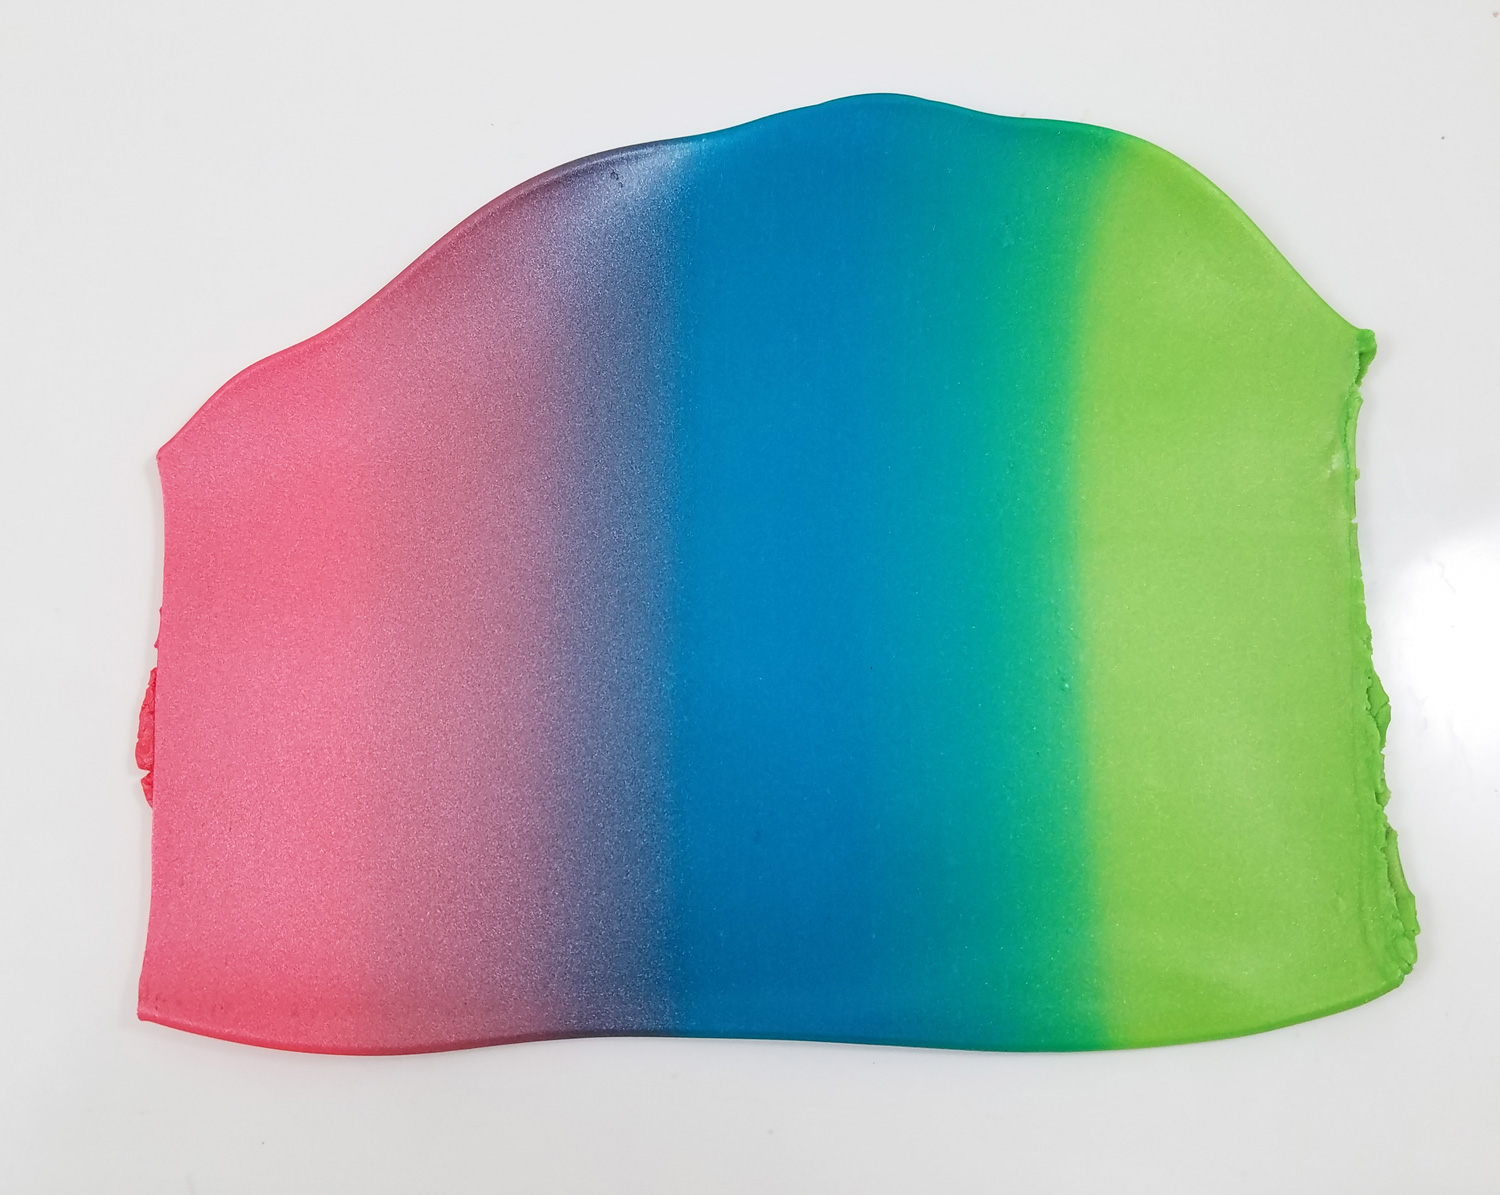
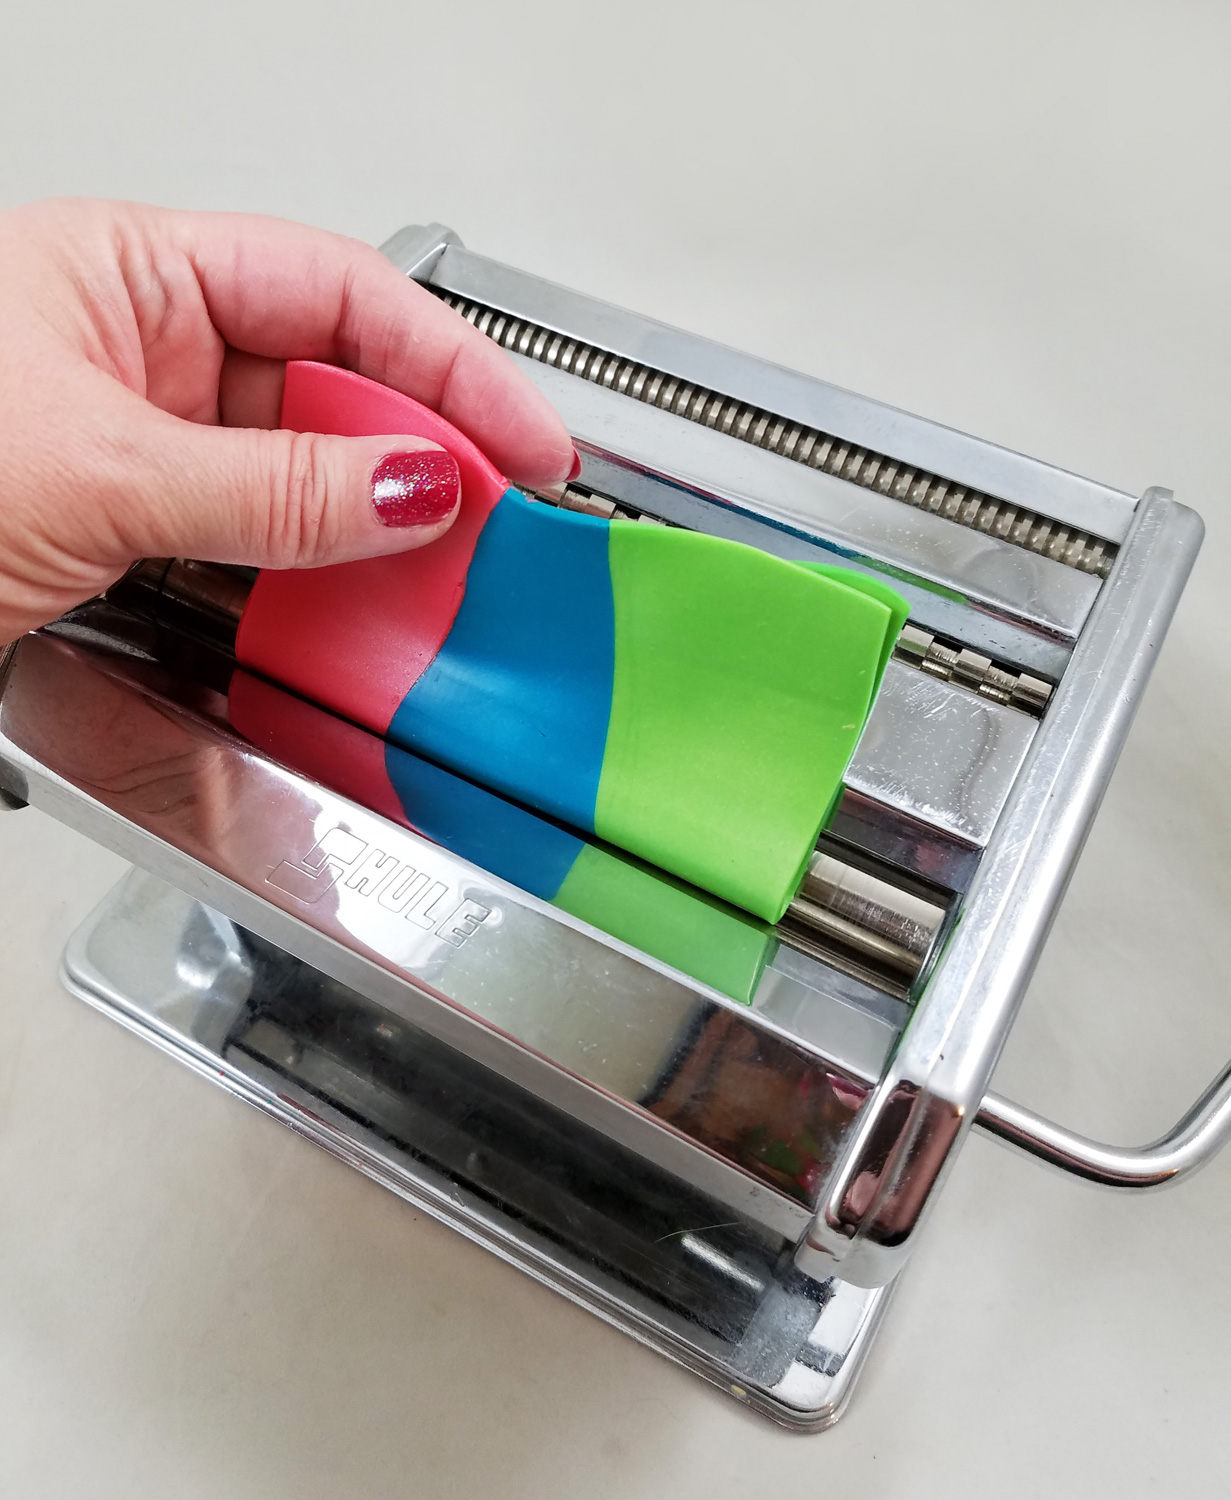
This gradient of colors is 10 fold-and-roll passes through the pasta machine, I wanted an even smoother transition of colors and ran the clay sheet a few more times through the pasta machine.
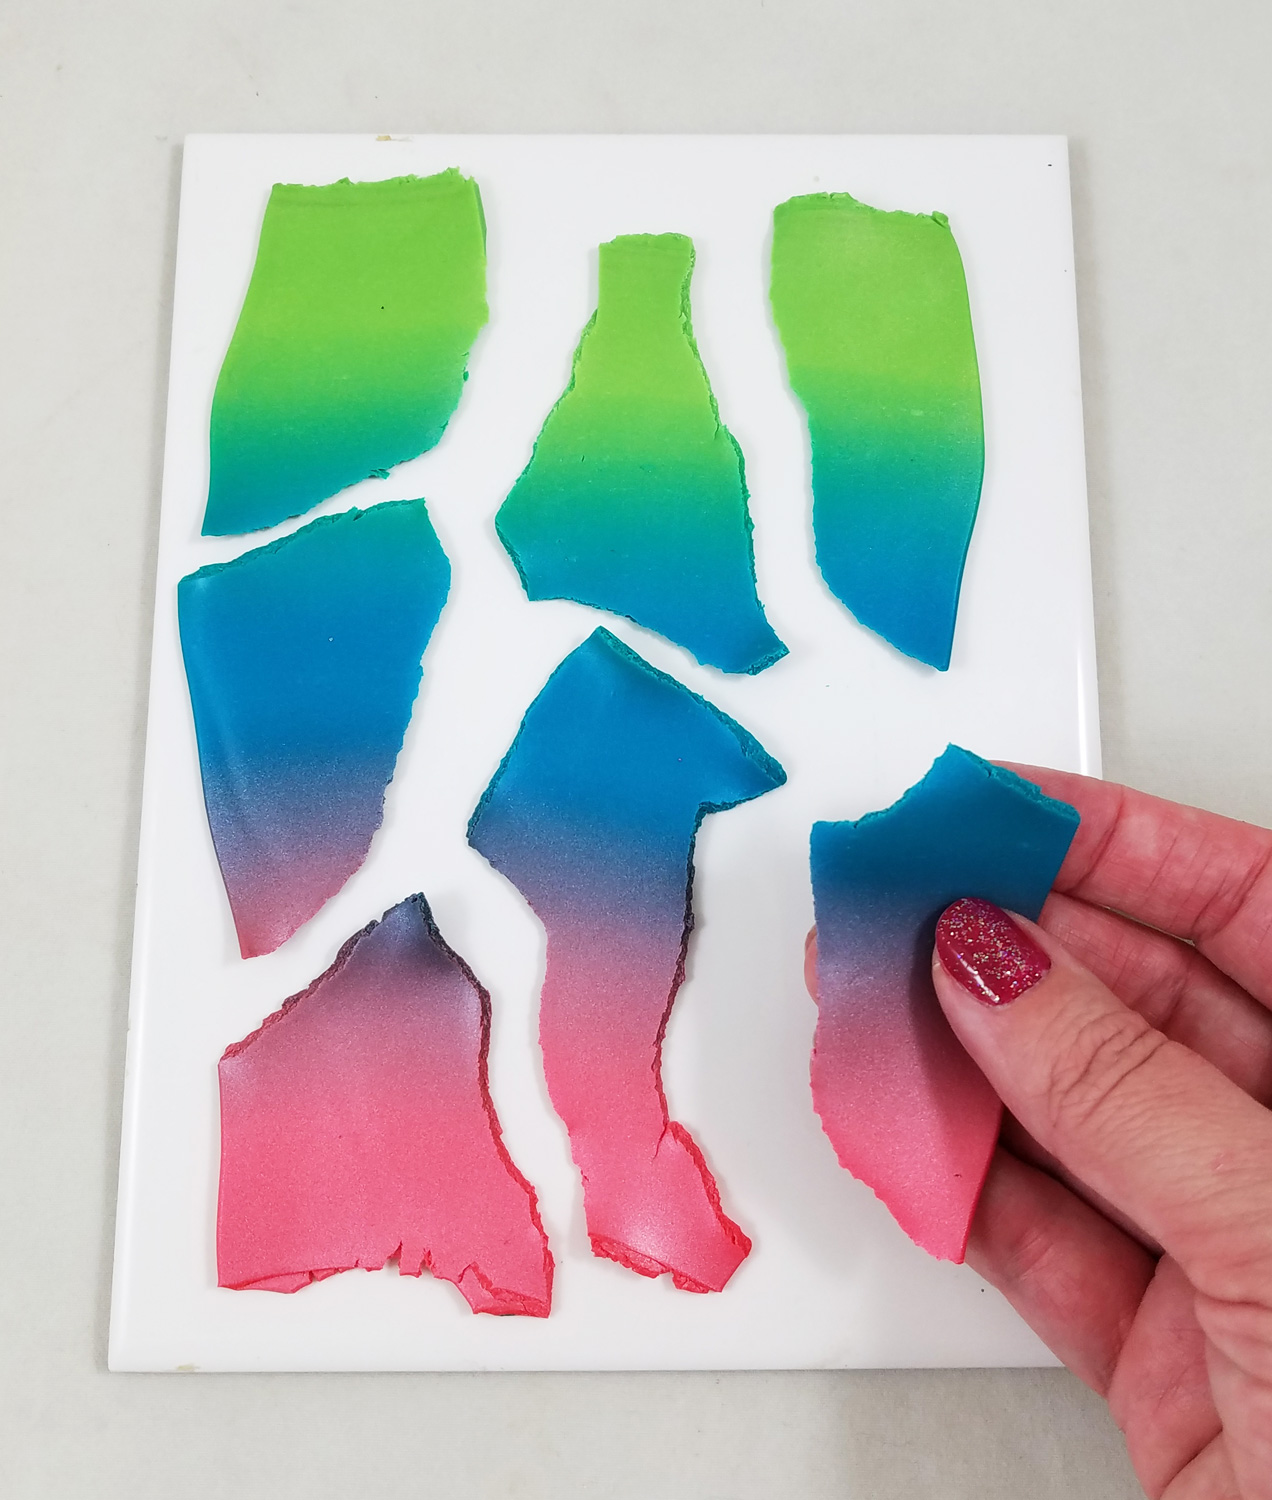
Once I got my clay sheet to the desired blend I carefully tore the gradient piece of clay into smaller pieces. This might seem a bit odd to do after all of the hard work getting a smooth gradient but stay with me!
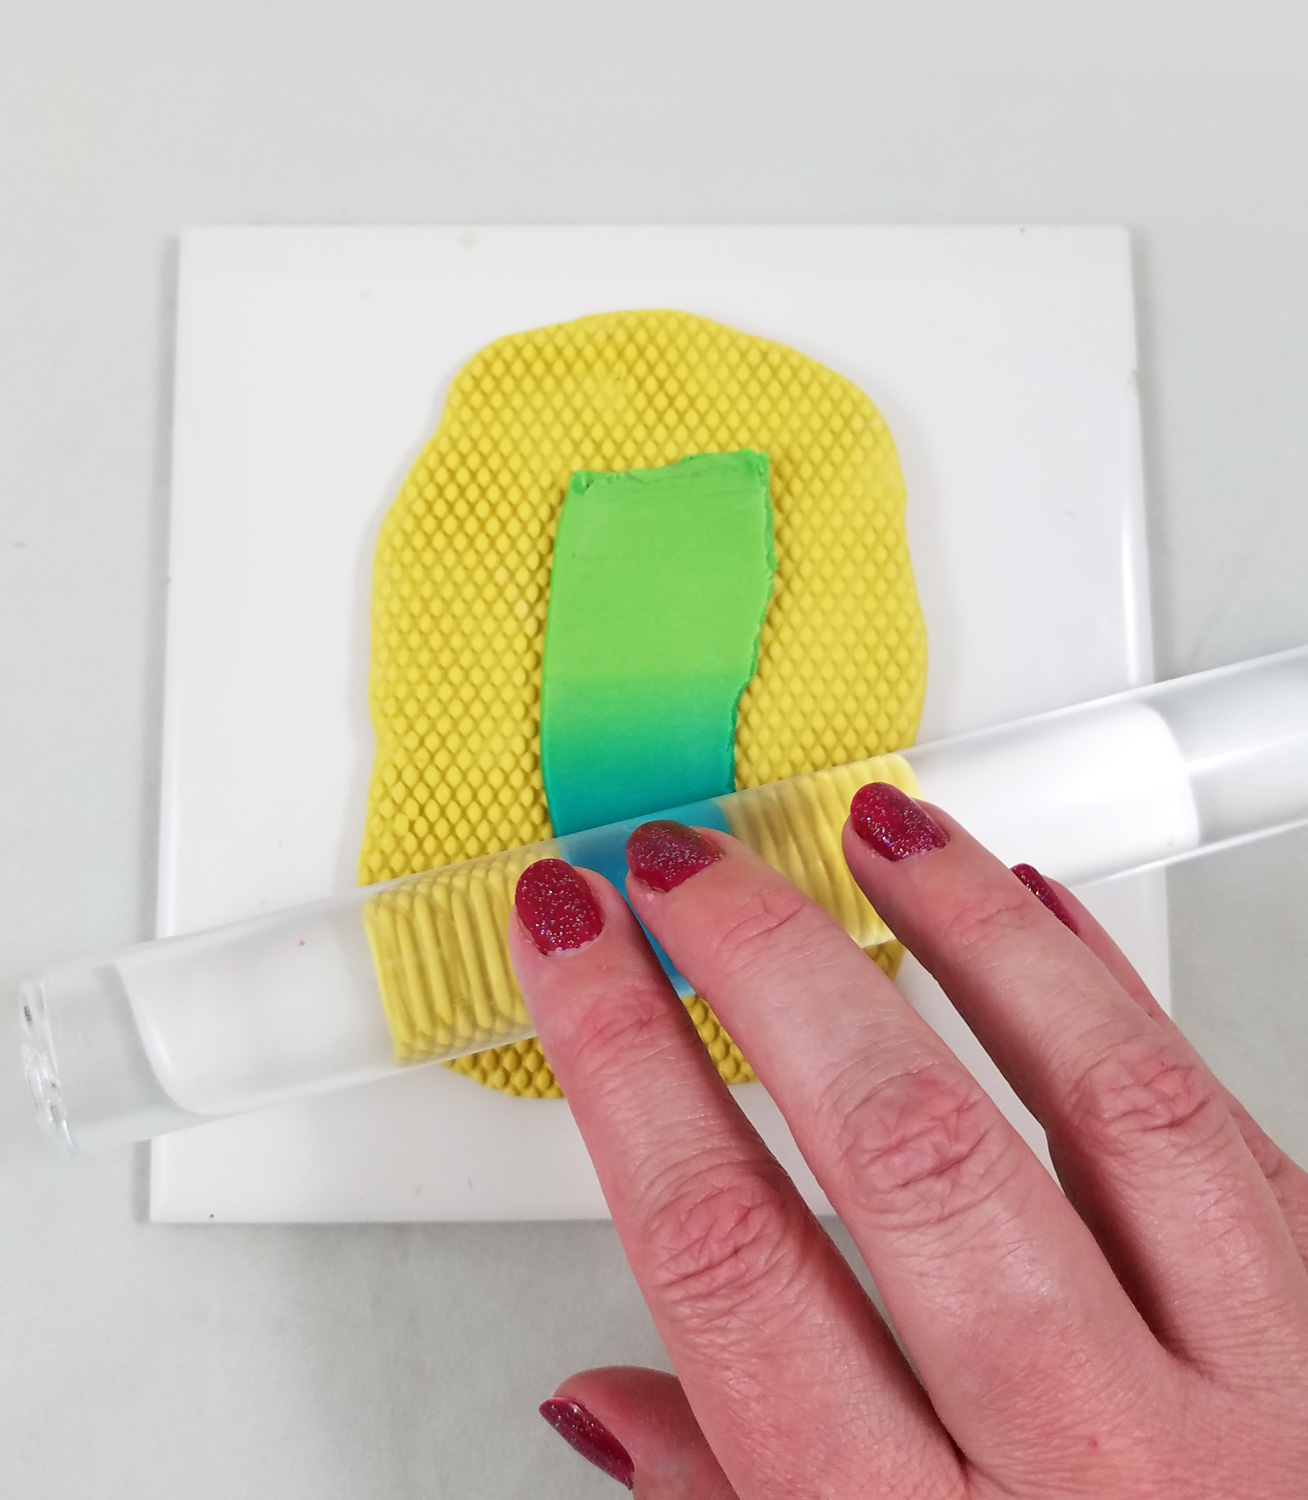
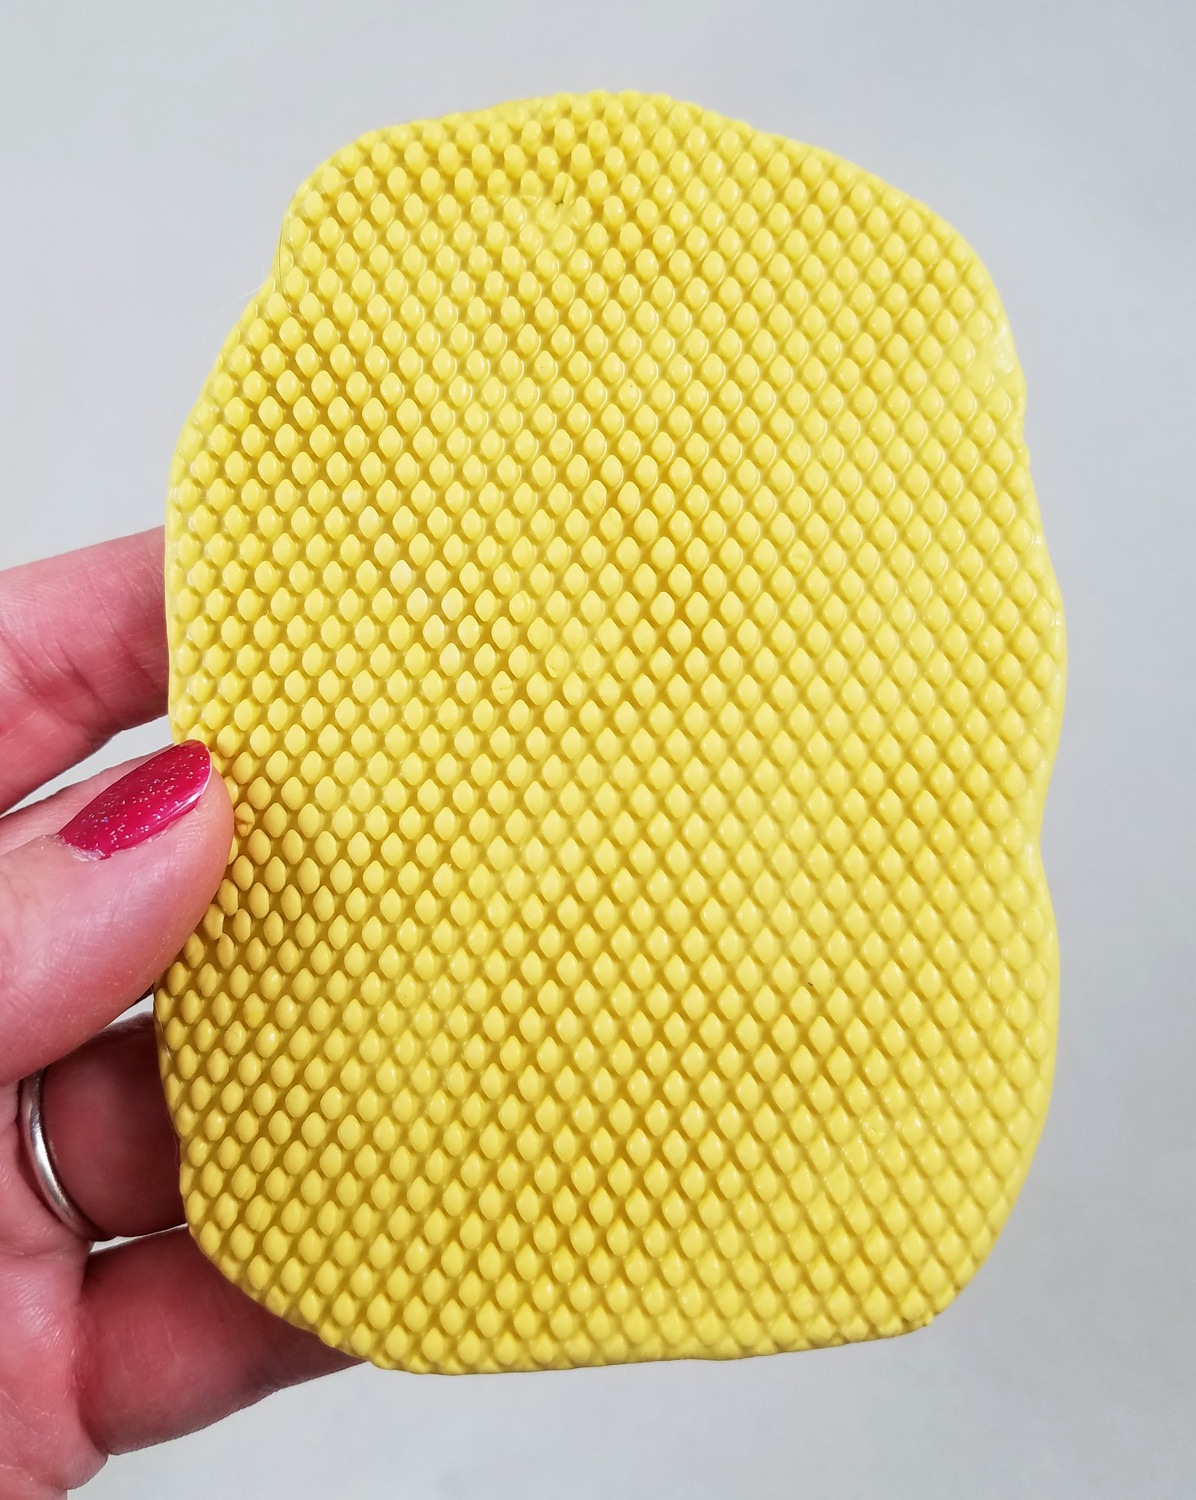
Taking each small torn piece of clay I placed it on my Amazing Mold Putty mesh texture plate and rolled an acrylic roller in a firm but consistent motion, careful to get as much texture as possible impressed into the soft clay.
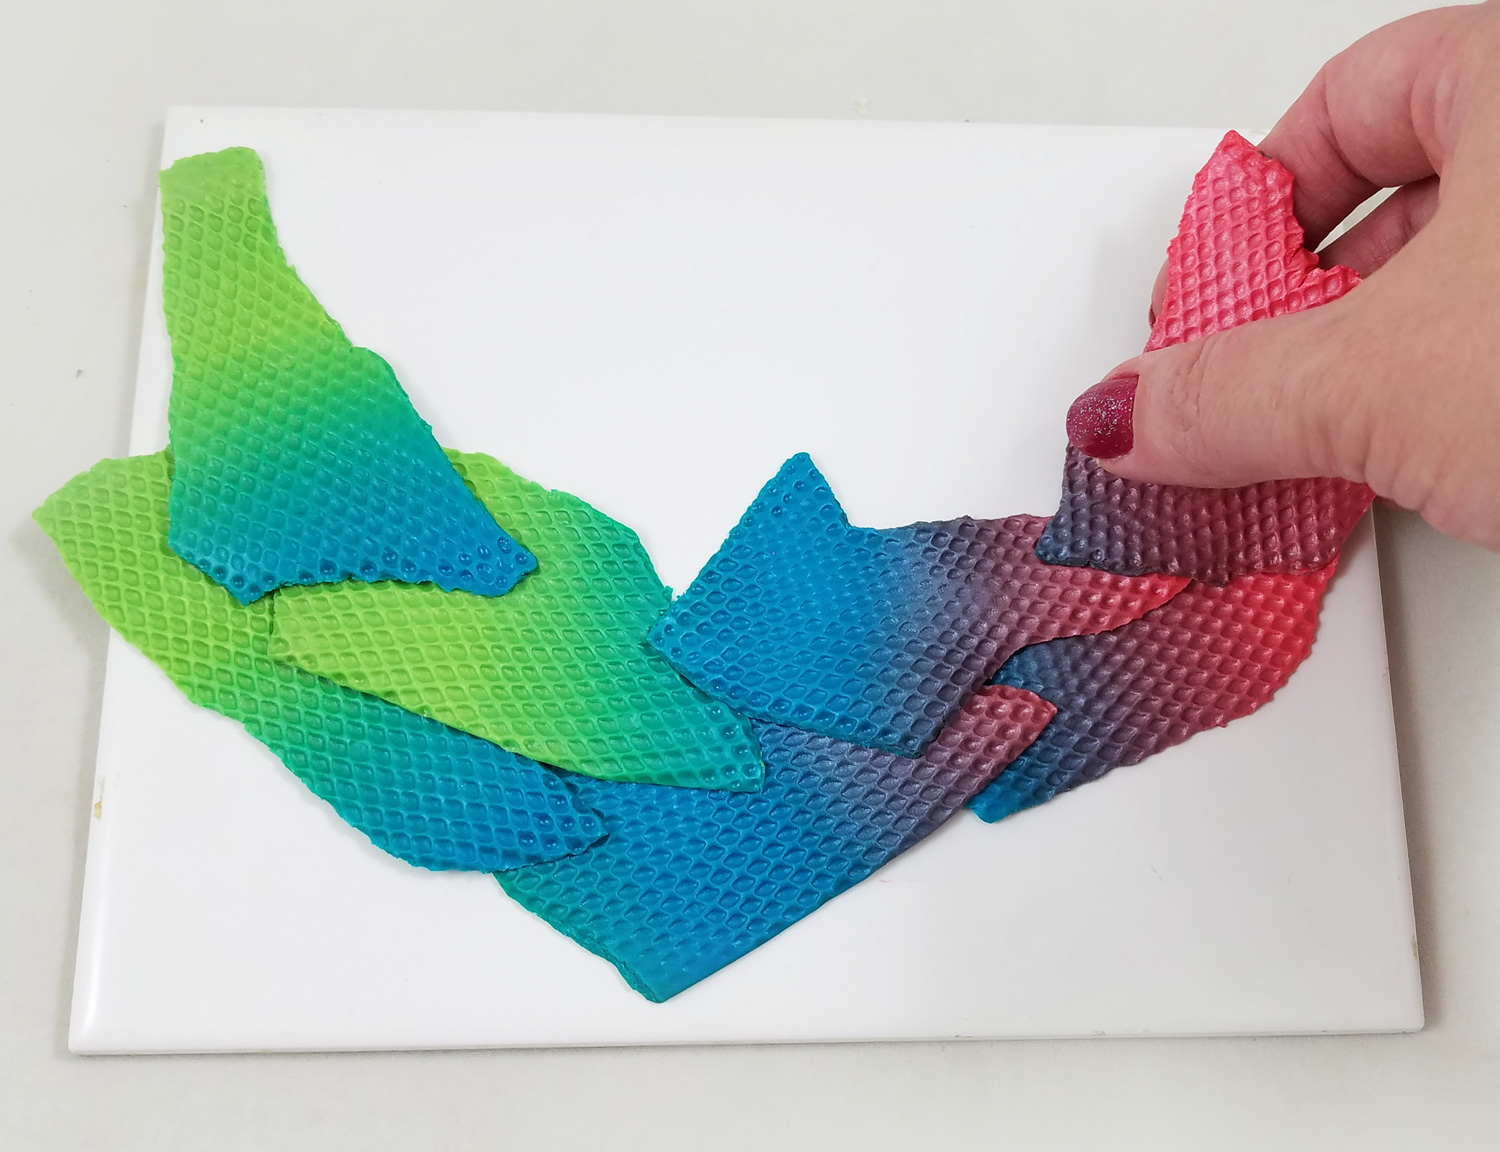
Each textured piece of clay was placed on top of each other in a semi-circle shape, and pressed lightly at the edges to help stick each piece together.
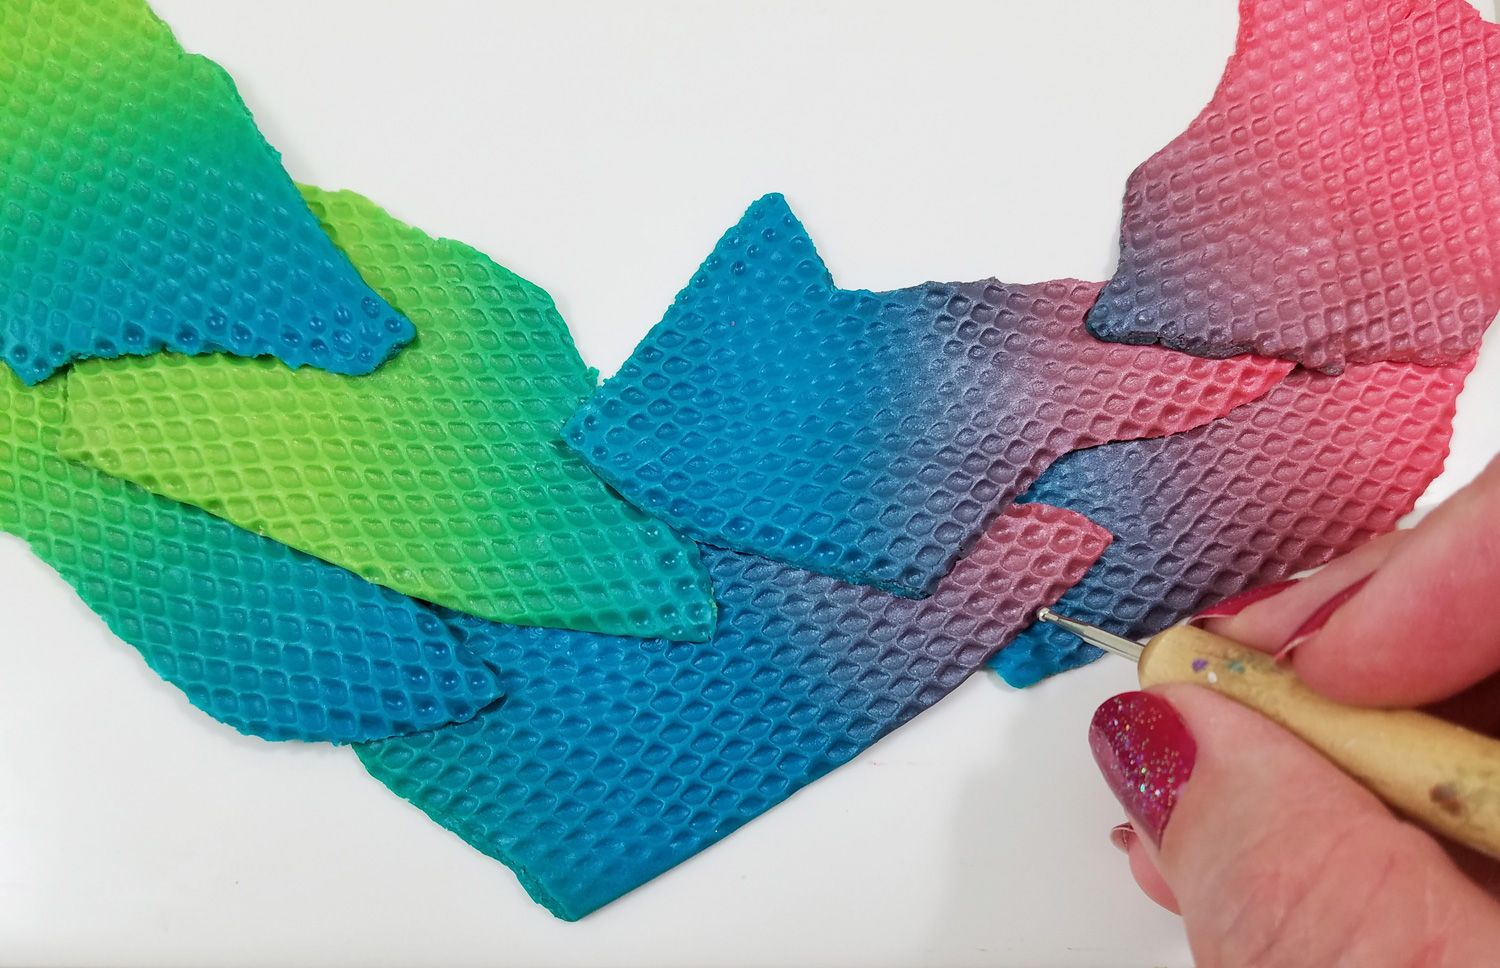
Using a small stylus I fixed any portions of the clay that didn’t get a complete impression of the texture plate and pressed the edges more firmly together in the scale-like indents.
I twisted up half a paper towel into a tube shape, curved it into a semi-circle and placed in on the my ceramic tile. I then carefully removed my curved clay piece off the tile and laid it on top of the twisted paper towel, pushing the clay sides down every so slightly creating a raised portion. The raised form would give the clay more dimension and allow for a more dynamic application of metallic powders.
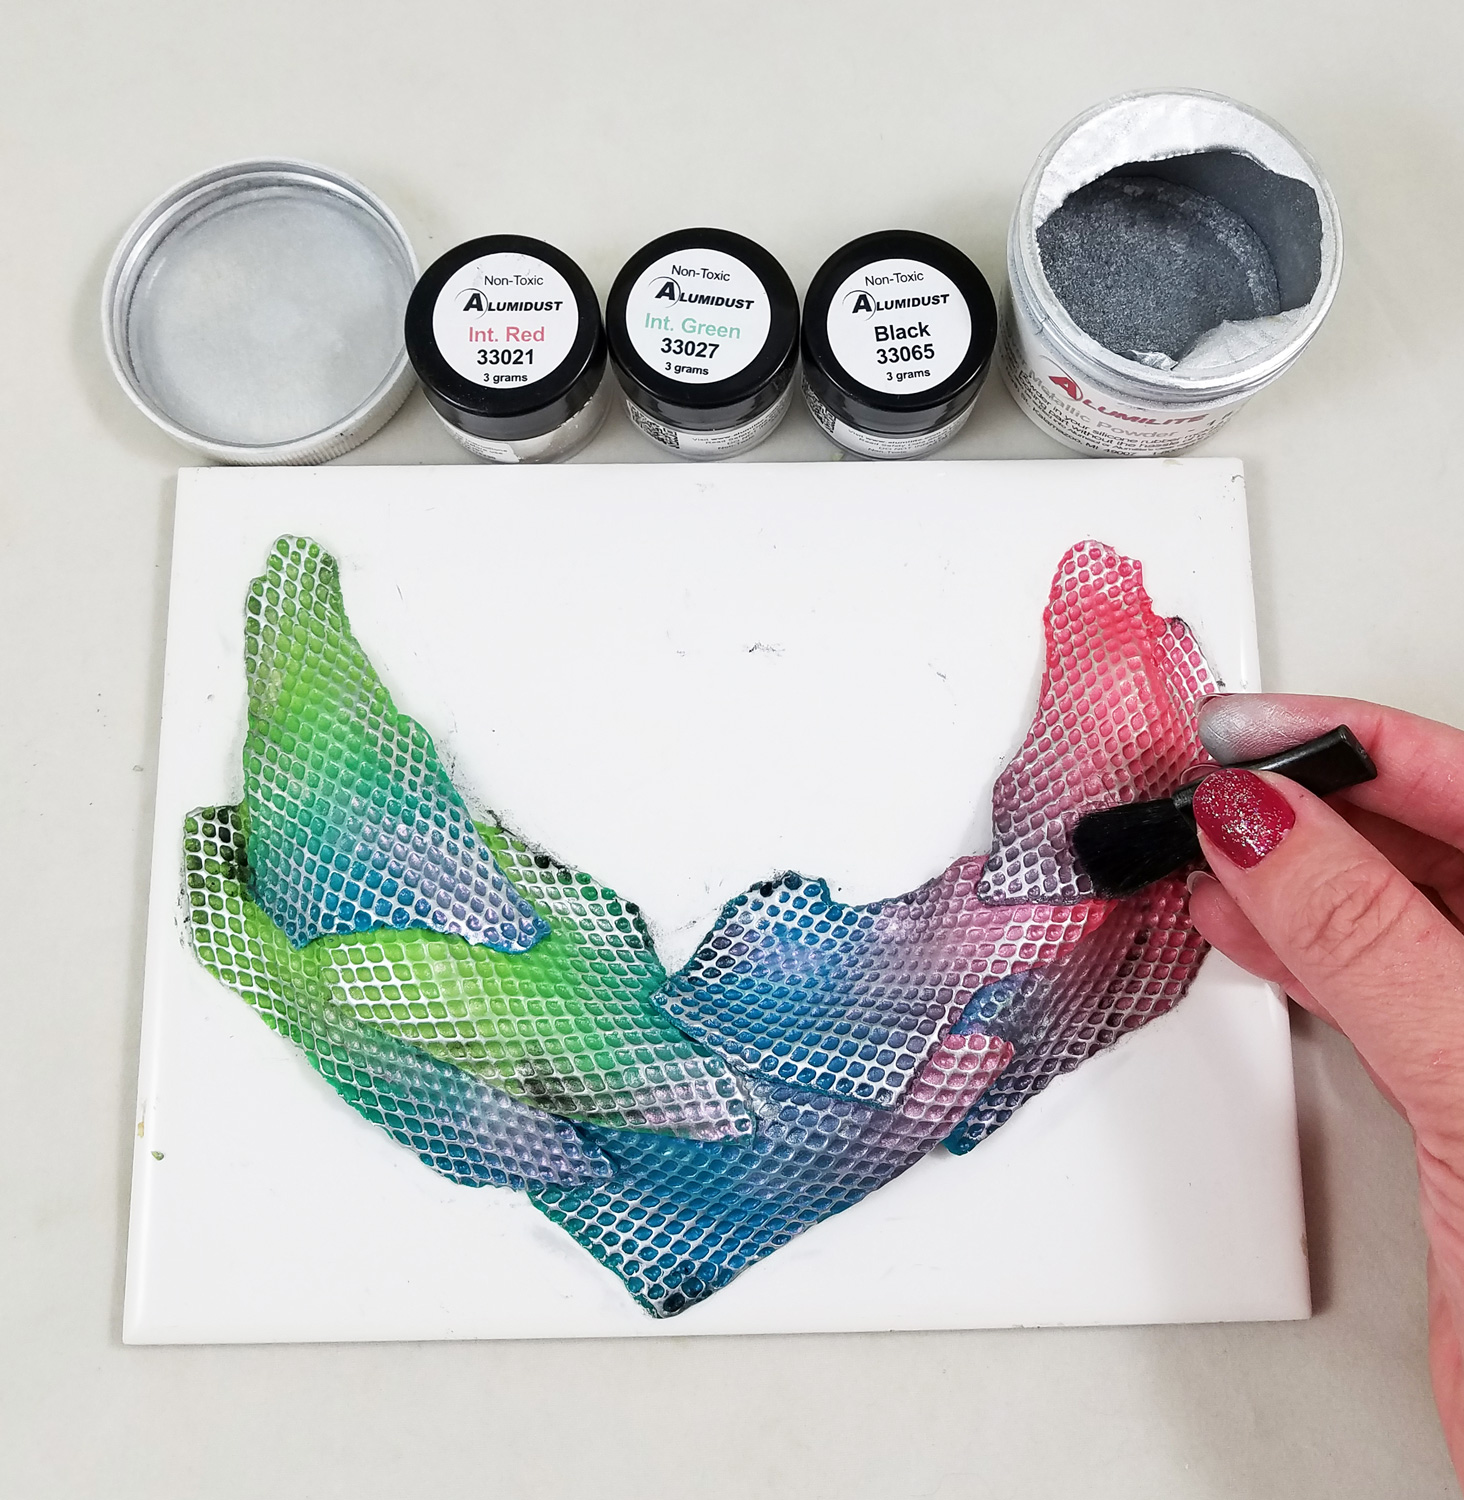
I dipped my finger in some Silver Alumilite Metallic Powder and gently ran my finger across the raised textured surface of the clay, highlighting the scaled texture. Using a soft makeup brush I applied Interference Red and Green Alumidust into the lower portions of the scale texture on the clay. I applied only a very small amount of the Black Alumidust to the edges of the clay. The powders bonded to the uncured polymer clay without the addition of a glue or sealant.
I made two holes on the top left and right of the necklace with a stylus; these would become holes to place jumprings and chain through once the clay is cured.
I then put the tile with the clay necklace into a toaster oven, heated per manufacturer instructions, to cure.
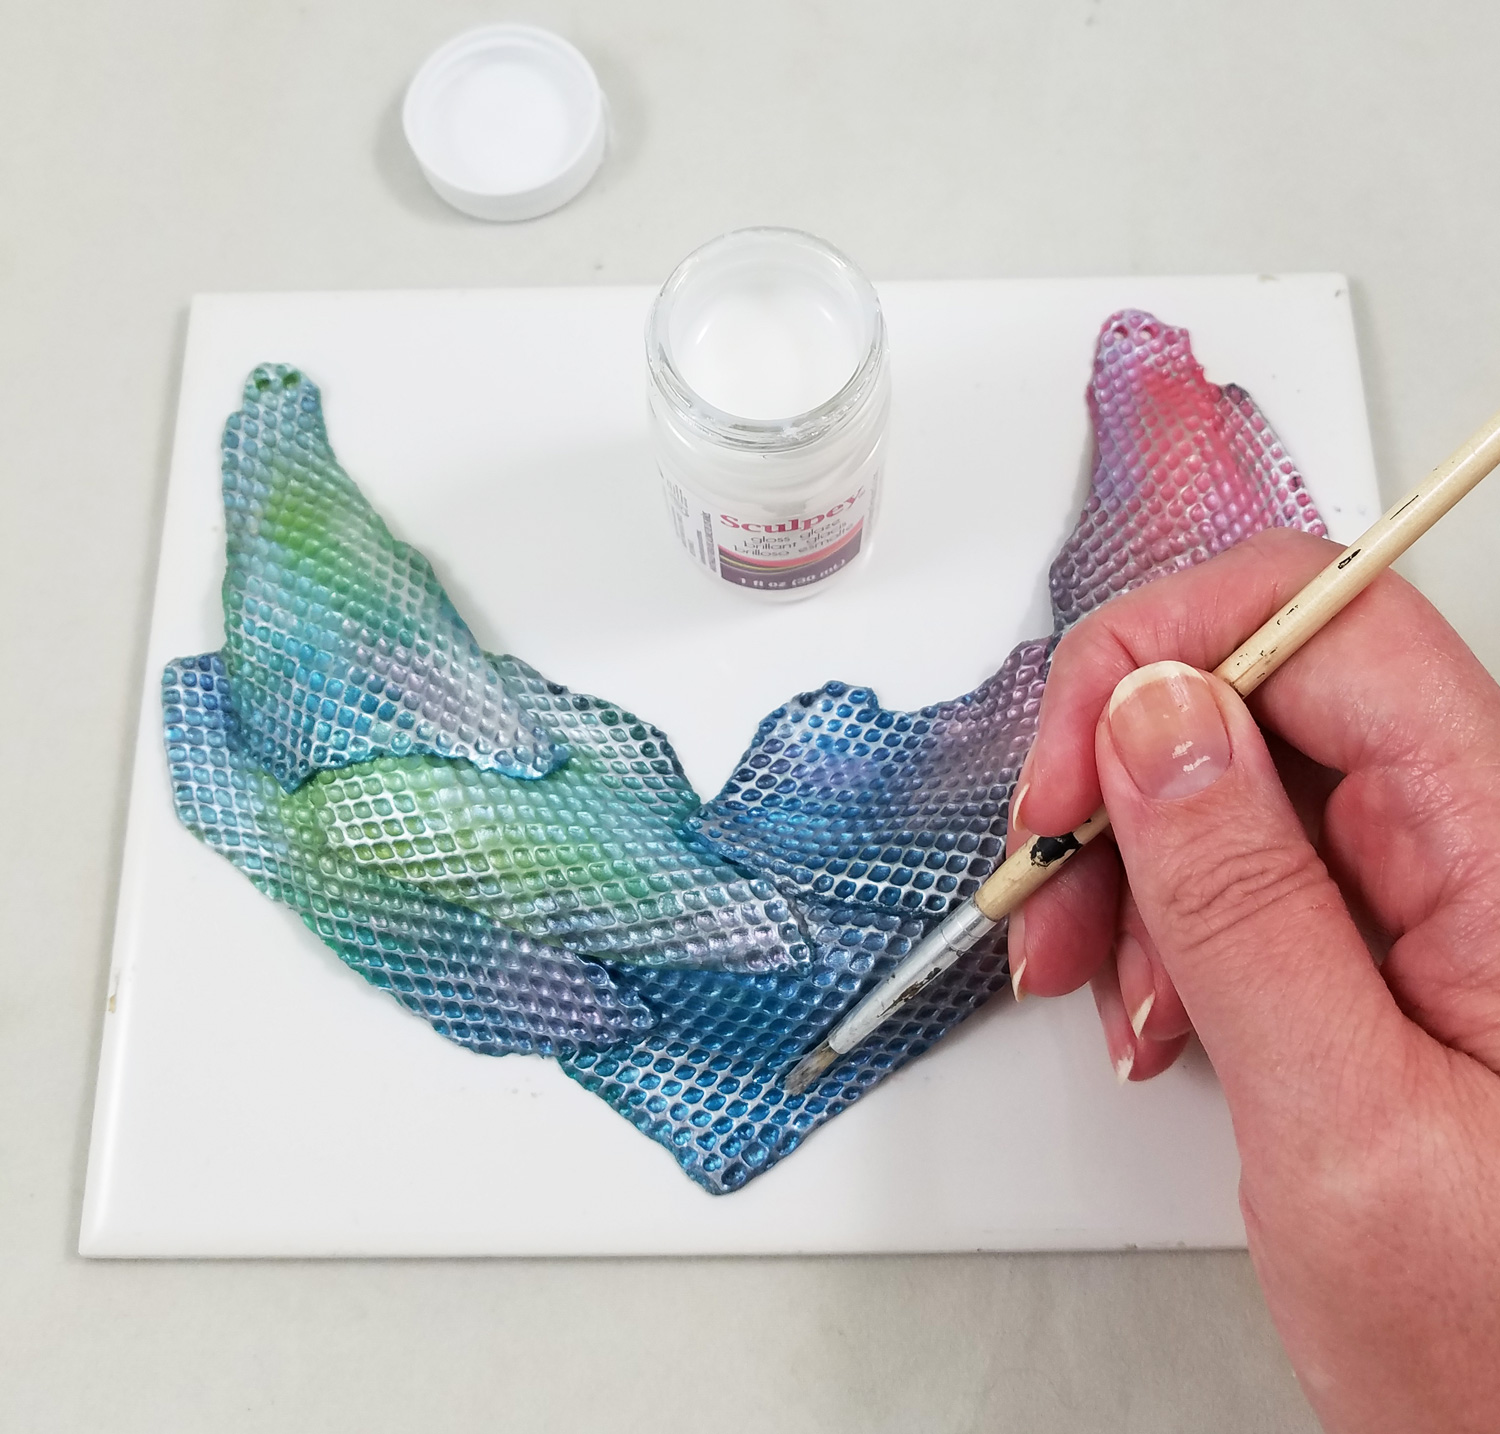
I painted on a coat of gloss Sculpey Glaze over the now cured piece of clay and let it dry per manufacturer instructions.
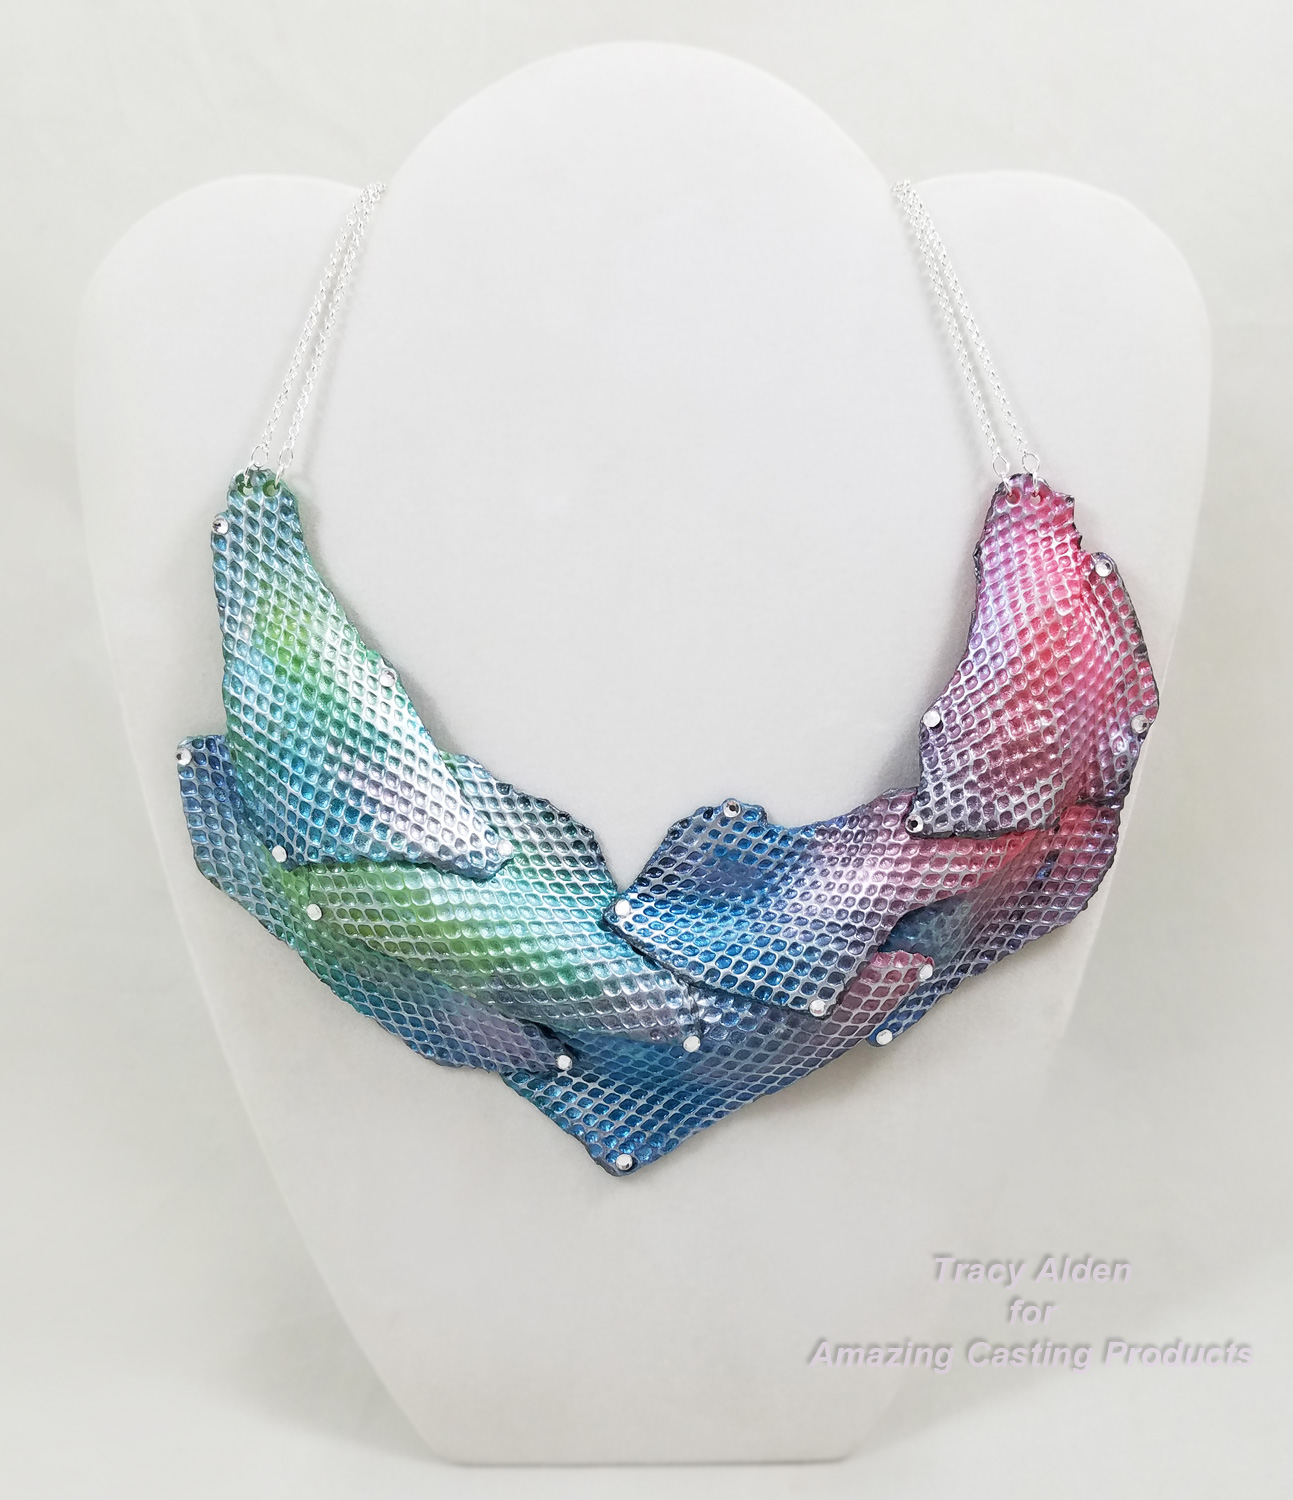
I applied little dots of Beacon’s Gem-Tac glue on the edges of the scales and I added flatback crystal rhinestones. I put jumprings through the two holes on each side and attached jewelry chain. Now the necklace was ready to wear!
Happy Holidays and until next time, safe travels!
This is an affiliate post, which means I received an assortment of products as a compensation for the creation of art. To read my full disclosure, click here.
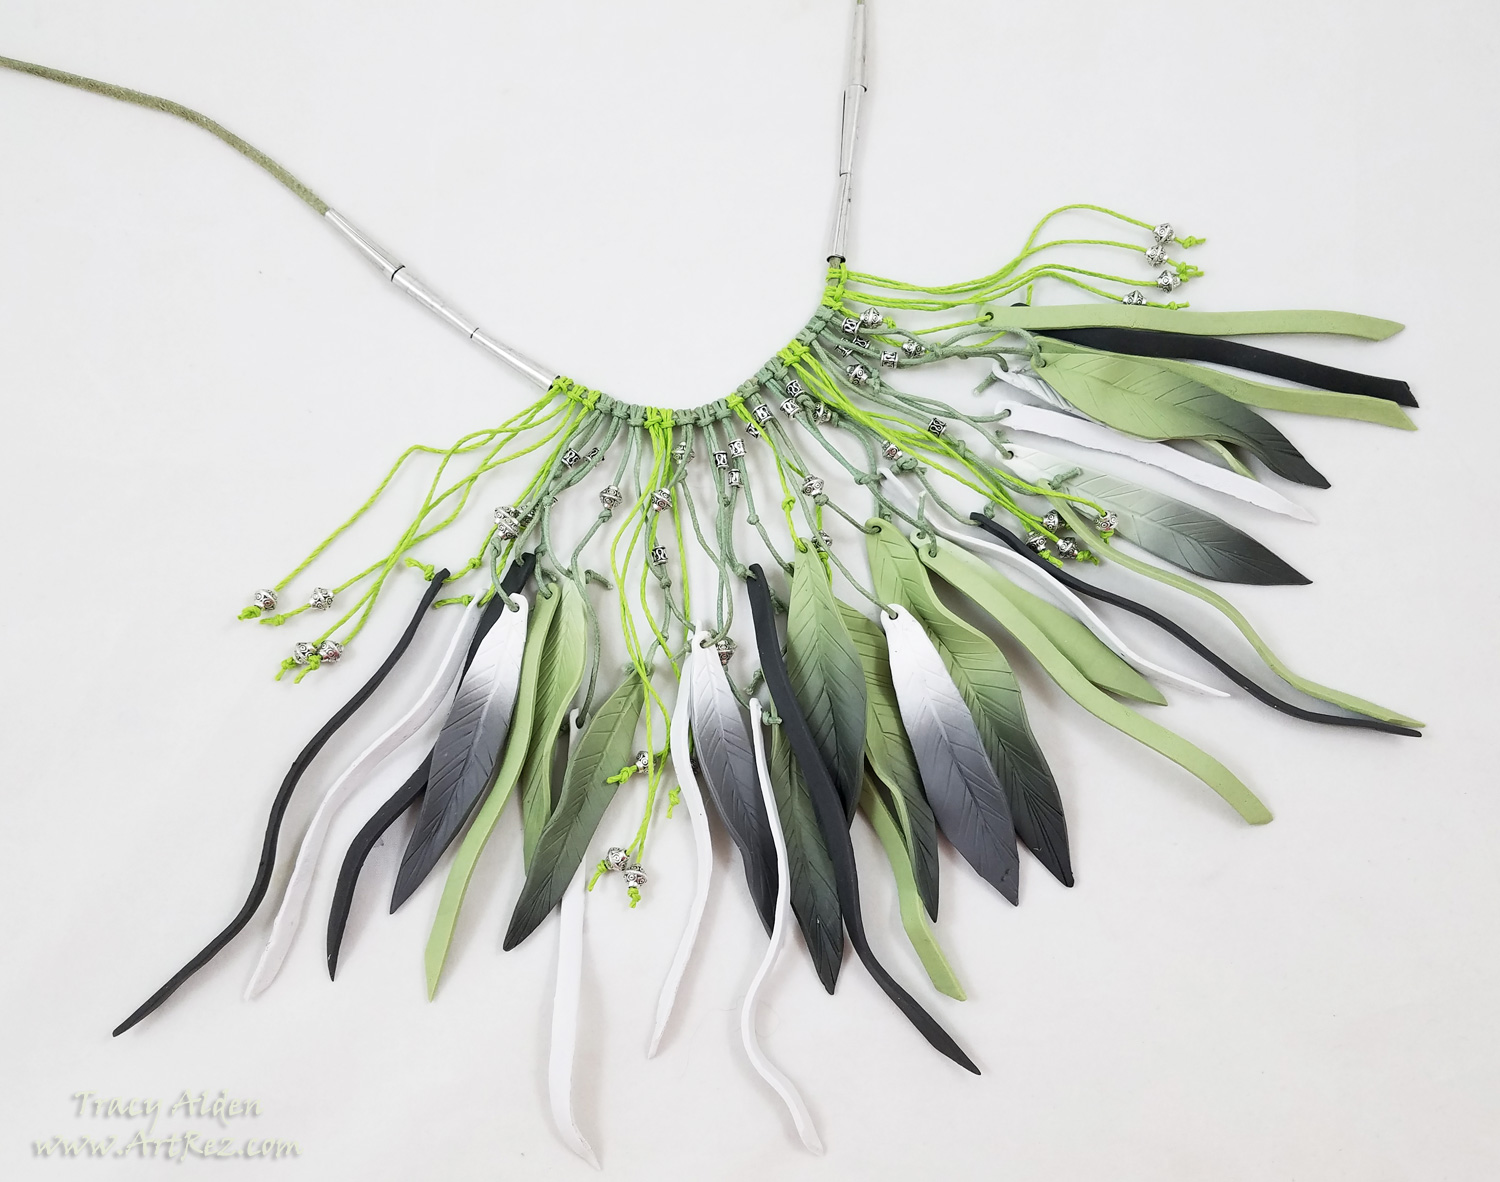
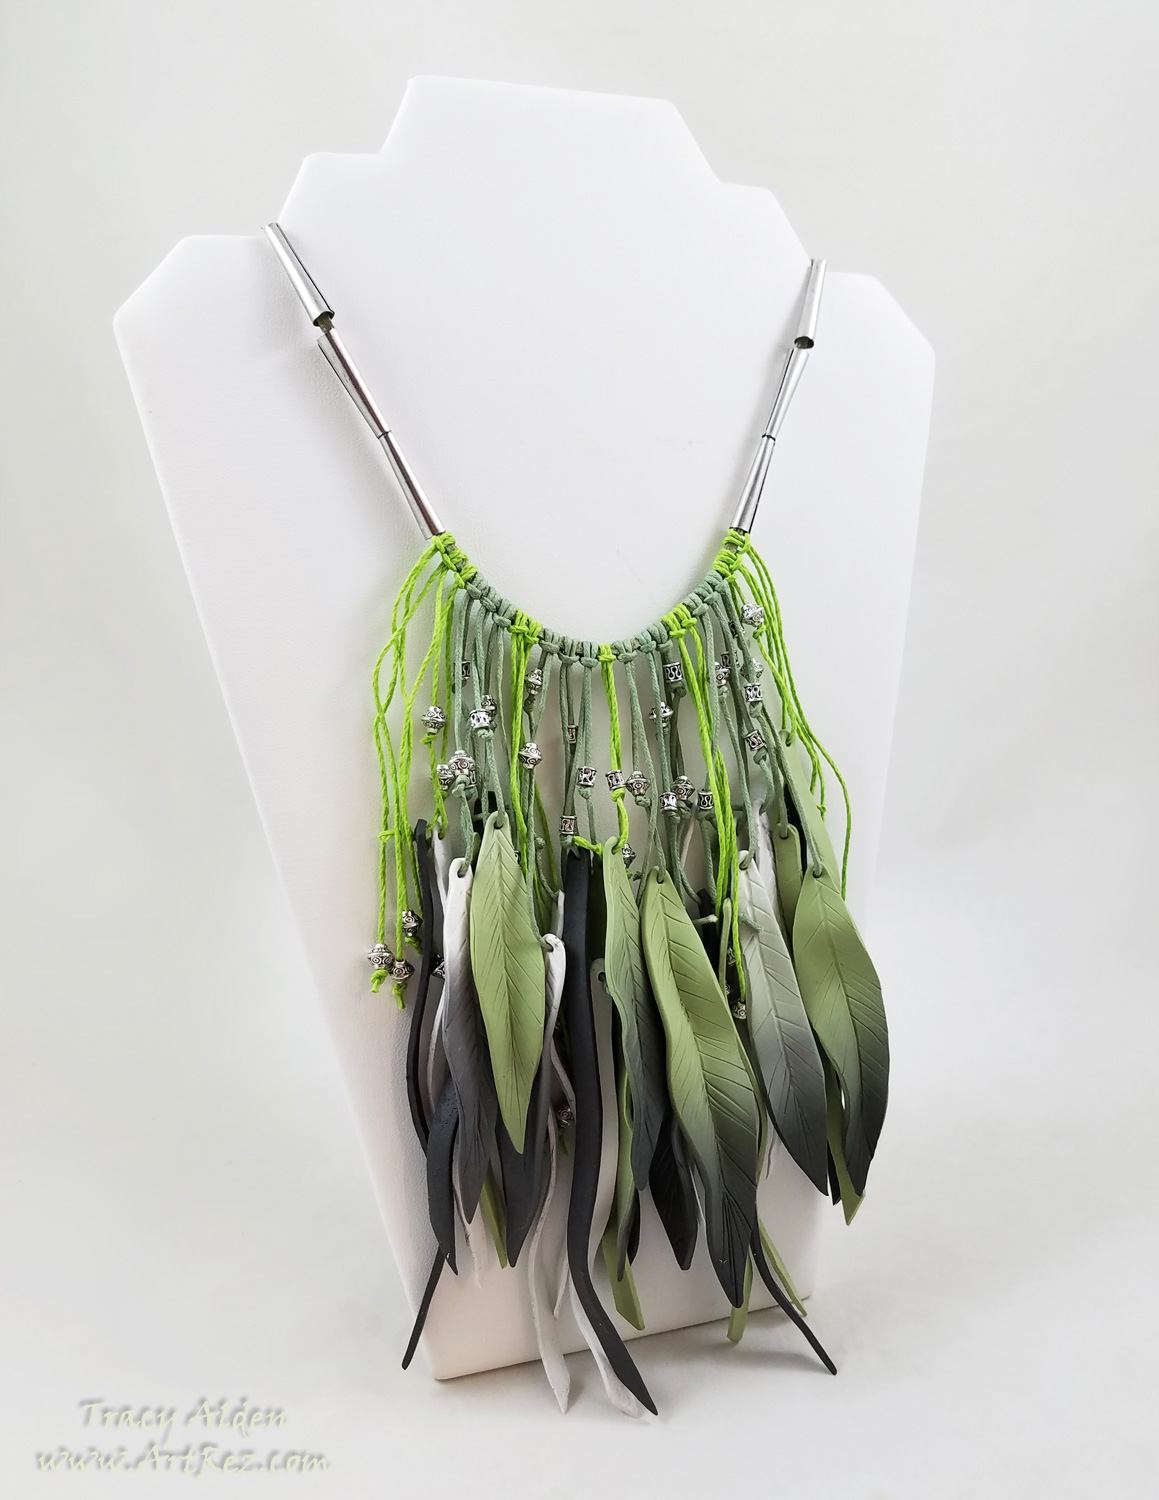
Feather Inspired Boho Necklace with Sculpey Soufflé
In January I traveled to the Creativation Trade show, in Phoenix, Arizona. Held by Association For Creative Industries or AFCI, during the show I was invited to the 6th annual Prime Networking Event. At this event, bloggers, designers, authors and brands in the craft industry came together to network, make new partnerships, and learn about new product information. The event was Educational, informative, had great food and drinks and free product samples provided by this year’s sponsors. After the event attendees were encouraged to try out and create art for the Favecrafts Best Blogger Craft Event.
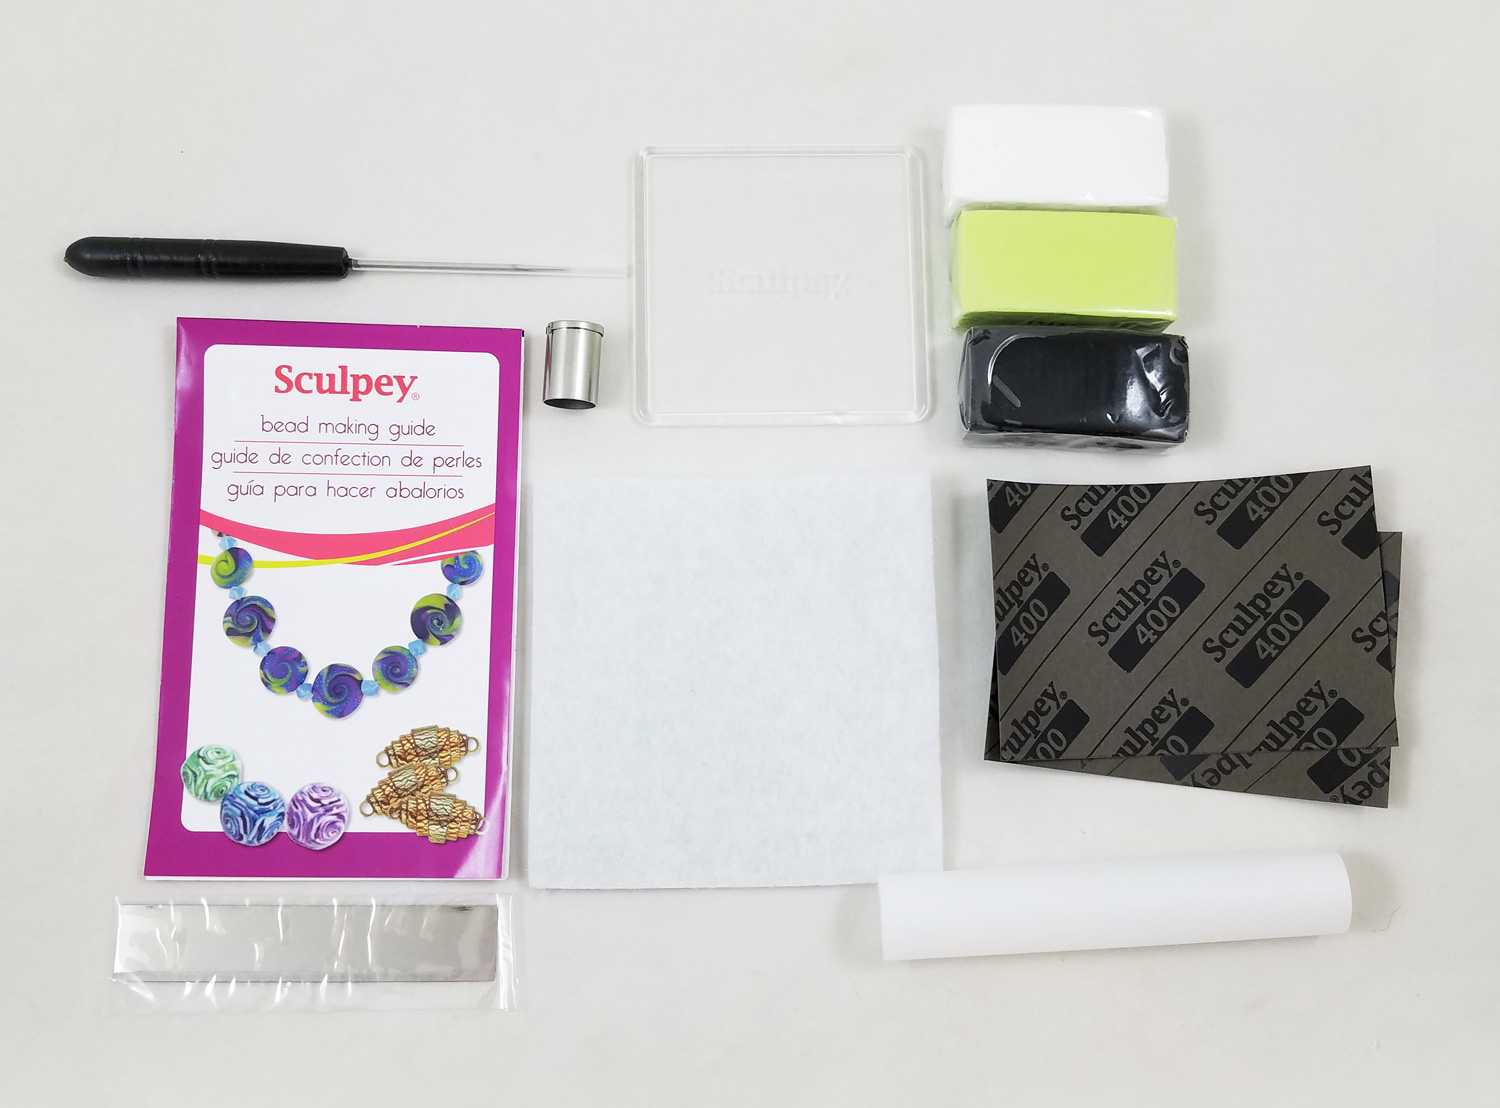
One of the sponsors was Polyform Products, who supplied a wonderful kit including a Sculpey® Bead Making Kit and three half bricks of Sculpey® Soufflé™ in Igloo, Pistachio and Poppy Seed.
The Souffle clay colors of the kit reminded me of the feathers of the Great Green Macaw. In particular the neck and chest feathers, in tones of green, black and fluffy white, that many Macaws can be seen preening while relaxing. This color inspiration helped me visualize a Boho necklace, faux leather in style, since Souffle Clay once baked in an oven has a matte finish, somewhat like leather.
Supplies:
Sculpey® Soufflé™ in Igloo, Pistachio and Poppy Seed
Sculpey® Bead Making Kit
Ceramic tiles
1 Coffee Straw
Pasta Machine
Paper Towels
Metal Spacer Beads
Cone Tin Beads
Toothbrush
Darice 100% Natural Hemp Cord, 20 lb. Assorted Brights
Cord Faux Suede Olive-Brown 3MM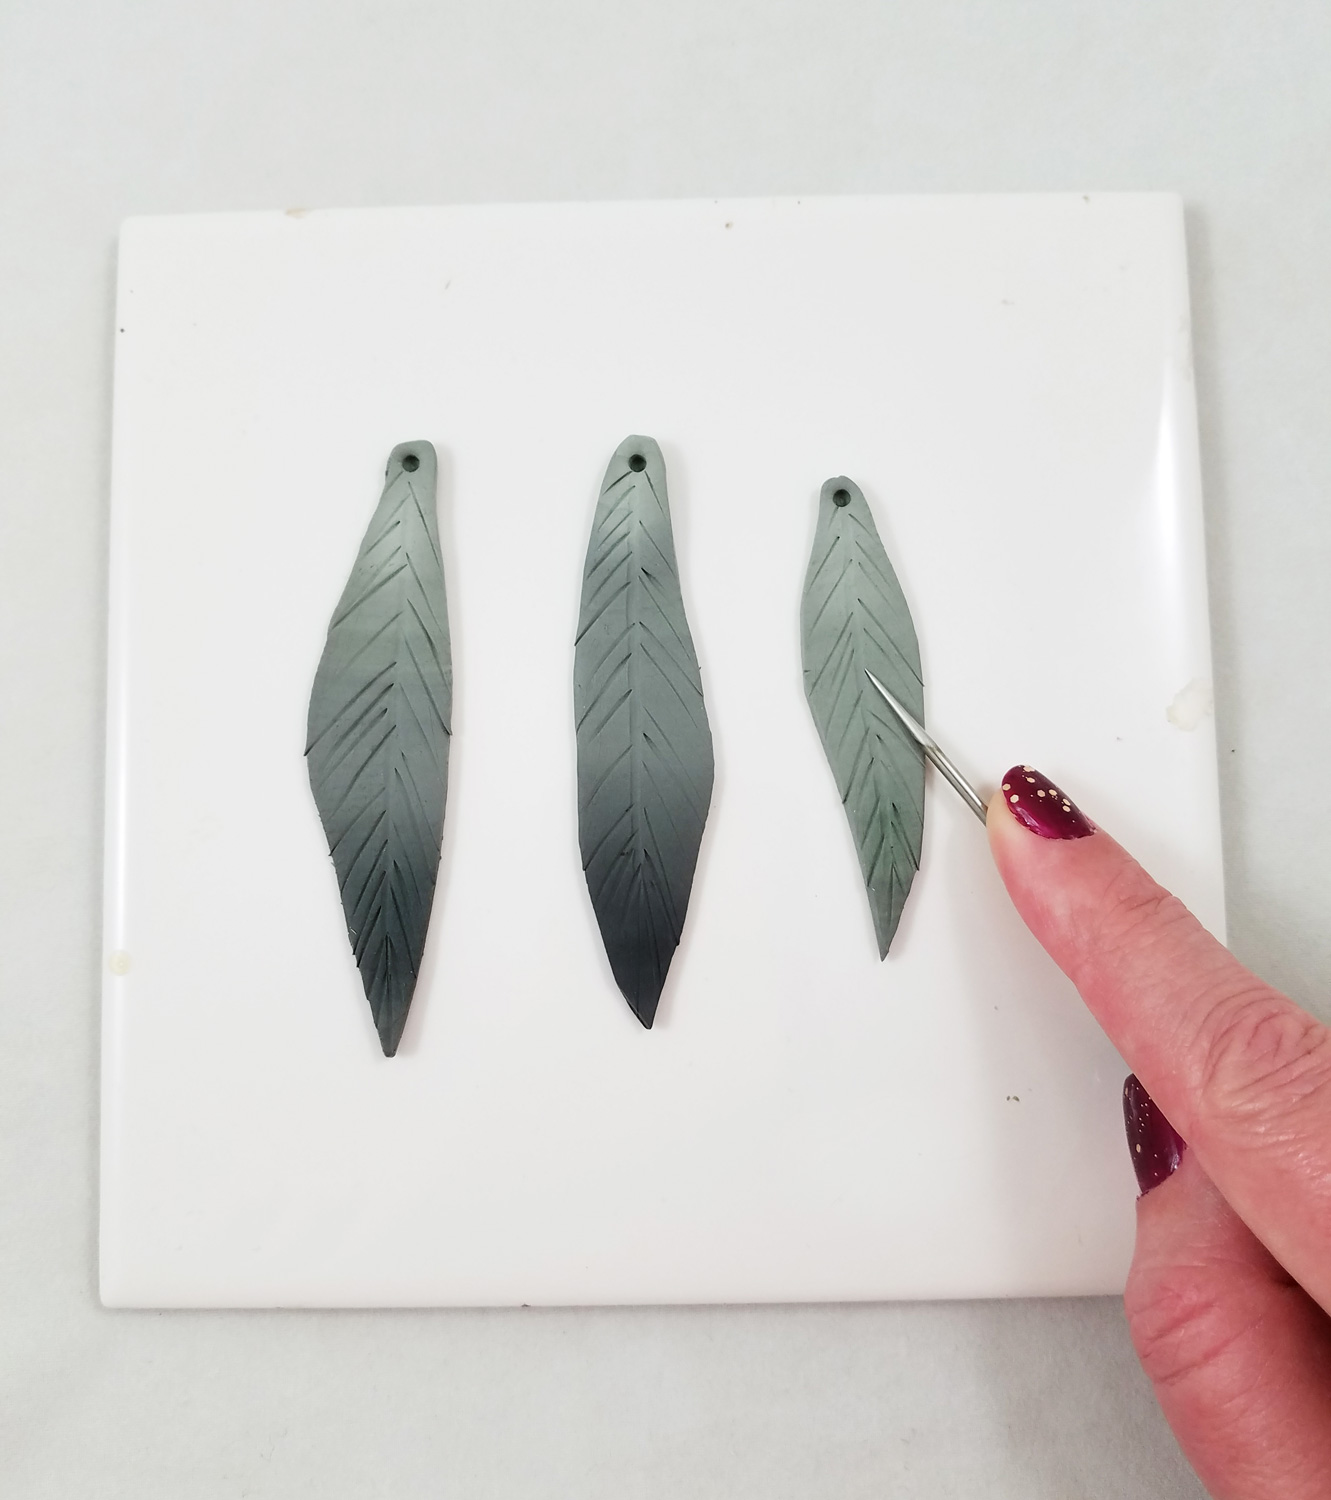
Working with the Sculpey Soufflé I quickly learned it is softer than most polymer clay, requiring little to no conditioning. Using the cutting blade, included in the bead making kit, I cut each brick in half, saving half of each clay brick for the second part of the project. I rolled out each half brick of clay with a pasta machine (devoted to craft use only) set on the thickest setting.
Using the Skinner Blend technique, which creates beautiful gradients in clay, I blended two of each color of clay. Now having pieces of clay with blends of green with black, white with black, green with white, I cut out 14 feather shapes using the cutting blade. I didn’t need to use a template because I wanted the organic look of naturally fallen feathers. Using a coffee straw I punched out a hole on the top of each feather. To give detail to the clay feathers I used the needle tool, included in the bead making kit, to draw on the clay, not going too deep but just enough to get create lines as shown in the photo above.
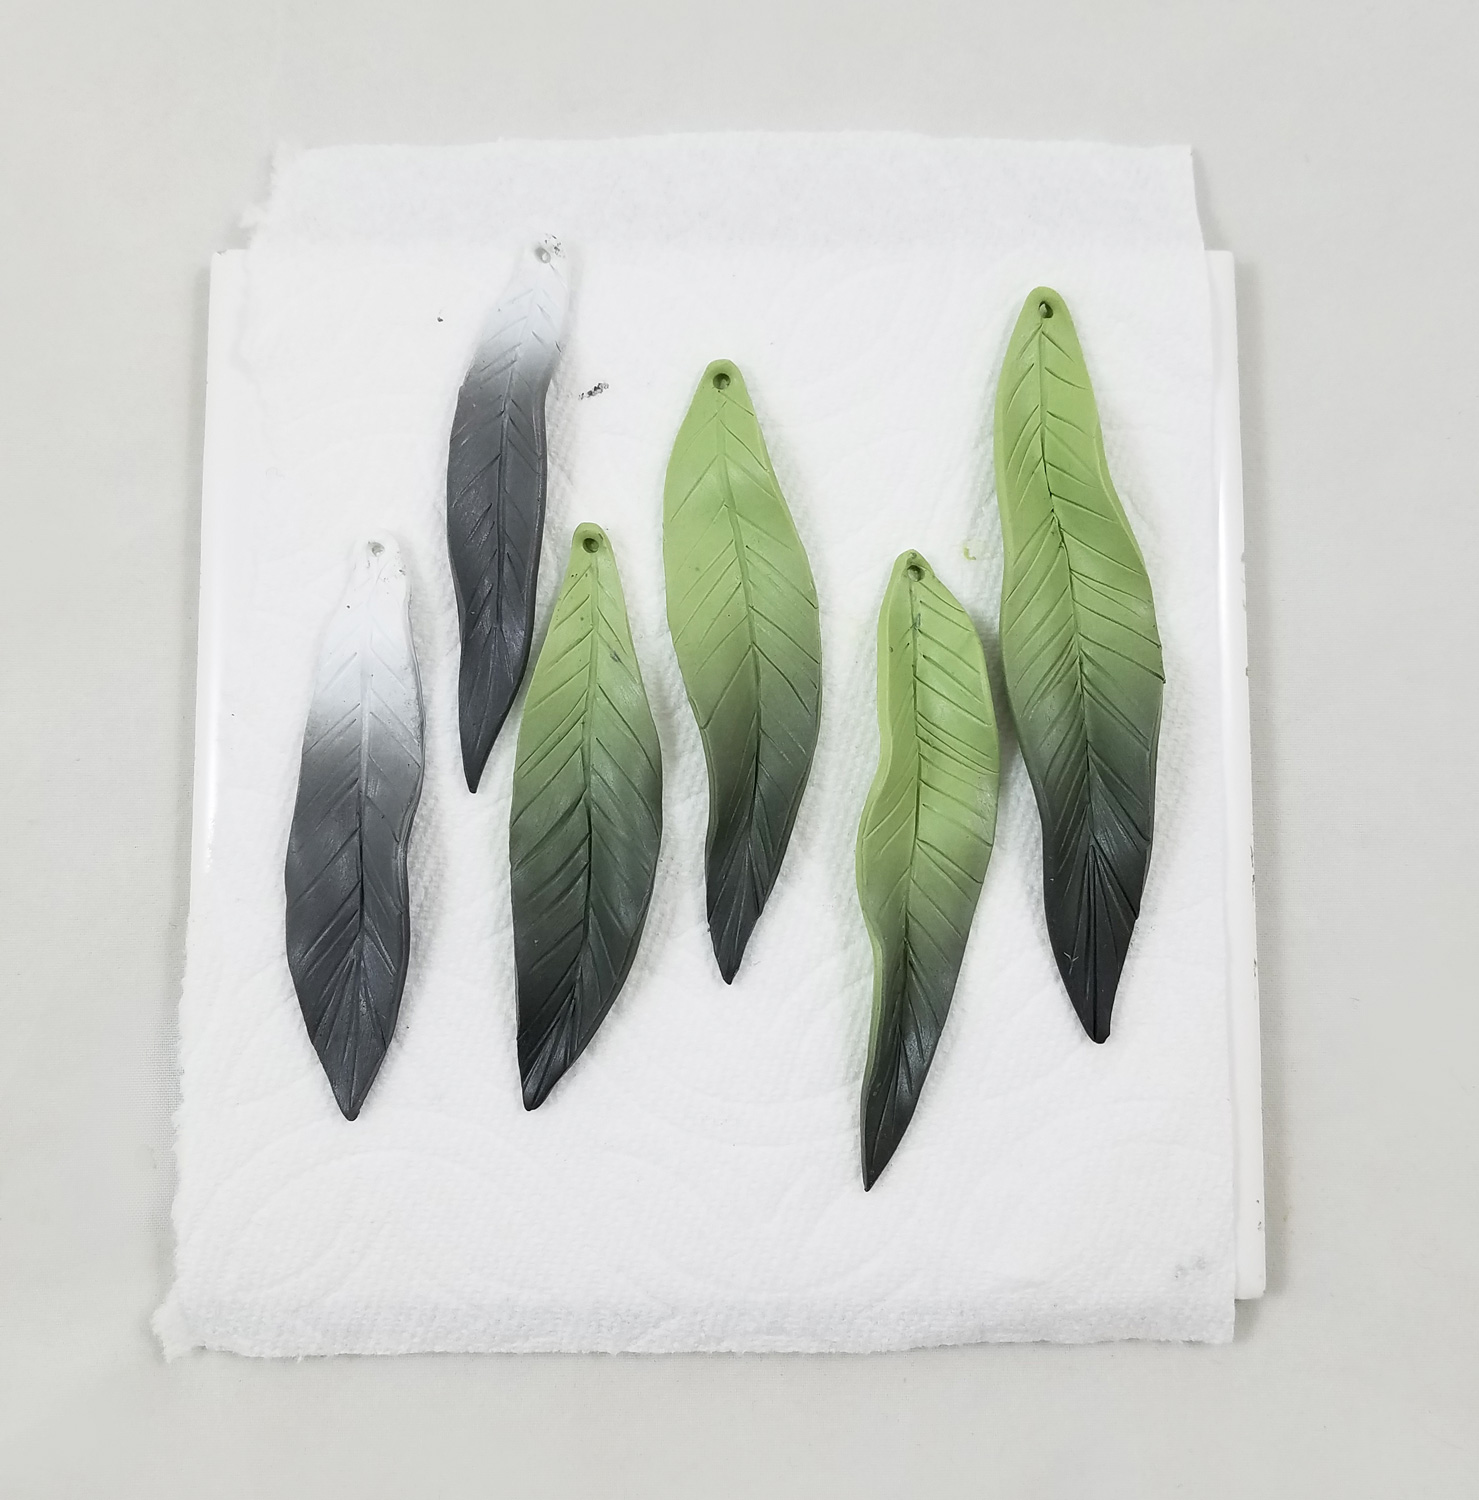
I placed a paper towel on a ceramic tile and carefully put my detailed feather pieces on top. I bent and curved the feather to give them a more natural flow. I baked the clay feathers on the tile as per the manufacturers instructions.
To condition and roll out polymer clay easier I use a Pasta Machine I got at a kitchen supply store. It also happens to have two noodle cutting rollers, that normally I ignore when using for clay. However the Fettuccine noodle roller was about to become very handy for the next part in my project.
*The use of a pasta machine with noodle cutting rollers is not necessary if you rather cut each strip out by hand.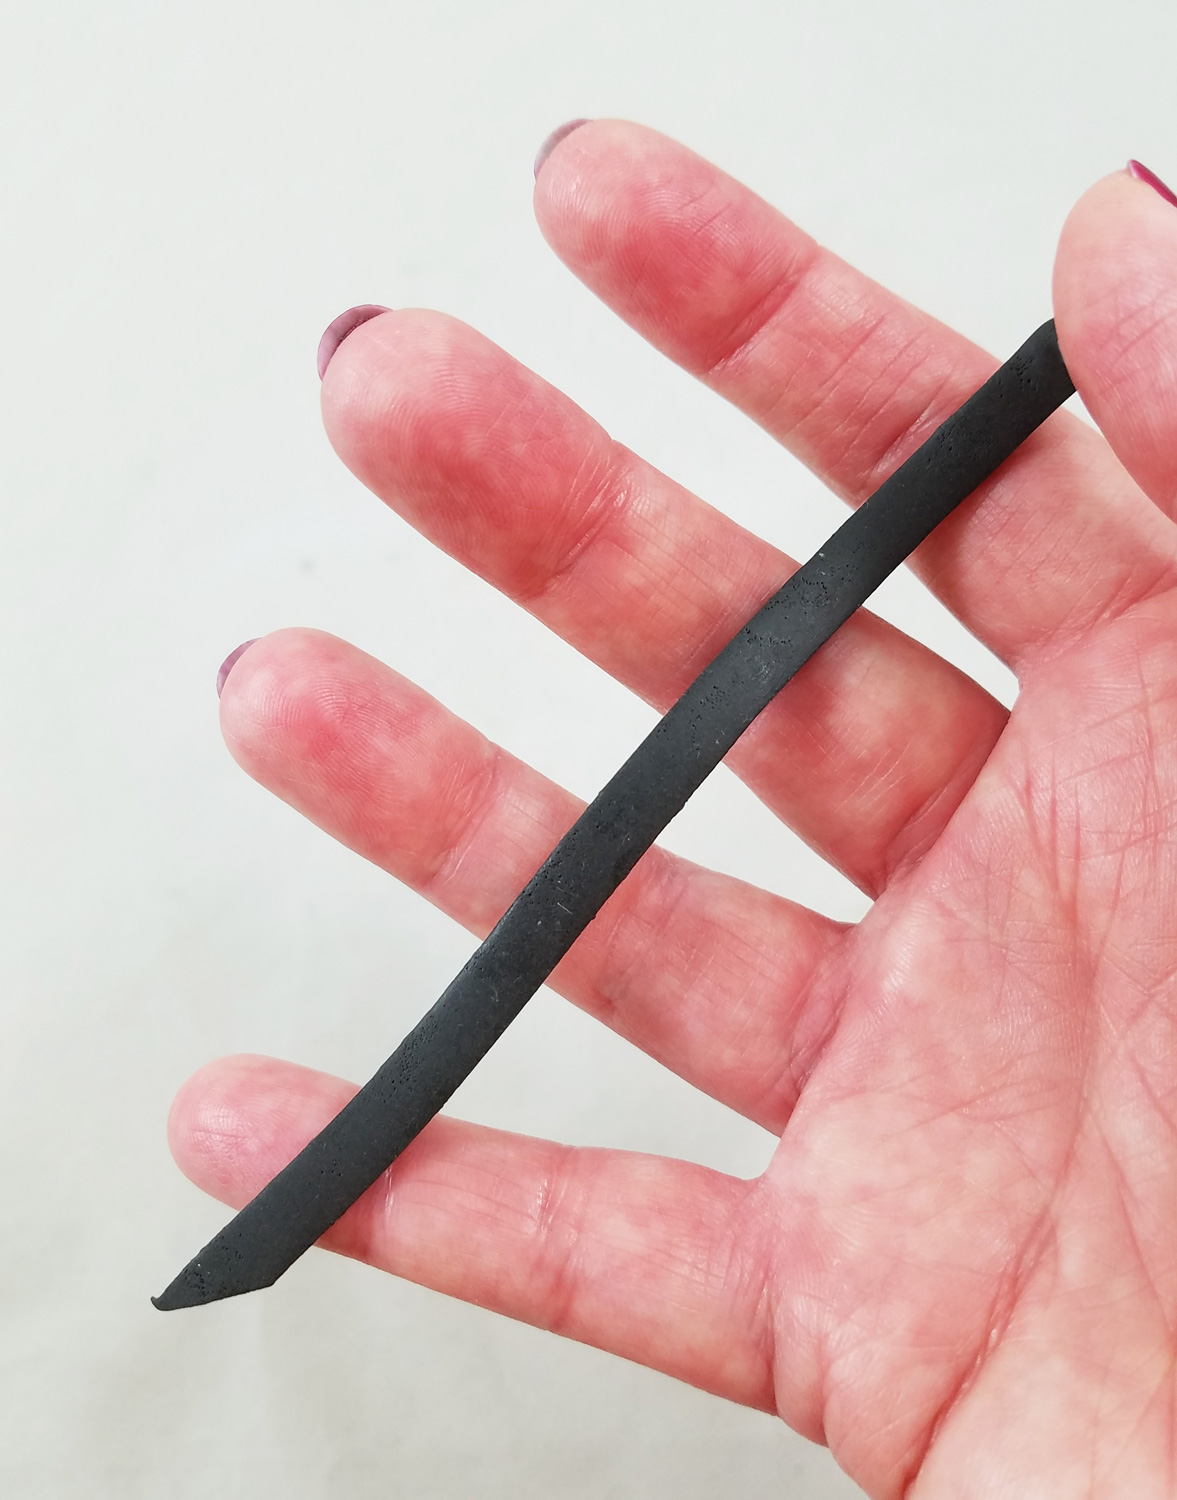
I rolled out the reserved half bricks of clay with the pasta machine on the thickest setting. Then I ran each portion of clay through the Fettuccine cutting roller, making sure to run the white, then green and black clay last to avoid color transfer of clay. Each strip of clay was easily textured with a tooth brush to emulate the appearance of leather. Using a coffee straw I punched out a hole on the top of each strip of clay.
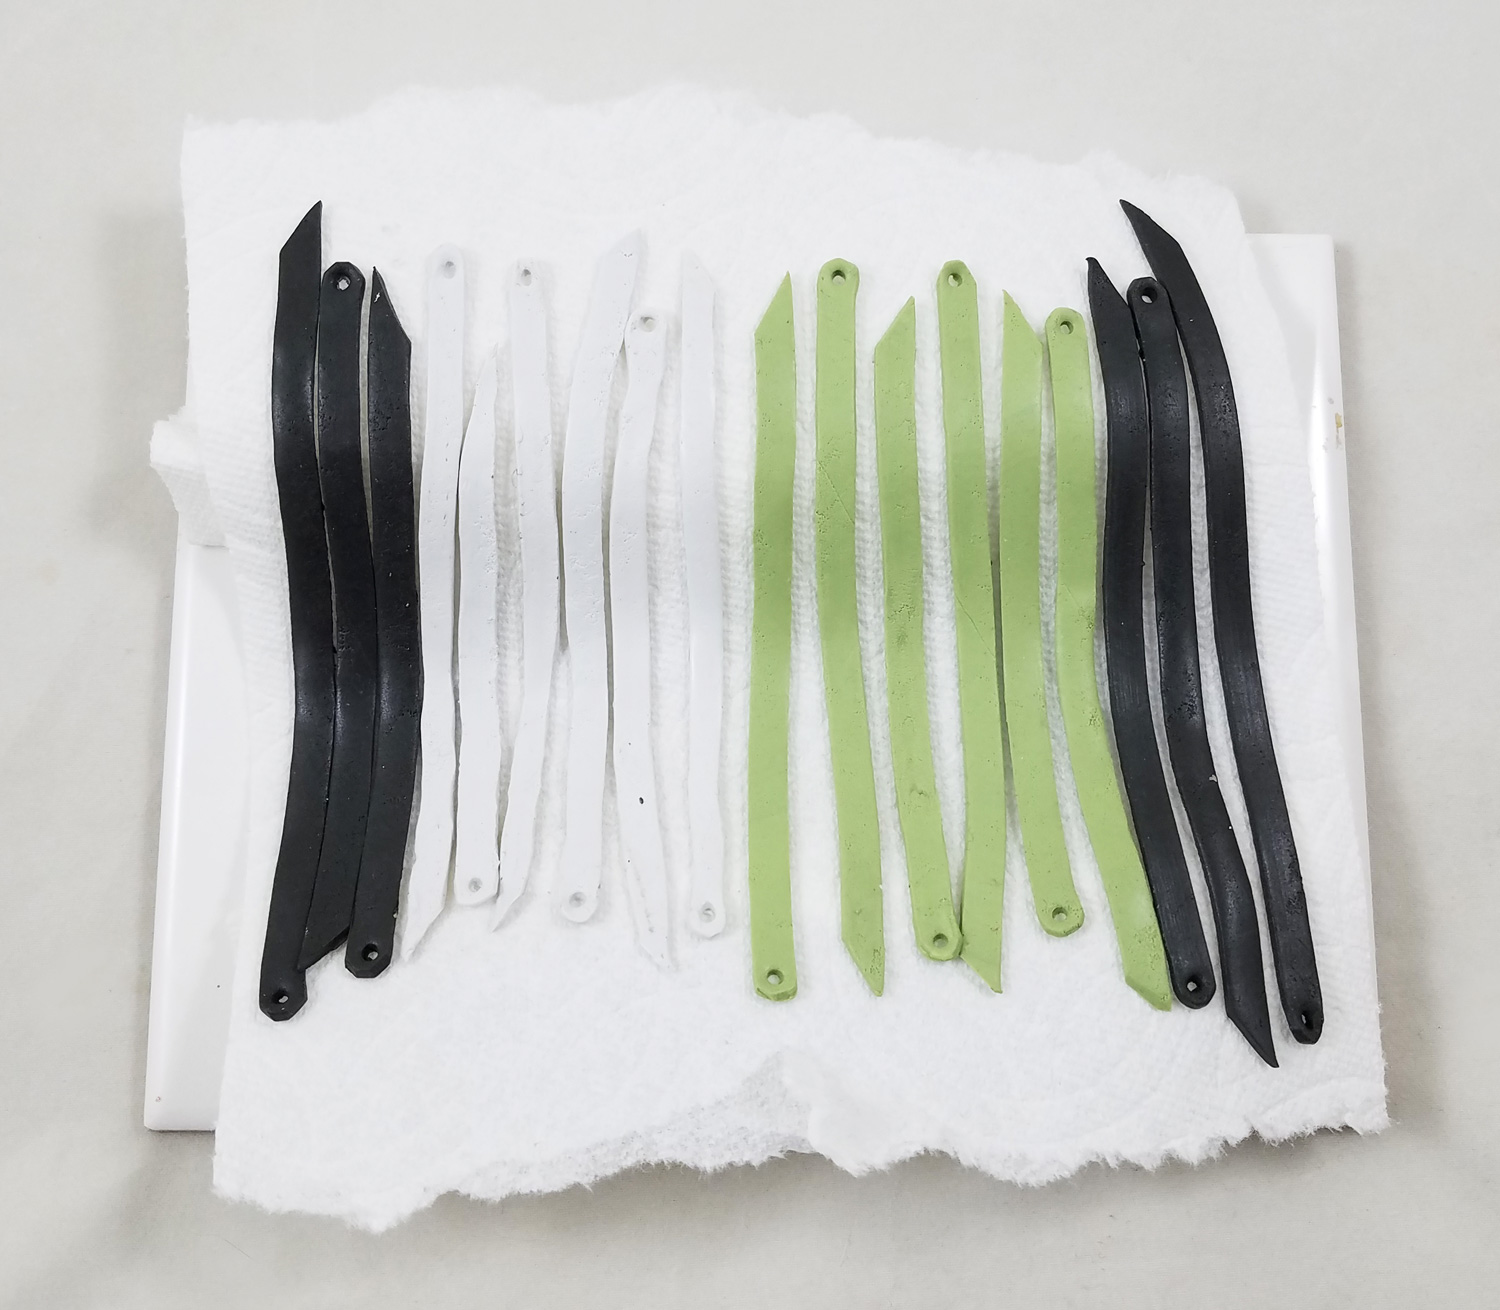
I crumpled two paper towels into rolls and placed a third paper towel on top of a ceramic tile. I carefully placed my strips of clay on the paper towels. I baked the clay strips on the tile as per the manufacturers instructions. Sculpey Soufflé once baked is more flexible than traditional polymer clay allowing for long and/or large art pieces to be created, yet be still resistant to cracking and breaking.
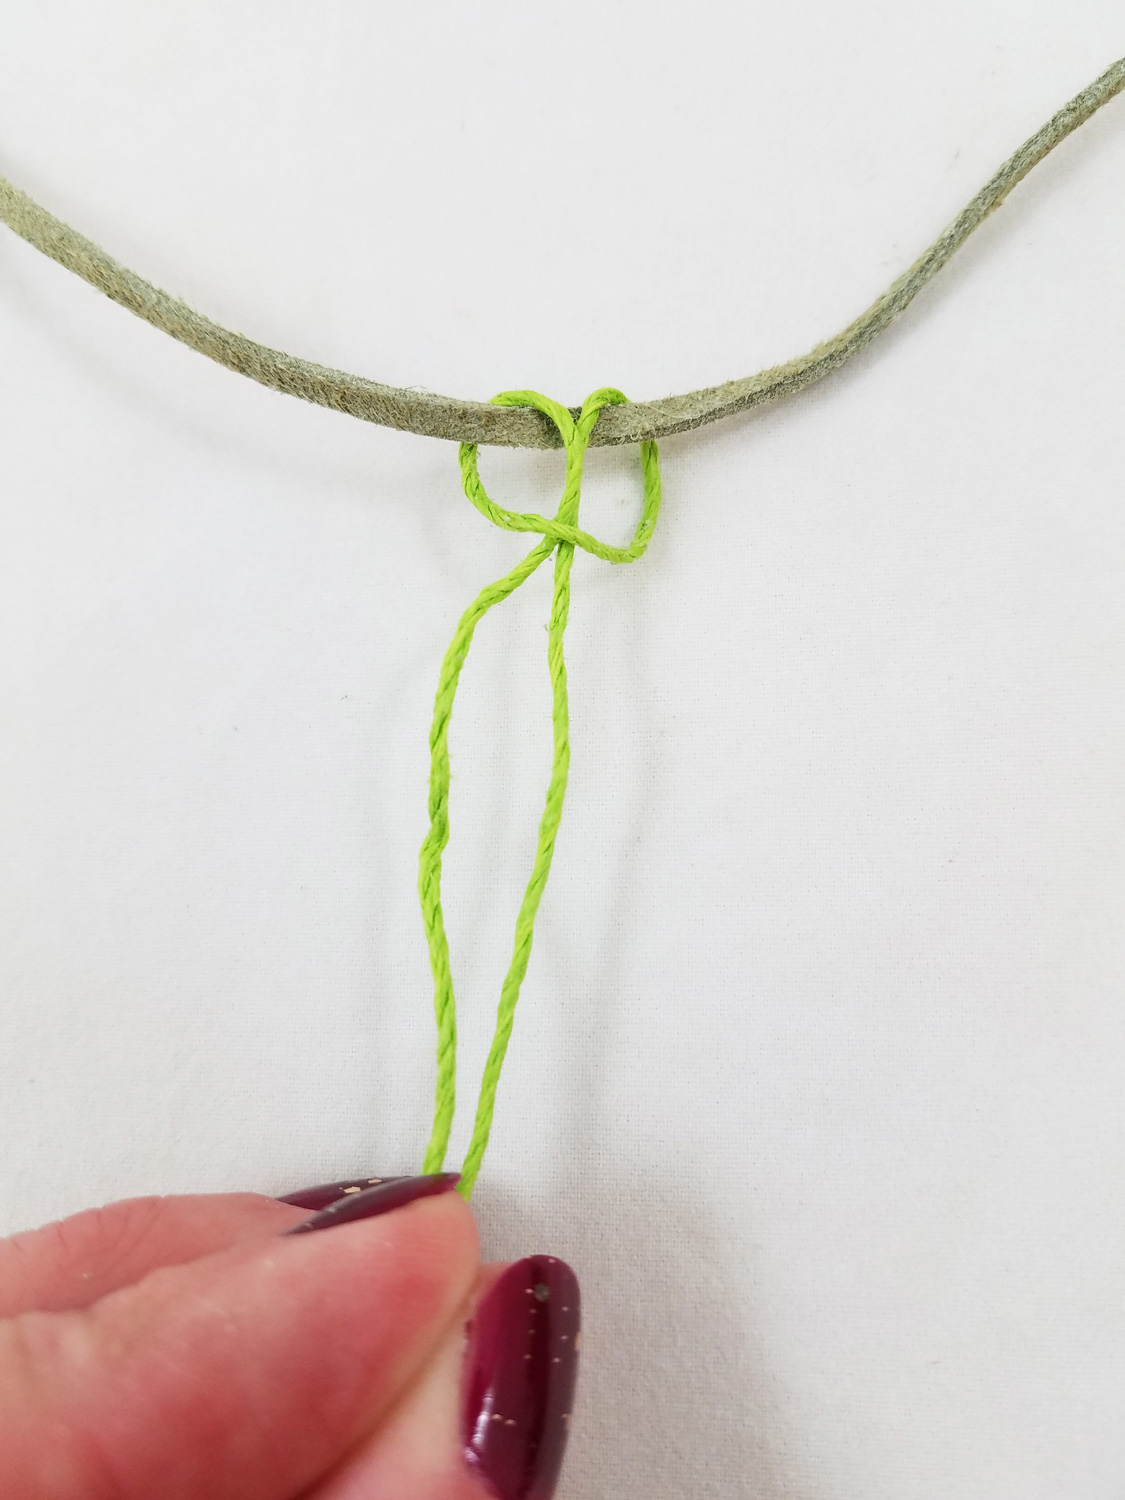
I cut a 24 inch portion of Faux Suede Olive-Brown Cord to be the start of my necklace. I cut a 10 inch portion of green Natural Hemp Cord and attached it to the suede cord using a Lark’s head (Cow Hitch) knot.
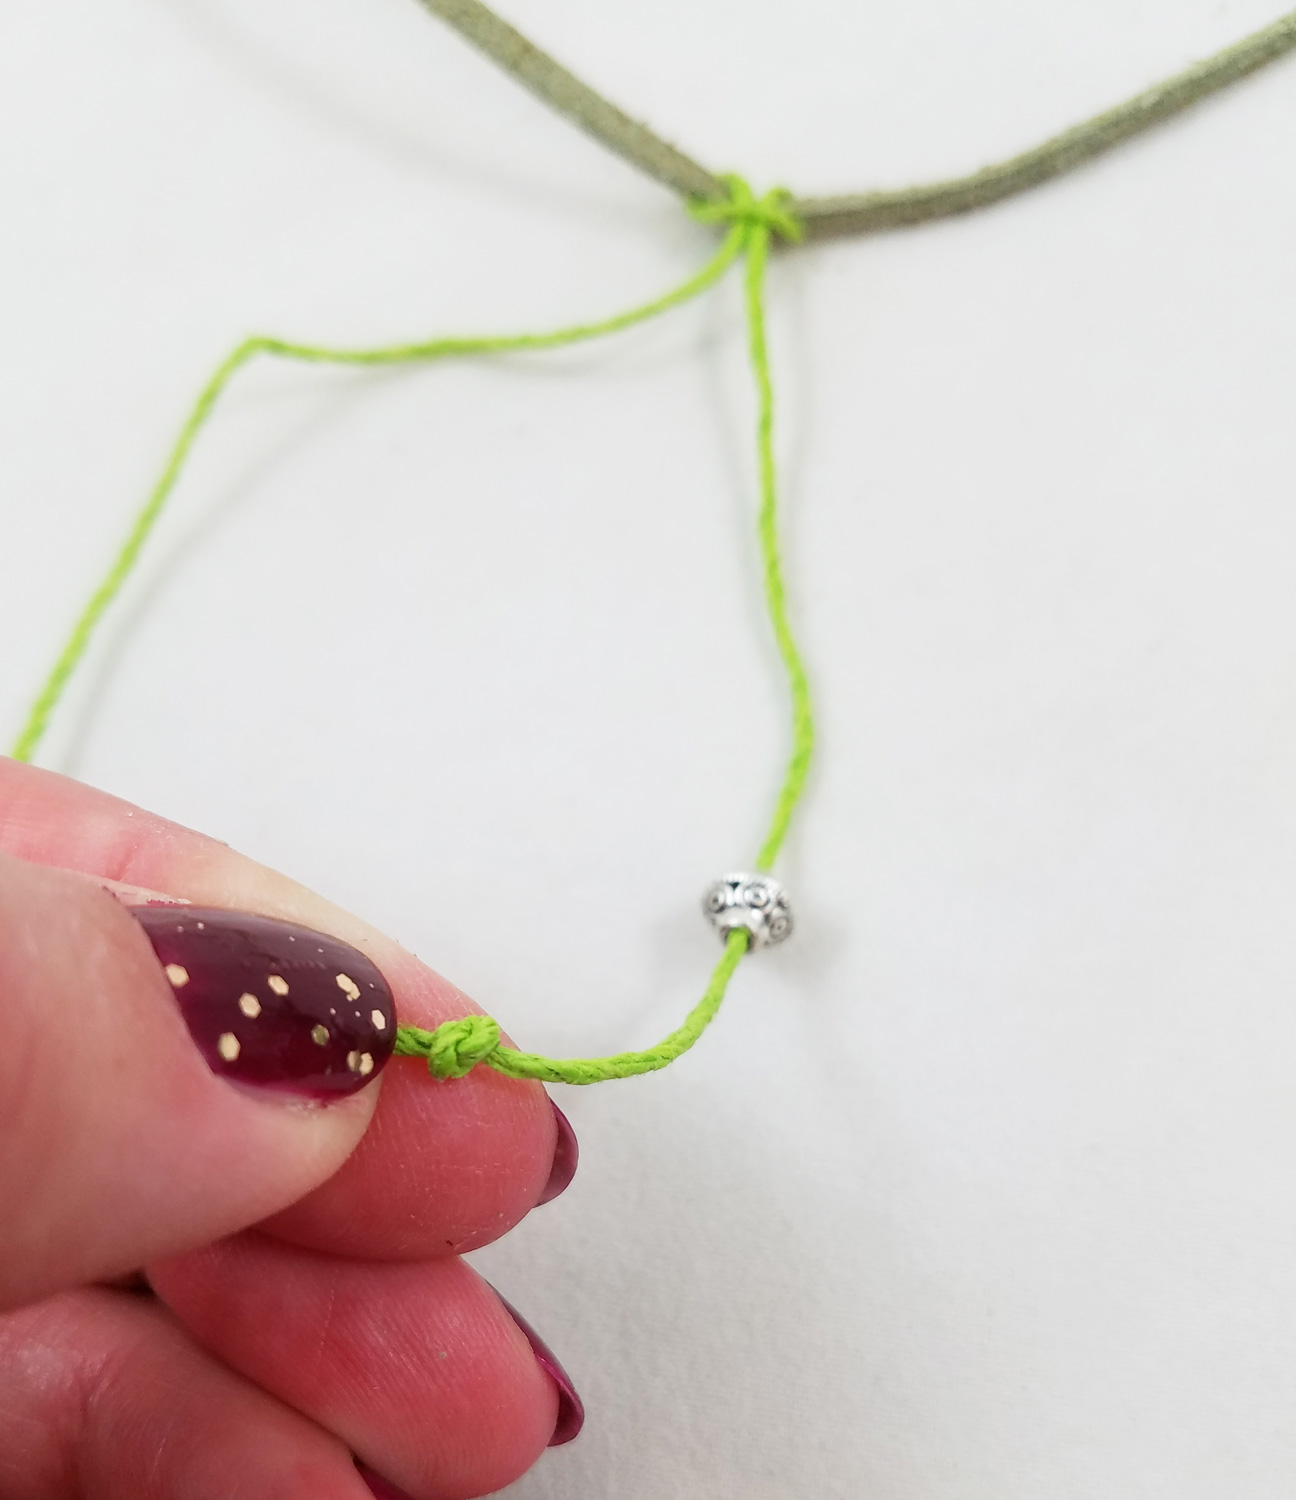
I slid a metal bead onto the hemp cord and did a overhand knot at the end of the cord. I repeated this on the second portion of the cord.
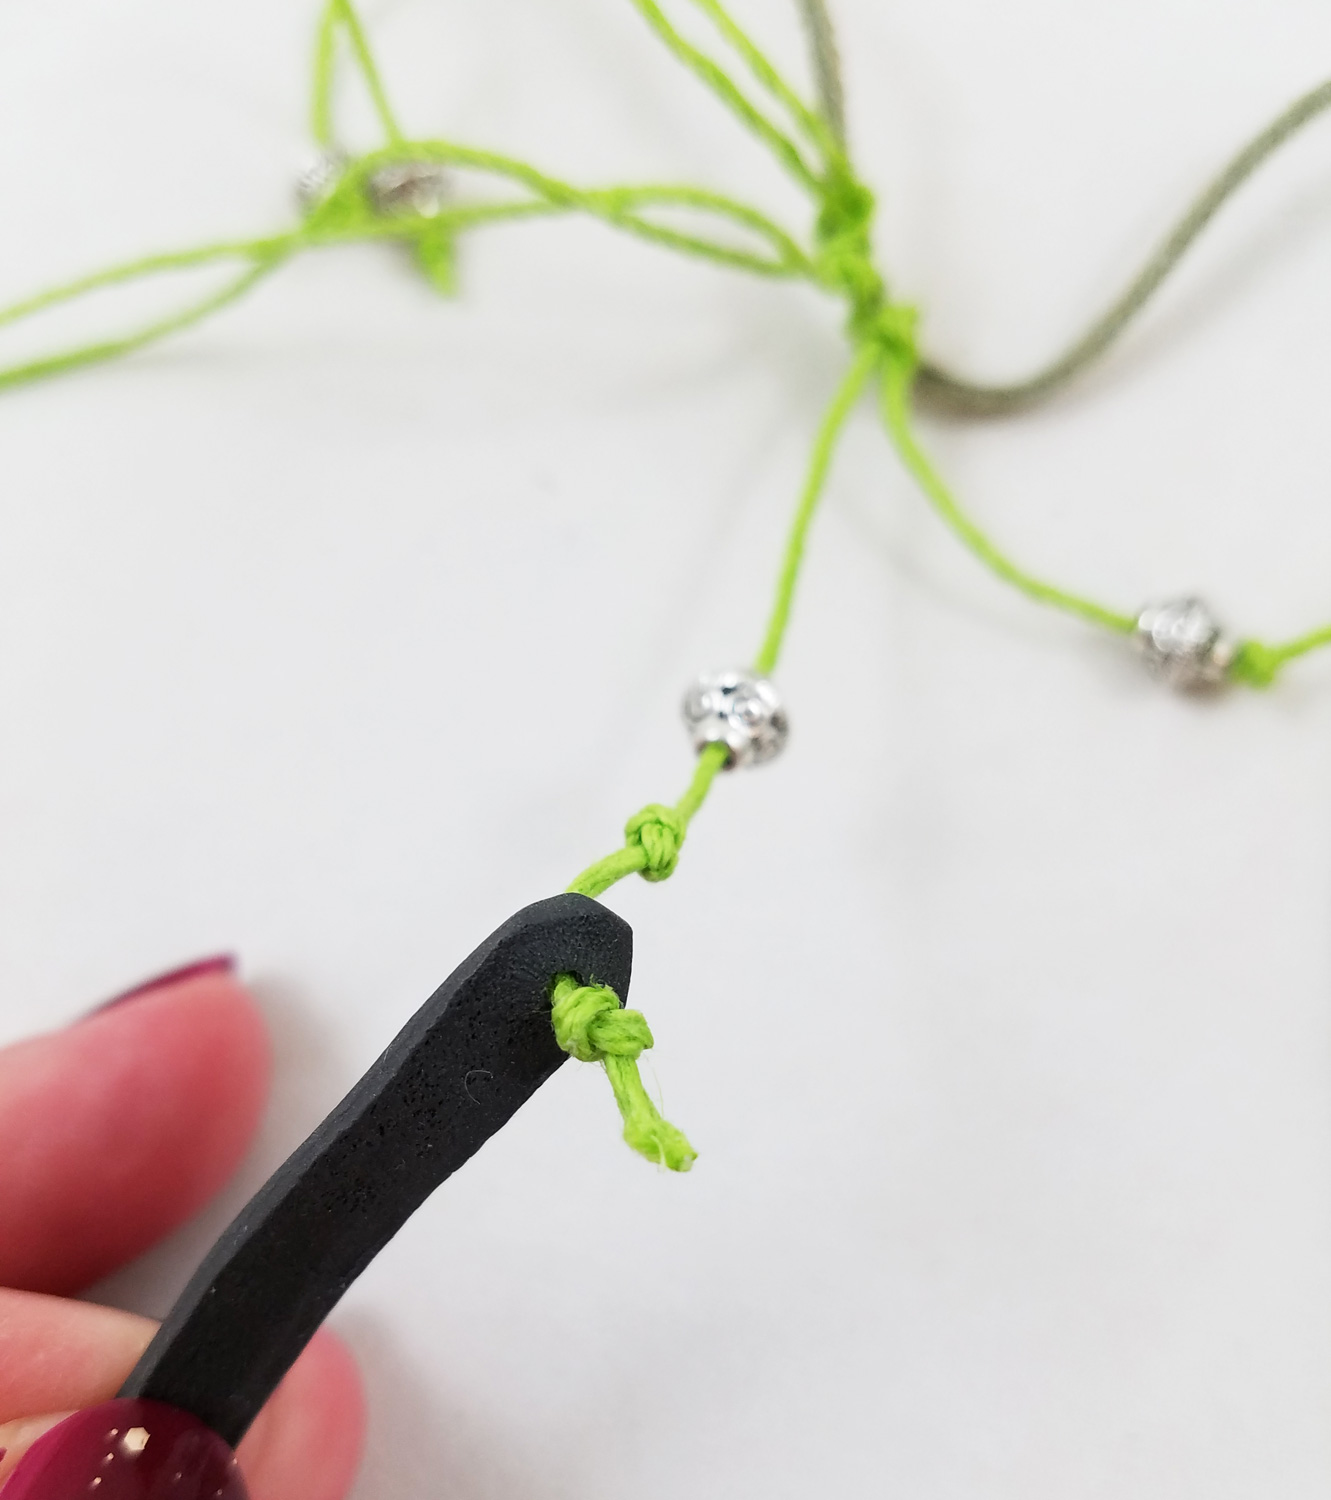
I added an additional 10 inch hemp cord length to the suede using a Lark’s Head knot, adding metal beads and securing them with overhand knots. Adding another hemp cord length I slid metal bead further down the cord, towards the Lark’s head knot. I did an overhand knot, slid on a strip of baked polymer Souffle clay and secured it with a overhand knot. I repeated this process for all of the other cured clay pieces.
I slid on three Cone Tin Beads on each side of the suede and did a simple slide knot to finish the necklace.
I am now a huge fan of Sculpey Soufflé, with its flexibility and matte finish it allows this cascade of cord, clay and metal beads to be lightweight, durable and fashionable!Until Next Time, Safe Travels!
The Gift of Sparking Winter Jewelry, Handmade of Course!
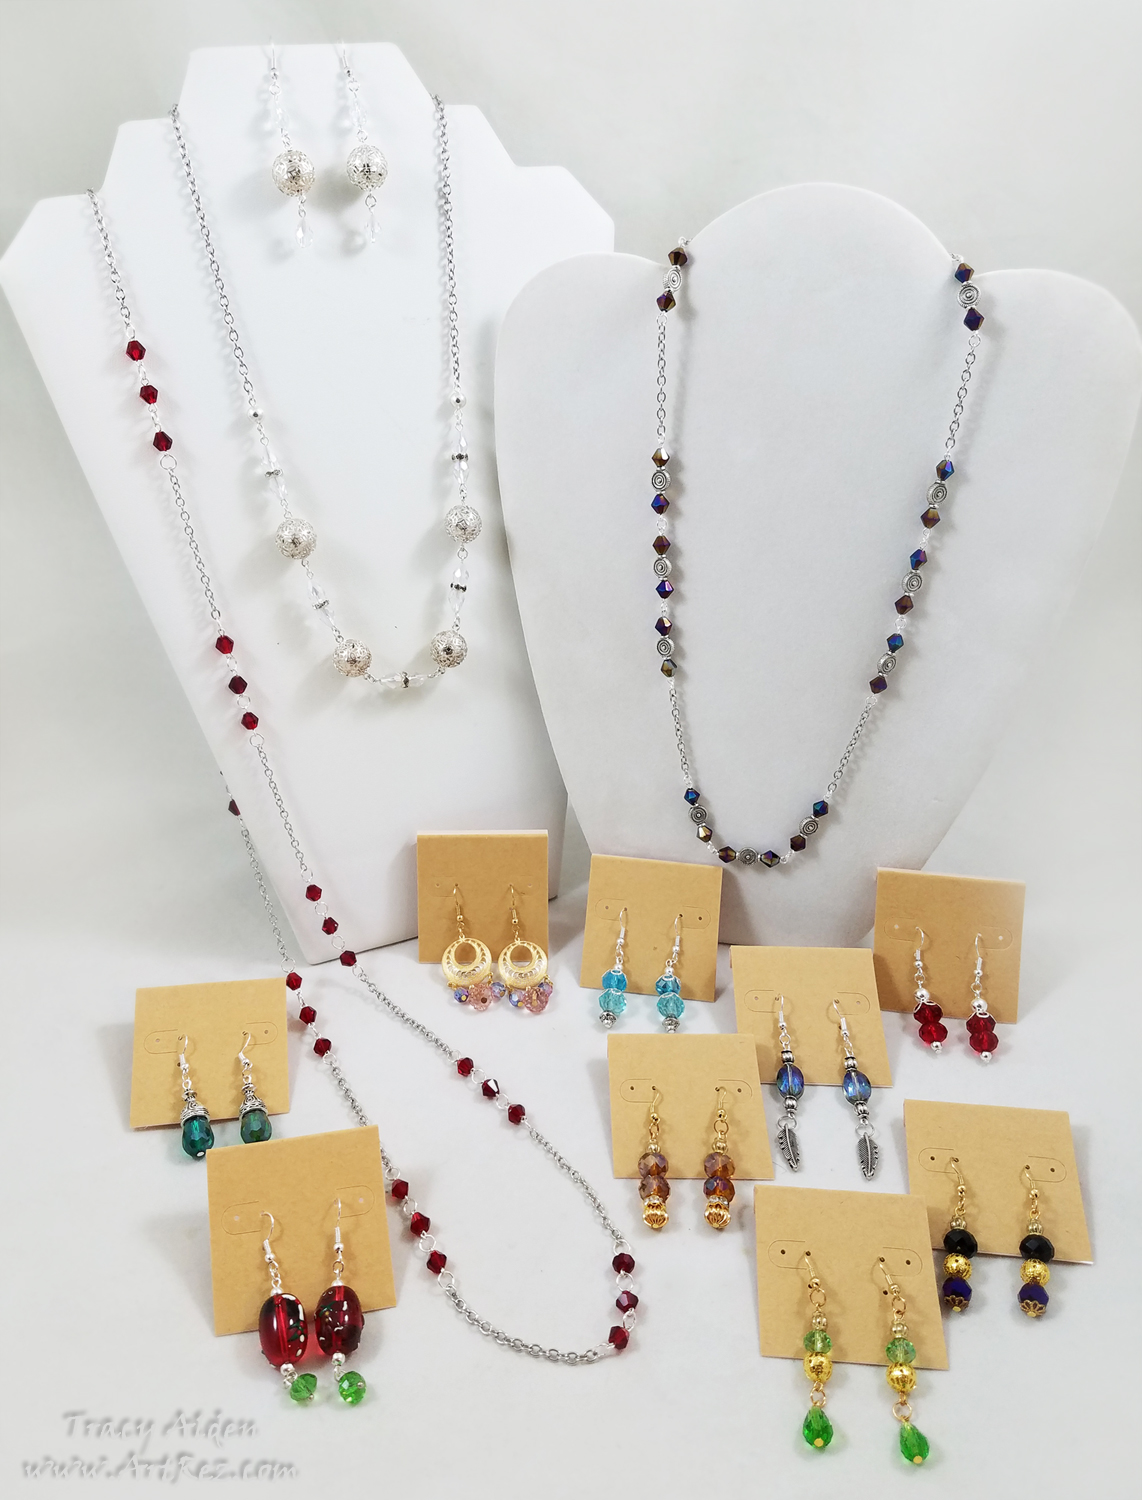
With the past few months speeding past, with projects, orders, shows and daily life, I still make time to create handmade gifts for friends and family. No matter how much planning involved I always seem to end up making a few things last minute, but now that most of these pieces are on their merry little way I can share a few of my favorites.
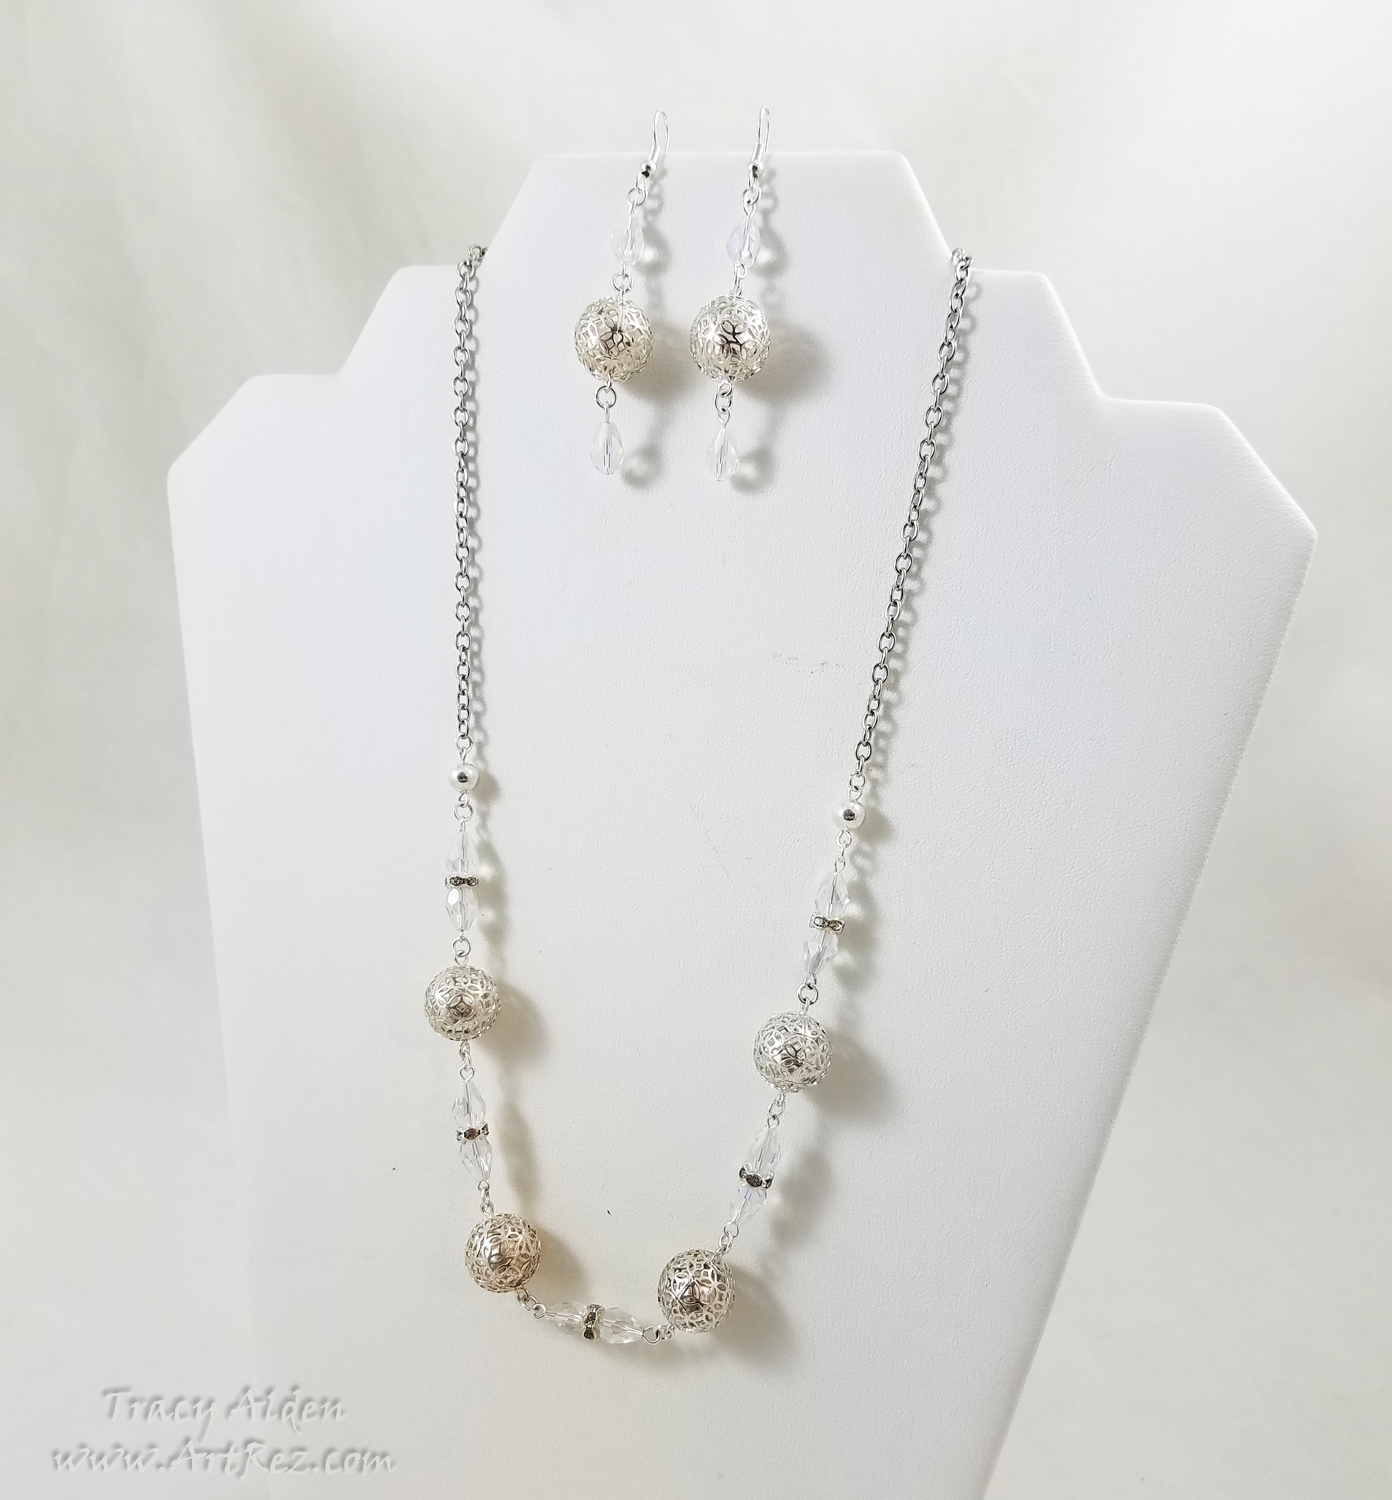
I love getting random bead assortments from Fire Mountain Gems. In one of my last orders I received some sterling silver filigree bell beads. Hoping to create some form of jewelry set, I was not sure what to put with them. Pulling out of my bead stash I found clear crystals and chain from Fiona Accessories. They were the perfect addition to the bells, creating a delicate but beautiful mix of sparkle and sound in a Princess length necklace.
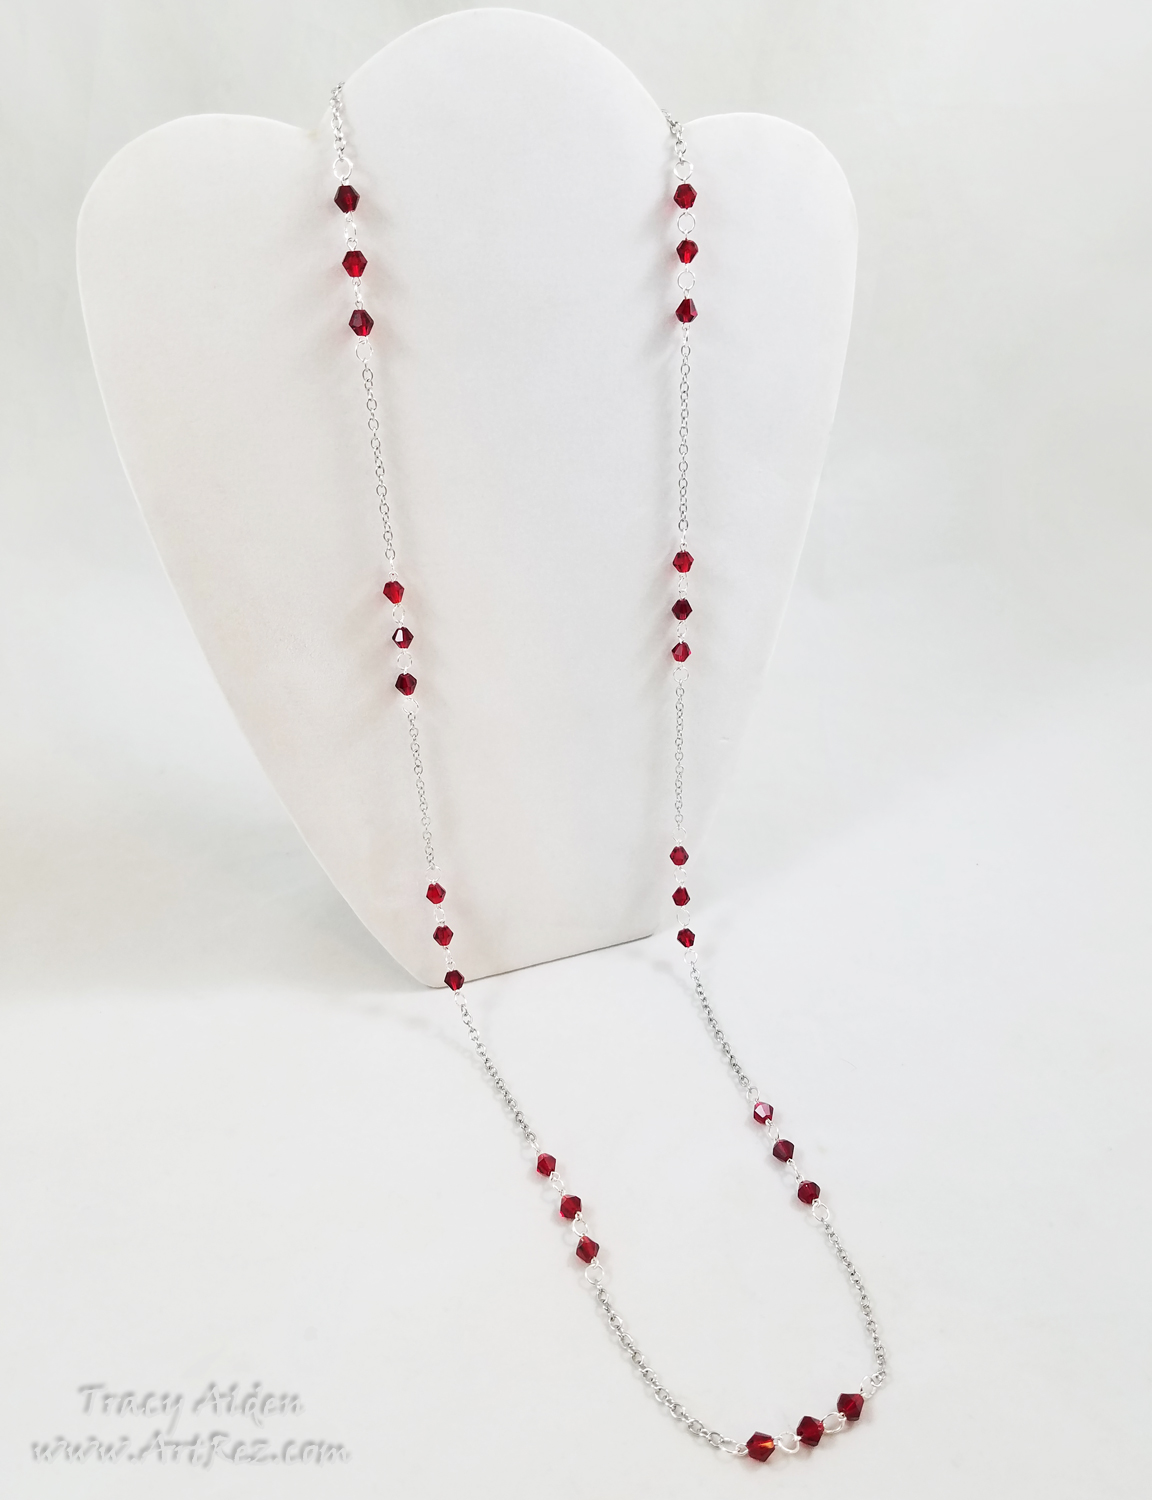
Taking inspiration from the 1920s jewelry styles I wanted to create a simple Opera length necklace. Once again using chain from Fiona Accessories and red crystals from Michael’s Bead Landing™ a graceful and lightweight necklace was created. While the red color is fitting for the holidays it also works well as a nice addition to dressy causal attire.
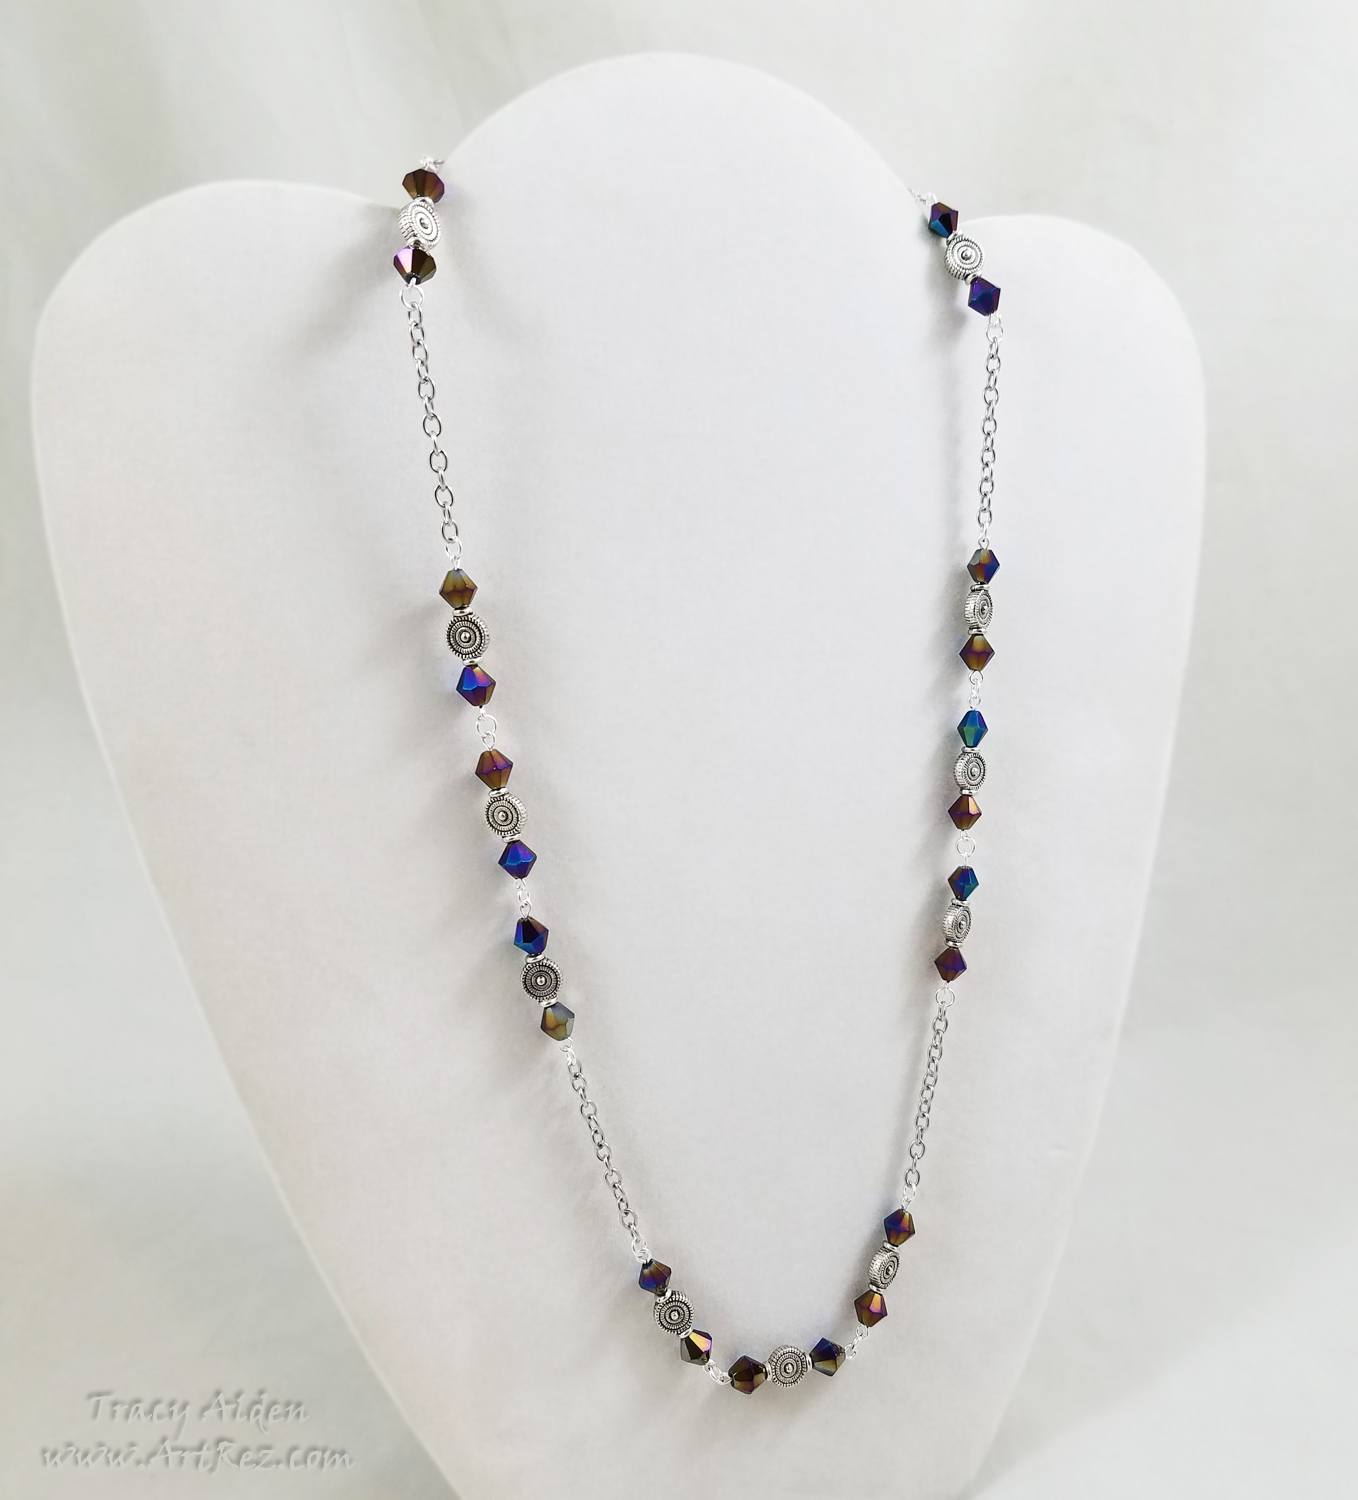
For this Matinee length necklace I used a mixture of miscellaneous findings left over from previous projects. The Aurora Borealis blue crystal beads went perfect with the patterned spacer beads. While the chain adds a more modern feel, the colors and spacers hark back to more ancient times.
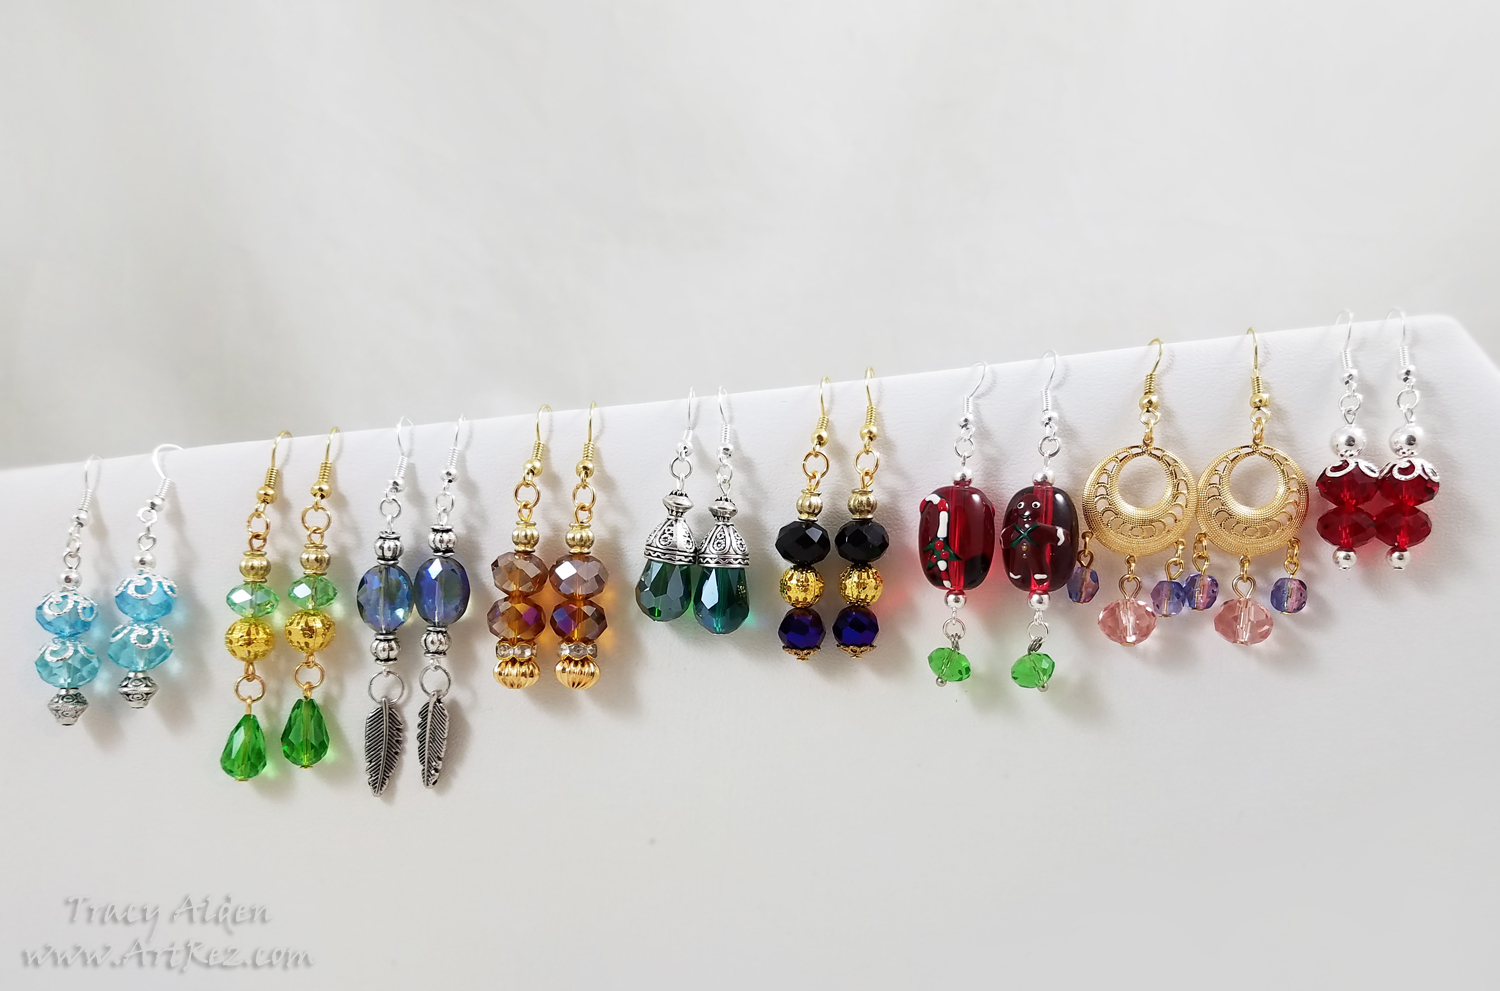
When making jewelry gifts I just have to make earrings. Some beads just lend themselves to something delicate or have just the perfect flash of color to be made into earrings. Using beads and findings from Fire Mountain Gems, Fiona Accessories, Michael’s and many more jewelry suppliers these earrings were quick to make. A few almost could pass for tree ornaments, others found treasures and old heirlooms, making them perfect gifts for young or old.
What handmade gifts have you made or are making this Holiday Season?
Wishing you all a Happy and Healthy New Year!
Until Next Time, Safe Travels!

Ancient and Contemporary Inspired Artistry