A Fall Cozy Crafting Recap
November has come and gone so quickly it is startling! Things have been so busy and I of course have to share some of my art and crafting goodness.
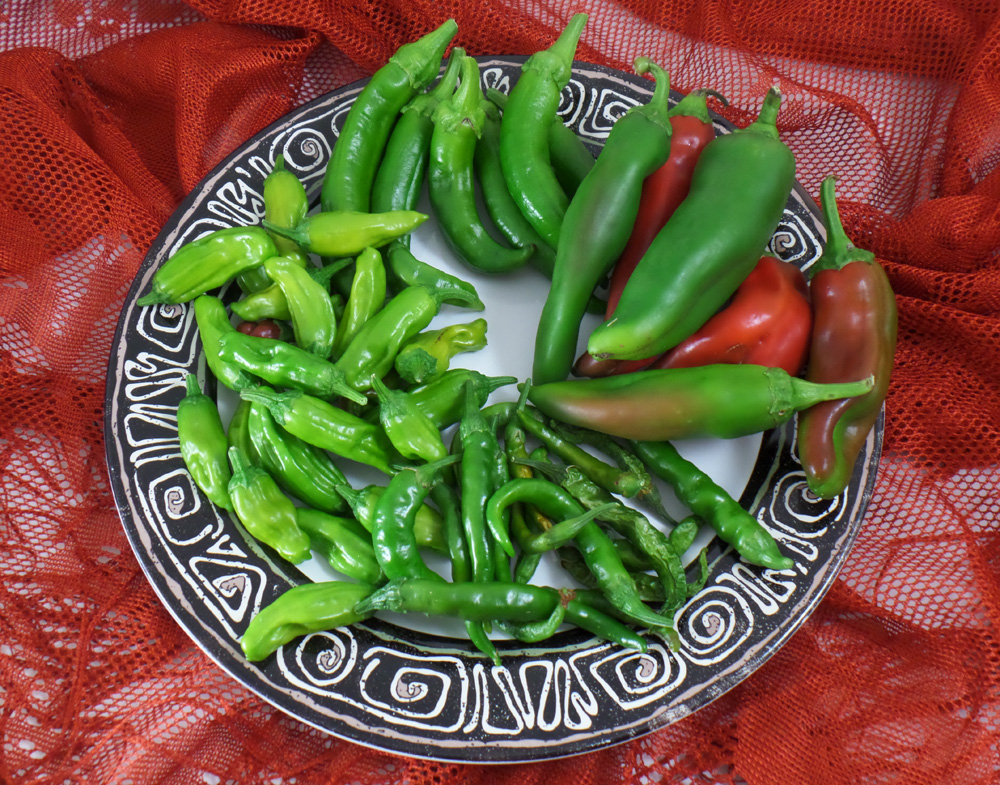
With an early cold snap hitting our area early, forcing a harvest all of my pepper crop, I was left scrambling to try to find ways to use them up! I dried some, saved seeds for next year, cooked all kinds of spicy foods but I was still left with buckets of peppers. Then I thought of of making pepper relish!
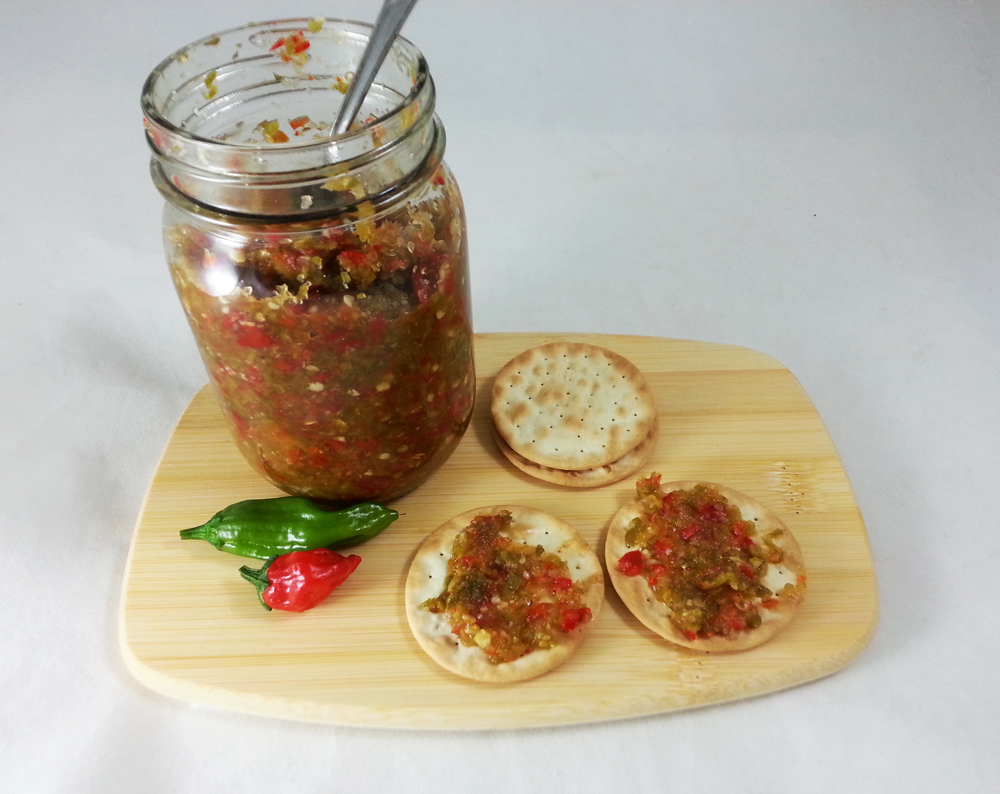
Using a simple but great Hot Pepper Relish Recipe from Serious Eats I was able to use up all the peppers. I made a few changes to the recipe using heirloom Jalapeno, Sapporo, Pepperoncini, Serrano, and Anaheim peppers and I didn’t have cider vinegar so I used white vinegar with a bit of fresh apple cider. The jars of relish were eaten so quickly, I already have requests to make more next season.
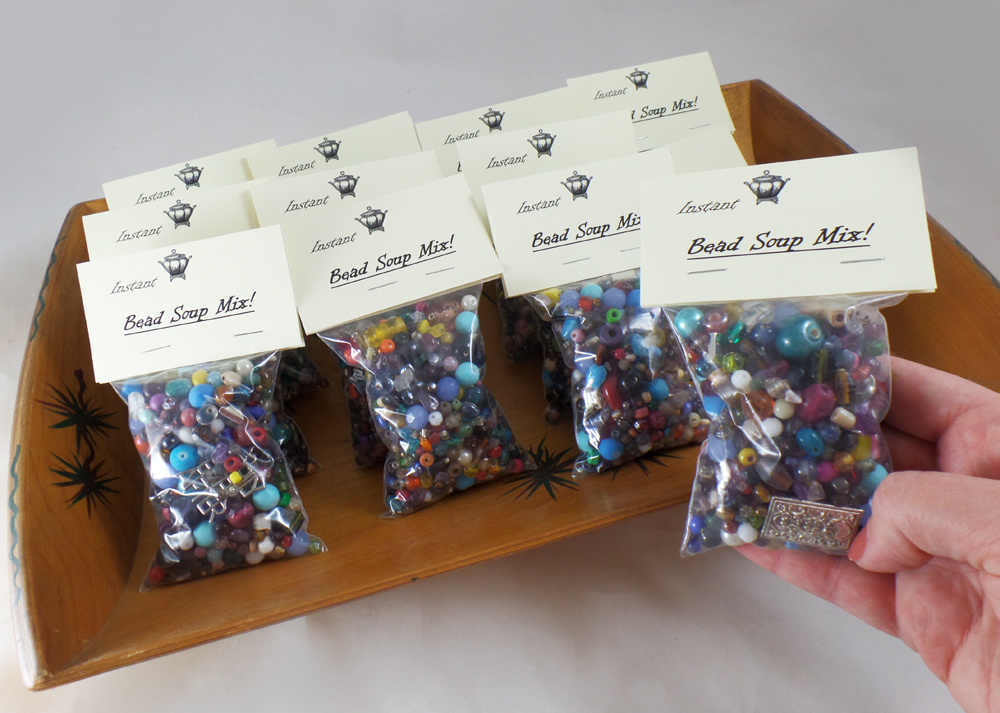
Another “harvest” I decided to share was making my own Bead Soup bags from all the extra beads I have in my beading supplies. Each bag I filled to the brim with a wonderful assortment of glass, metal, acrylic, stone, clay and wood beads to help start a day with creative goodness! These fun and creative mixes are great gifts to give and perfect for crafty nights.
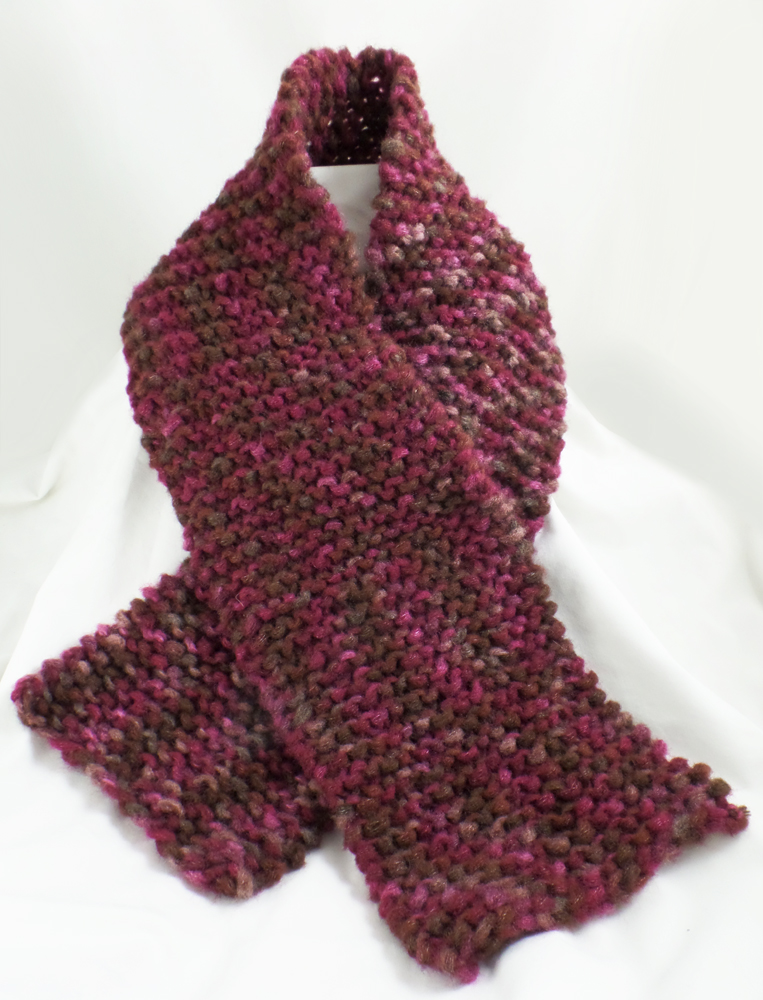
To relax at night I picked up knitting again this time trying out chunky weight yarn from the Bernat Viva line in Burgundy using Clover Bamboo knitting needles, size 15. With two skeins I was able to make my mother a wide scarf and a thin accent scarf for myself. They worked up so quickly I know I will have to make more projects with chunky yarn.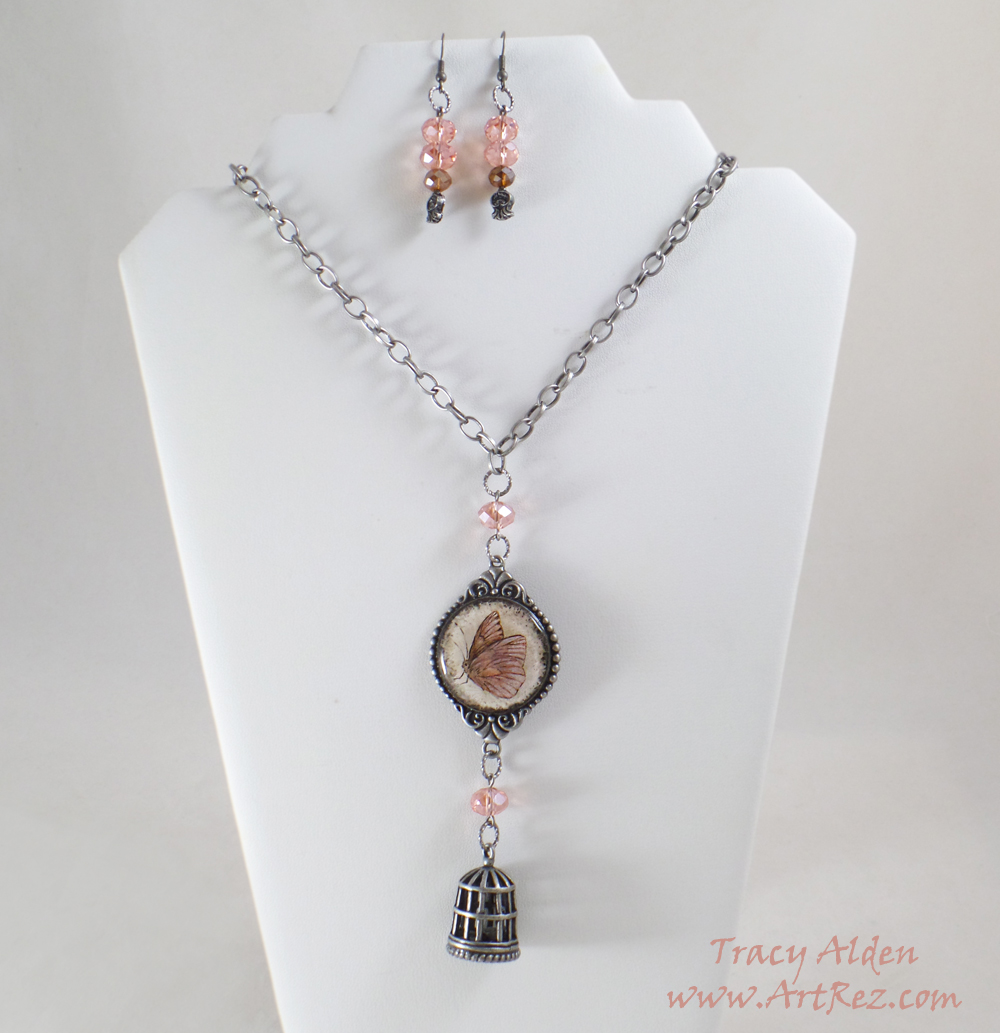
Speaking of crafting addictions, resin jewelry is still a ongoing addiction for me. I love using Amazing Clear Cast Resin for creating my one of kind molding pieces. Lately however I decided to hark to one of the traditional styles of resin jewelry of filling bezels and frames to encapsulate drawings, paper and stickers. My favorite piece out of my most recent crafting whirlwind is the one above using beads and jewelry findings from Fiona Accessories
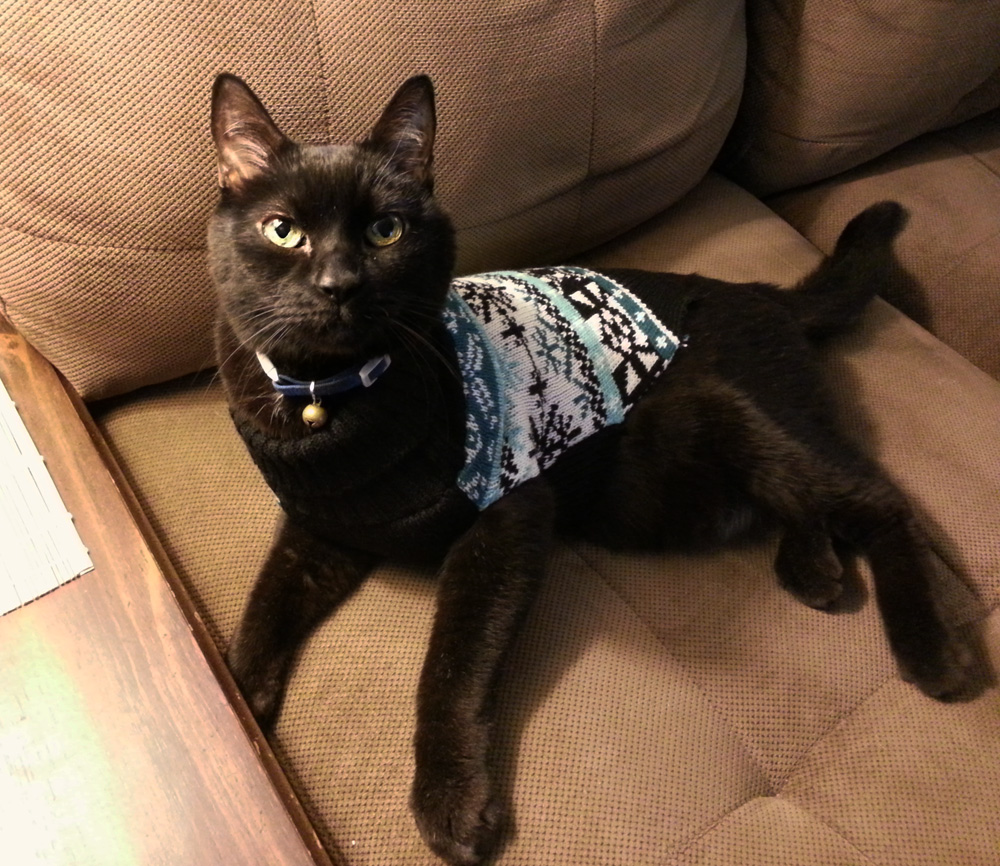
With the weather rapidly turning cold, I hope you stay warm and cozy as my dear 18 year old kitty Vladimir is with his new winter sweater!
Until Next Time, Safe Travels!
An Artistic Halloween Haunting Recap!
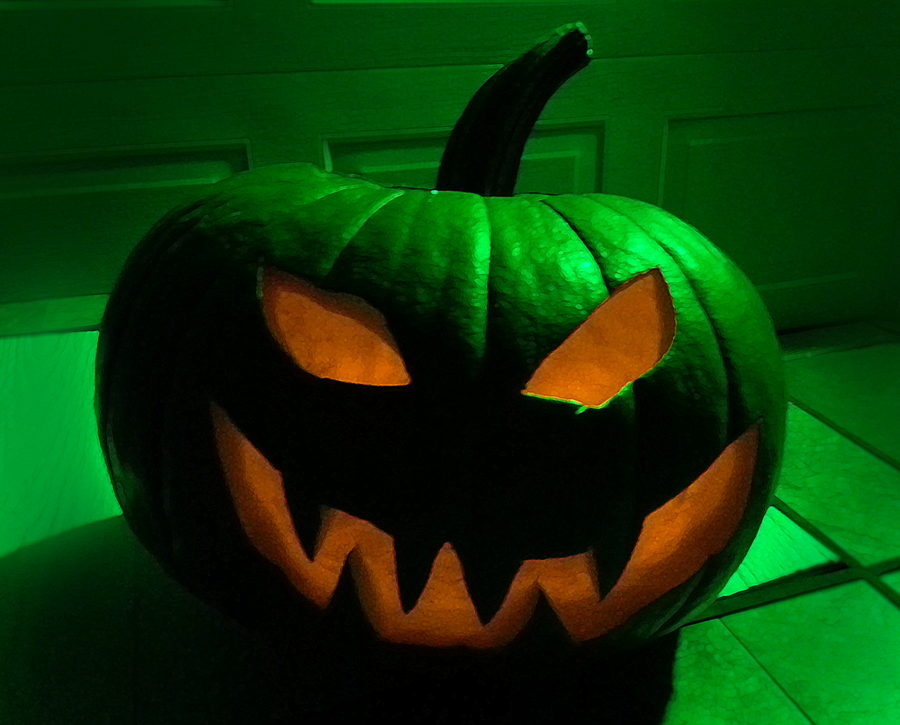
Welcome to my Artistic Halloween Haunting Recap! The month of October and all of the Halloween goodness flew by so fast, but I wanted to share some of my ghoulish crafting fun before Halloween is just a faint promise of next year.

Using some wonderful chains, crystals and beads from Fiona Accessories I created this jewelry assemble for my spellbinding costume of a Gothic witch. The sterling silver snake pendant was hand crafted in Nepal and really played well with the raven skull I had bought recently.
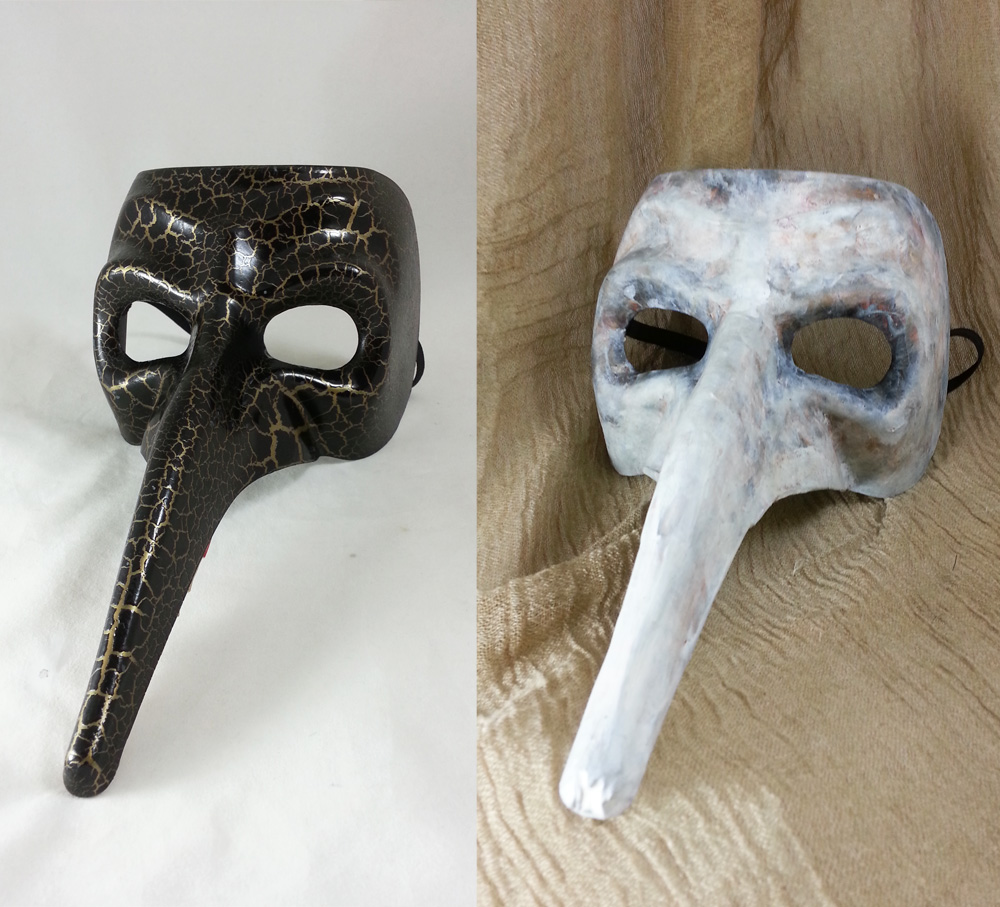
I transformed this plastic Italian Carnival mask into a Plague Doctor mask using paper mache, paint and Liquitex Matte Varnish. However I wasn’t finished there and created the rest of the look:

With the addition of a black heavy weight line robe, hood, gloves, hat and walking stick it made a perfectly frightening Plague Doctor costume for my husband.
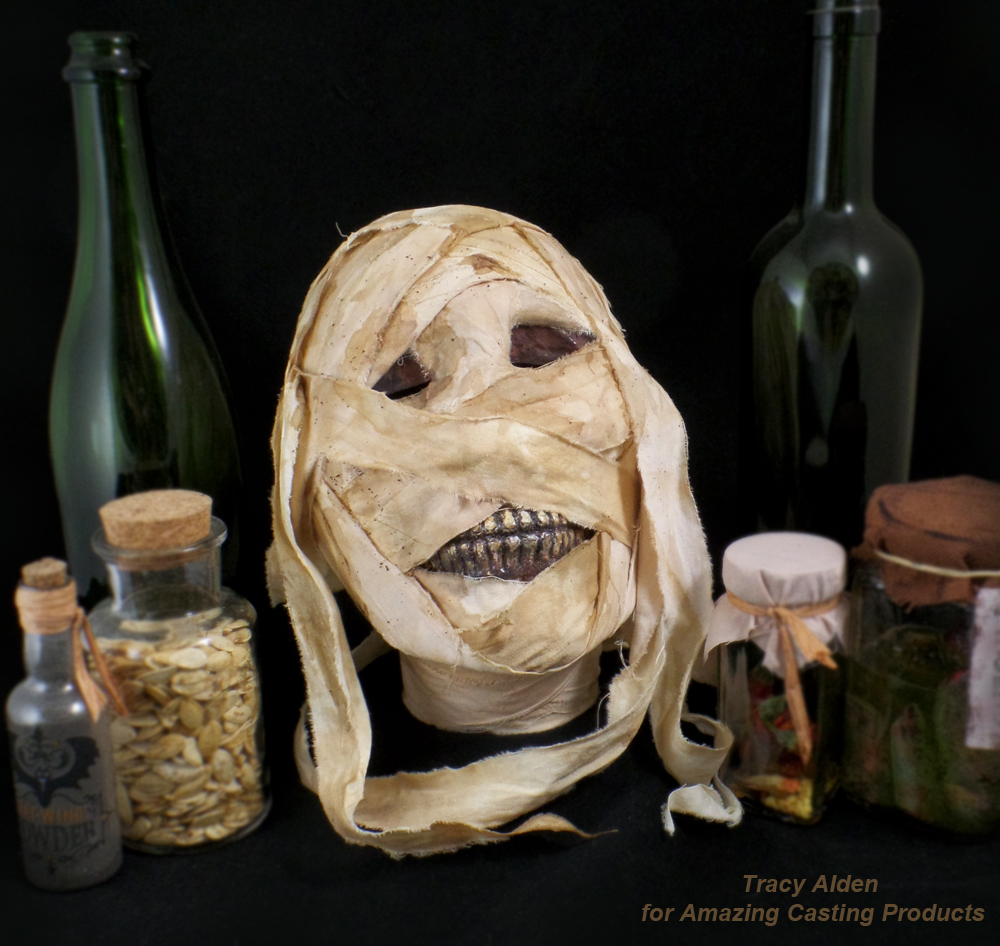
I created a replica mummy head using a plastic Halloween skull and the help of Amazing Casting Products. Clicj HERE for this Upcycled Mummy’s Curse!
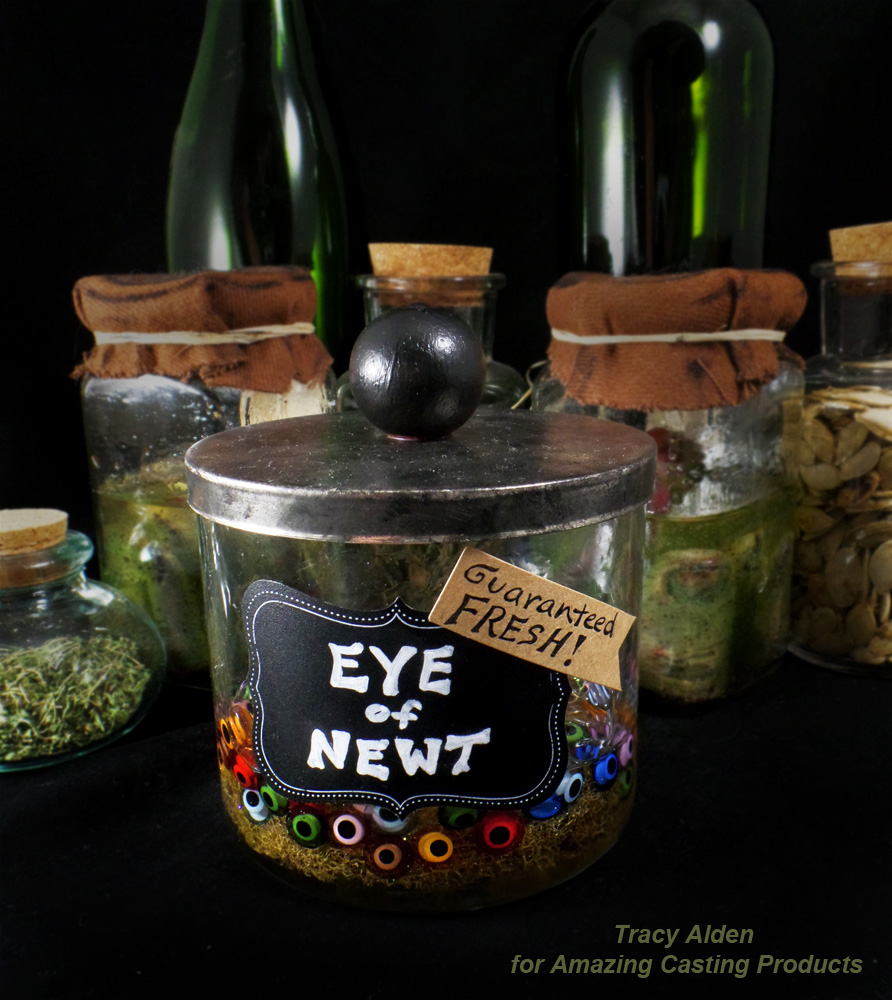
Taking inspiration from one of William Shakespeare’s most famous plays, Macbeth, I created a Eye of Newt Apothecary Jar, spooky enough to keep any monster happy!
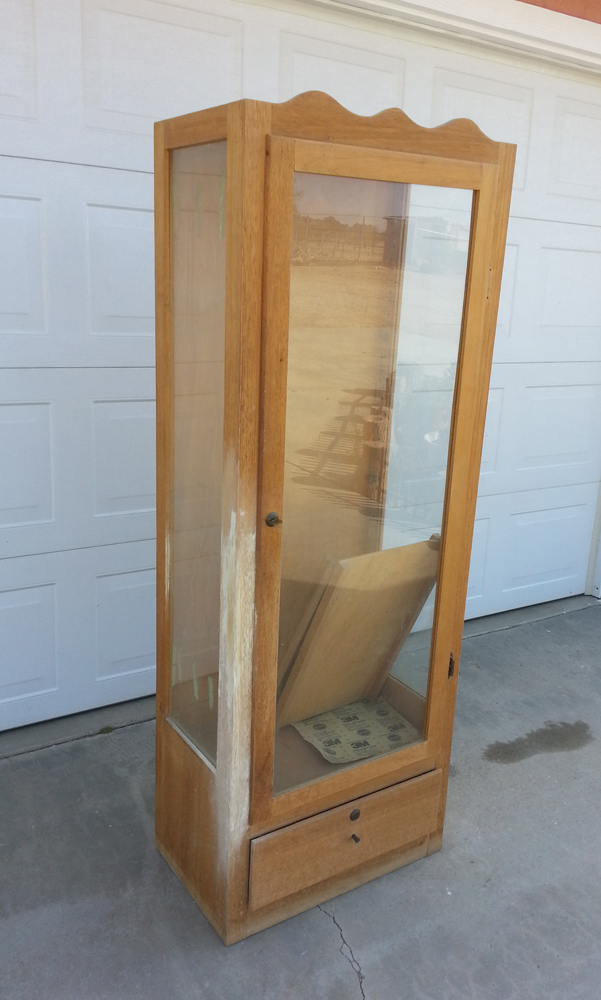
Last but not least my husband and I finally took the time to refinish a old cabinet that had been in the family longer than me. After patching, sanding, staining and varnish it was ready to become a Halloween curio cabinet!
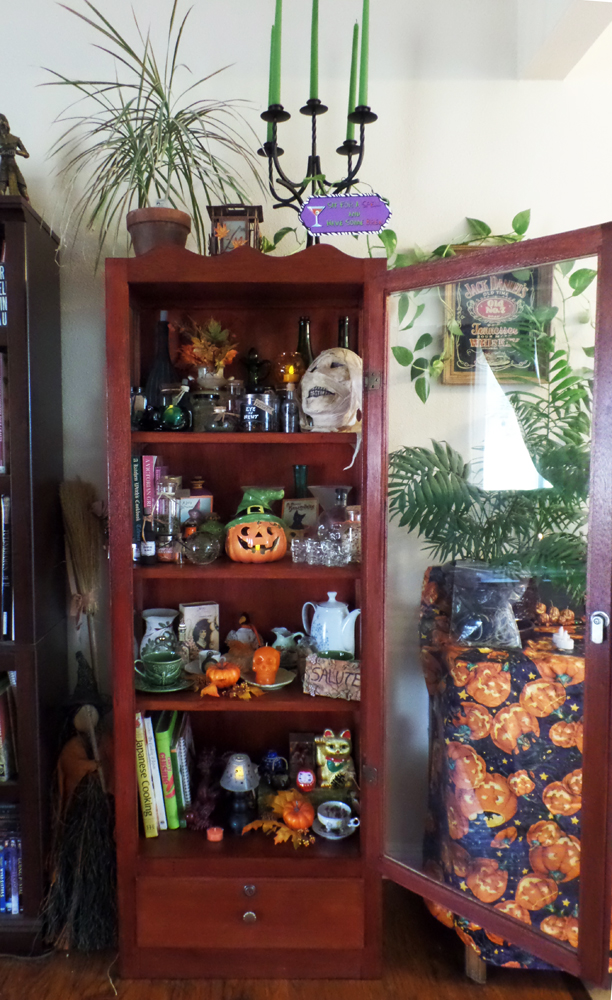
Not bad for our first attempt at giving new life to an old piece. Once filled with fun holiday decor it made a perfectly frightening Halloween decoration. With Halloween gone and past now I can fill it with with antiques and little curios befitting of Fall.Now to start on art projects for Fall and the coming Winter!
Until Next Time, Safe Travels!
Faux Ancient Egyptian Pendants

One of my favorite pastimes is to go visit museums and flip through books with ancient jewelry collections. The ingenuity, craftsmanship and raw talent in ancient work is a true inspiration.
One of those ancient testaments to ingenuity is Ancient Egyptian Faience, known as the world’s oldest known form of glazed ceramic and a precursor to the earliest forms of glass making. While it shares the name faience with the tin-glazed pottery associated with Faenza in northern Italy, it is not true faience. Ancient Egyptian Faience is not made of clay at all but type of frit, a mixture of sand, quartz, silica, calcite lime and a mixture of alkalis. To the ancient Egyptians, it was known was known as “tjehnet” which means brilliant or dazzling. Often crafted into beads, pendants, figures, tiles and other small objects, using push molds or sculpted by hand, then heated to create lovely glazed pieces of art. It was used as a imitation of semi precious stones, such as lapis lazuli and turquoise, though many colors could be achieved by changing some of the ingredients of the frit mixture.
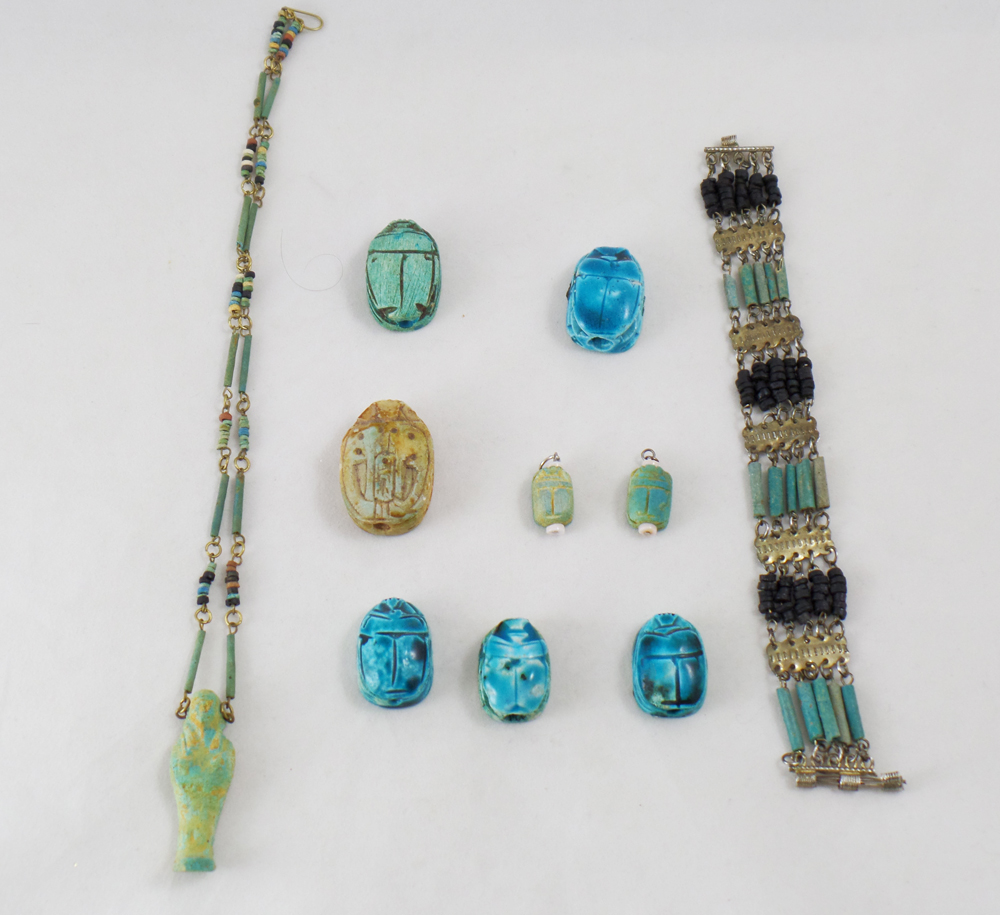
I wondered, how I could make something that looked like Ancient Egyptian Faience but without the need of a kiln? Using real Egyptian Faience as my model, such as those in the above photo, gave me a good idea of what colors and textures I wanted to match. While it is very easy to create the shapes out of any number of air dry and oven bake clays, the glazed appearance of much of the Ancient Egyptian Faience was going to be tricky. I got to thinking how Amazing Casting Products’s Amazing Clear Cast Resin on top of polymer clay could appear like a glaze and more akin to the lovely ancient work.
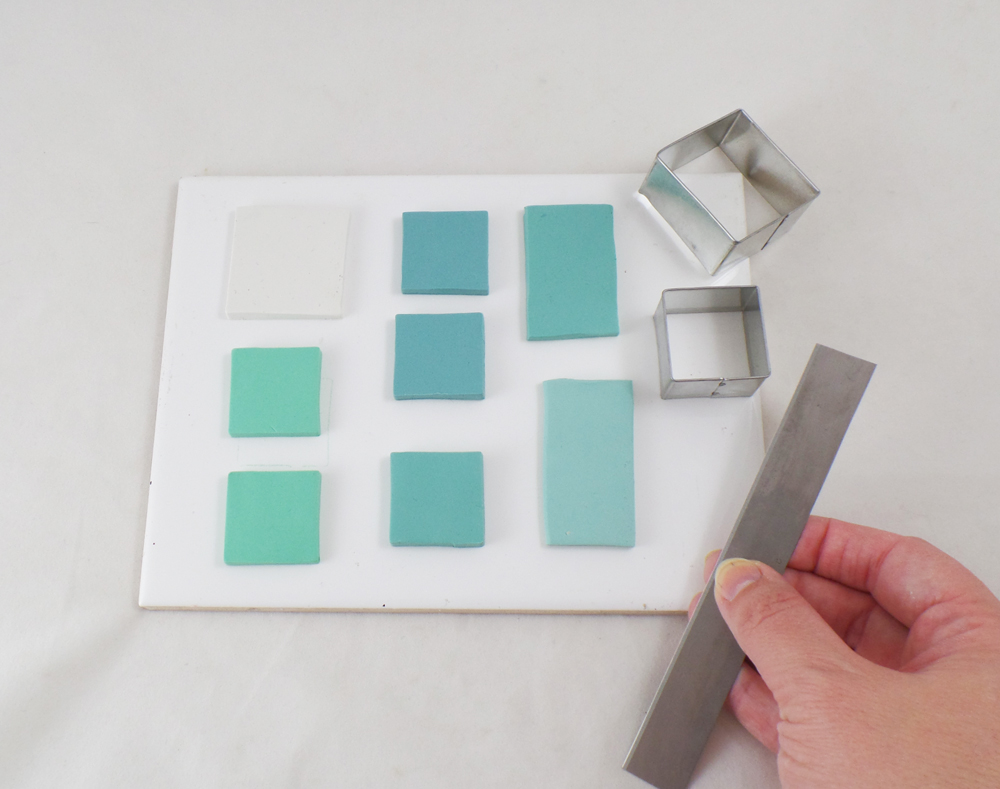
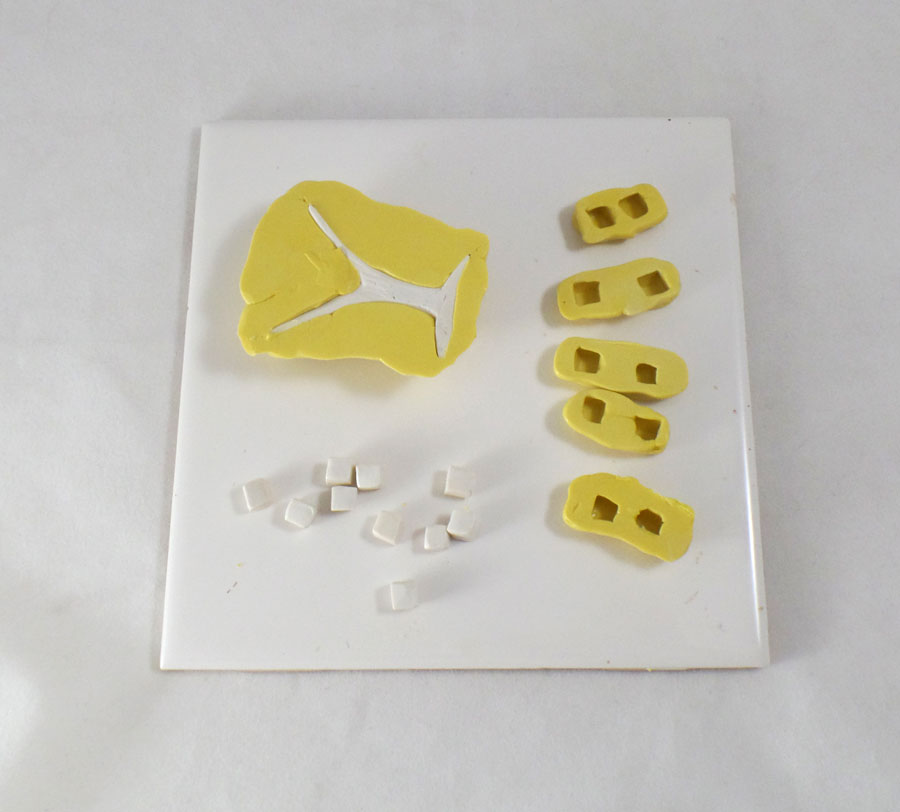
I started with conditioned polymer clay, in the color tones of blues and greens, betting that a base color of those hues would give me the best results. I also conditioned a piece of white polymer clay as a color test. I then cut all pieces into sizes and shapes good for pendents.
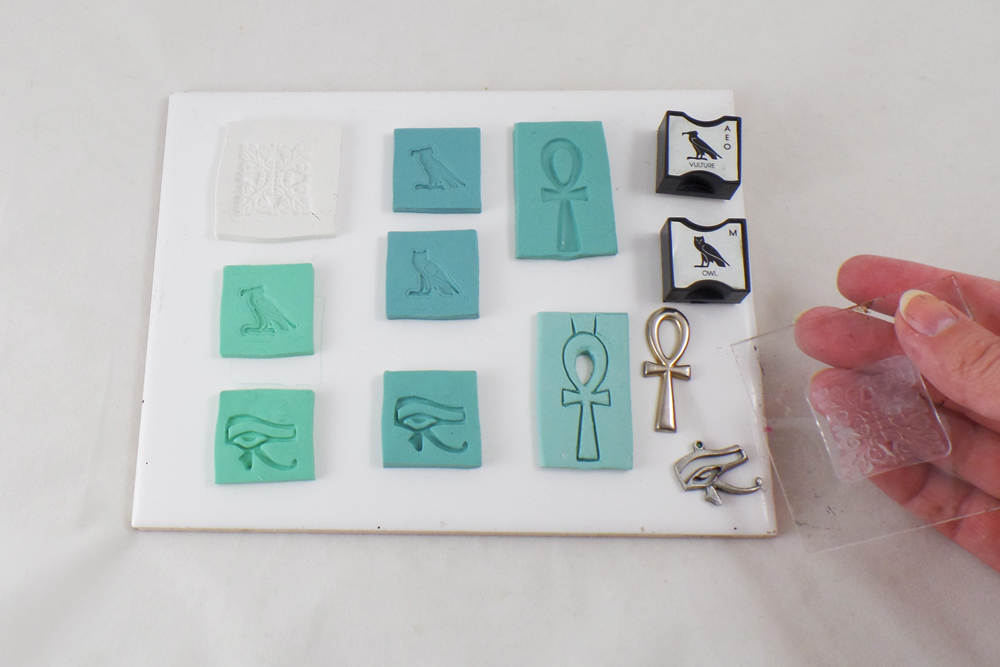
I went through my collection of stamps and charms, picking ones that were Egyptian themed. I sprayed the object to be pressed in the clay with water to act as a stamp release from the clay and pressed firmly into the clay.
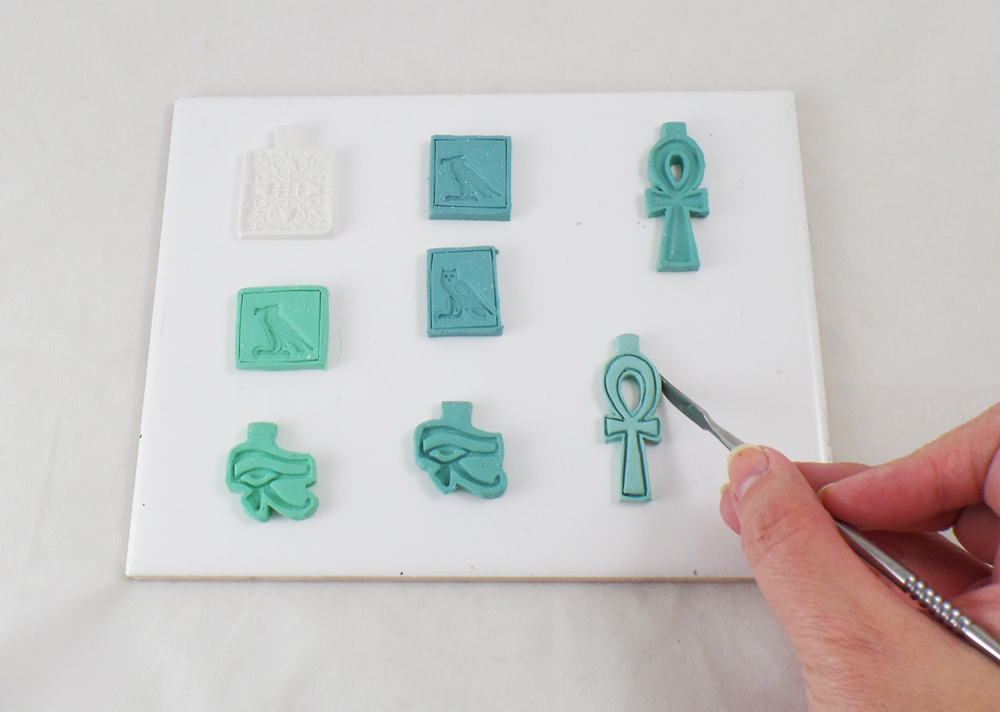
I trimmed the pieces of clay close to the stamped images, smoothing edges and defining details of the stamped images.
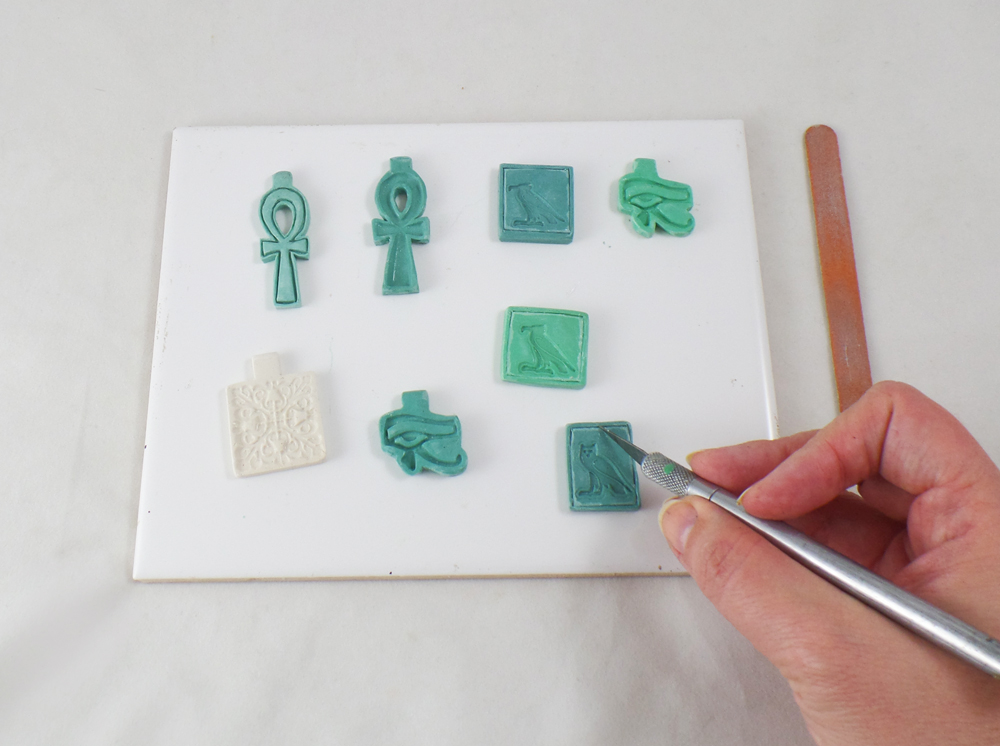
After curing the polymer clay by manufacturer’s instructions, and once the pieces were cool, I trimmed off any rough edges on the clay pieces with a craft knife.
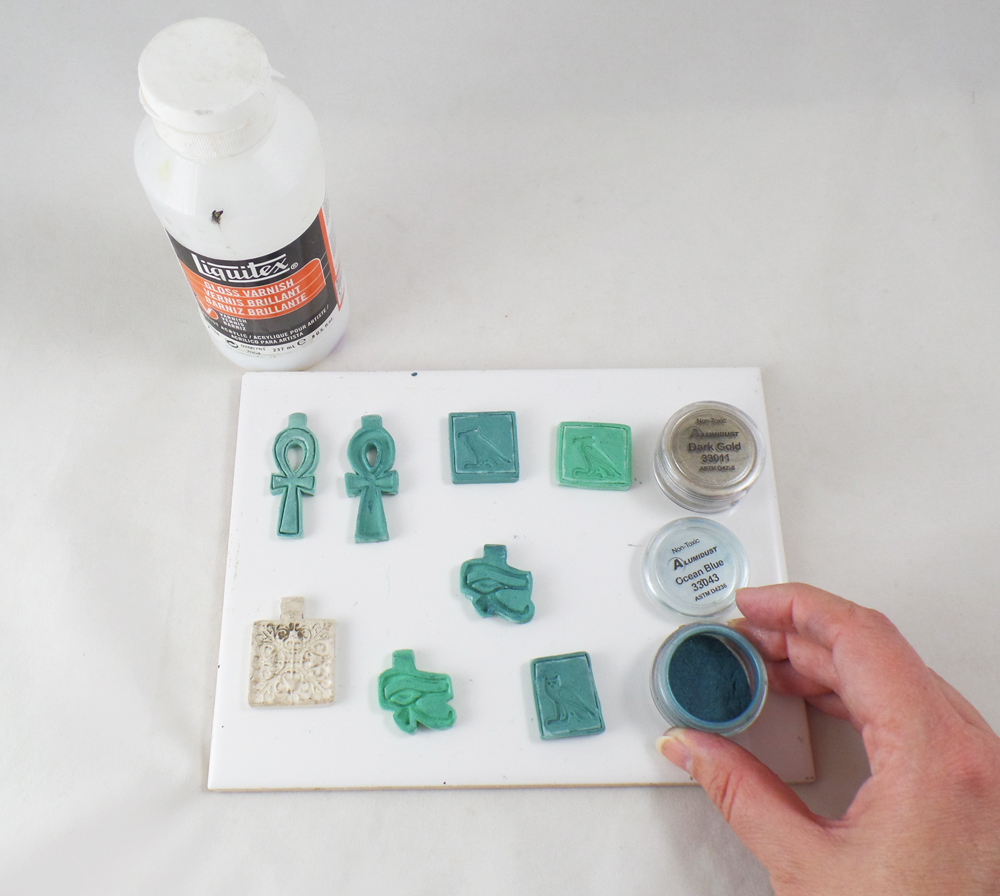
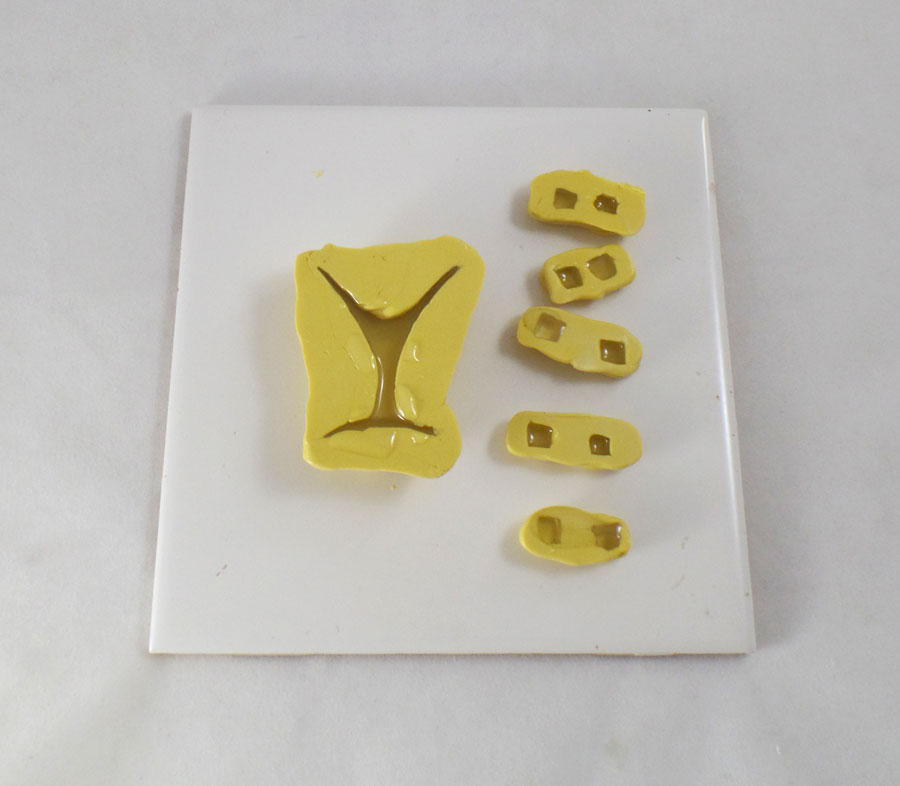
I applied a thin layer of Liquitex Gloss Varnish to all of the pieces and before they dried rubbed on a light layer of Alumidust.
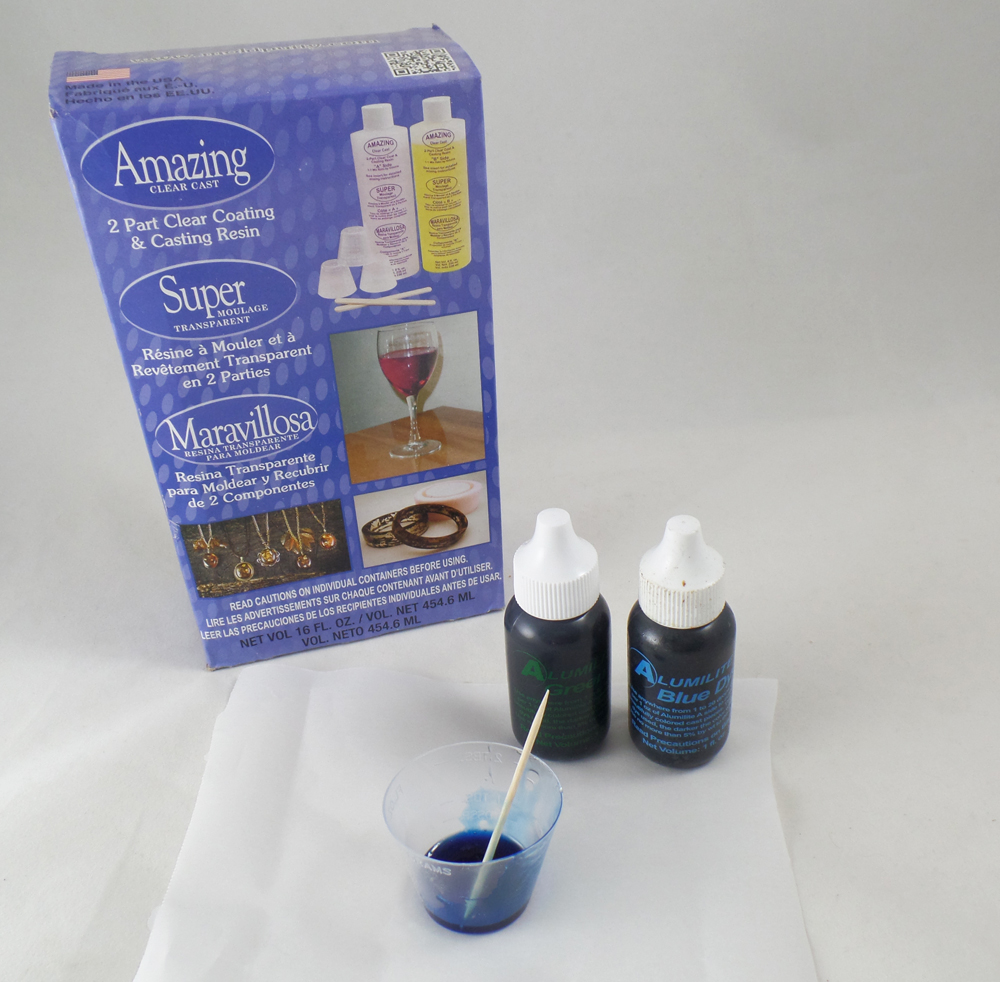
I mixed a very small amount of blue and green Alumilite Dyes with Amazing Clear Cast Resin, making sure to fully stir the dyes into the resin and let it sit for 10 minutes.
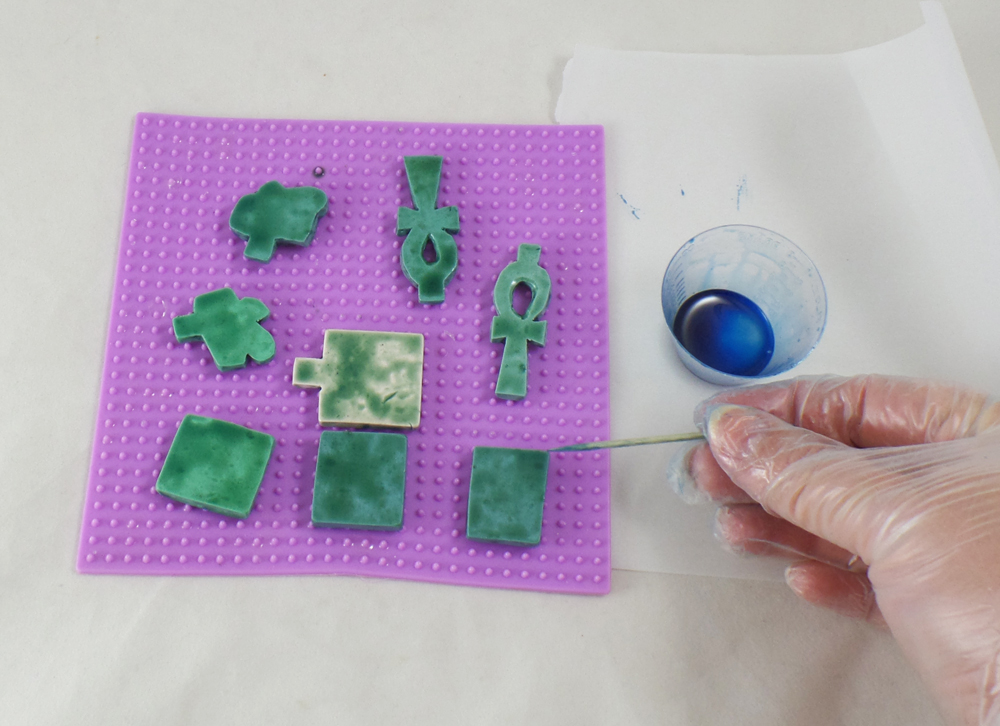
By letting the resin sit for 10 minutes, the resin will be thicker and stick more to the polymer clay pieces. I carefully applied the resin to the back and sides of the pendants with a toothpick first and let them cure completely, as per manufacture instructions, before moving onto the next step.
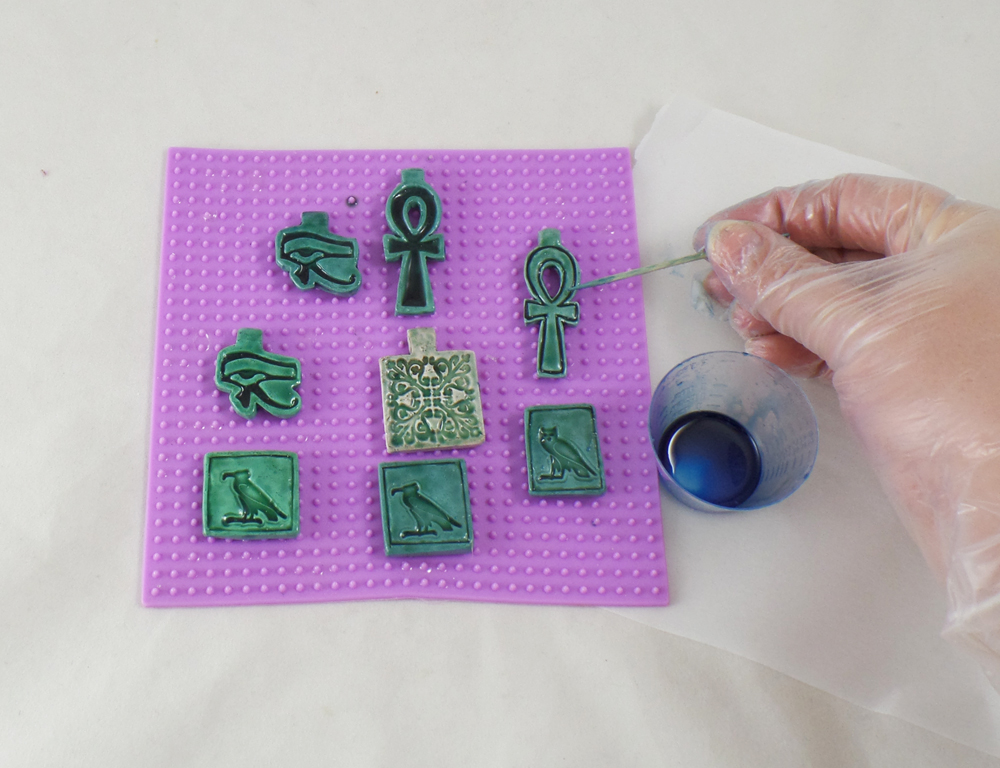
After the back of the polymer clay pieces were dry I applied resin to the front of the pieces with a toothpick, making sure to get all the groves and indents of the stamped images. I let this layer of resin cure completely.
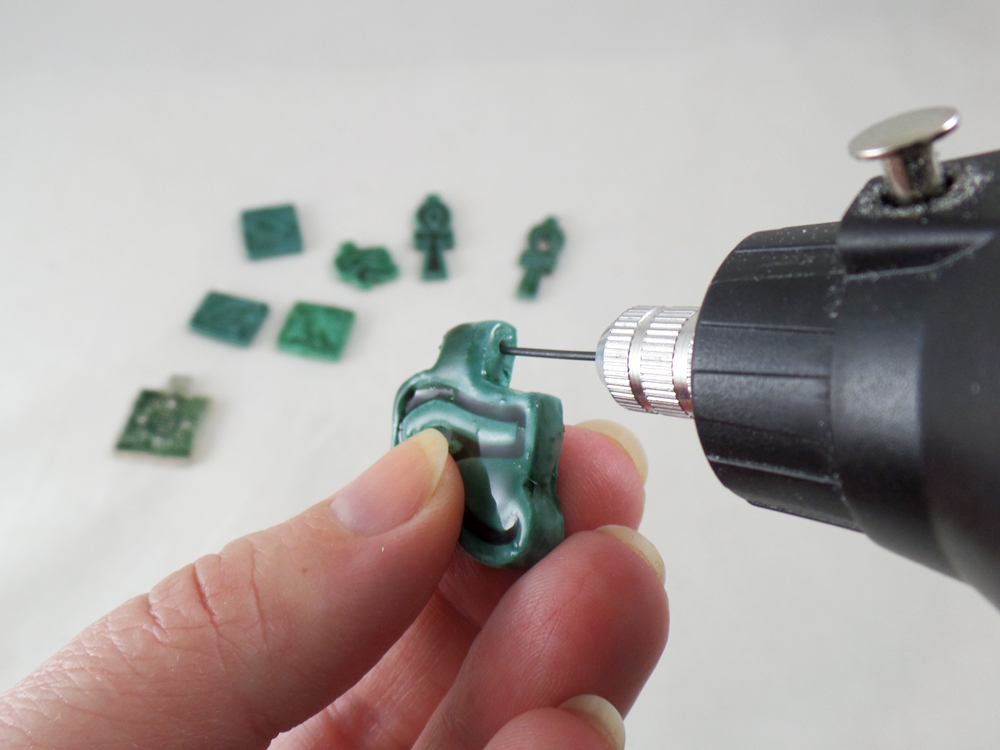
Once all of the pieces were fully cured I carefully drilled holes to put beading wire and thread through each piece.
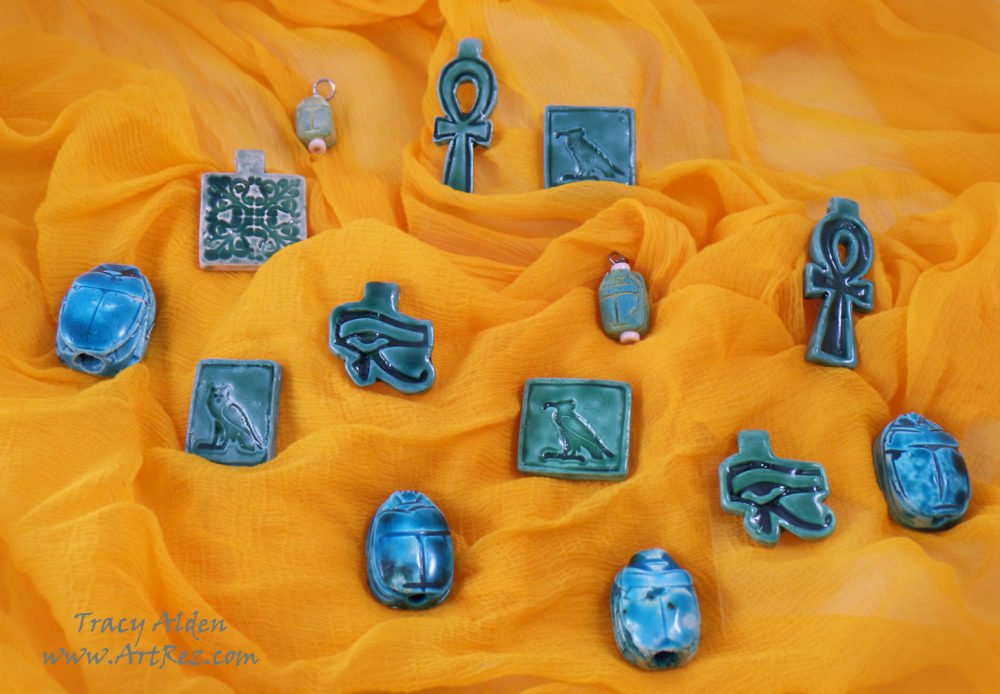 Here are the finished Faux pieces with the real Egyptian Faience, a pretty close match if I do say so!
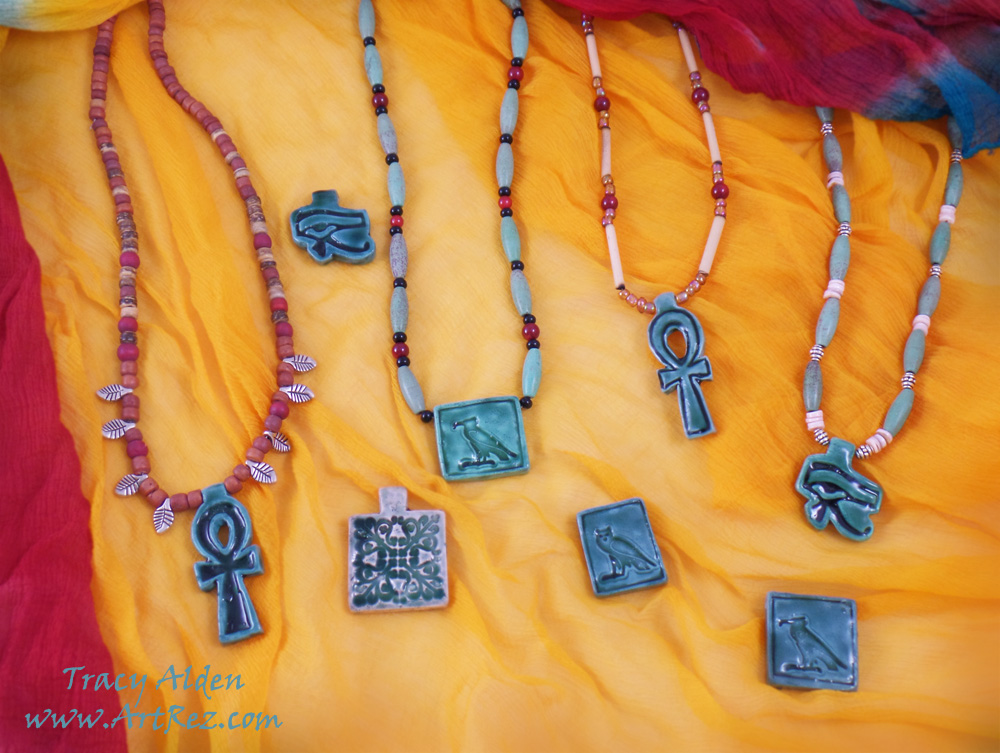 The addition of wood, glass, semi precious stones and shell makes these pieces look straight out of ancient jeweler’s marketplace!Want to see more of Amazing Casting Products tutorials and inspiration? Hop on over to their Blog to see all kinds of Amazing Artists’ Designs!Until Next Time, Safe Travels!
Got a Monster Eye on You! Halloween Jewelry DIY
 Oh my goodness, it is already October! Things are flying by so quick with all of the work we are doing on our house! With most of the house packed up it was hard to do any arts and crafts. I was going stir crazy with everything I needed being packed up. Finally with more rooms being finished I could start unpacking and I was able to sneak out some beads and supplies to make a few Halloween inspired projects.
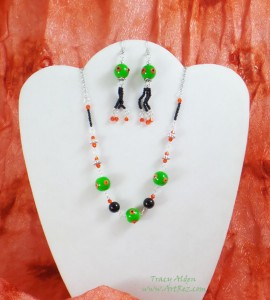
My first one is a simple and ghoulish Halloween jewelry project using a bracelet and earrings set from Fiona Accessories. I rather love their line of Halloween Jewelry Fiona Accessories carries, full of the classic colors and themes, with hand painted elements.
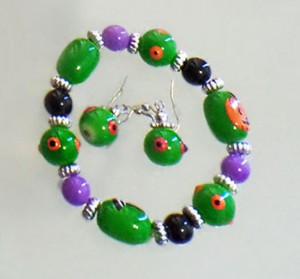
One of the pieces they carry is BR-2027 Painted Halloween Bracelet, with fun little green monster eye beads that got me thinking of turning it into a new jewelry set. Now not only does it have the awesome eyeball beads it also has very delicate hand painted beads of a pumpkin, witch’s hat and a ghost. I cut apart the bracelet and was careful to keep those beads for another project, they are just too cute.
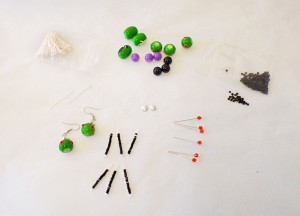
Supplies:
Fiona Accessories BR-2027 Painted Halloween Bracelet
Needle and Flat head Nose Pliers
Silver tone jewelry eyepins and nailpins(21 gauge), chain, jewelry clasp and jumprings
Orange crystal beads
Black Seed Beads
Spreading out my supplies on the table I separated the beads by shape and color. Using six eye pins I threaded on black seed beads, six nail pins I threaded on orange crystal beads and on two eyepins the eyeball beads.
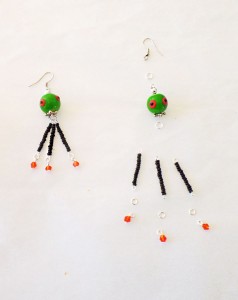
Carefully I snipped off the excess wire, and using round nose pliers I rolled the end of the wire into a loop. I repeated this with all of the jewelry wire with crystal, seed and eyeball beads on them. I opened up a jumpring with the flat nose pliers and put the jumpring through one of the crystal beads, now on a wire and the seed beads, on a wire. When I closed the jumpring with the pliers the bead became a beautiful dangle on the black seed bead length of wire. I repeated this for two more and attached them to one of the eyeball beads, creating little black “tentacles” growing out of the eyeball bead. I repeated this for the second earring.
Once I assembled both earrings I slightly bent the jewelry wire the seed beads were on to give them to look of moving tentacles. As cute as they were I wanted to make a matching necklace.
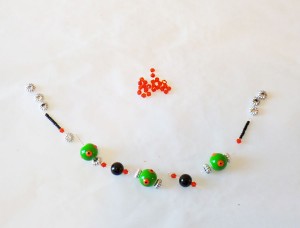
I placed the rest of the eyeball, black glass, seed, crystal and silver beads down to get an idea for the necklace layout. Using more silver eye pins I threaded on the beads, snipped off the excess wire, and using round nose pliers I rolled the end of the wire into a loop. I connected each piece to the next with more jumprings, linking all of the pieces together and added a jewelry clasp at the end to finish off the necklace.
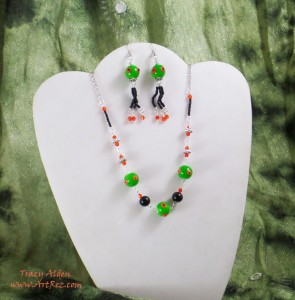
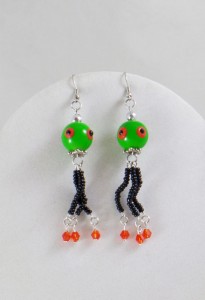
Now I have a fun and freaky monster jewelry set! What might you make with your favorite Halloween themed beads? 🙂
Until next time, safe travels!Drinks on me! Anything But a Card Challenge #36
Good morning! Today’s project tutorial is thanks to a challenge! The talented Susan M. Brown of SBartist: Painting In The Dark Blog asked me if I would be willing to be a guest designer for the Anything But a Card Challenge blog and of course I had to say yes!
Anything But a Card Challenge Challenge #36 : Summer Lovin’ – A celebration of all things summer! Think summer weather, vacations, sunflowers, beach parties, cold drinks and barbecues… bright colors and wide open sky. Pool parties all day, then sitting in lawn chairs sipping drinks and watching the night sky. The warm summer months have me thinking of cold drinks, sunny days and BBQs with family and friends. My project for the Anything But a Card Challenge for this month played perfectly into that inspiration!
One of the aspects of having a party or BBQ is that someone is bound to spill a drink. While many find it an annoyance I decided to use it as a inspiration!
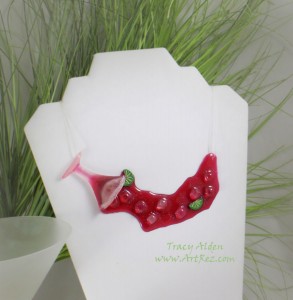
Starting with the idea of a spilled Pomegranate Martini or Cosmo, I came up with a wearable art piece called “Drinks on me!”
Supplies:
Amazing Mold Putty
Amazing Clear Cast Resin
Stampendous Multi Ultra Fine Crystal Glitter
Craft Knife
Polymer Clay
Stylus
Elastic jewelry cord
Small drill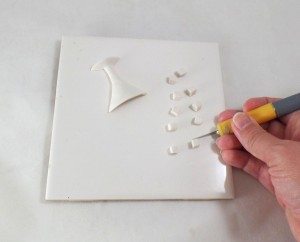
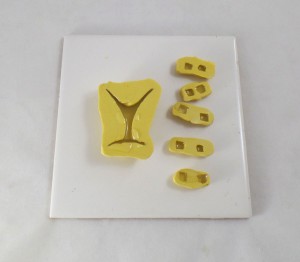
Using a stylus and a craft knife, I shaped and carved half a martini glass and ice cubes out of polymer clay. I then baked the clay pieces on the tile to manufacturer’s instructions.
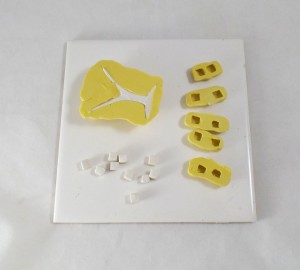
After I baked the polymer clay, I lightly sanded and trimmed the edges of the pieces with a craft knife and an emery board. Once the polymer pieces are cleaned of dust, I used Amazing Mold Putty to make molds of the pieces.
Once the molds were cured I poured Amazing Clear Cast Resin into the molds and let it set for about five hours. The pieces came out frosted by using the Mold Putty and that was the perfect look for the glass and ice cubes.
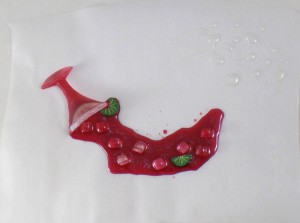
I then placed the glass upside down on *parchment paper and poured Amazing Clear Cast Resin tinted with Alumilite Red Dye in a controlled U shape. I coated the ice cube resin pieces with untinted Clear Cast and placed them gently into the tinted resin to give the illusion of melting ice. I added a few polymer clay lime cane slices, sprinkled a touch of Stampendous Multi Ultra Fine Crystal Glitter on the tinted resin to finish off the look and let it all cure.
*The resin has to be poured on parchment paper otherwise the resin will soak into any other paper.
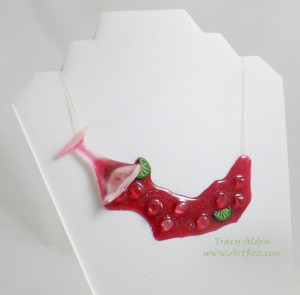
I drilled a hole on each side of the pendant and threaded clear elastic jewelry cord on for easy wear.
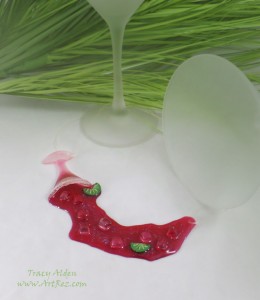
One of the really fun aspects of this project is with a simple change of dye used with the resin you can create any spilled drink you would like!
What might YOU make for the Anything But a Card Challenge? CLICK HERE to link up your projects! 🙂
Until next time, safe travels!

Ancient and Contemporary Inspired Artistry