Spring Bo-Ho Fire-Polished Earrings

With Spring cleaning in full swing in my household, pulling out beads and findings I might have forgotten is a yearly ritual. This time I found one of my favorite types of beads, Czech Fire-Polished!
Here is a quick way to use up some of your jewelry supplies sitting around to make a fun, yet elegant pair of earrings.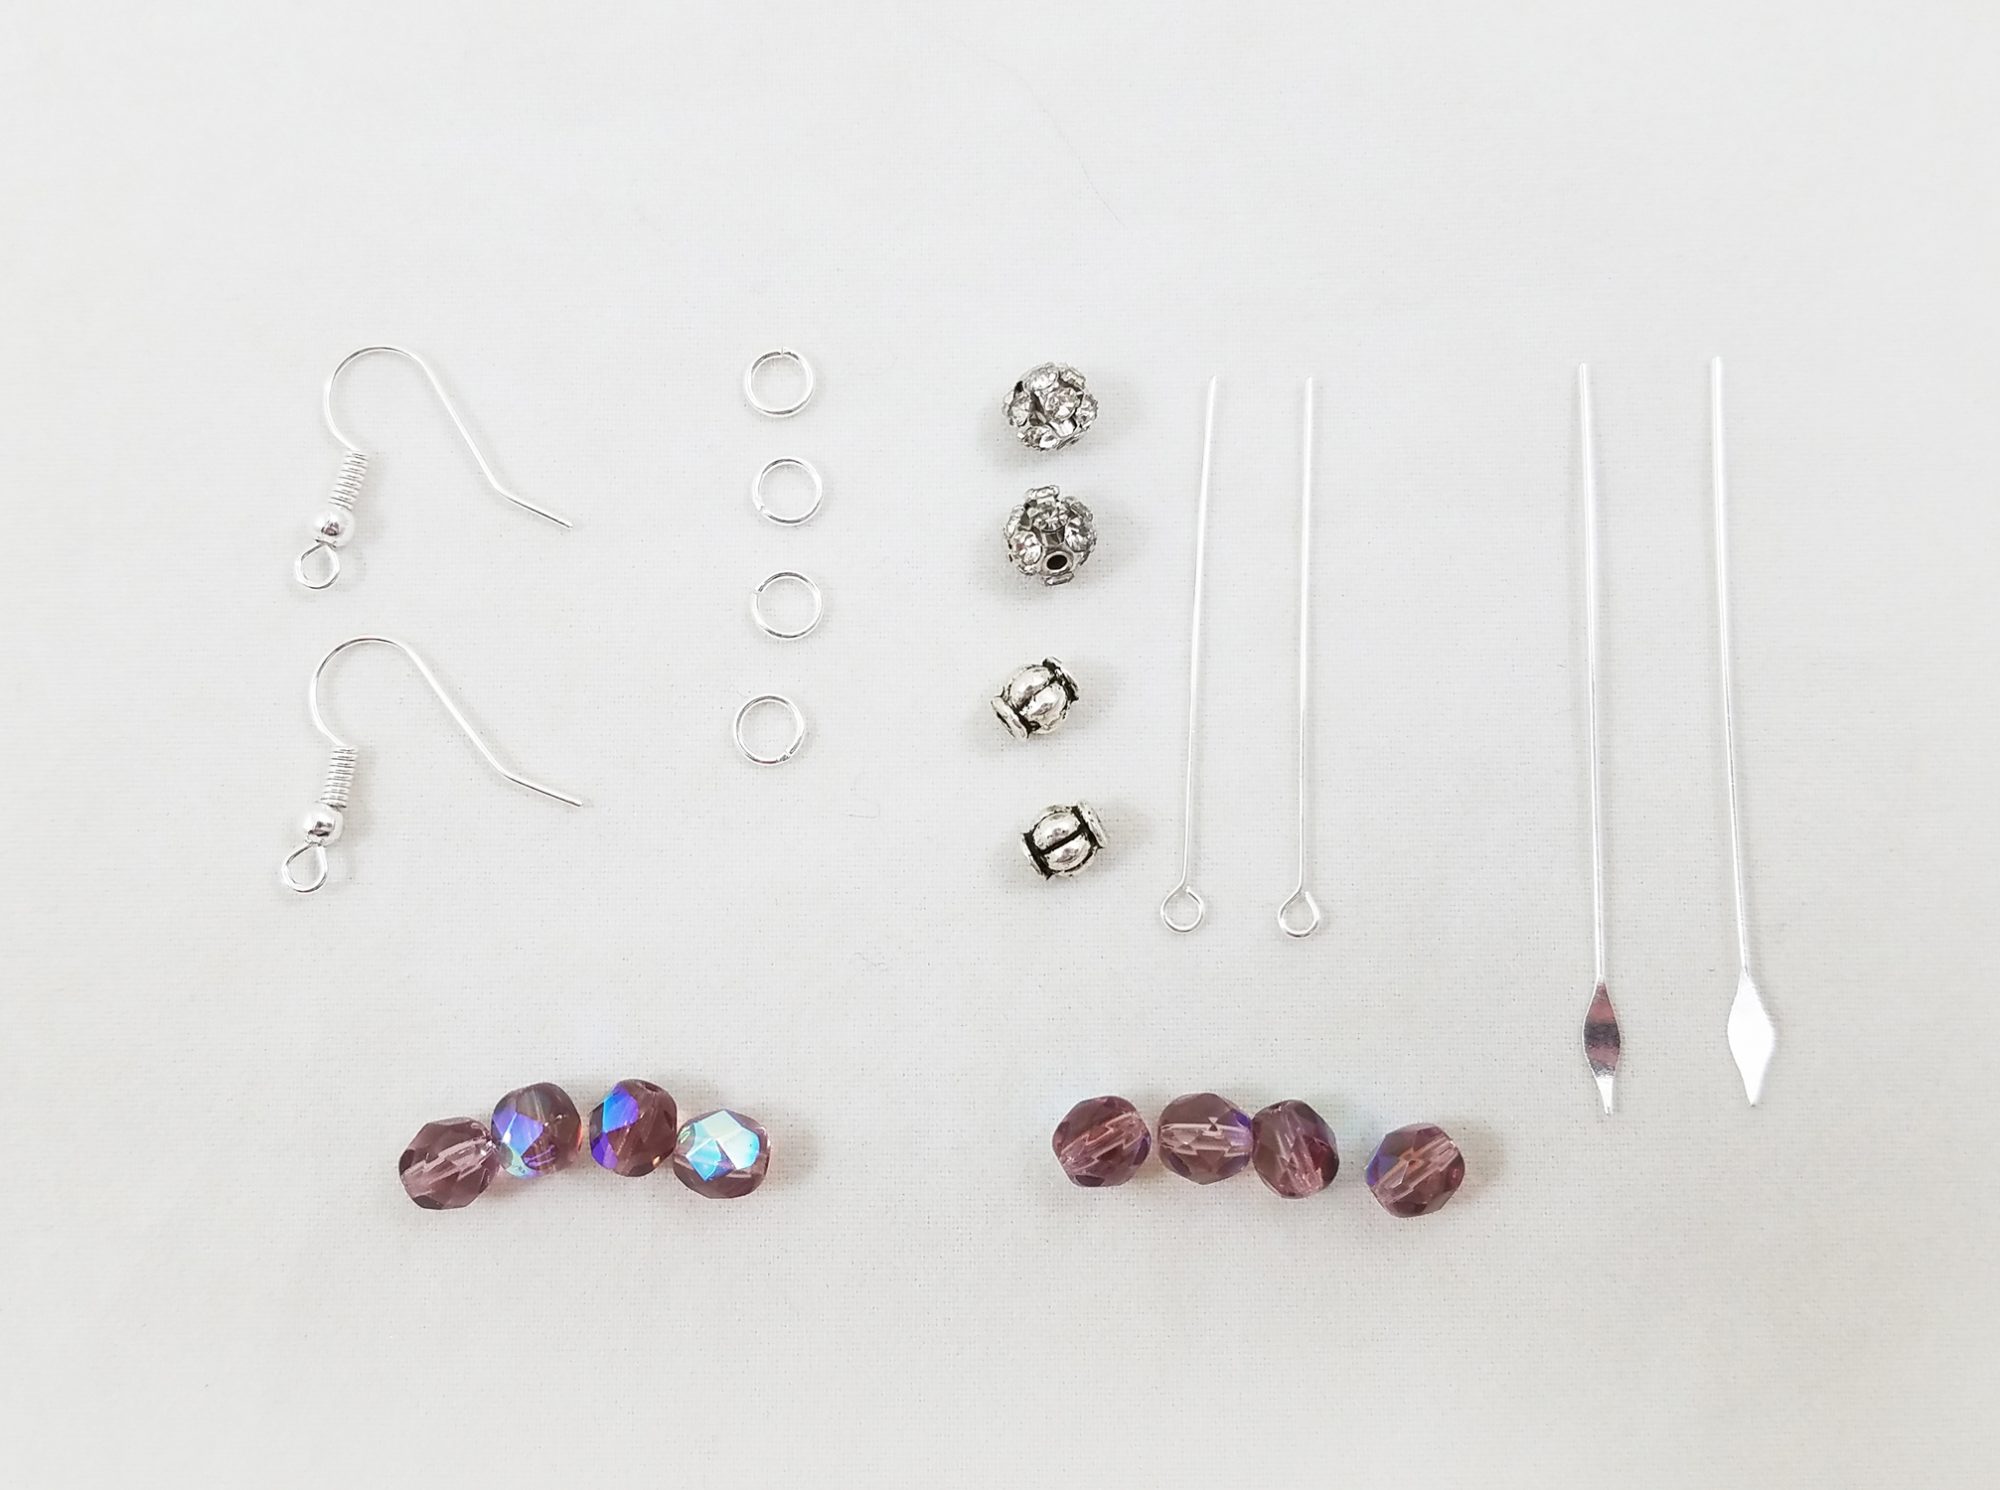
Supplies:
2 Silver Plated Fish Hook Earring Wires 19mm
4 Silver plated 5mm Jump Rings
2 1 1/2 inch Silver Plate Eye Pins 22 gauge
2 2 inch Silver Plate Paddle Pins 22 gauge
8 Czech Fire-Polished Beads in Pale Purple 6mm
2 Silver Plated Lantern Beads 4x6mm
2 Rhinestone Metal Ball Beads 6mm
1 Pair of Jewelry Wire Cutters
2 Pairs of Chain-Nose Pliers
1 Pair of Round-Nose Pliers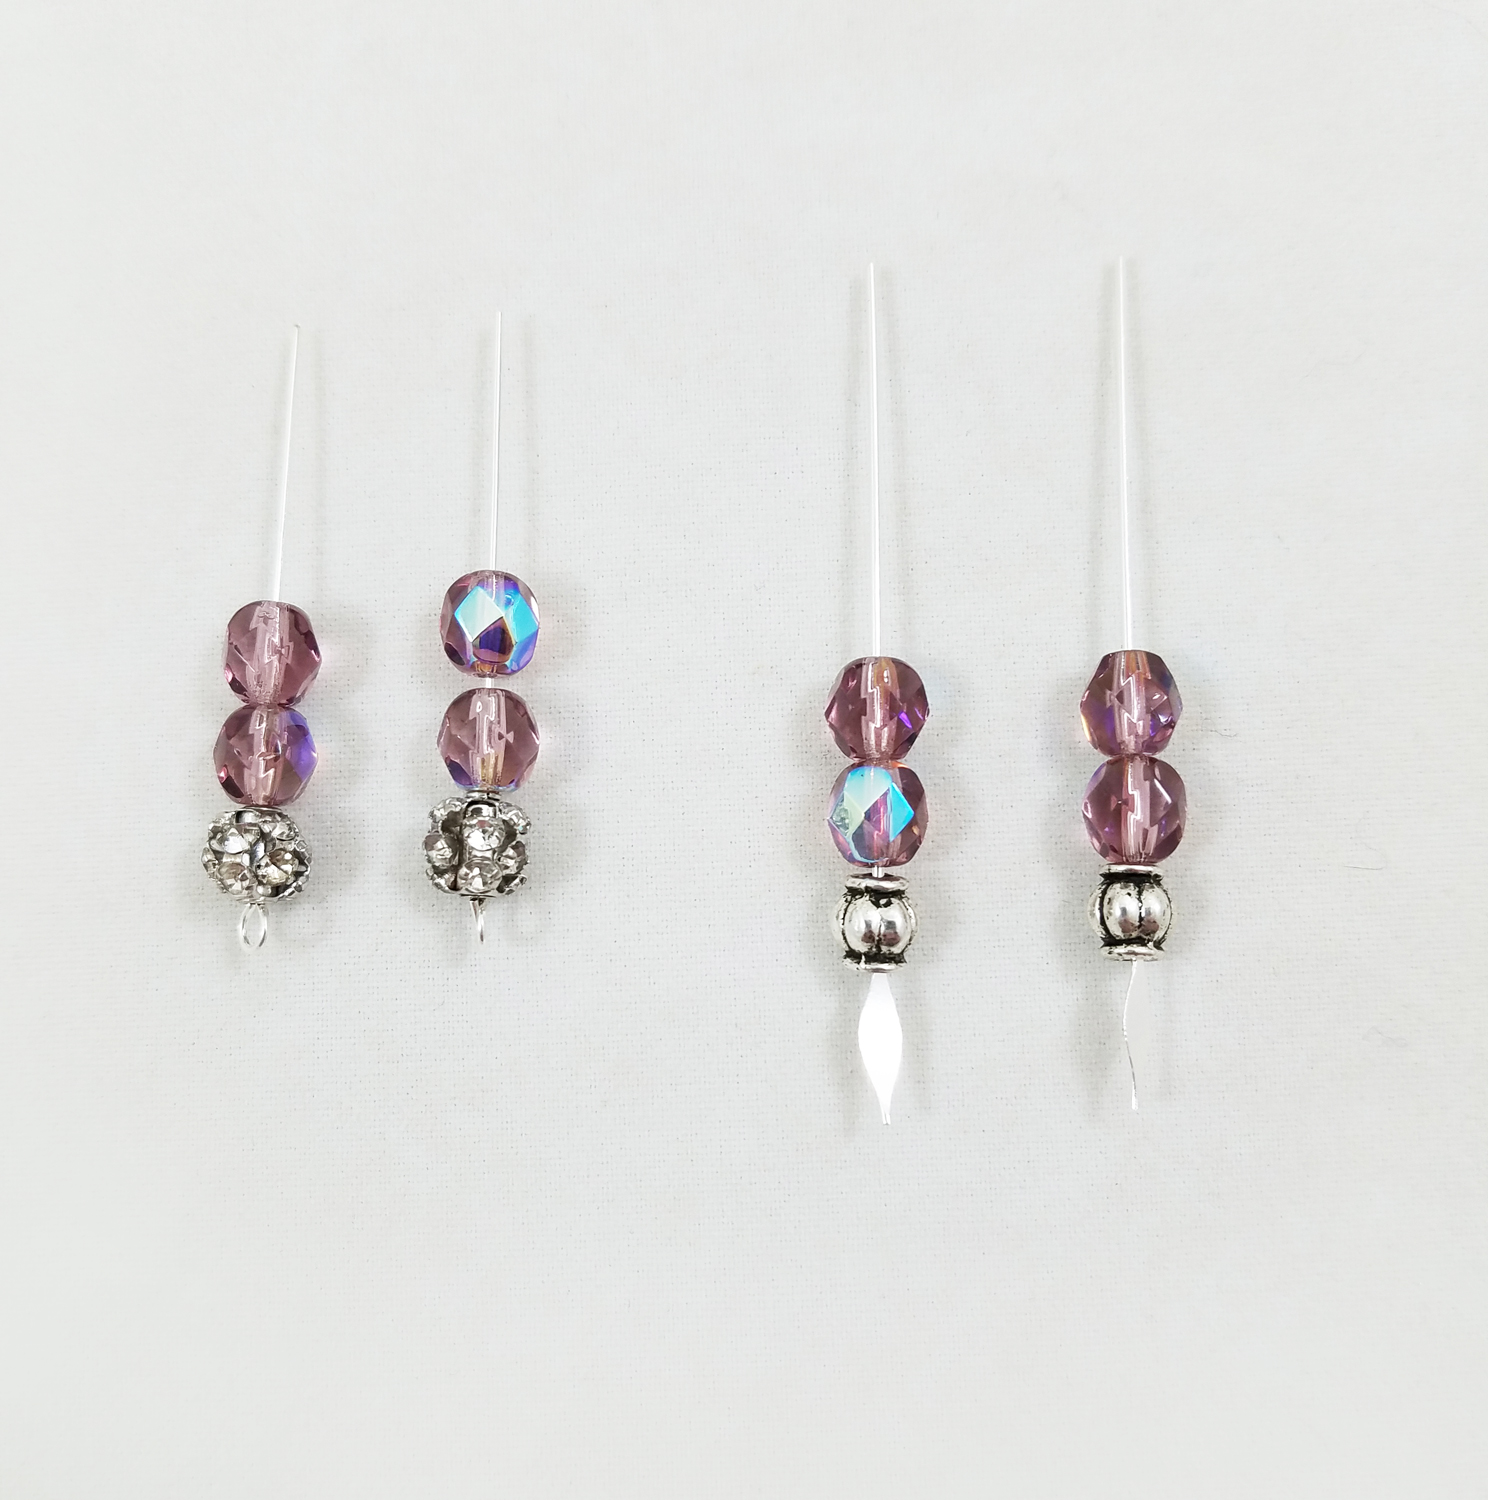
Carefully thread two Czech fire-polished beads and one rhinestone metal ball bead on each 1 1/2 inch silver plate eye pins.
Thread onto each 2 inch silver plate paddle pins two Czech fire-polished beads and one silver plated lantern bead.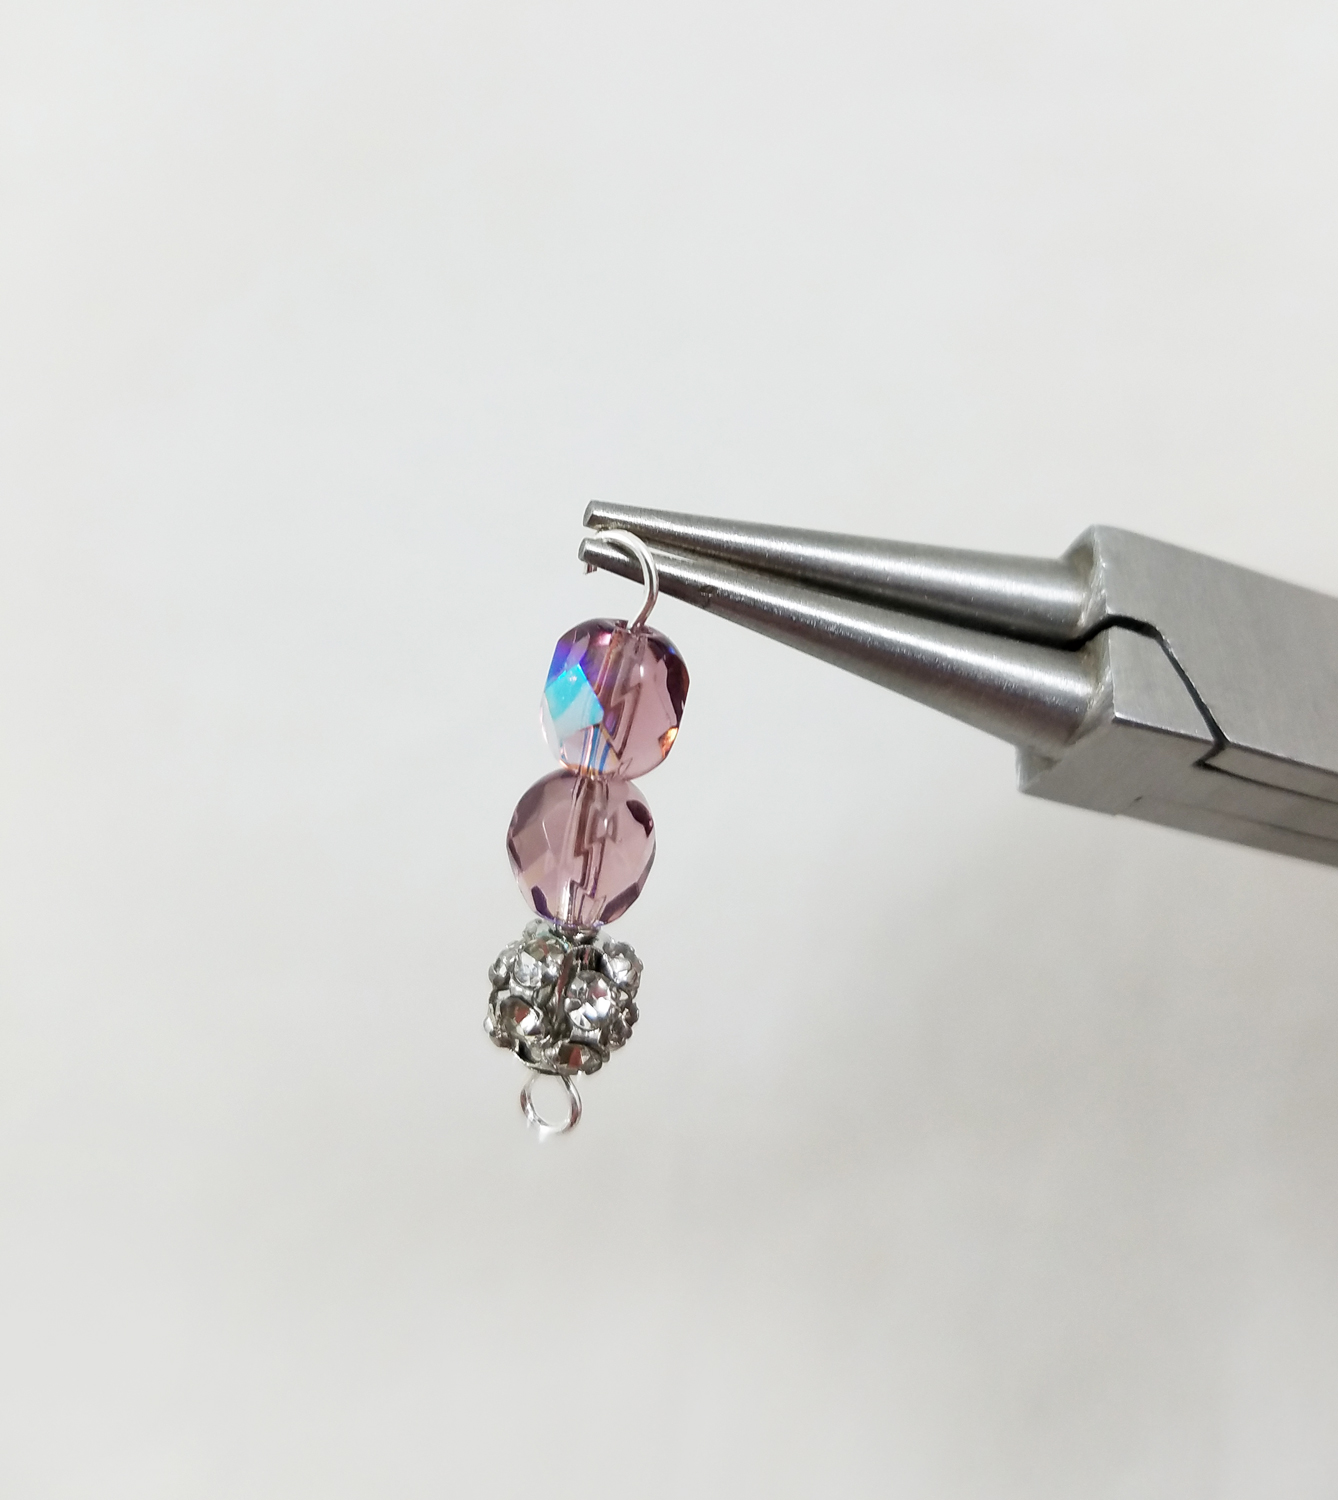
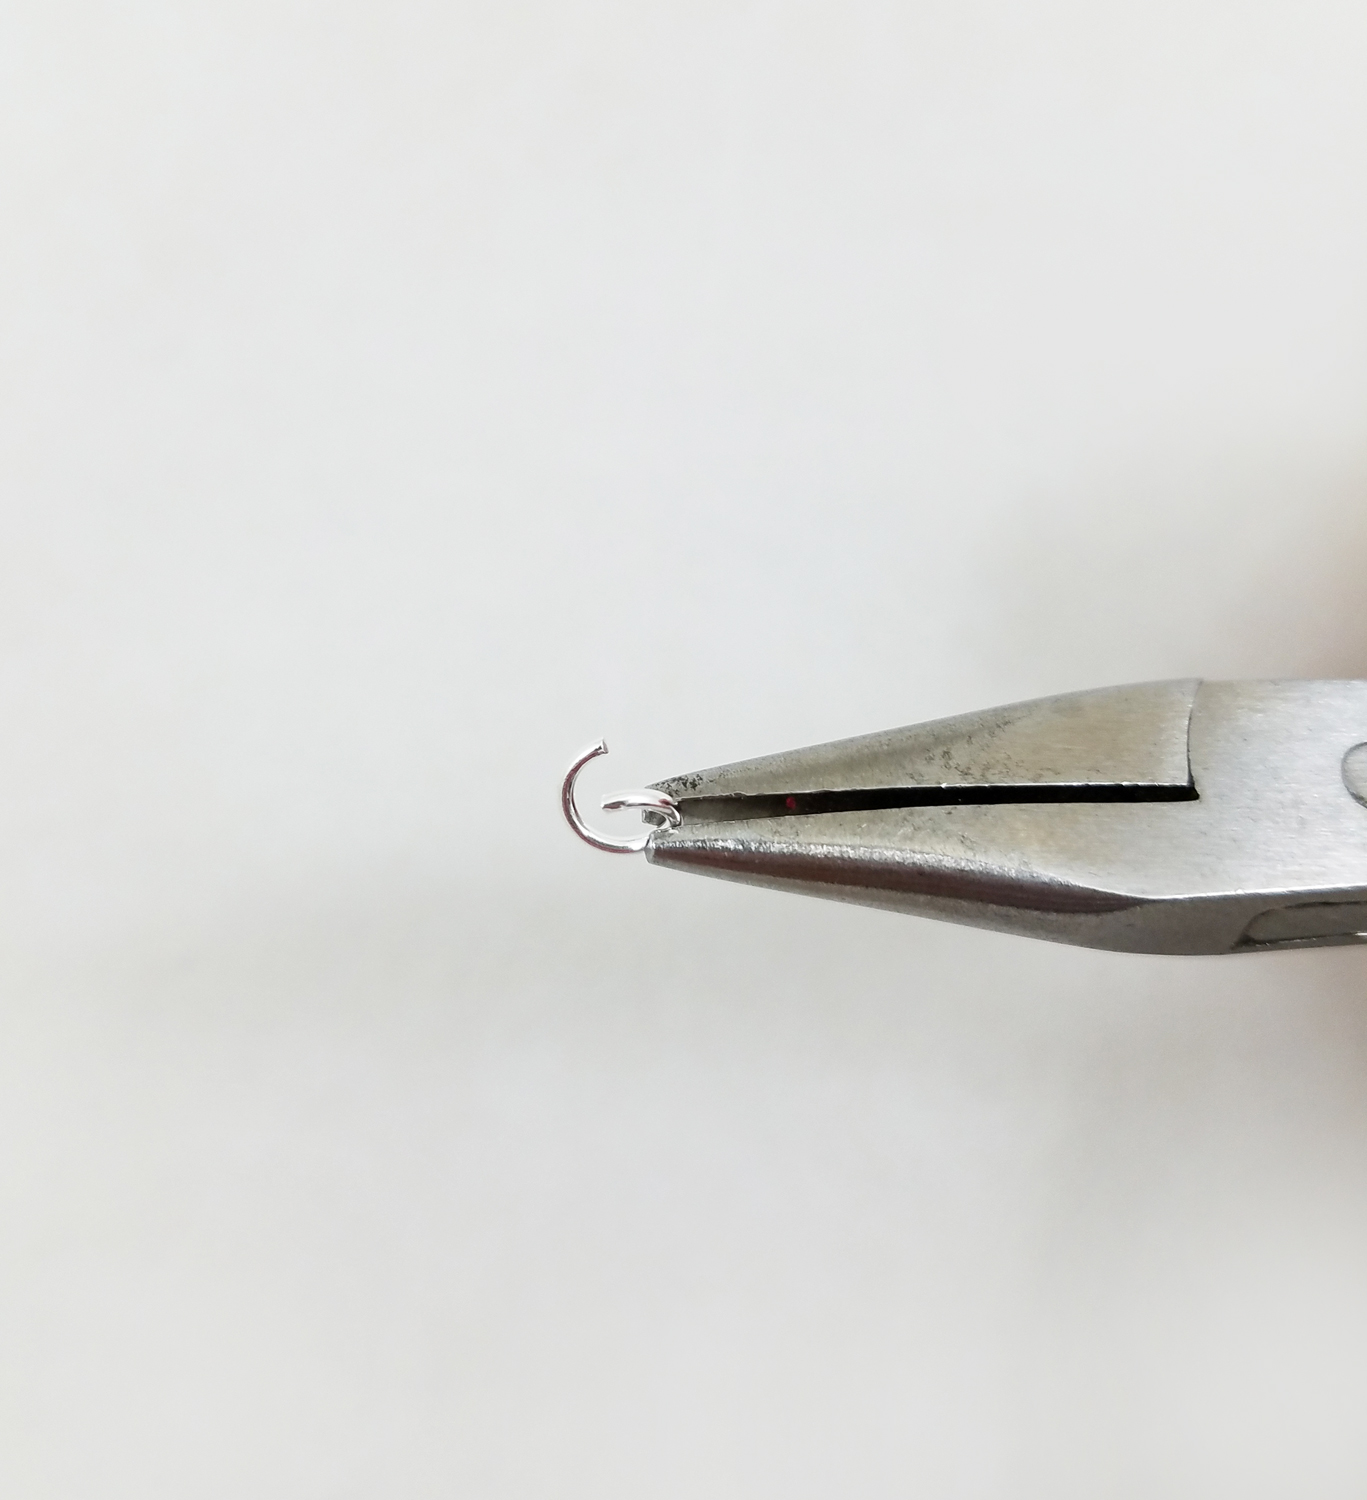
Using the jewelry wire cutters, trim off the excess wire of the eye pin with two fire-polished beads and rhinestone metal ball bead. Using the
round-nose pliers, curl over wire into complete loop by rotating your wrist forward. Close the loop, snug to the bead and repeat these steps with the second eye pin.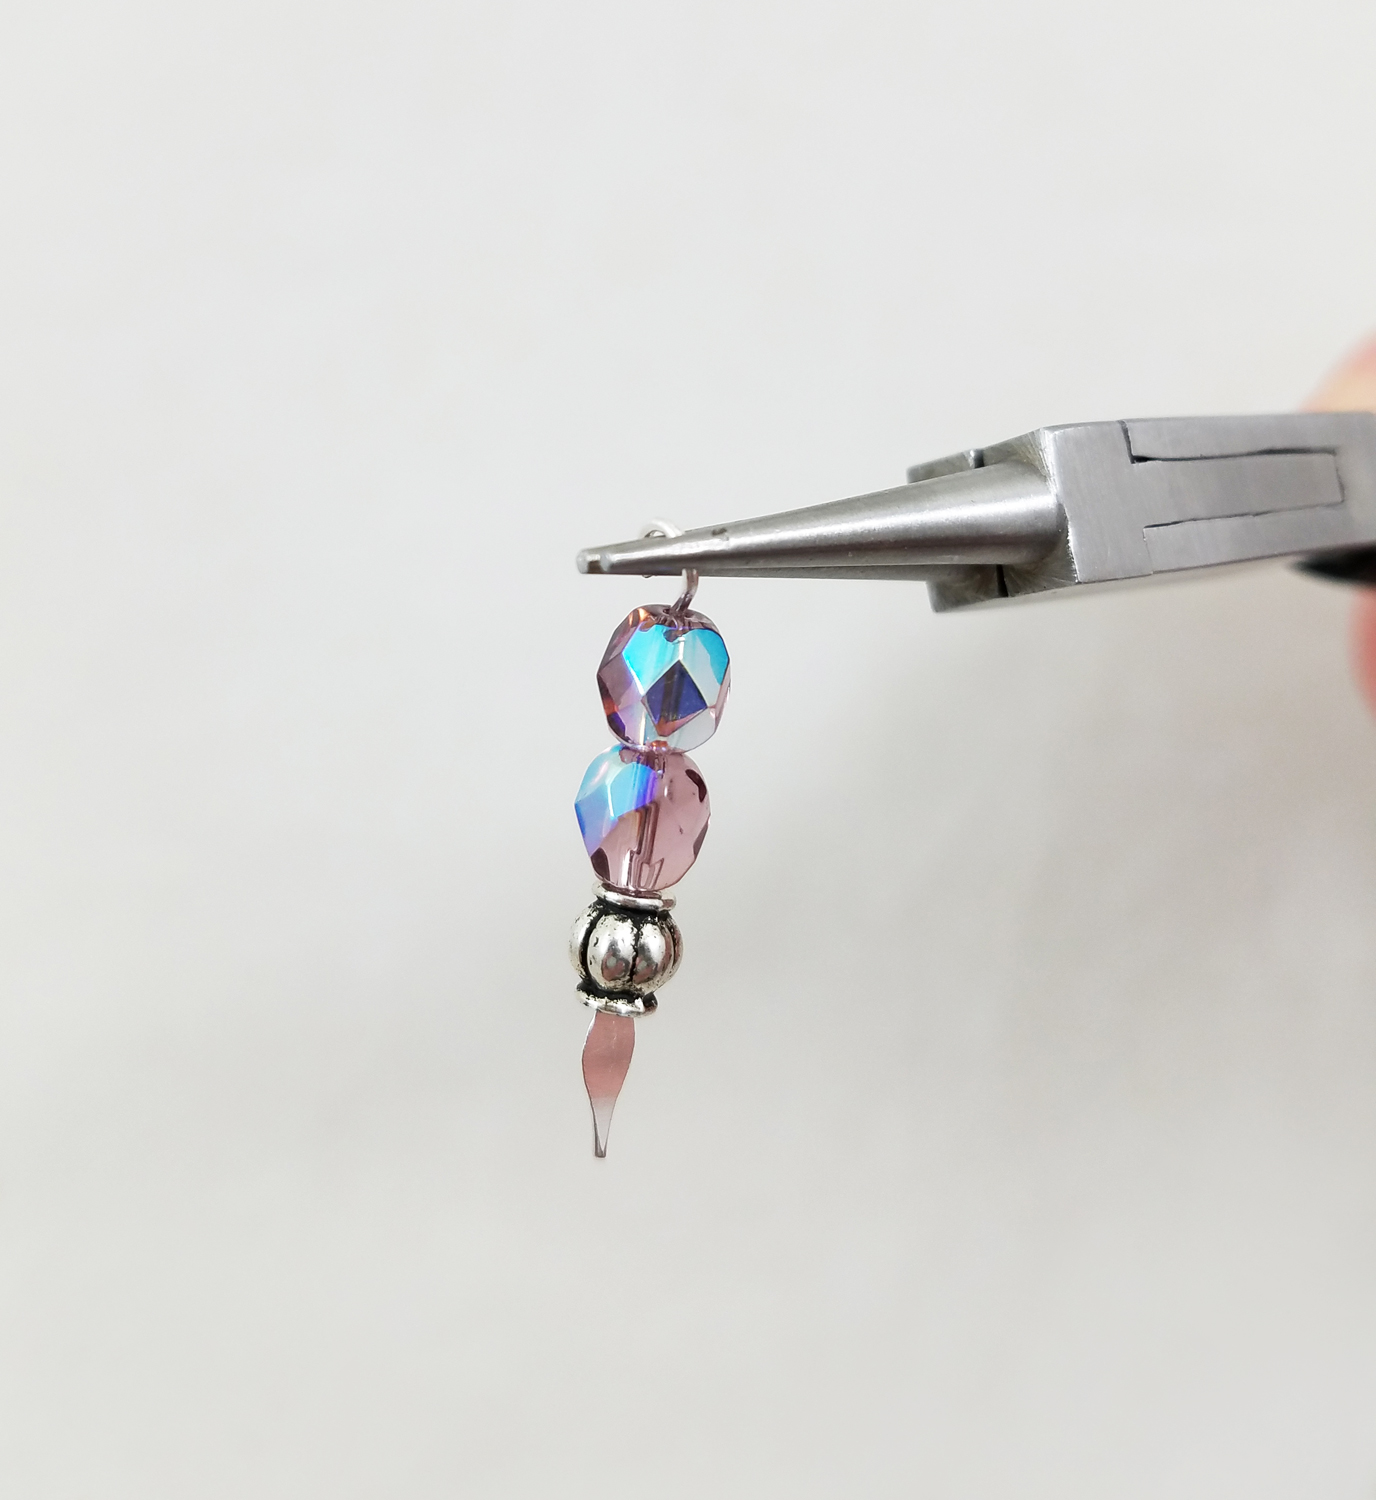
Using the jewelry wire cutters, trim off the excess wire of the
silver plate paddle pin with two fire-polished beads and one silver plated lantern bead. Making sure the flat side of the paddle pin is facing you curl over the wire into complete loop with the
round-nose pliers by rotating your wrist forward. Close the loop, snug to the bead and repeat these steps with the second paddle pin.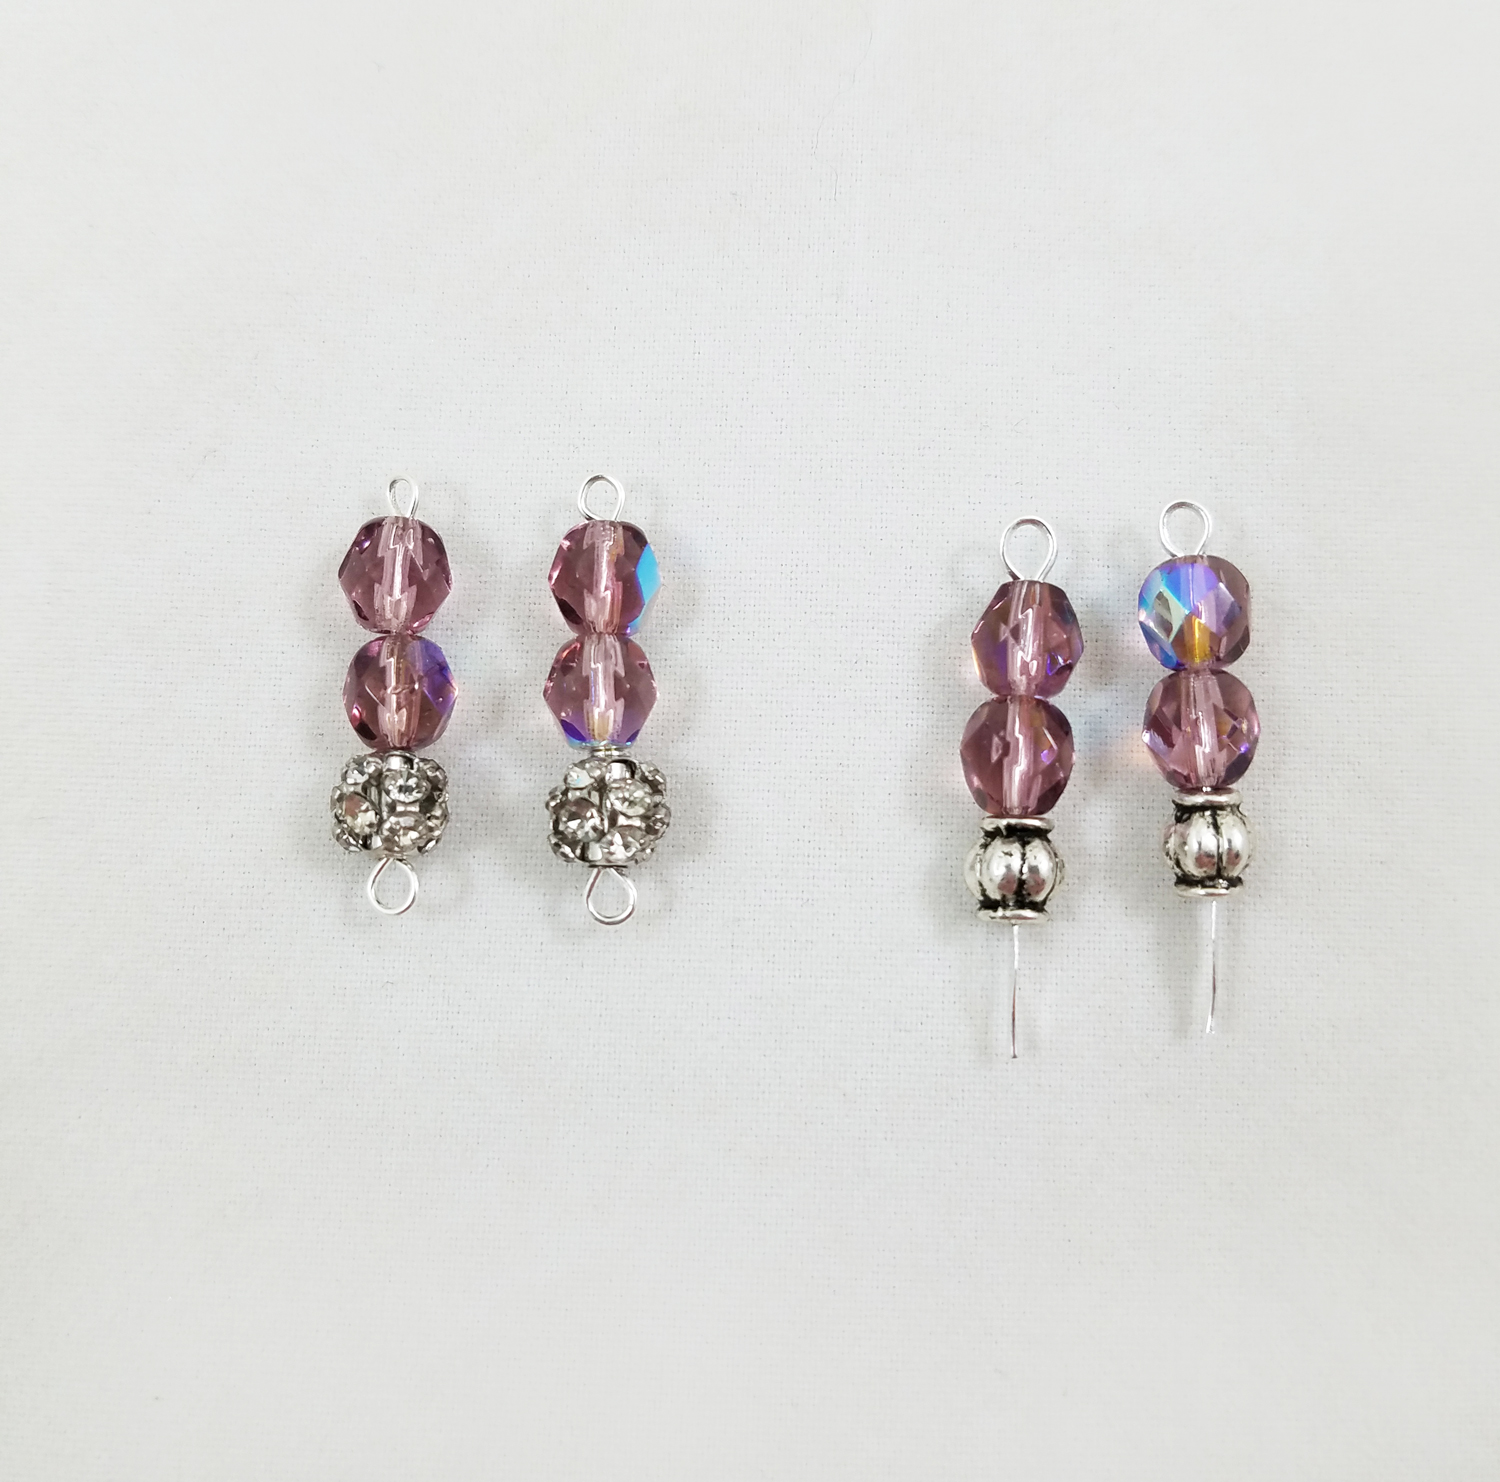
Both of the eye pins and paddle pins should look like the photo above.
Using two pairs of chain nose pliers start twisting the jump ring until the required opening is achieved.
*Do not pull open jump rings as this will distort them.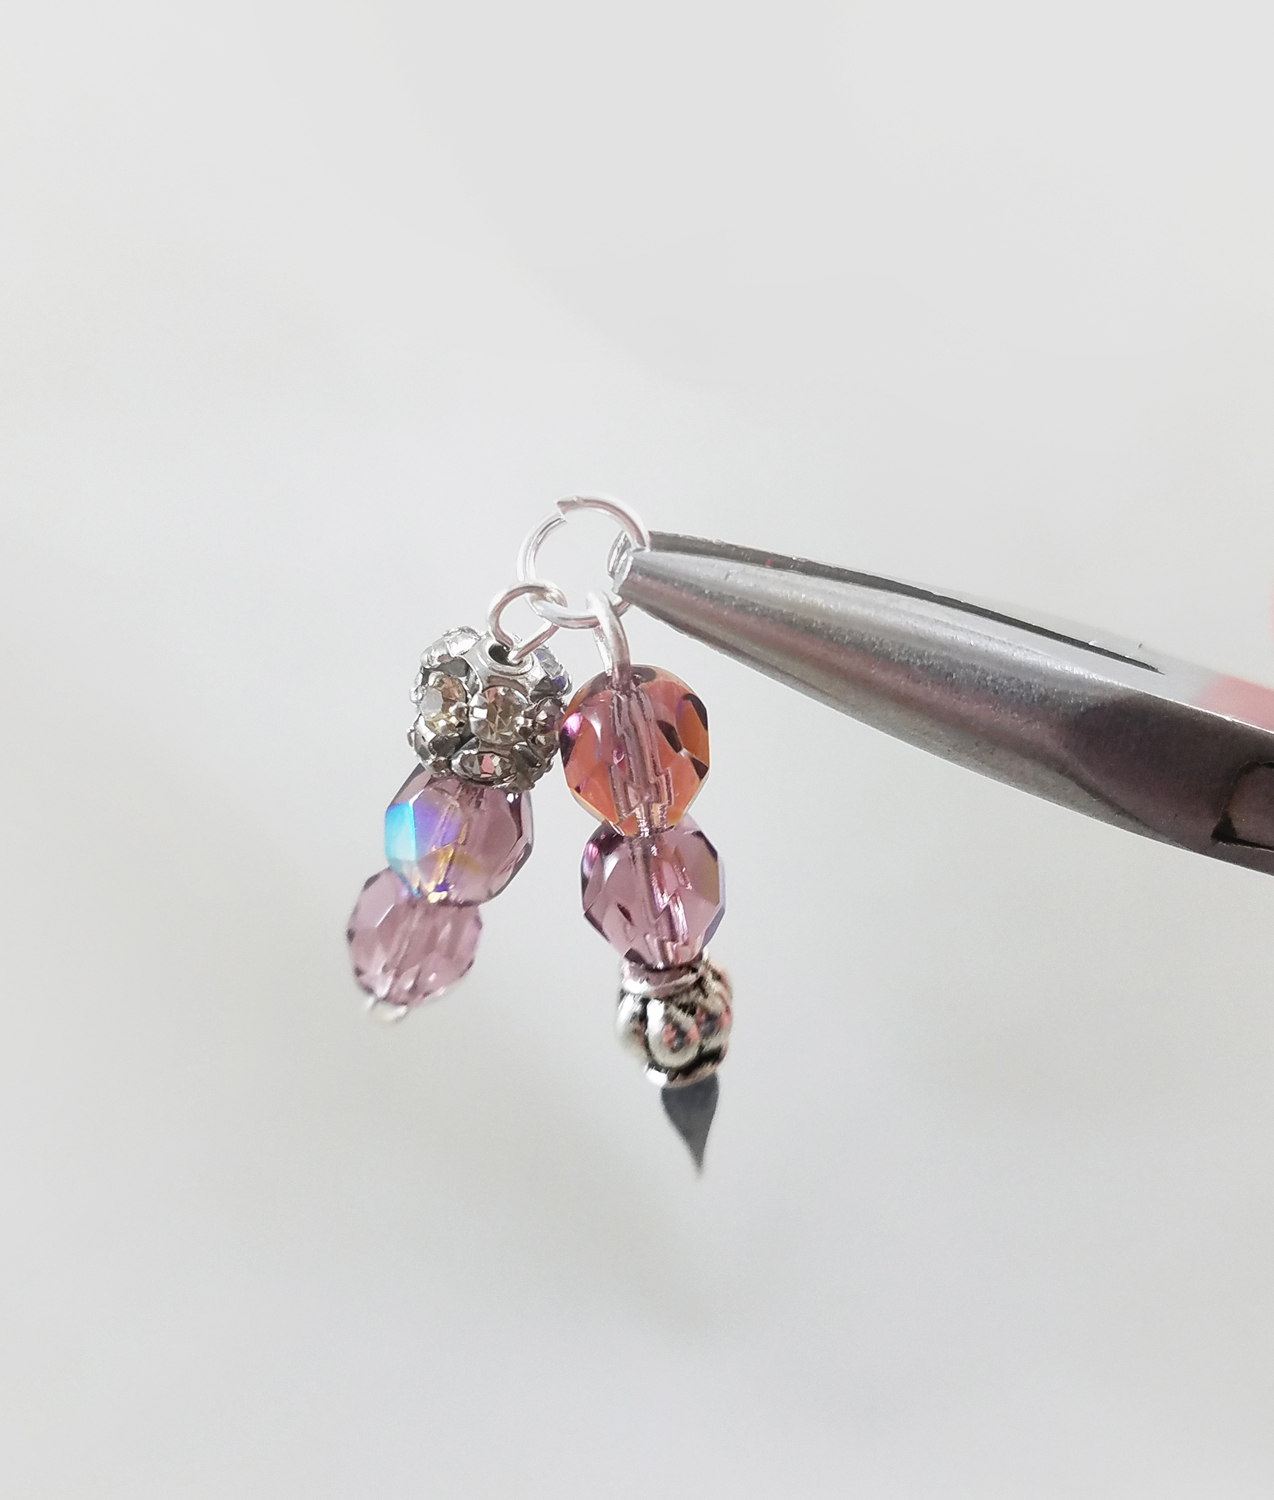
Thread both the eye pin and paddle pins on the open jump ring and close the jump ring with the two pairs of chain nose pliers by twisting the jump ring closed. Repeat this process for the second set of pins.
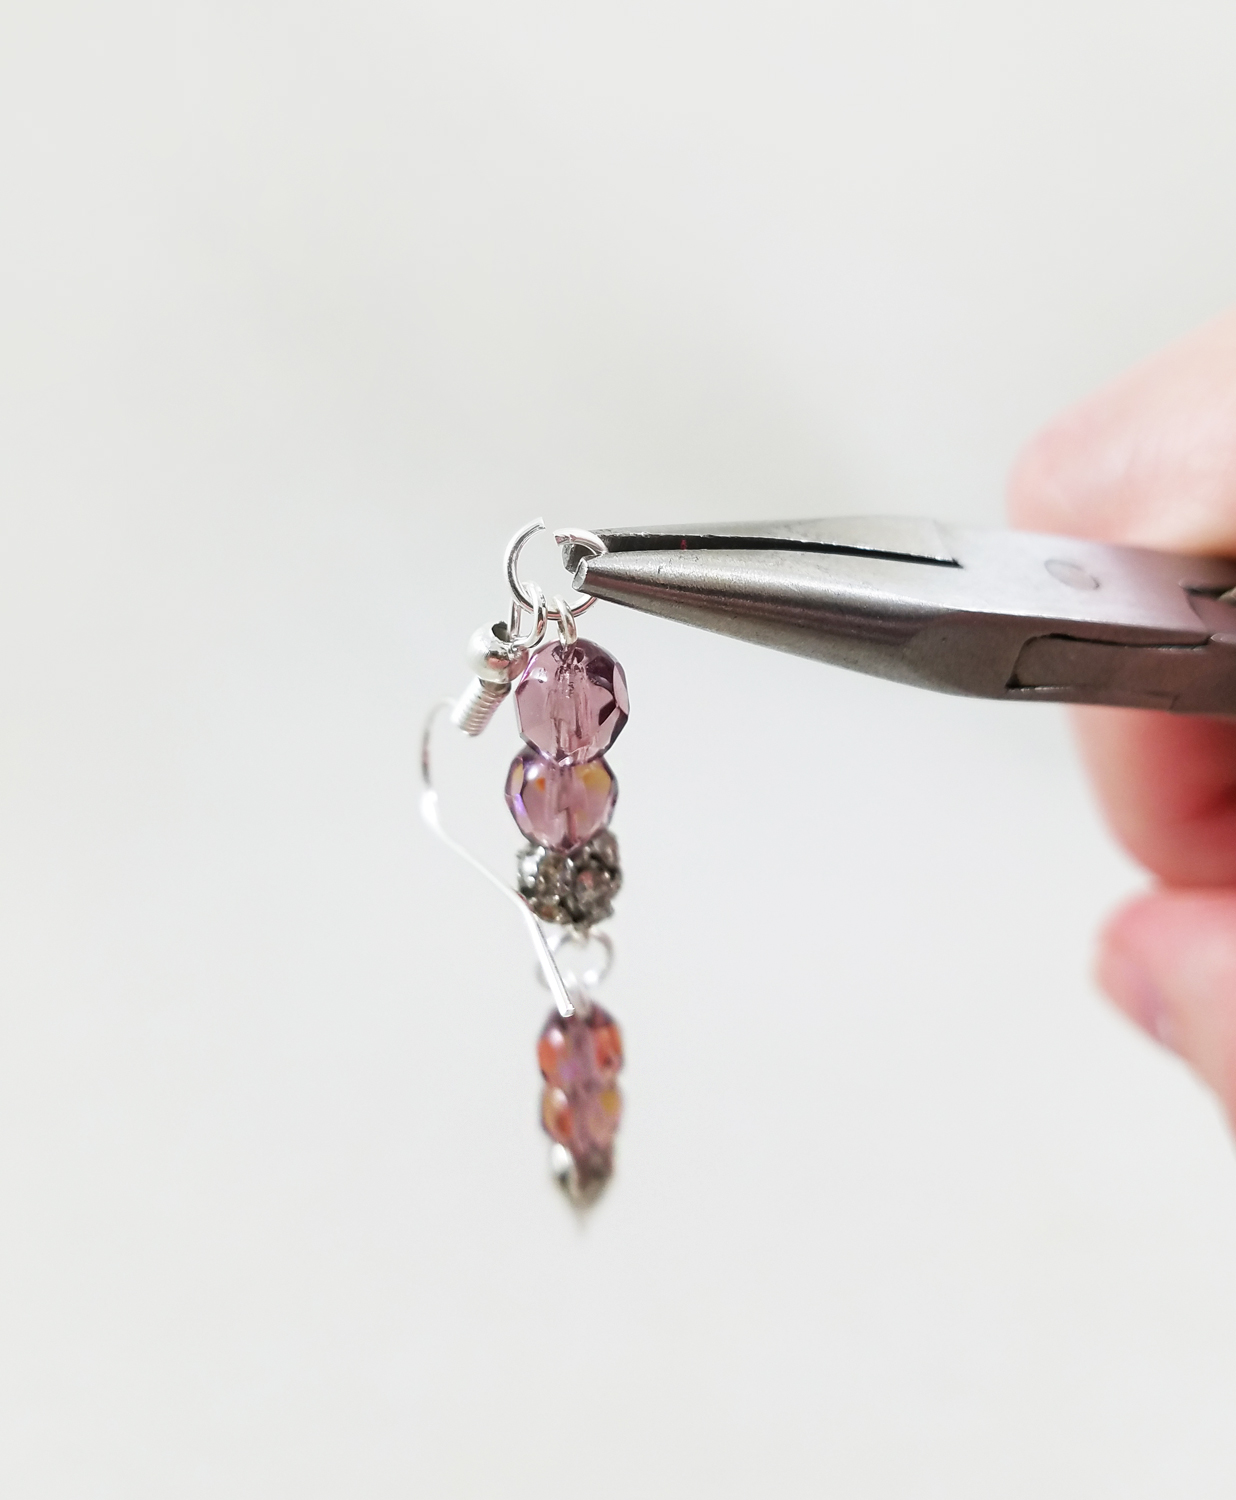
Open another jump ring and add a fish hook earring wire and close the jump ring. Repeat this process for the second earring.

Now you have the perfect pair of earrings for a casual or dressy occasion.
Until Next Time, Safe Travels!Upcycled Fabric Cedar Sachets

Since I was a child I was raised to save fabric. My childhood was full of stories from my grandmother, who lived through the Great Depression and my mother, who lived through WWII, on how they learned to be frugal and resourceful, saving things to turn into something new. Outgrow a shirt? Pants have too many holes? Curtains sun damaged? Fabric left over from making a dress? Save the fabric! The years have sped by, and in this modern world the ease and access to any number of arts and crafts supplies is astounding. However there is a want and even a need to reduce, reuse, or recycle long forgotten craft supplies.
One of my favorite upcycled crafts I was raised on making was fabric sachets. Both pretty and practical, these little bits of fabric, crafted into any number of shapes, stuffed with cedar, would decorate the house, protect our clothing from insects and remind us of loved ones present and past.Supplies:
Fabric scraps
Small pieces of lace and/or trim
Small lengths of ribbon or thin strips of fabric such as linen or muslin
Thread
Sewing needle
Buttons
Fabric Scissors
Cedar shavings (many pet shops and hardware stores have large bags available)
Cedar Essential oil
Mixing bowl
Sewing Machine *if not hand stitching
Ruler
Pencil
Paper
Craft scissors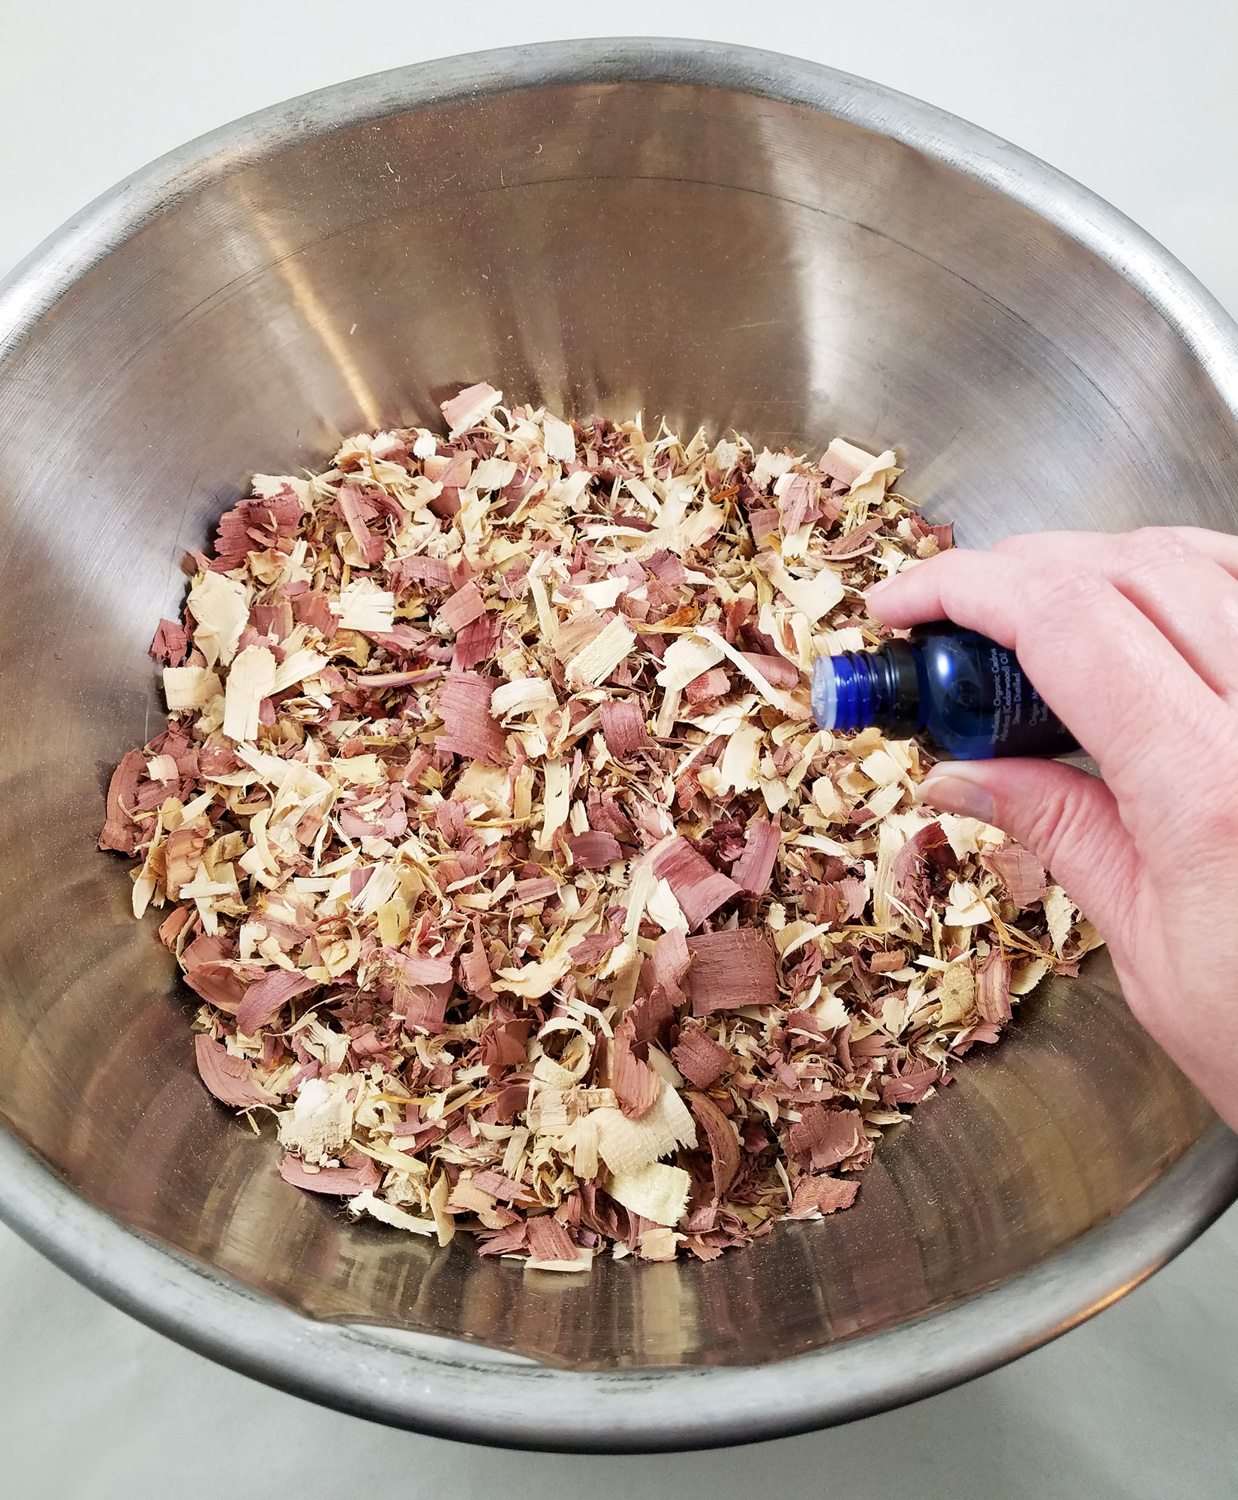
Pour the cedar shavings into the mixing bowl and remove any large chunks of wood or bark from the mix. Sprinkle lightly the cedar essential oil and stir the shavings. Repeat this about 4 times to make sure the shavings have an extra boost of cedar scent. Let the shavings sit and soak up the oil, which can take 5 to 10 hours.
In this pile I have fabric scraps, remnants, old bed linen, swatches of clothing, table cloths and more. The only requirement for any fabric pieces to use in this project is that is to be lightweight and ideally cotton, hemp, linen, muslin or other plant fiber based materials. These will allow the scent of the cedar to release easier over time.
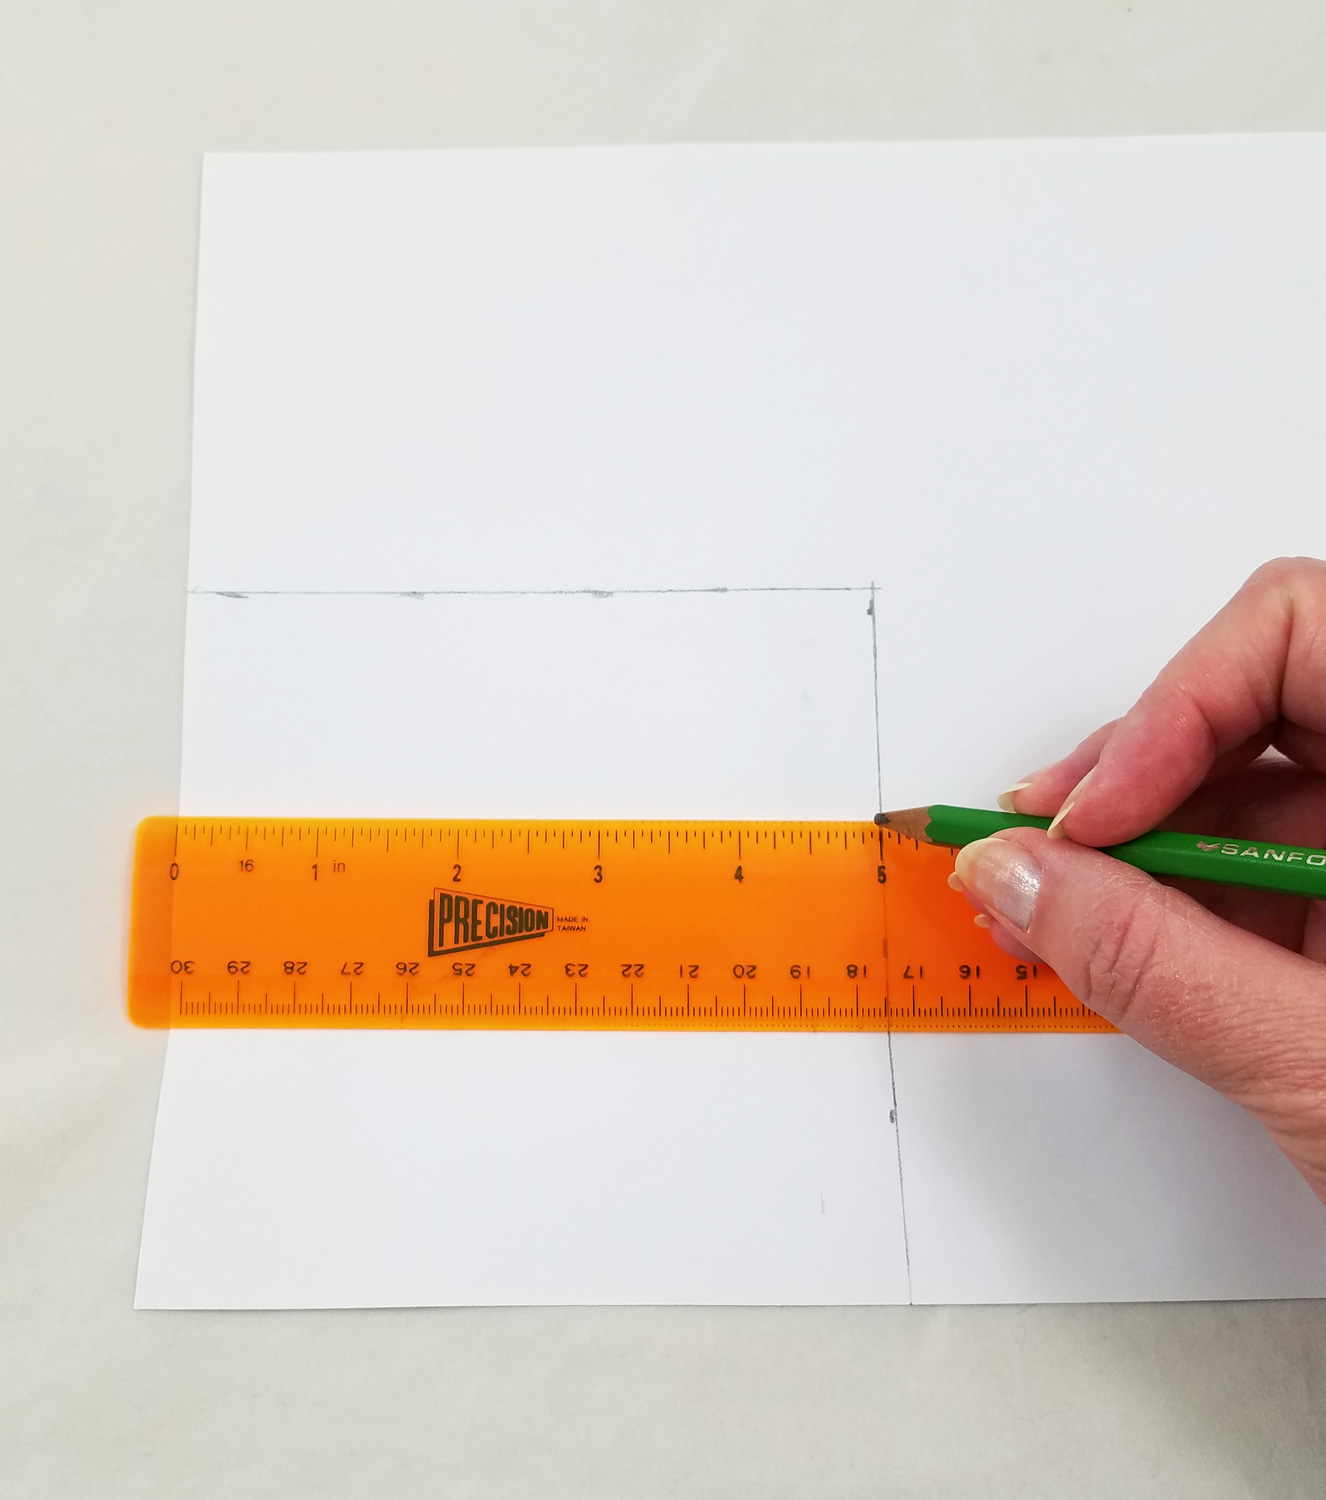
Using a ruler and pencil draw a 5 inch by 5 inch square. This is the starting size for the heart pattern.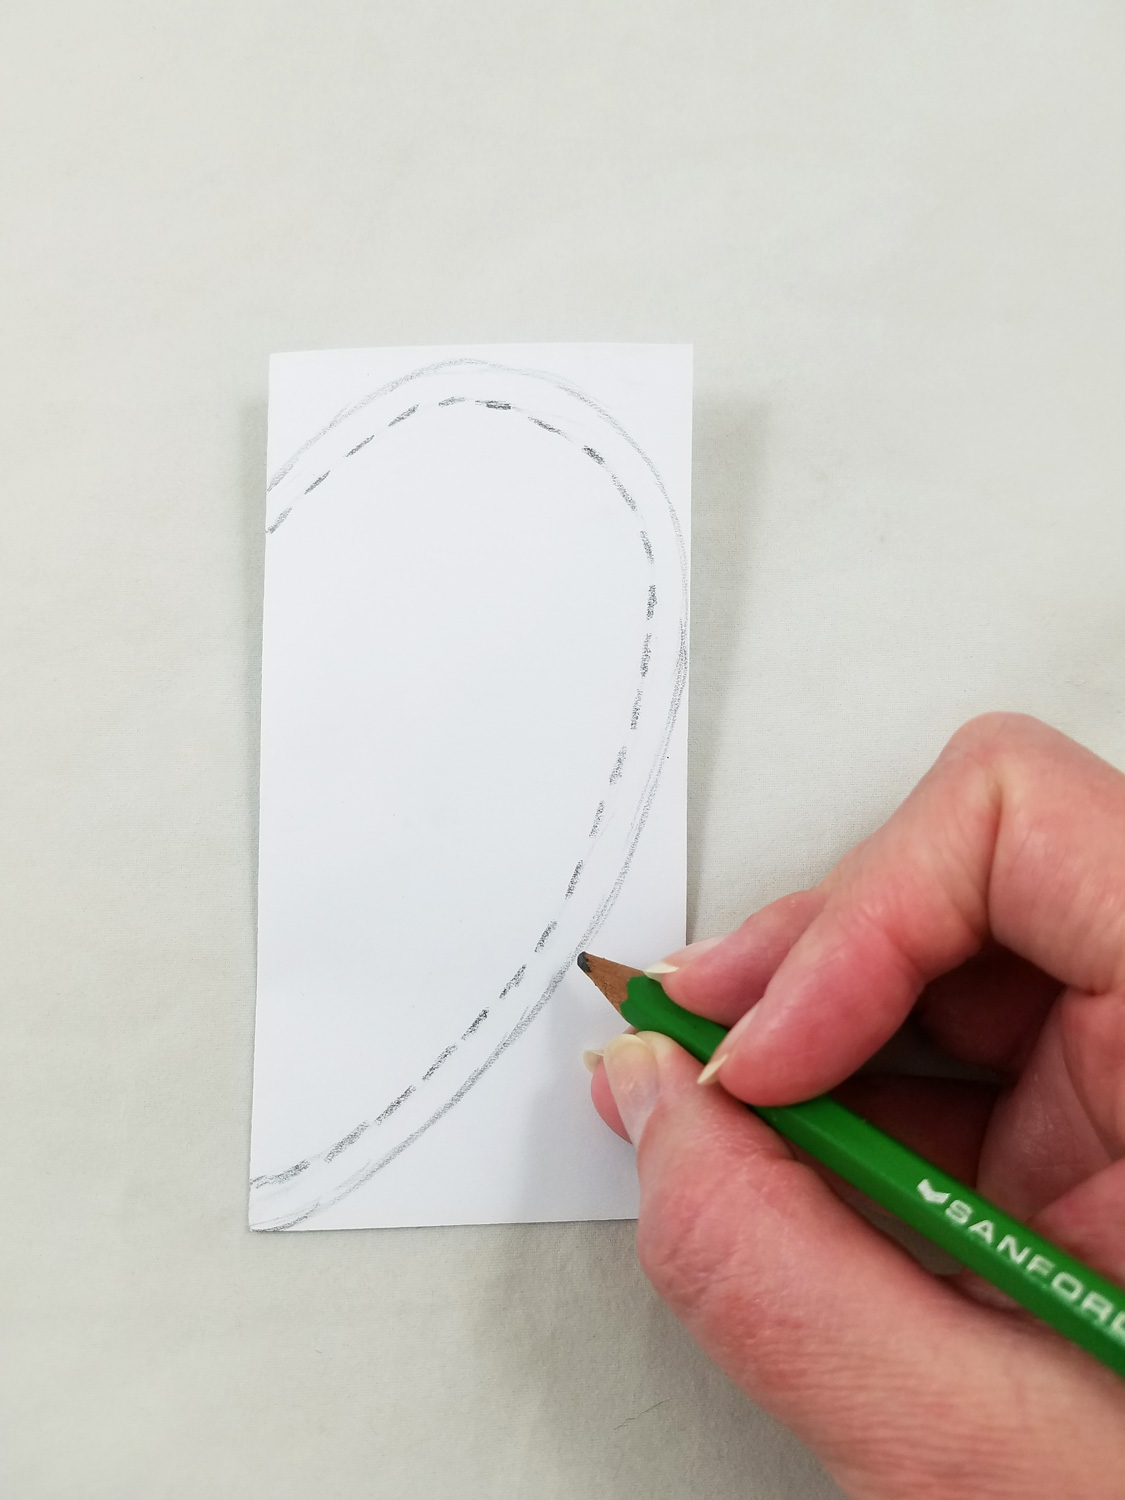
Cut out the 5inch square and fold in half. Staying just within the lines of the paper, draw half a heart. Then within that line draw a second dotted line, ¼” width. This will be the guide for a ¼” seam.
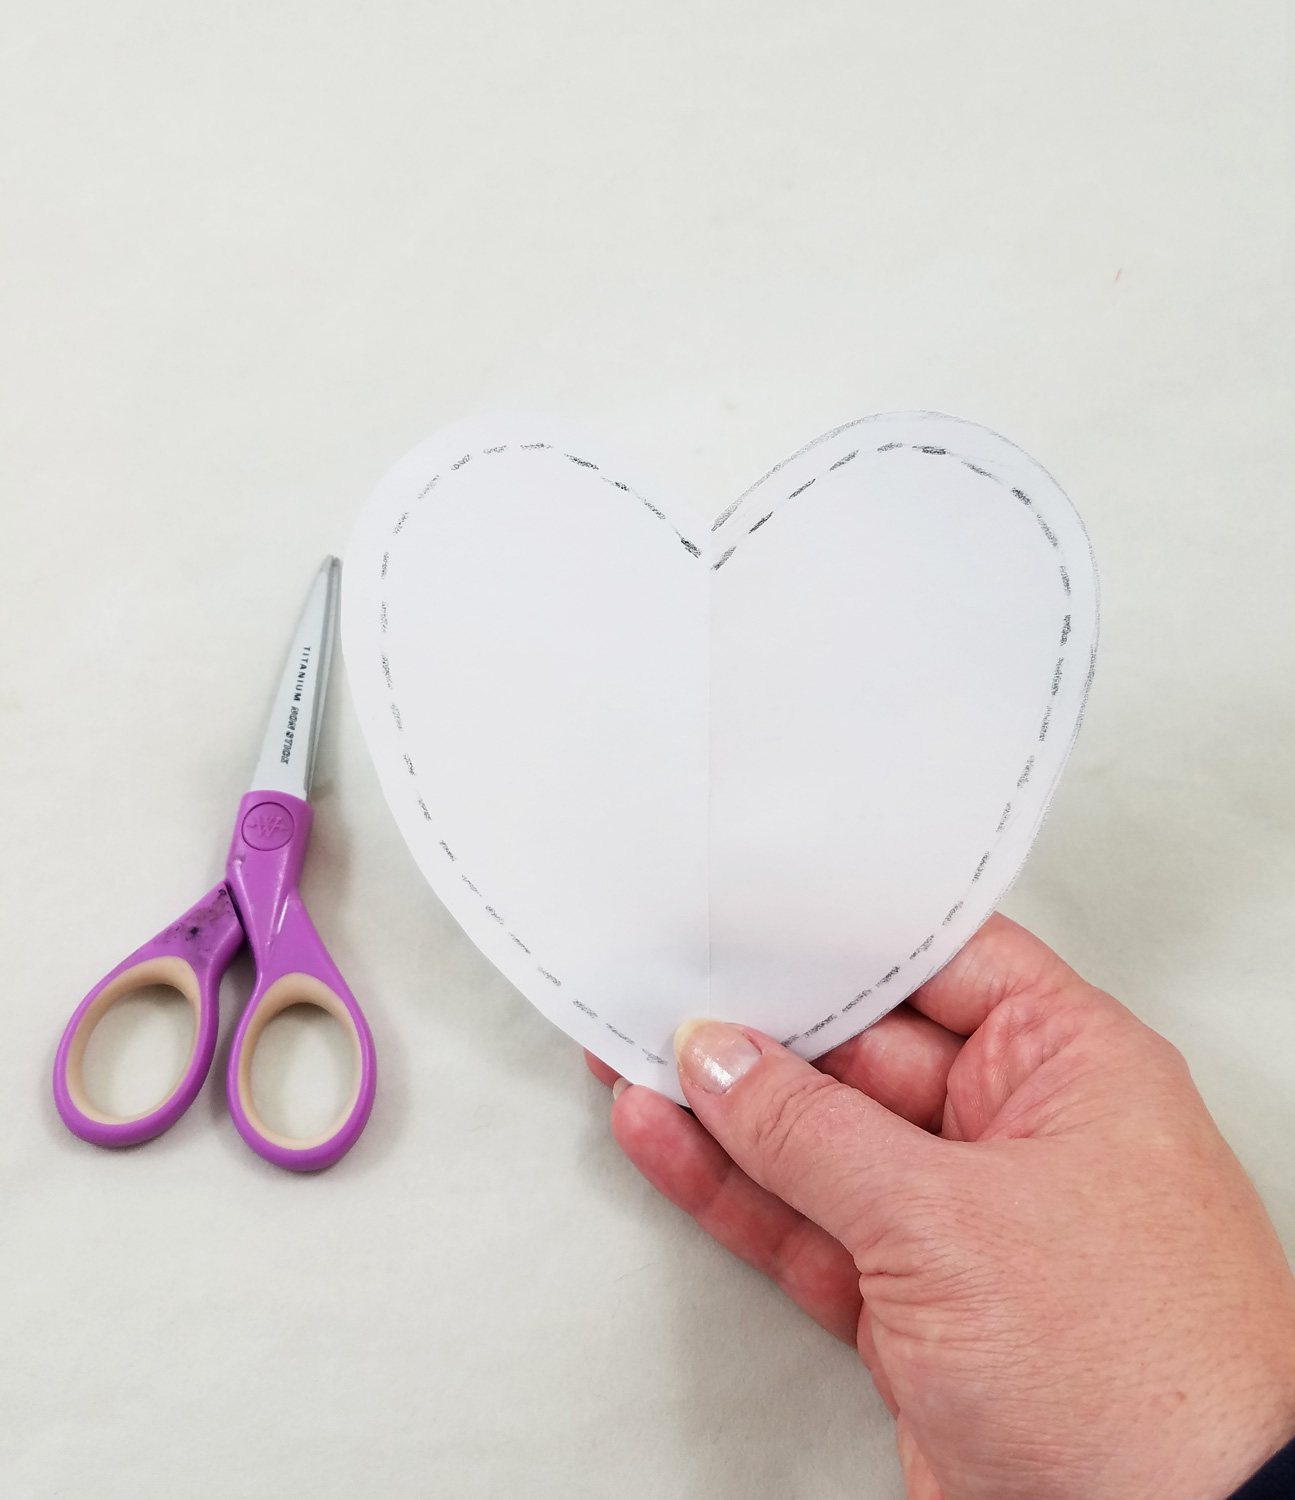
Cut out the paper heart and draw in the ¼” seam allowance dotted line on the second side.
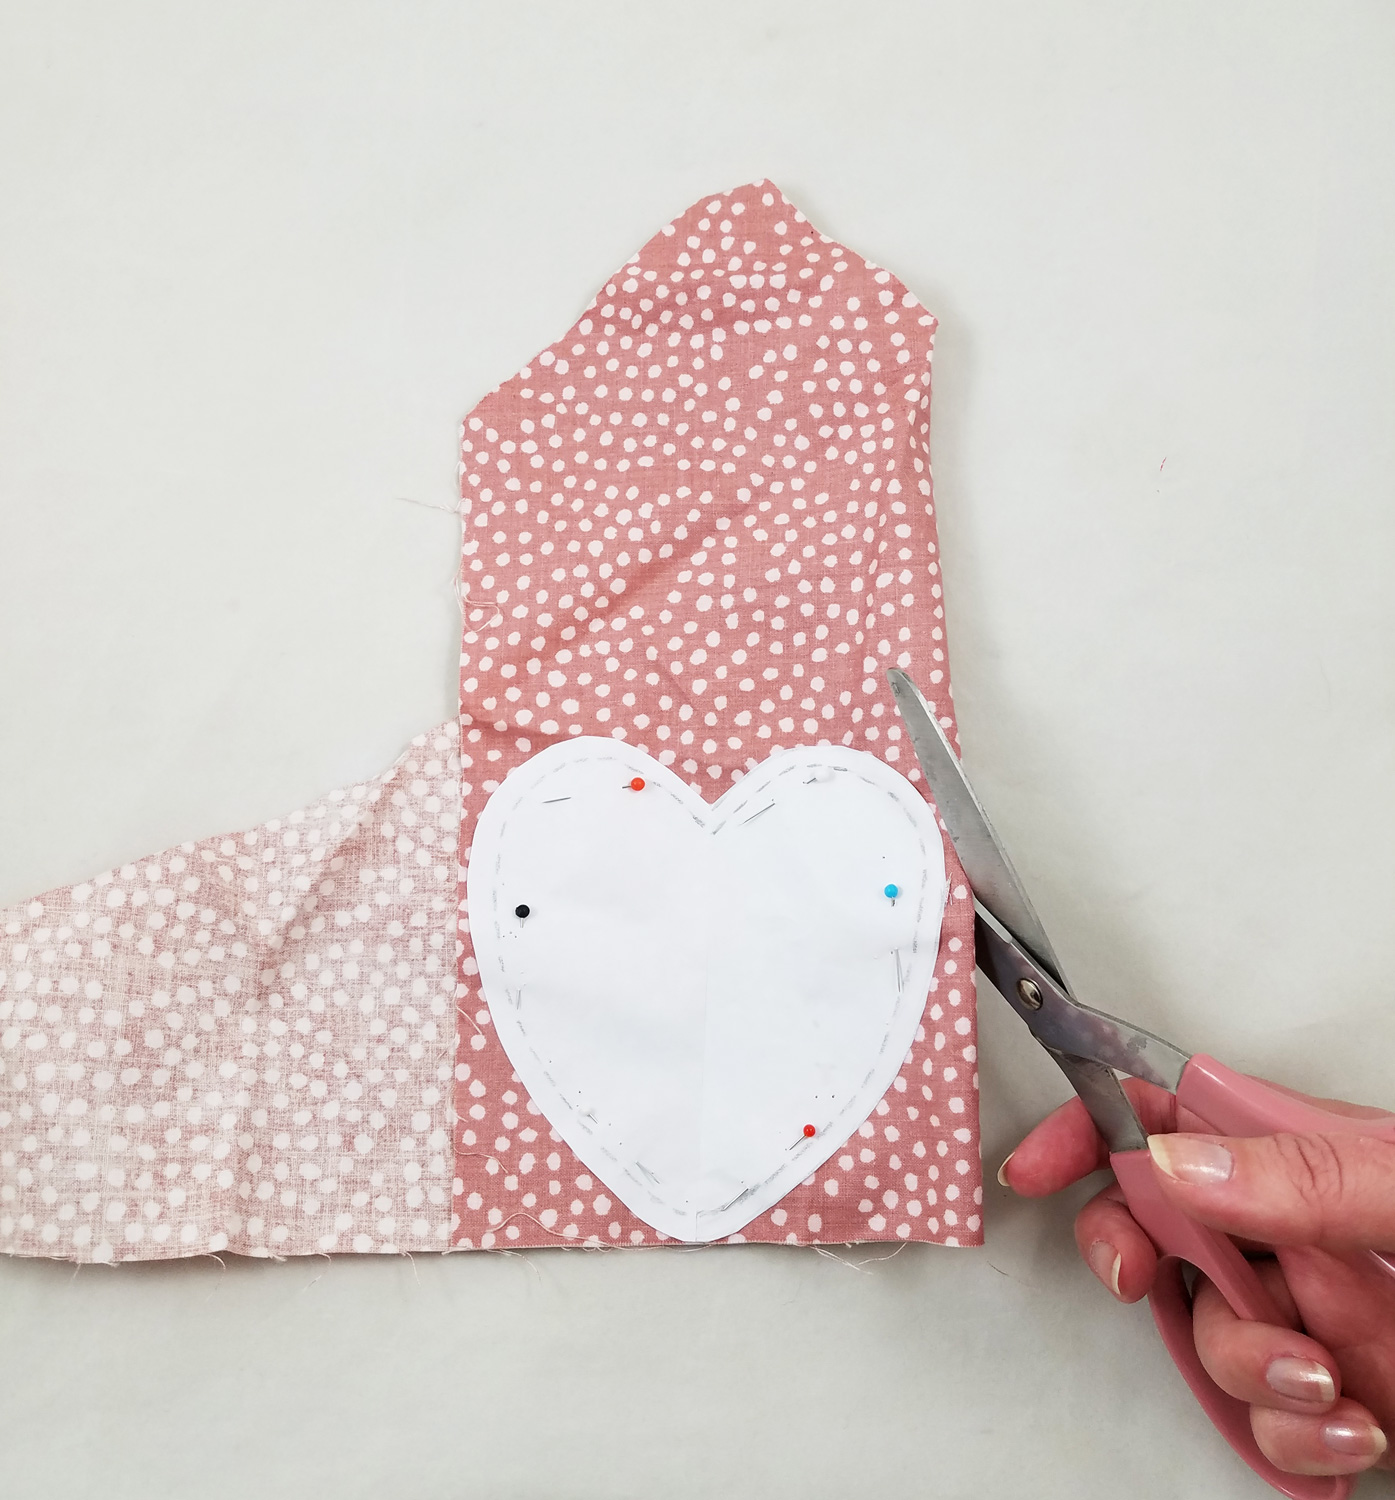
Use the pattern to cut out 2 fabric hearts for each sachet. If possible fold fabric and pin the pattern onto the fabric to cut two fabric hearts at a time if the remnants are large enough.

Do not worry if the fabric pieces are only wide enough to cut one heart out, as you can always cut more of a contrasting or complementary fabric.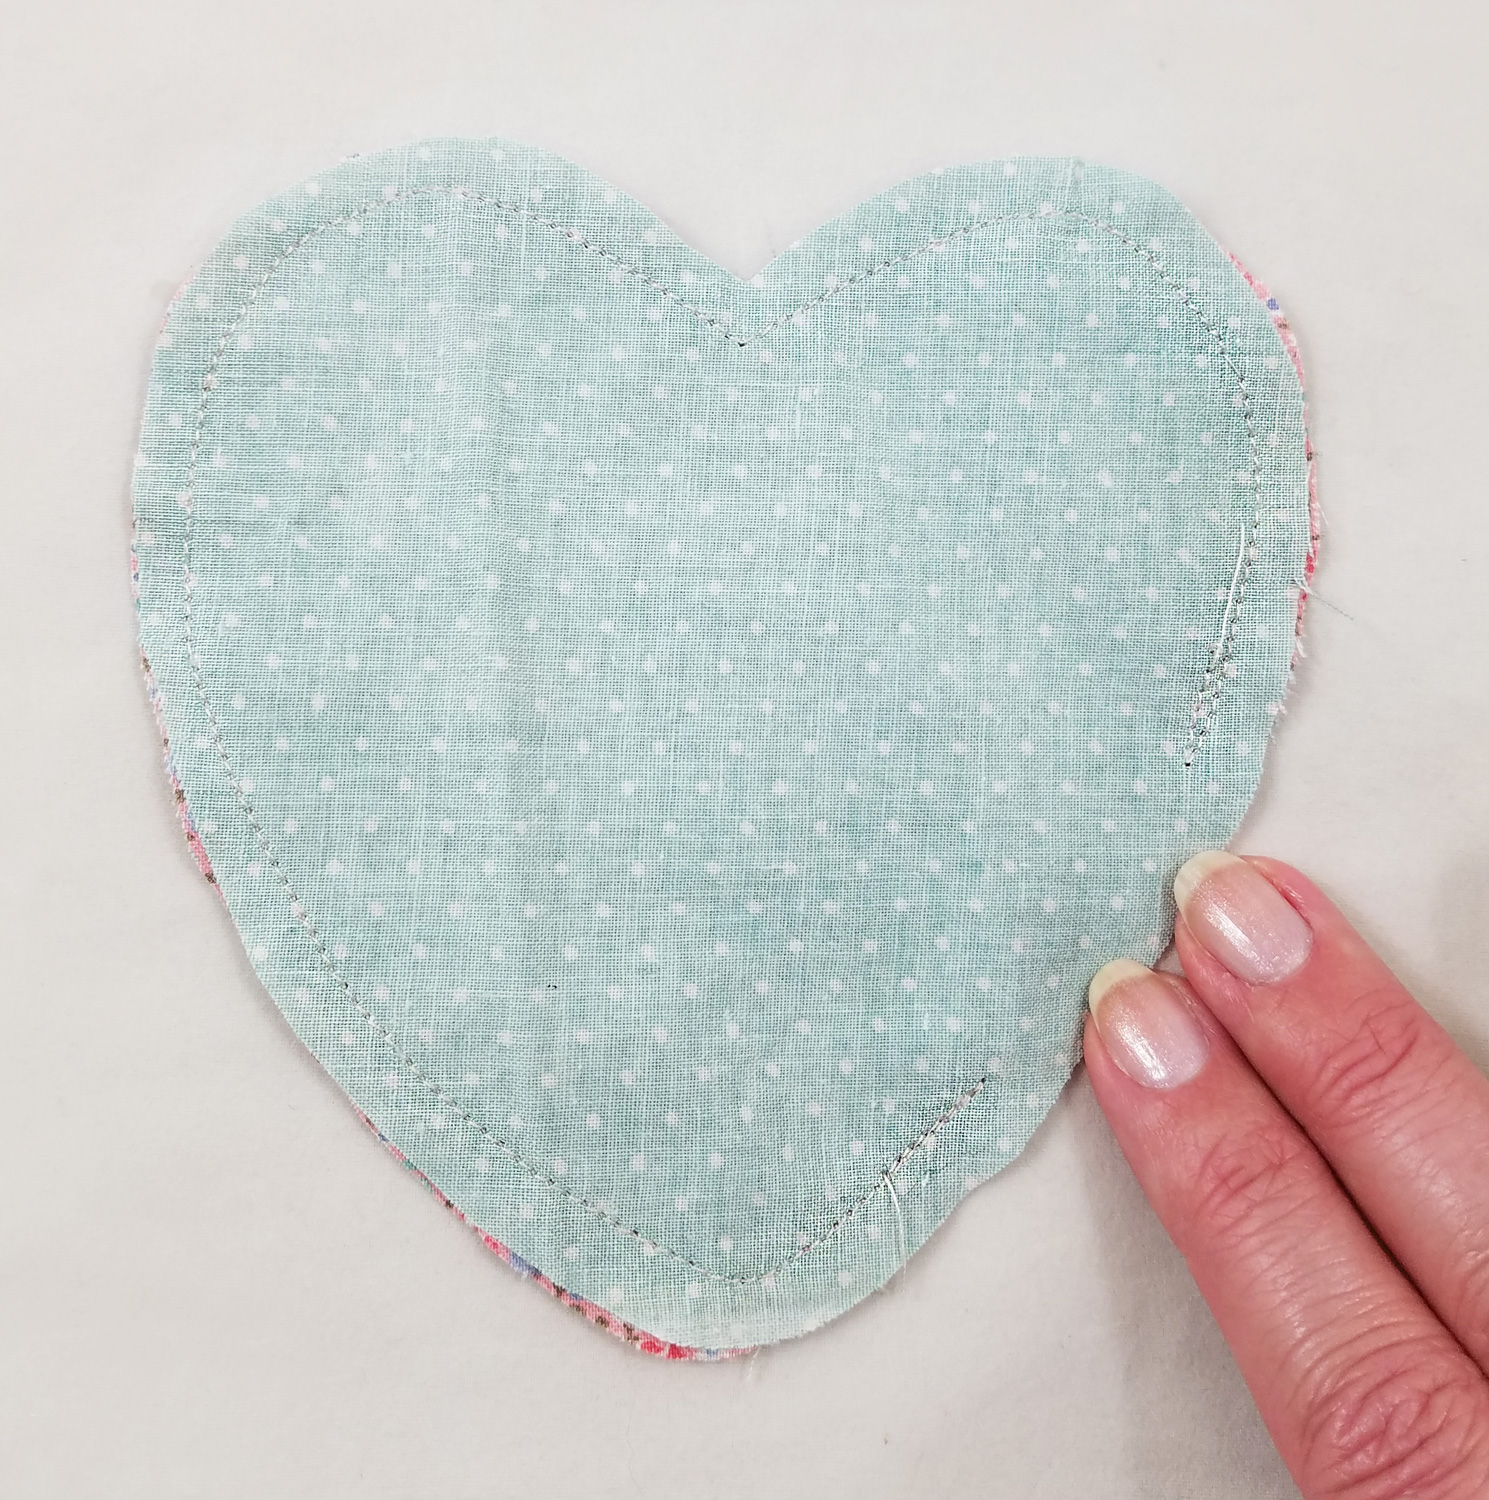
Place the right sides of the fabric hearts together and stitch around the heart with a ¼” seam. Make sure to do a reverse stitch when you start to sew and at the end, as it will strengthen the stitch and prevent it from unraveling when turning rightside out and stuffing the fabric heart. Make sure to leave a portion unstitched, making an opening to turn the fabric heart rightside out.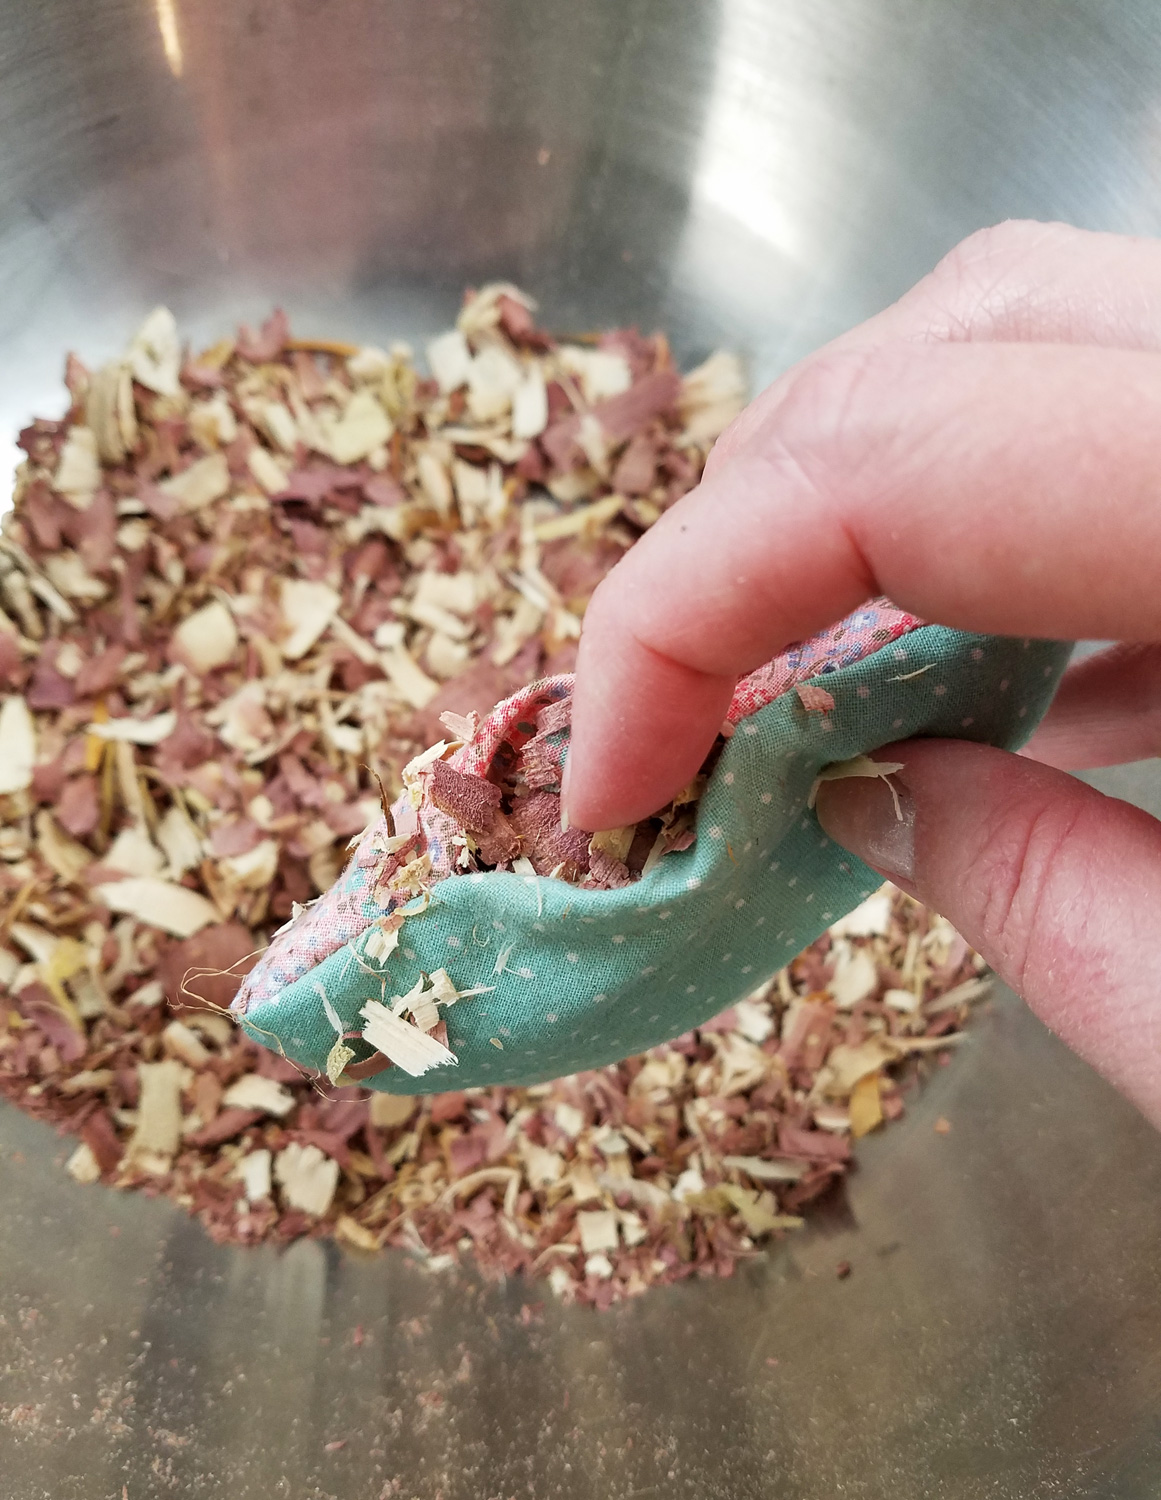
Snip any corners of fabric that might pull or tuck when turned rightside out, such as the dip in the heart or the point of the heart. Turn rightside out and use the eraser end of a pencil to push the heart into shape. Stuff each heart with cedar shavings.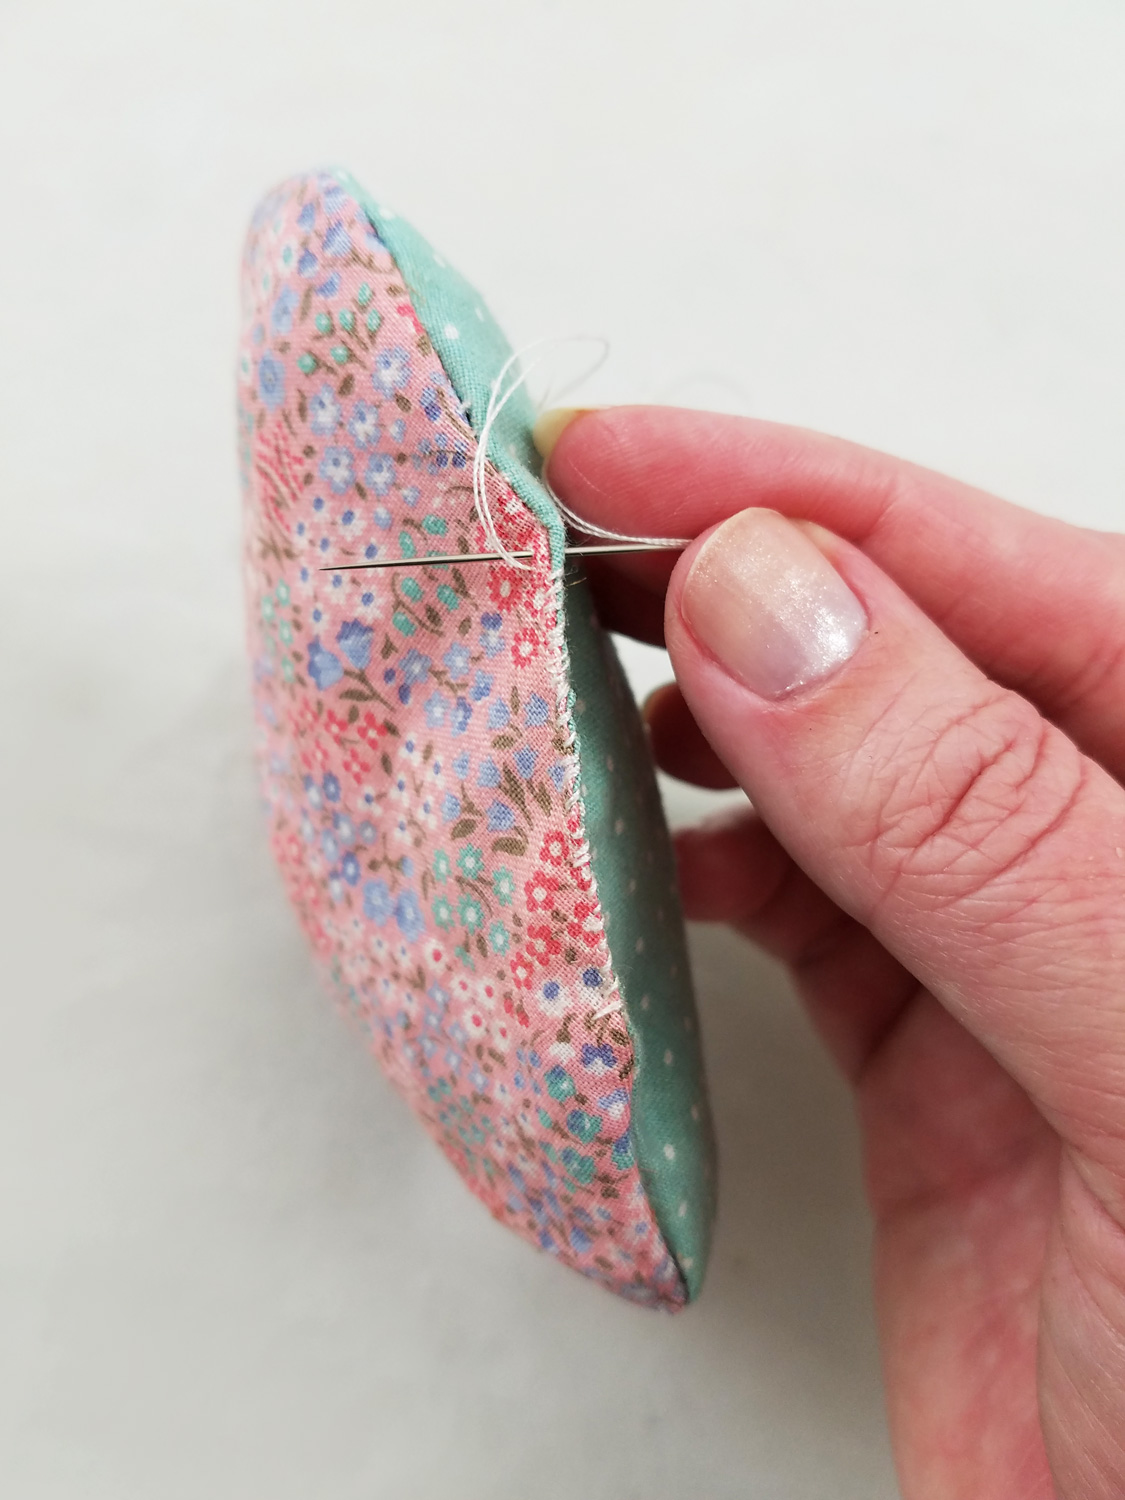
I used an Overcast Stitch to sew up the open part of the heart, as any lace or trim later will cover up the stitches. If you do not want to add lace or trim later, use a Slip Stitch to sew shut the heart.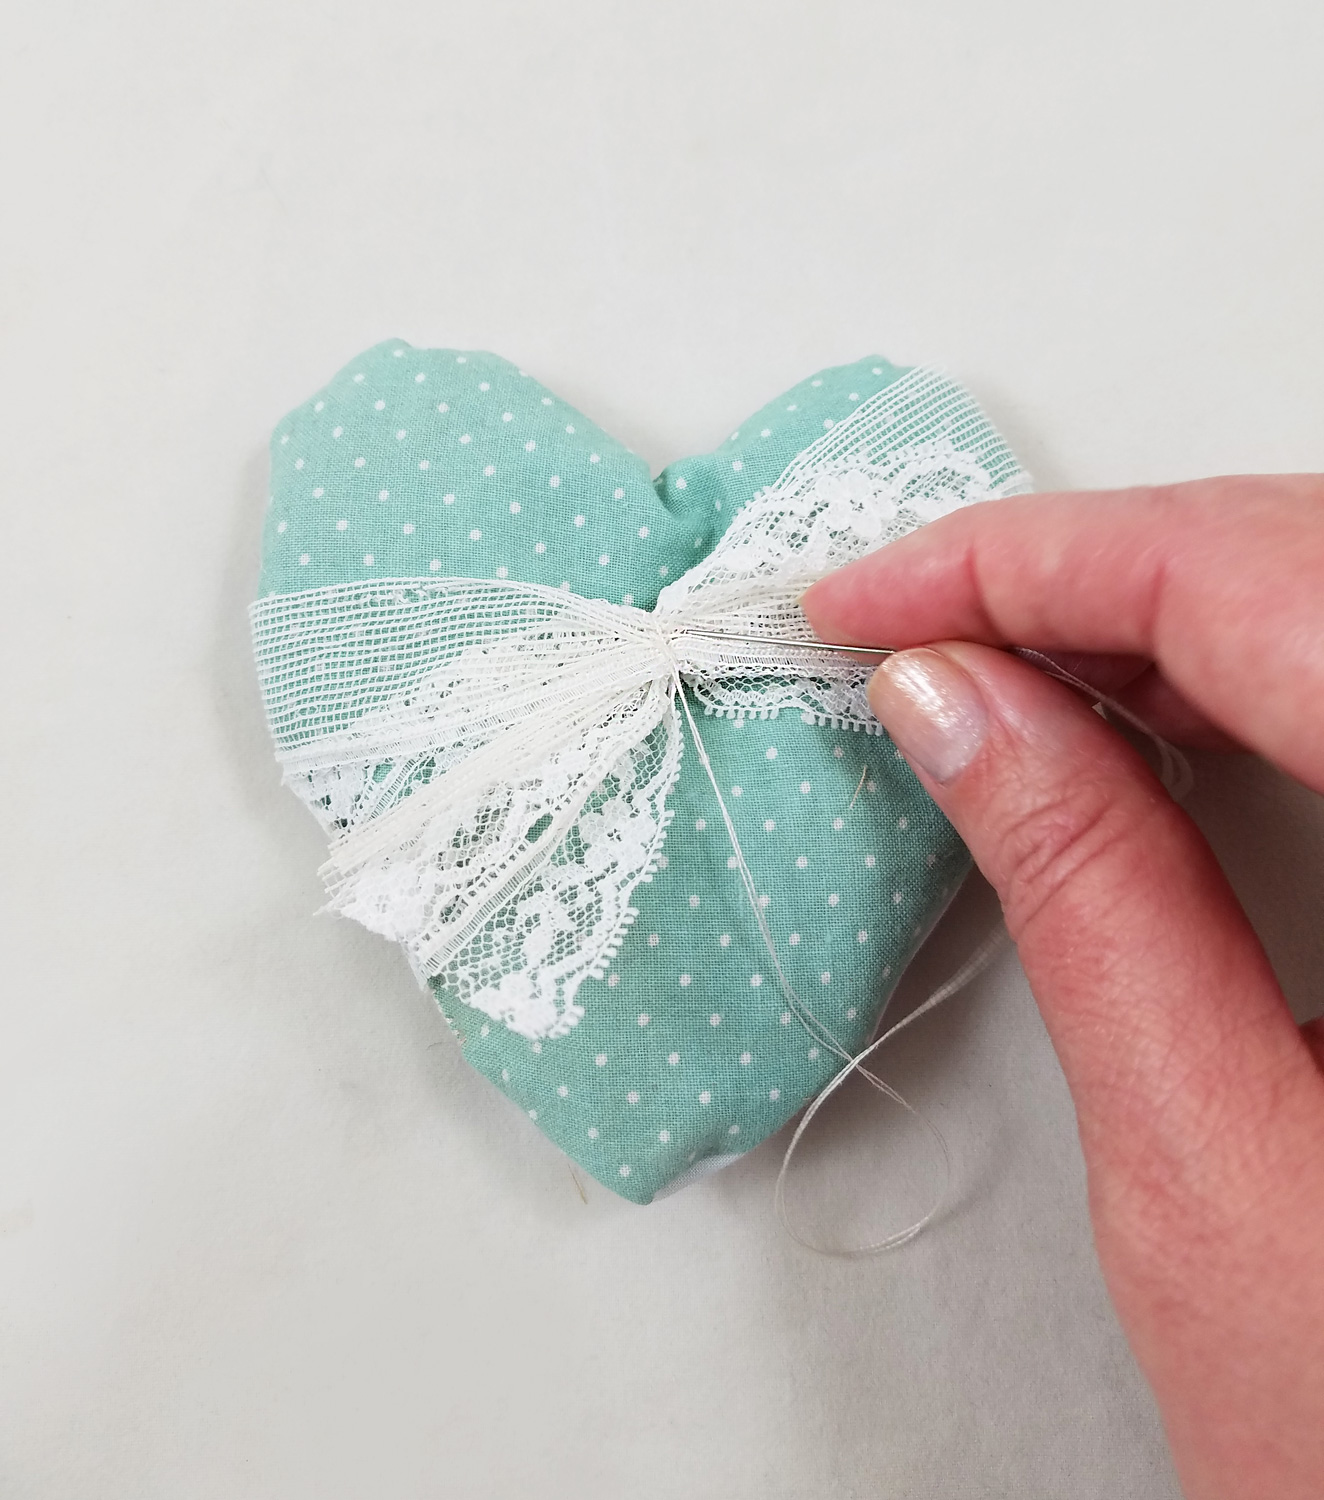
Using a small piece of lace or fabric create a sash that goes around both sides of the heart, making sure to cover the stitch that closed the heart. Gather and stitch together the sash, in the front of the heart. If you do not want a gathered front sash you can always stitch closed the sash on the back of the fabric heart.
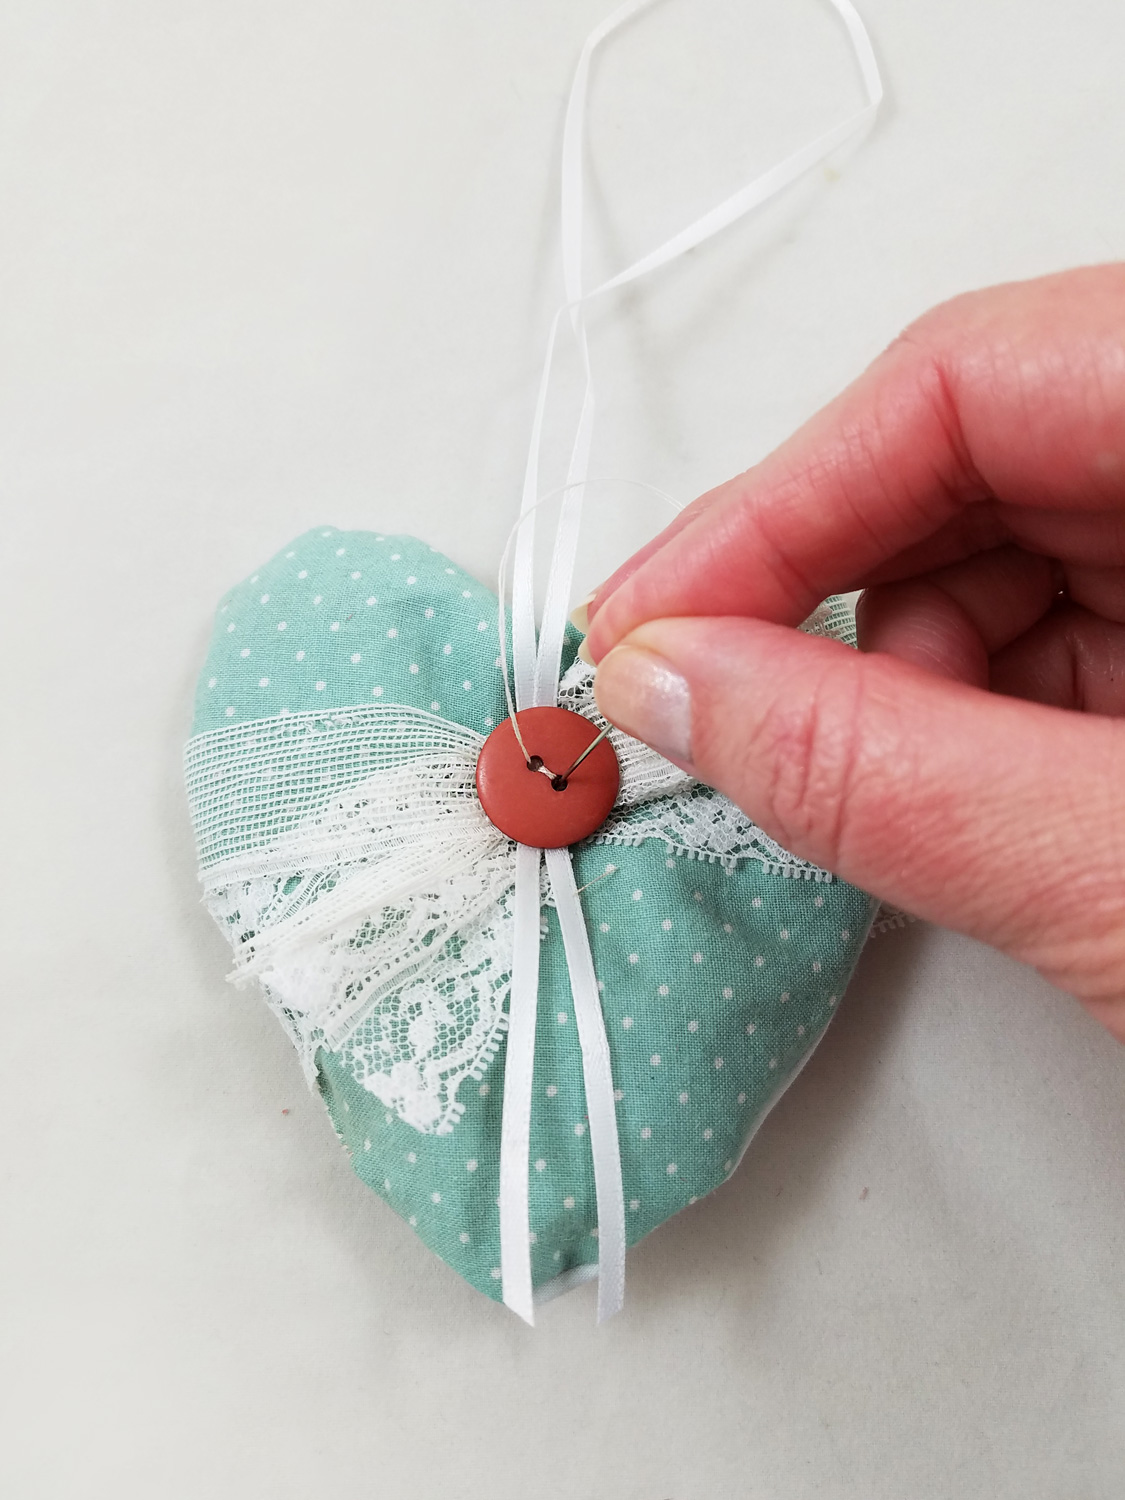
Loop a piece of ribbon and stitch the ribbon and a button through the sash and the fabric heart to create a secure hanger for the sachet. Hang your newly created sachet on doorknobs, hangers, coat racks or in boxes or dressers
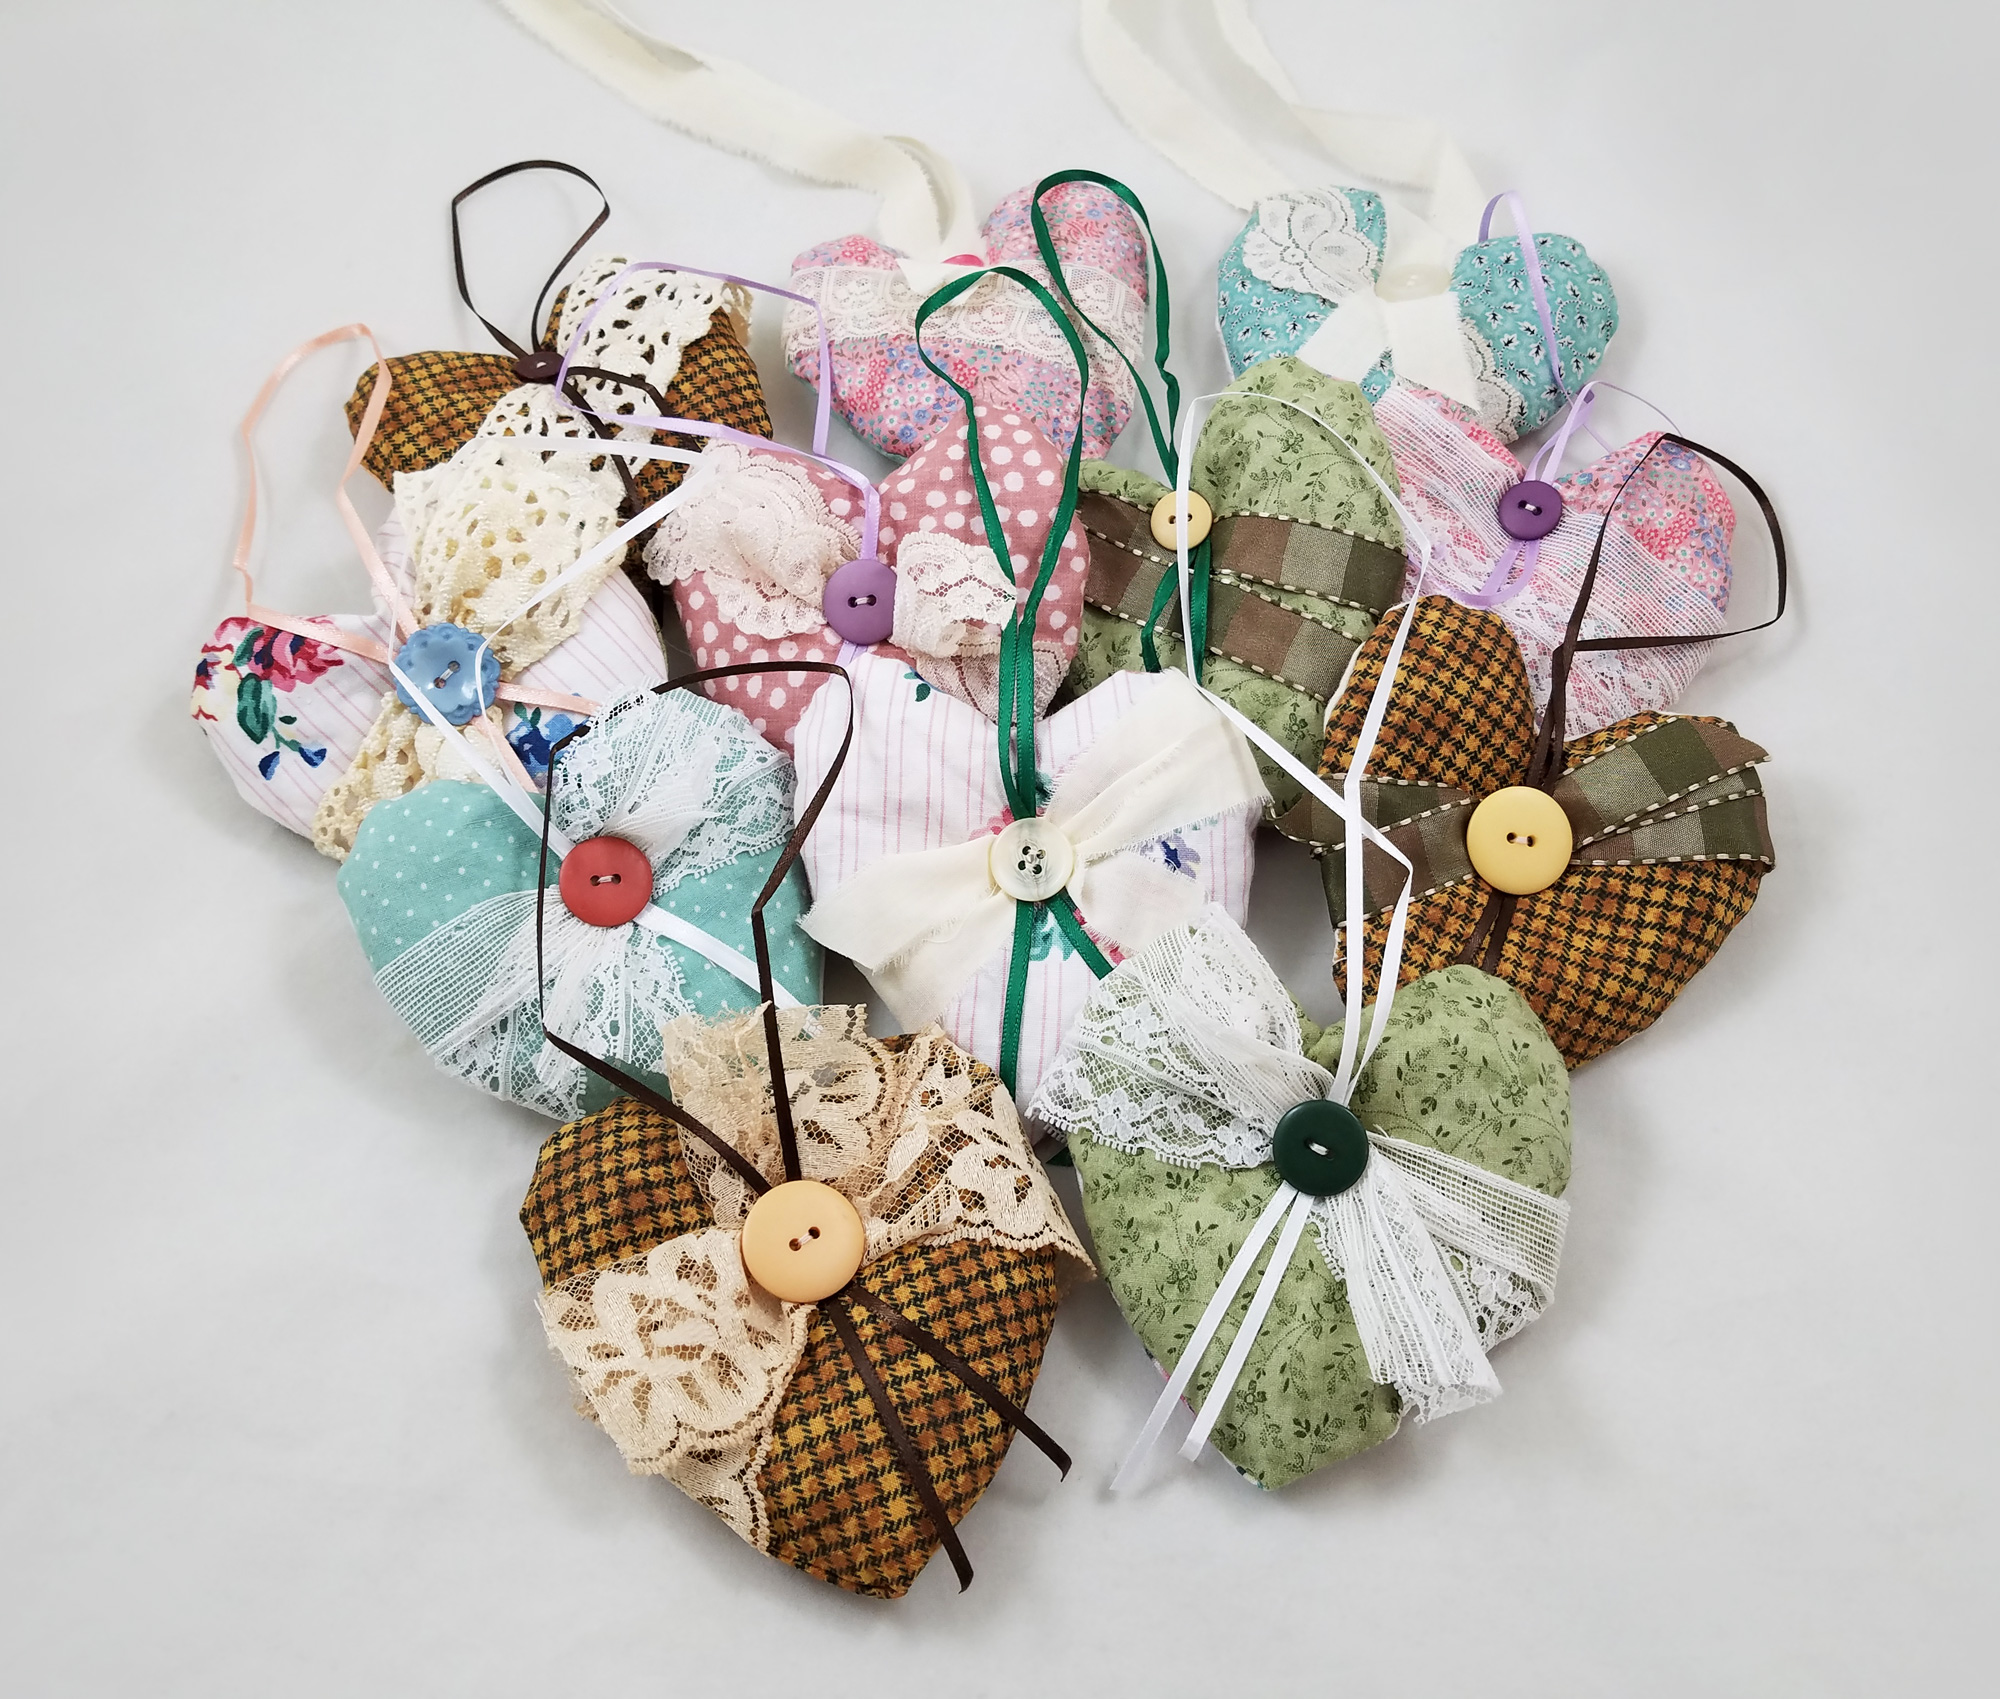
Different lace and trim placements make each sachet a unique piece. Try making sachets in different shapes, sizes and fabrics. Not a fan of cedar? Switch out the cedar for dried rose petals, rosemary or lavender!Happy Holidays and until next time, safe travels!
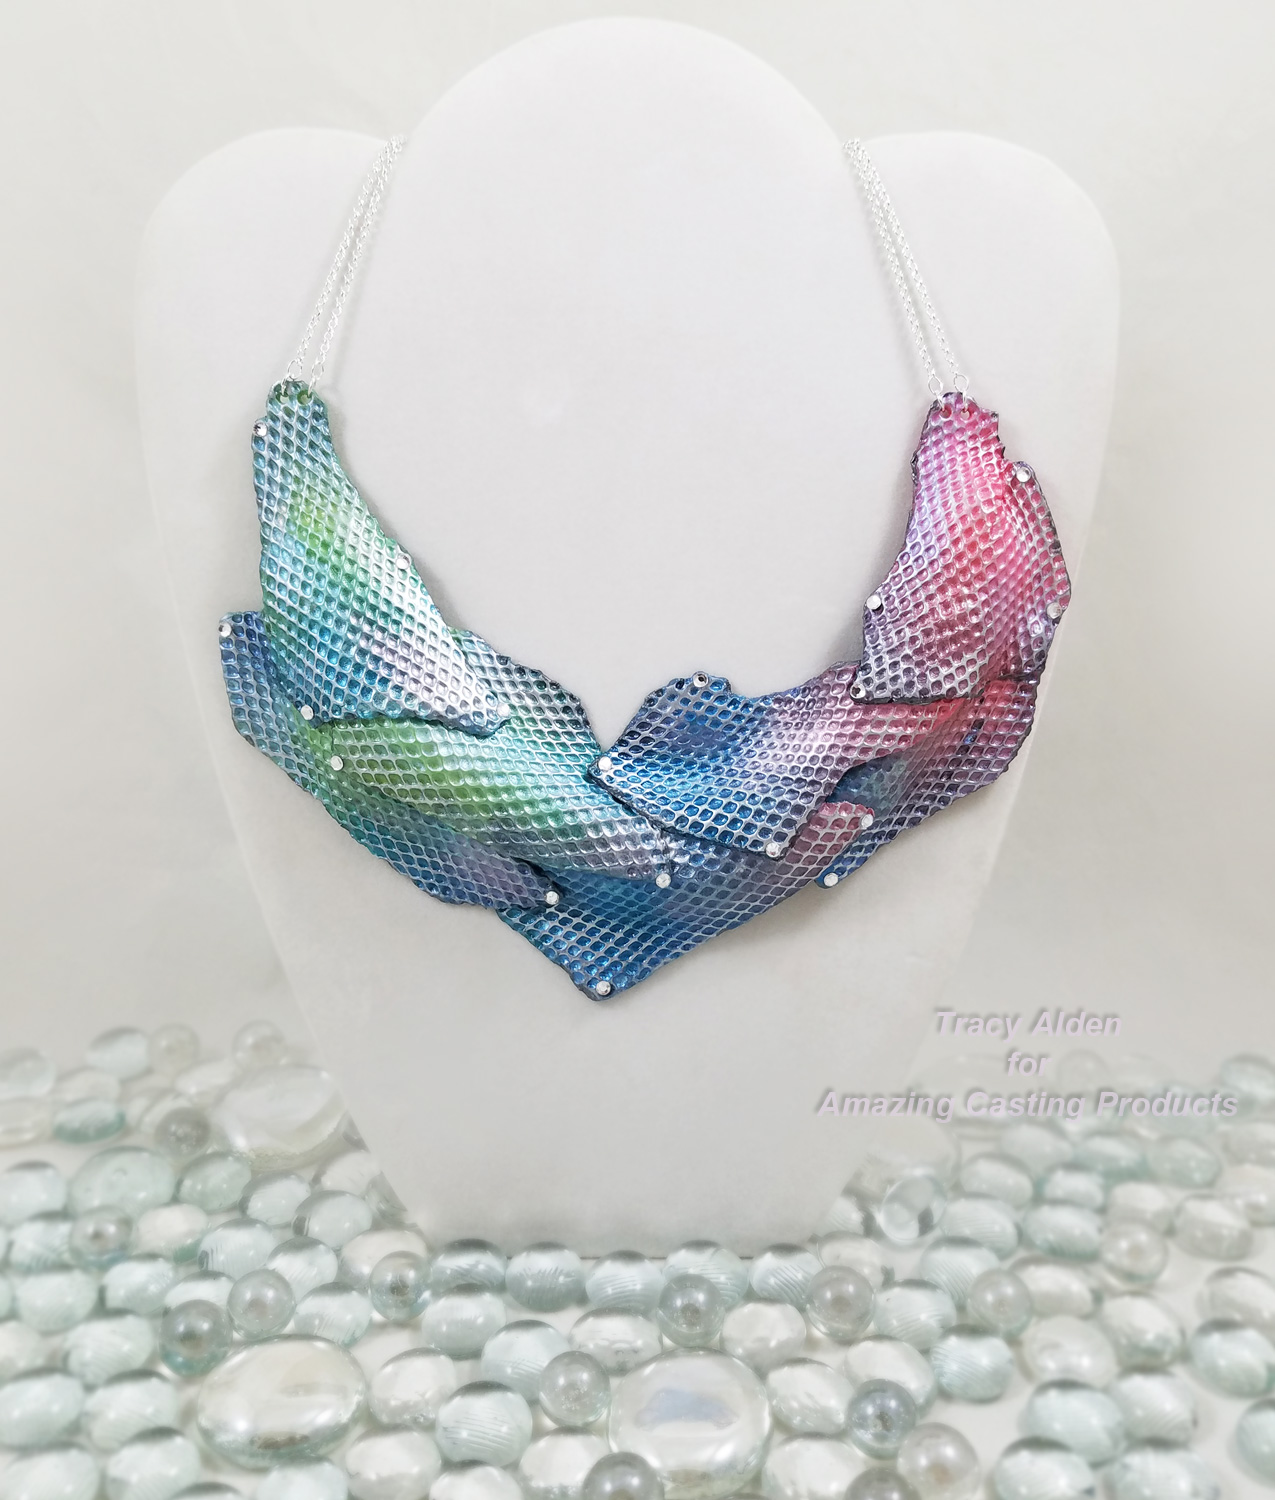
The Mermaid’s Necklace, a #Cre8time fish-tale
A great inspiration for my art is looking for and finding textures to duplicate and/or mold. While my project might look like something from the sea it started in a by far more mundane environment, my office. My metal pen, paper and paperclip holder is made out of mesh, a delicate diamond pattern, reminiscent of tiny fish scales. With the help of Amazing Mold Putty I could transfer this lovely pattern to Premo Accents polymer clay to create a necklace fit for a mermaid!
Supplies:
Amazing Mold Putty
Alumidust
Alumilite Metallic Powder
Premo Sculpey Accents Multipack 12 pc Mixed Effects(using Bright Green Pearl, Sunset Pearl, Peacock Pearl from this pack)
Premo Sculpey Accents Translucent
Sculpey Glaze Gloss
Acrylic Roller
Stylus (small sizes)
Pasta Machine (optional but helpful)
Ceramic Tiles
Craft Knife
Small Paint or Makeup Brush
Beacon Gem-Tac Glue
Rhinestones
Silver tone jewelry chain and jumprings
Metal mesh office pen and note holder or a piece of heavy weight mesh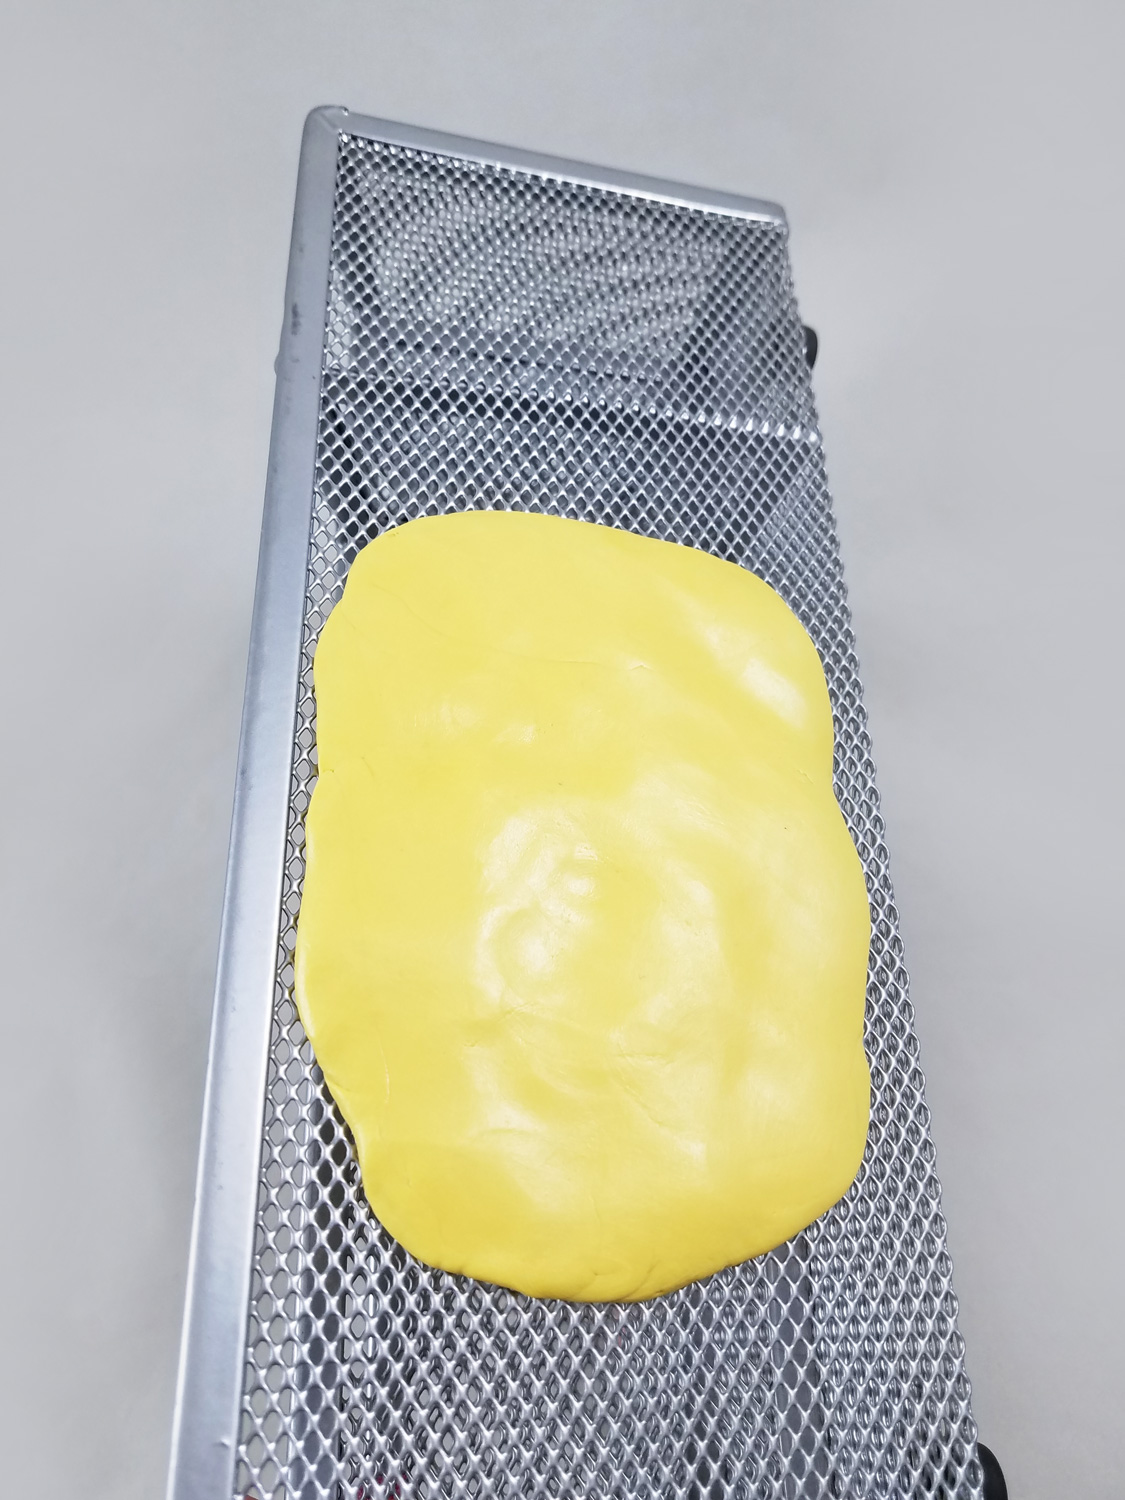
I mixed up some Amazing Mold Putty {CLICK HERE to view mixing/preparation}, and applied it to the largest open part of the mesh office supply holder. I was careful to press the Mold Putty through the mesh to get detail, but not too far that the mold putty would seep through creating weak points and holes in the mold.
Once the Mold Putty was cure I carefully peeled it off the wire mesh. Now I had a perfect texture plate that had a close resemblance to tiny fish scales.
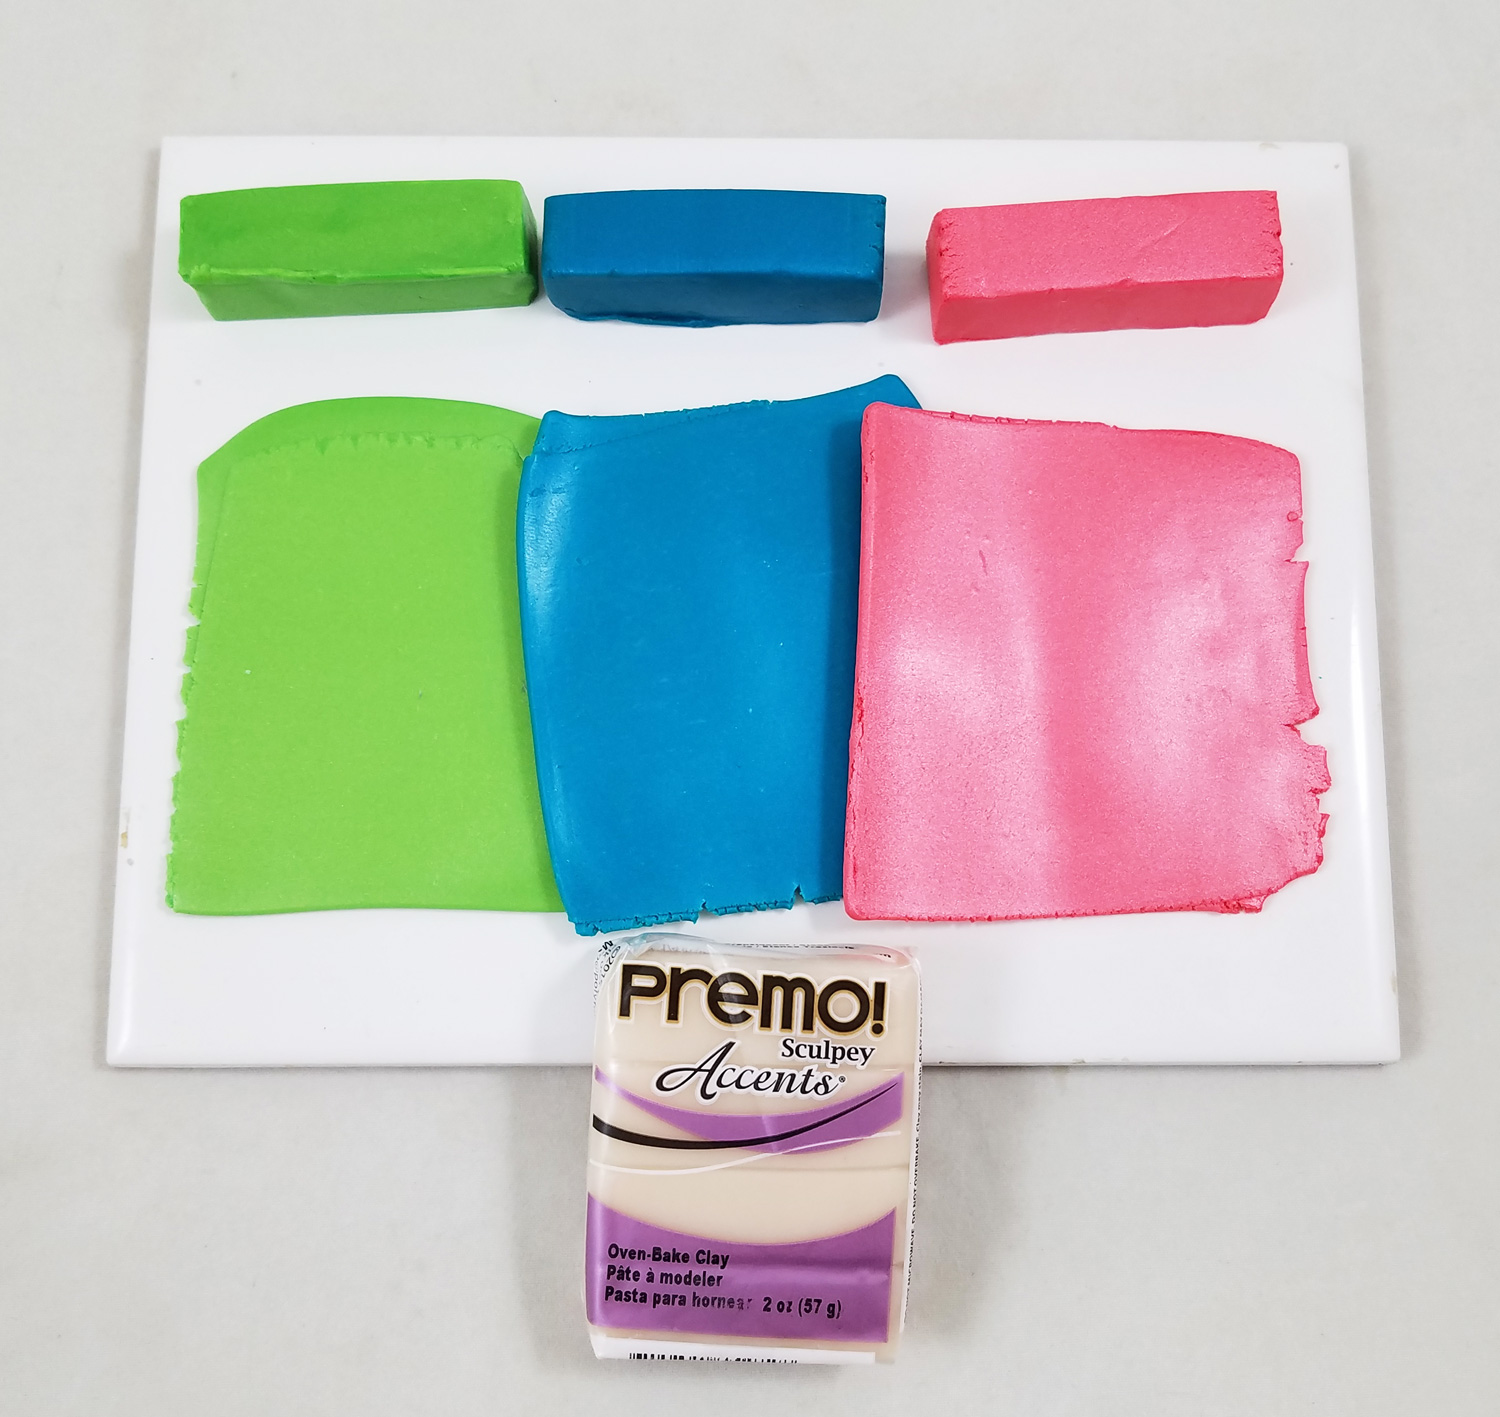
Using a pasta machine (devoted to craft use only) set on the thickest setting, I conditioned some Premo Accents Translucent polymer clay. I added the translucent clay to one half of the Bright Green Pearl, Sunset Pearl, Peacock Pearl clay bricks found in the Premo Accents Multipack.
*The addition of the translucent clay to the colored clay creates a look of slightly translucent fish scales once the clay is baked.
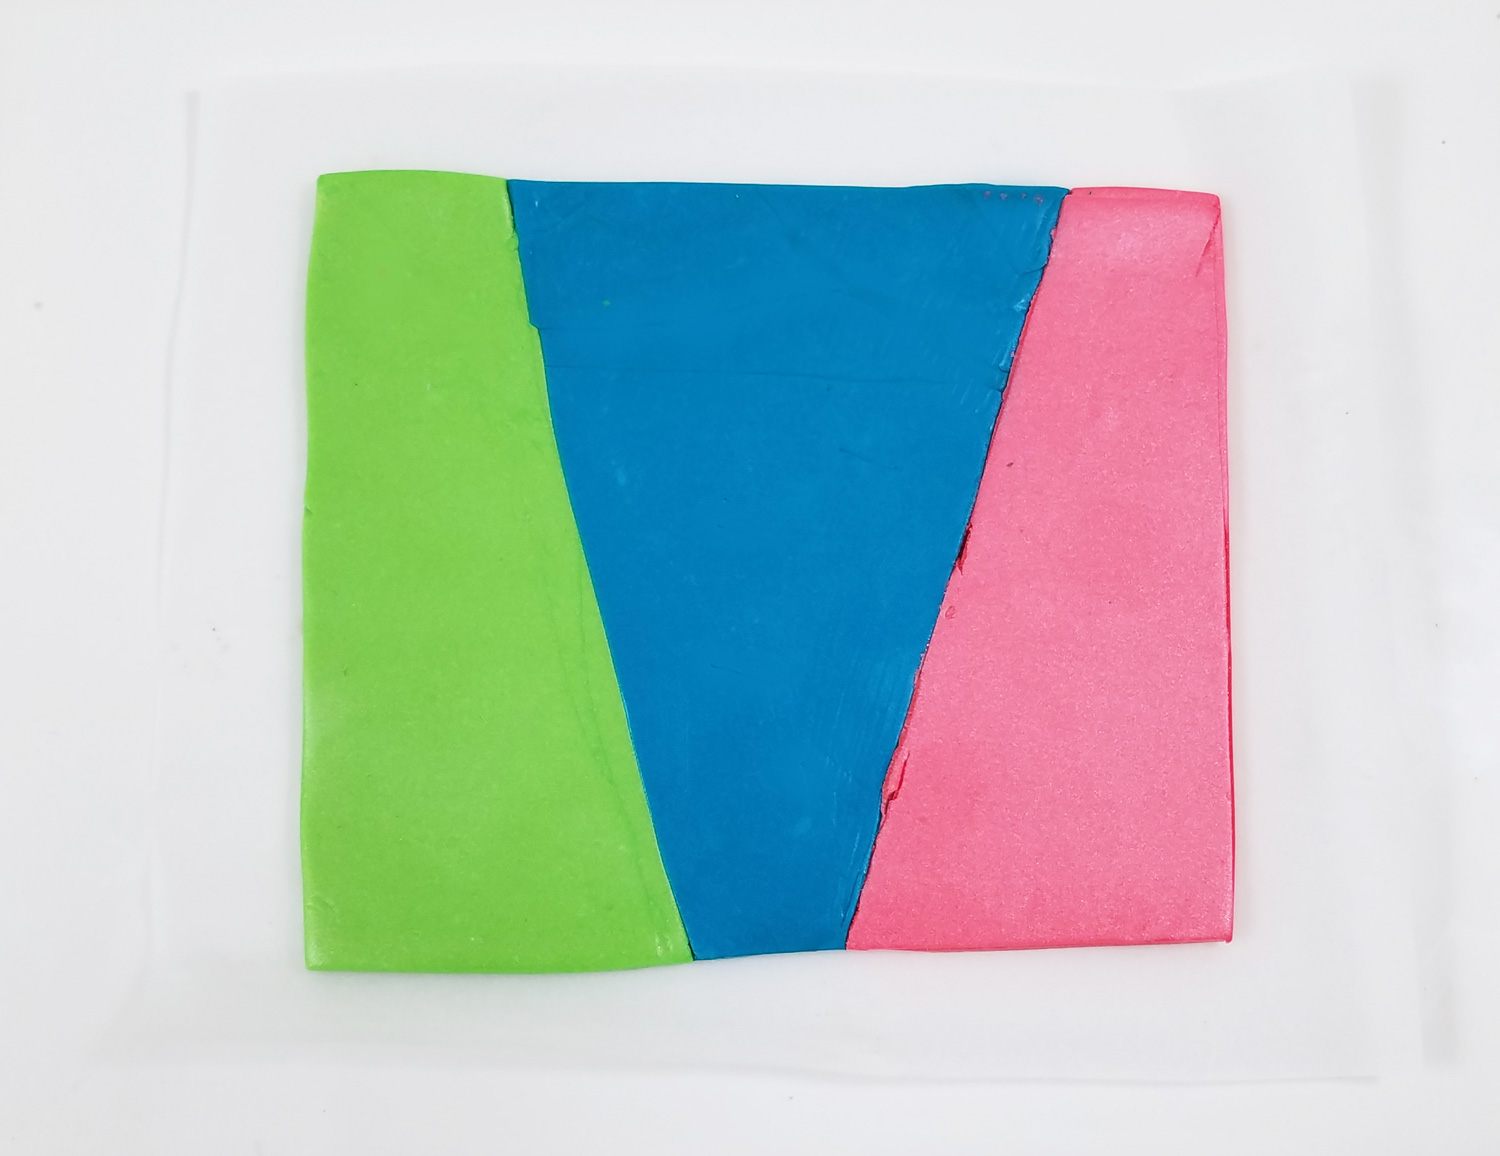
Next I cut my conditioned clay into wedges and pushed the edges together as seen in the above photo. What I created is the start of what is call an Offset Skinner Blend technique. This technique was developed by a talented polymer clay artist named Judith Skinner in the 1990s, which creates a stunning and smooth blend of colors in polymer clay when clay is cut into triangles and then run through a pasta machine multiple times. In the photo you can see those are not triangles, those are purposefully offset and trimmed so that it will create areas of pure unblended color with the blended portions, giving a more vibrant contrast in the final blend.
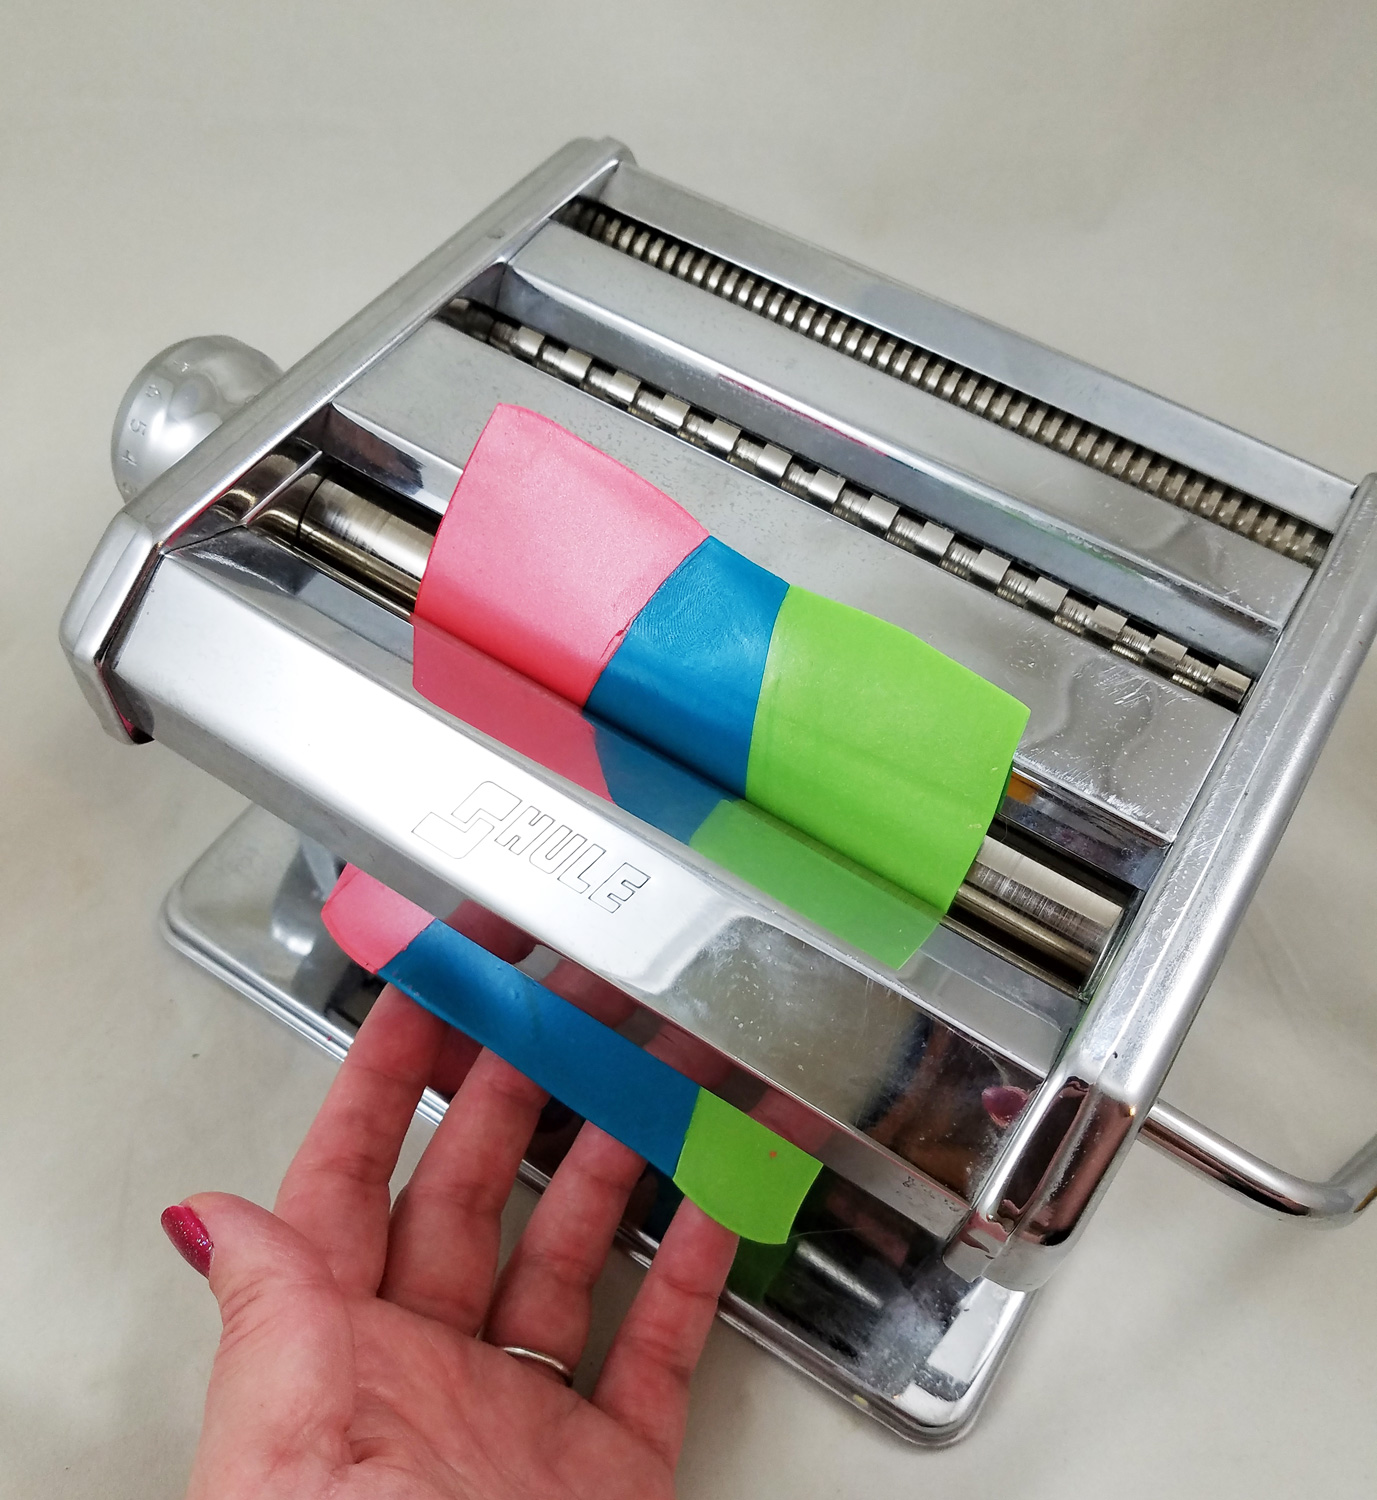
Using the thickest setting of the pasta machine I inserted the clay sheet, with the edge of of all three colors first; this made sure all the seams are pressed lightly together. I caught the clay sheet as it came out of the pasta machine.
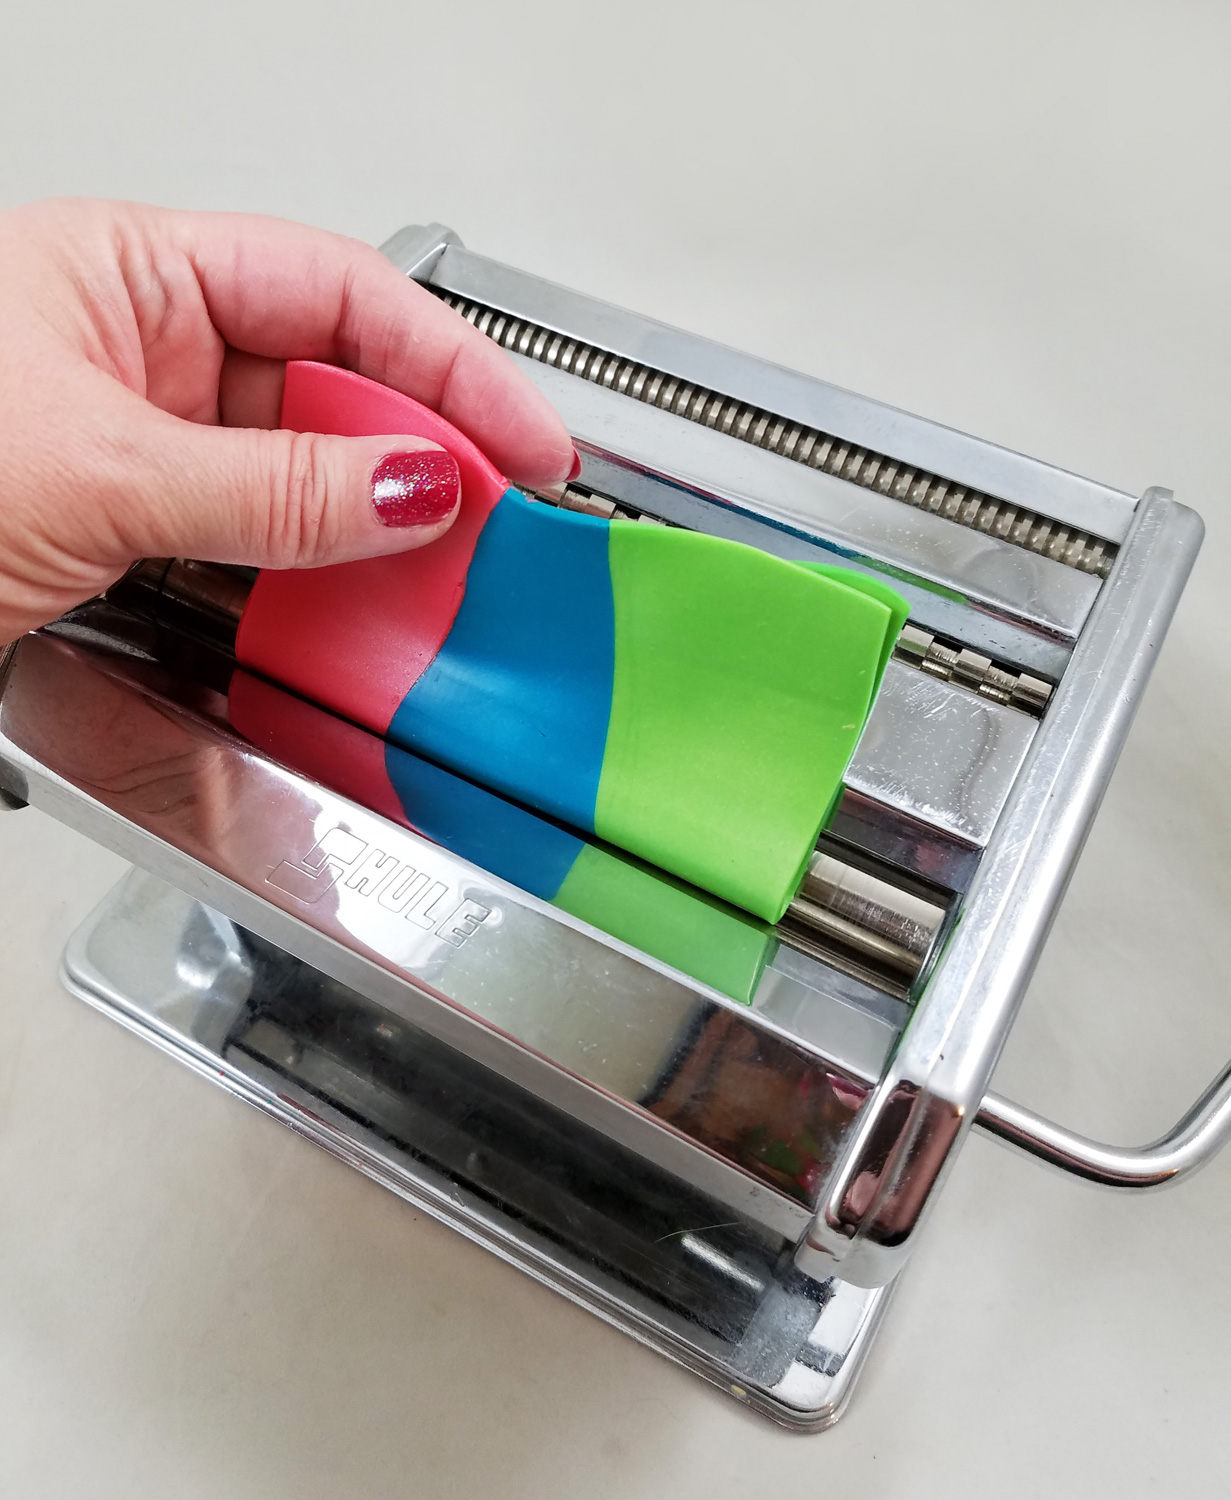
I then folded in half, top to bottom, the clay sheet making sure to match the colors on the sheet edges and once again run it through the pasta machine. I did that 10 more times, folding and rolling the clay sheet in the same direction.
*If you are new to trying this technique try it first with scrap clay to practice. Polyform Products has great video on how to create a Skinner Blend HERE.
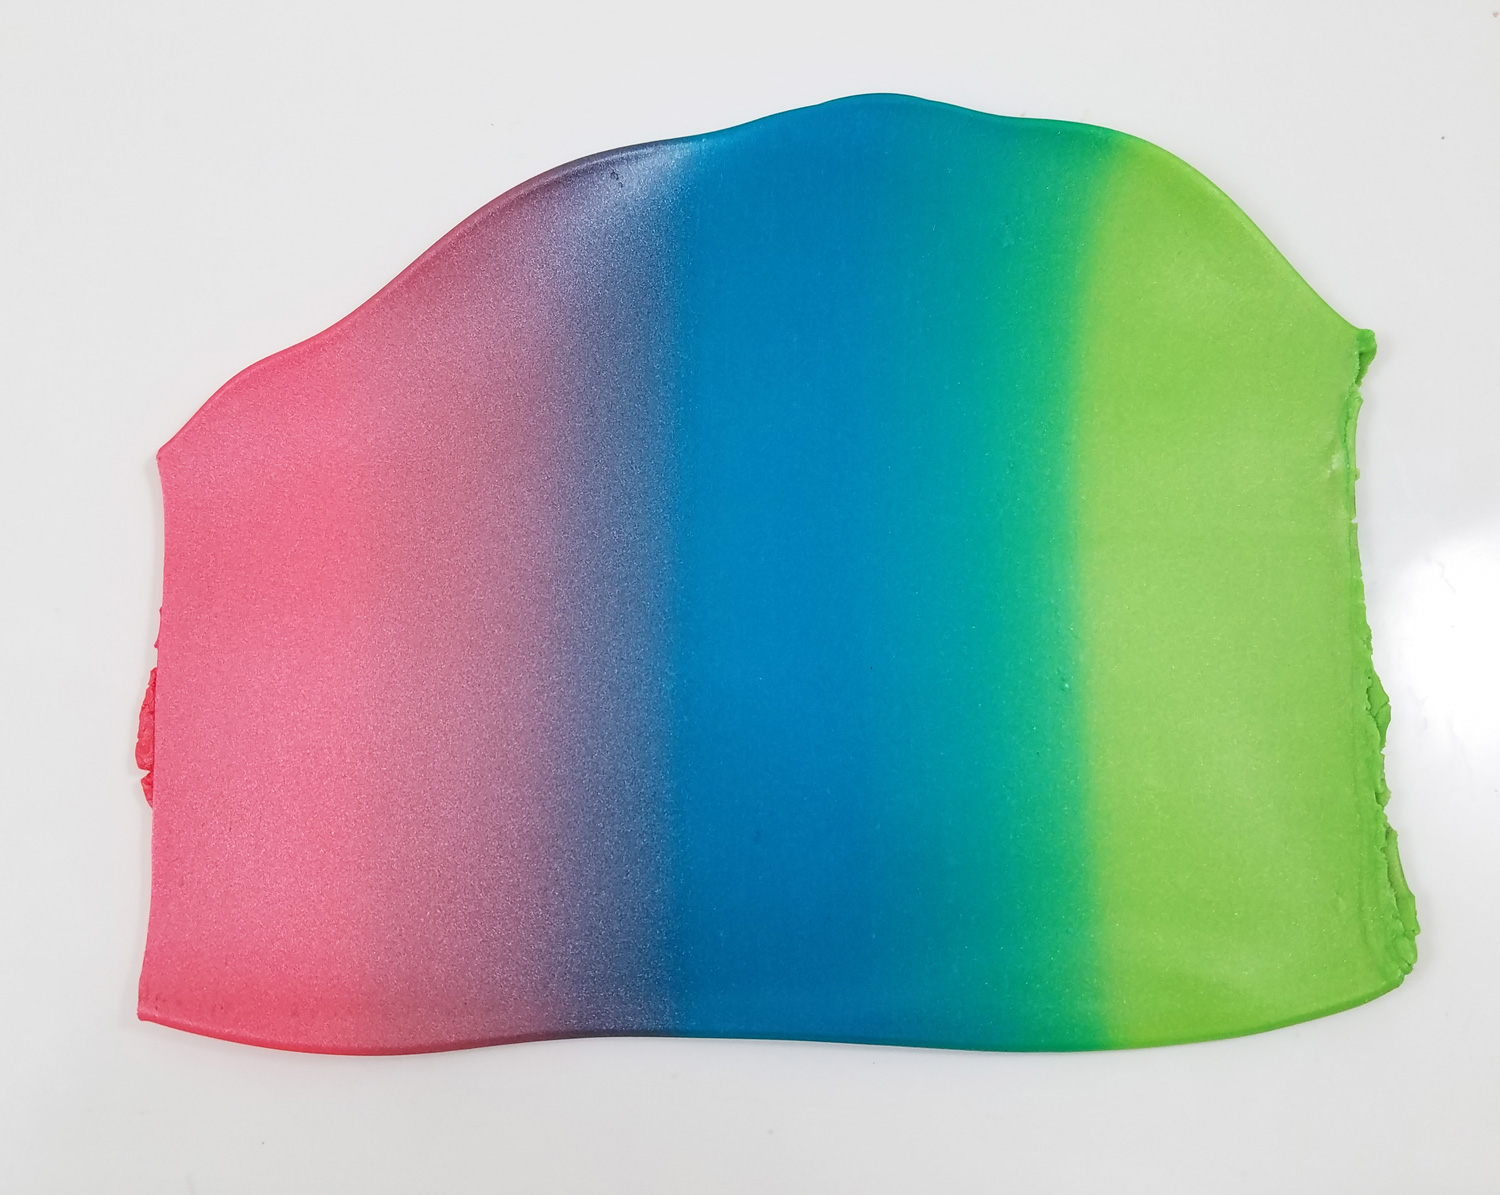
This gradient of colors is 10 fold-and-roll passes through the pasta machine, I wanted an even smoother transition of colors and ran the clay sheet a few more times through the pasta machine.
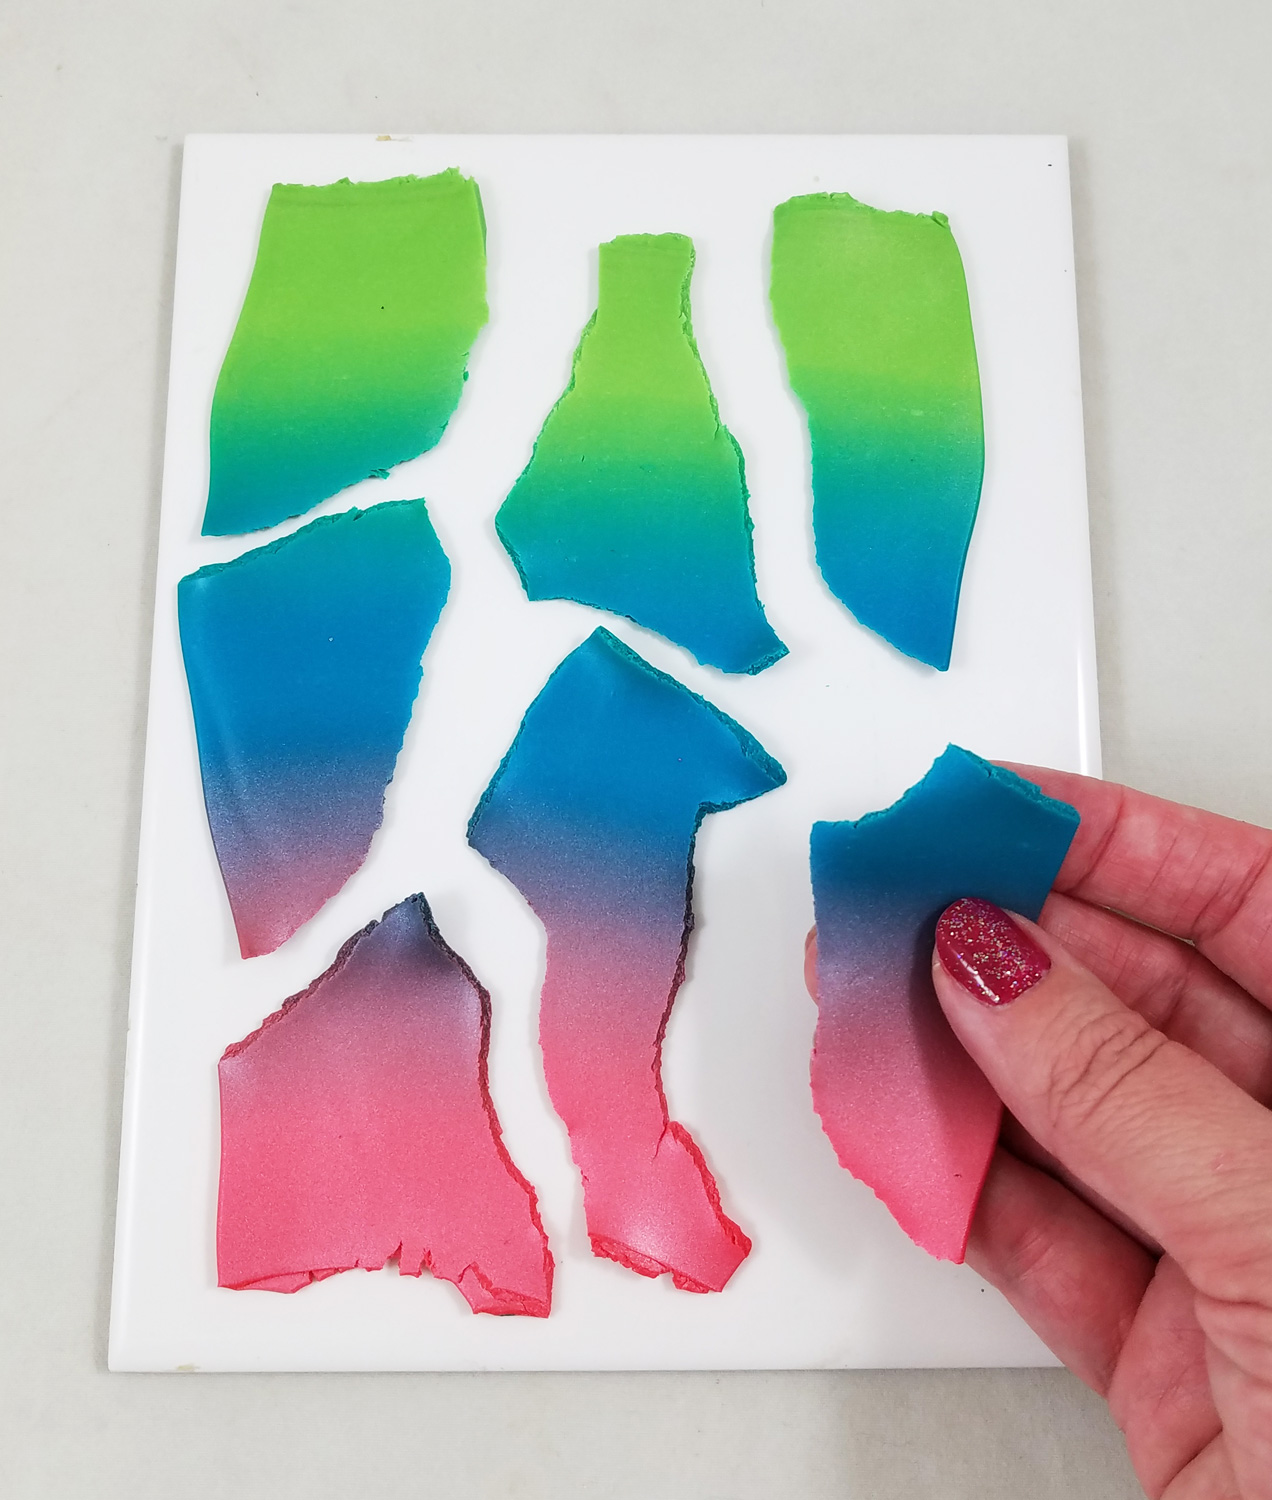
Once I got my clay sheet to the desired blend I carefully tore the gradient piece of clay into smaller pieces. This might seem a bit odd to do after all of the hard work getting a smooth gradient but stay with me!
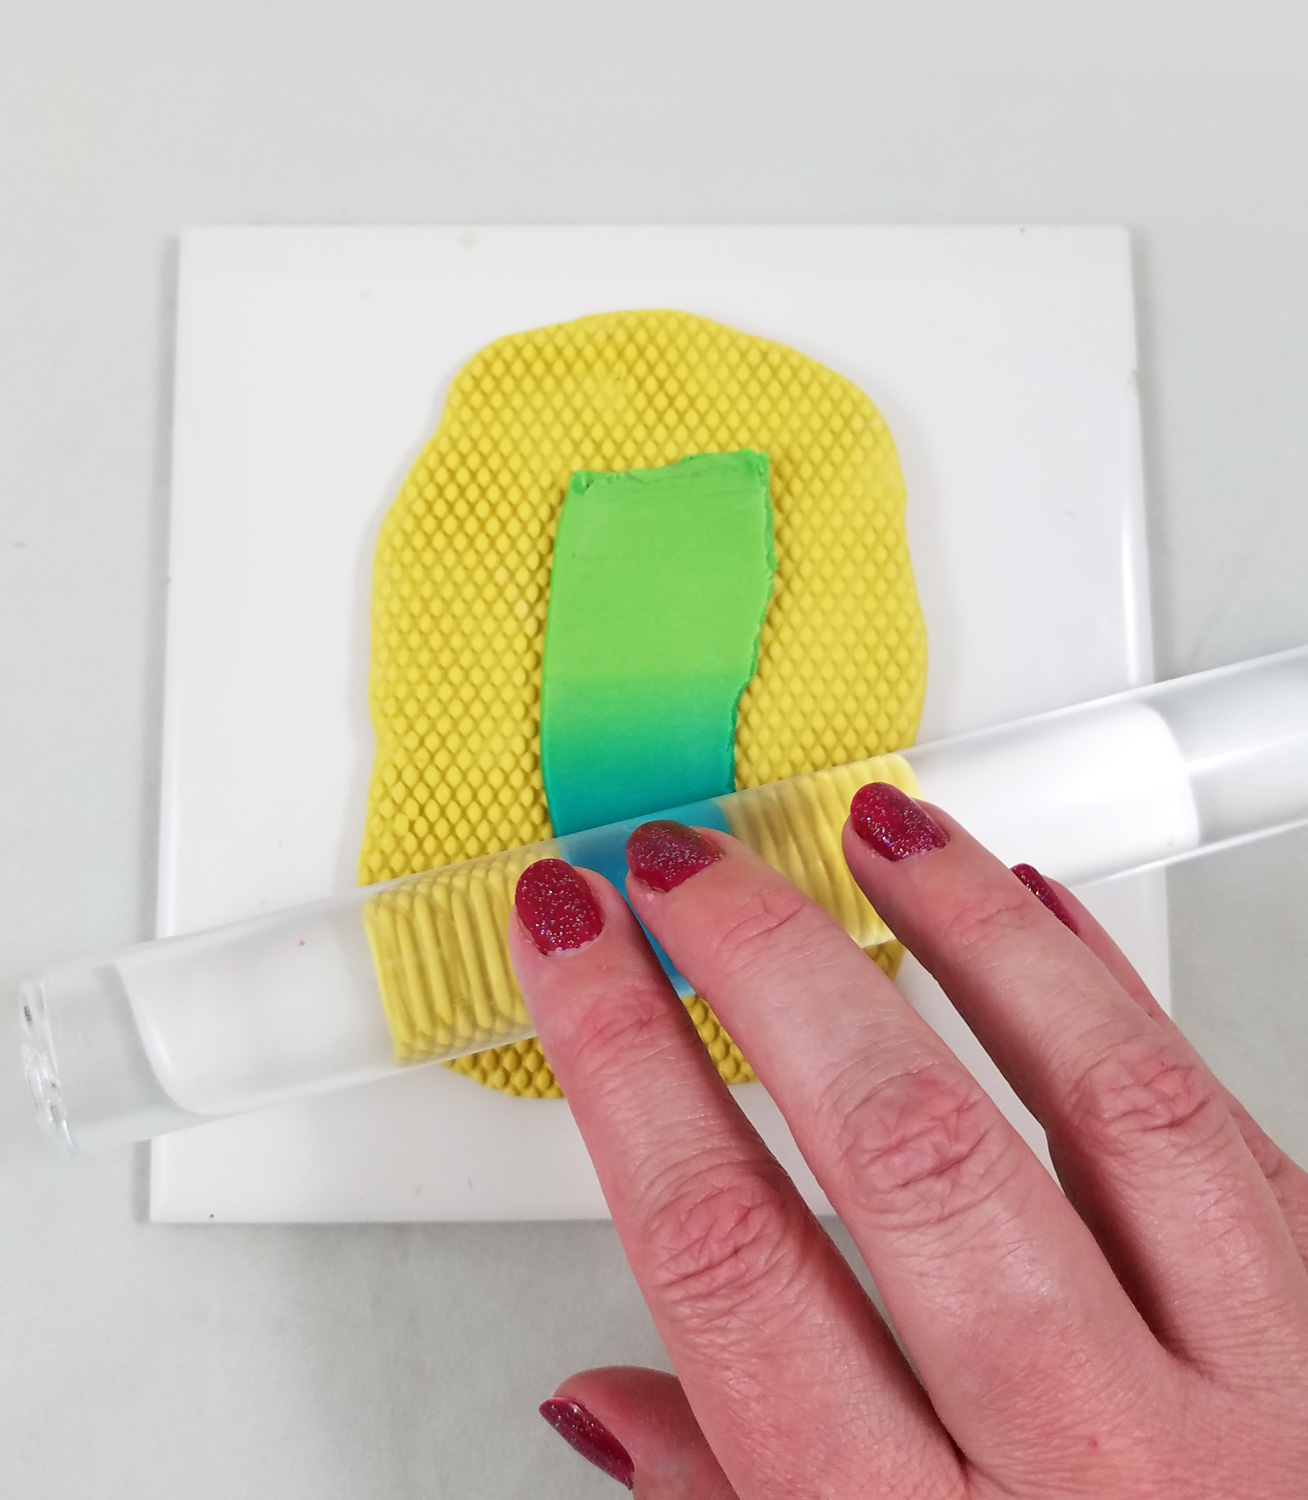
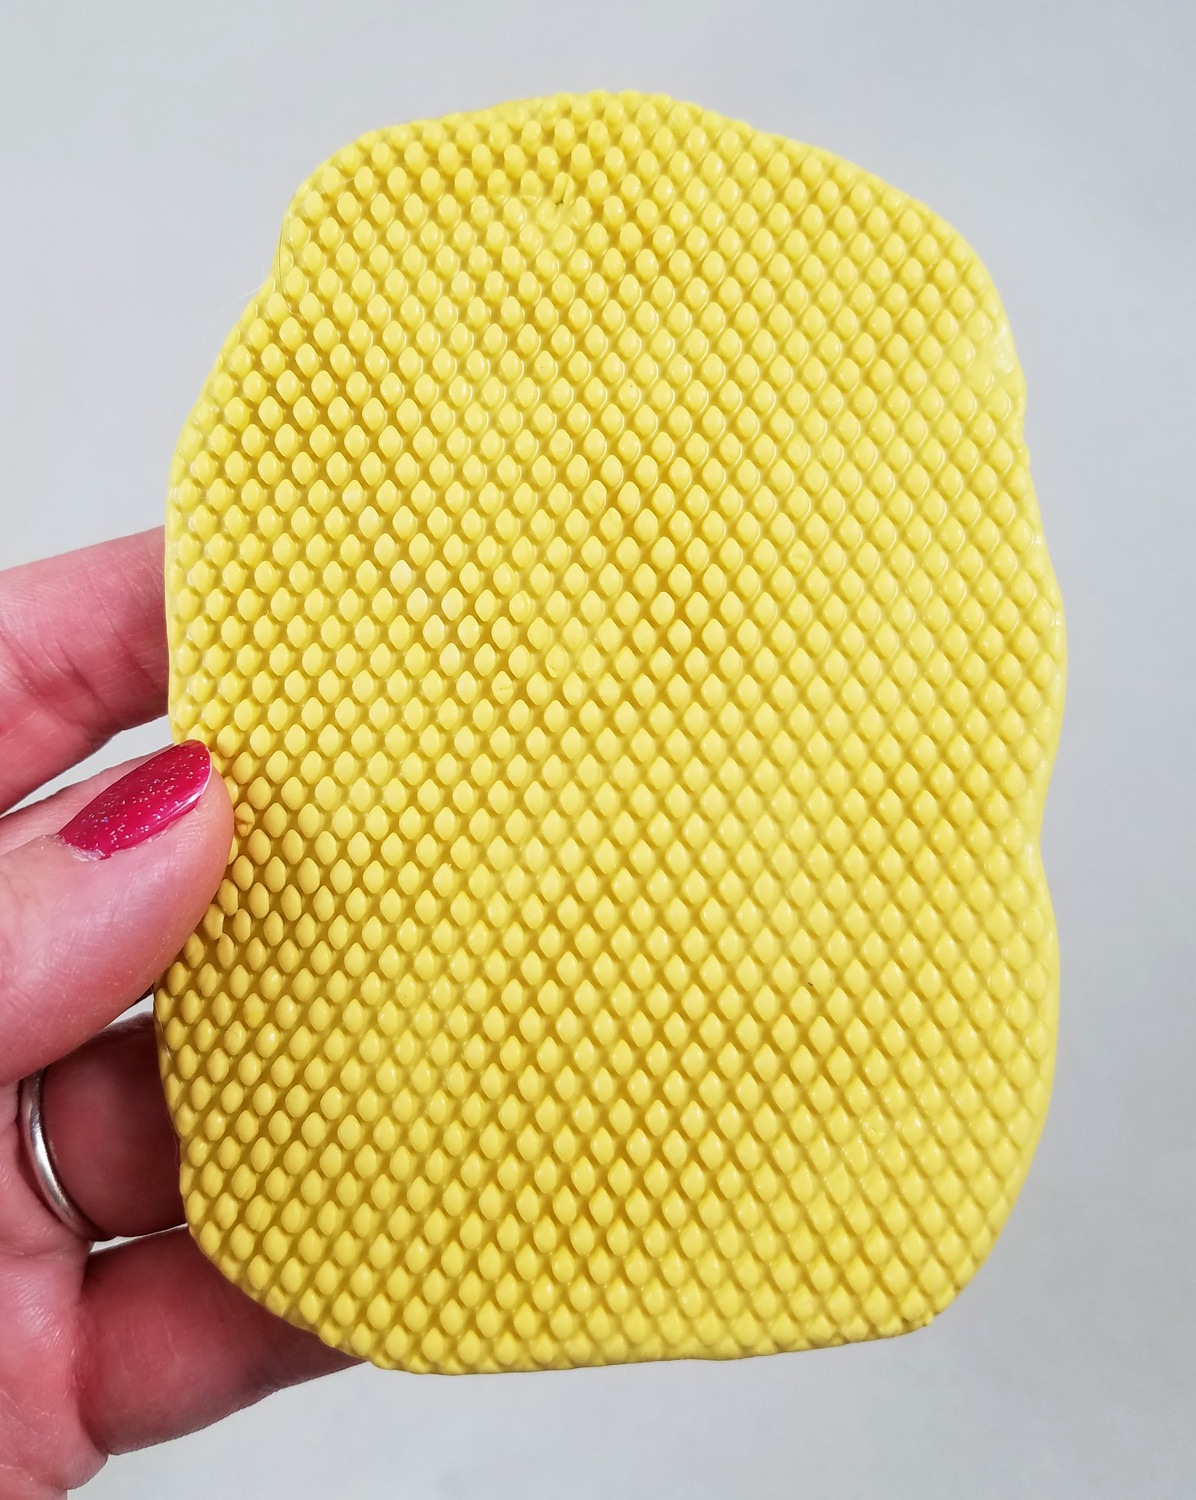
Taking each small torn piece of clay I placed it on my Amazing Mold Putty mesh texture plate and rolled an acrylic roller in a firm but consistent motion, careful to get as much texture as possible impressed into the soft clay.
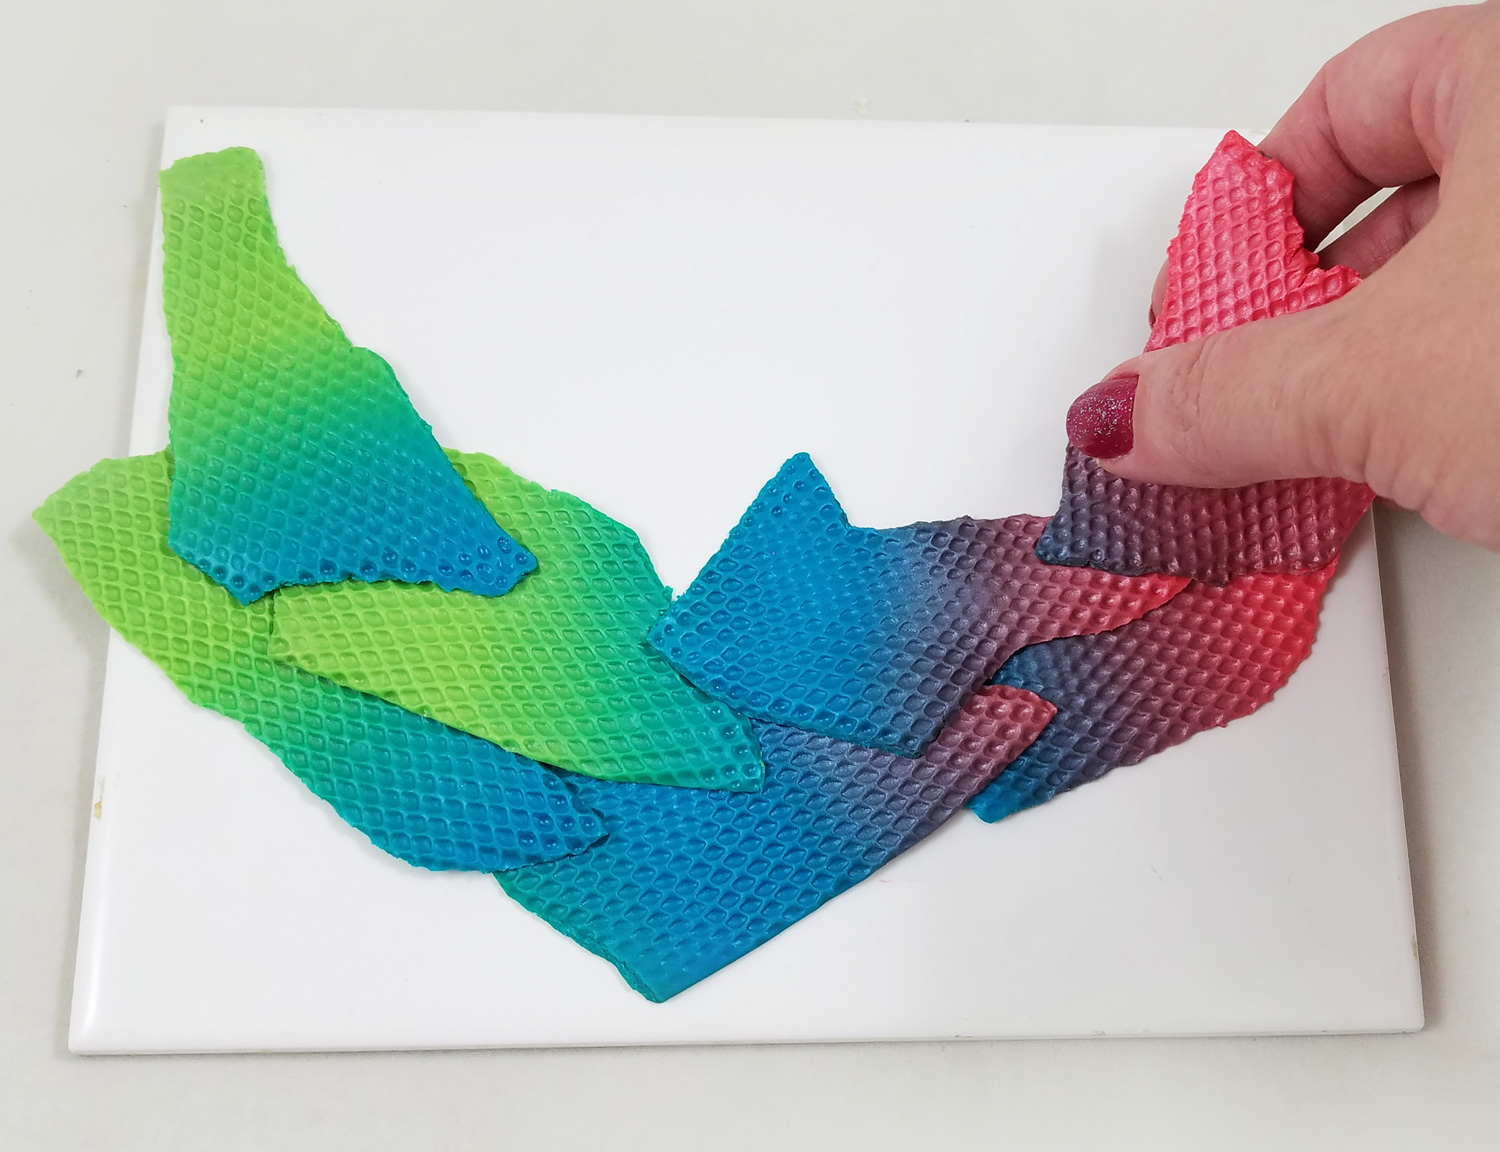
Each textured piece of clay was placed on top of each other in a semi-circle shape, and pressed lightly at the edges to help stick each piece together.
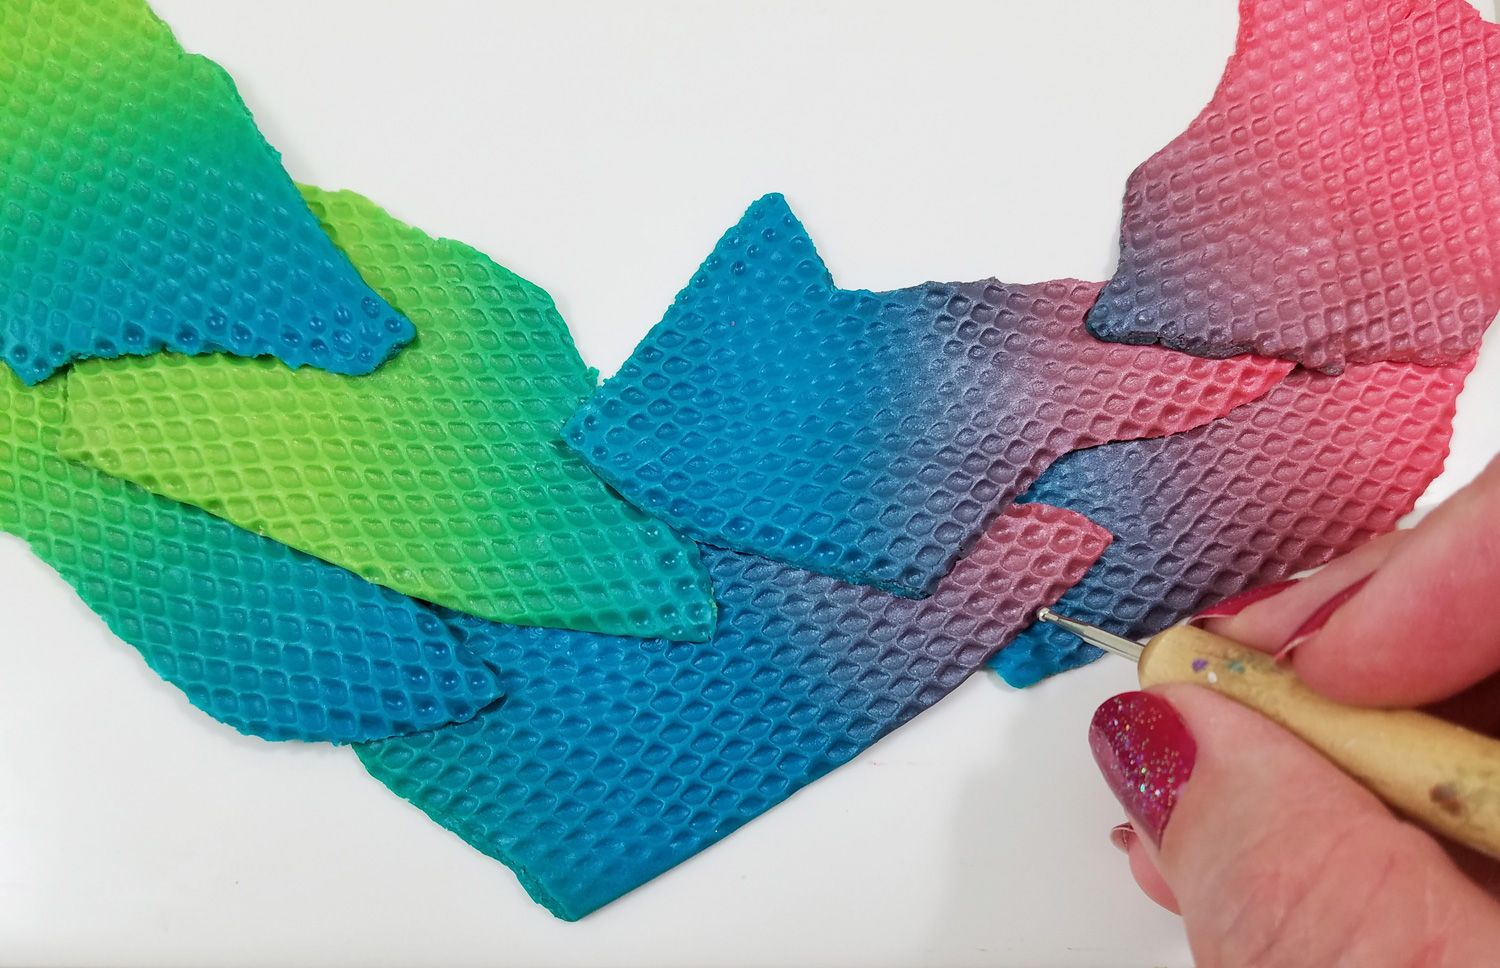
Using a small stylus I fixed any portions of the clay that didn’t get a complete impression of the texture plate and pressed the edges more firmly together in the scale-like indents.
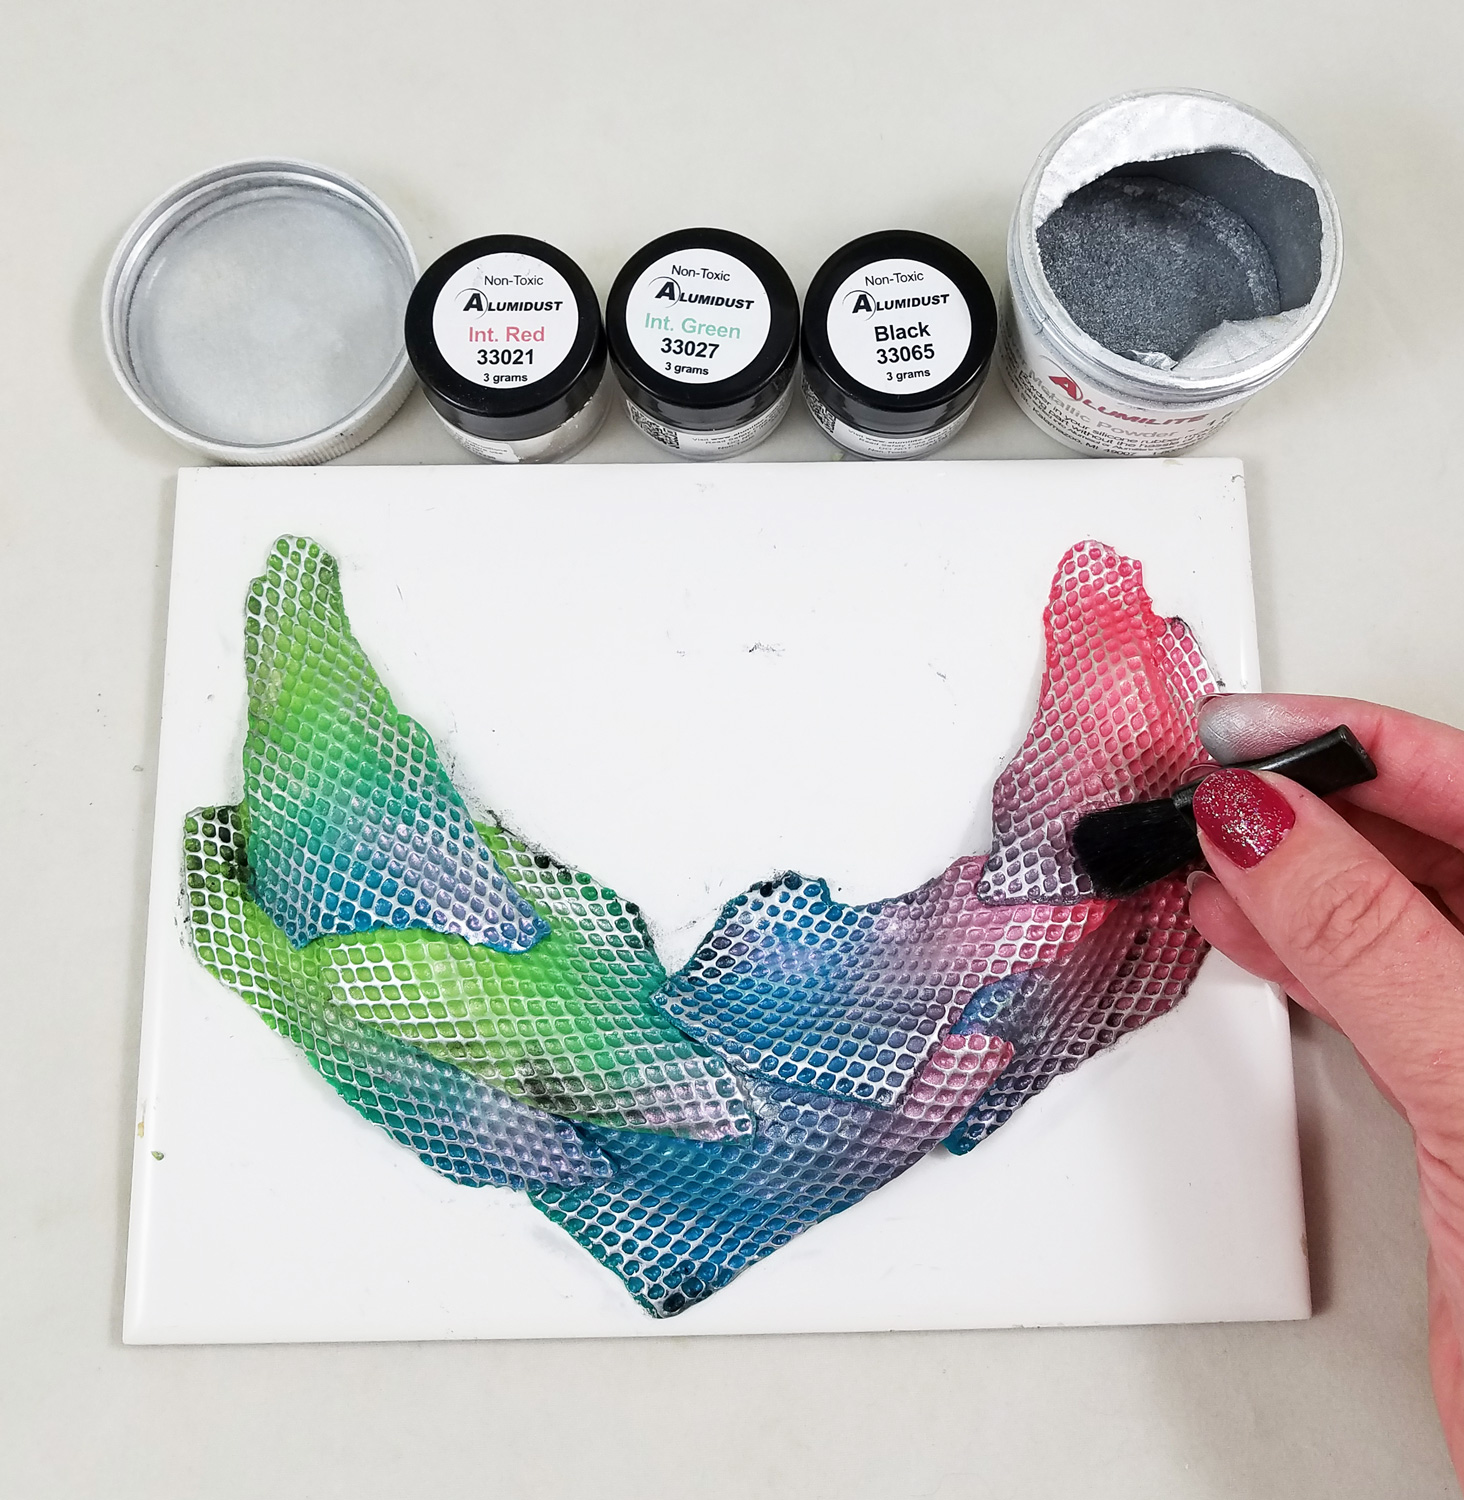
I twisted up half a paper towel into a tube shape, curved it into a semi-circle and placed in on the my ceramic tile. I then carefully removed my curved clay piece off the tile and laid it on top of the twisted paper towel, pushing the clay sides down every so slightly creating a raised portion. The raised form would give the clay more dimension and allow for a more dynamic application of metallic powders.
I dipped my finger in some Silver Alumilite Metallic Powder and gently ran my finger across the raised textured surface of the clay, highlighting the scaled texture. Using a soft makeup brush I applied Interference Red and Green Alumidust into the lower portions of the scale texture on the clay. I applied only a very small amount of the Black Alumidust to the edges of the clay. The powders bonded to the uncured polymer clay without the addition of a glue or sealant.
I made two holes on the top left and right of the necklace with a stylus; these would become holes to place jumprings and chain through once the clay is cured.
I then put the tile with the clay necklace into a toaster oven, heated per manufacturer instructions, to cure.
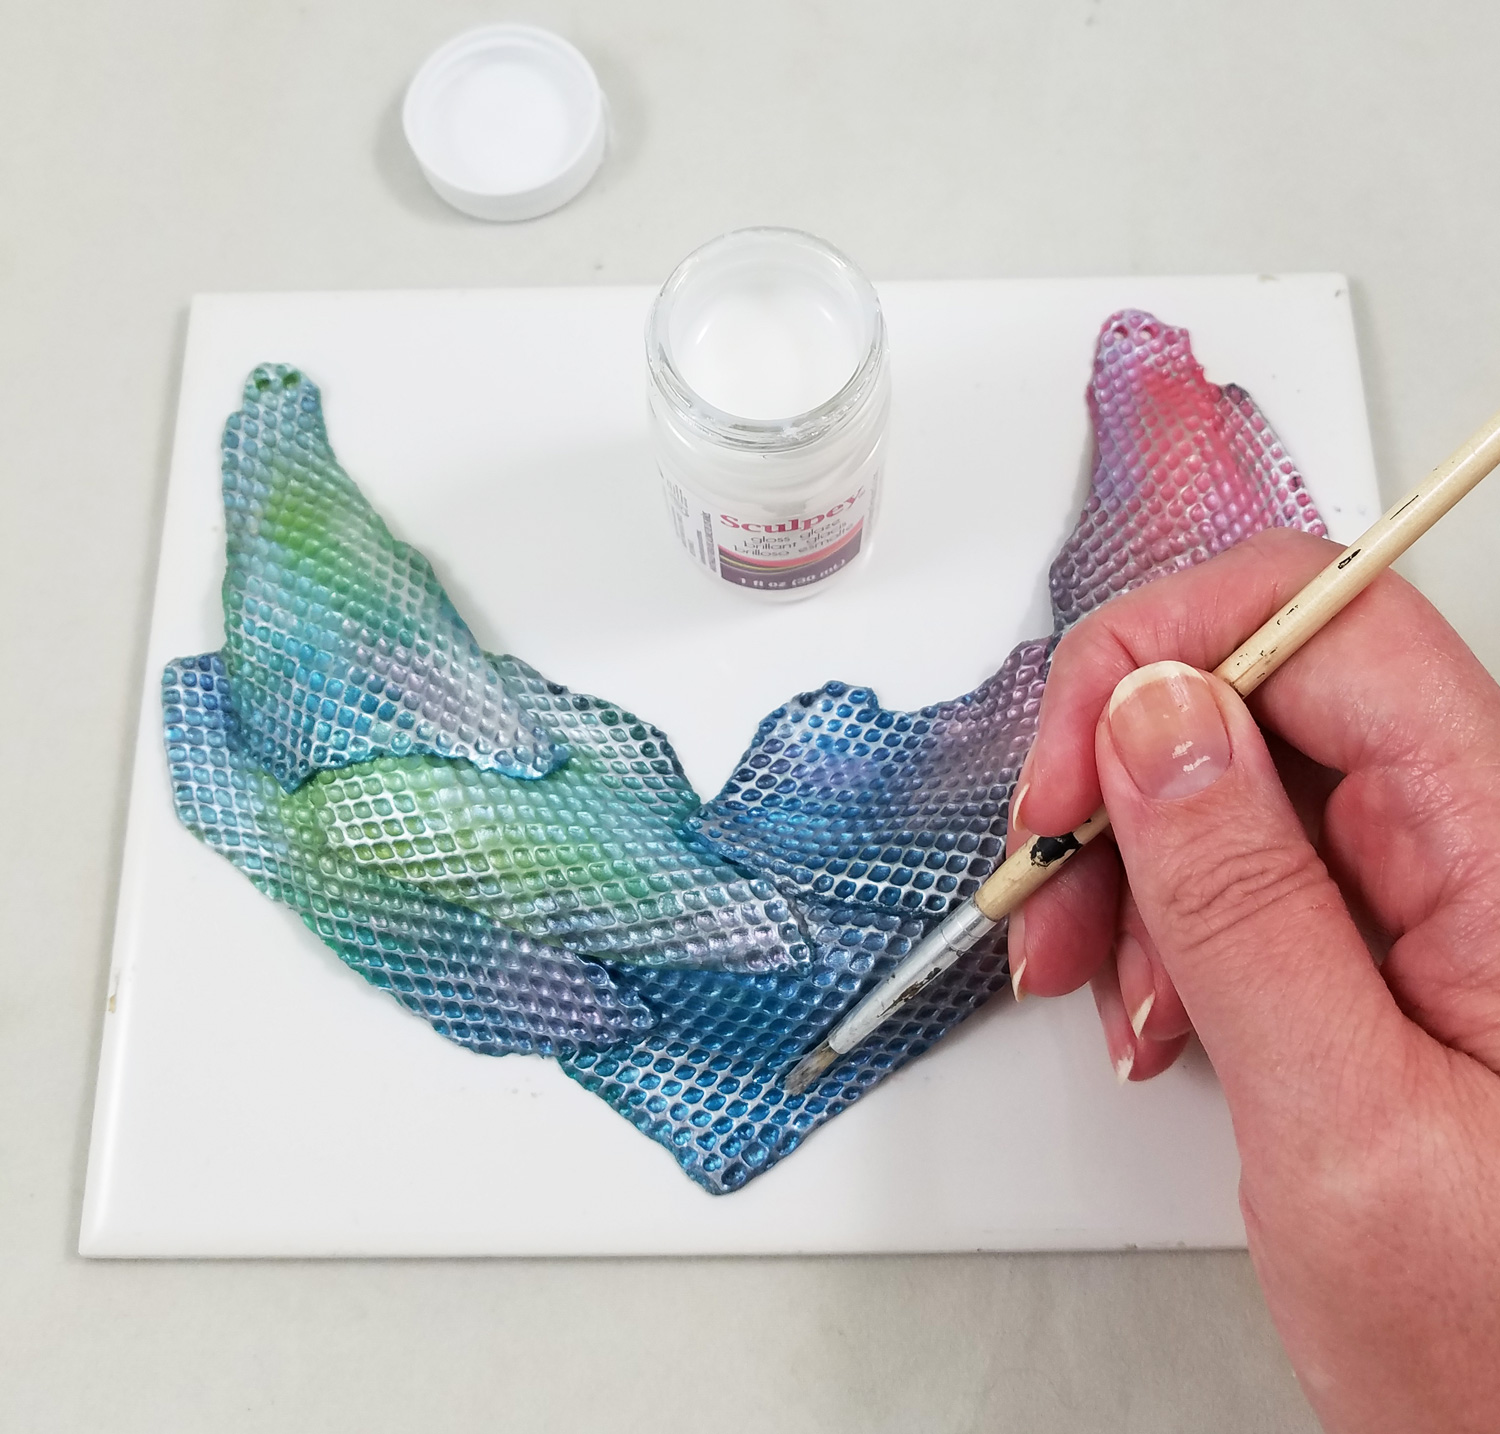
I painted on a coat of gloss Sculpey Glaze over the now cured piece of clay and let it dry per manufacturer instructions.
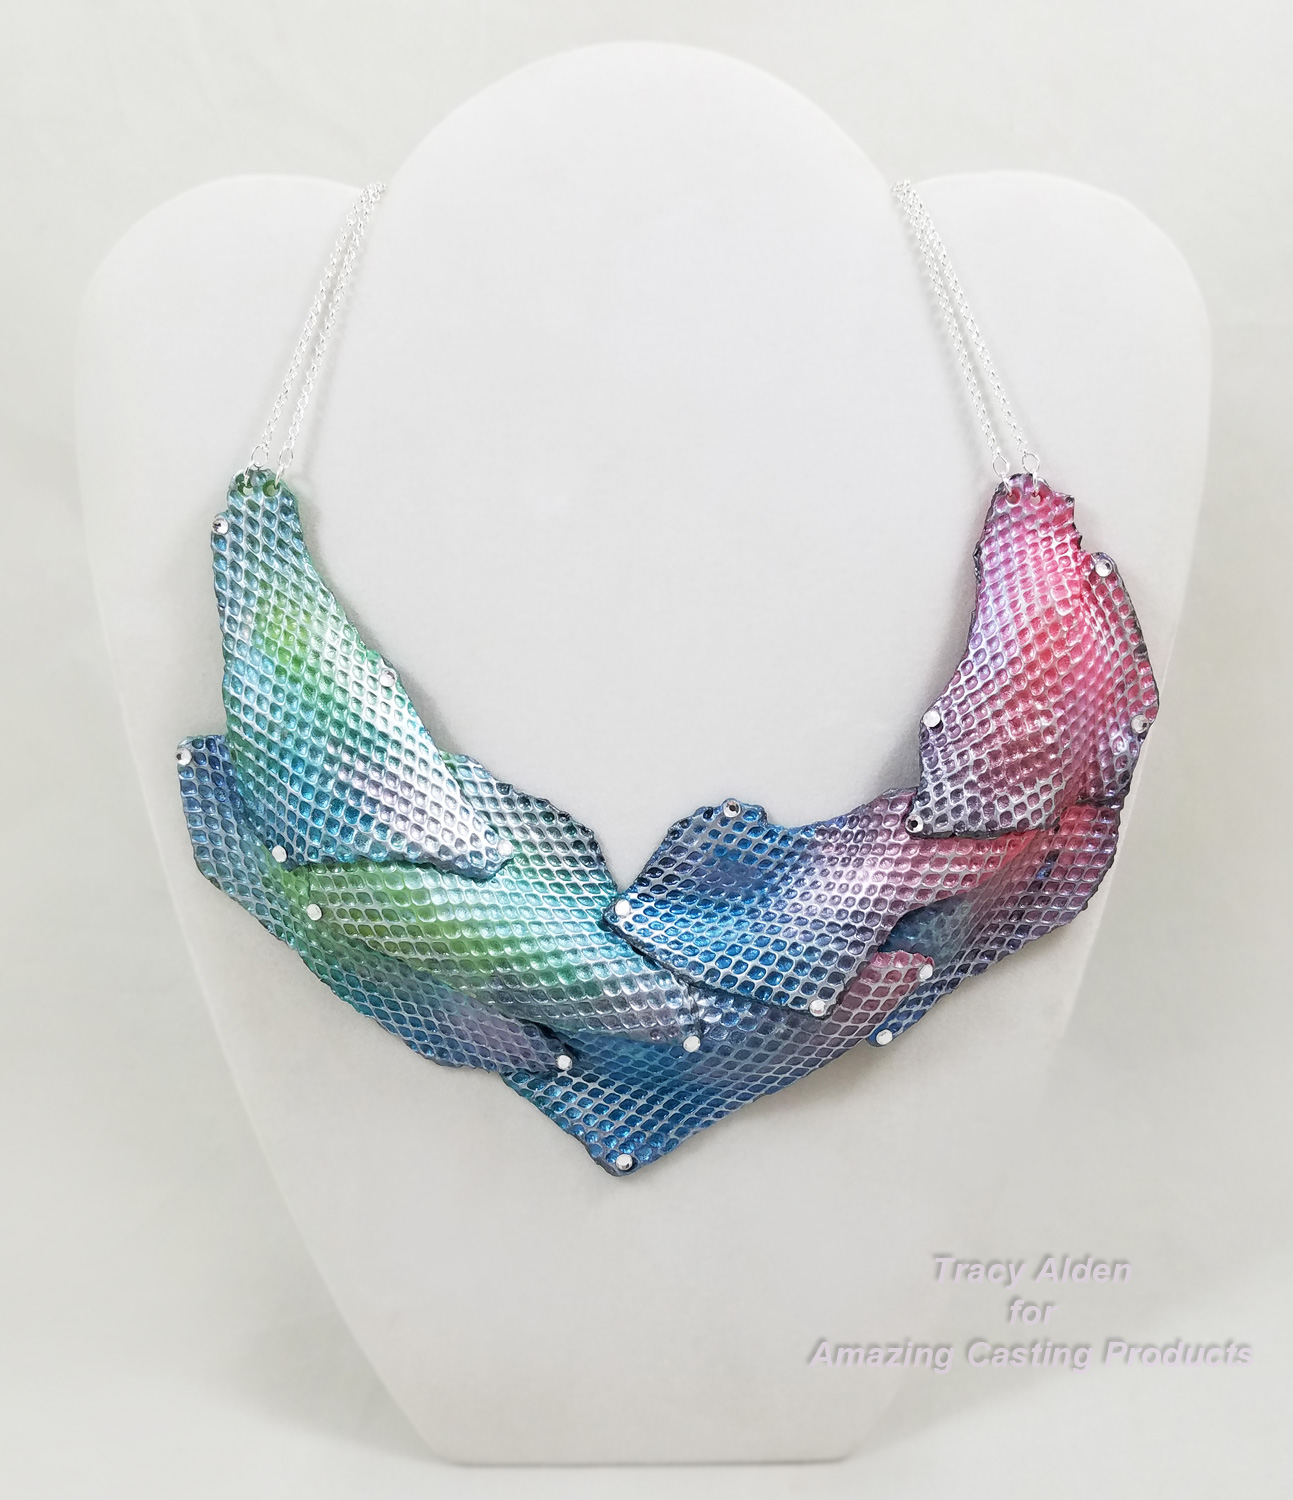
I applied little dots of Beacon’s Gem-Tac glue on the edges of the scales and I added flatback crystal rhinestones. I put jumprings through the two holes on each side and attached jewelry chain. Now the necklace was ready to wear!
Happy Holidays and until next time, safe travels!
This is an affiliate post, which means I received an assortment of products as a compensation for the creation of art. To read my full disclosure, click here.
A Melt and Pour Soapy First Try…
Hello! I have been a wee bit quiet lately taking care of family and doing some major home overhaul but here I am back again with some crafty goodness. What better way to get back into the creative swing of things other than trying a new craft I had never made before! Melt and Pour soaps have been around for some time but I honestly thought they might be a bit much to try. The closest I had gotten to melt and pour products was making candles with my mother as a child, so this was going to be a learning curve. Thankfully it ended up being a lot easier than I thought and I might have found a new crafting medium to work in!
At The Creativation Trade Show 2018, held by Association For Creative Industries or AFCI, I saw the Life of the Party booth showcasing their soap products. At first I was just excited with their lovely line of molds, being not only safe for soap but can be used for candy and resin. Their line of soap products can be found at most craft stores and online (don’t forget to use your store coupons). Watching their demos I saw how their Melt and Pour Soap base kits could be used, also how to be more creative by using their premade soap bases with additional scents, dyes, herbs and exfoliates. I expressed my concern with a few allergies I have to certain plants and chemicals so the kind ladies at the booth gave me some kits to try out that did not contain my allergens.
Fast forward to the end of Summer, while cleaning and sorting my craft supplies I find these kits collecting dust on one of my craft tables. I needed to rectify this and start trying to make some soap!
In addition to the soap making kits I used:
1 Small Spritz Bottle filled with rubbing alcohol
1 Microwave Safe Glass Measuring Cup
1 Soap Cutting Blade
1 Pack Wood Craft Sticks
Additional Fragrance and Essential Oils
Dried Herbs from my garden
Food Grade Spices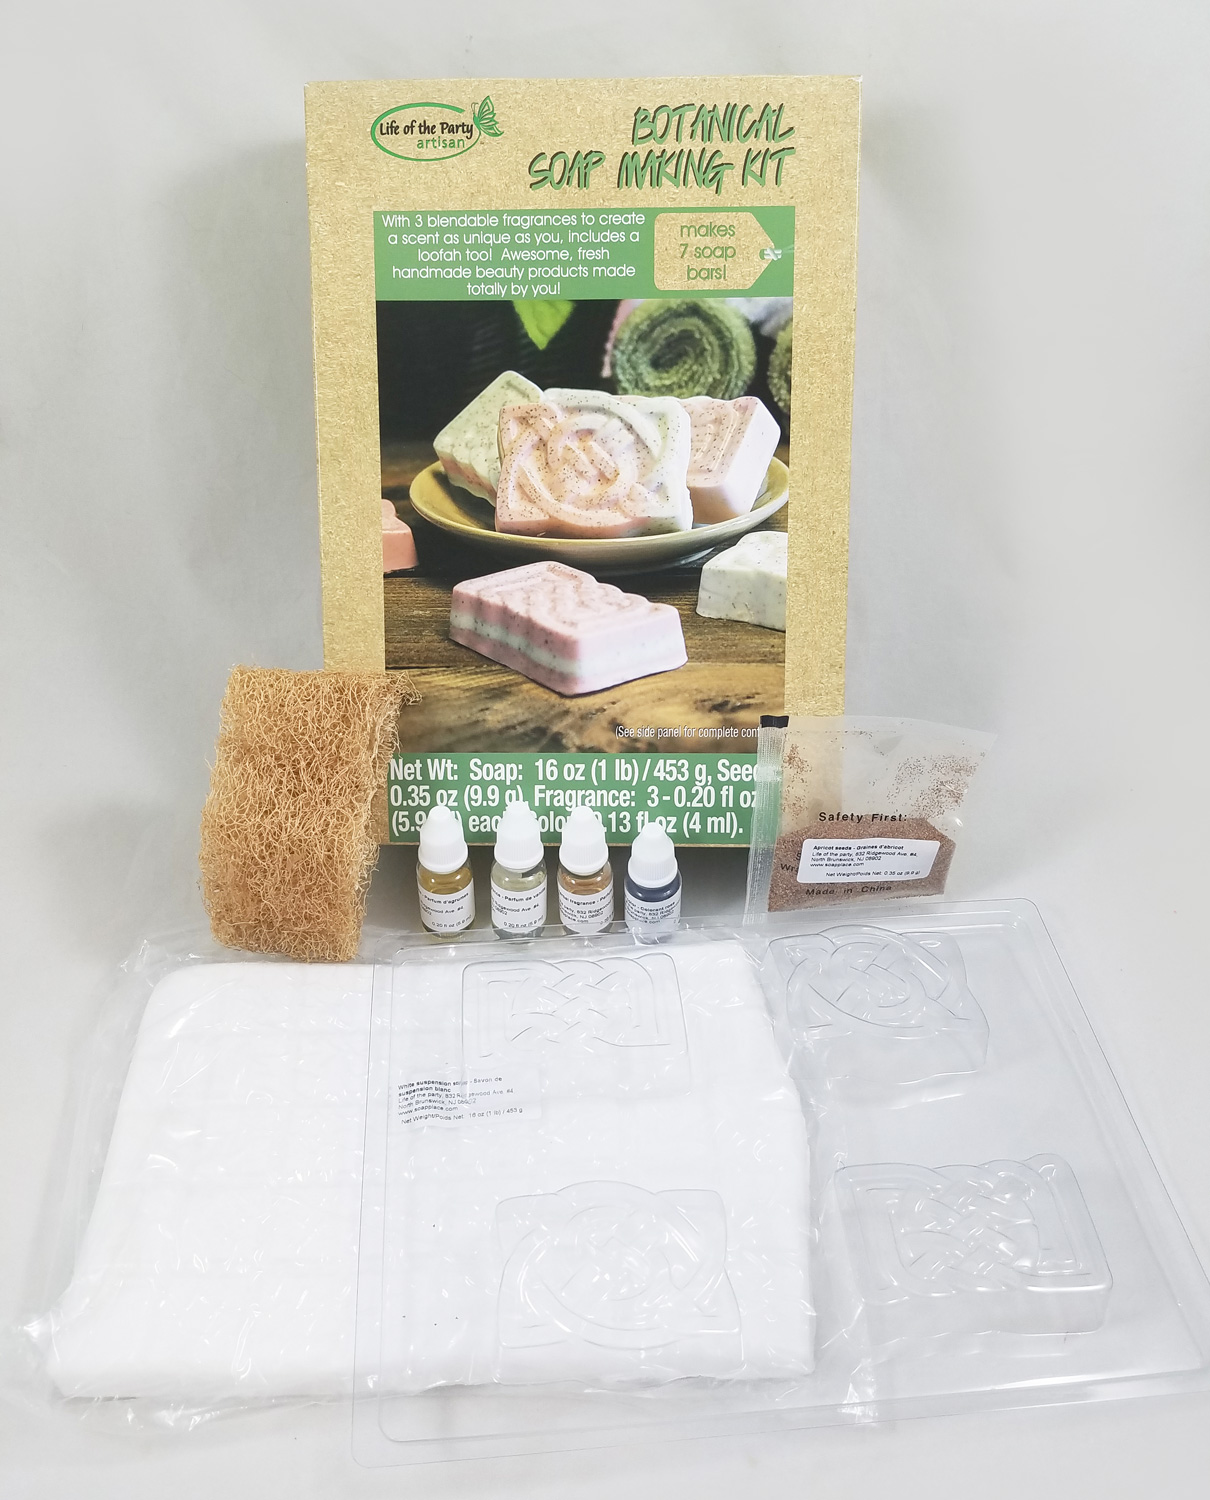
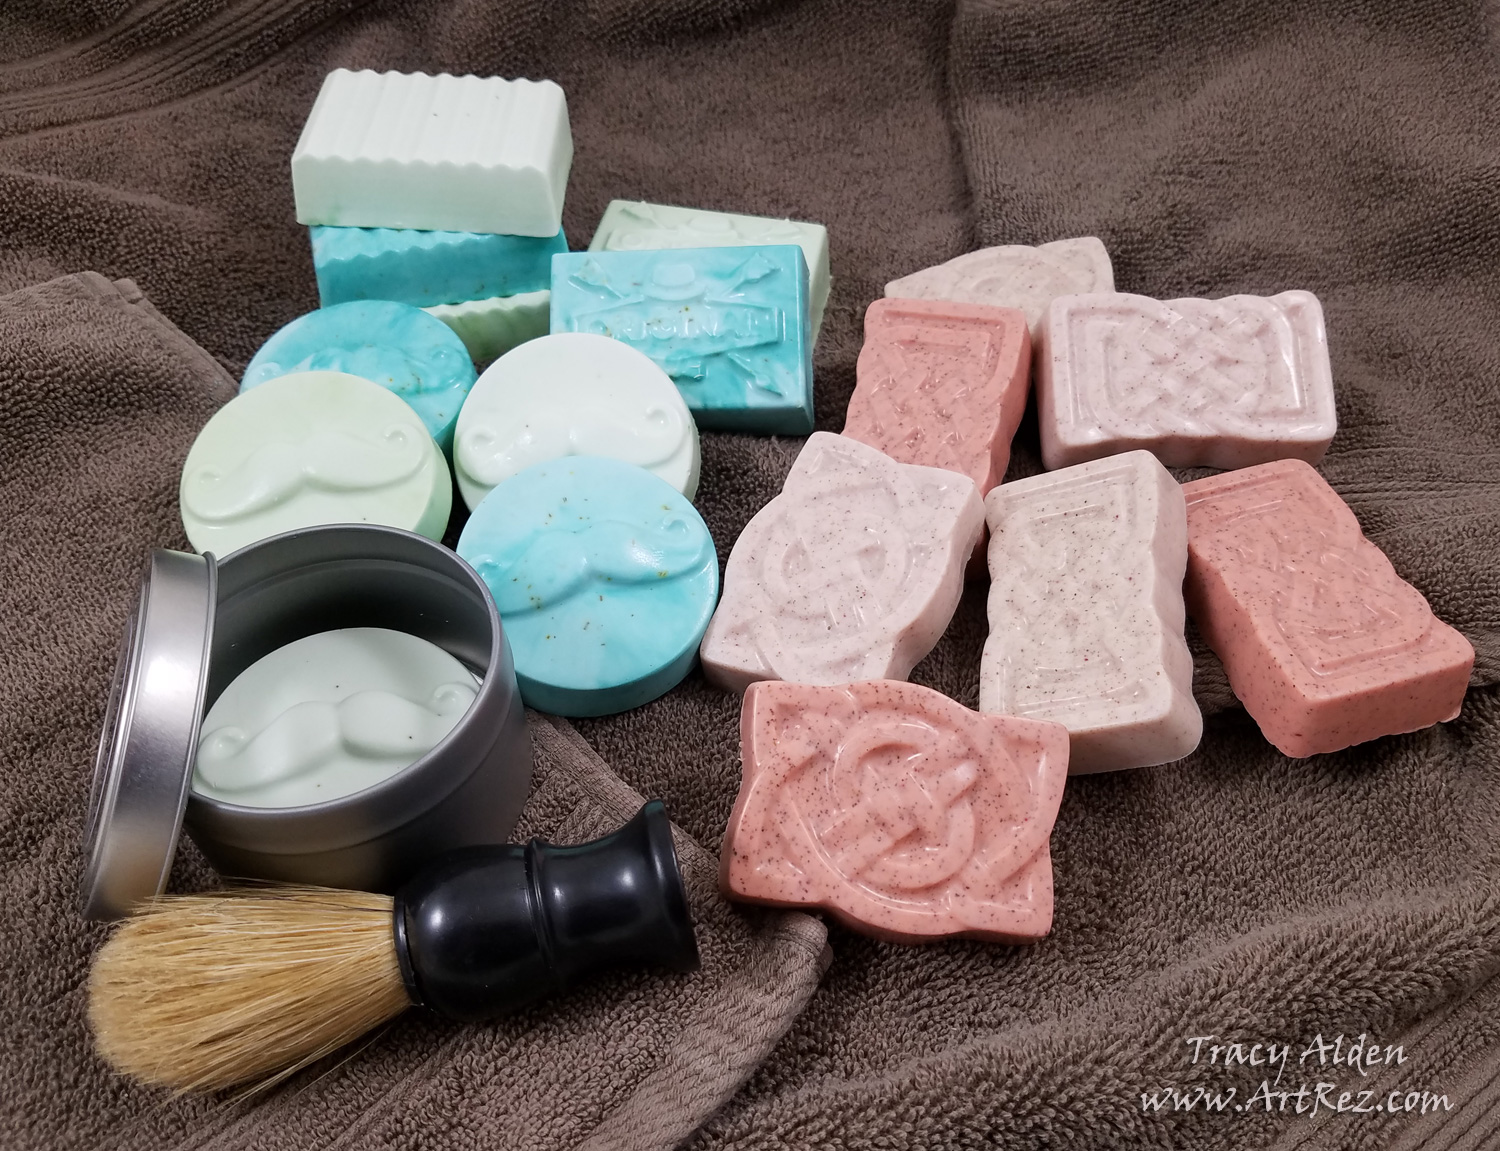
The first kit I tried out was the Life of the Party Botanical Soap Making Kit*. I picked this kit as my first try as it seemed the most simplistic of the kits, with smaller soap bar molds and a more mainstream soap base.
It comes with:
16 oz (1lb) White Suspension Soap
3 – 0.20 fl oz blendable fragrances Cool Citrus, Warm Vanilla, Fresh Herbal
0.13 fl oz rose color
0.35 oz apricot seeds
1- 4 cavity mold 1 loofah 1 instruction sheetMake sure to read the kit instructions fully before attempting to create any soap.
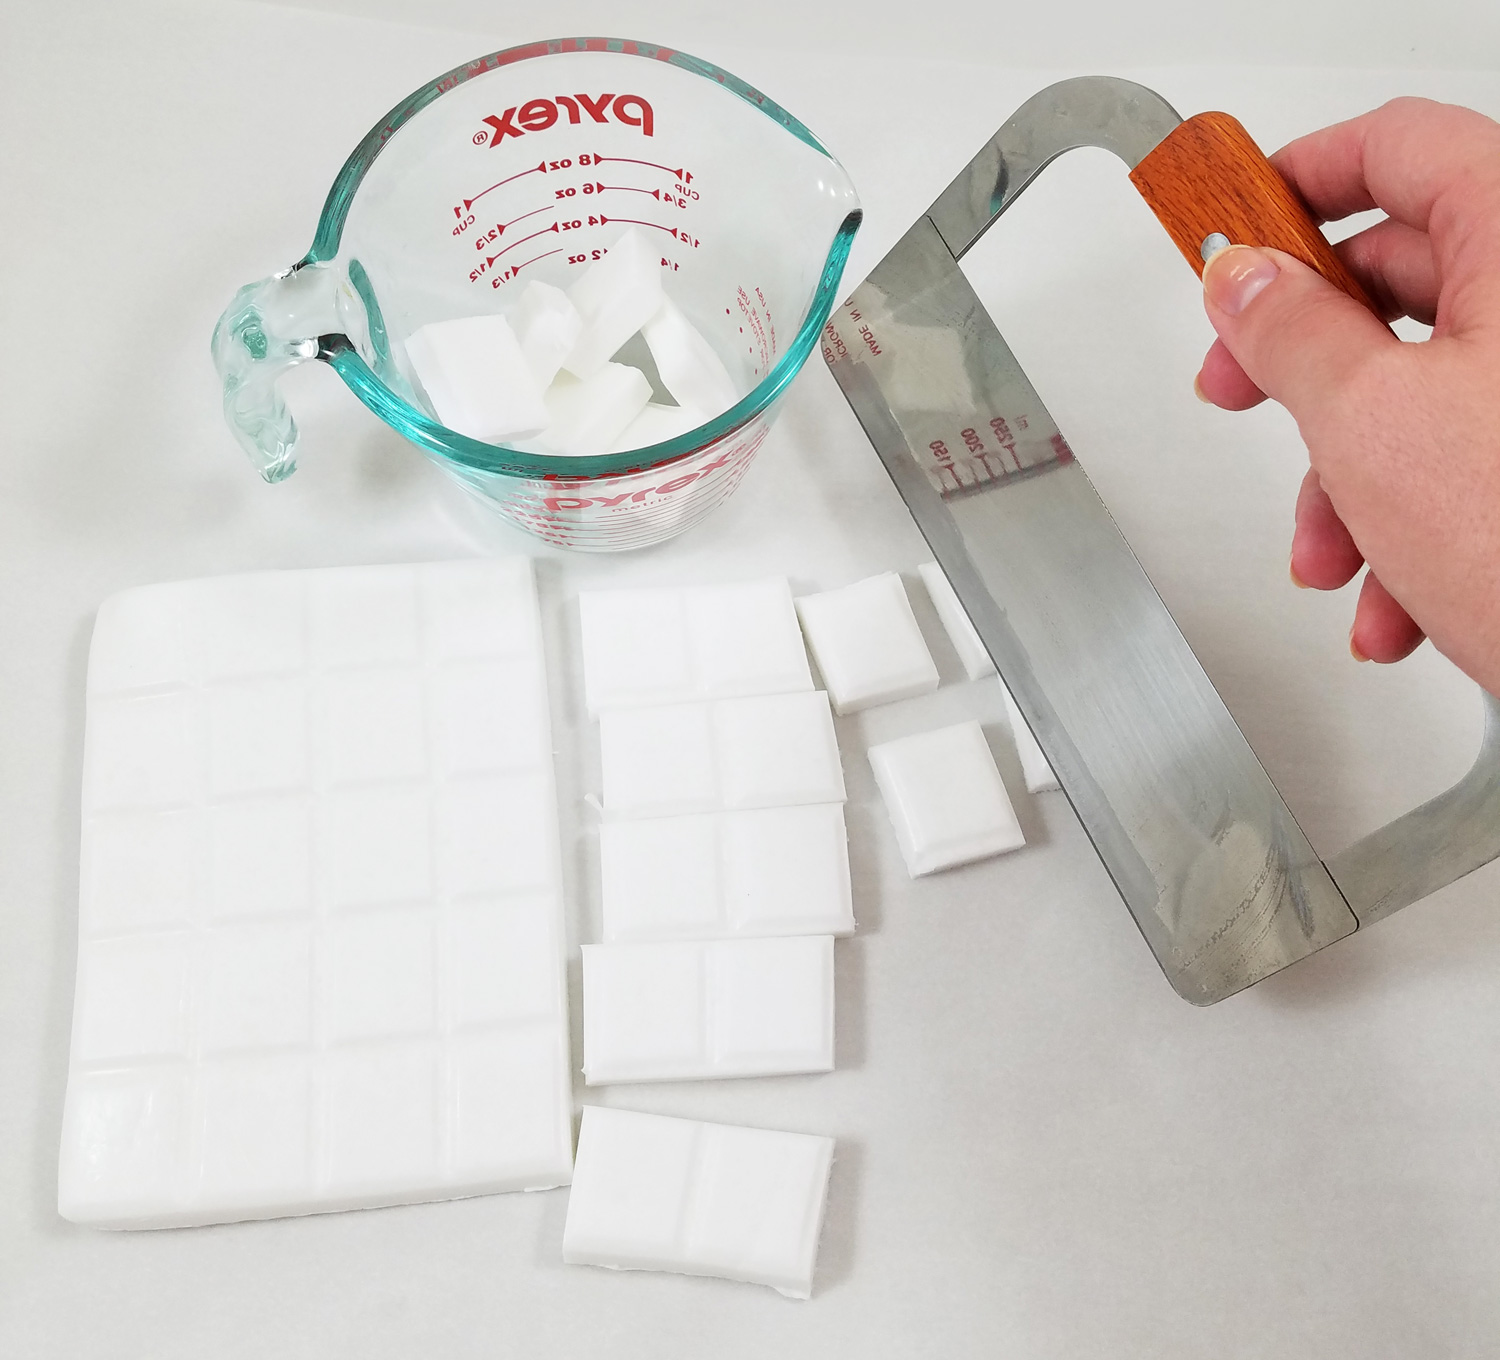
Following the instruction sheet included with the kit I cut the soap brick into cubes.
I would describe the texture of the White Suspension Soap as something akin to the old style “skin care bar” soap sold in the U.S. for the last hundred or so years. It was a bit stiff to cut through with a butter knife so I went ahead and tried Life of the Party Soap Cutter Straight Blade *. While a knife can do the same job, I find using the cutter allows me to cut easier and quicker and it is kinder on achy hands.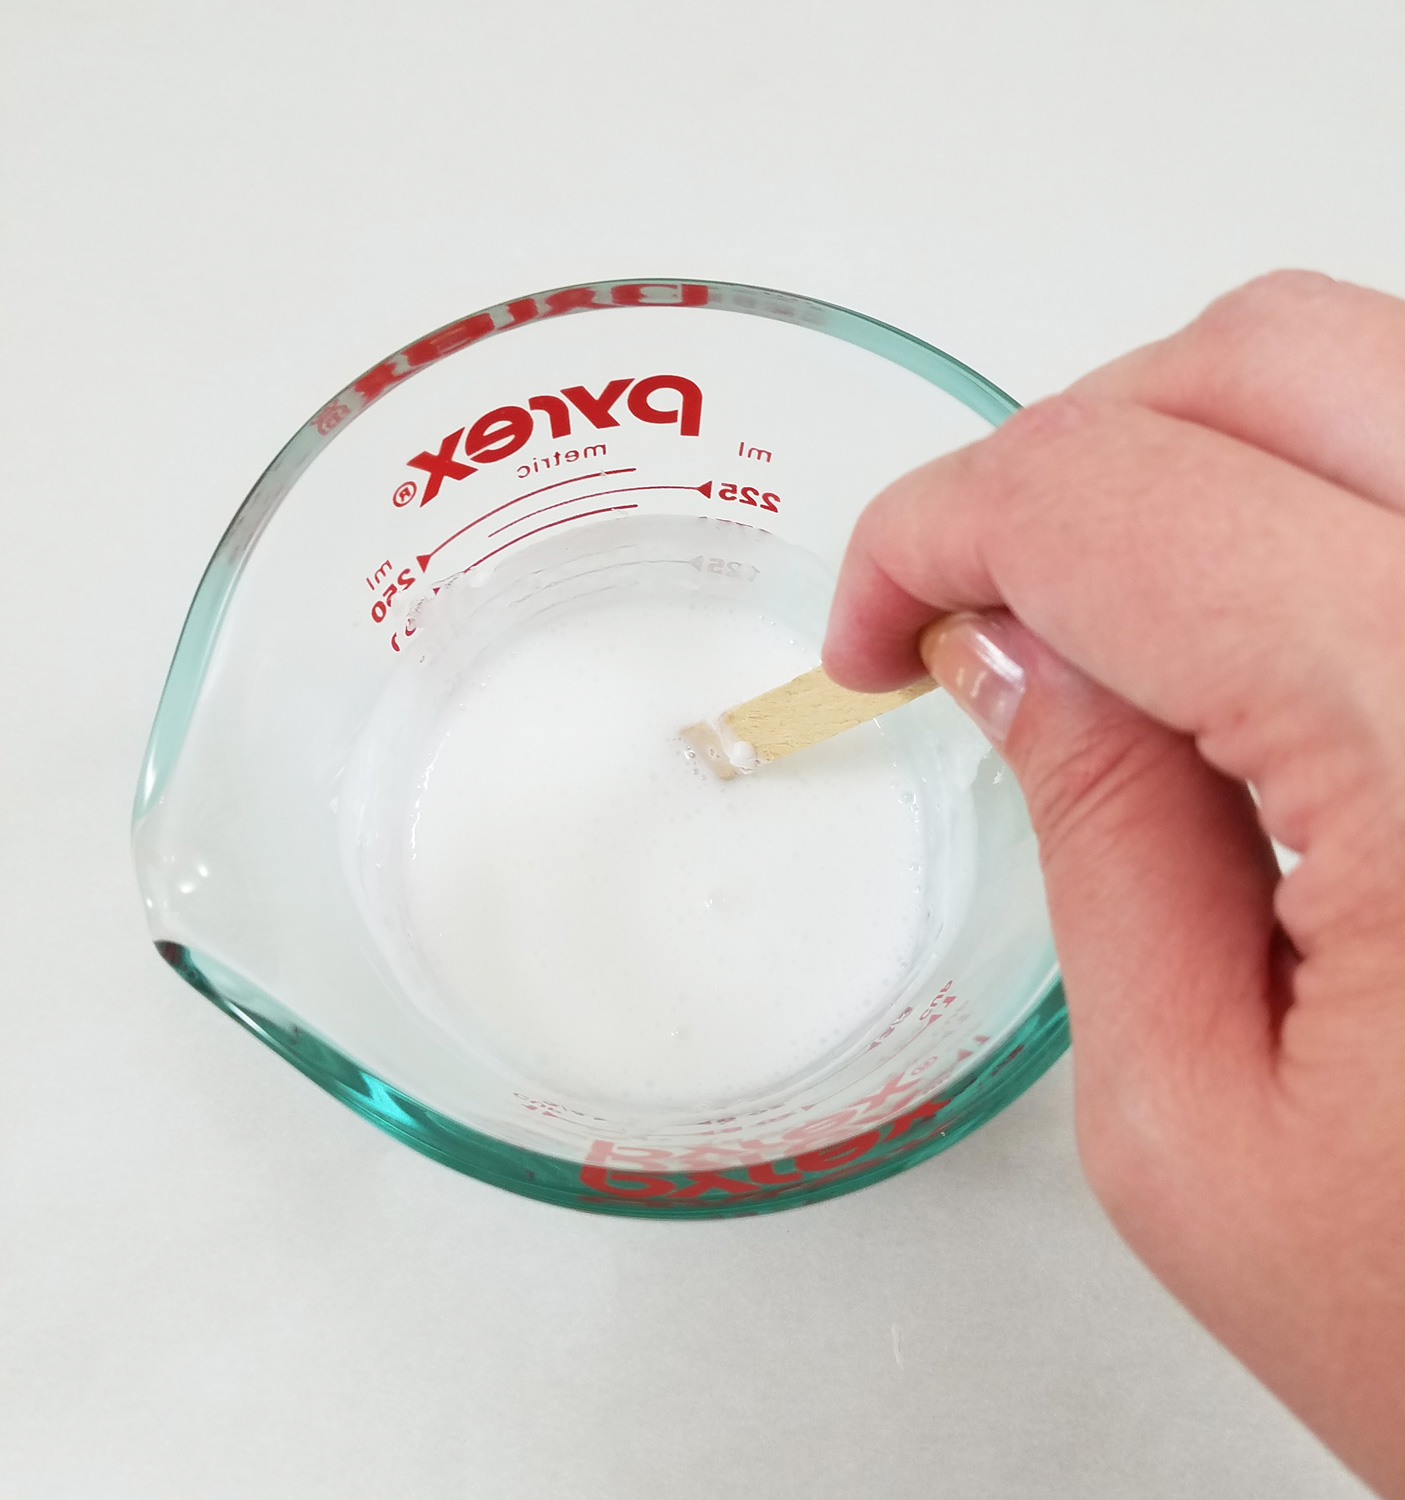
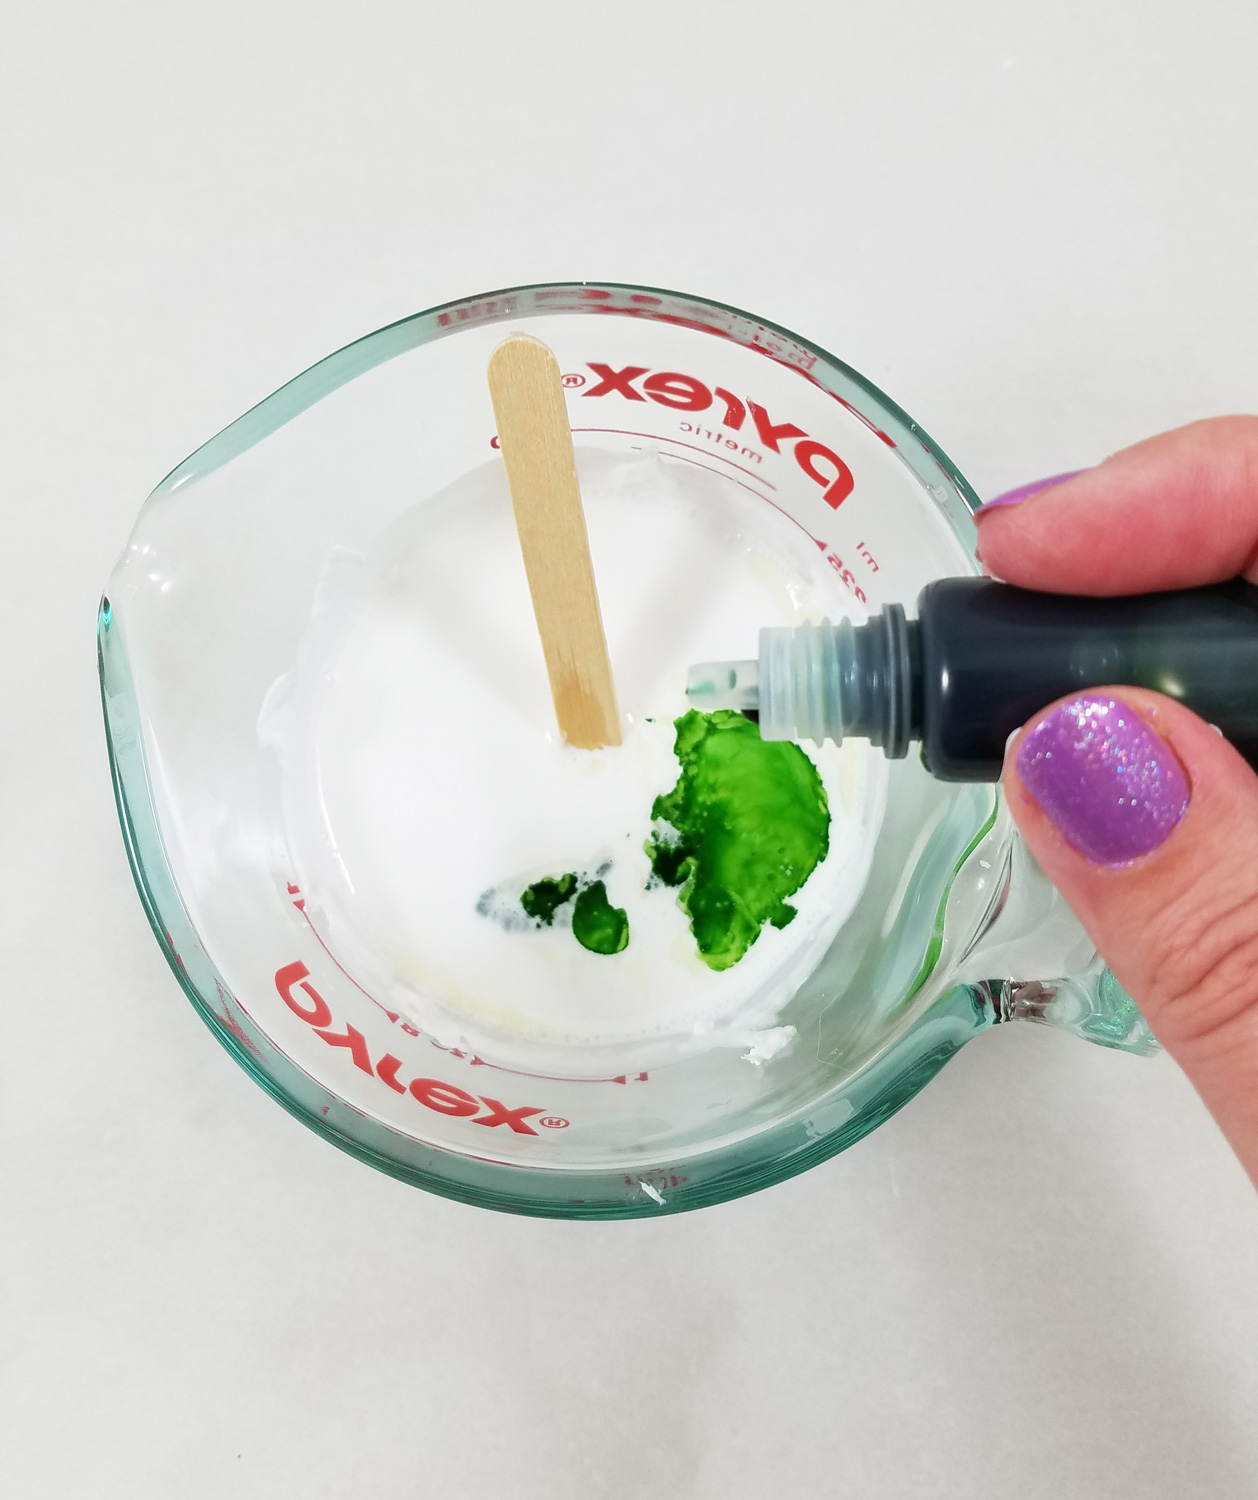
I put the soap cubes into a microwave-safe measuring cup and put it in the microwave for 20 second intervals, stirring the cubes until melted. Be careful with this step as it is easy to overheat the soap and the melted soap is very hot.
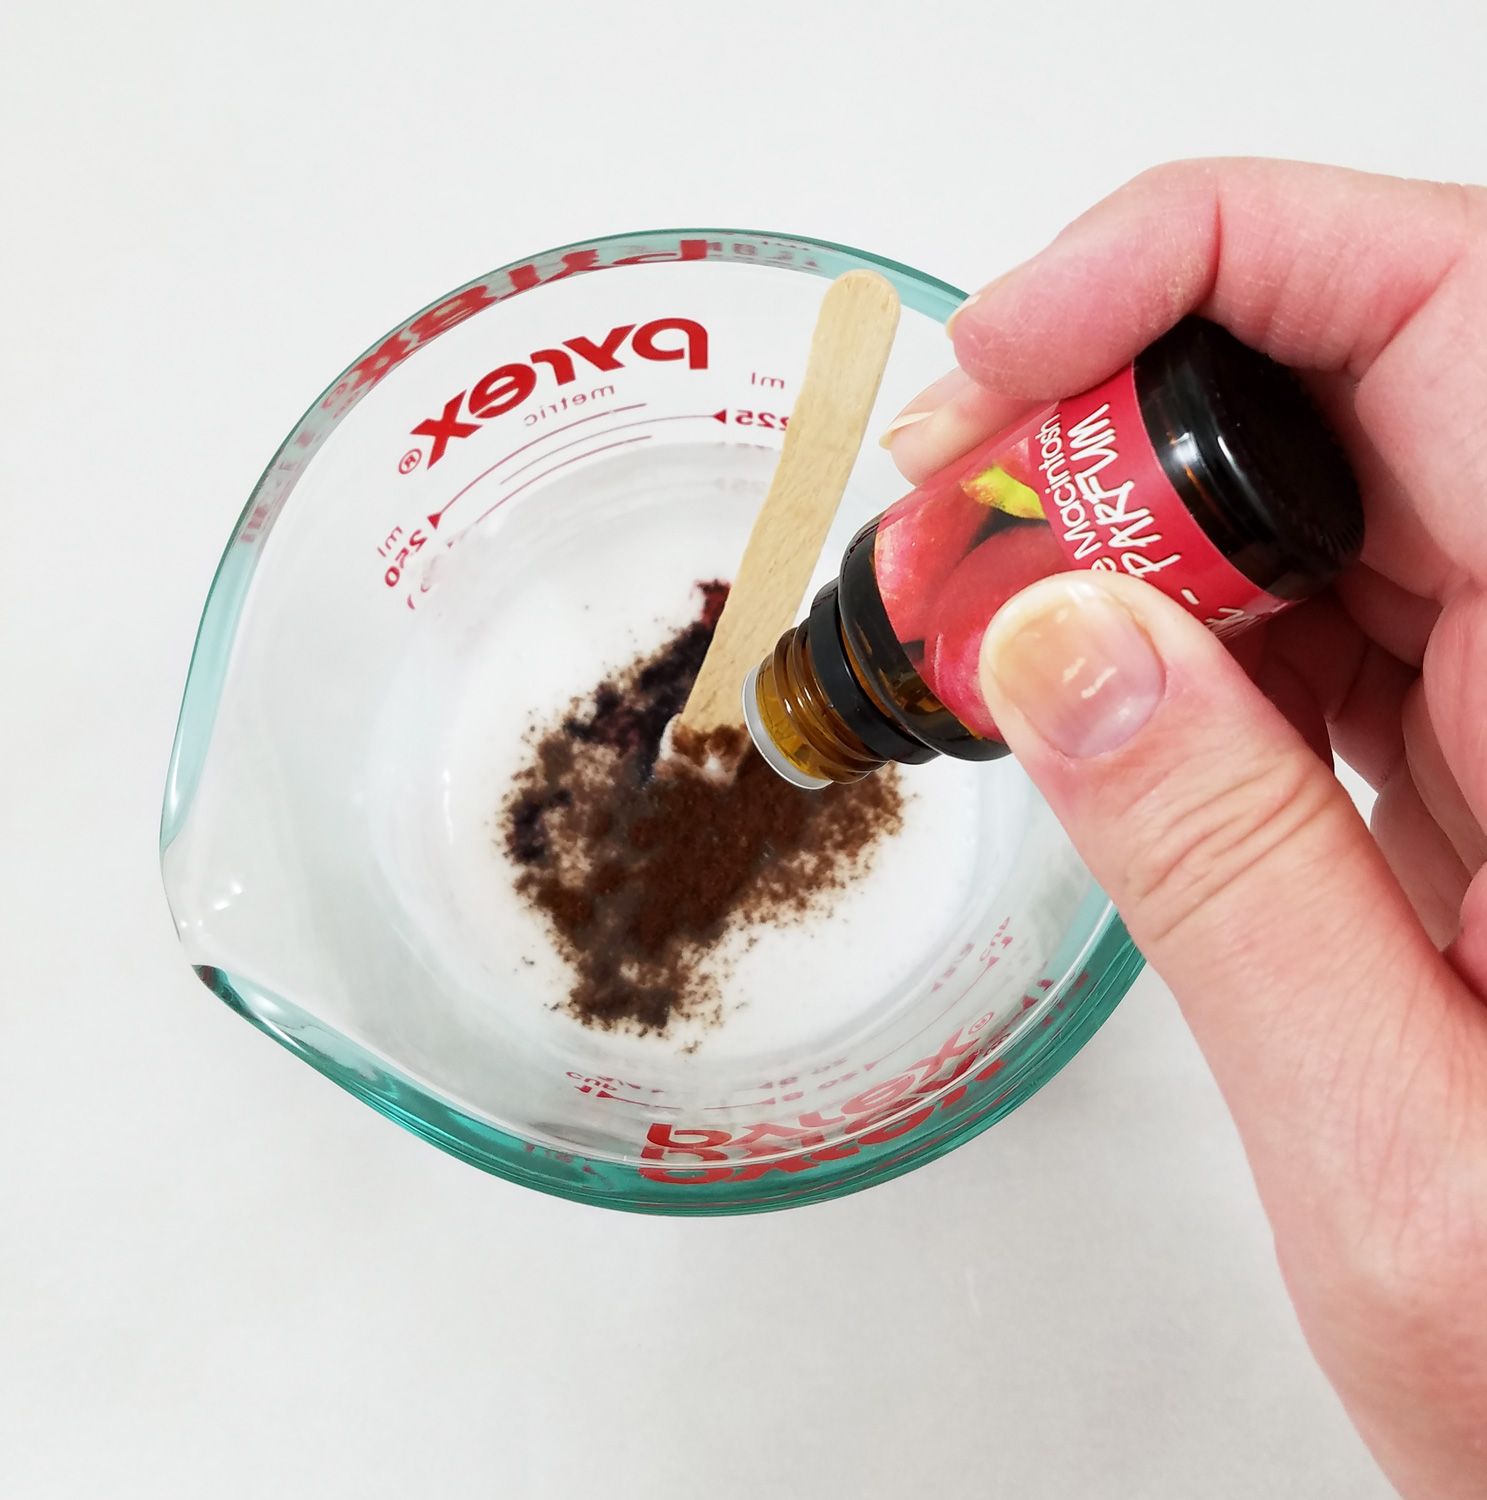
I wasn’t overly fond of the other two fragrances that came with the kit but I did like the Warm Vanilla scent. So I decided to add ground cinnamon, the Warm Vanilla and Life of the Party Macintosh Apple Fragrance * , giving it a scent somewhat akin to an apple pie. Keep in mind the more drops of fragrance or oils you use the stronger the scent will be.
I added in the apricot seeds from the kit as an exfoliant and a few drops of the rose color dye to tint the soap a pale pink. At one point I noticed the soap started to get cool and harden so I popped it back in the microwave for 20 seconds and then stirred well.
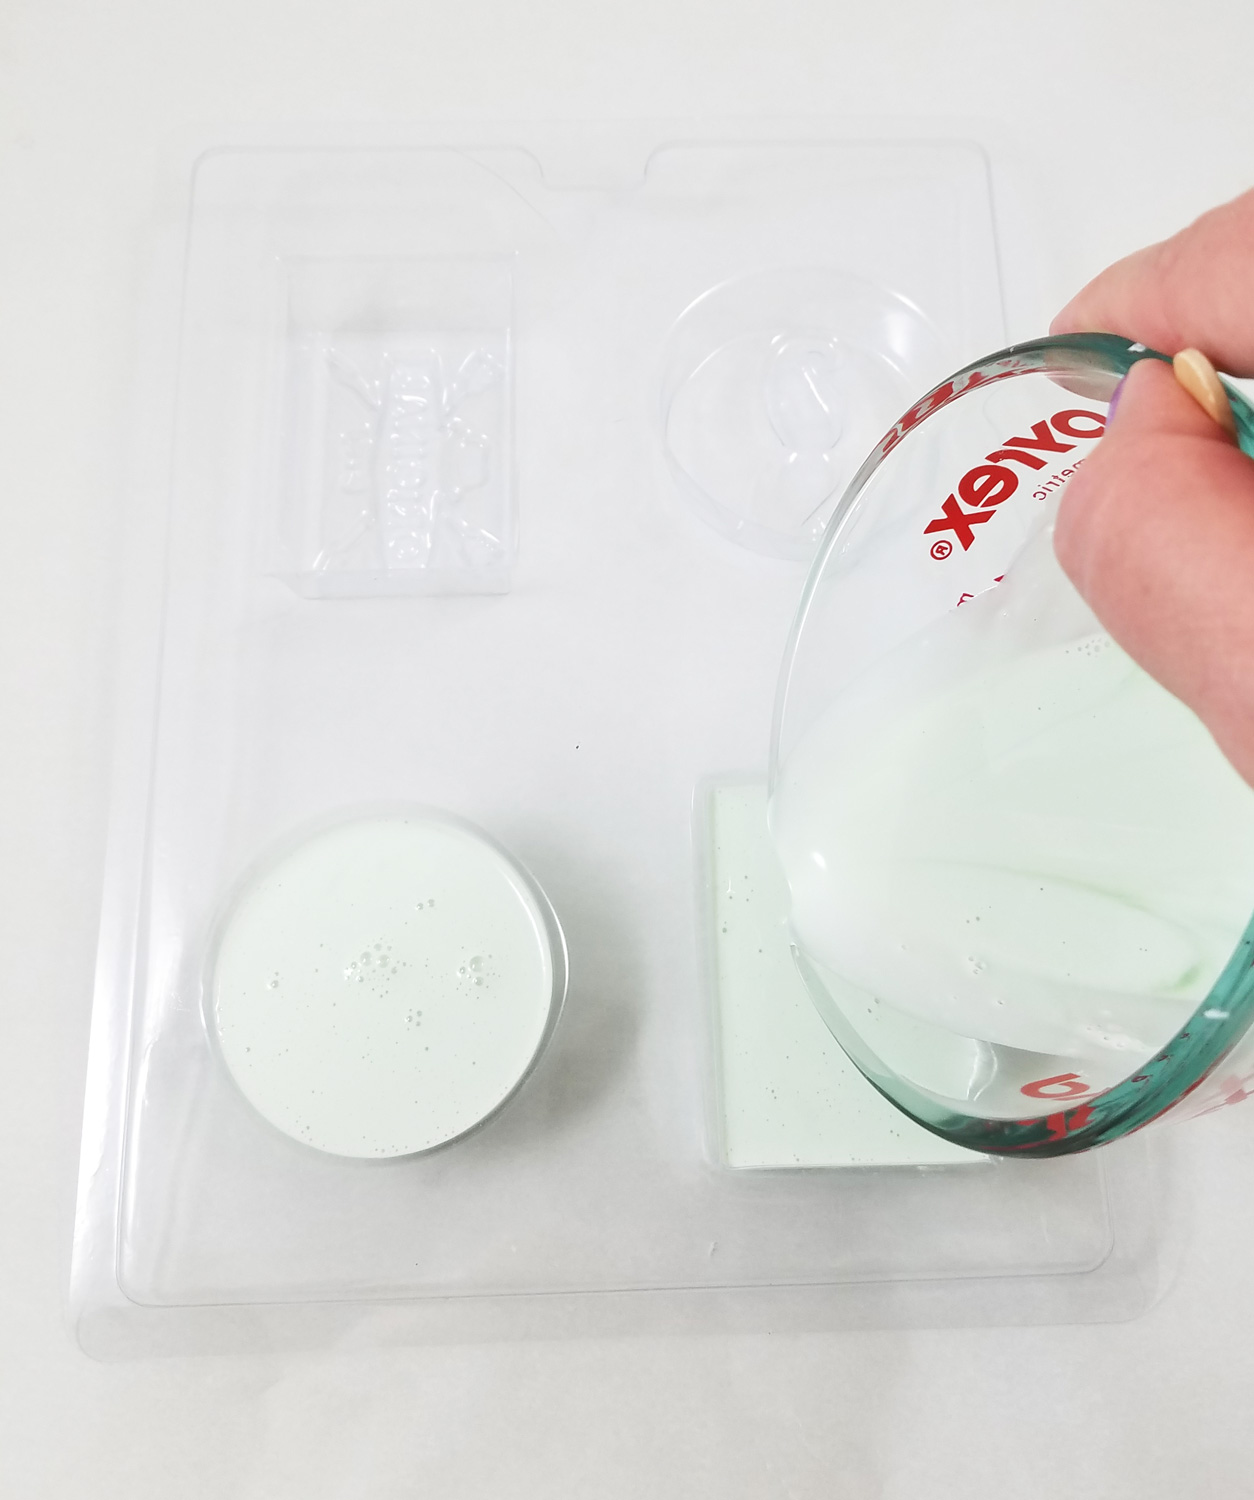
Instead of leaving the loofah whole I cut it up so I could put portions into each soap cavity. This would make these not your normal soap bars but indulgent foot scrubbing soap bars. The hot liquid soap saturated the loofah and filled each mold cavity.
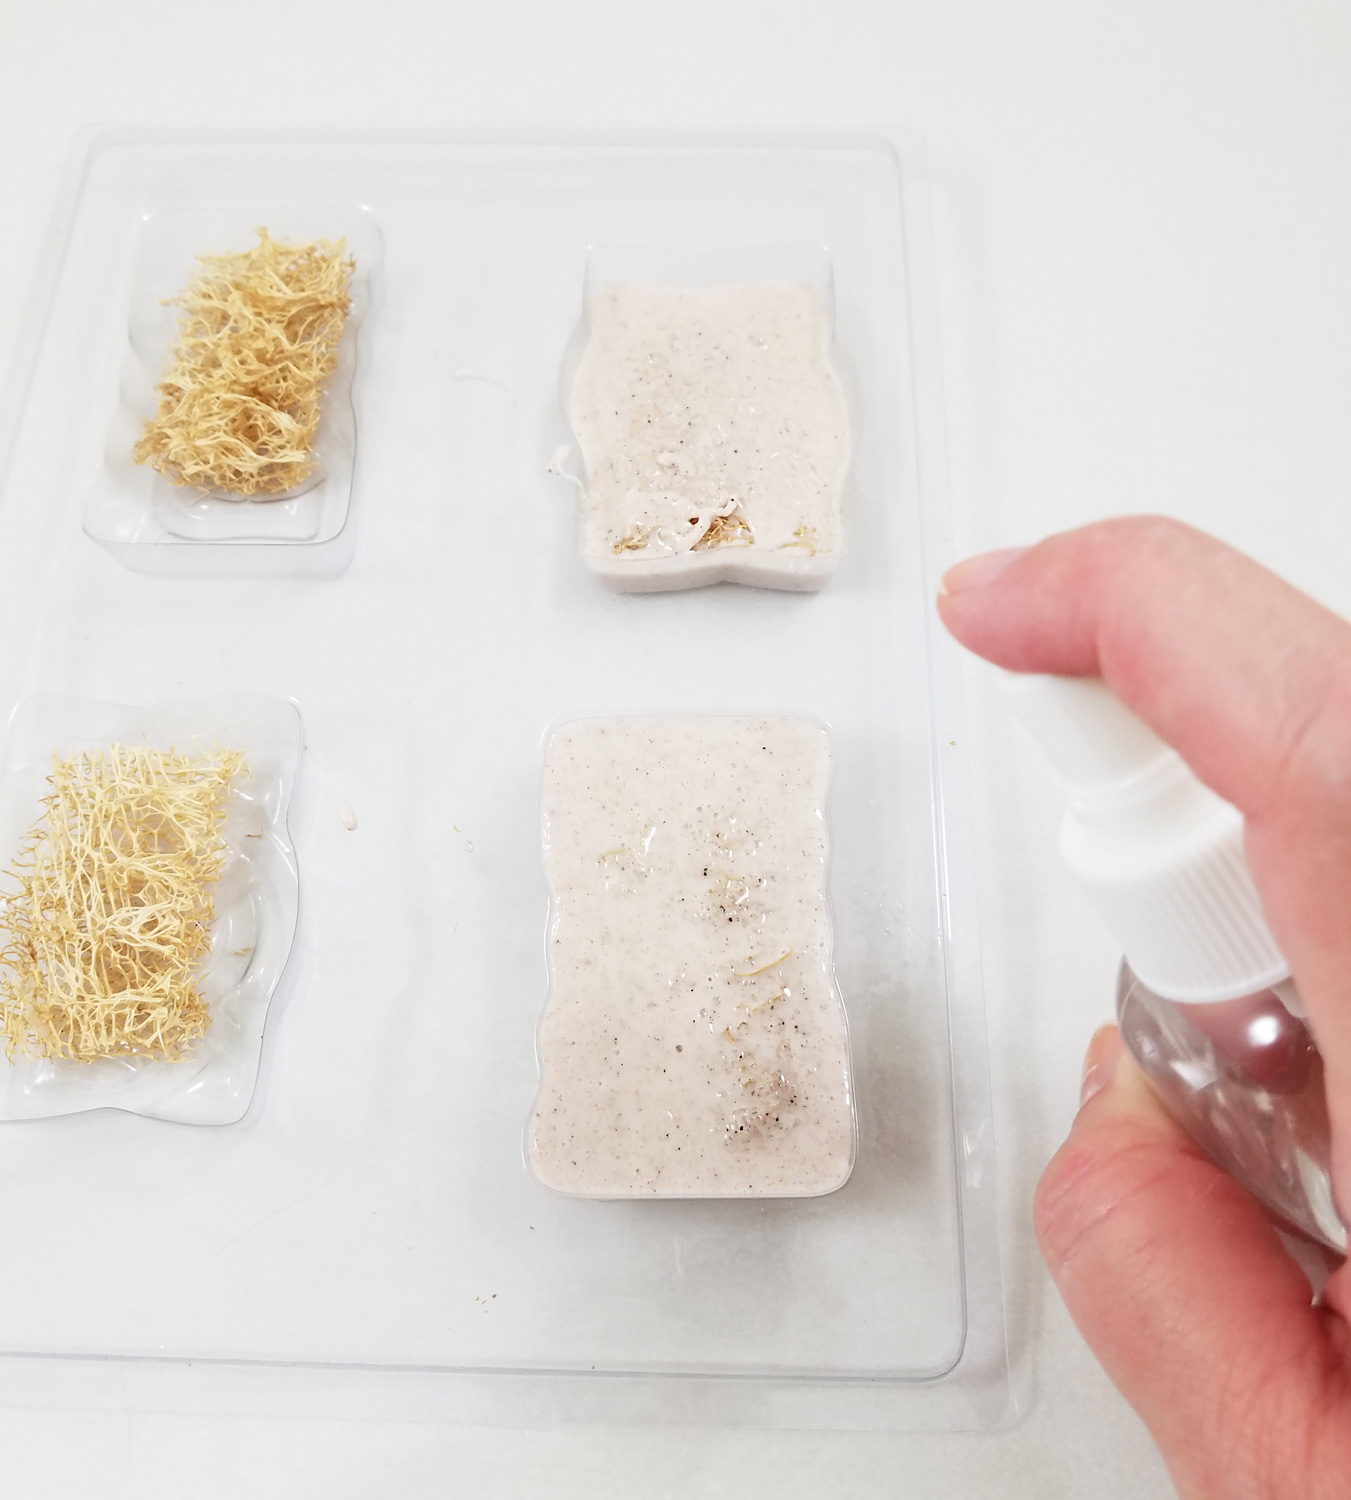
Before the soap cooled I spritzed the soap in the mold with the rubbing alcohol to pop the bubbles that formed in the pouring process. The instructions said to let the soap bars cool and sit still for 30-40 minutes, but since I live in a warm climate I had to let the soap sit for close to 1 1/2 before moving and demolding. You might find that there will be some variance in heating and cooling time depending on what climate you live in.
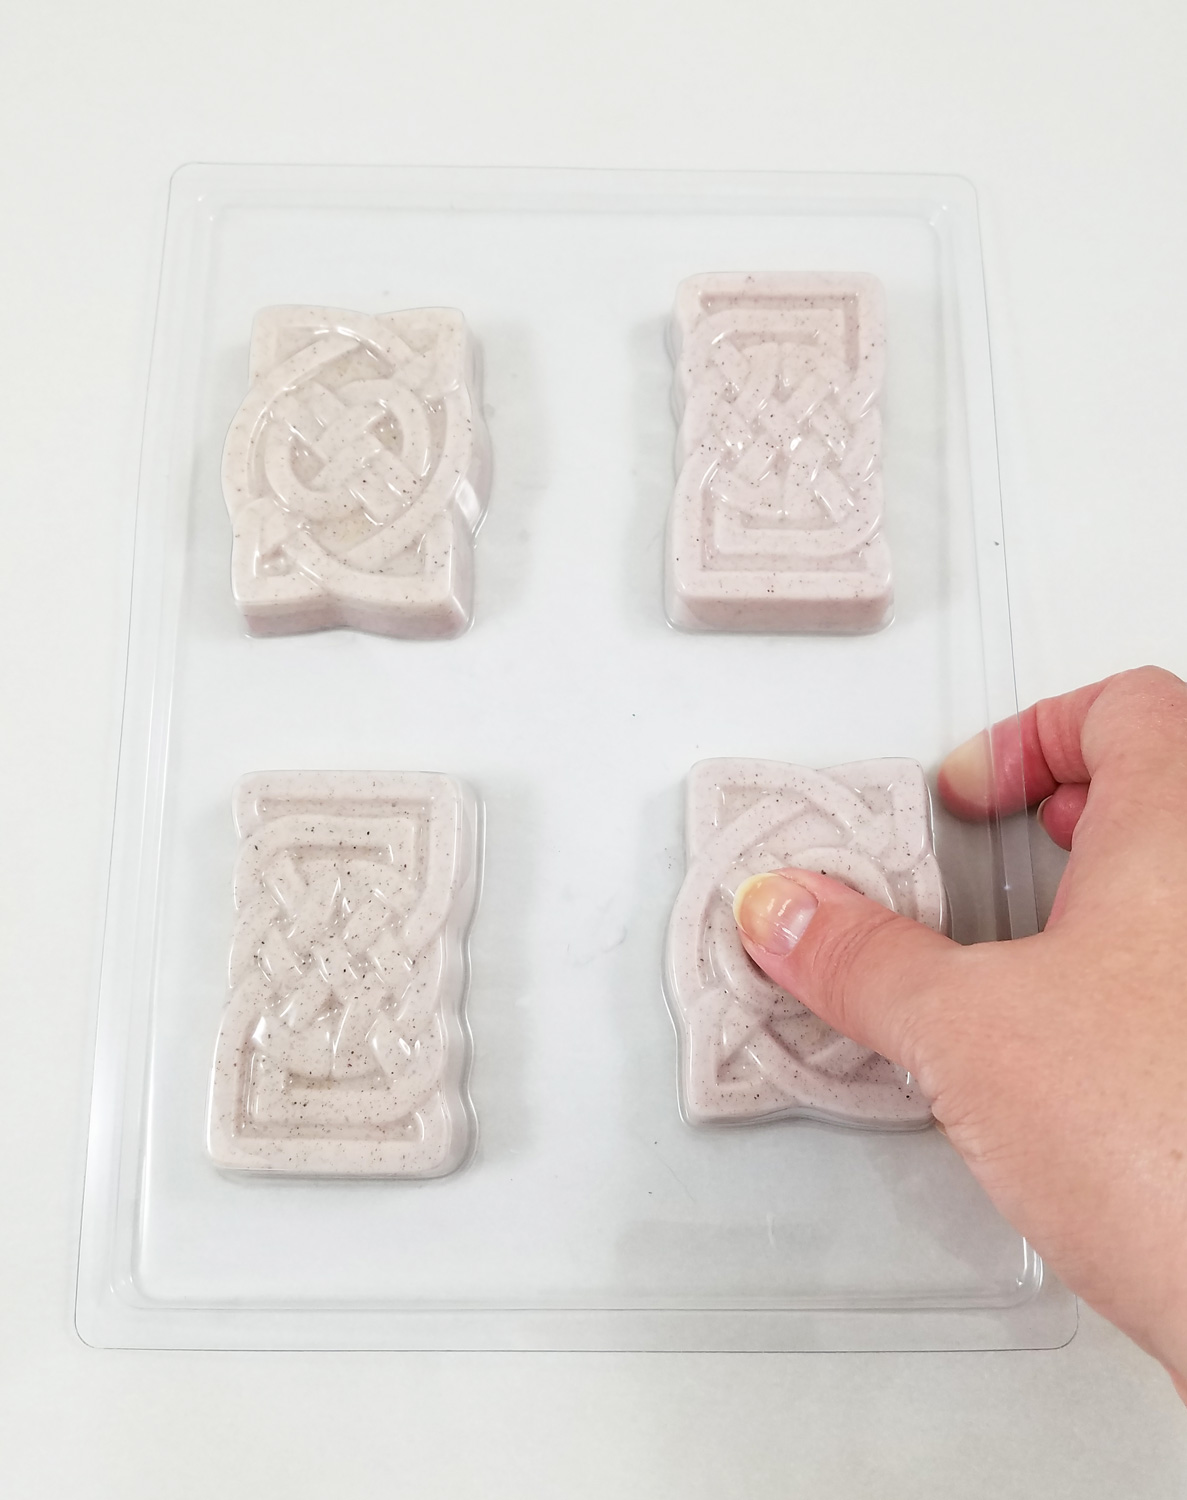
To release the soap from the molds I had to flip over the mold onto a flat surface and apply pressure with my thumbs to the back of the mold. The soap base being a firmer soap, it required a decent amount of pushing and easing the soap out of the mold.
Once I got the soap out of the molds I was really surprised how nicely the soap captured the delicate knotwork pattern of the mold. The instructions said to wrap the soaps individually in plastic wrap and/or scrapbook paper to retain the scent and freshness of the newly made soap.
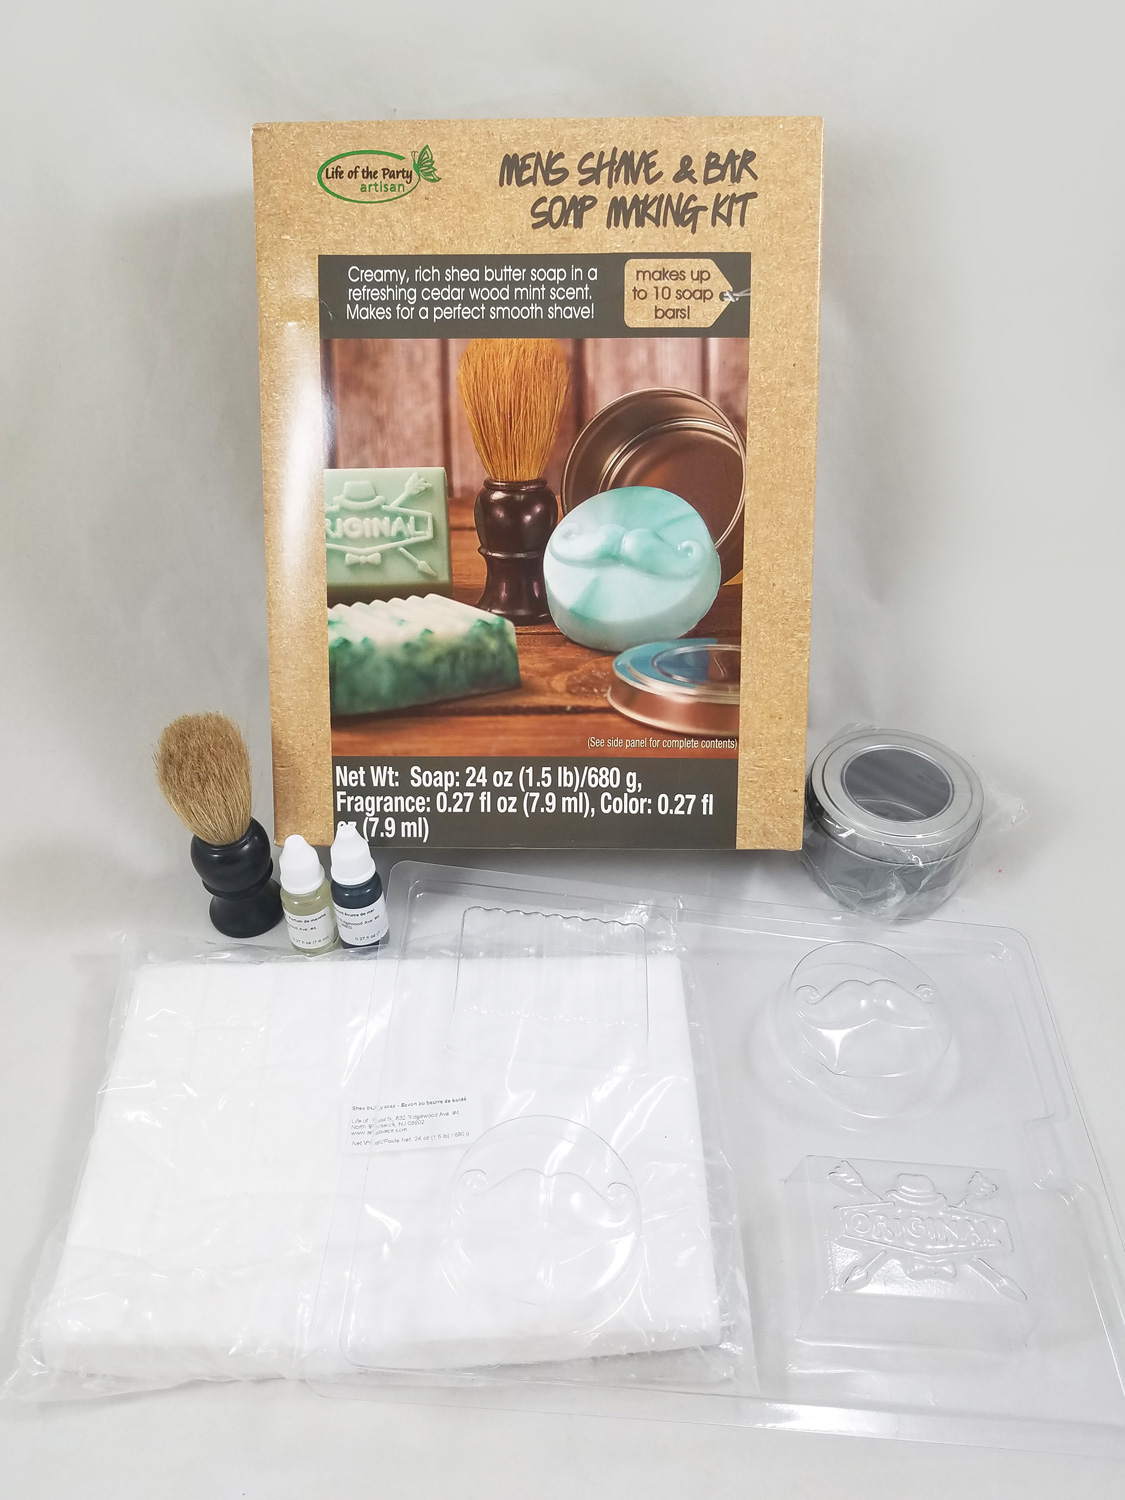
The second kit I tried was the Life of the Party Mens Shave & Bar Soap Making Kit *. This kit had a shea butter soap base, old timey soap mold and shave elements.
It comes with:
24 oz (1.5 lb) shea butter soap
0.27 seafoam color
0.27 fl oz cedar wood mint fragrance
1 shave brush
1 soap tin
1- 4 cavity mold
1 instruction sheet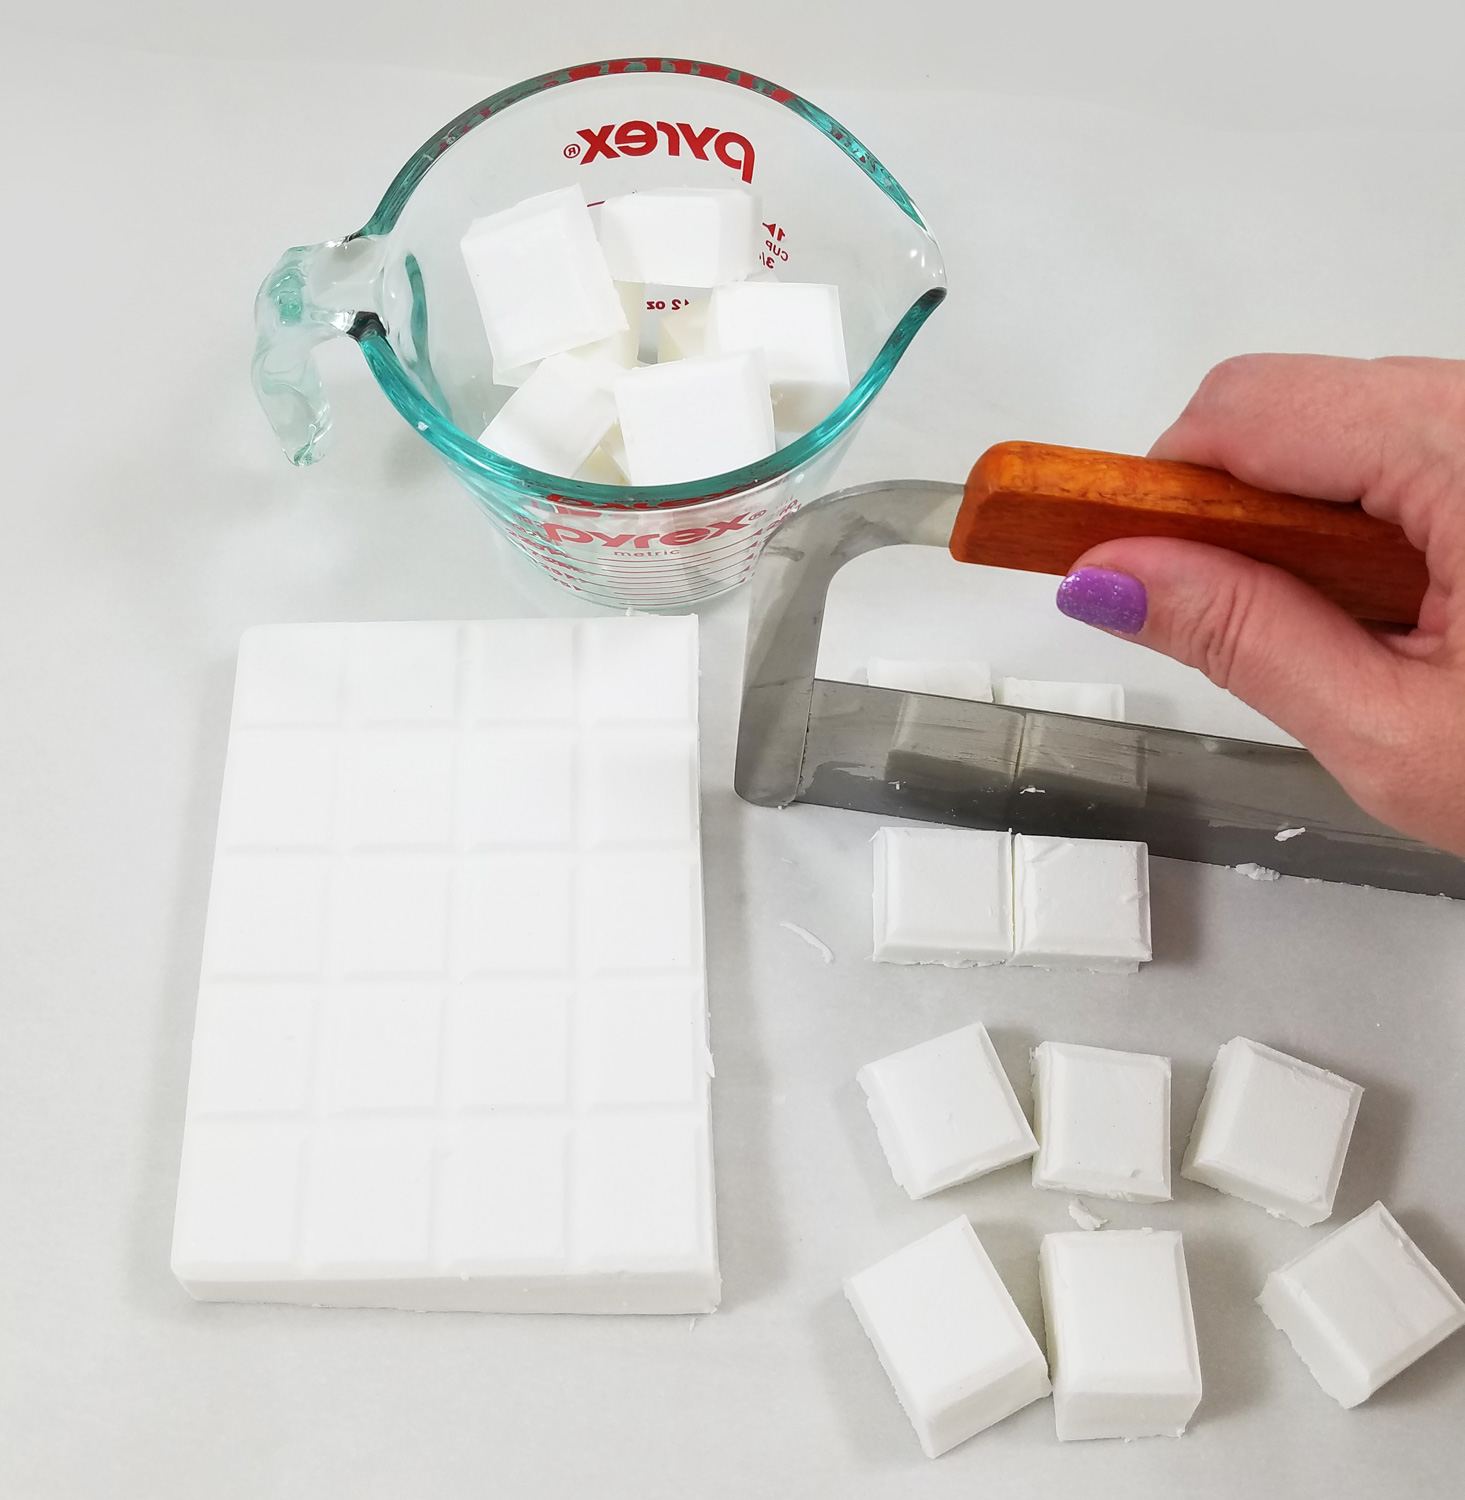
Once again following the instruction sheet included with the kit I cut the soap brick into cubes. My personal opinion is that the Shea Butter Soap Base is a better soap than the White Suspension Soap. It is very smooth, a bit soft and feels great on the skin, it does not remind me of a mass produced soap. It is more along the lines of specialty milled soaps and gift shop soaps. It also seems to melt faster and stay hotter longer when heated in the microwave.
I got a bit more creative in the fragrance department because the cedar wood mint fragrance included in the kit was kinda weird. I had my husband smell it and he felt it smelled rather accurately like “generic men’s body spray”. So I decided to play fragrance mad scientist and break out some of my essential oils. I mixed together several small scent batches (before melting the soap) until I found two blends that were more unique.
Clean Forest Scent
Cedarwood Essential oil
Peppermint Essential oil
Life of the Party Eucalyptus Mint fragrance *
This blend works for the soap and the shave bars as it lathers smooth without exfoliant.Spice Route Scent
Tangerine Essential oil
Life of the Party Eucalyptus Mint fragrance
Ground Cloves (gives a nice scent and acts as a exfoliant)
Dried mint from my garden (gives a nice scent and acts as a exfoliant)
This blend works more as a soap bar only because of the added exfoliant.Once my scents were ready I split the soap base into two batches. Each batch got a different fragrance and different amounts of the seafoam green dye.
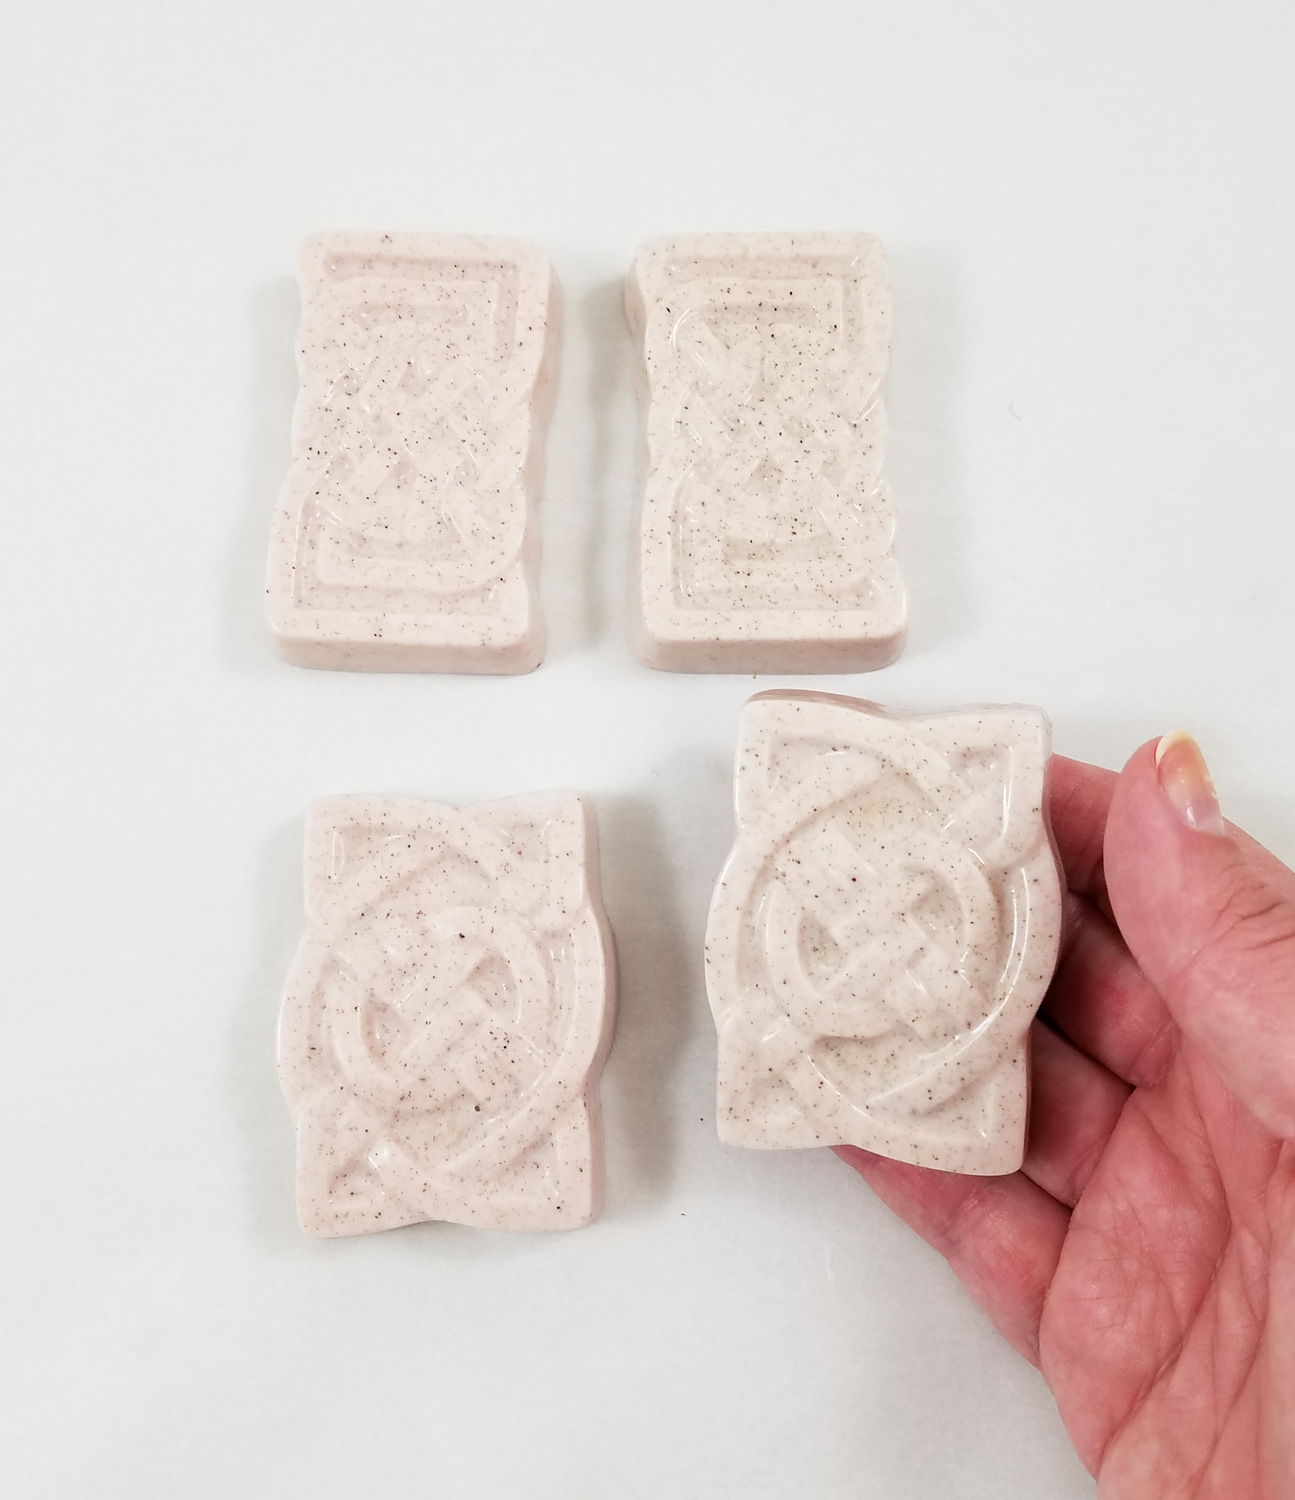
The shea butter soap base flows even smoother into the mold cavities and cools a little slower. I let them cool completely and popped them out of the molds as per the instructions.
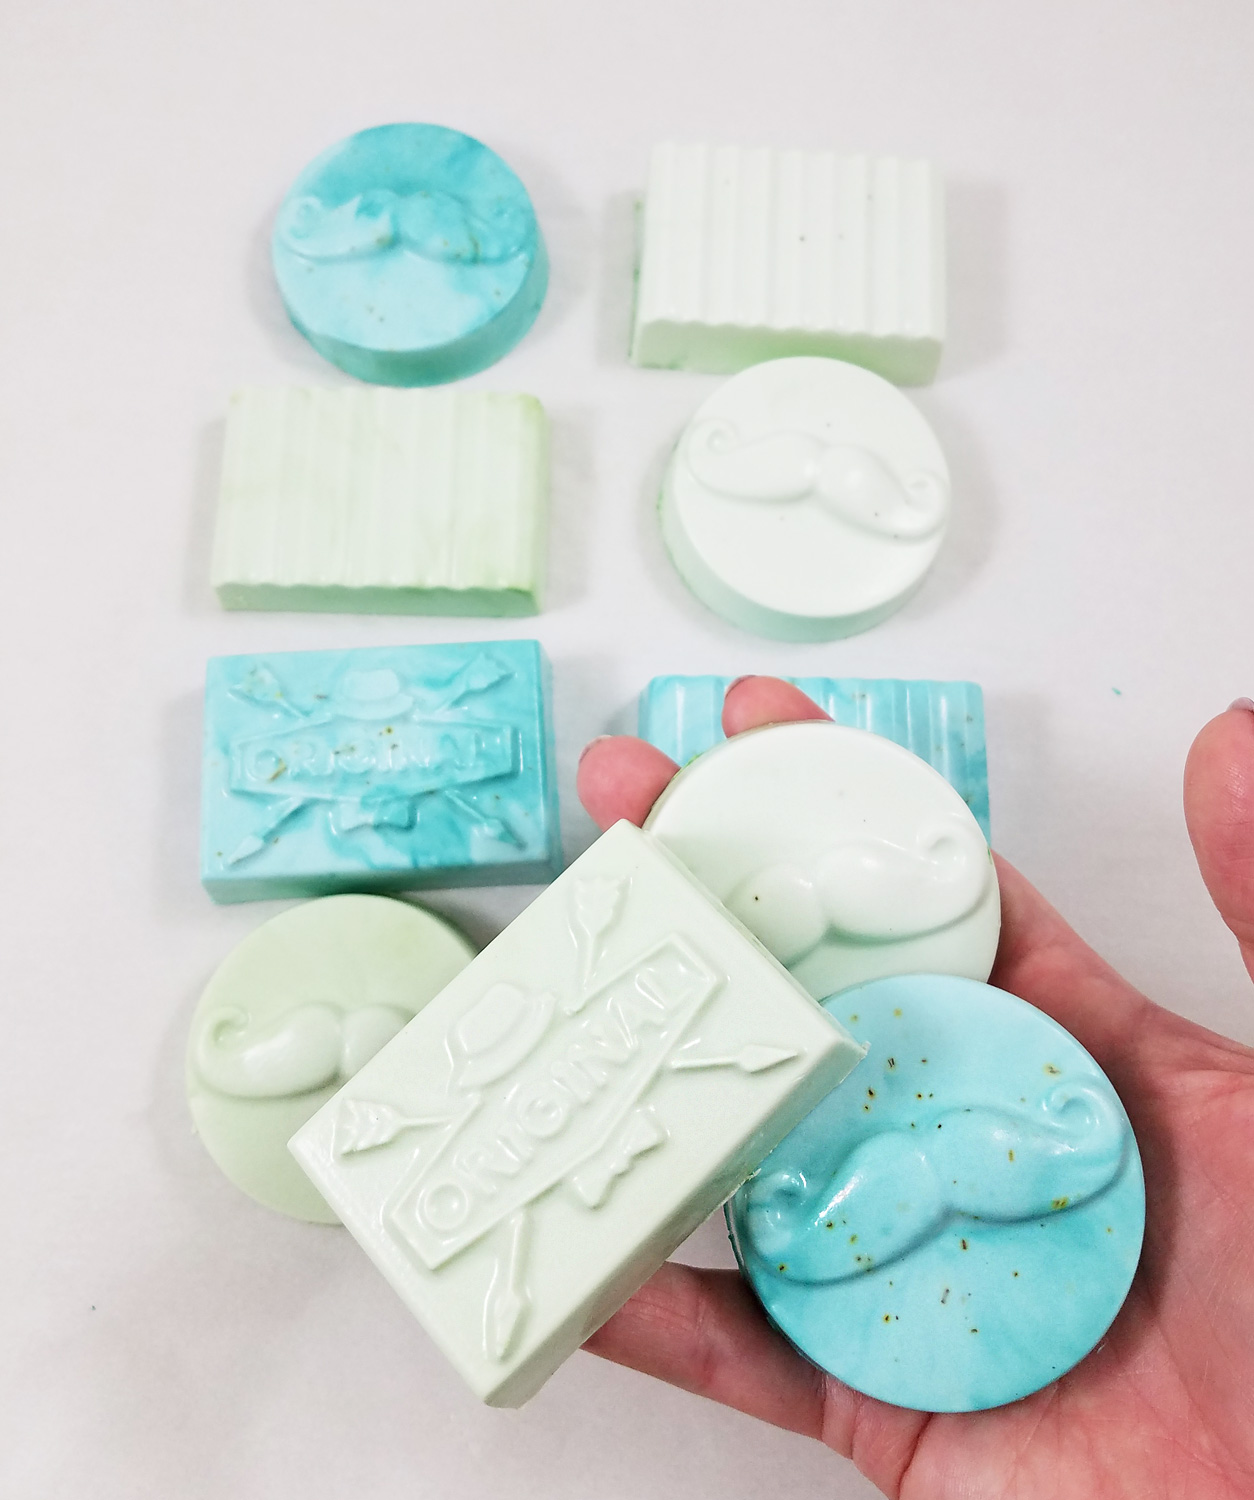
Once again the soap took on the delicate details of the mold. The shea butter makes these bars a bit softer so it is important to wrap them up so they do not get marred. The shaving soap puck lathered up perfect in the tin with the use of the shave brush.
Overall I love both of these kits but the shea butter base is my favorite soap base and I think a bit easier to work with. I am also pretty fond of the molds and can see them being used for candy and resin projects easily with the right mold release. While the scents were not my favorite aspect of the kits, everyone’s sense of smell is different, so someone else might love them. I did find rather enjoyable the ease of making and adding other fragrances, herbs, spices and exfoliants. As for my sensitive skin not one of the soap bars have caused me to have an allergic reaction.
What interesting soaps might you create? 🙂
Until Next Time, Safe Travels!
This post contains affiliate links. To read my full disclosure, click here. All affiliated links will have a red asterisk, such as this*.
Sparkling Masquerade Mask with Testors Craft Intense Glitter Paint
My last two blog posts, found Here and Here I talked about the 6th annual Prime Networking Event in January. At this event, bloggers, designers, authors and brands in the craft industry came together to network, make new partnerships, and learn about new product information. Educational, informative, with food, drinks and free product samples provided by this year’s sponsors. Afterward, the event attendees were encouraged to try out and create art for the Favecrafts Best Blogger Craft Event.
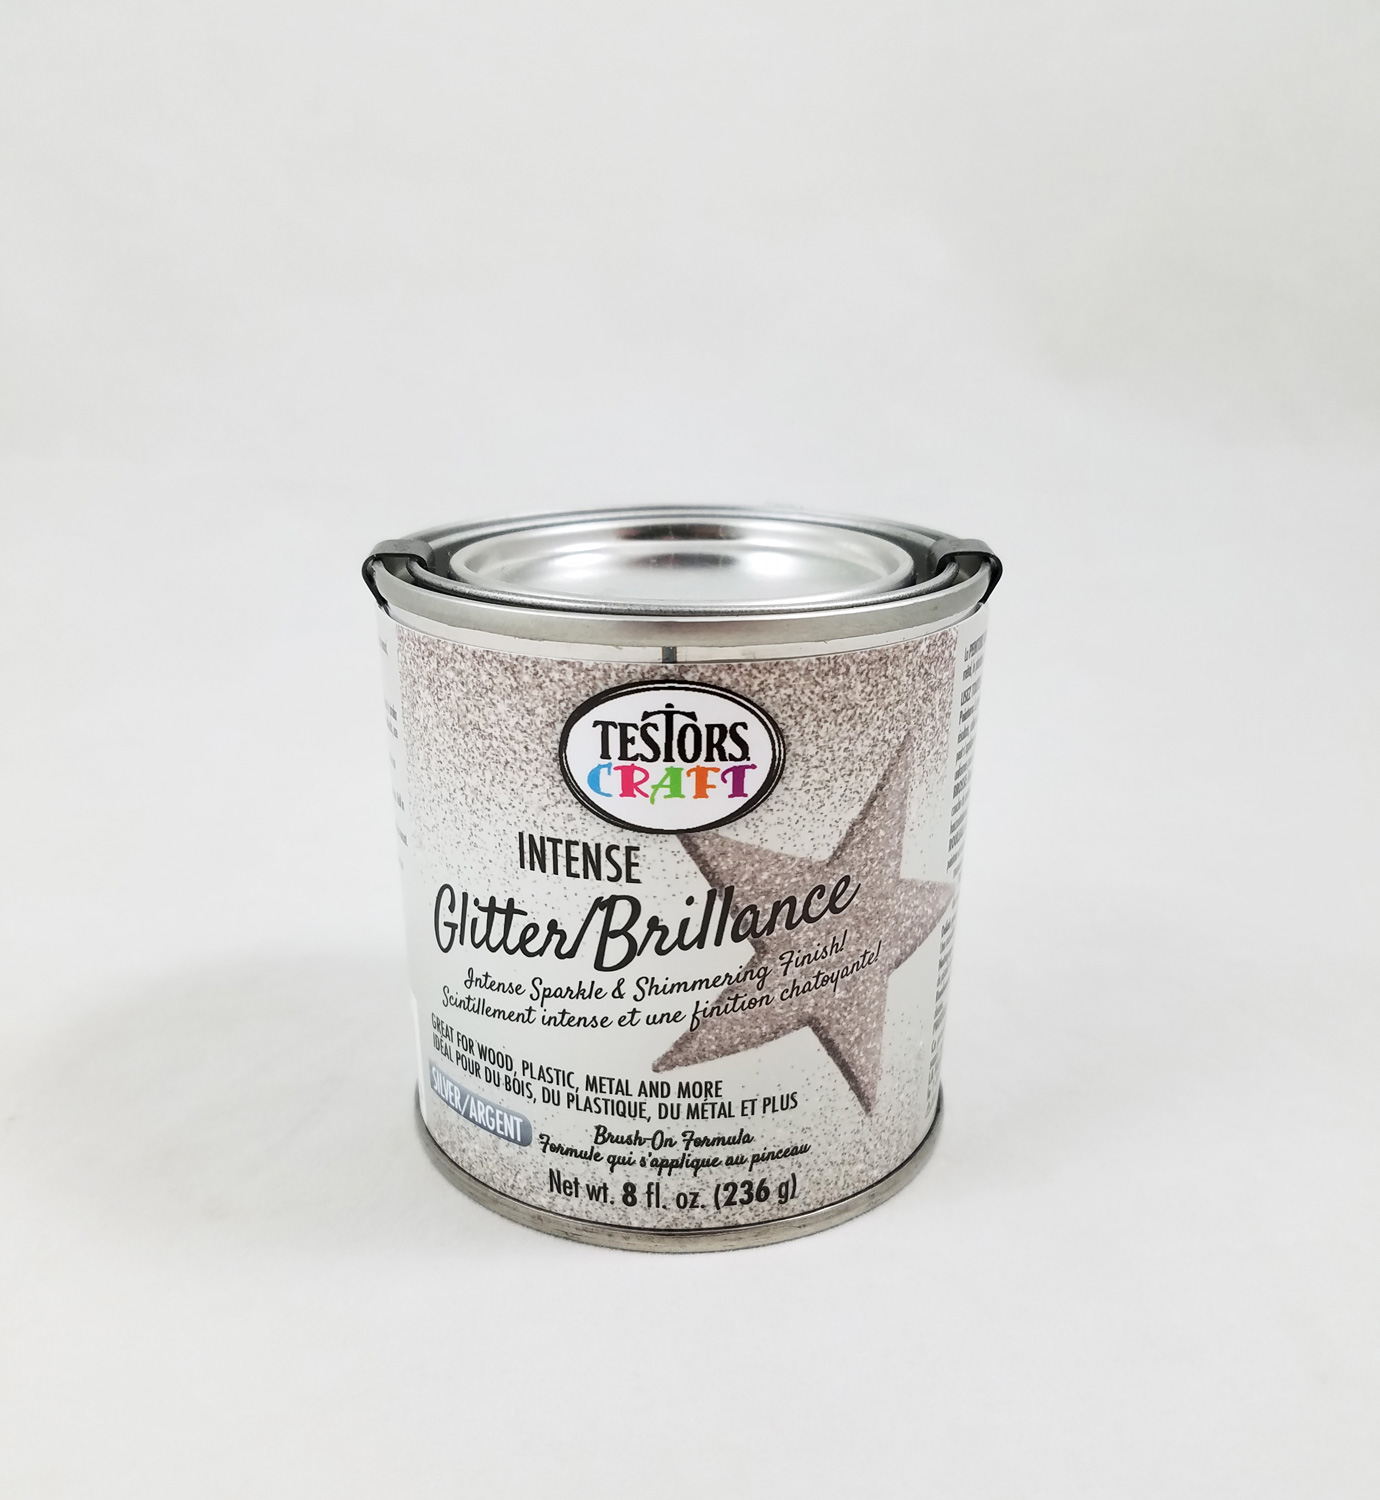
A sponsor at the event was Rust-Oleum with the Testors paint brand (Testors once its own company is now part the Rust-Oleum Group). During the blogger event attendees were asked to cast a vote for their favorite new Testors Craft/Rust-Oleum product. The winner of that vote was the Testors Craft Intense Glitter paint. As per the label it can be applied to wood, plastic, metal and more, with excellent adhesion, perfect for special occasion tablescapes and home accessories. Testors Intense Glitter paint is water based, low VOC and the glitter is made out of very small Mica particles (Mica is a naturally occurring mineral found in granite, rocks and crystals).
Many at the event were excited with this new paint and were excited to try it. However I will let you in on a secret: while a fan of the Rust-Oleum/Testors paint lines I am not a huge fan of glitter. I know I probably broke a crafting world rule by saying that but I have never found myself using much glitter in my projects. I use it mostly as a highlight, a minor shimmer or a tiny amount encased by resin. I have found many glitter paints in the past to be messy, have bad adhesion and not cover well. That being said I wanted to give this new paint a chance.
Upon opening the can of paint I realized how tiny the particles of glitter were. I painted a small swatch onto plastic, which it coated smoothly and even, when dry it looked amazing. I was staring to understand why so many were eager to try this paint. Inspiration for this project came from not wanting to coat furniture or small wood objects with glitter. I wanted to try turning something common into something beautiful. Grabbing a plastic Halloween mask from a .99 cent store I wanted to give this paint a true test, only to be very happy with my end results!Supplies:
Testors Craft Intense Glitter Paint
Plastic Owl Mask from a .99 cent store
Multi Surface Acrylic Paint in Grey and Black
Metallic Multi Surface Acrylic Paint in Blue and Green
2 Paint Brushes
Beacon Gem-Tac Glue
Swarovski Rhinestones Flatback Vitrail Medium SS20
Clear Crystal Rhinestone Flatback 4mm and 3mm
Crayon
Silver Ribbon
Beads, Bead Thread and Jumprings *optional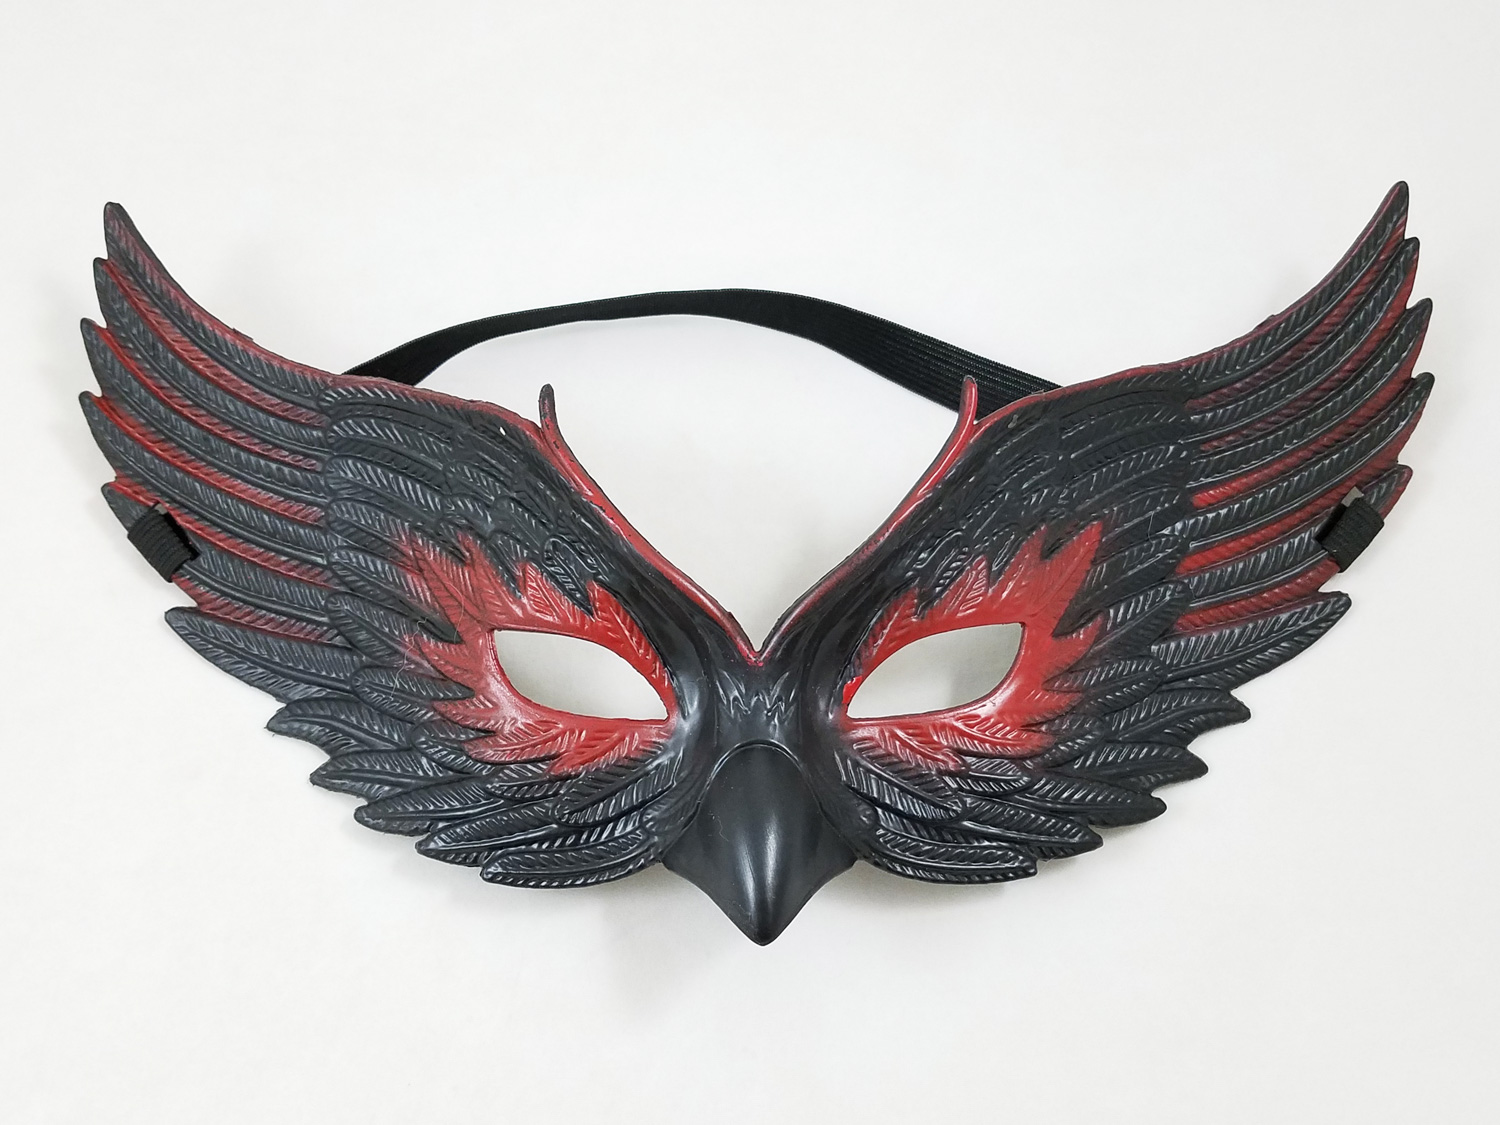
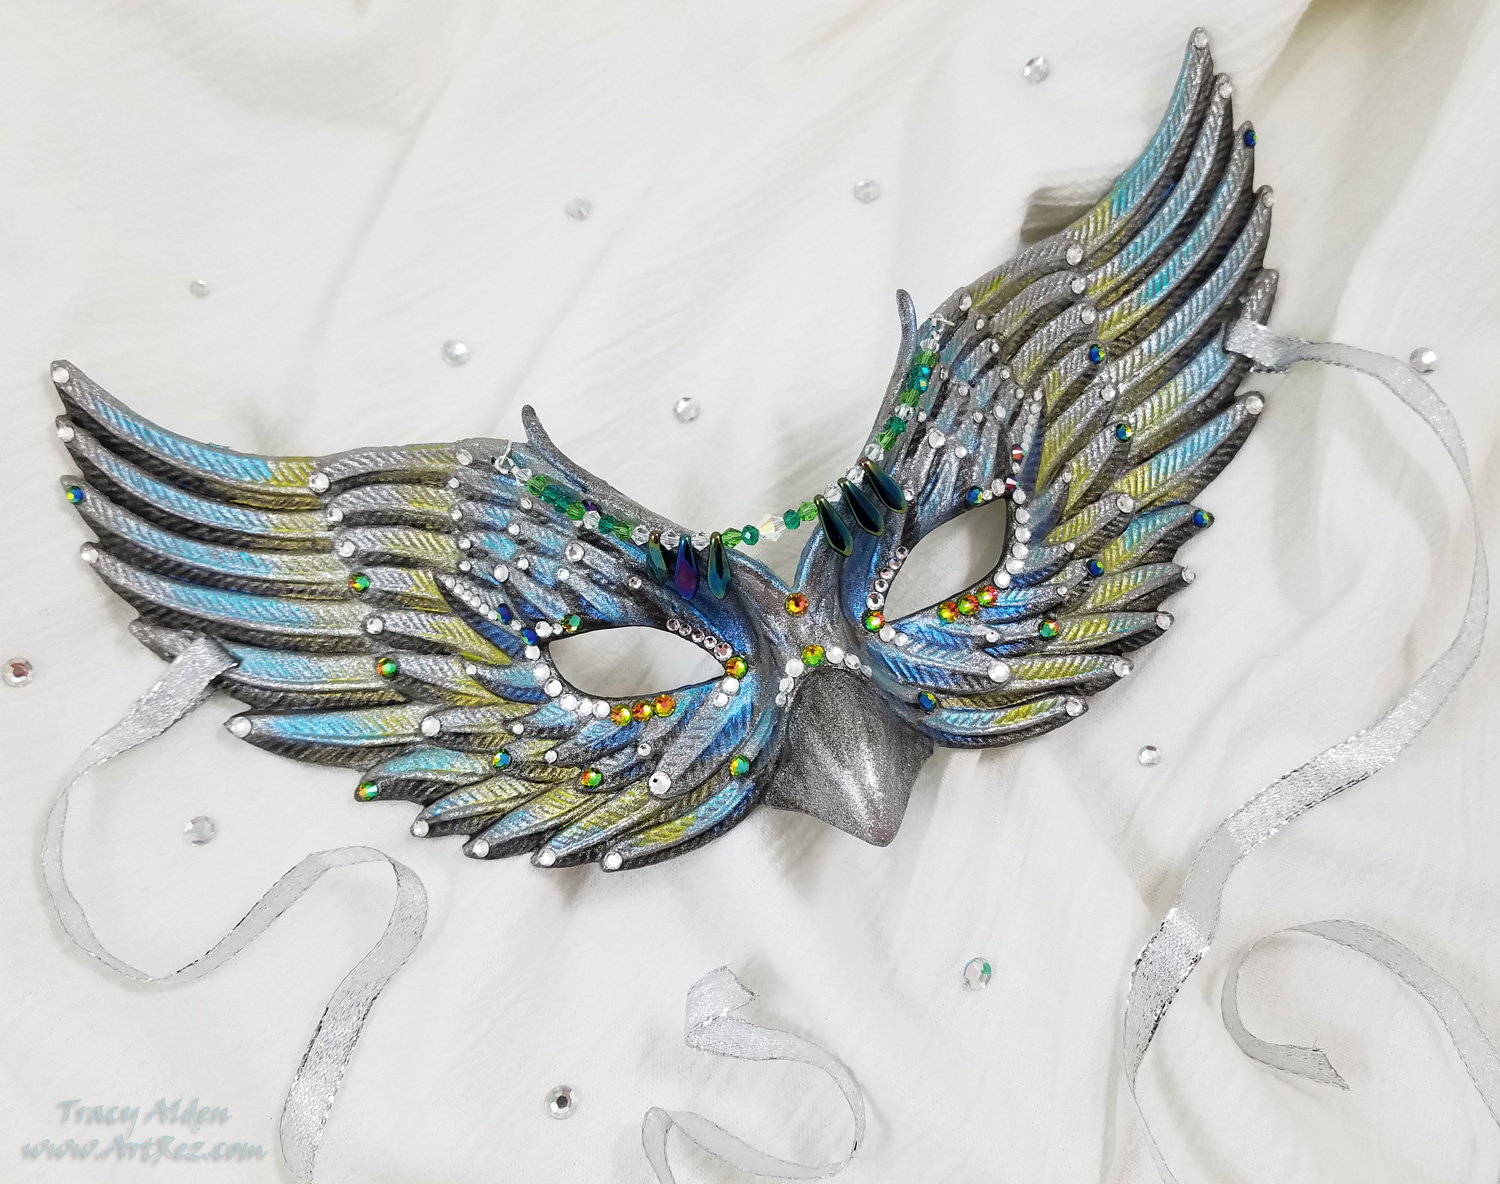
Starting by cleaning the plastic Halloween mask with soap and water, I made sure to remove any oils or dirt left from the manufacturing process. I cut off the elastic headband and filed any sharp edges.
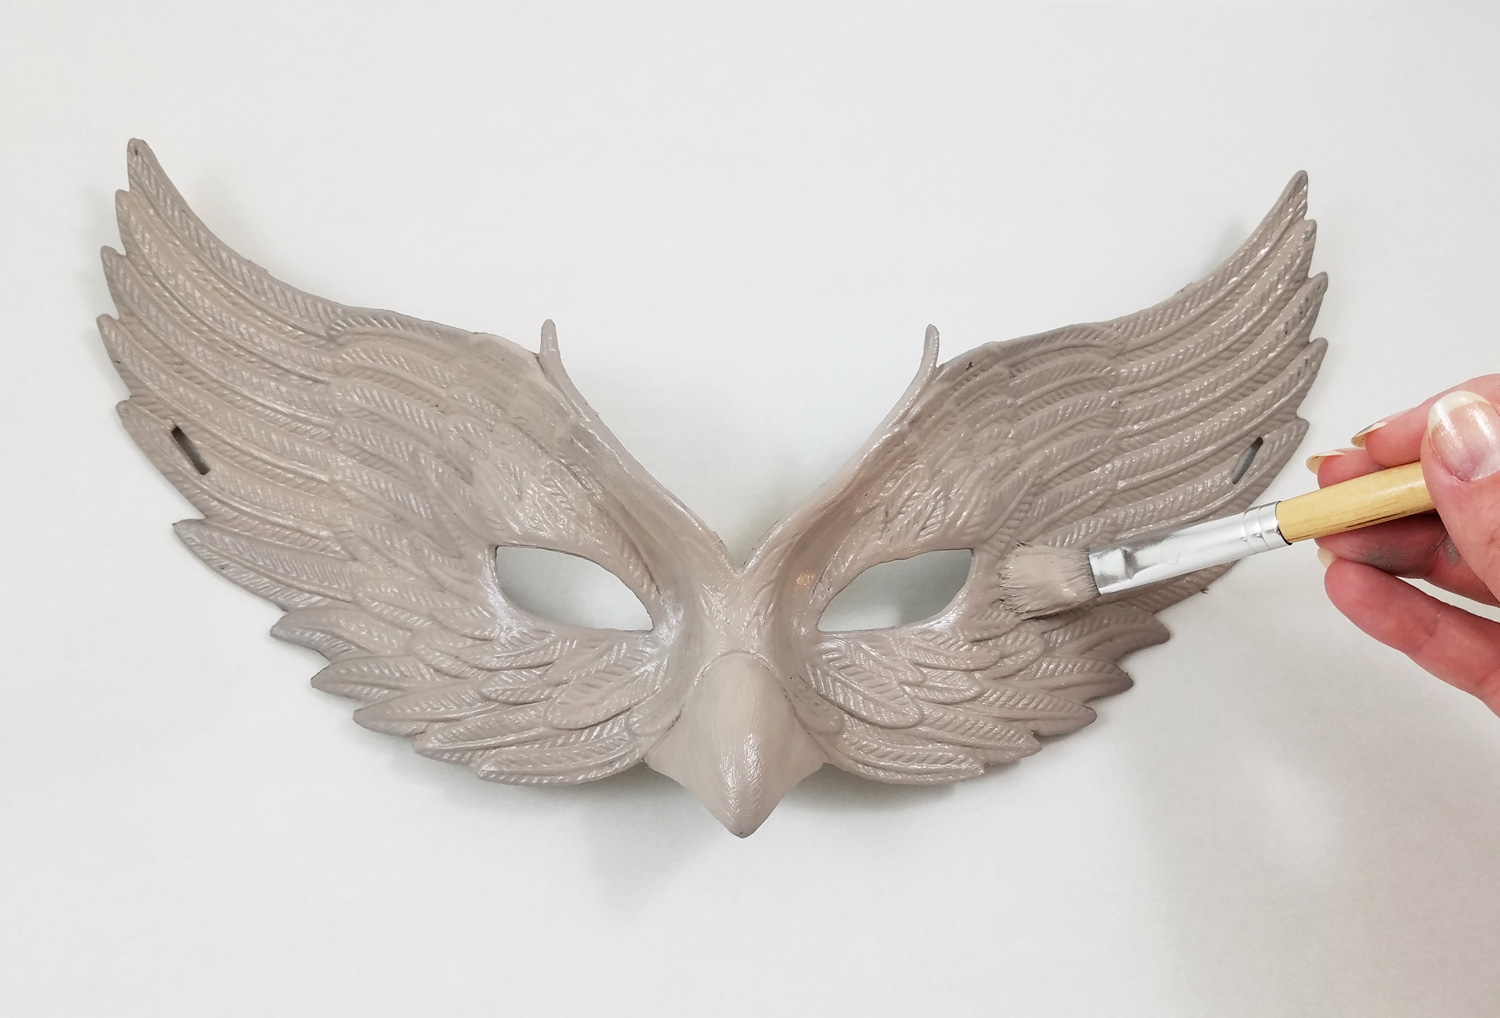
I noticed on the can of Testors Craft paint it said for best results to use a acrylic paint base coat similar in color to the glitter. Using a multi surface acrylic paint I painted the front and back of the mask, making sure to get complete coverage over the original black plastic.
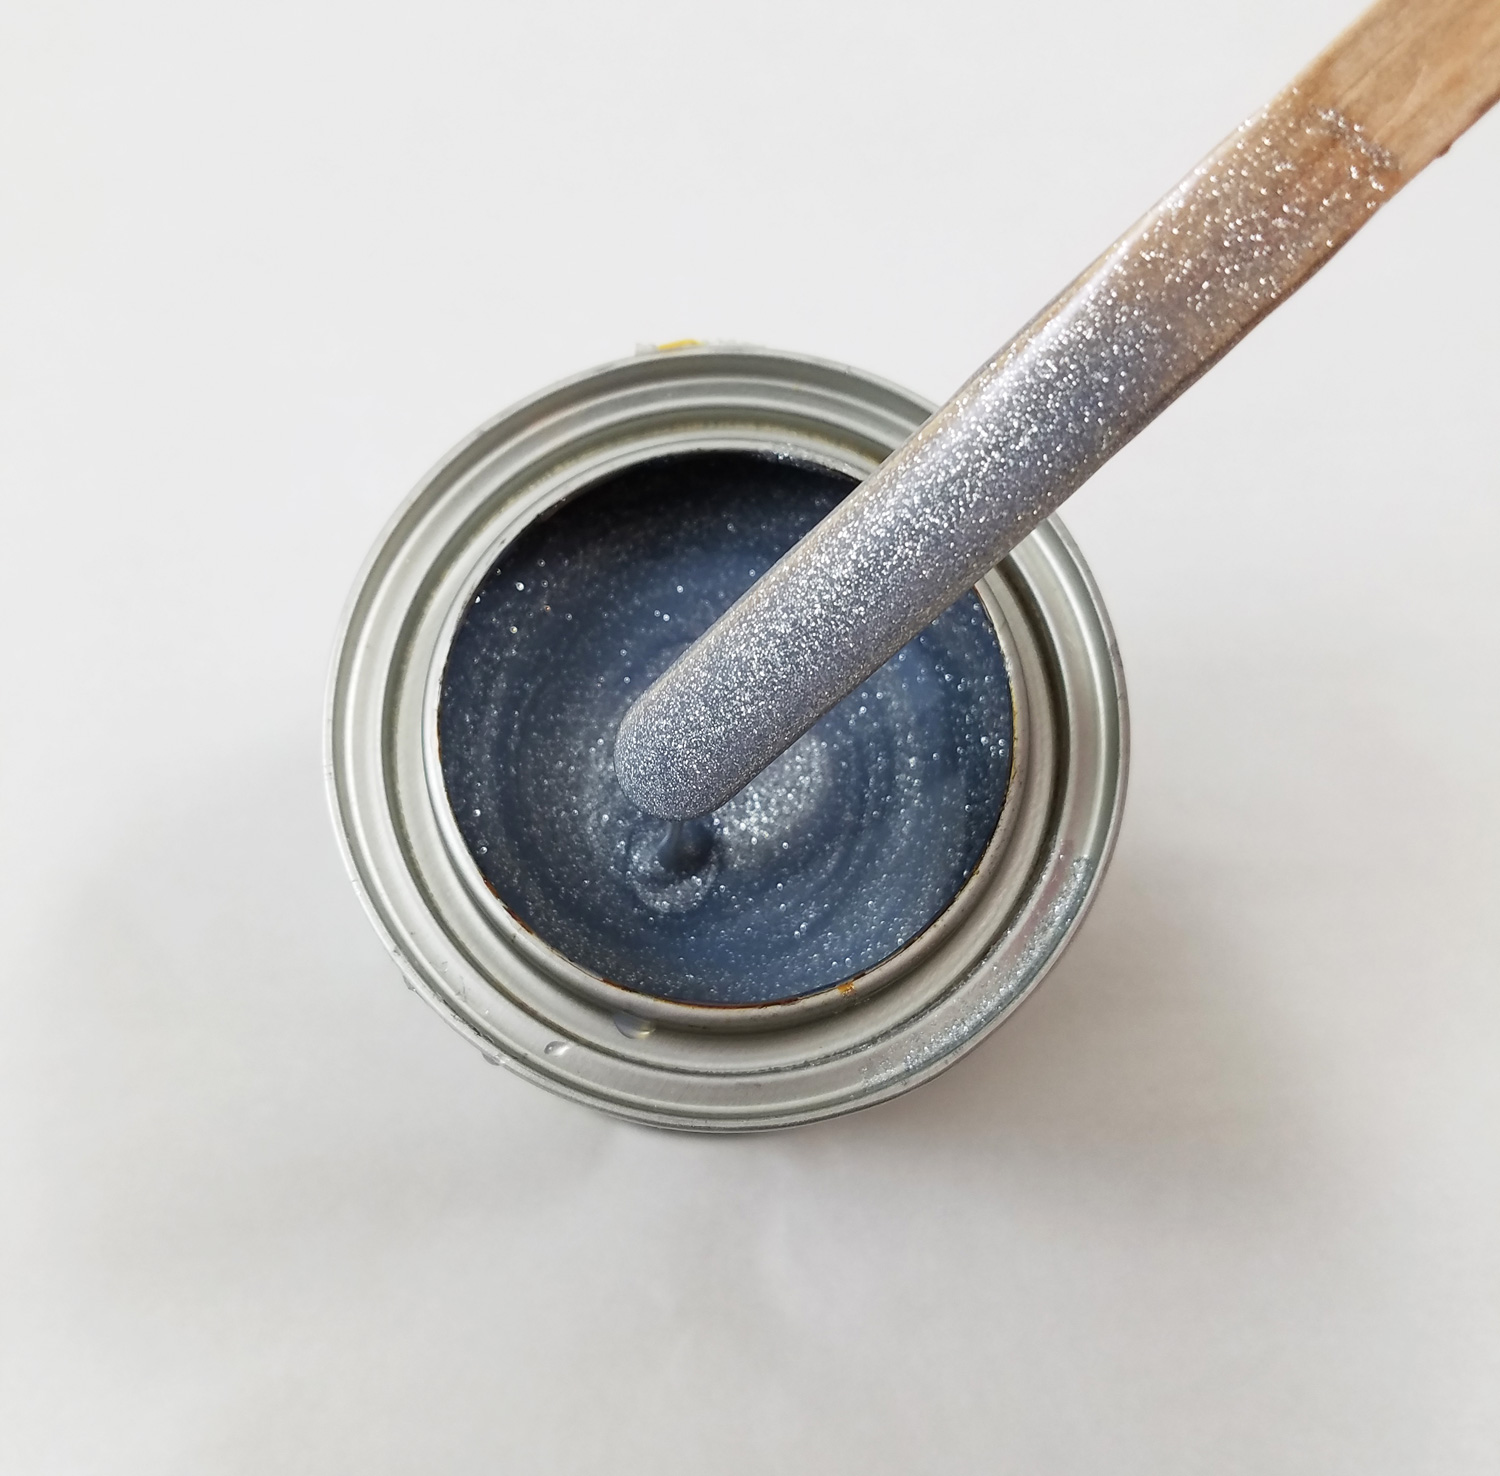
As you can see from the photo there is a intense amount of glitter in this paint. Before applying the paint to any surface make sure to stir thoroughly the Testors Craft Intense Glitter paint. This step MUST be repeated before each application because there is so much glitter in the paint it settles to the bottom when resting.
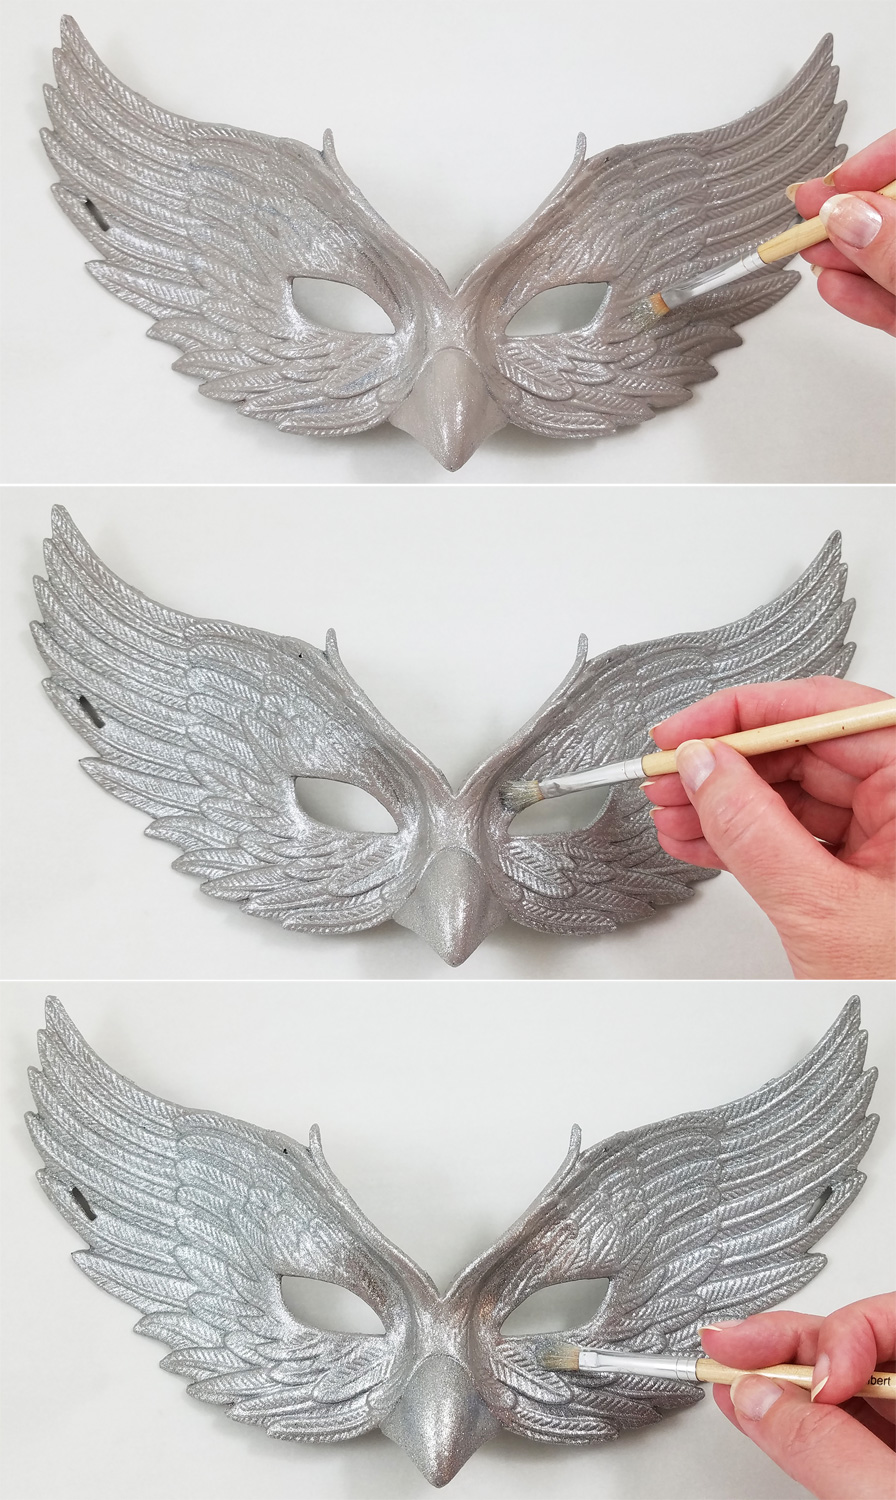
I applied one coat of paint brushing it on in uniform direction. With no need to rush, slow, steady and even brush strokes got the best and most even application of the paint. As long as you do not overload the brush the paint is not a messy paint and sticks well to the plastic surface. It dries in about one hour to touch and can be painted with a second coat in 4 hours. In the top photo you can see one coat of paint, each additional image with another coat of paint. I chose to paint three coats to get the most vibrant and intense glitter coverage, though I could have easily gotten away with 2 coats of paint.
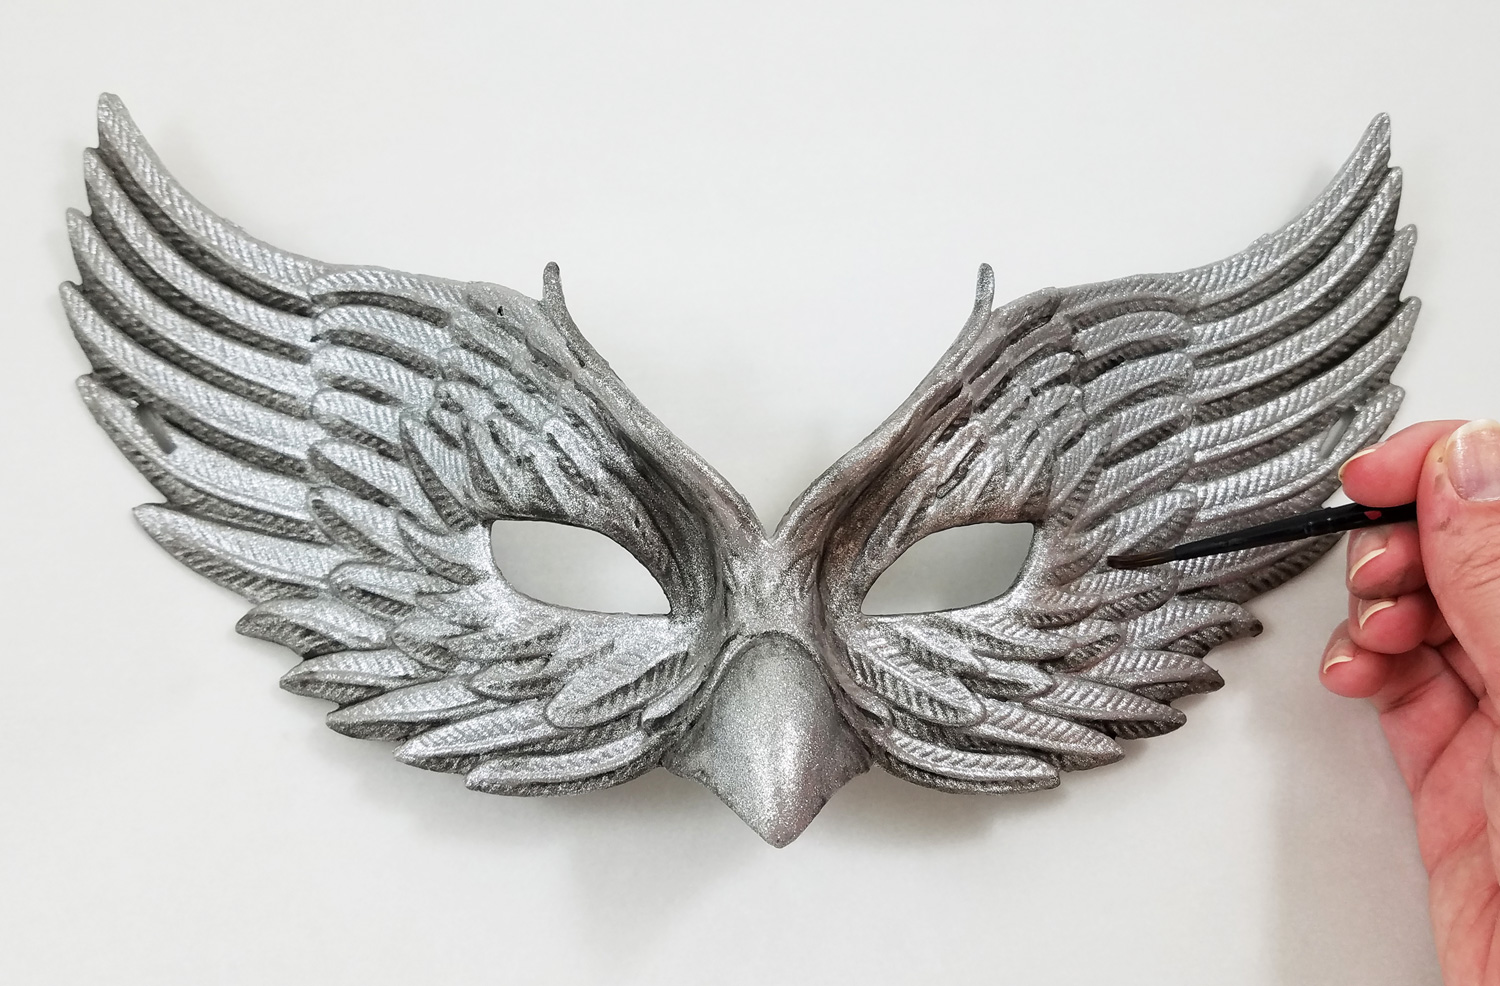
By applying a light color wash of black multi surface acrylic paint in the groves of the feather details, it added more contrast to the mask. I let the paint dry fully.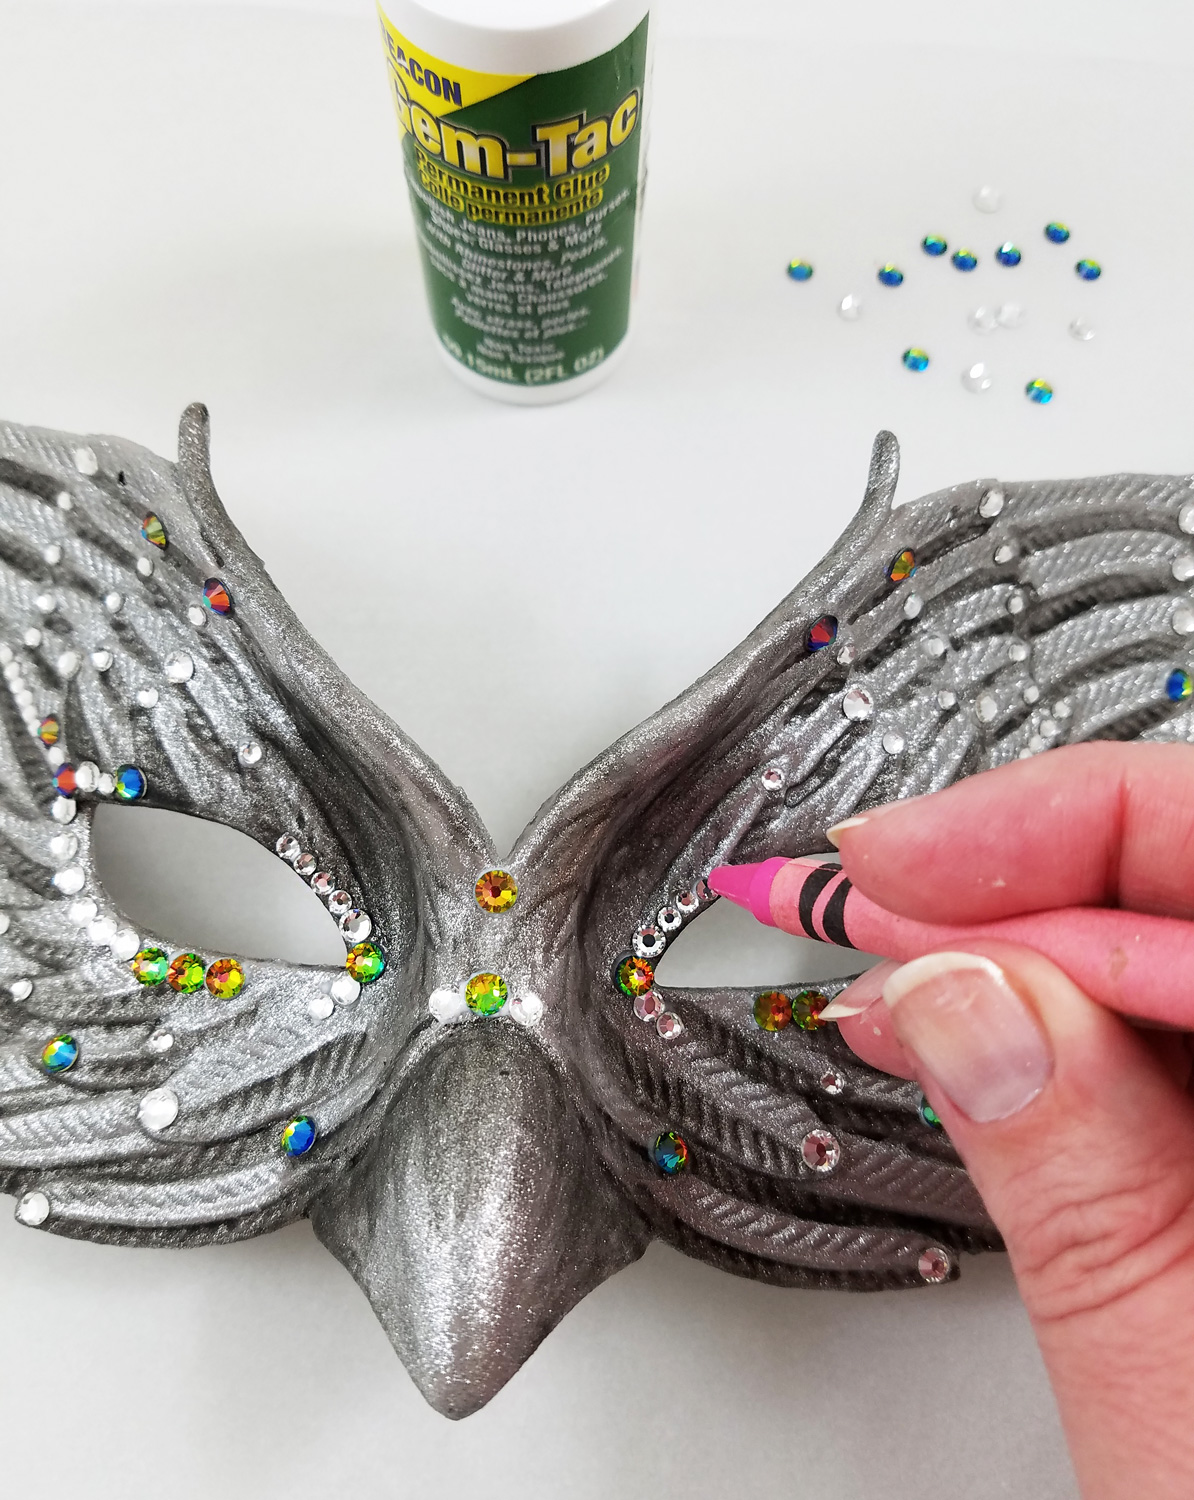
Beacon’s Gem-Tac is my go-to glue for applying small decorative elements to most craft surfaces. By squeezing small dots of glue on different portions of the mask I added flatback crystal rhinestones to add that extra special sparkle and shine. Applying flat backed rhinestones can be tedious but using an old costuming trick you can quickly apply them: pick up each rhinestone by pressing the top of each stone with a crayon. The wax is soft enough it temporarily sticks to the rhinestone allowing you to move it to wherever you would like it applied.
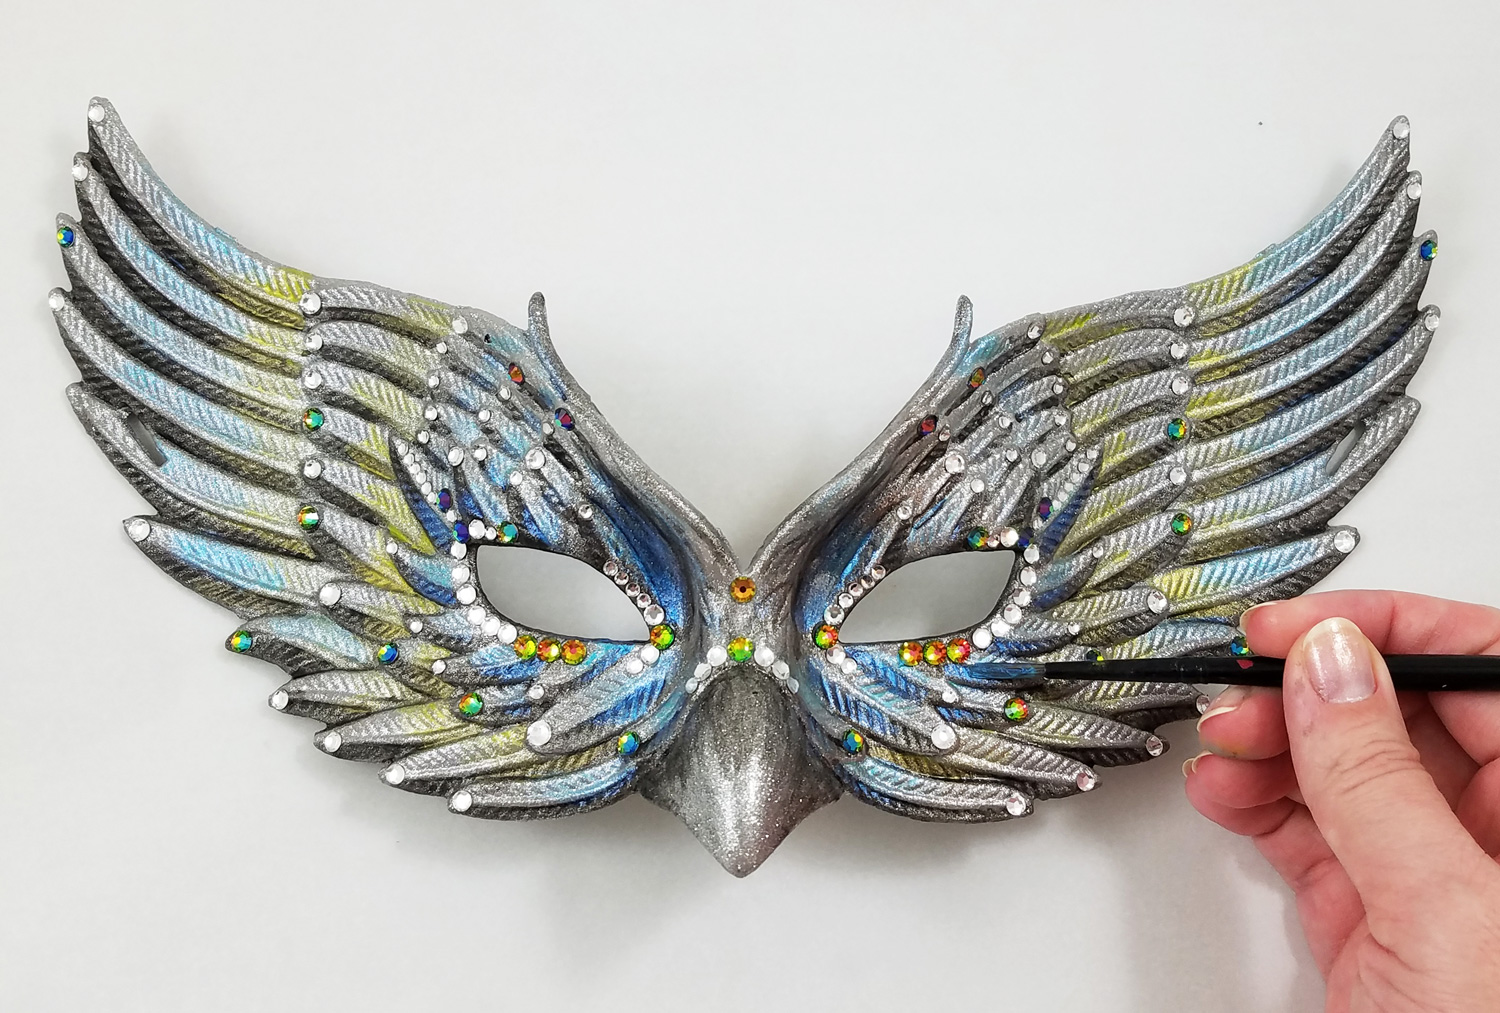
I loved the look of the rhinestones to the mask but I felt it was missing a little something. I went ahead and created a second acrylic paint color wash but this time with metallic blue and green paint. I applied this color directly on top of each glittered feather element of the mask and in the eyelid creases. This created a lovely transparent metallic hue. I let the paint dry fully.
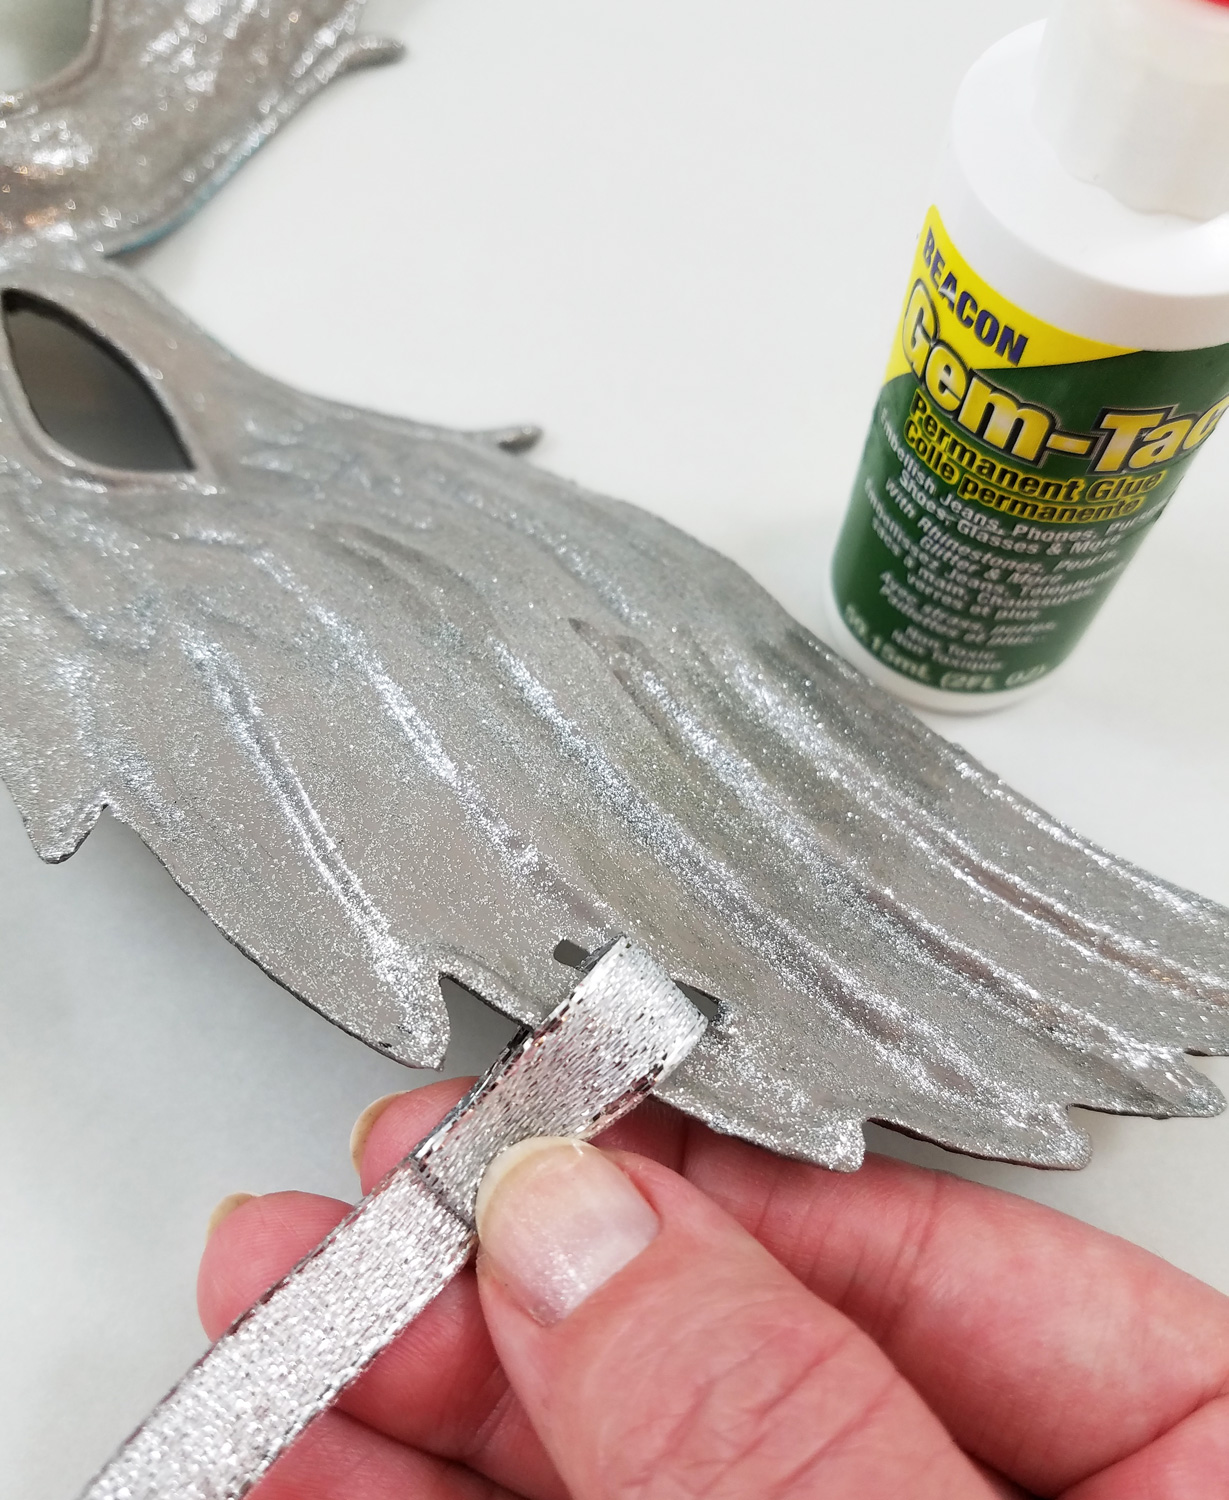
Silver ribbon was threaded through each side of the mask where the black elastic use to be. I folded the end of the ribbon under and glued it in place, pressing down firmly with my fingers and used a clothespin to hold in place while the glue dried.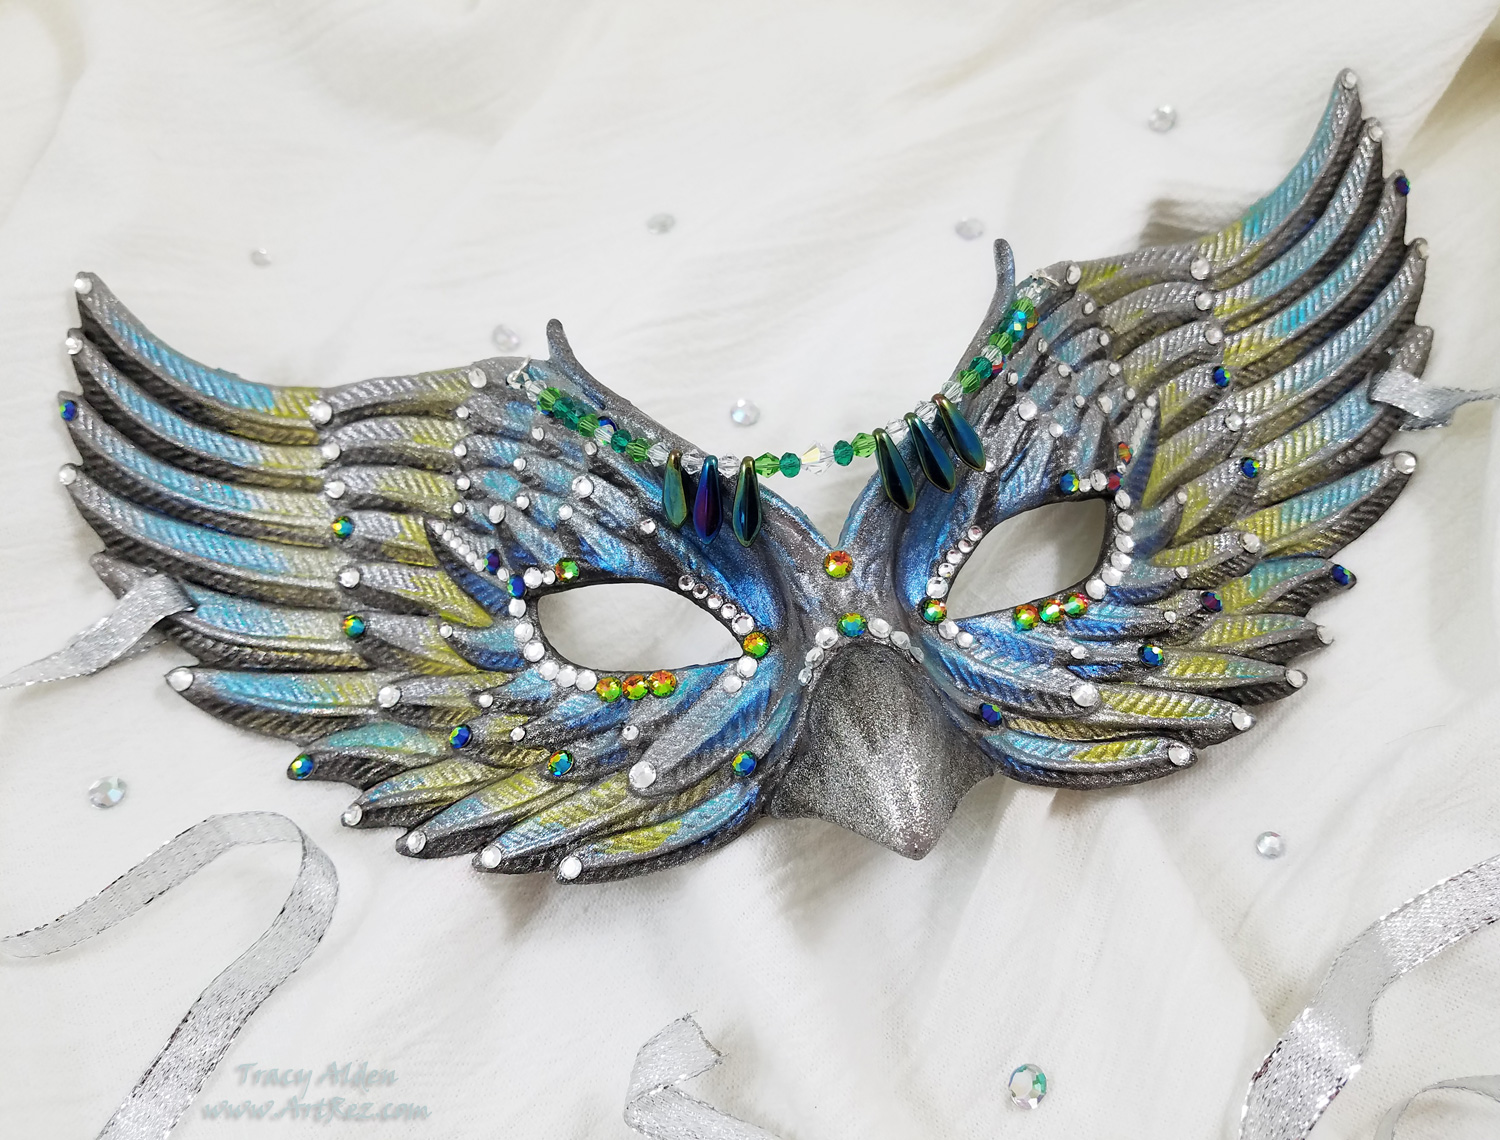
One more element of sparkle was added by stringing some crystal beads onto a 9 inch length of beading thread and threading it through two tiny holes that were part of the original mask. Now the masquerade mask was finished, ready to be worn or displayed.Testors Craft Intense Glitter paint truly won me over and I look forward to finding out what other paint applications I can try!
Until Next Time, Safe Travels!

Ancient and Contemporary Inspired Artistry