Drinks on me! Anything But a Card Challenge #36
Good morning! Today’s project tutorial is thanks to a challenge! The talented Susan M. Brown of SBartist: Painting In The Dark Blog asked me if I would be willing to be a guest designer for the Anything But a Card Challenge blog and of course I had to say yes!
Anything But a Card Challenge Challenge #36 : Summer Lovin’ – A celebration of all things summer! Think summer weather, vacations, sunflowers, beach parties, cold drinks and barbecues… bright colors and wide open sky. Pool parties all day, then sitting in lawn chairs sipping drinks and watching the night sky. The warm summer months have me thinking of cold drinks, sunny days and BBQs with family and friends. My project for the Anything But a Card Challenge for this month played perfectly into that inspiration!
One of the aspects of having a party or BBQ is that someone is bound to spill a drink. While many find it an annoyance I decided to use it as a inspiration!
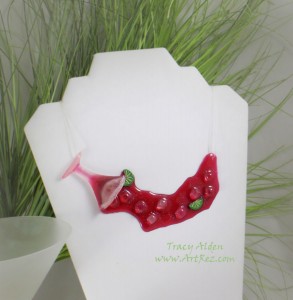
Starting with the idea of a spilled Pomegranate Martini or Cosmo, I came up with a wearable art piece called “Drinks on me!”
Supplies:
Amazing Mold Putty
Amazing Clear Cast Resin
Stampendous Multi Ultra Fine Crystal Glitter
Craft Knife
Polymer Clay
Stylus
Elastic jewelry cord
Small drill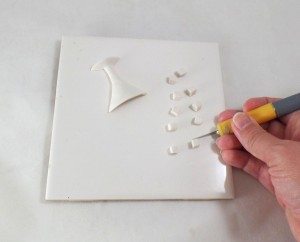
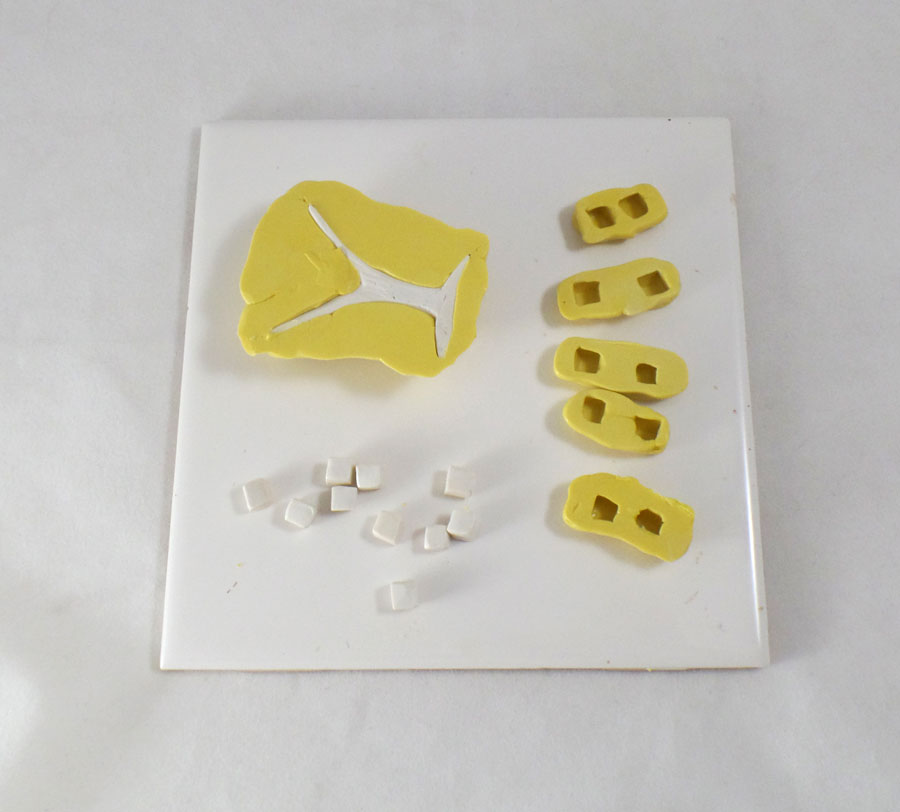
Using a stylus and a craft knife, I shaped and carved half a martini glass and ice cubes out of polymer clay. I then baked the clay pieces on the tile to manufacturer’s instructions.
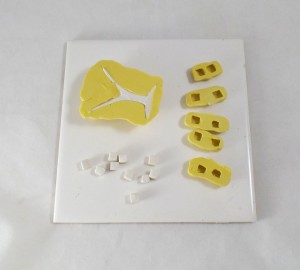
After I baked the polymer clay, I lightly sanded and trimmed the edges of the pieces with a craft knife and an emery board. Once the polymer pieces are cleaned of dust, I used Amazing Mold Putty to make molds of the pieces.
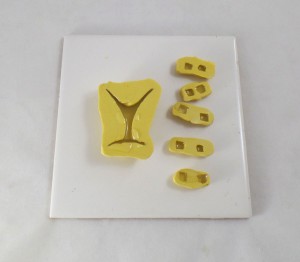
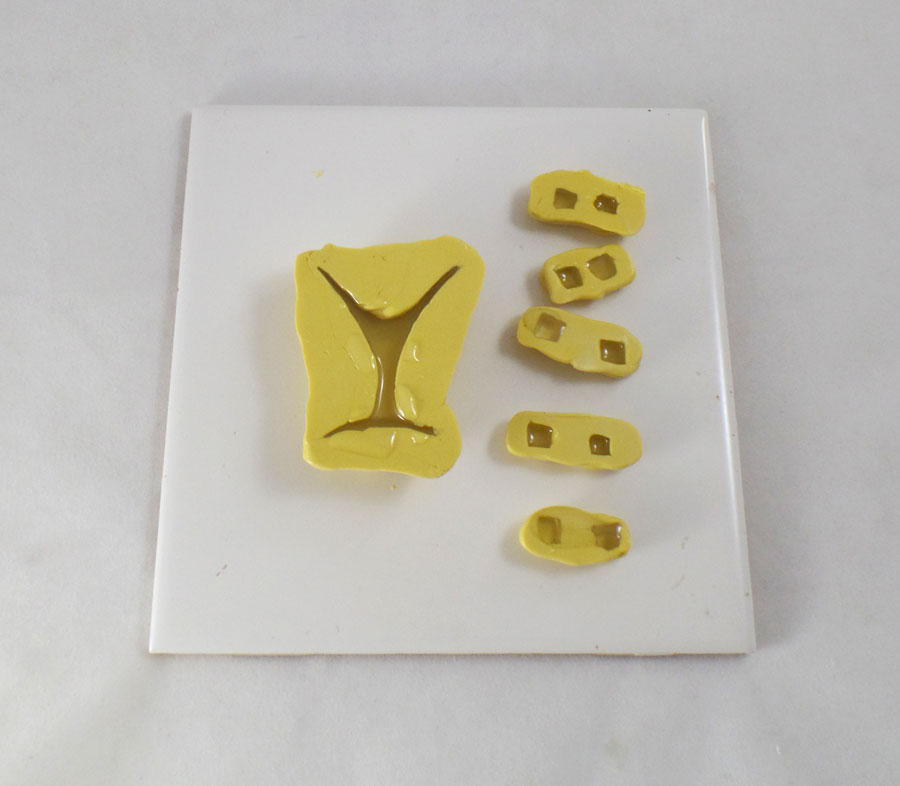
Once the molds were cured I poured Amazing Clear Cast Resin into the molds and let it set for about five hours. The pieces came out frosted by using the Mold Putty and that was the perfect look for the glass and ice cubes.
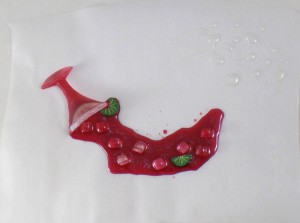
I then placed the glass upside down on *parchment paper and poured Amazing Clear Cast Resin tinted with Alumilite Red Dye in a controlled U shape. I coated the ice cube resin pieces with untinted Clear Cast and placed them gently into the tinted resin to give the illusion of melting ice. I added a few polymer clay lime cane slices, sprinkled a touch of Stampendous Multi Ultra Fine Crystal Glitter on the tinted resin to finish off the look and let it all cure.
*The resin has to be poured on parchment paper otherwise the resin will soak into any other paper.
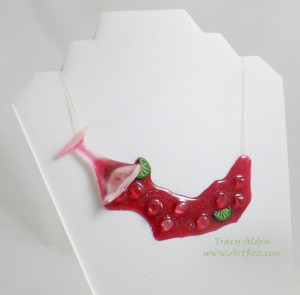
I drilled a hole on each side of the pendant and threaded clear elastic jewelry cord on for easy wear.
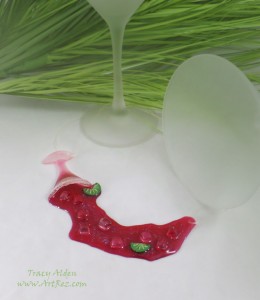
One of the really fun aspects of this project is with a simple change of dye used with the resin you can create any spilled drink you would like!
What might YOU make for the Anything But a Card Challenge? CLICK HERE to link up your projects! 🙂
Until next time, safe travels!
Temple Rain, a Mixed Media Canvas
In April I had the great opportunity to receive a Frog Dog Studio kit by being part of the Amazing Crafting Products Design Team. I was so excited when I received the kit; it had so many wonderful goodies, from ink pads, pigment ink, mica, chipboard pieces, tissue paper and more! There was enough supplies to make several projects and still have things left over.
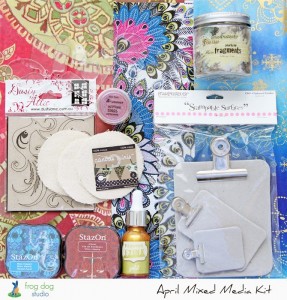
Many of the supplies in the April kit seemed to have a East Asian flair to it. It got me thinking about my trip through Asia and I was inspired to create a Mixed Media hidden story book.
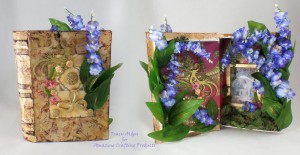
The tutorial for this project can be found here: Mixed Media Book Box
With more of the supplies left over, I created a Mixed Media Canvas piece with wild tropical colors. It was so much fun that I wanted to try making another canvas piece but with a completely different feel, and I still had supplies left over from the Frog Dog Studio kit. Sadly, I got busy with home improvement projects and had to wait until the end of May to start my new canvas.
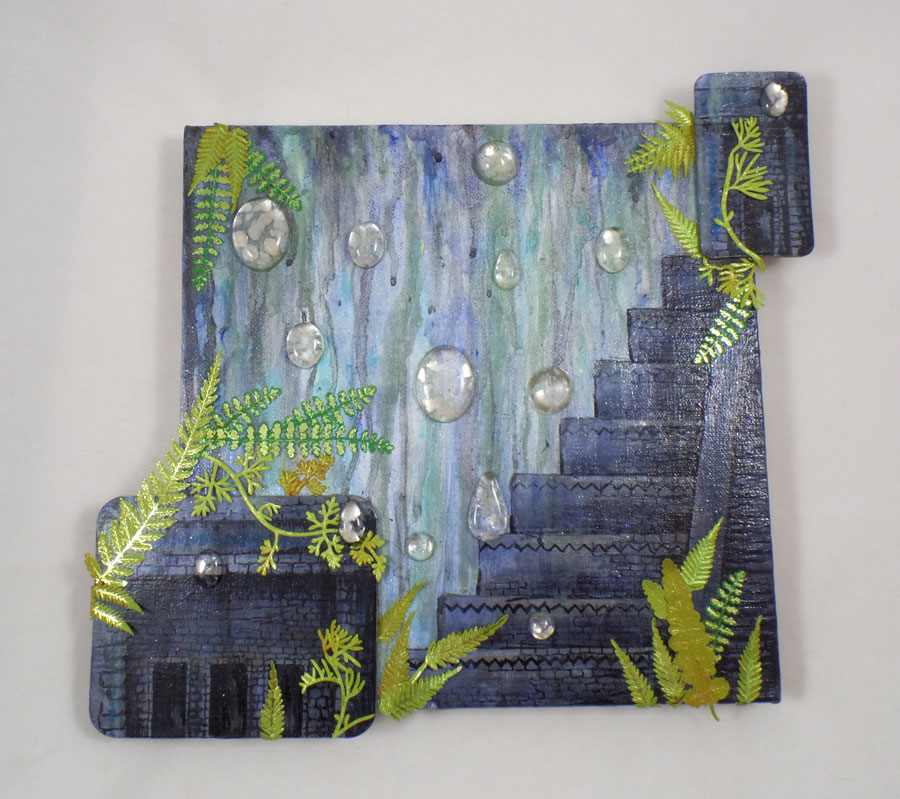
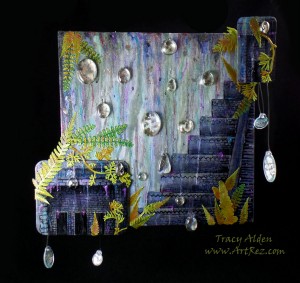
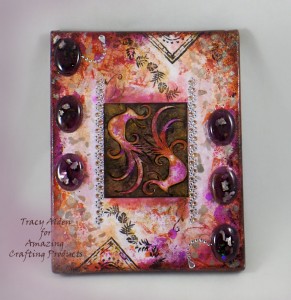
 With a portion of the extras from the kit, miscellaneous supplies from my collection and canvas, I started to lay out the project, figuring out which direction to go. I wanted to use the chipboard from the Stampendous Mini Clipboard Canvas pack, the Tim Holtz Clear Fragments and Pearlized Stampendous Mica Fragments. I placed them this way and that on the canvas and suddenly I got an idea. What if I were to try making a abstract ruins in the rain?
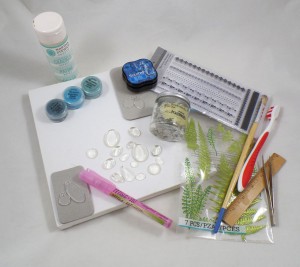
Just like with my previous canvas piece, I pulled out what I call my resin “save for later” bin. This bin is populated with all kinds of resin pieces, some finished, uneven pourings or even pieces I just didn’t know what to do with. I picked out resin cabs that had the look of abstract water droplets.
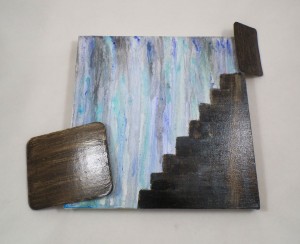 I applied water and acrylic paint to the canvas and tilted it so all the paint and water ran down to the bottom. Once dry, I painted a base dark layer for my ruins. I glued the chipboard pieces to the canvas using Nine Lives Products Glu6 Paste and let dry.
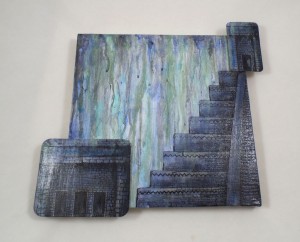
I applied a second layer of water and paint to give a look of rain falling. On went the crackle medium to the dark paint layer and once dry I added a gray-blue paint top layer that then crackled giving it the look of ancient stone. I wasn’t completely happy with the look so using a black permanent marker I drew in small bricks and shading to give detail to the ruins.

Using Nine Lives Products Glu6 Nonporous glue I glued the mica flakes to the back of the resin cabs and while the glue was still wet pressed them onto the canvas. The glue has to dry overnight but it is well worth the wait for a great bond on the resin cabs. I applied little paper leaves to look like plant overgrowth and Liquitex Gloss Varnish to seal the paper leaves and paint in place. I added some acrylic paint in blue and purple as highlights on the ruins and brown on the paper plants to give an earthy hue. A second layer of varnish in drops and dribbles gave the illusion of water to the finished canvas.
I added some acrylic paint in blue and purple as highlights on the ruins and brown on the paper plants to give an earthy hue. A second layer of varnish in drops and dribbles gave the illusion of water to the finished canvas.
Frog Dog Studio’s available kits change every month but the great variety offered in each kit is a great inspiration. What might you make with their next kit?Until next time, safe travels!Amazing Crafting Products Design Team!
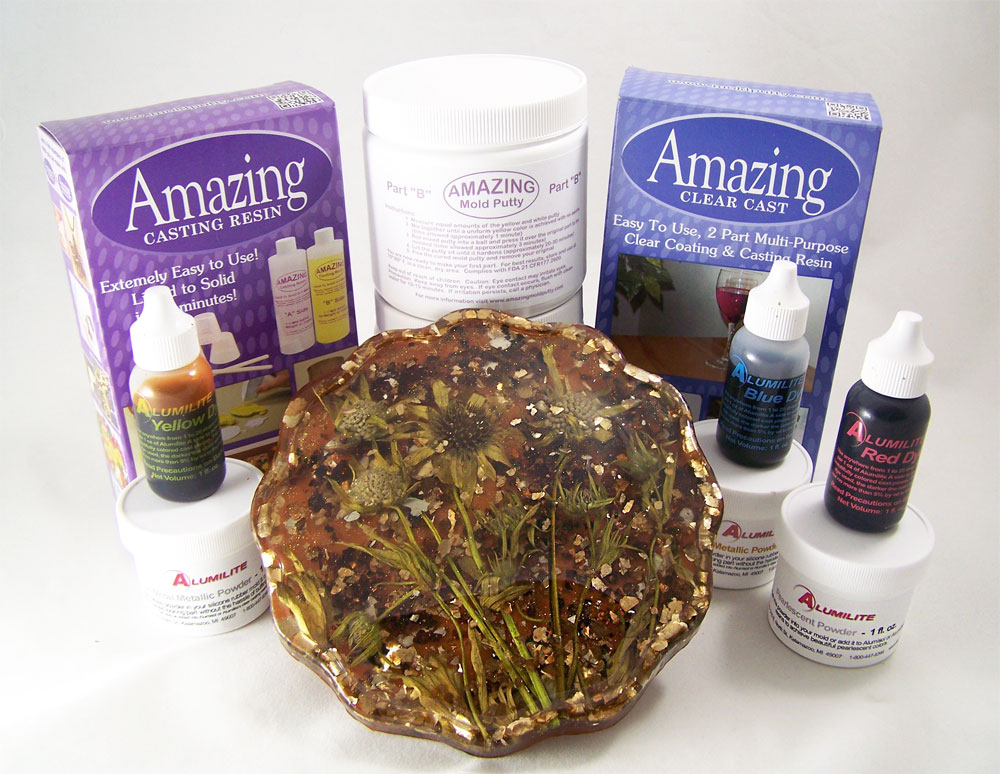
Things have been a whirlwind lately! So many new things happening and so many changes! I was contacted by the talented Susan M. Brown, Design Team leader for Amazing Crafting Products to see if I was interested in joining their design team since in the past I had used their product and enjoyed working with it. Of course I said yes and I am now a proud part of the Amazing Crafting Products design team blog! The photo above is of my first design team shipment and it was so full of awesome goodies to try out.
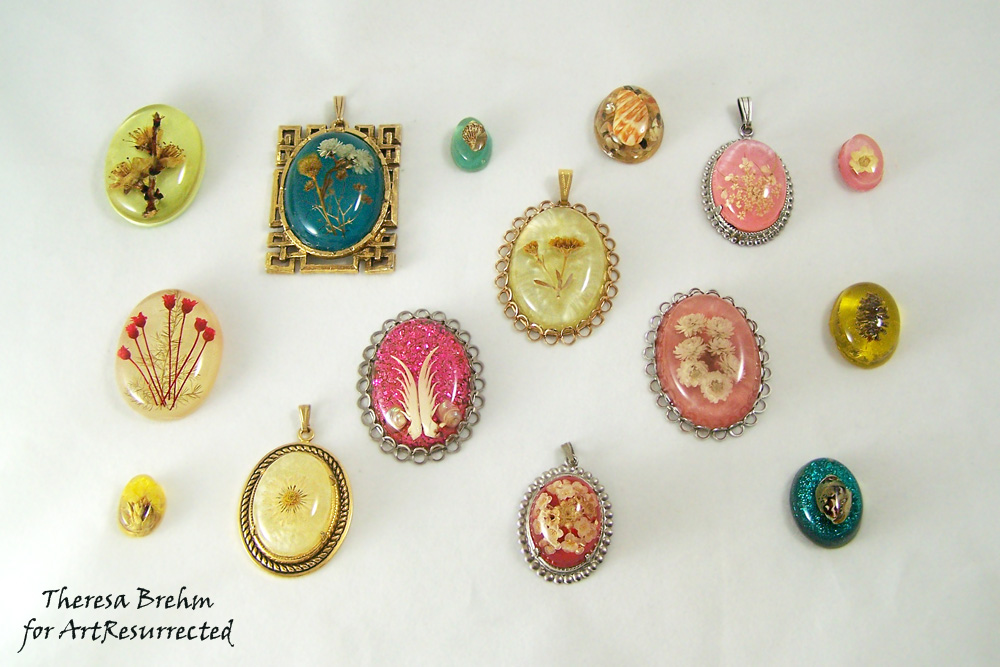 Not only do I enjoy using their products as I have noted in past blog posts, I was introduced to resin as wearable art by my parents many years ago. Here is a photo of some of my mother’s work. All of the pieces in the above photo are over 35+ years old. Amazing Crafting Products even graciously allowed me to showcase her work and vintage molds in an Inspiration post.
  Entranced at an early age by the idea of encapsulating objects I was inspired to use one of my mother’s vintage polyurethane molds to make a retro trivet piece and tutorial!
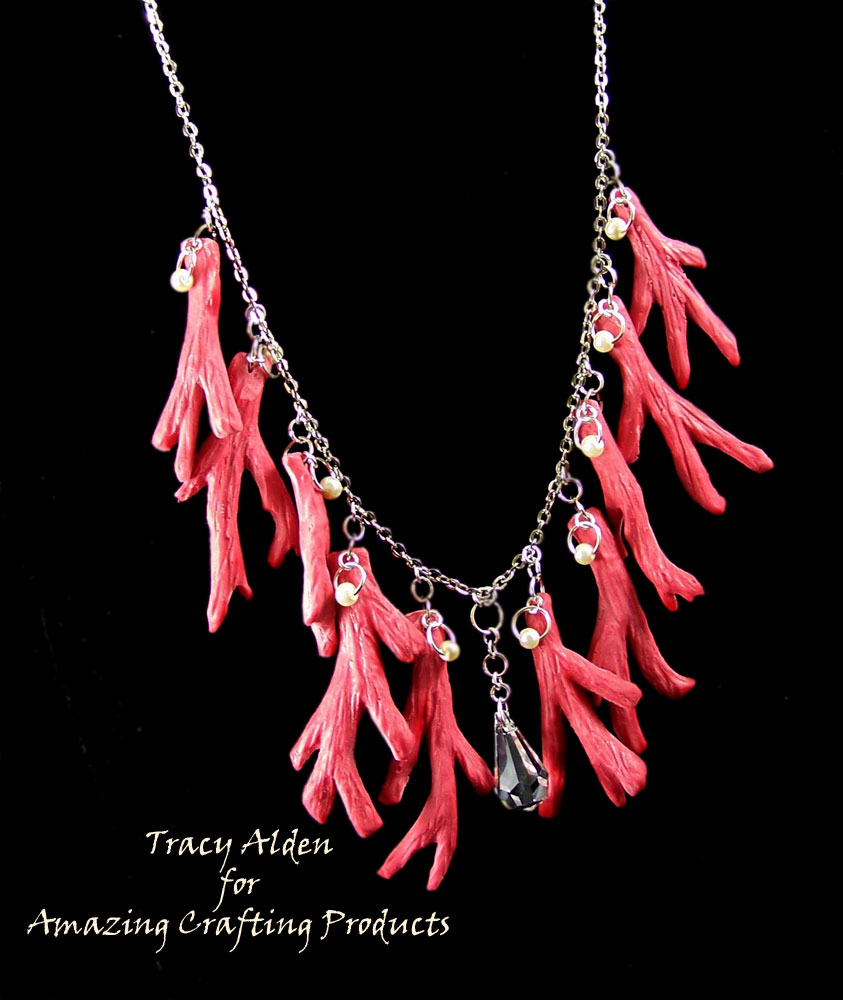 Now I am on a roll and I just can’t help but want to test out how the products perform. I am starting to get back into my polymer clay work so I tried my hand at a faux coral necklace and tutorial. I used polymer clay pieces for the originals to make the resin coral pieces.
For years now I have been trying to mimic the perfect faux amber, I blame a certain dinosaur movie for me always wanting the perfect piece of amber with an insect inside. While I have gotten close in the past there was always an issue with durability and/or clarity. Well, after trying some test with Amazing Clear Cast I was finally able to get the look I have wanted. You can find my inspirations post here talking about these new pieces.
Though don’t just take my word for it, please go to the Amazing Crafting Products design team blog to see all of the talented artists on the team! From model car makers, food artists, mixed media artist, paper crafters and so much more you will not be at a loss for ideas and inspiration. 🙂
Until next time safe travels!
CHA Winter Show 2013
Another Craft and Hobby Association Winter show has come and gone. While there were less vendors this year, I honestly feel this was one of the best I attended. This show was amazing! The classes, networking and show floor events were wonderful. I was able to make new accounts with several vendors and got to meet up with some seriously talented artists.
The wonderful Globecraft & Piccolo had a booth again at CHA. I am proud to be part of their Design Team and a part of product design & development! Members of the G&P design team, Jami Bostjancic (of Accent Allusions) and I were honored to be asked to do demos at the booth for three of the four days of CHA.
Here is some of the cool G&P products we got to demo at the show:
NEW Globecraft & Piccolo UV Resin: It cures in 3 minutes in UV light, scratch resistant, self leveling and not affected by humidity (in fact it can set up underwater). It works wonderful on top of chipboard, acrylic, paper, polymer clay, fabric, vellum and so much more!
NEW Globecraft & Piccolo Acrylic Bezels and Tags: Clear acrylic bezels and tags come in so many shapes and sizes. Perfect for making jewelry, mixed media and card decor! Looks lovely stamped and with paper backings.
NEW additions to the Globecraft & Piccolo Embossing powder line: These powders are specially designed to look awesome on large and small projects. G&P Embossing Powders are made of varying-sized particles that create a unique depth and dimension not available with traditional embossing powders. These wonderful colors can mimic stone, metal, natural elements and aged surfaces. The new colors are Real Rust, Ruby Red Slippers, Shamrock Dreams, Turquoise Lagoon, and Platinum!
New Piccolo Chipboard Elements: Now in many different sizes, great for home decor, card making, mixed media, jewelry and more! From holiday, seasonal, steampunk, animals, swirls, and elaborate corner and edge elements.

The Globecraft & Piccolo booth at CHA.
G&P display showcasing all of their embossing powders and chipboard charm sets. All of the charm sets on the velvet boards are my work. 🙂

G&P acrylic and chipboard bezels samples by the talented design team, the Secrist family (G&P) and I.
Just beautiful card decor work with Piccolos by the design team!
G&P Ornament sets. The lovely mixed media piece on the left is made by the talented Linda Neff (part of the G&P design team) from ornaments and a lampshade.
An overview of the booth.
Some samples of the demo work showing the new UV Resin and acrylic bezels! Pieces by Pat Secrist (Of G&P), Jami Bostjancic and I.The following photos are close up of booth display samples to show you how many new styles and techniques you can use with the new G&P products.

G&P acrylic bezel, G&P UV Resin, mica powder, permanent ink, paper and sticker gems.
Mini oval acrylic bezels with Pure Sparkle Glitter in Gold, mica powder, 3D Enamel Gel and sticker gems. Faux glass technique.
Top left and bottom bezels are acrylic and top right bezel is bookboard. 3D Enamel Gels, Pure Sparkle Glitter in Gold and Silver, mica powder and sticker gems. Glastique Gloss is used to seal each layer. Topped with the new UV resin. Nebula/night sky technique.
G&P acrylic bezel, G&P UV Resin, G&P Piccolo Gears, mica powder, permanent ink, paper and sticker gems. Piccolo layer technique.
G&P acrylic bezel, G&P UV Resin, mica powder, 3D Enamel Gels, Origami foil paper and sticker gems. Faux glass technique.Until next time safe travels!
Family of Pumpkins
I have pumpkins on the brain lately (sounds like a condition doesn’t it? LOL). I am trying to grow a pumpkin patch, wanting to make pumpkin pie, finding vintage ads of pumpkins and creating pumpkins out of polymer clay. I have always had fond memories of carving pumpkins, making pumpkin cakes and cookies with my family. To me they are what Fall, Halloween and harvest festivals are about.
This year I am making all kinds of Fall crafts but I wanted to make something showcasing pumpkins and the happy feeling of family together for the seasons. I started with making a cute little family of pumpkins out of polymer clay. I really liked how they came out but felt I could use them on so many projects such as cards, magnets, jewelry and wall decor. So I decided to make a mold of them so I could do all the projects I thought of and more.
For the pumpkin family mold I used:
Polymer clay (any brand or color will do since I made a mold from the original polymer piece)
Amazing Mold Putty
Amazing Casting Resin
Martha Stewart Crafts 2oz Multi-Surface Satin Acrylic Craft Paint Carrot, Jonquil and Beetle Black
Here is the original pumpkin family made out of poly clay. I gave them deep smiles and happy faces, I don’t have to worry about any detail being lost since the Amazing Mold Putty does wonderful with anything with high detail.
I mixed the putty according to the manufacture’s instructions, though the Amazing Mold Putty is rather forgiving if there is not exact amounts used. I do not attempt to remove the mold for at least 20 minutes to make sure the mold has set. While the cure time for the molds is 20 minutes I like to leave the orignal in the molding putty for longer, making sure the mold is a rigid as possible (but keep in mind it is silicon and very flexible once cured) before trying to make any replicas. The mold can be cleaned with mild soap and water before you make any replicas to remove any loose particles left by the original.
 When mixing the Amazing Casting Resin I have to be careful about stirring too fast and for too long. Once the two parts are combined stir carefully until clear, scraping sides, about 15-20 seconds. I then immediately start to pour the resin into the mold; be careful not to pour too quick as you will increase the amount of air bubbles. It will set in 10 minutes, but keep in mind that the thicker the piece the faster the cure time. In this case the pumpkin family is a thick piece and set in about 8 minutes.
 Here the resin copy is next to the original and the mold. Once the piece is cured I demold, trim any rough edges, sand and started painting.
Here I show the 3 stages of painting. I have found that the Martha Stewart Crafts Multi-Surface acrylic paint bonds well with the resin replicas. I start with the Carrot, then a color wash of Beetle Black and then paint the Jonquil paint only in the eyes, noses and mouths of the pumpkin family.The first project I wanted to make with a pumpkin family was a home decor piece for my mother. She loves the holidays and always likes to have the family home to celebrate.
For the home decor piece I used:
Globecraft Memories Classic Fancy Rectangle
Globecraft Memories Glastique Gloss Finishing Glaze
Globecraft Memories Enamel powders 24K Gold and Mossy Glen
Globecraft Memories Piccolo Accents
Cardstock (any color or brand will work, I used orange, metallic white and black)
Mini Fall Leaves (most local craft stores carry small bags of fabric or paper leaves in the scrapbooking or floral sections) Using one of the finished pumpkin resin pieces, I placed it in the middle of the Classic Fancy Rectangle and traced along the inside of the oval to make sure the background paper, pumpkins and a leaf embellishments fit inside the globe.
 Once I decorated the outer layers of the frame with the paper, enamel and Piccolos, I coated the outside layers with two coats Glastique Gloss glaze. Once completely dry I glued the layers and globe with Glastique together. I then glued the pumpkin resin piece to the backplate of the frame with a thick layer of Glastique. I carefully added the mini leaves around the bottom of the pumpkin family to give them a “bed” of leaves to be on.

Glue the top layers of the the frame to the backplate with Glastique and once dry it is now ready to hang on the wall! 🙂Until next time, Safe Travels!

Ancient and Contemporary Inspired Artistry