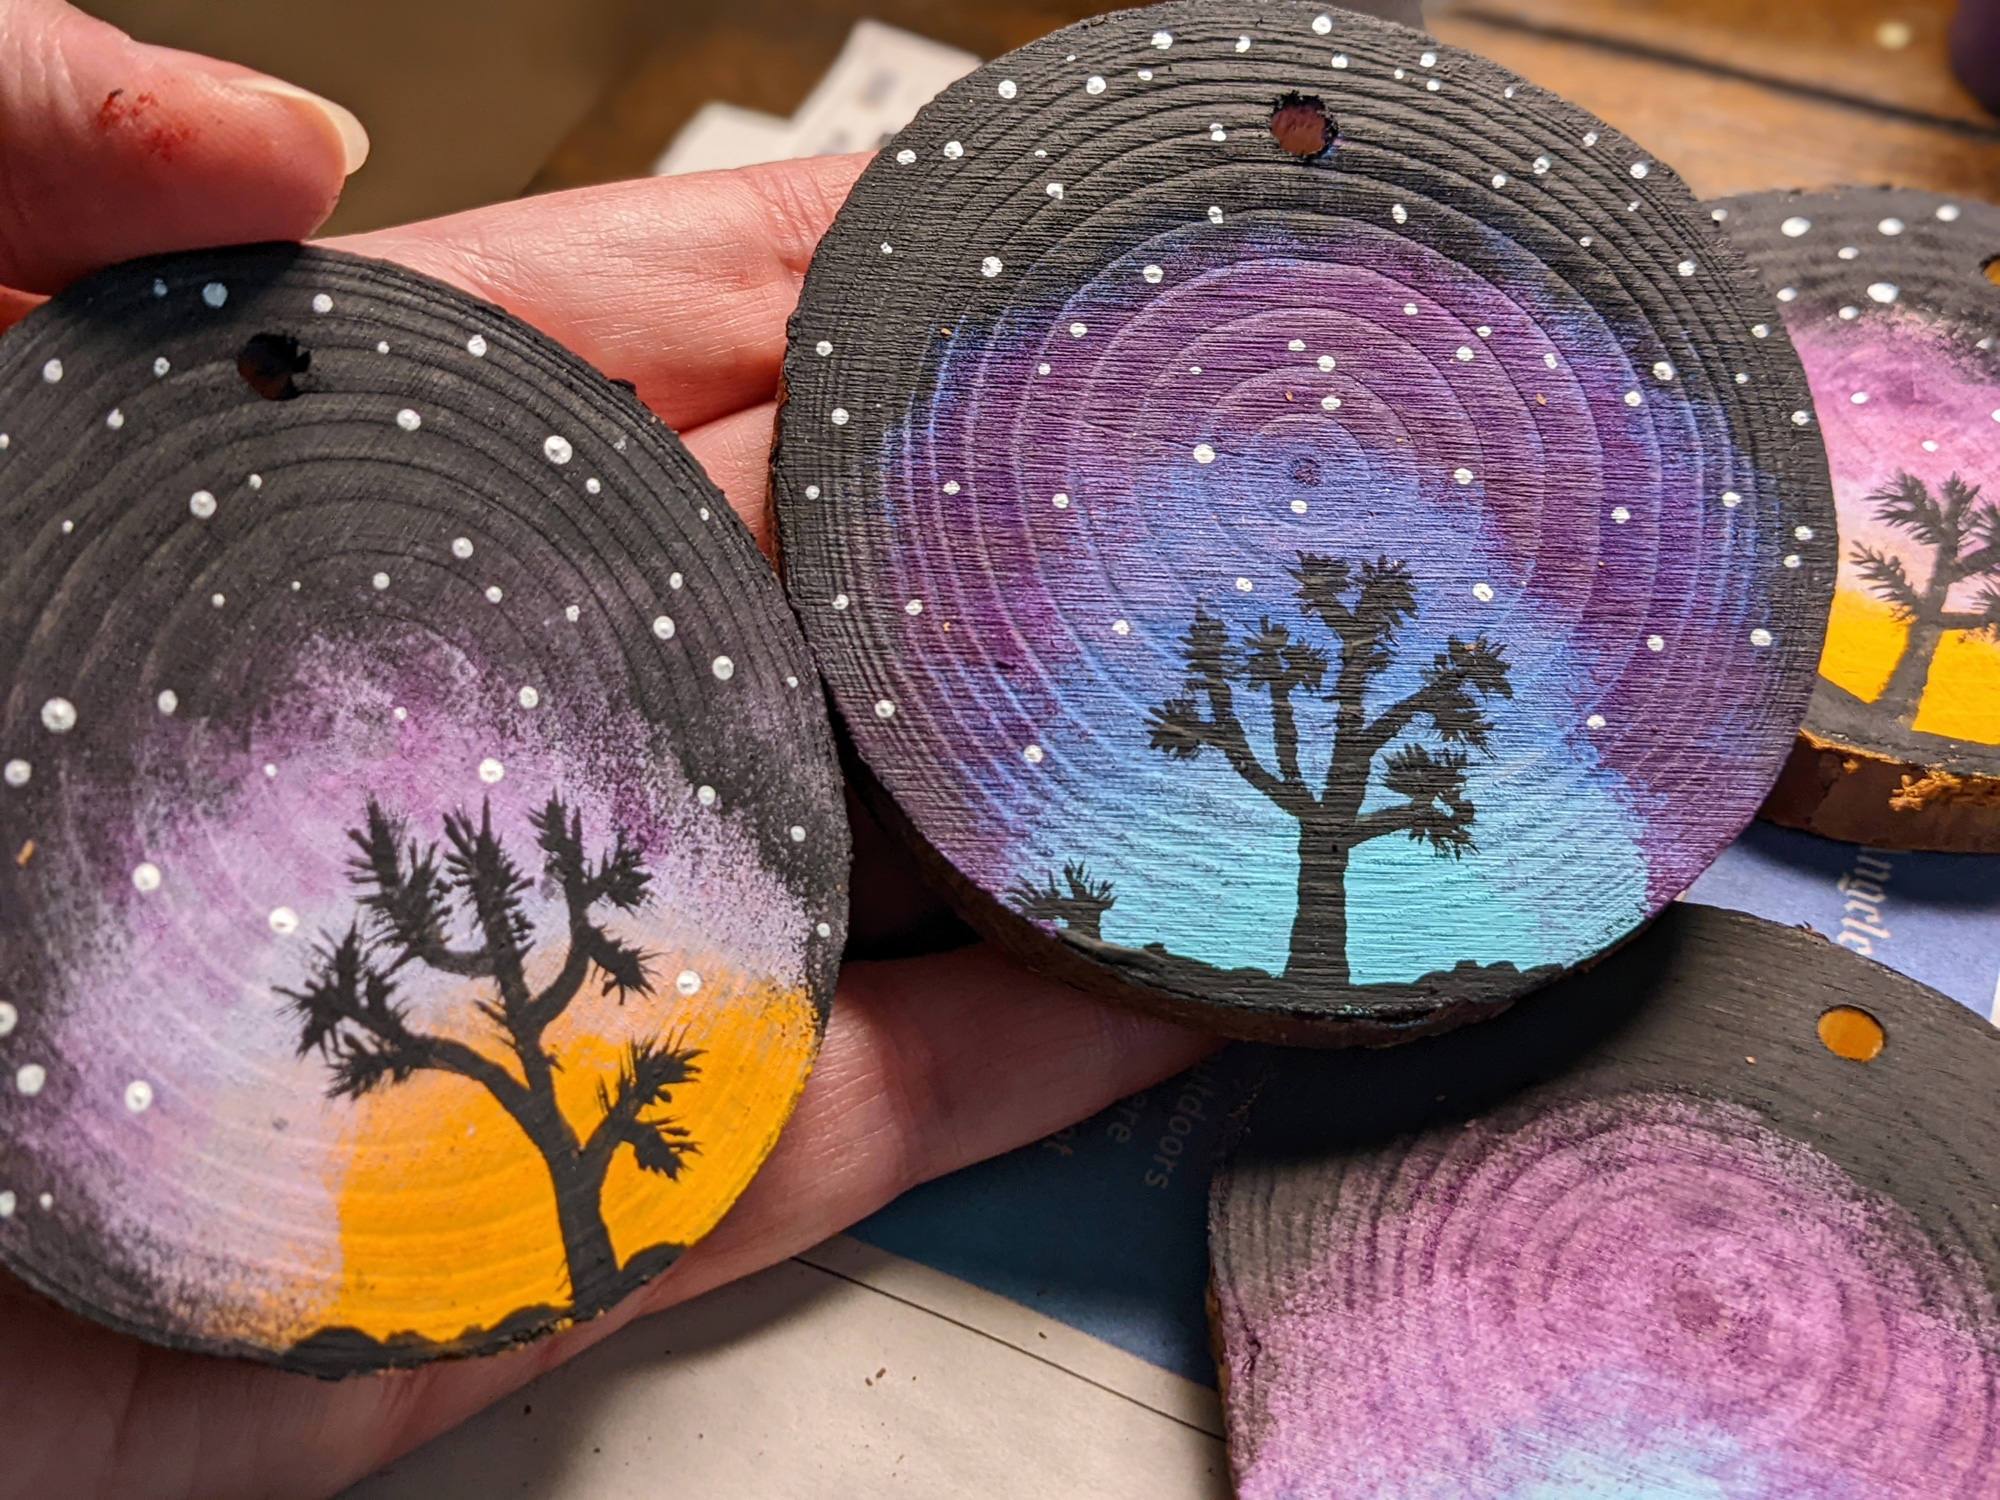
High Desert Inspired Ornaments
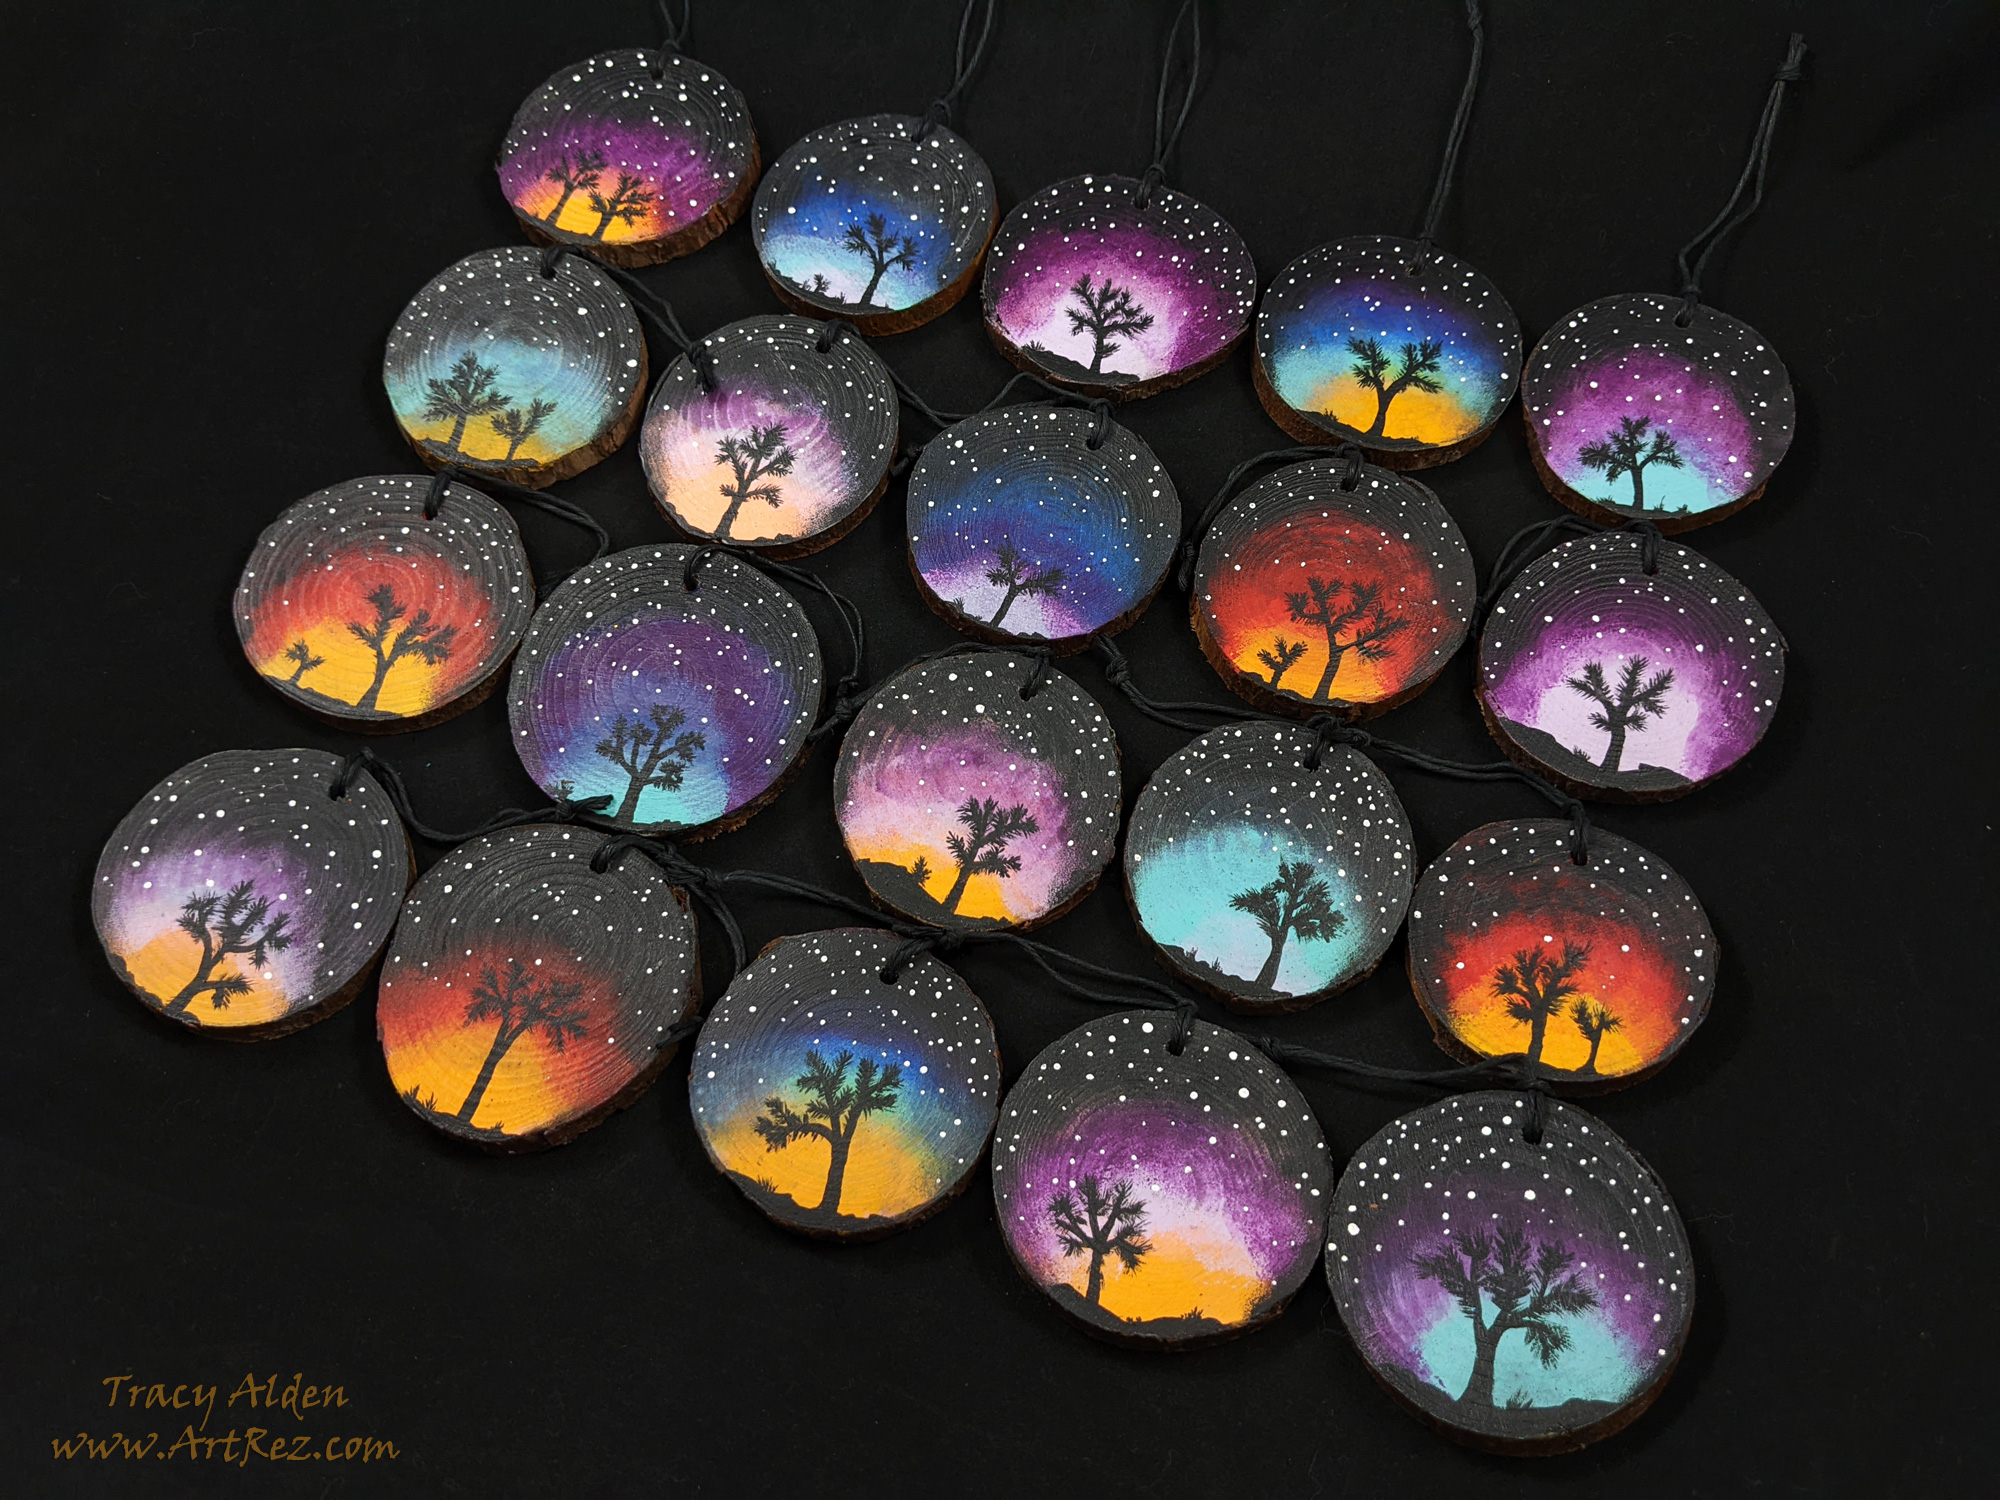
As a child growing up in the high desert I found many inspirations for my artwork in the surrounding area. From sagebrush, seasonal flowers, quartz glistening out of the earth, to animals roaming in the distance. My recent painted ornament collection comes from those childhood inspirations.
One of the most unusual and iconic images of the high desert is the Joshua tree (Yucca brevifolia), a member of the Agave family. An important part of the Mojave Desert ecosystem, Joshua trees are home to all types of wildlife. Birds, mammals, insects, and lizards all live with, in and around Joshua trees. A favorite subject for many southwestern artists to paint, carve and sculpt in their preferred media.
Sometimes seen as unruly, these slow growing trees create a striking silhouette in the high desert. For many living in the high desert, snow covered Joshua trees are seen as a traditional holiday image. Following that tradition I wanted to create holiday ornaments highlighting the Joshua tree.

Another familiar sight to the high desert is the relentlessly gorgeous sunsets and sunrises. In hues of red, pink, yellow, purple, blue and soft grey, the sky is an ever changing canvas. These unfiltered displays of colors are the natural background for Joshua trees in Winter months.

Using photos of Joshua trees, high desert sunsets and sunrises that I took as reference, I painted blank pine wood slices. Layer by layer early morning and twilight high desert scenes came to life.
By painting in a folk art style, I found the process of making each ornament relaxing, bringing back happy holiday memories. Once each pine wood ornament was painted, they were signed and varnished. Many of the ornaments now have happy new homes for the holidays.
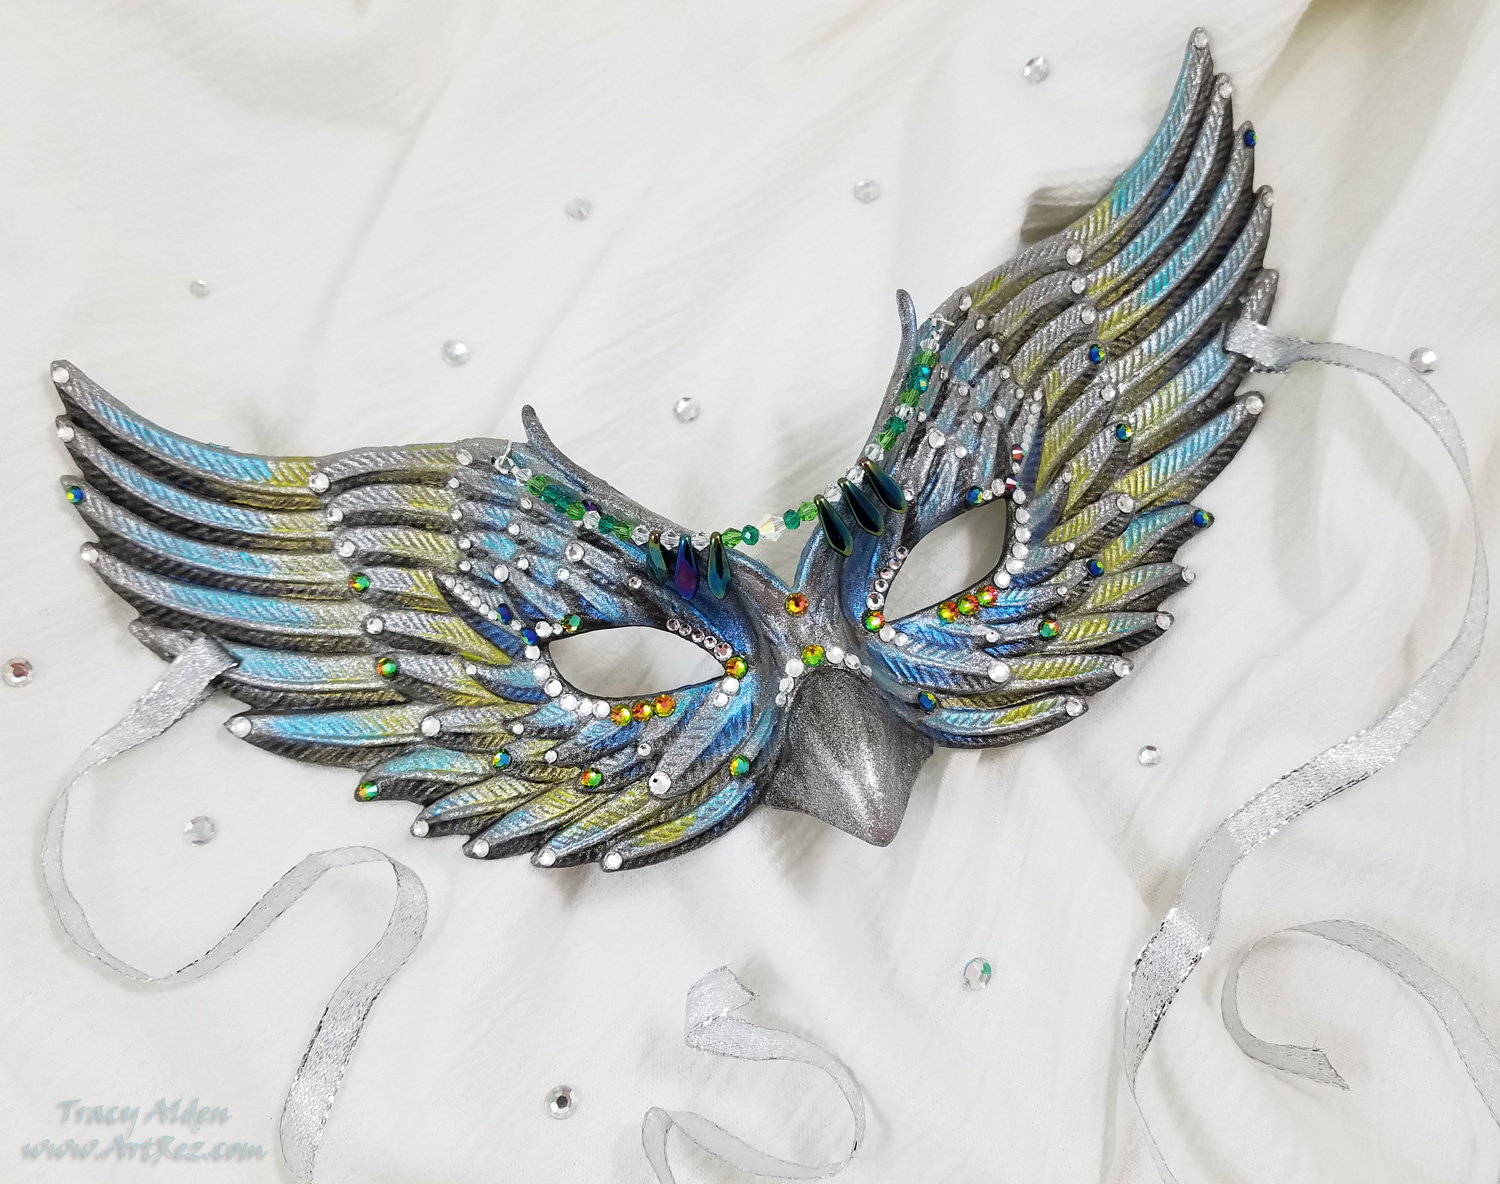
Until Next Time, Stay Crafty, Stay Safe!Sparkling Masquerade Mask with Testors Craft Intense Glitter Paint
My last two blog posts, found Here and Here I talked about the 6th annual Prime Networking Event in January. At this event, bloggers, designers, authors and brands in the craft industry came together to network, make new partnerships, and learn about new product information. Educational, informative, with food, drinks and free product samples provided by this year’s sponsors. Afterward, the event attendees were encouraged to try out and create art for the Favecrafts Best Blogger Craft Event.
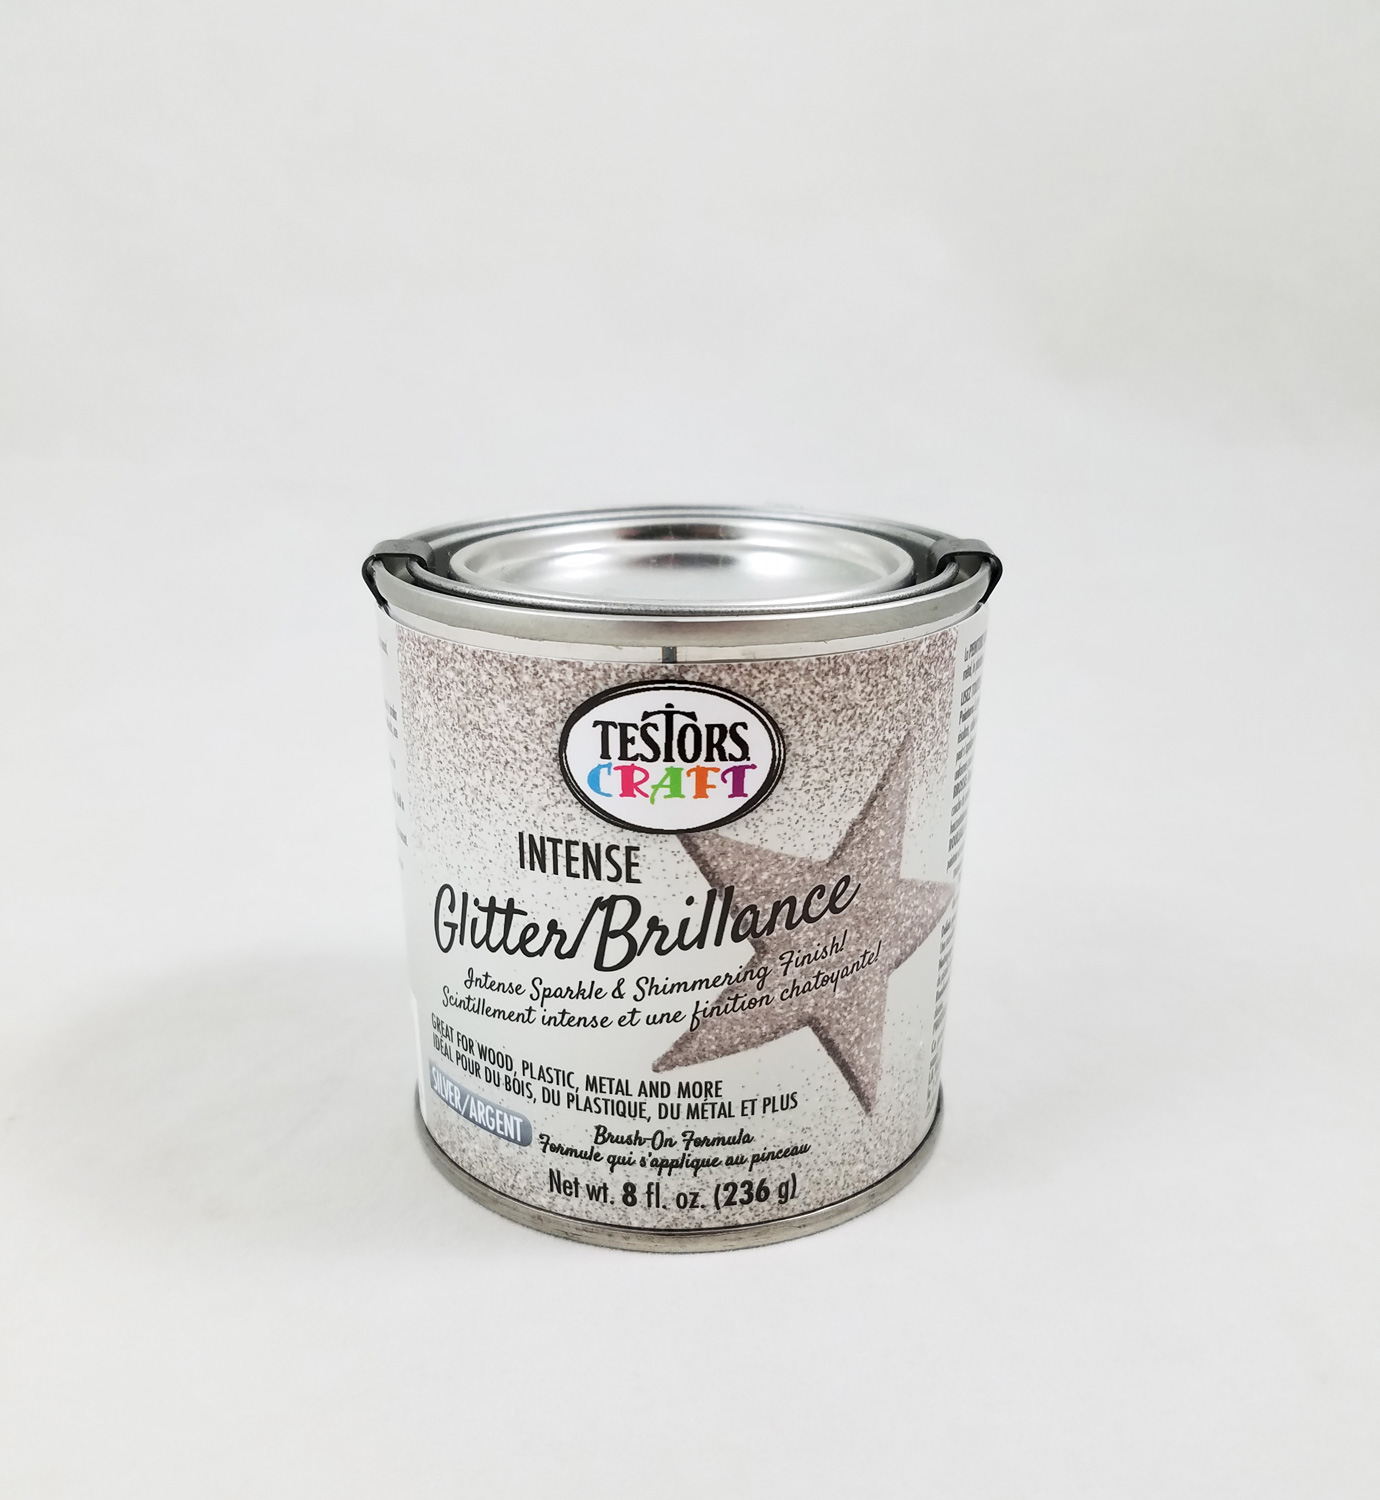
A sponsor at the event was Rust-Oleum with the Testors paint brand (Testors once its own company is now part the Rust-Oleum Group). During the blogger event attendees were asked to cast a vote for their favorite new Testors Craft/Rust-Oleum product. The winner of that vote was the Testors Craft Intense Glitter paint. As per the label it can be applied to wood, plastic, metal and more, with excellent adhesion, perfect for special occasion tablescapes and home accessories. Testors Intense Glitter paint is water based, low VOC and the glitter is made out of very small Mica particles (Mica is a naturally occurring mineral found in granite, rocks and crystals).
Many at the event were excited with this new paint and were excited to try it. However I will let you in on a secret: while a fan of the Rust-Oleum/Testors paint lines I am not a huge fan of glitter. I know I probably broke a crafting world rule by saying that but I have never found myself using much glitter in my projects. I use it mostly as a highlight, a minor shimmer or a tiny amount encased by resin. I have found many glitter paints in the past to be messy, have bad adhesion and not cover well. That being said I wanted to give this new paint a chance.
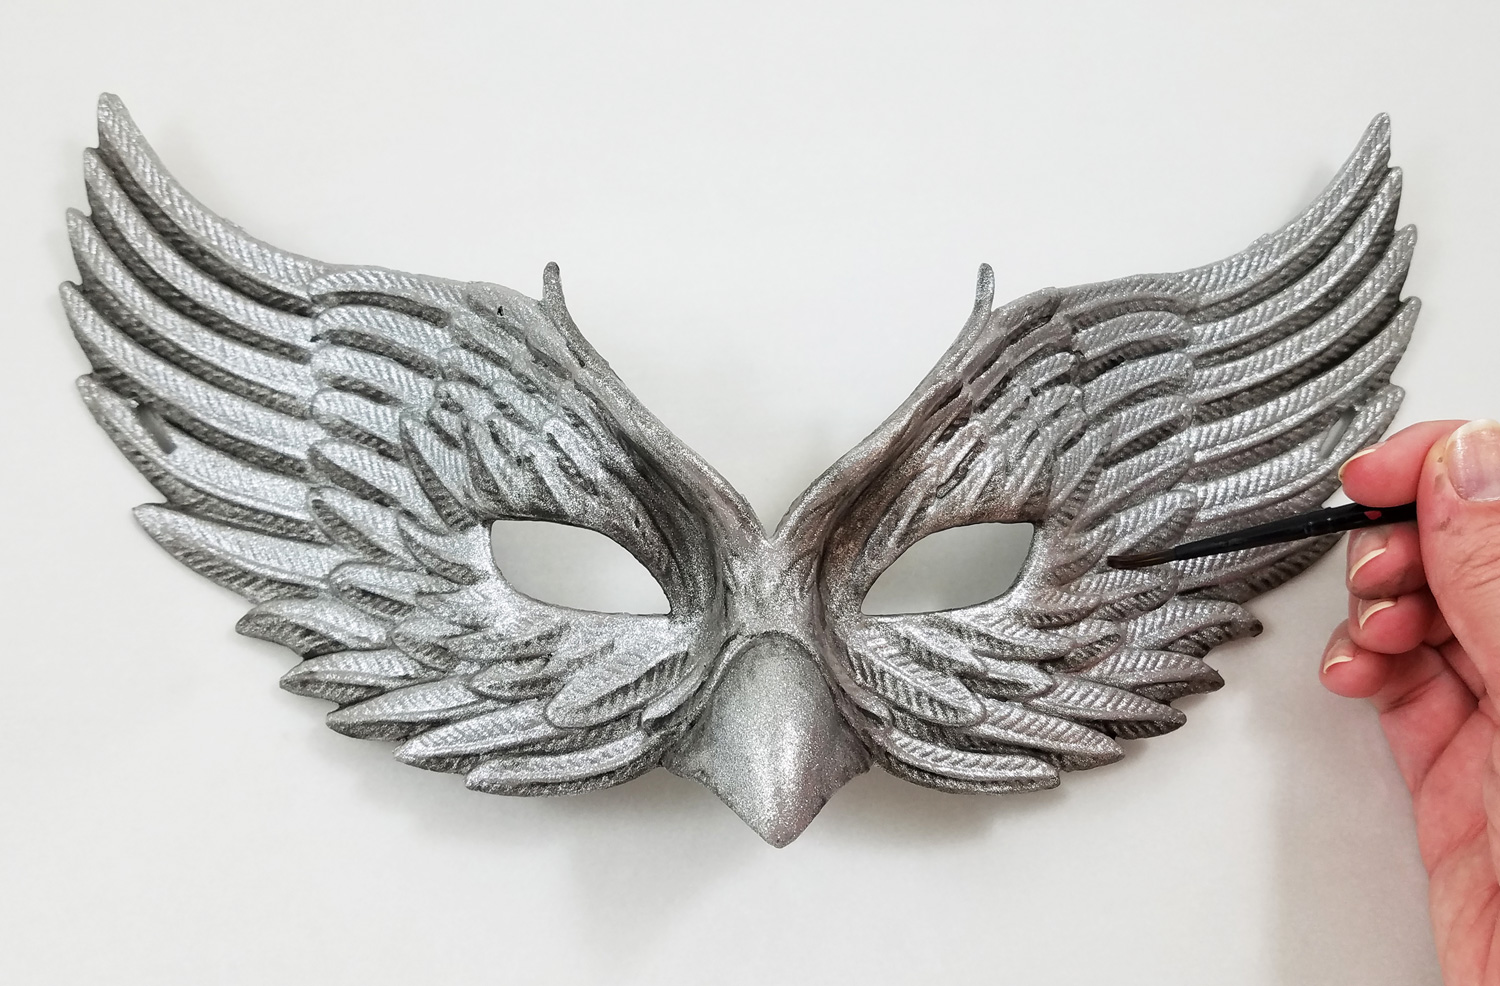
Upon opening the can of paint I realized how tiny the particles of glitter were. I painted a small swatch onto plastic, which it coated smoothly and even, when dry it looked amazing. I was staring to understand why so many were eager to try this paint. Inspiration for this project came from not wanting to coat furniture or small wood objects with glitter. I wanted to try turning something common into something beautiful. Grabbing a plastic Halloween mask from a .99 cent store I wanted to give this paint a true test, only to be very happy with my end results!Supplies:
Testors Craft Intense Glitter Paint
Plastic Owl Mask from a .99 cent store
Multi Surface Acrylic Paint in Grey and Black
Metallic Multi Surface Acrylic Paint in Blue and Green
2 Paint Brushes
Beacon Gem-Tac Glue
Swarovski Rhinestones Flatback Vitrail Medium SS20
Clear Crystal Rhinestone Flatback 4mm and 3mm
Crayon
Silver Ribbon
Beads, Bead Thread and Jumprings *optional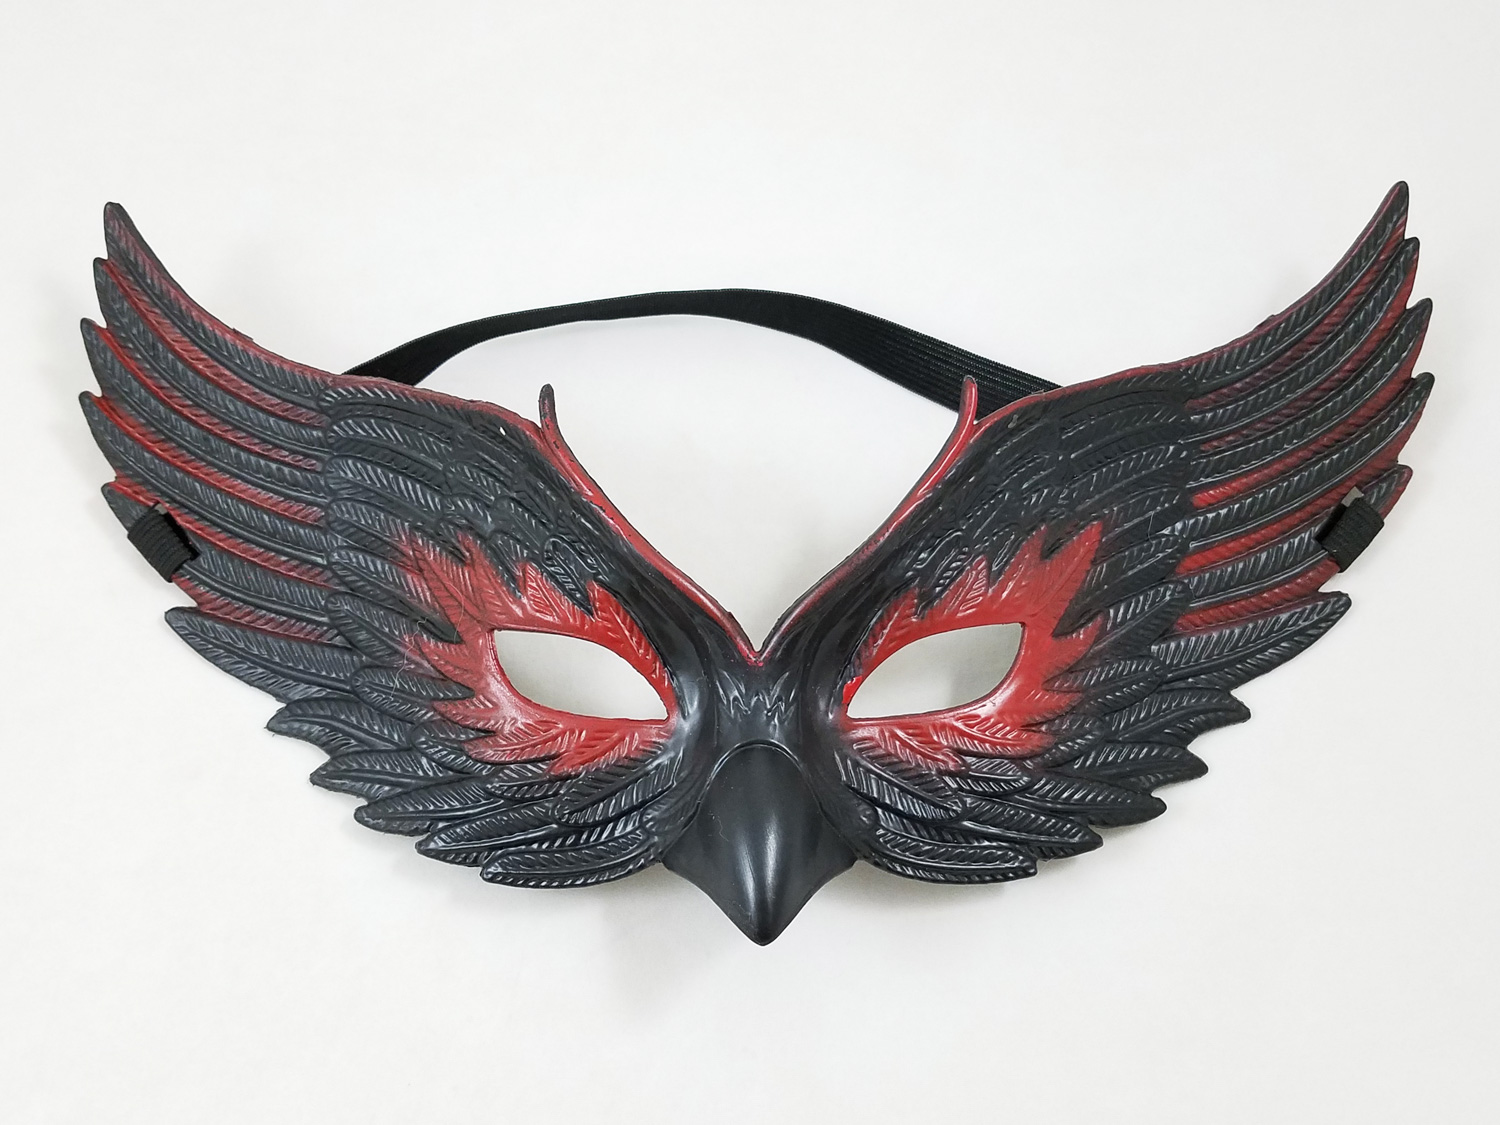
Starting by cleaning the plastic Halloween mask with soap and water, I made sure to remove any oils or dirt left from the manufacturing process. I cut off the elastic headband and filed any sharp edges.
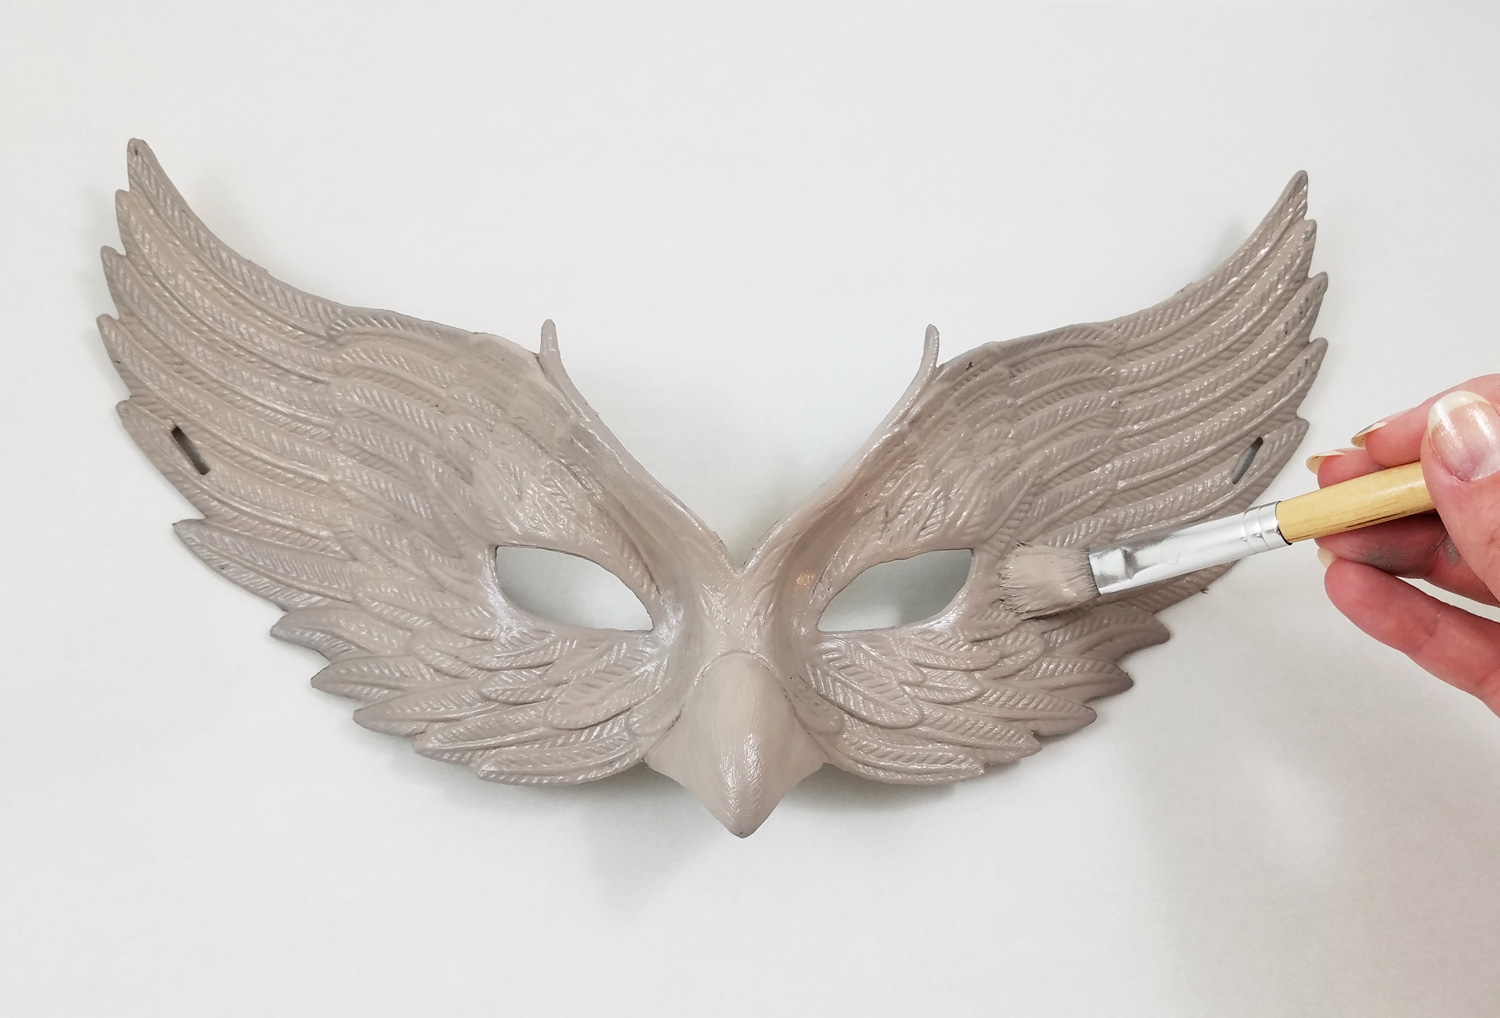
I noticed on the can of Testors Craft paint it said for best results to use a acrylic paint base coat similar in color to the glitter. Using a multi surface acrylic paint I painted the front and back of the mask, making sure to get complete coverage over the original black plastic.
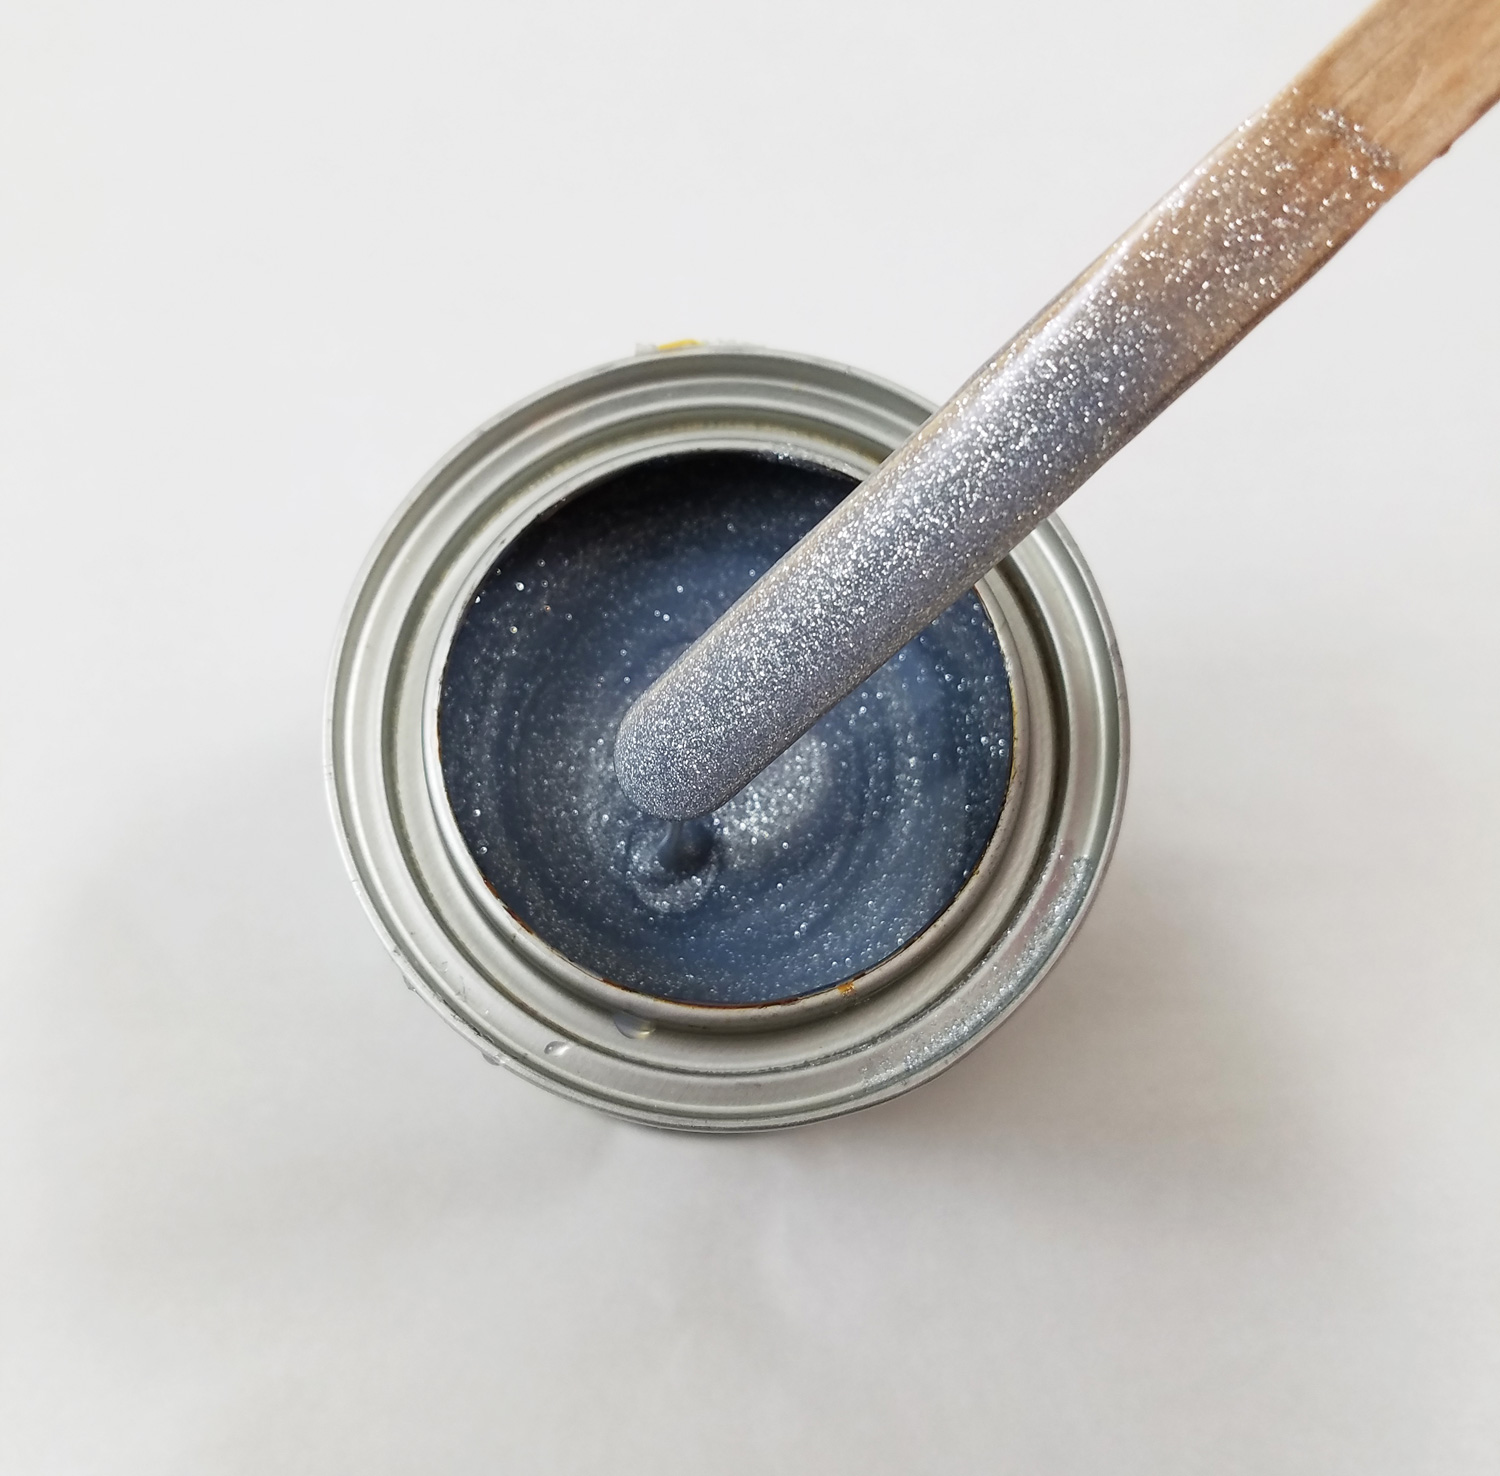
As you can see from the photo there is a intense amount of glitter in this paint. Before applying the paint to any surface make sure to stir thoroughly the Testors Craft Intense Glitter paint. This step MUST be repeated before each application because there is so much glitter in the paint it settles to the bottom when resting.
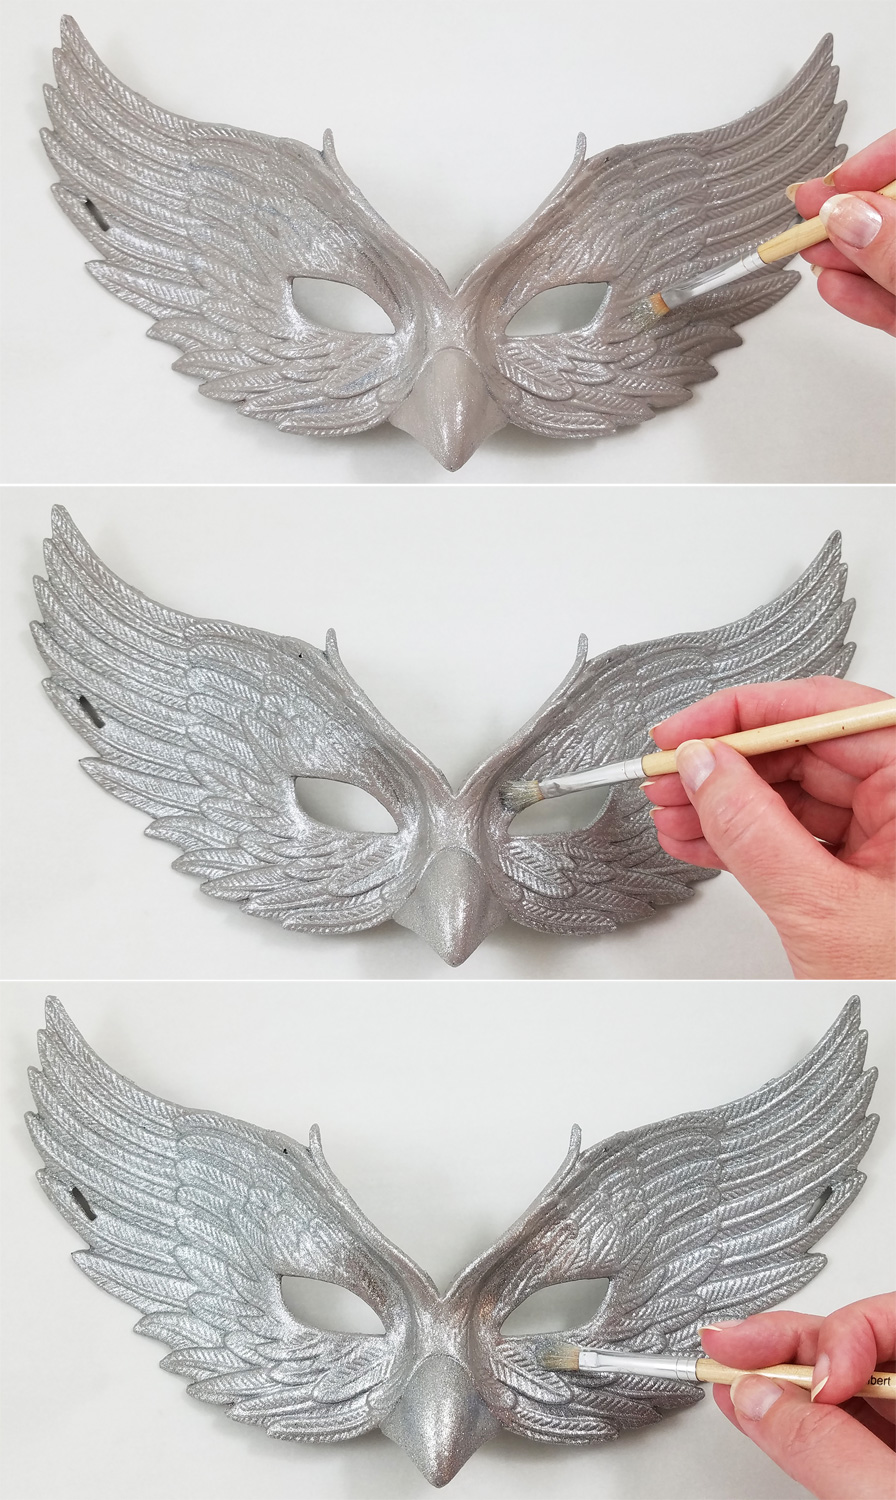
I applied one coat of paint brushing it on in uniform direction. With no need to rush, slow, steady and even brush strokes got the best and most even application of the paint. As long as you do not overload the brush the paint is not a messy paint and sticks well to the plastic surface. It dries in about one hour to touch and can be painted with a second coat in 4 hours. In the top photo you can see one coat of paint, each additional image with another coat of paint. I chose to paint three coats to get the most vibrant and intense glitter coverage, though I could have easily gotten away with 2 coats of paint.
By applying a light color wash of black multi surface acrylic paint in the groves of the feather details, it added more contrast to the mask. I let the paint dry fully.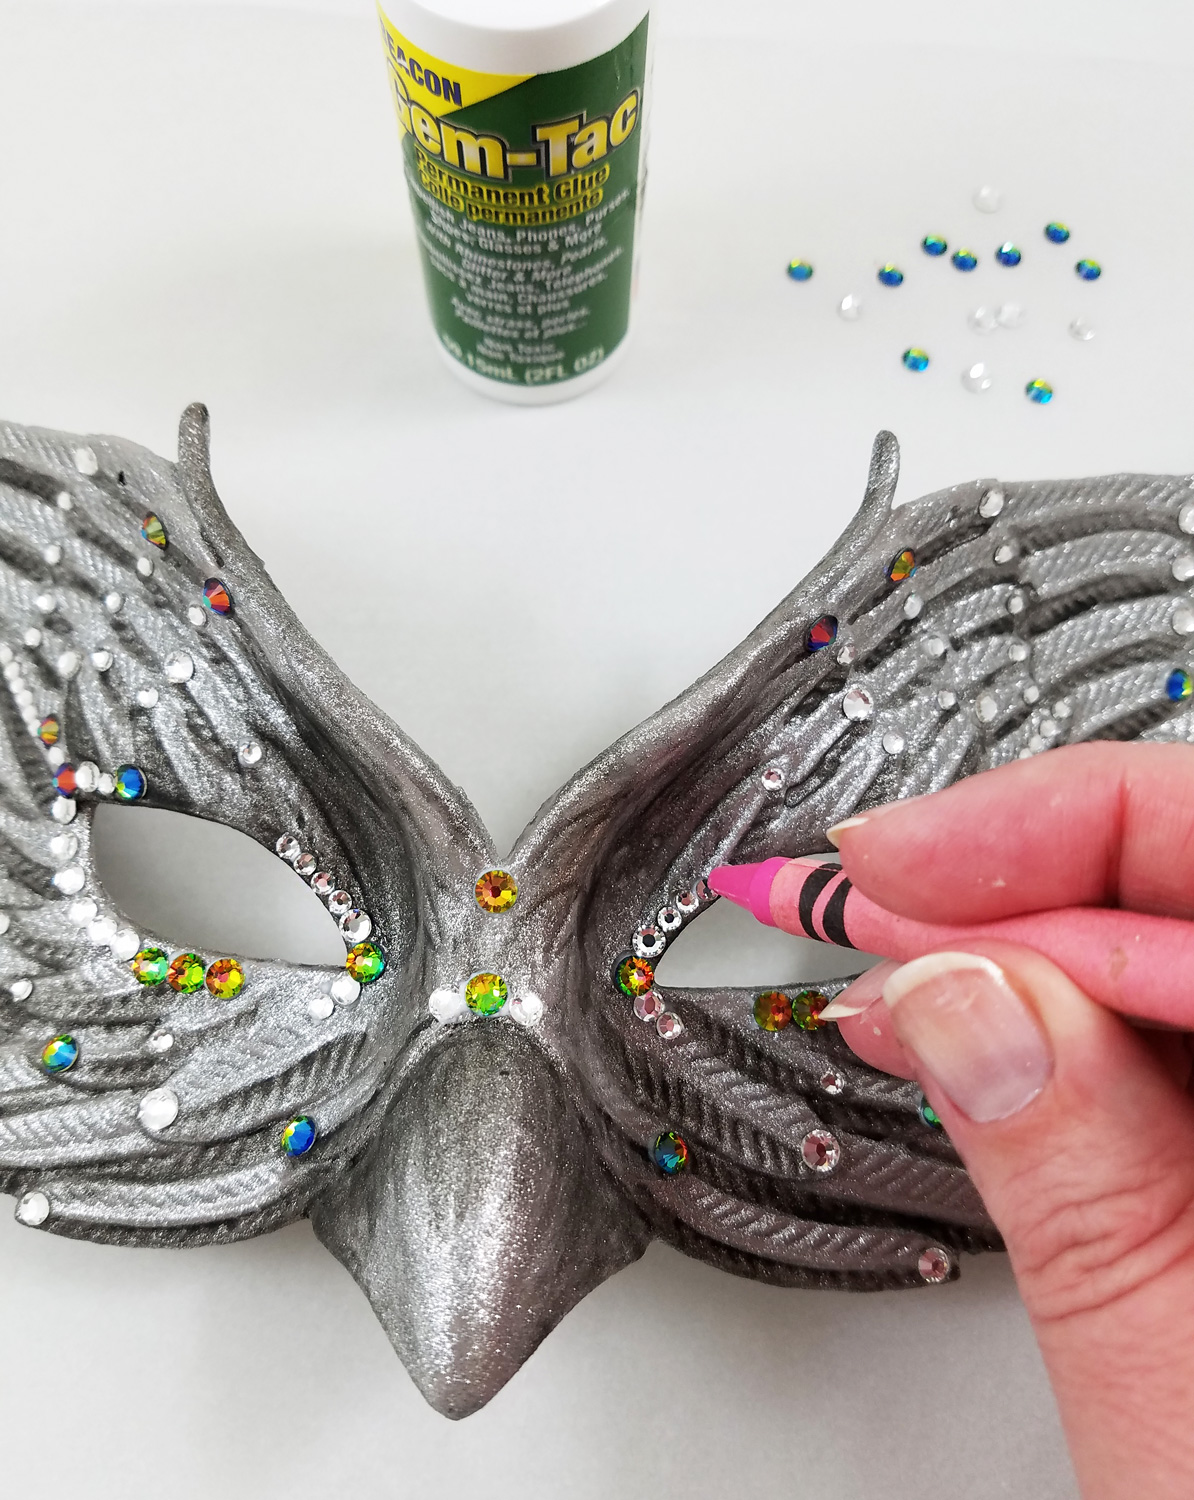
Beacon’s Gem-Tac is my go-to glue for applying small decorative elements to most craft surfaces. By squeezing small dots of glue on different portions of the mask I added flatback crystal rhinestones to add that extra special sparkle and shine. Applying flat backed rhinestones can be tedious but using an old costuming trick you can quickly apply them: pick up each rhinestone by pressing the top of each stone with a crayon. The wax is soft enough it temporarily sticks to the rhinestone allowing you to move it to wherever you would like it applied.
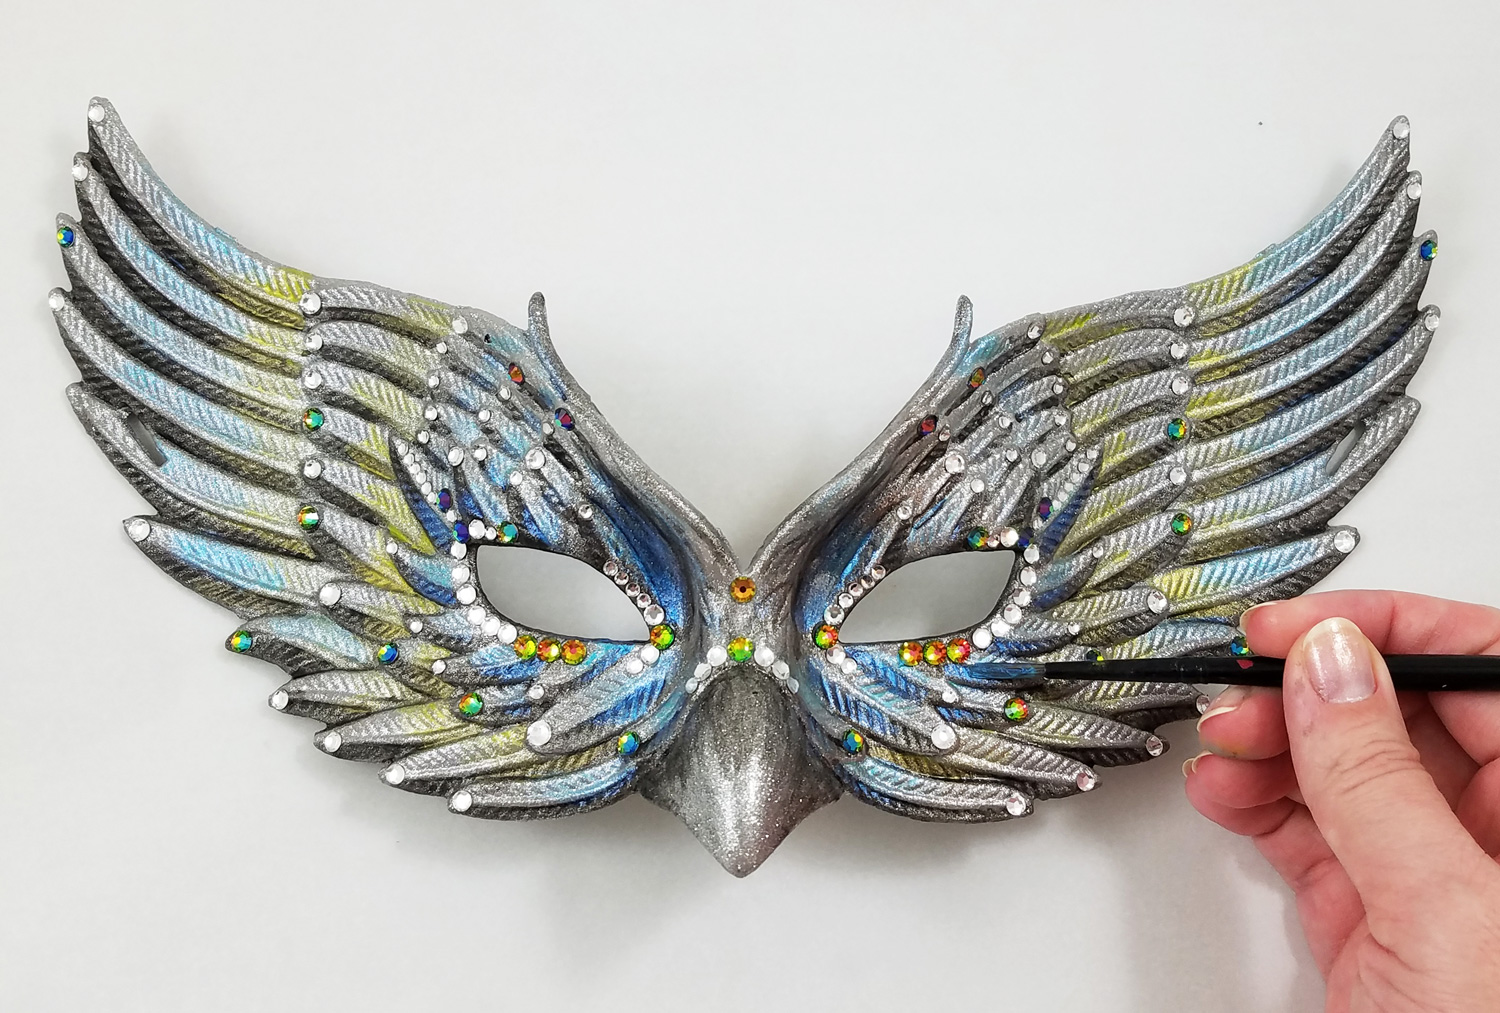
I loved the look of the rhinestones to the mask but I felt it was missing a little something. I went ahead and created a second acrylic paint color wash but this time with metallic blue and green paint. I applied this color directly on top of each glittered feather element of the mask and in the eyelid creases. This created a lovely transparent metallic hue. I let the paint dry fully.
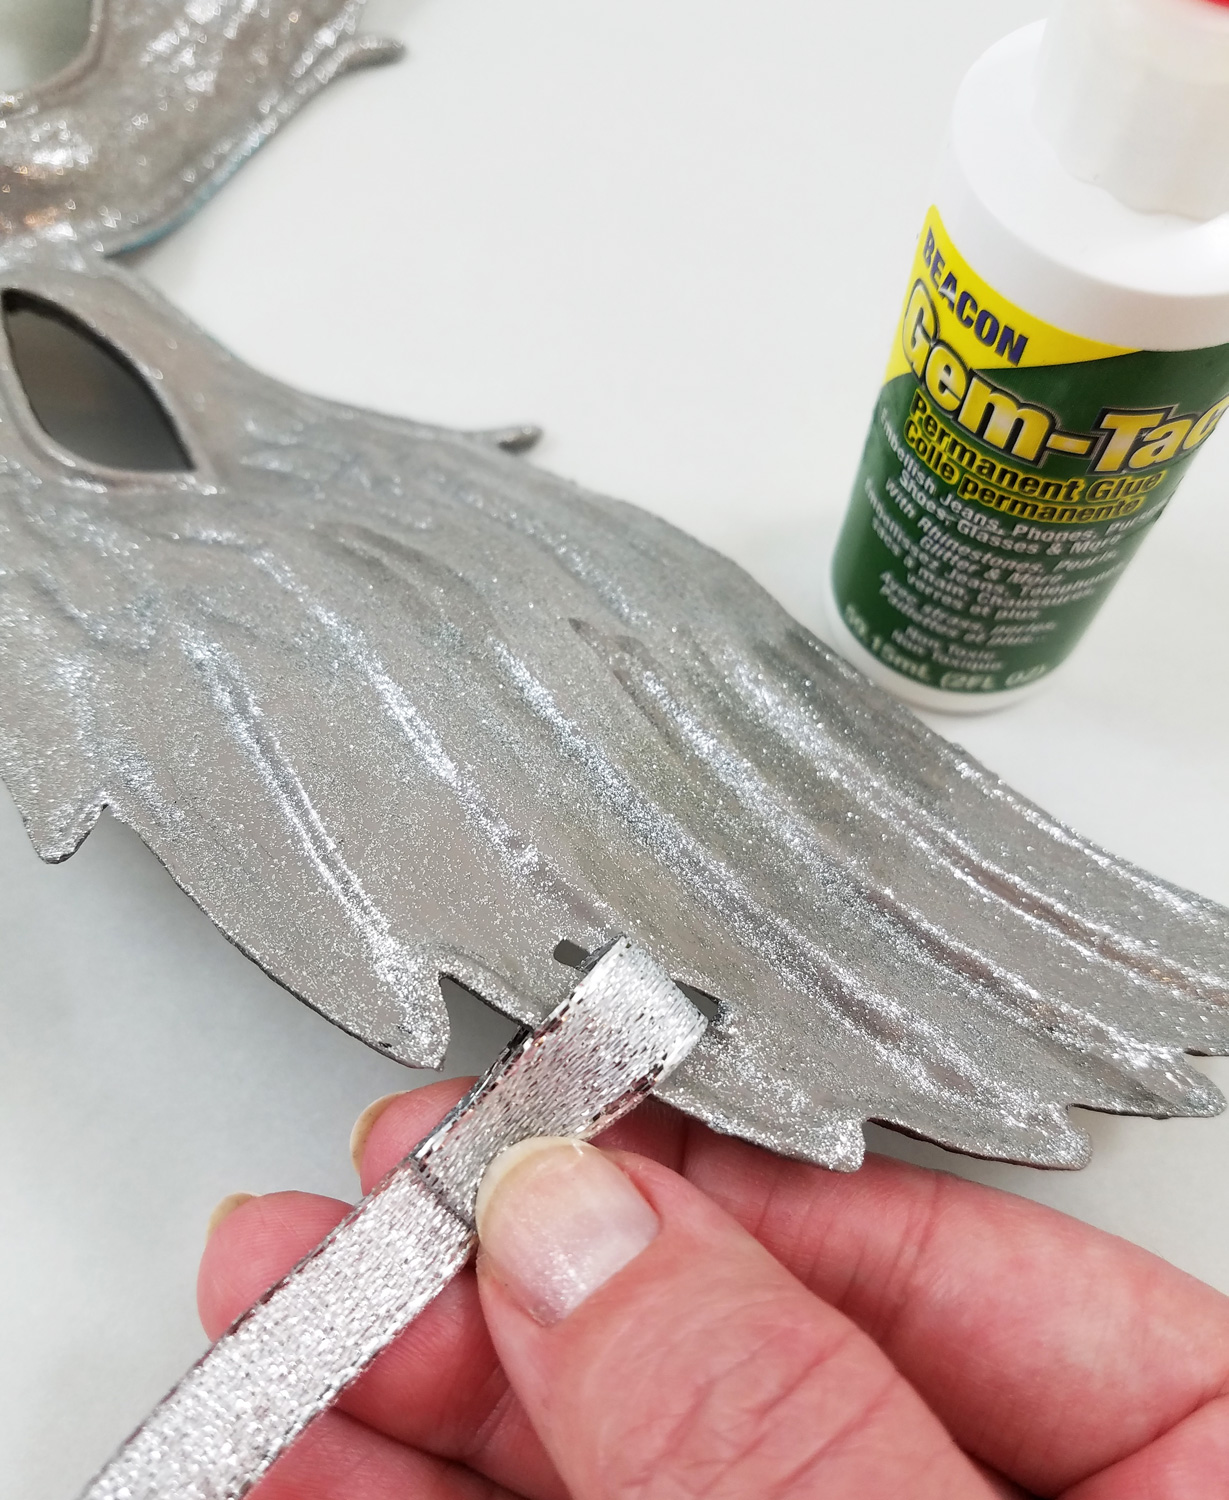
Silver ribbon was threaded through each side of the mask where the black elastic use to be. I folded the end of the ribbon under and glued it in place, pressing down firmly with my fingers and used a clothespin to hold in place while the glue dried.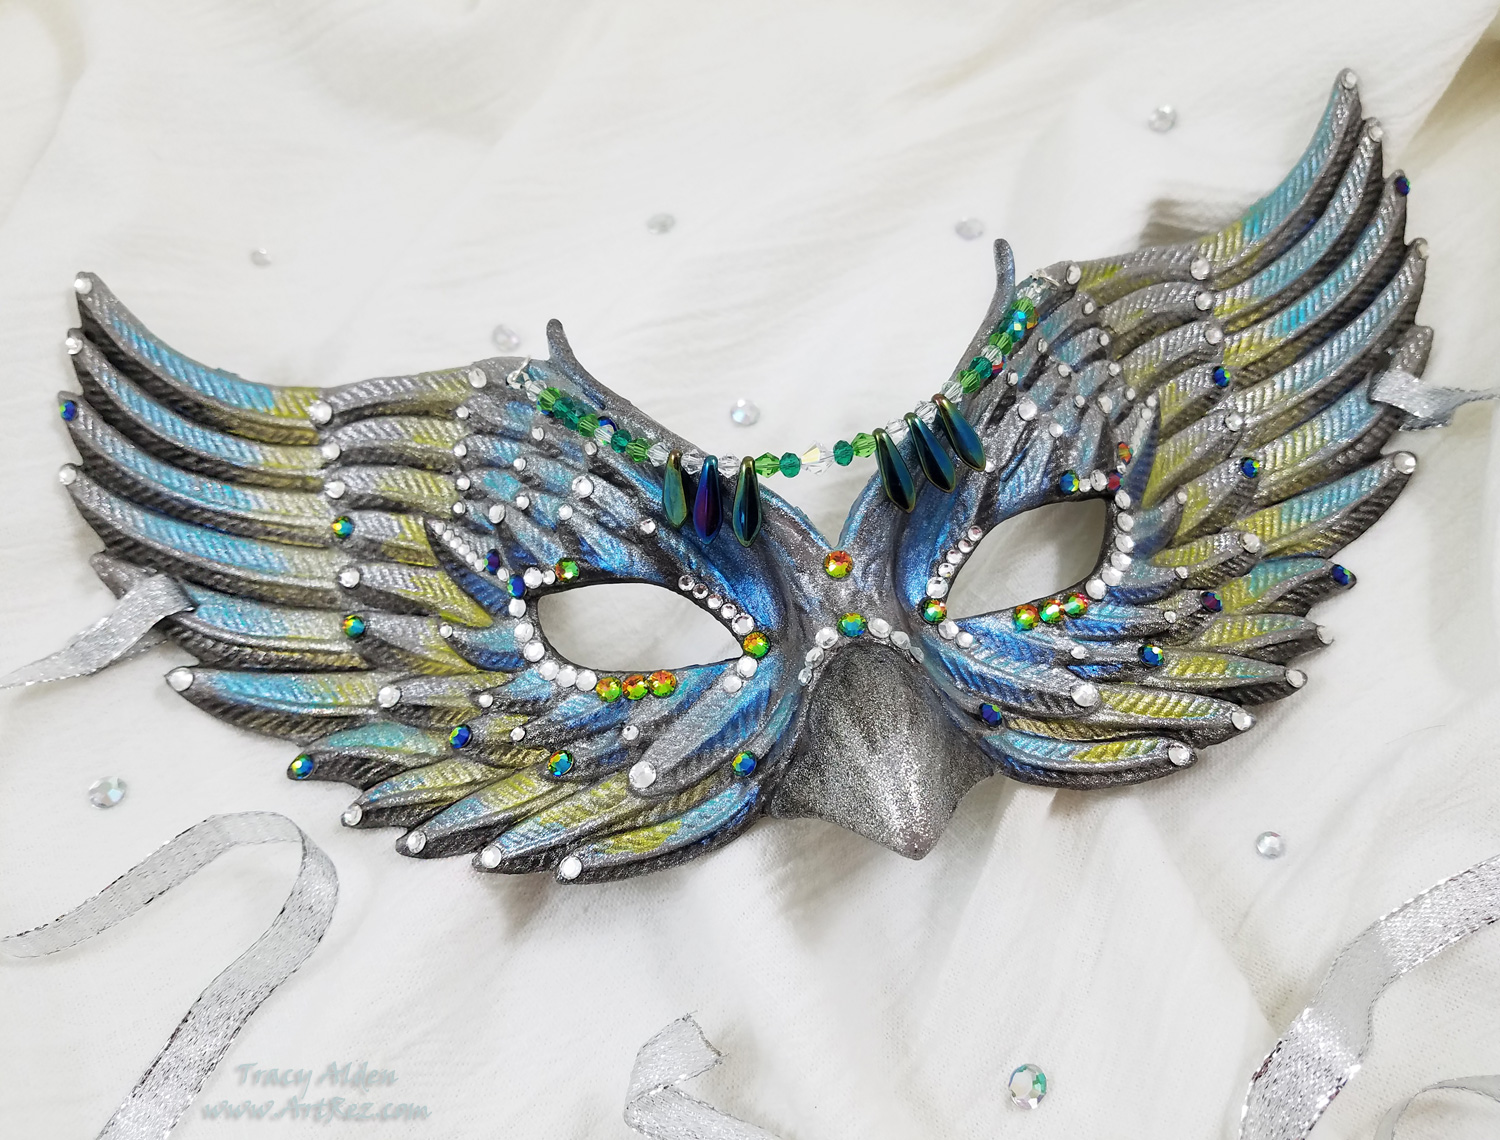
One more element of sparkle was added by stringing some crystal beads onto a 9 inch length of beading thread and threading it through two tiny holes that were part of the original mask. Now the masquerade mask was finished, ready to be worn or displayed.Testors Craft Intense Glitter paint truly won me over and I look forward to finding out what other paint applications I can try!
Until Next Time, Safe Travels!
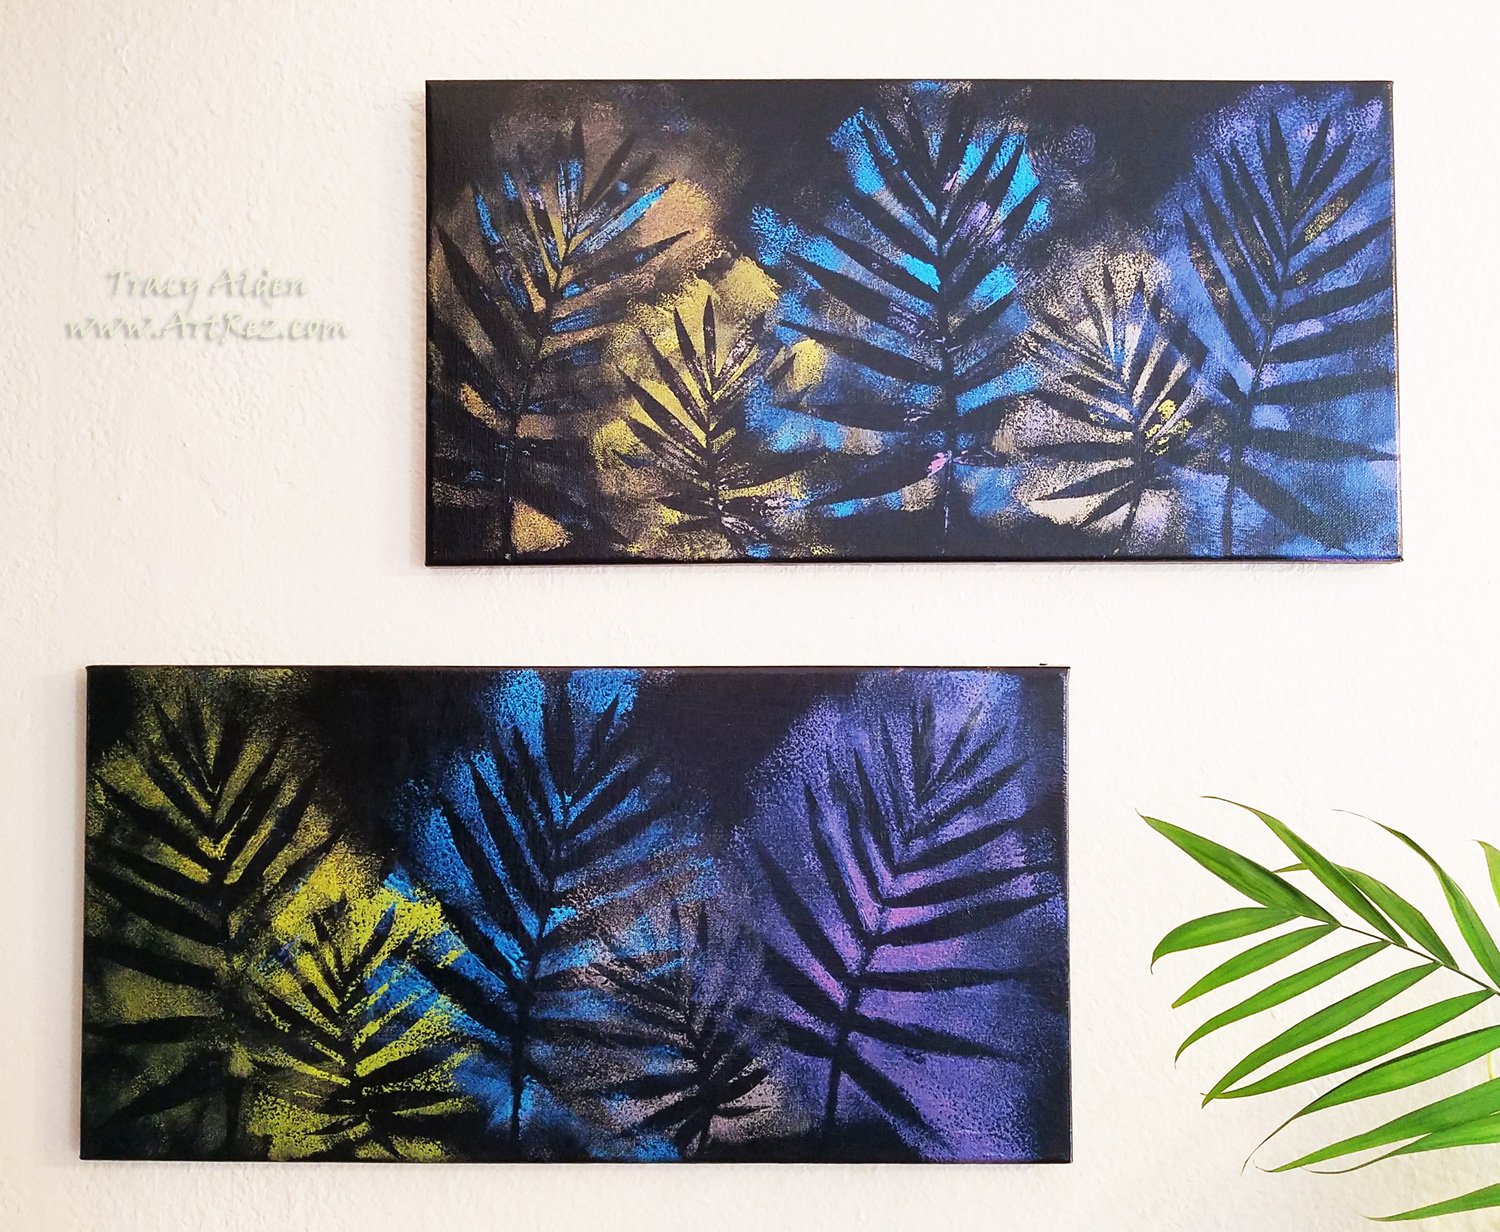
Palm Frond Stencil Art with FolkArt Color Shift Paints
In my last Blog Post I talked about attending the 6th annual Prime Networking Event. The event was educational, informative, had great food and drinks and free product samples provided by this year’s sponsors. At this event, bloggers, designers, authors and brands in the craft industry came together to network, make new partnerships, and learn about new product information. Afterward, the event attendees were encouraged to try out and create art for the Favecrafts Best Blogger Craft Event.
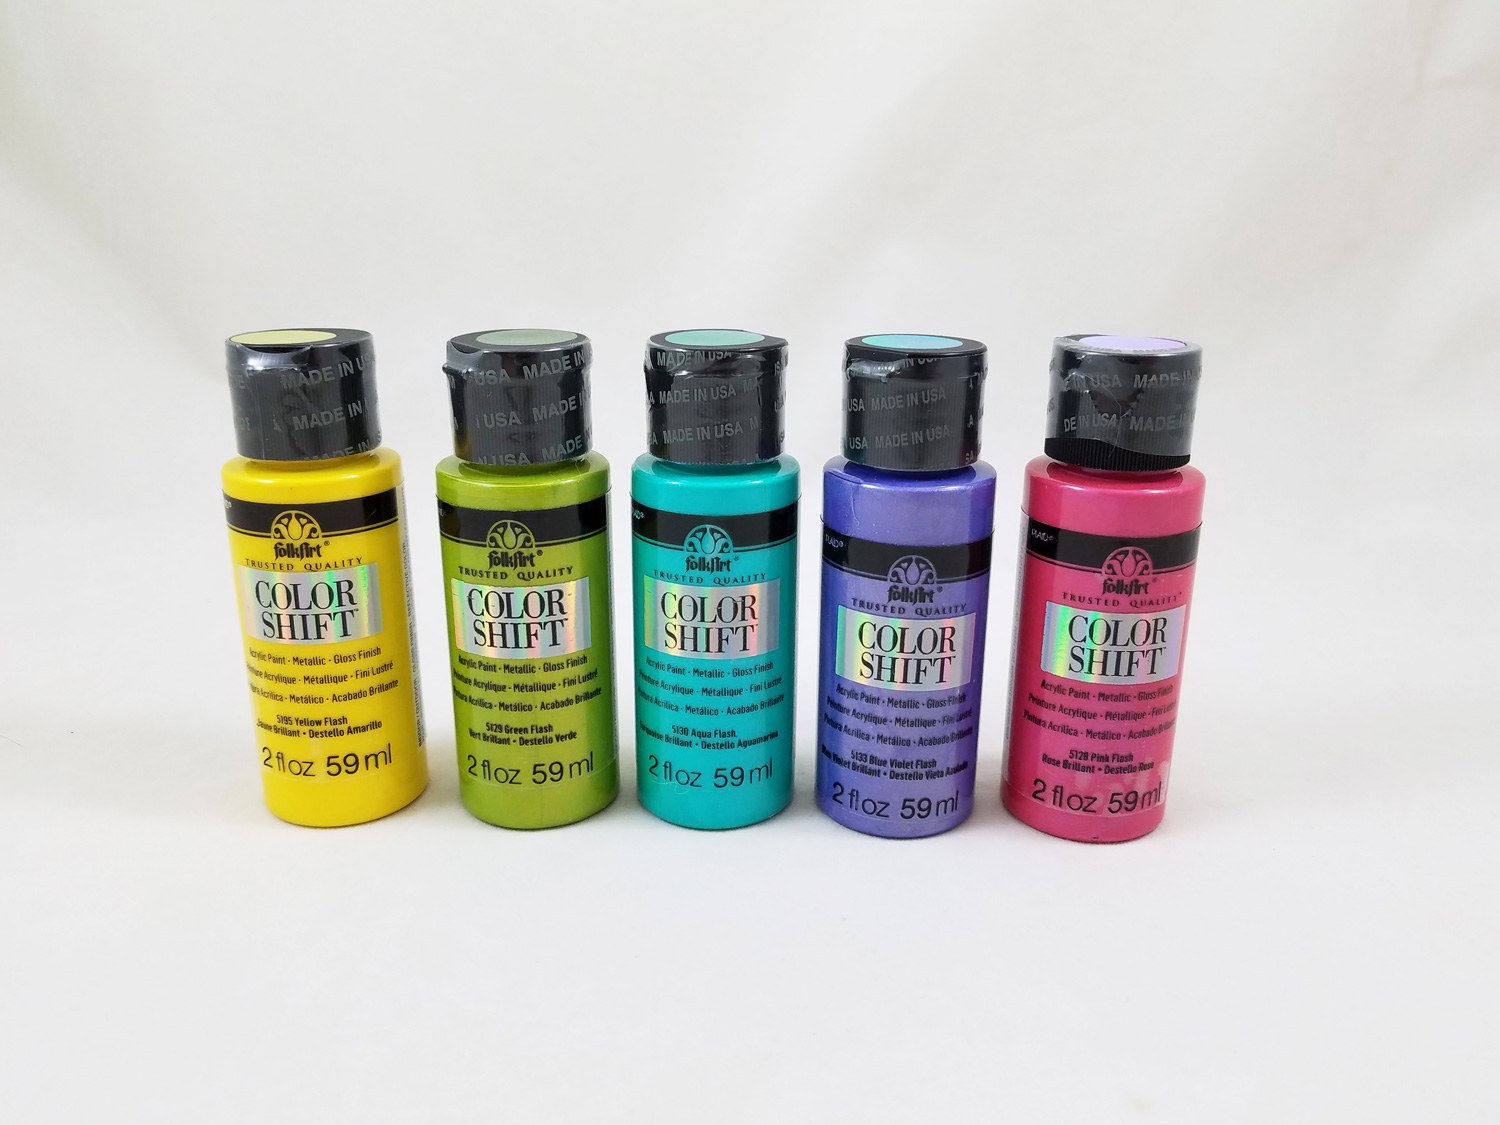
One of the sponsors was Plaid, who supplied a wonderful assortment of their water-based, non-toxic FolkArt Color Shift Paints. These paints indeed do shift color and luminosity with light. In low lighting they produce a soft shimmer and in bright light the color is just stunning.
While the paints can be applied to any number of surfaces and base colors I noticed they have the most impressive result when painted on a dark or black hued surface. Keep in mind each color will dry a bit different from how they look wet. In some cases becoming brighter and in others softer when dry but any color will end up having a metallic shimmer, reminiscent of a lovely mica coating.
The bright and cheerful color selection of the paints made me think of Spring and with the trimming of my plants to encourage growth I got an idea to create a quick and easy stencil art.Supplies:
FolkArt Color Shift Paints in Yellow Flash, Green Flash, Aqua Flash, Blue Violet Flash and Pink Flash
10×20 Canvas
Paint Brush
Acrylic Paint in Black
Mini Paint Roller
Plastic Salad Lid
Gloss Varnish
Palm Fronds or other fresh plant trimmings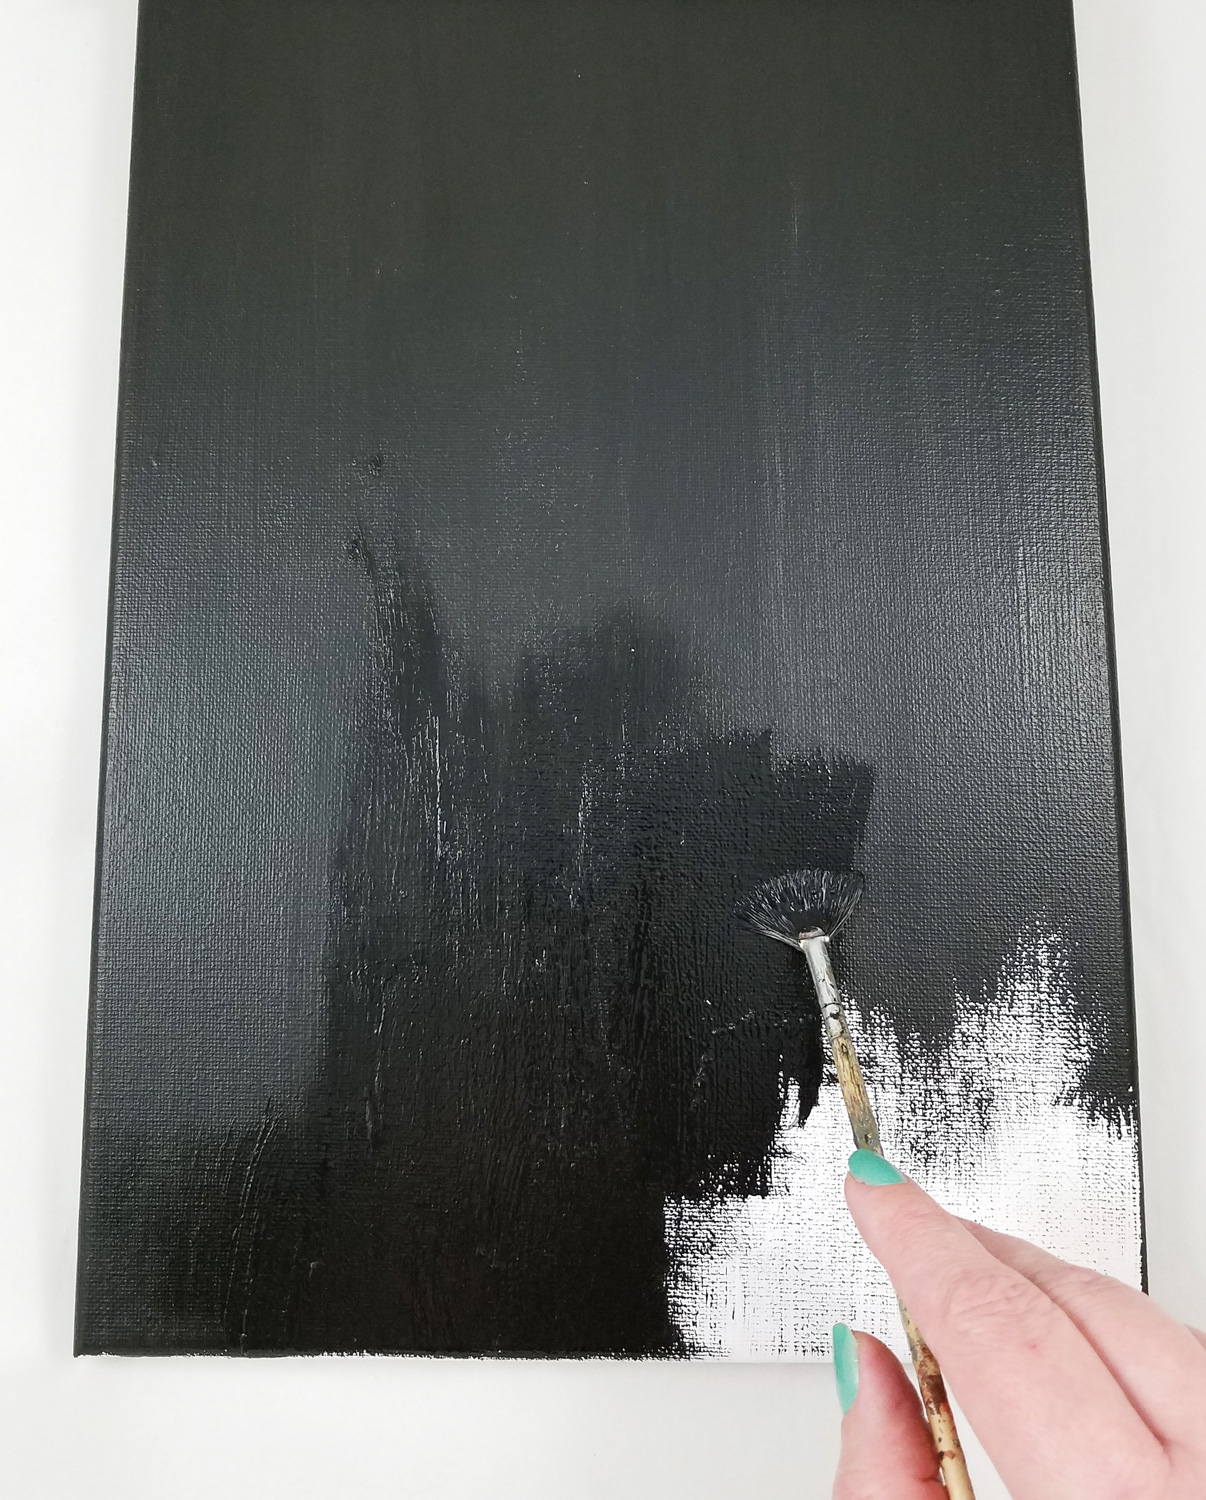
I started with applying a coat of black acrylic paint to a 10×20 Canvas. I made sure to get good coverage of paint and let it dry as per manufacturer’s instructions.
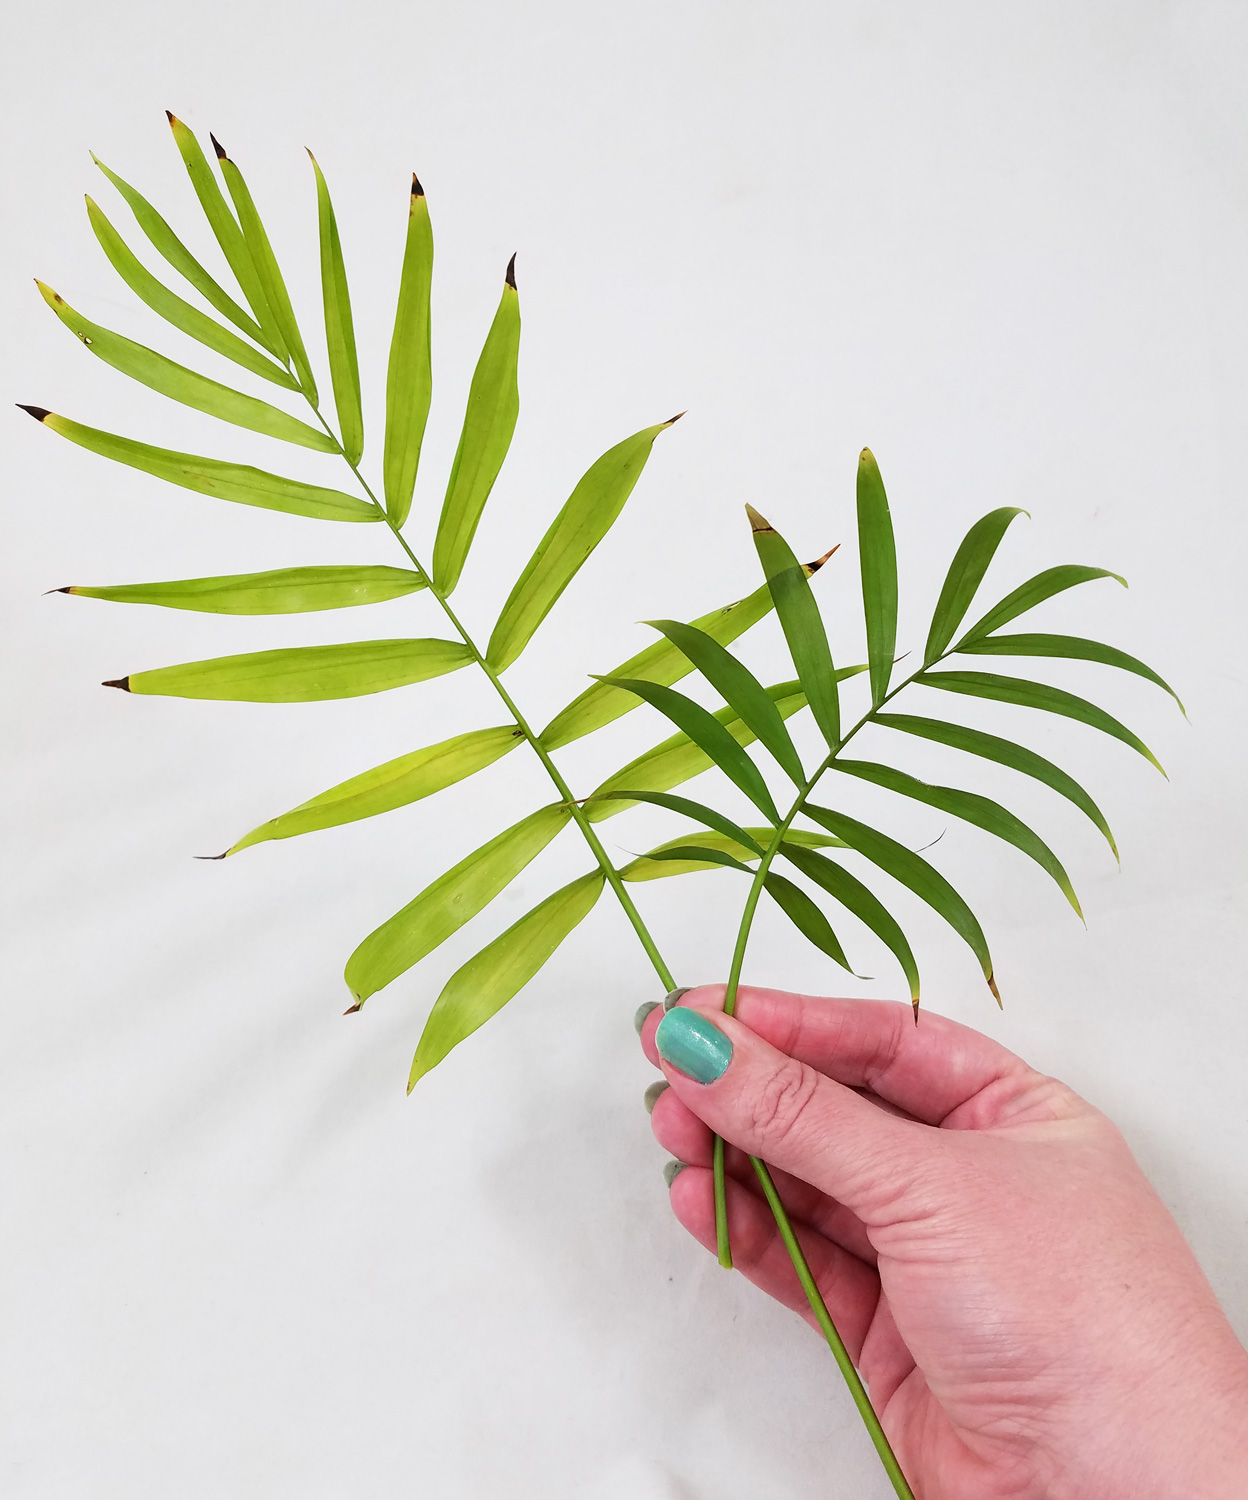
To be able to turn fresh palm fronds into flexible yet not brittle stencils I placed them between two pieces of parchment paper and then placed several heavy books on top and let it sit overnight. This way they would be easier to lay flat and yet still be green enough to not break with repeat paint applications.
*In more humid climates you might need to let the plant material sit for 2-3 days pressed by books.
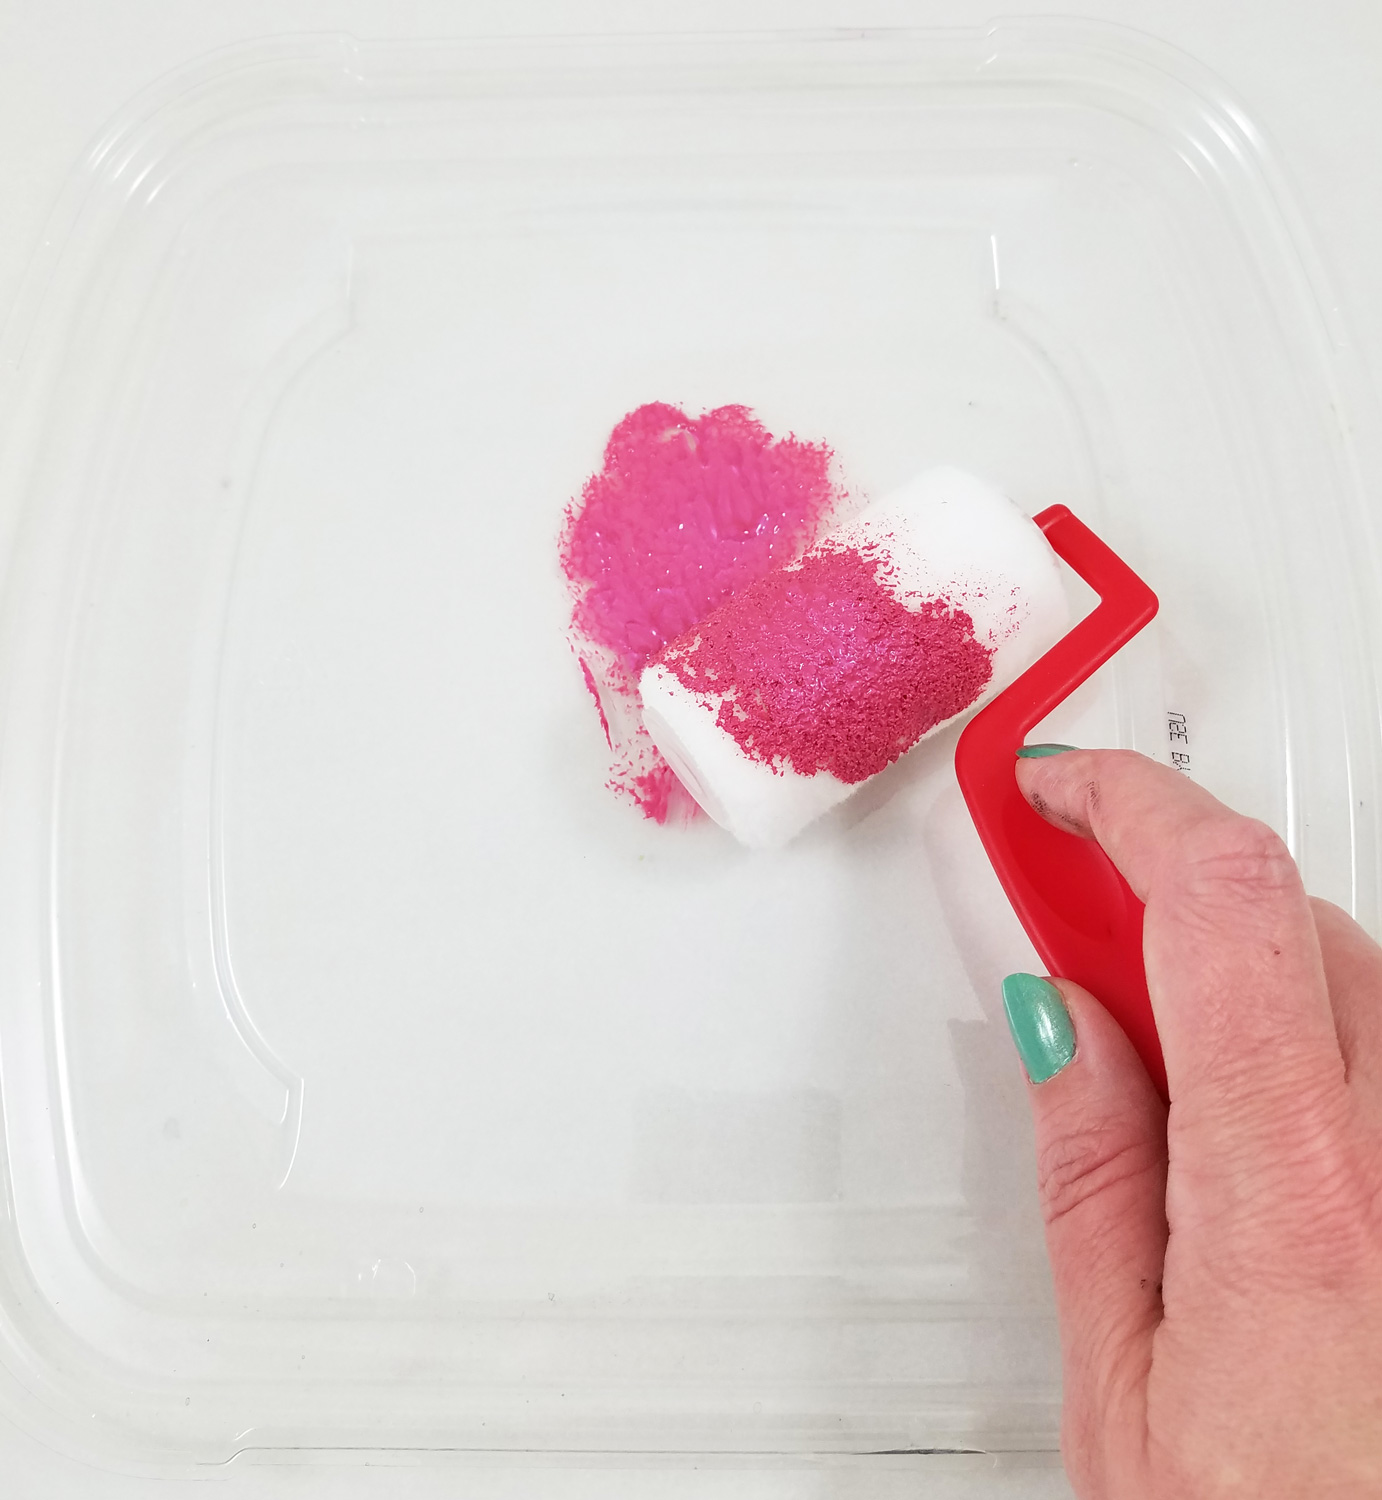
A single use plastic salad container lid got a second life as paint pallet in this project. The lid being flat with some grooves around the edges makes a perfect paint pan to apply paint to the roller and catch any excess paint in the groves. I squeezed out a little of Pink Flash FolkArt Color Shift Paint and moved the roller back and forth to get splotchy coverage, I didn’t want to over-saturate the roller with paint so I used a little at a time.
*A plate or nonstick craft mat will also work.
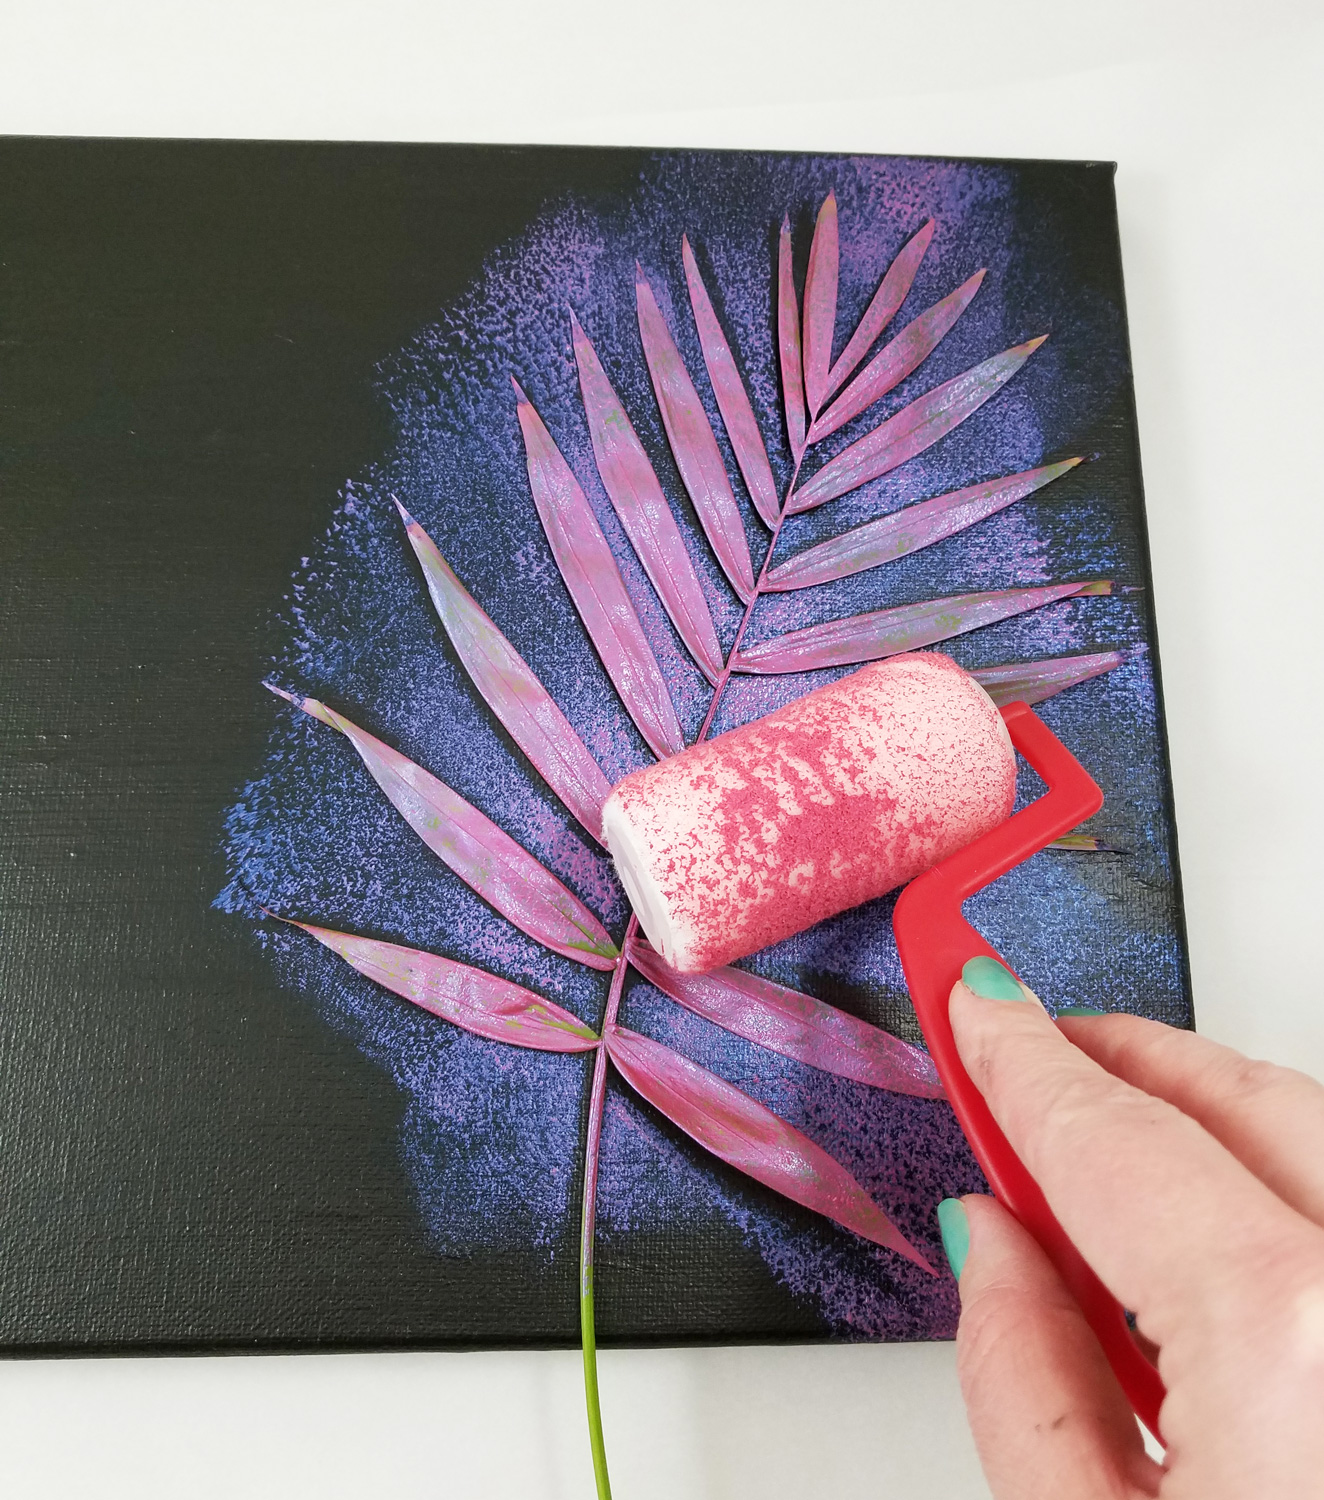
I placed the pressed palm frond on the canvas and rolled the paint coated roller over the frond carefully. A temporary adhesive was not necessary to keep the frond from shifting as I didn’t mind if I got a little paint seepage around the frond as it gave it a softer edge to the painted image.
I then carefully removed the frond to see how the paint application turned out.
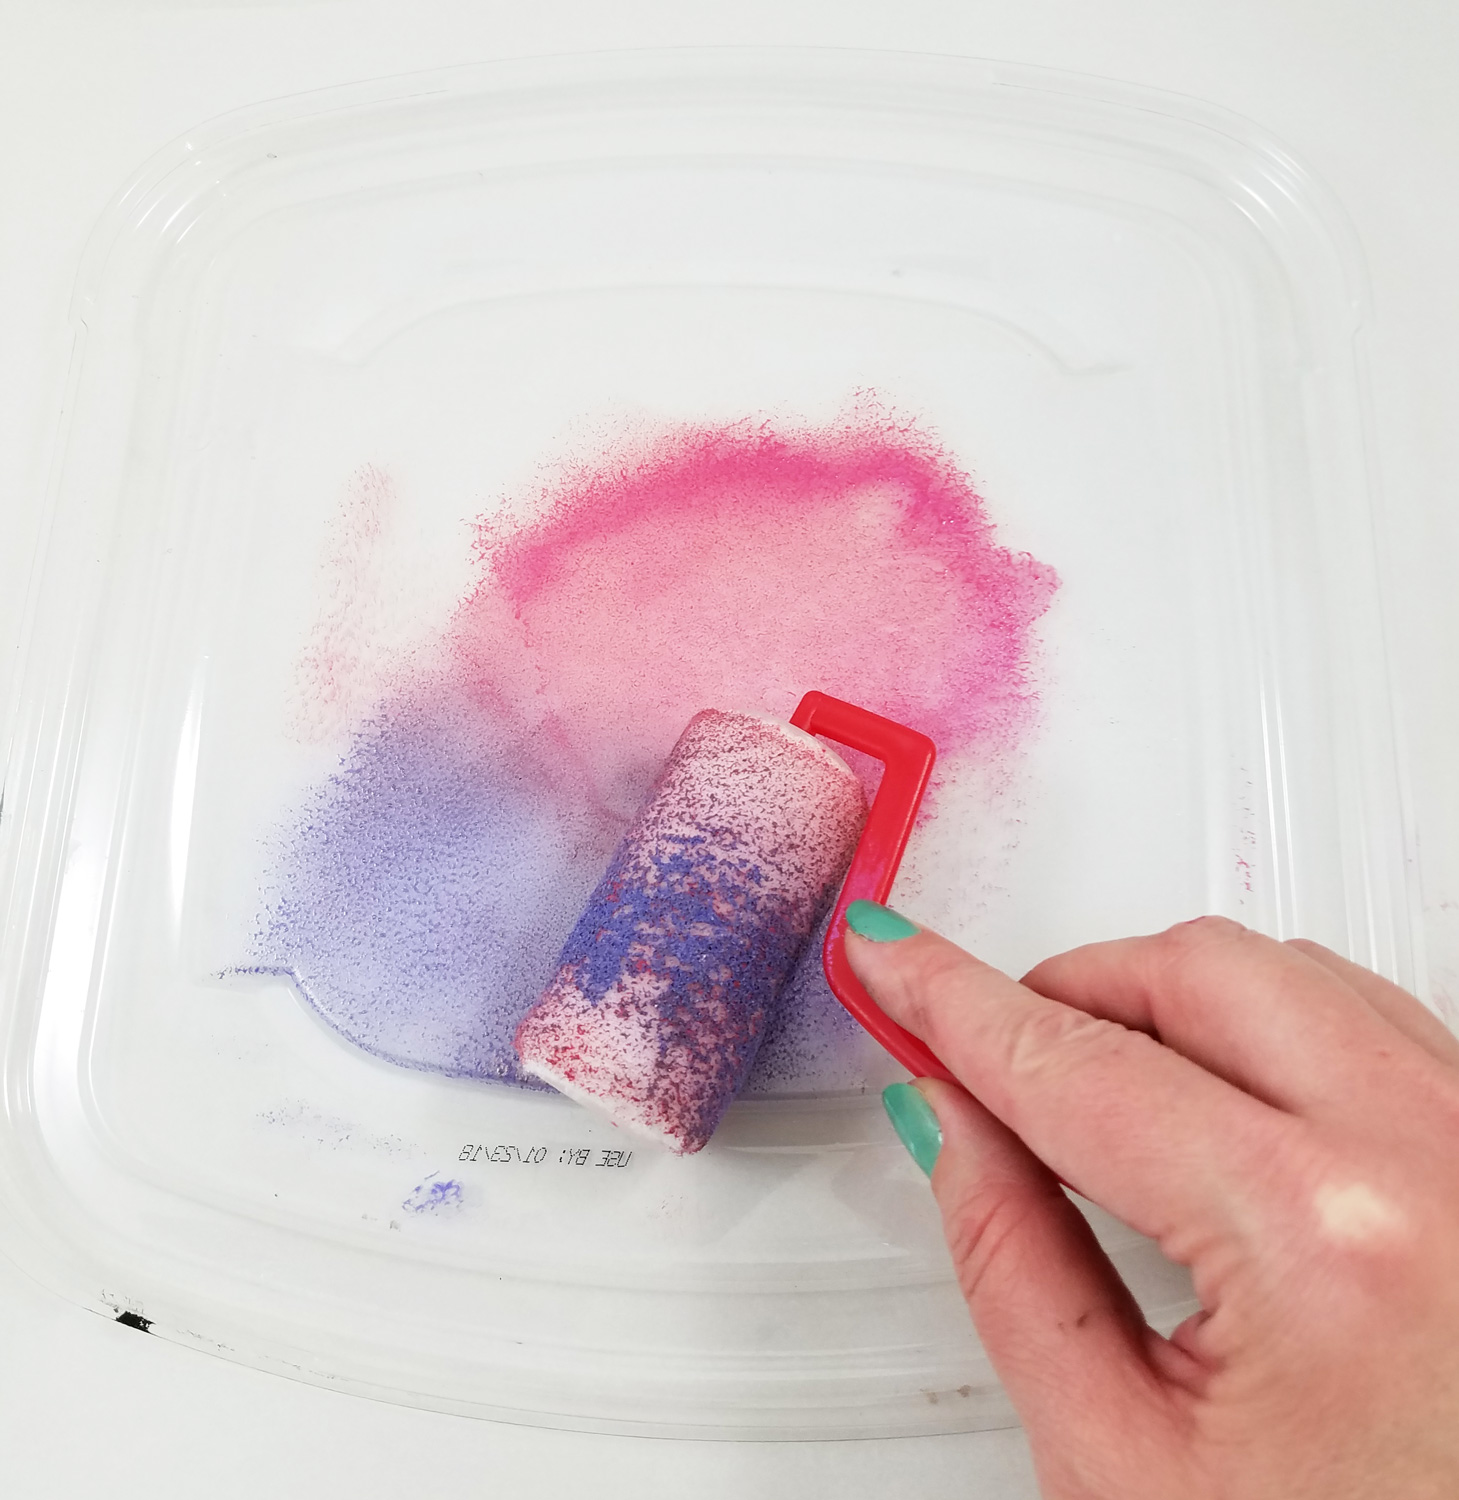
I blotted the roller lightly with a paper towel to remove any excess paint. I then added a little of Blue Violet Flash FolkArt Color Shift Paint to the side of the pink paint on the pallet and moved the roller back and forth to get splotchy coverage, making sure once again not to over-saturate the roller.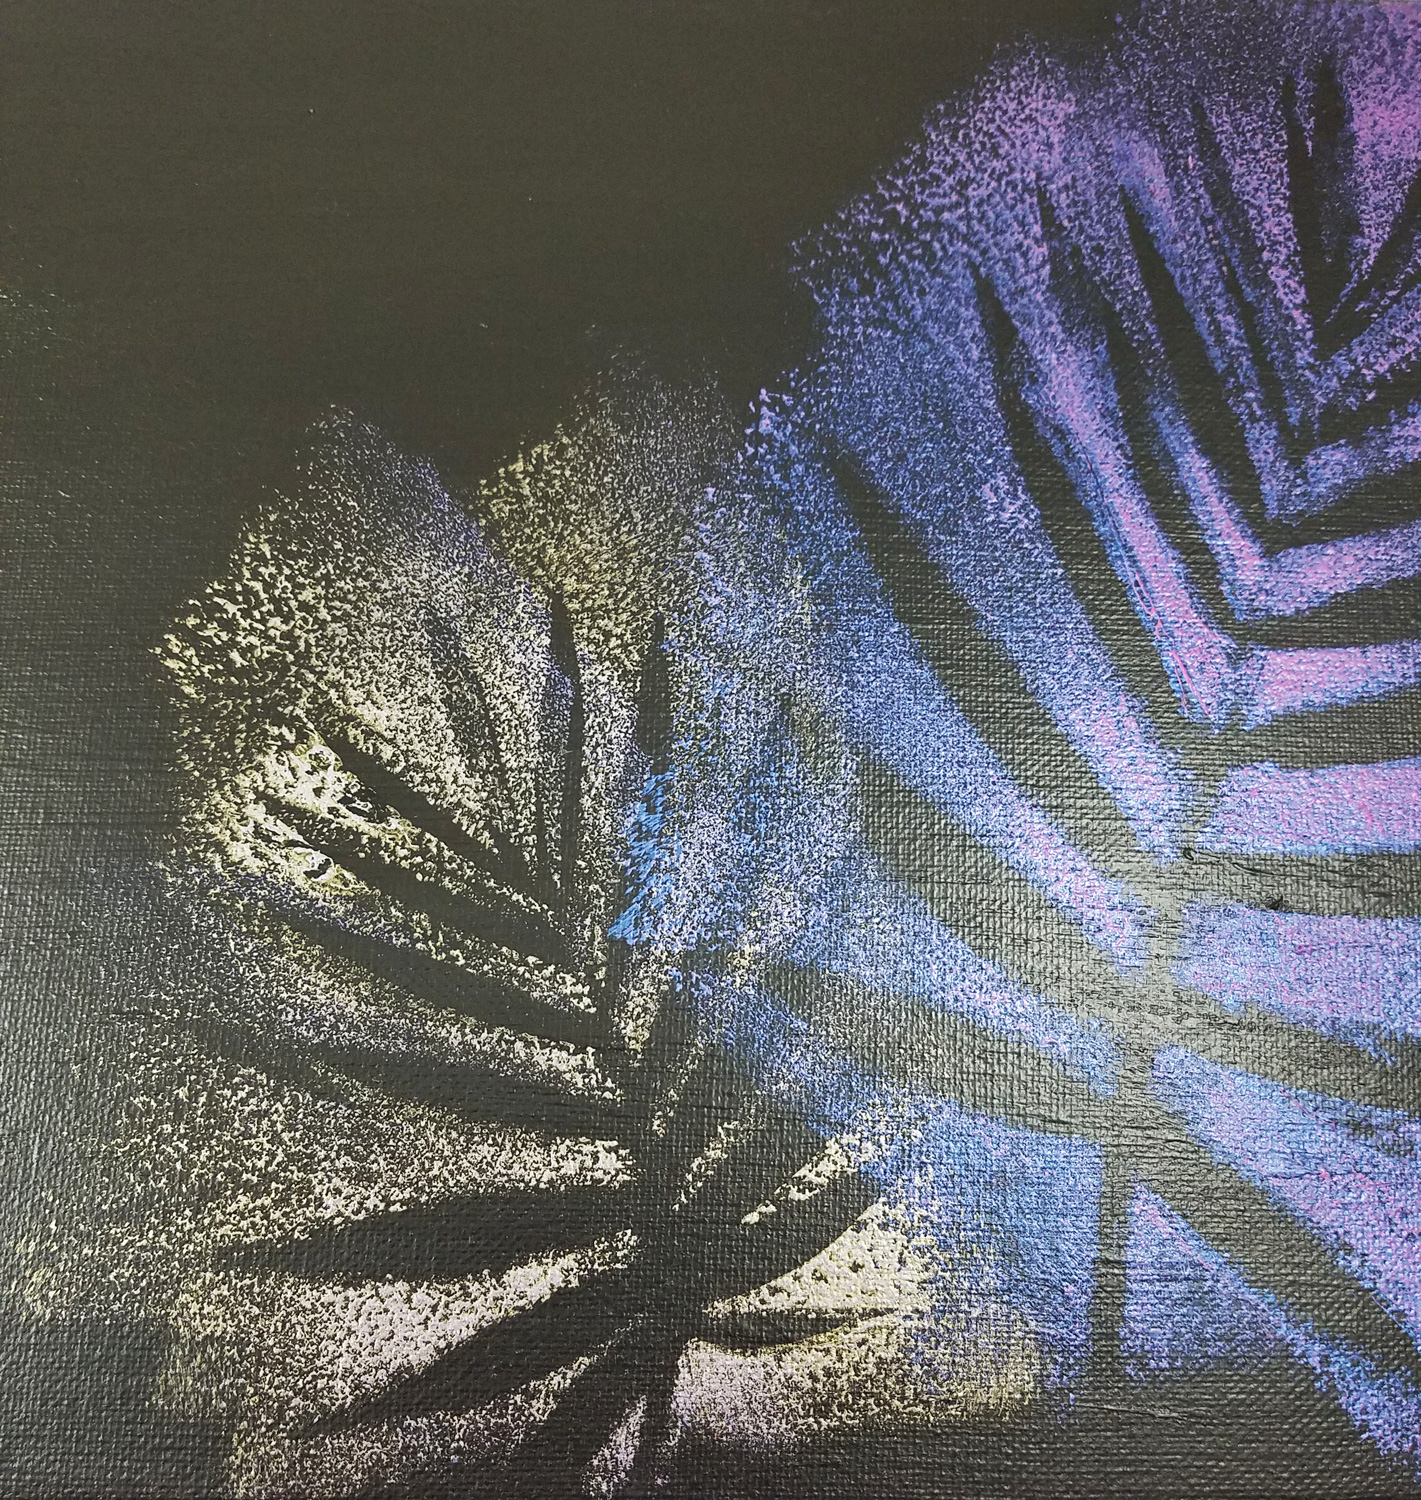
Using the smaller palm frond as my stencil I applied the Blue Violet Flash paint with the paint covered roller carefully. As you can see in this photo the Blue Violet Flash paint turns a gold with a blue hue on the black painted canvas.
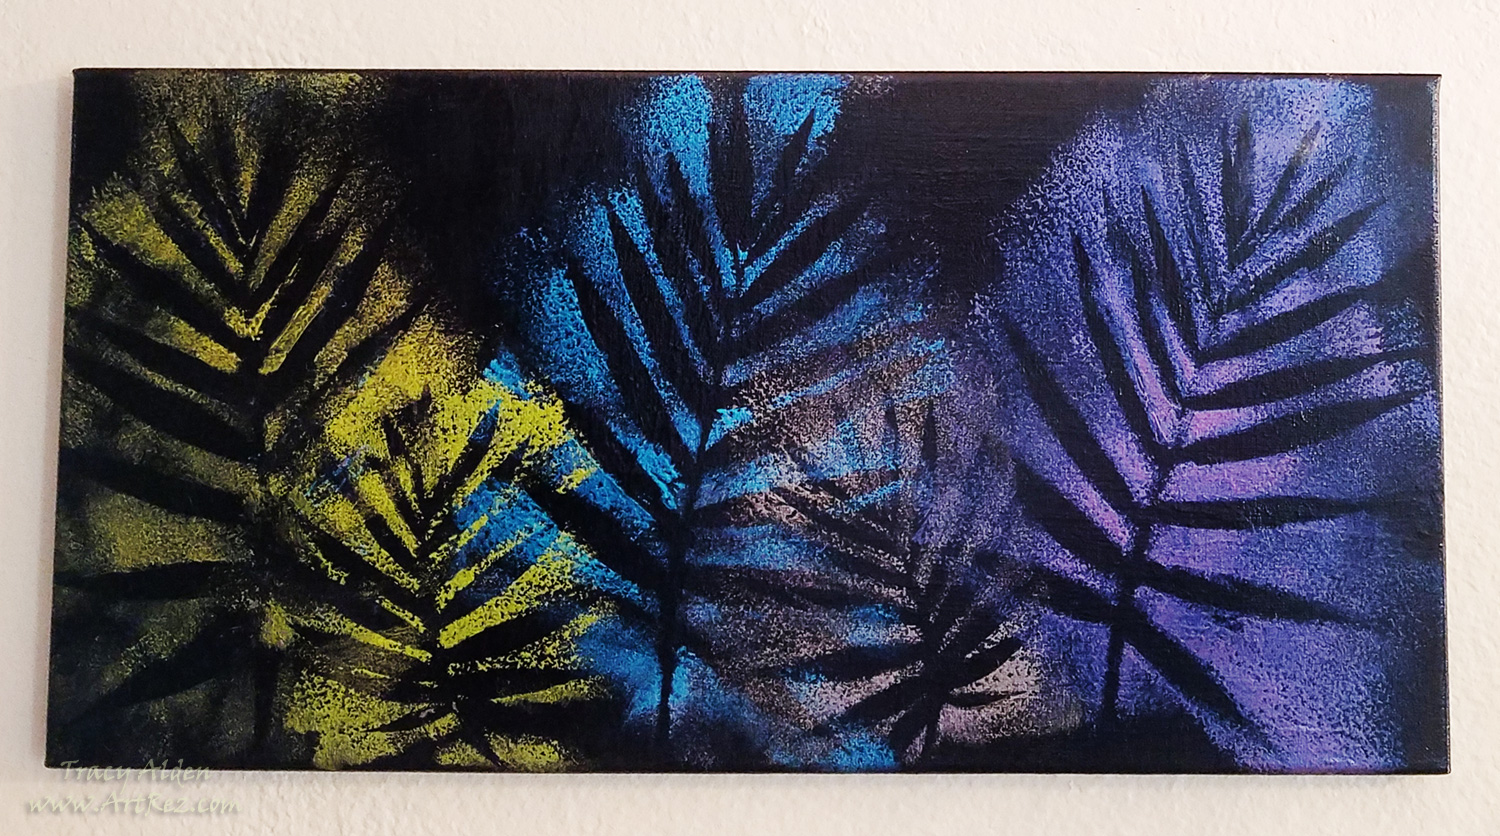
I repeated using the palm fond as a stencil with the other FolkArt Color Shift paints until I covered the canvas and let it dry as per the manufacturer’s instructions. To enhance the color and help the metallic shimmer become a touch more intense I applied a coat of gloss varnish and let dry.
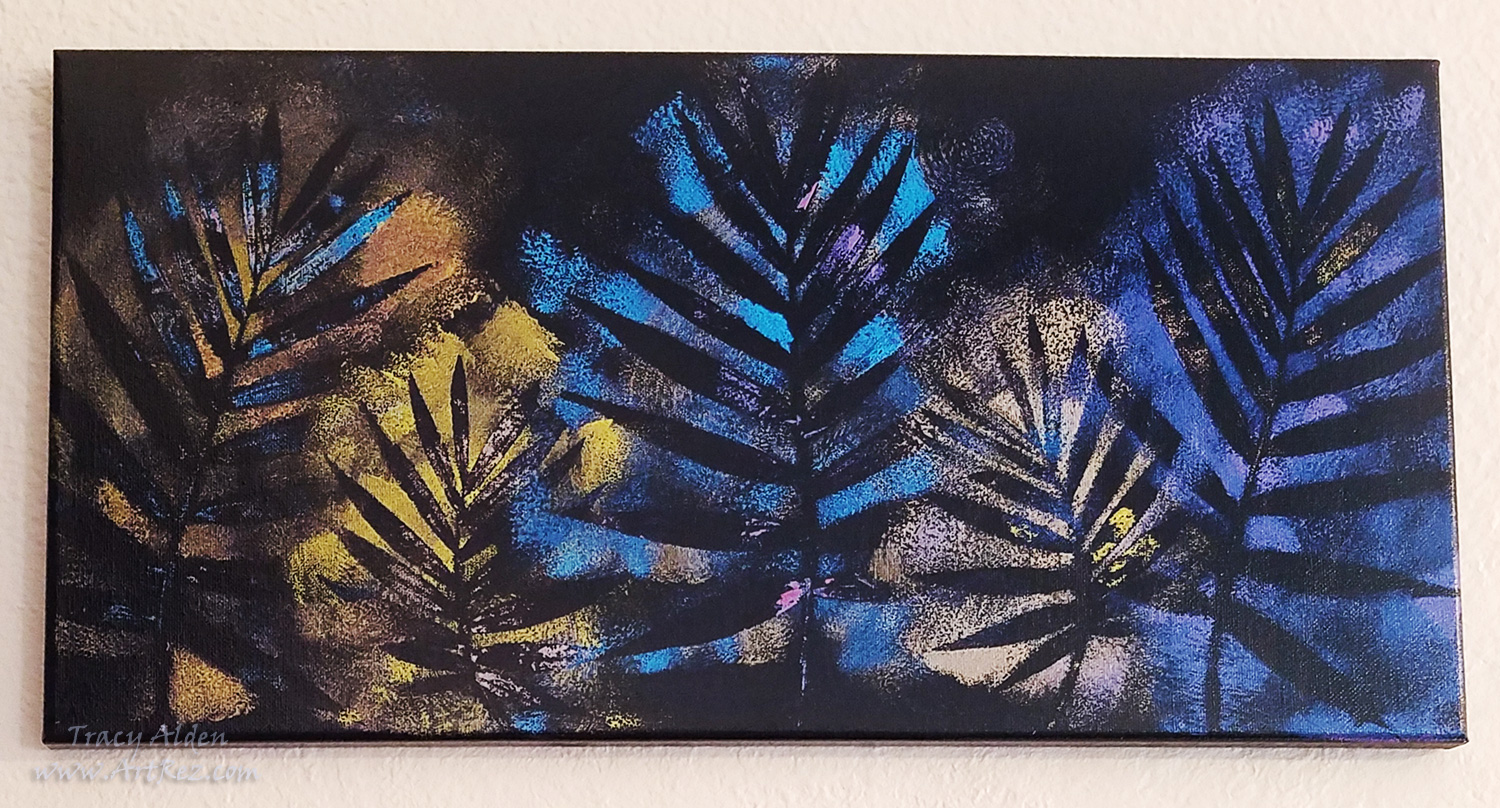
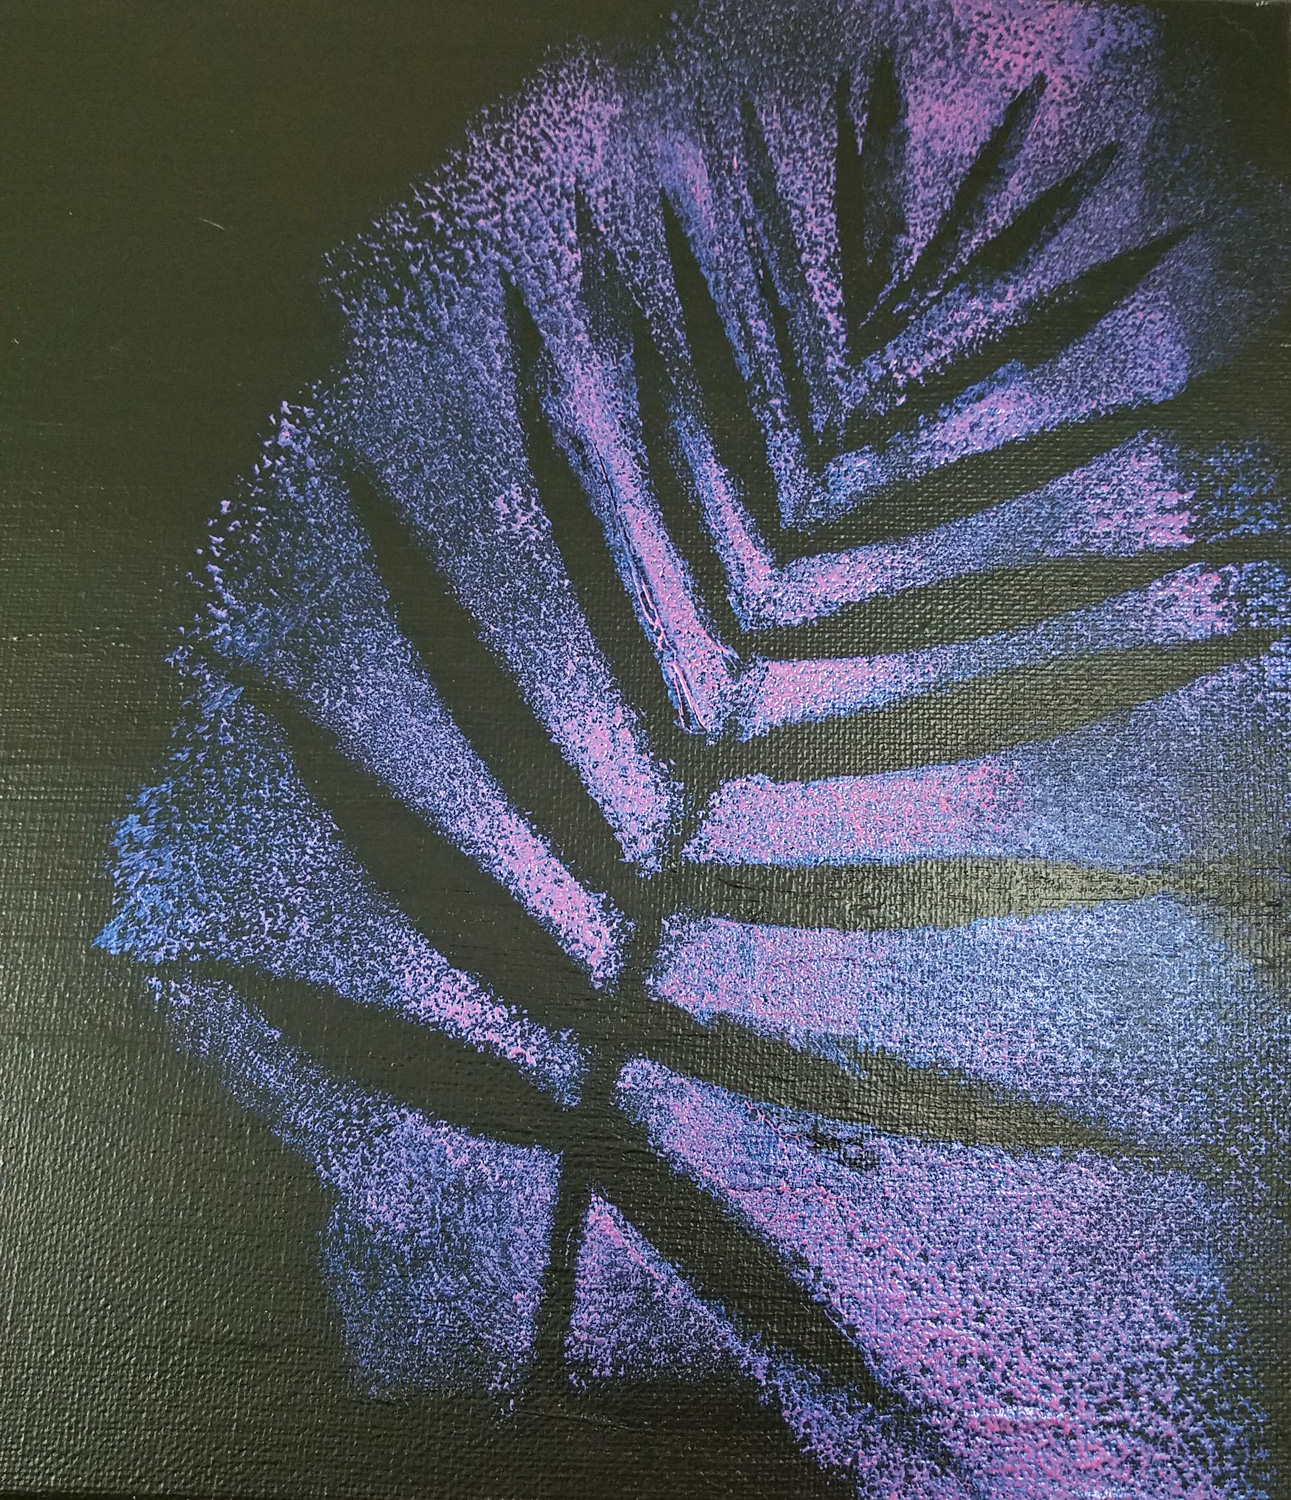
Noticing that when I used the same two palm fronds as my stencils without cleaning them there was at times slight paint transfer if I flipped over the frond quickly enough and used it as stencils before letting the paint dried. So using another black painted canvas I repeated the same paint application process as the previous piece. This time I got even more paint transfer and slight blending of the different FolkArt Color Shift paints, creating a variant of the original project.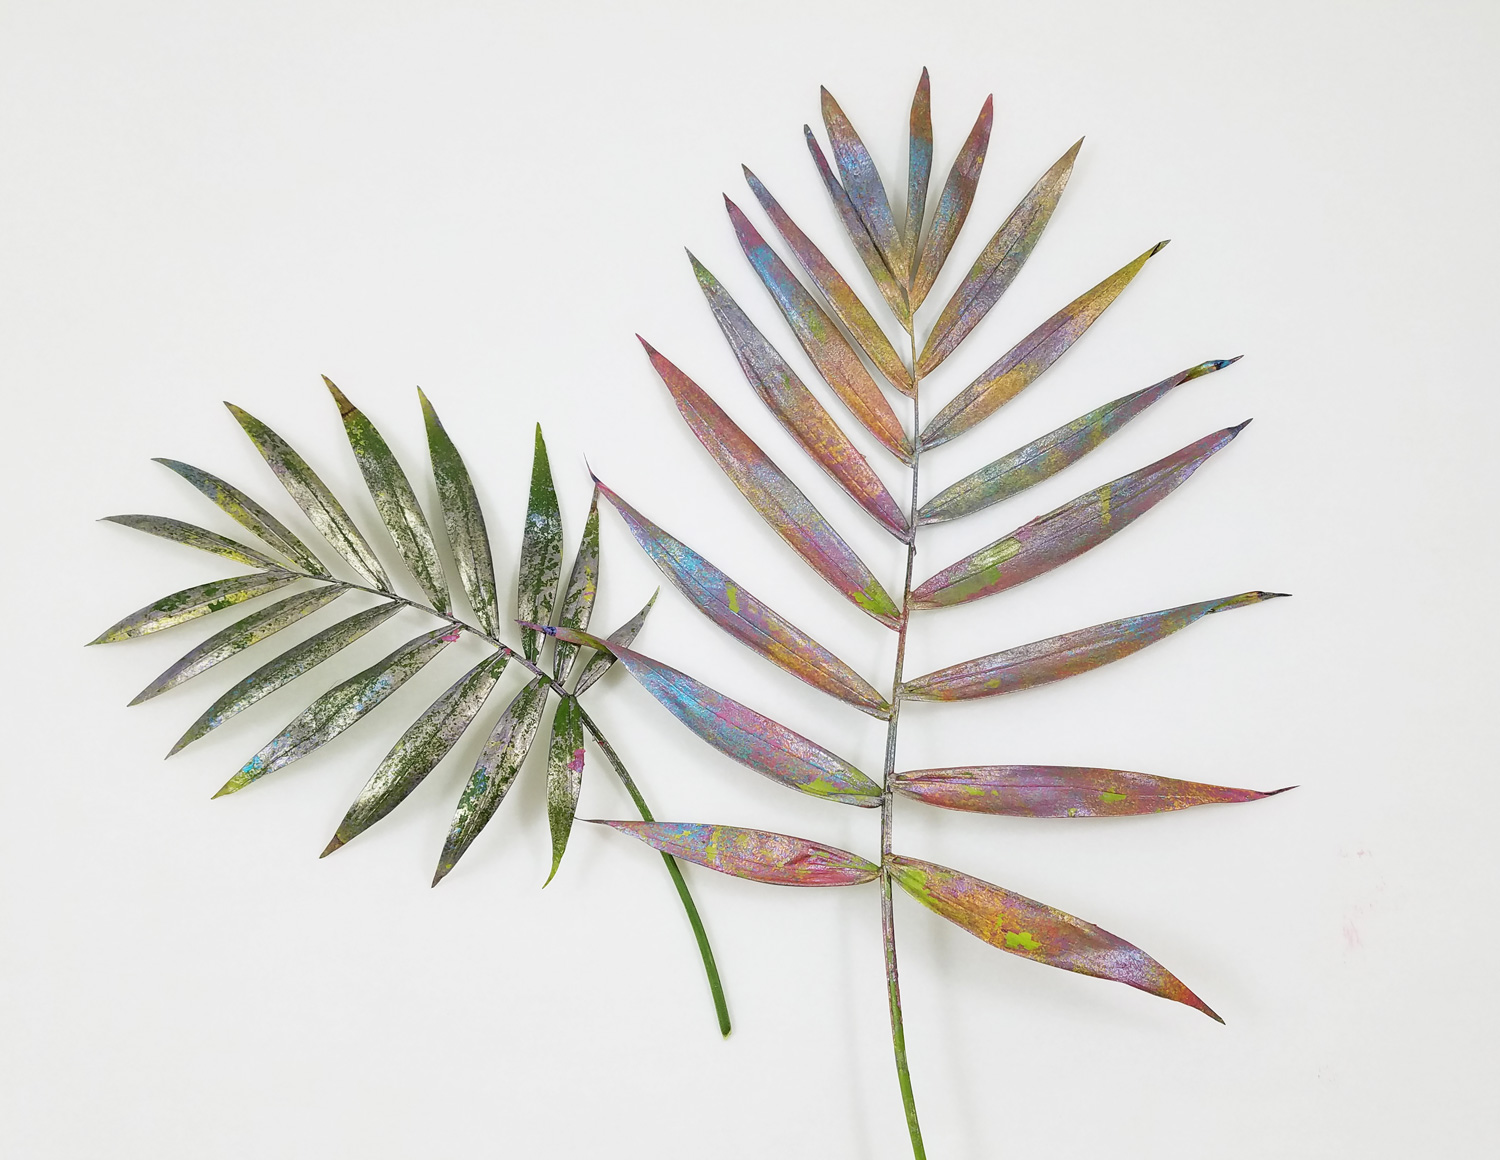
After creating my two canvas pieces I noticed the Palm fronds were covered in paint but looked too good to throw away! I put them back between the two piece of parchment paper, with books on top to fully dry out so I could use them in future art projects!
I really love the vibrancy of color and shimmer created by Plaid‘s FolkArt Color Shift Paints and I look forward to using these paint in future projects.
Until Next Time, Safe Travels!
A #Cre8time trip to Ancient Greece with Amazing Casting Products and Stencil Girl Products
Hello! Tracy here with something special this month, a wonderful collaboration between Amazing Casting Products and Stencil Girl Products! Showcasing projects by incorporating Stencil Girl stencils along with Amazing Mold Putty and Amazing Clear Cast.
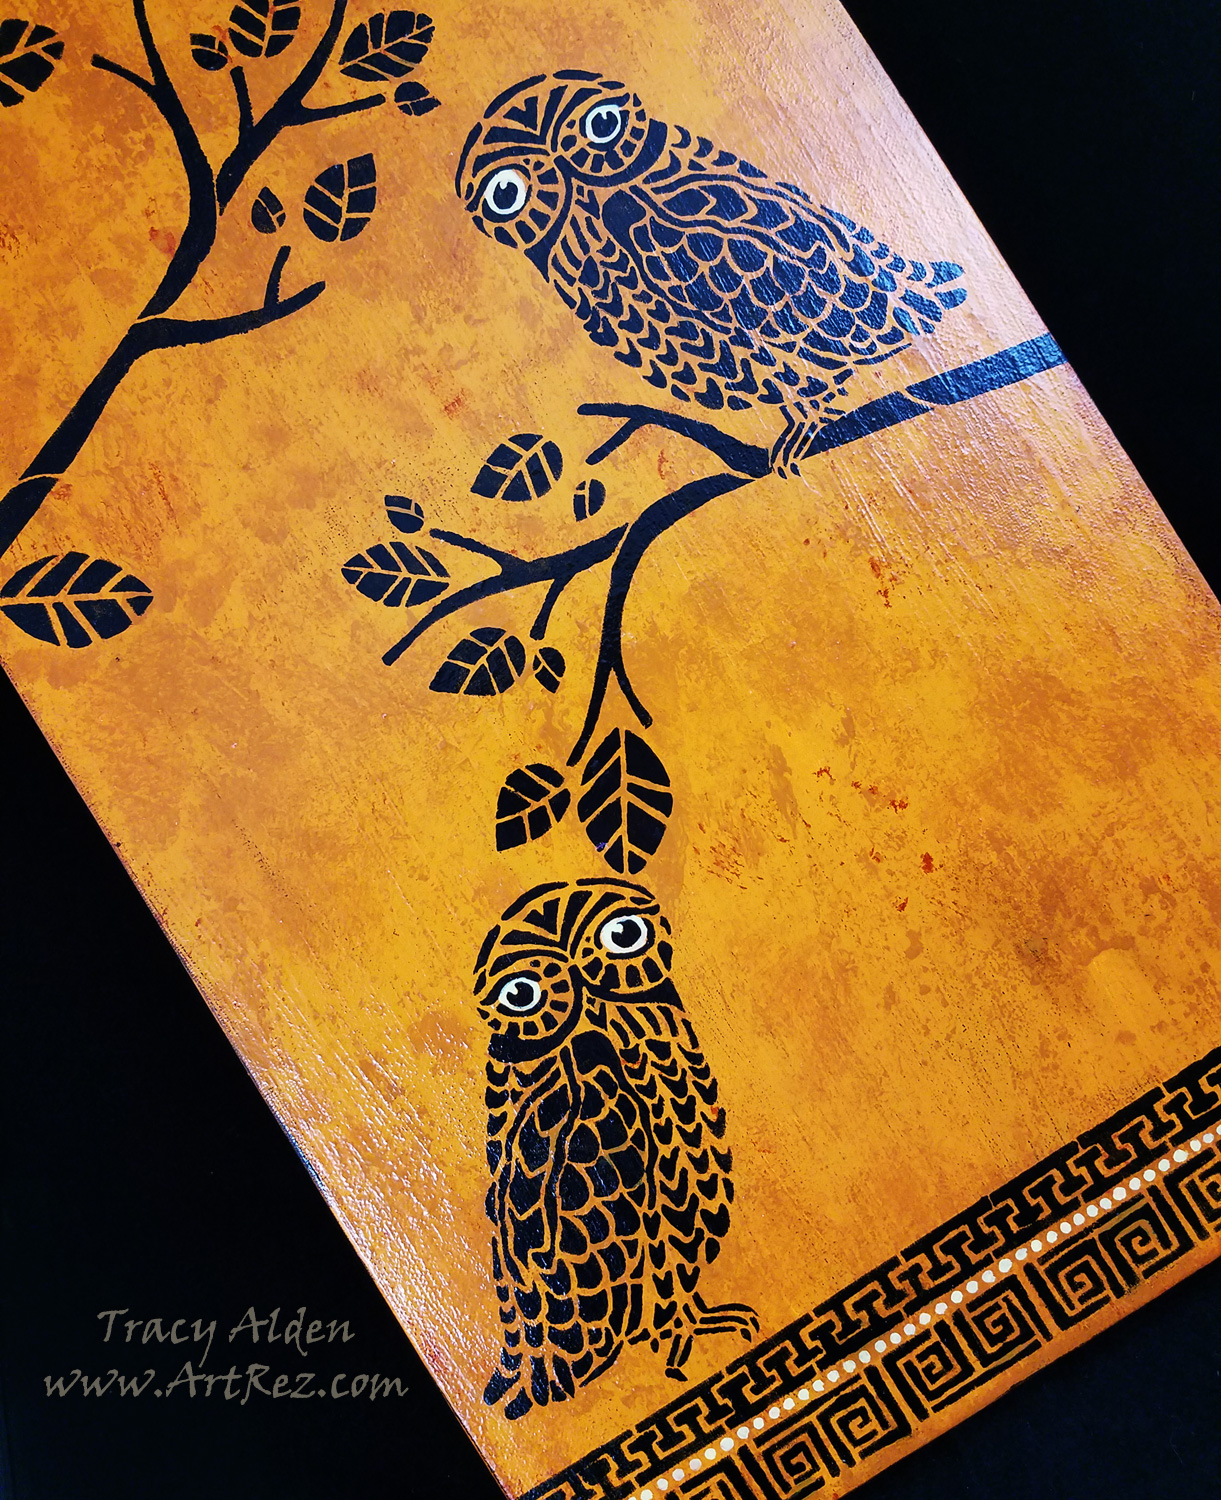
When I was given the chance to look through the Stencil Girl Products online catalog of stencils, there was so many to choose from! After seeing their Three Owls and a Branch stencil I immediately got an idea for a canvas piece. One of the owls in particular reminded me of Athena’s owl from the original Clash of the Titans movie, and once I saw the Stitch a Greek Border stencil I just knew I had to do a Grecian inspired piece!
Supplies:
Amazing Mold Putty
Amazing Clear Cast Resin
Stencil Girl Products Three Owls and a Branch 9″ X 12″ stencil
Stencil Girl Products Stitch a Greek Border 9″ X 12″ stencil
12″ X 24″ Canvas
Painter’s Tape
Paint Brush
Cosmetic Sponges
Acrylic Paint (Black, Yellow, Pale Yellow, Brown and Orange)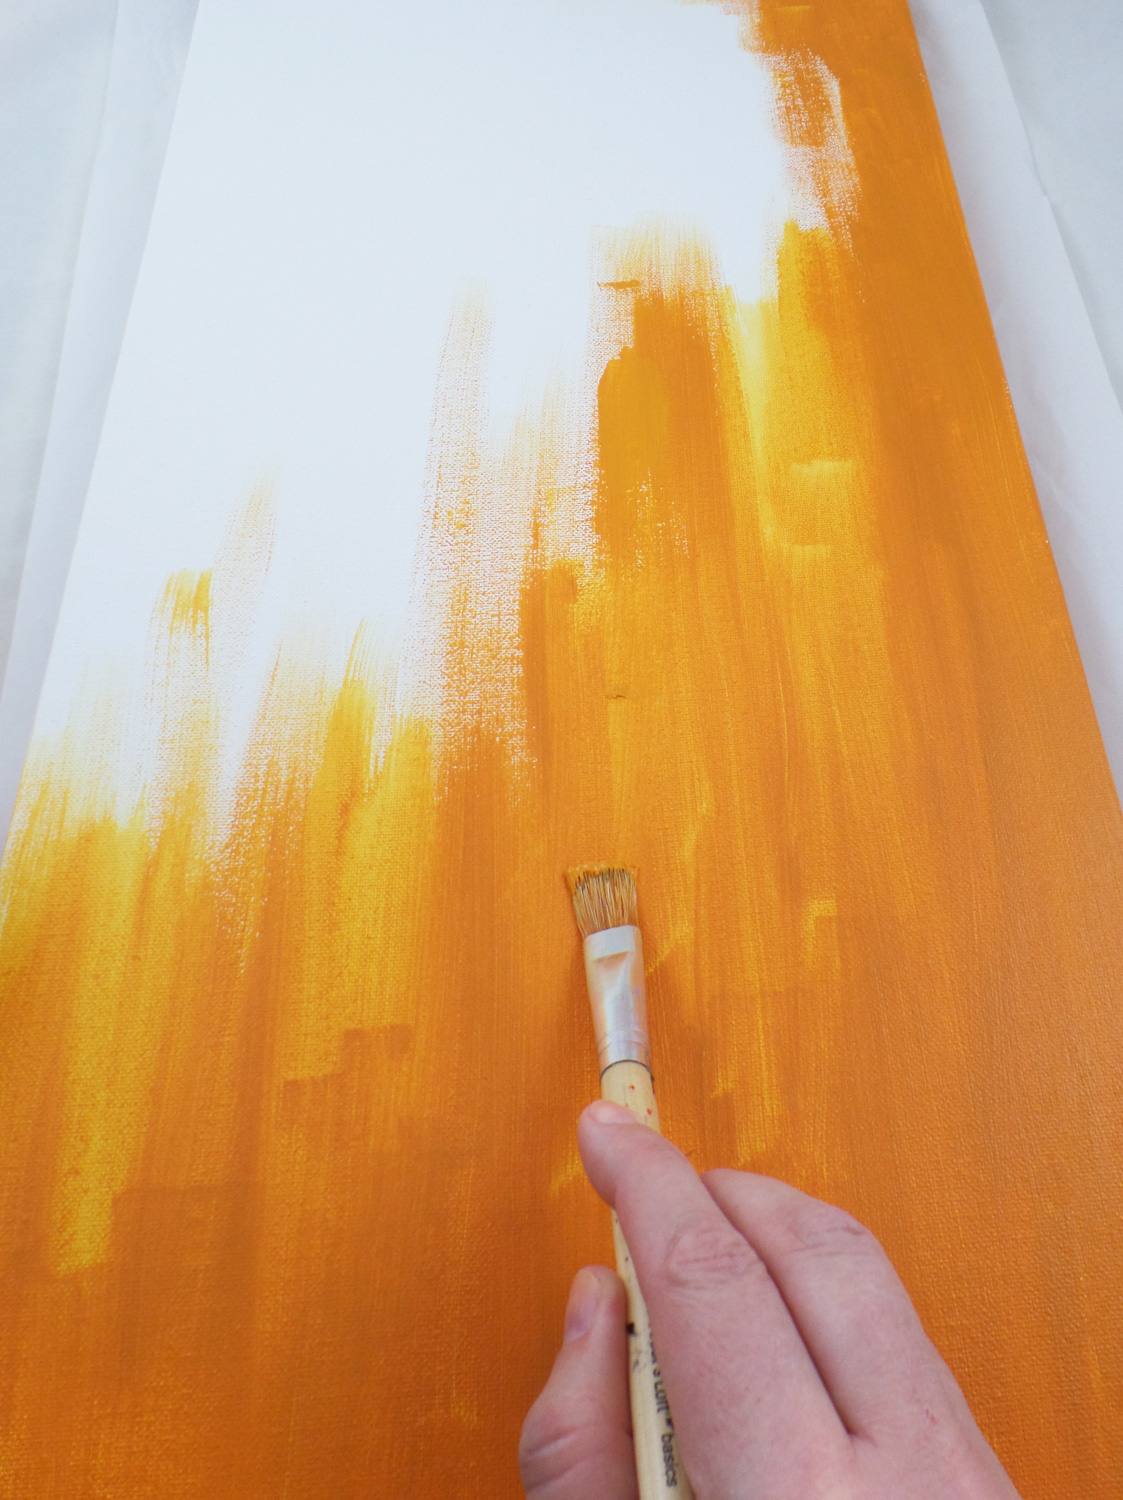
I mixed together the Yellow, Brown and Orange acrylic paints and applied it to the surface of the canvas. I did about two coats of paint to get a mostly even color tone.
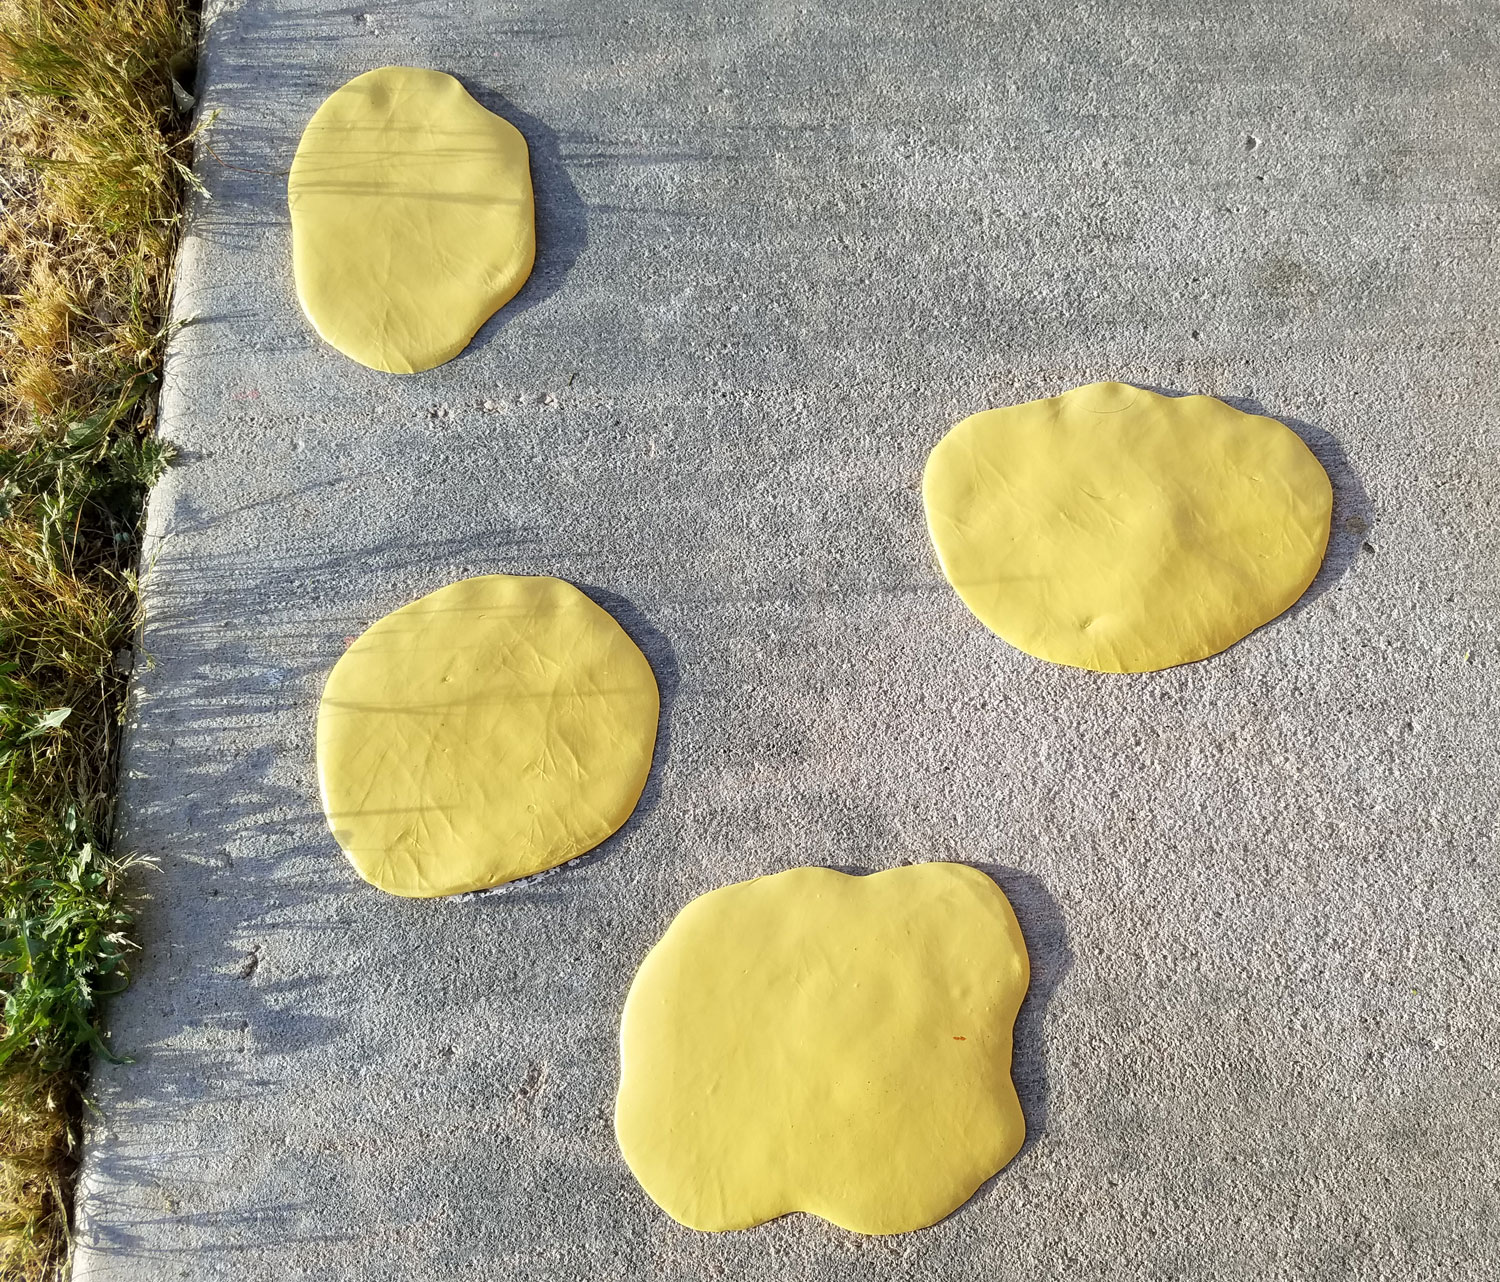
While the paint on the canvas was drying I scrubbed and cleaned a rough patch of sidewalk in my front yard. Once the cement was dry I mixed up some Amazing Mold Putty{CLICK HERE to view mixing/preparation}, and pressed the putty into the most textured spots of the sidewalk. I let the mold putty cure and carefully peeled the putty off the sidewalk.
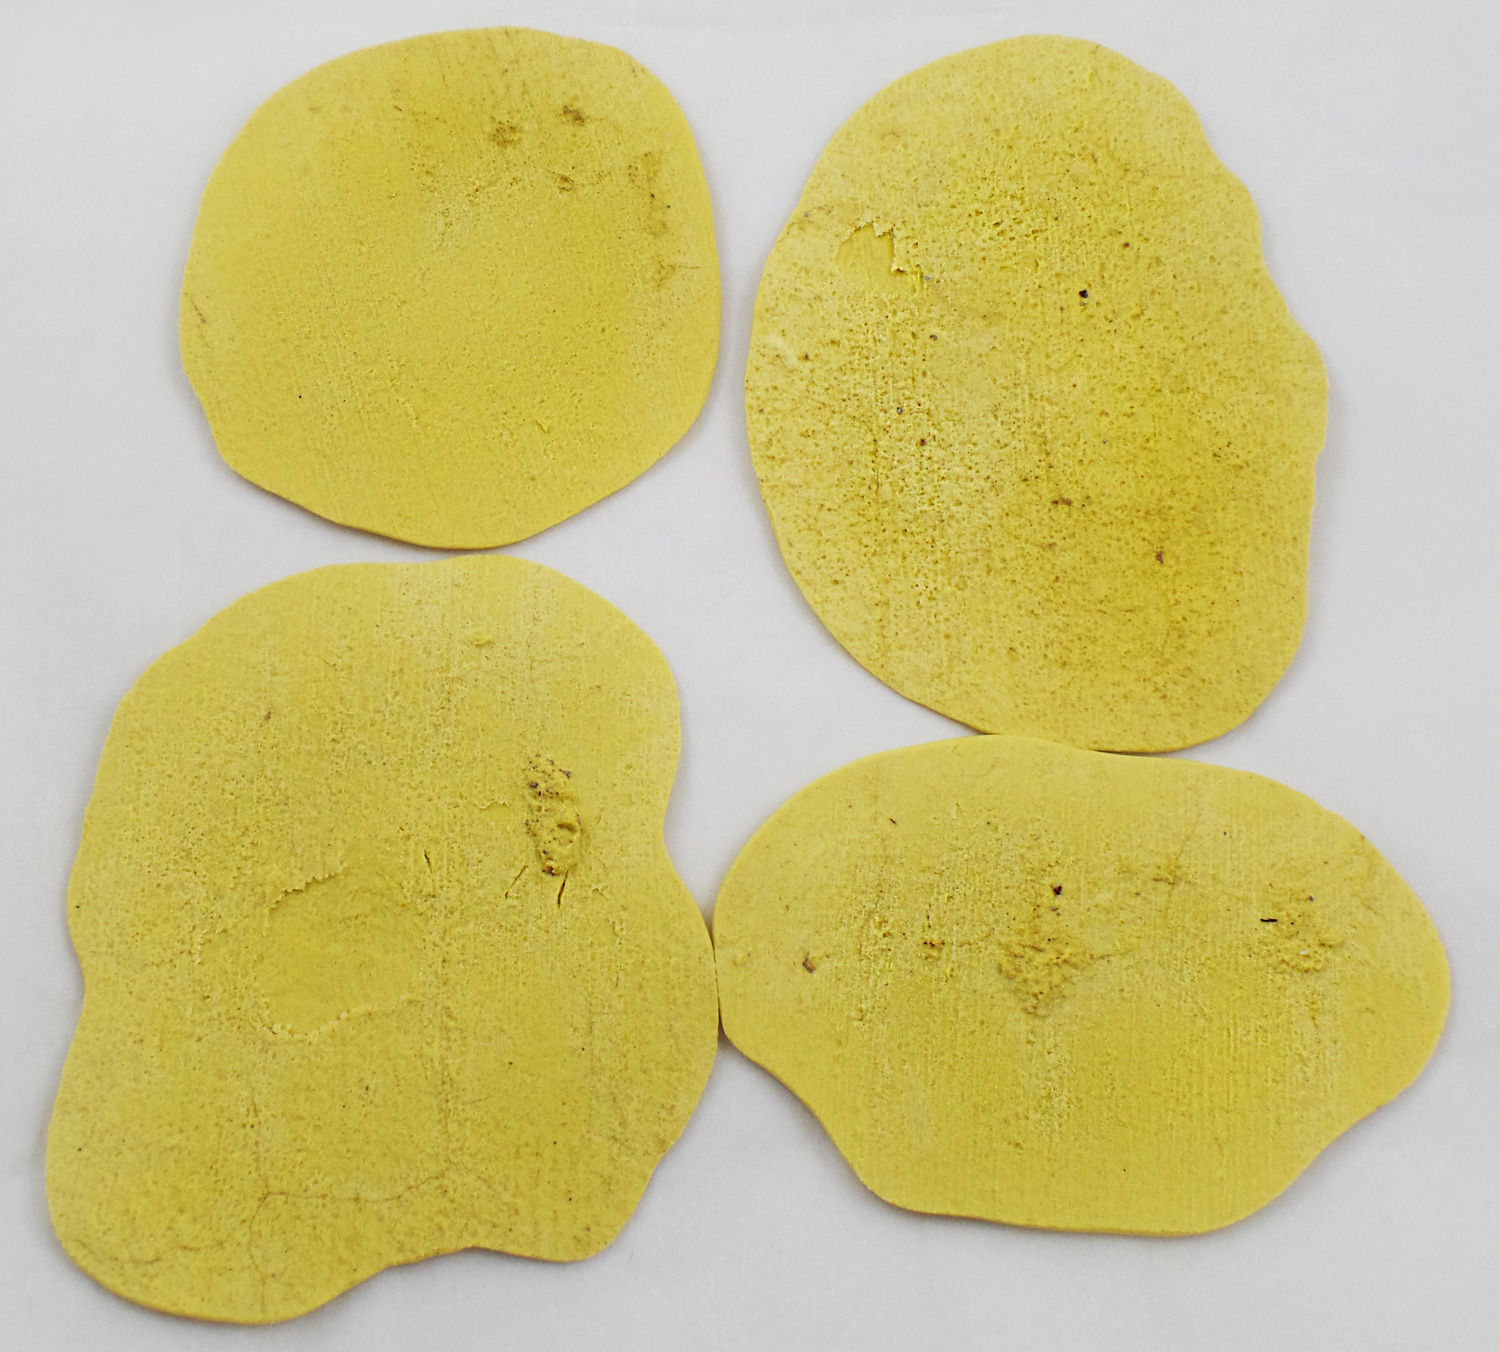
Once removed from the sidewalk I now had wonderful one of kind texture plates to use as stamps!
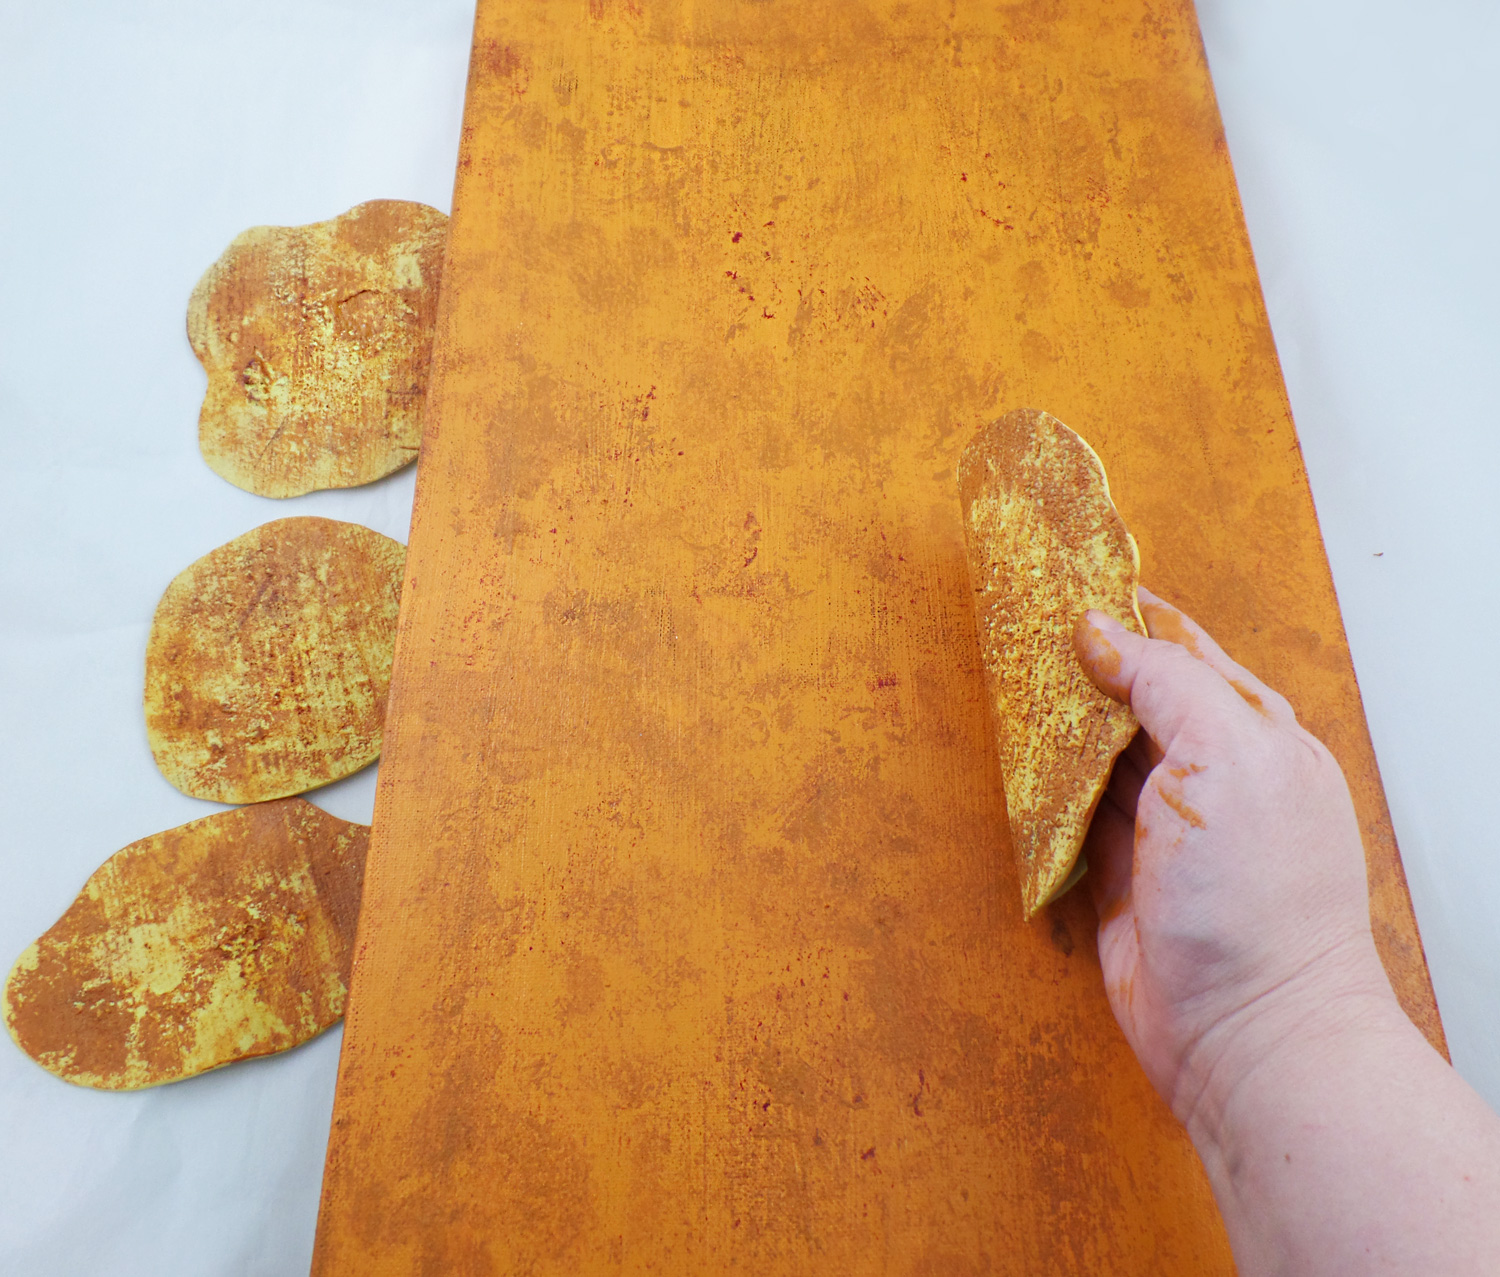
To each Amazing Mold Putty stamp I applied a light coat of acrylic pant and stamped it all over the surface of the canvas. There was no rhyme or reason to the placement, just anywhere I wanted to create a controlled splatter of color. By using several colors of paint the surface started to mimic aged Grecian frescoes and pottery. I let the paint dry fully.
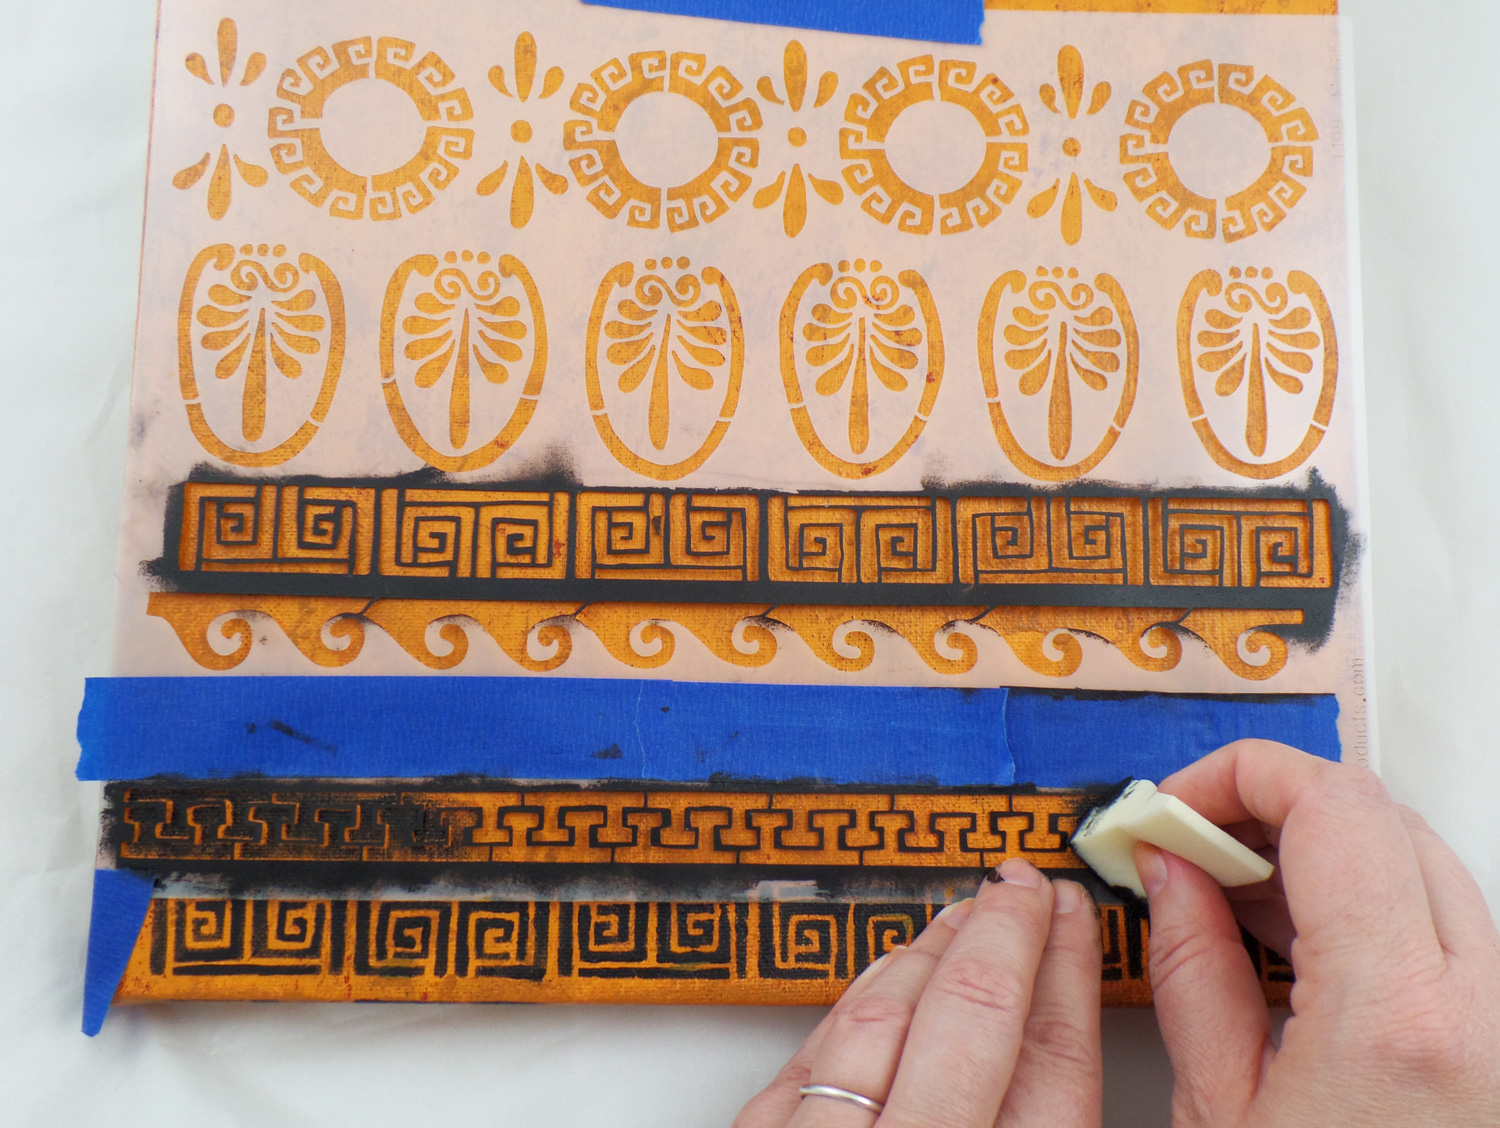
Using painters tape I taped in place the Stencil Girl Products Stitch a Greek Border on the bottom of the canvas and picked two different trim patterns to stencil. By using painter’s tape, it will hold the stencil in place but not damage the painted surface (nor the stencil), allowing for easy repositioning. I then poured a small amount of Black acrylic paint on a palette and dabbed a cosmetic sponge lightly into the paint. I carefully applied the paint while holding the stencil in place to prevent any slight slippage of the stencil. If an area needed a second coat of paint it was easy to go back and reapply paint without any worries of paint overloading. I repeated this for the top of the canvas as well.
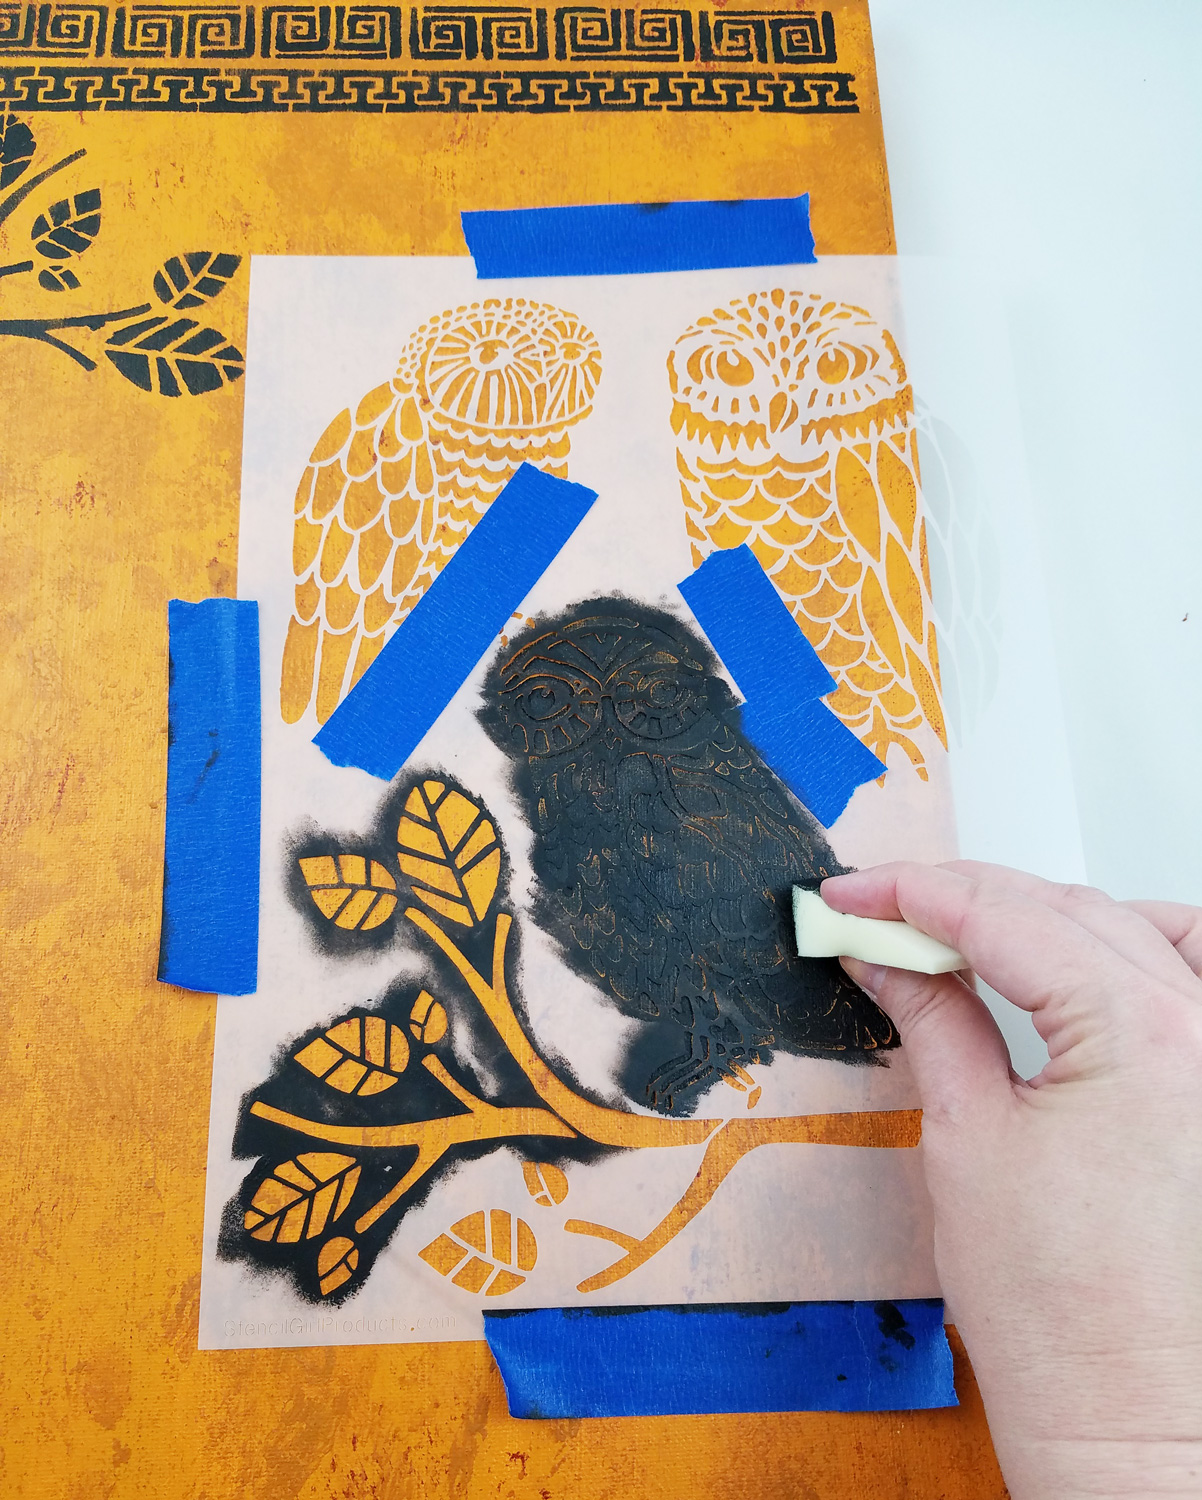
The Stencil Girl Products Three Owls and a Branch stencil allowed for a lot of artistic freedom by simply blocking off sections I did not want paint to go through with painter’s tape. By flipping over the stencil or moving it around at different angles I was able to create many tree branches with ease.
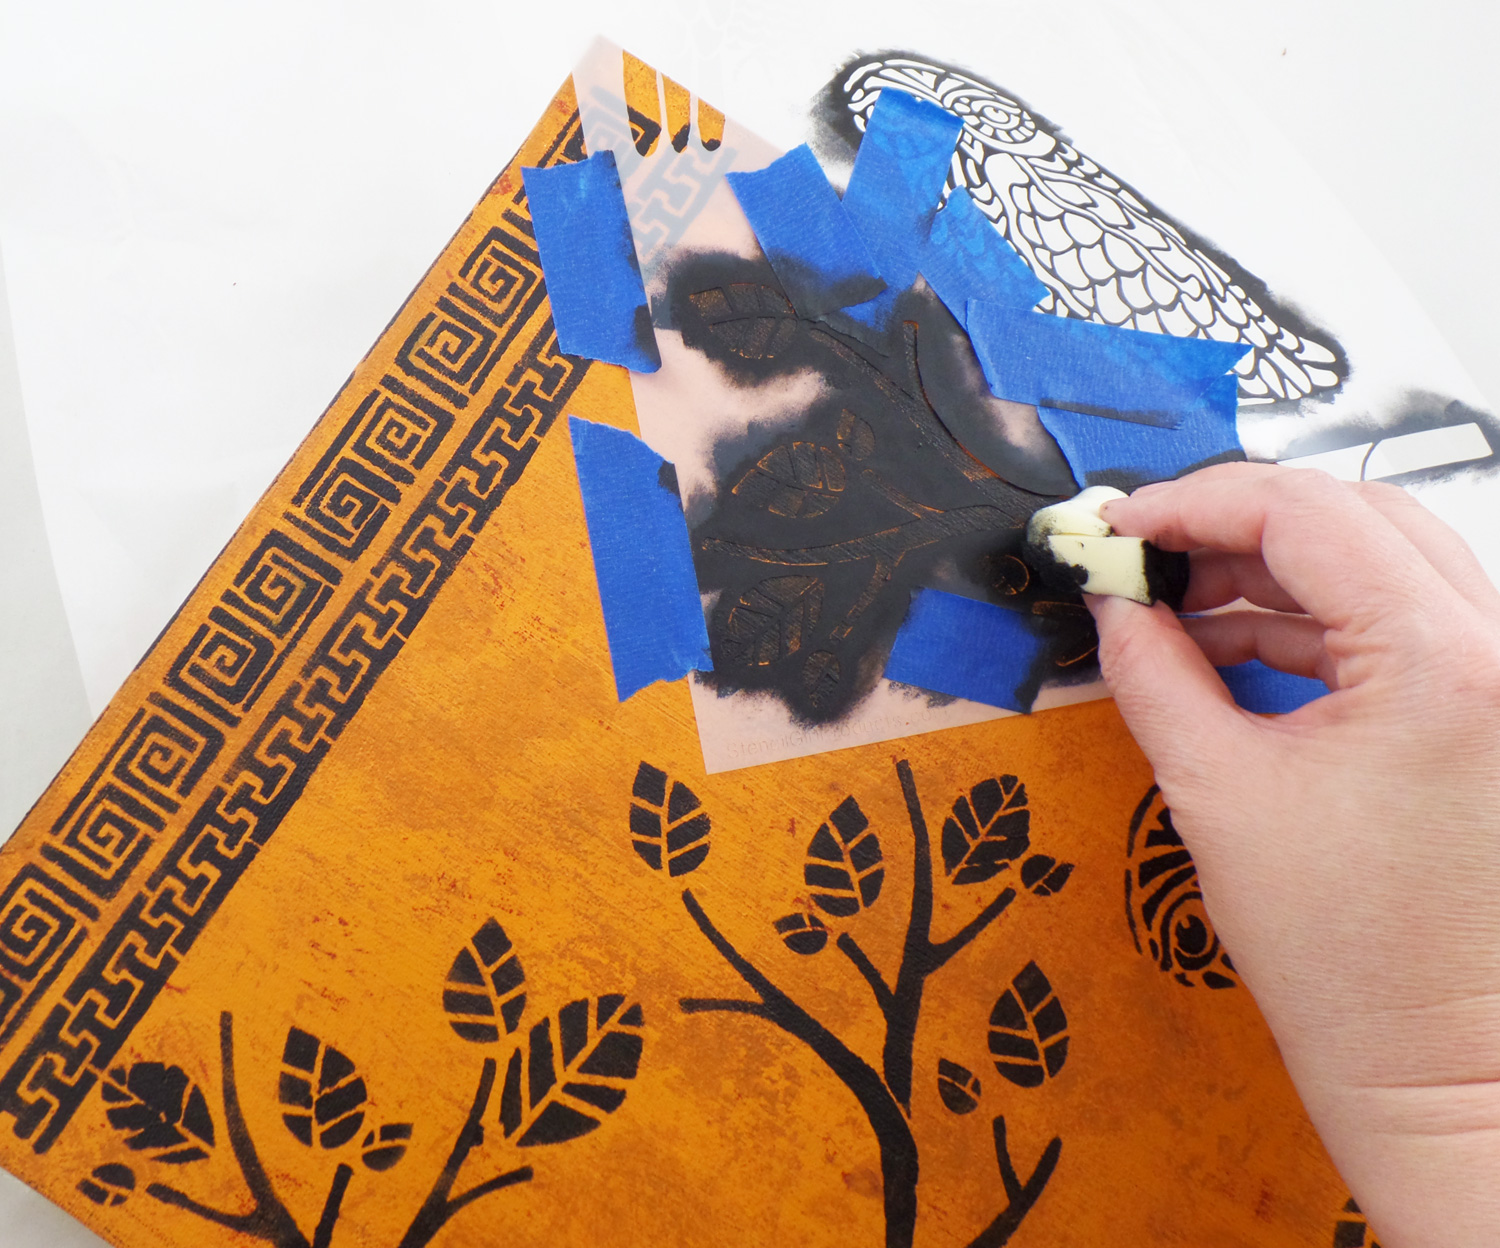
With a few branches I even taped off some of the leaves to create the look of tree just starting to sprout leaves in Spring. Once I was done stenciling it was easy to clean the stencils by placing them in a small tub with soap water and gently rubbing the paint off.

Once all of the paint was dry I went back to fix any stenciling mistakes I had made with a small paint brush. I then added some Light Yellow acrylic paint to the eyes of the owls and trim to further replicate the look of ancient Greek art.
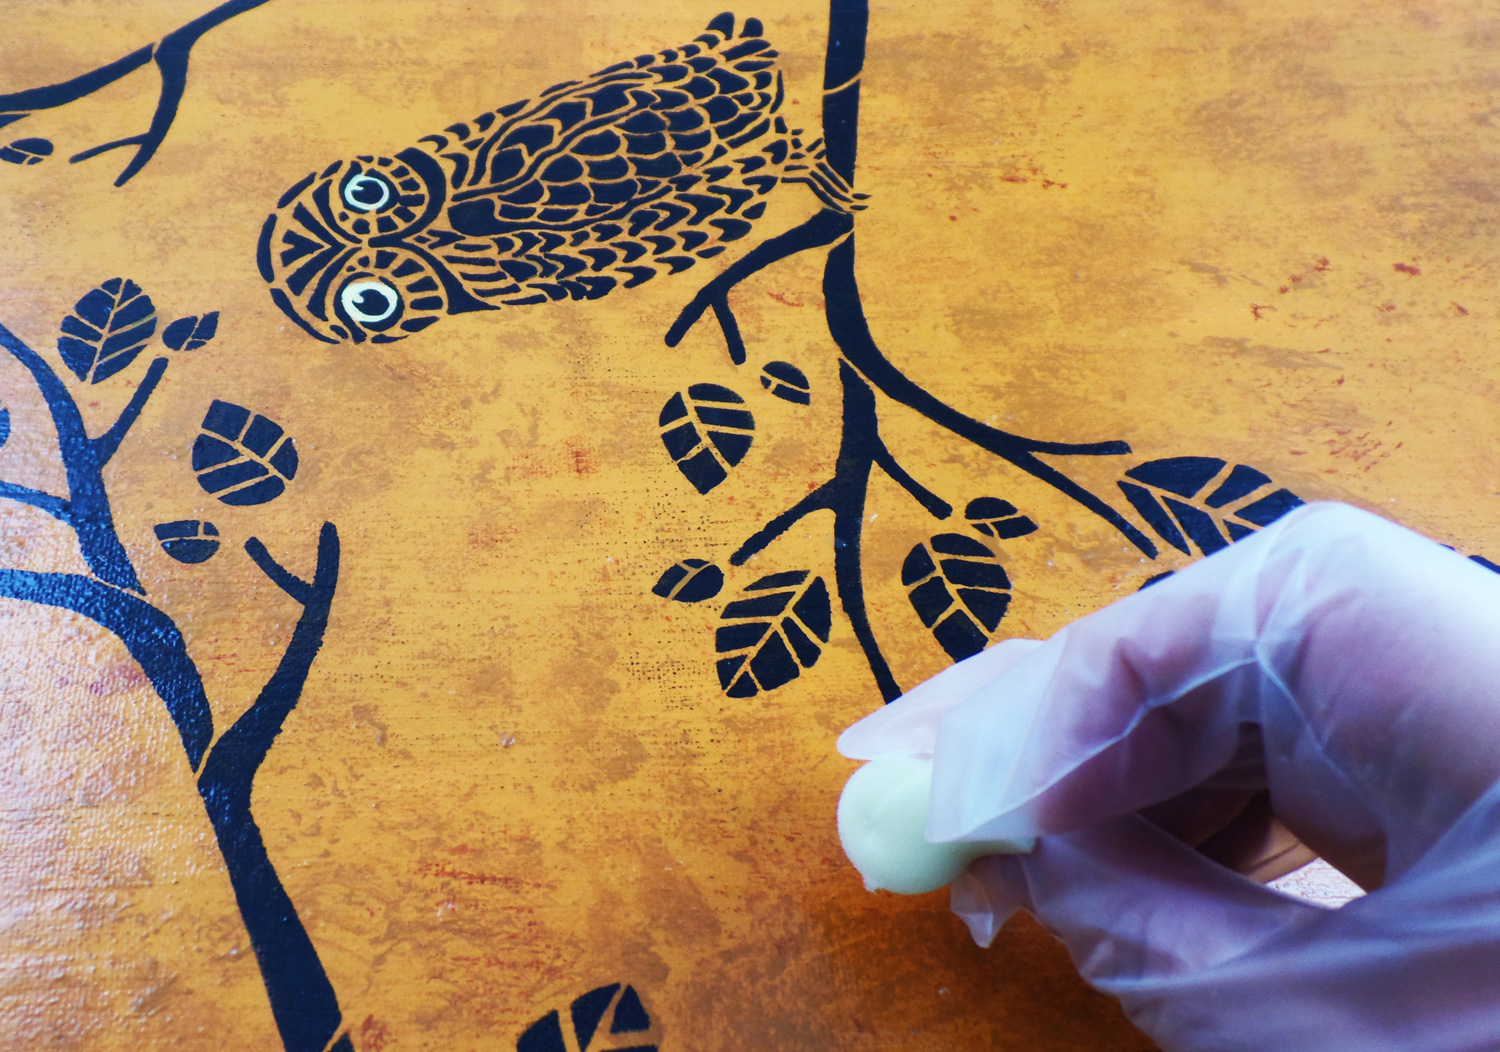
I mixed up some Amazing Clear Cast Resin, let it sit for 10 minutes, and applied a thin layer to the front of the canvas with a cosmetic sponge. I applied the resin slowly, a downward motion, top to bottom of the canvas. I didn’t mind if I had little bumps and canvas texture showing through, as the resin was acting as a color intensifier and a thin protective coating. I let the resin fully cure for 24 hours before handling.
*If I wanted a more of a glassy smooth surface I would apply a second or even third layer of resin without a cosmetic sponge.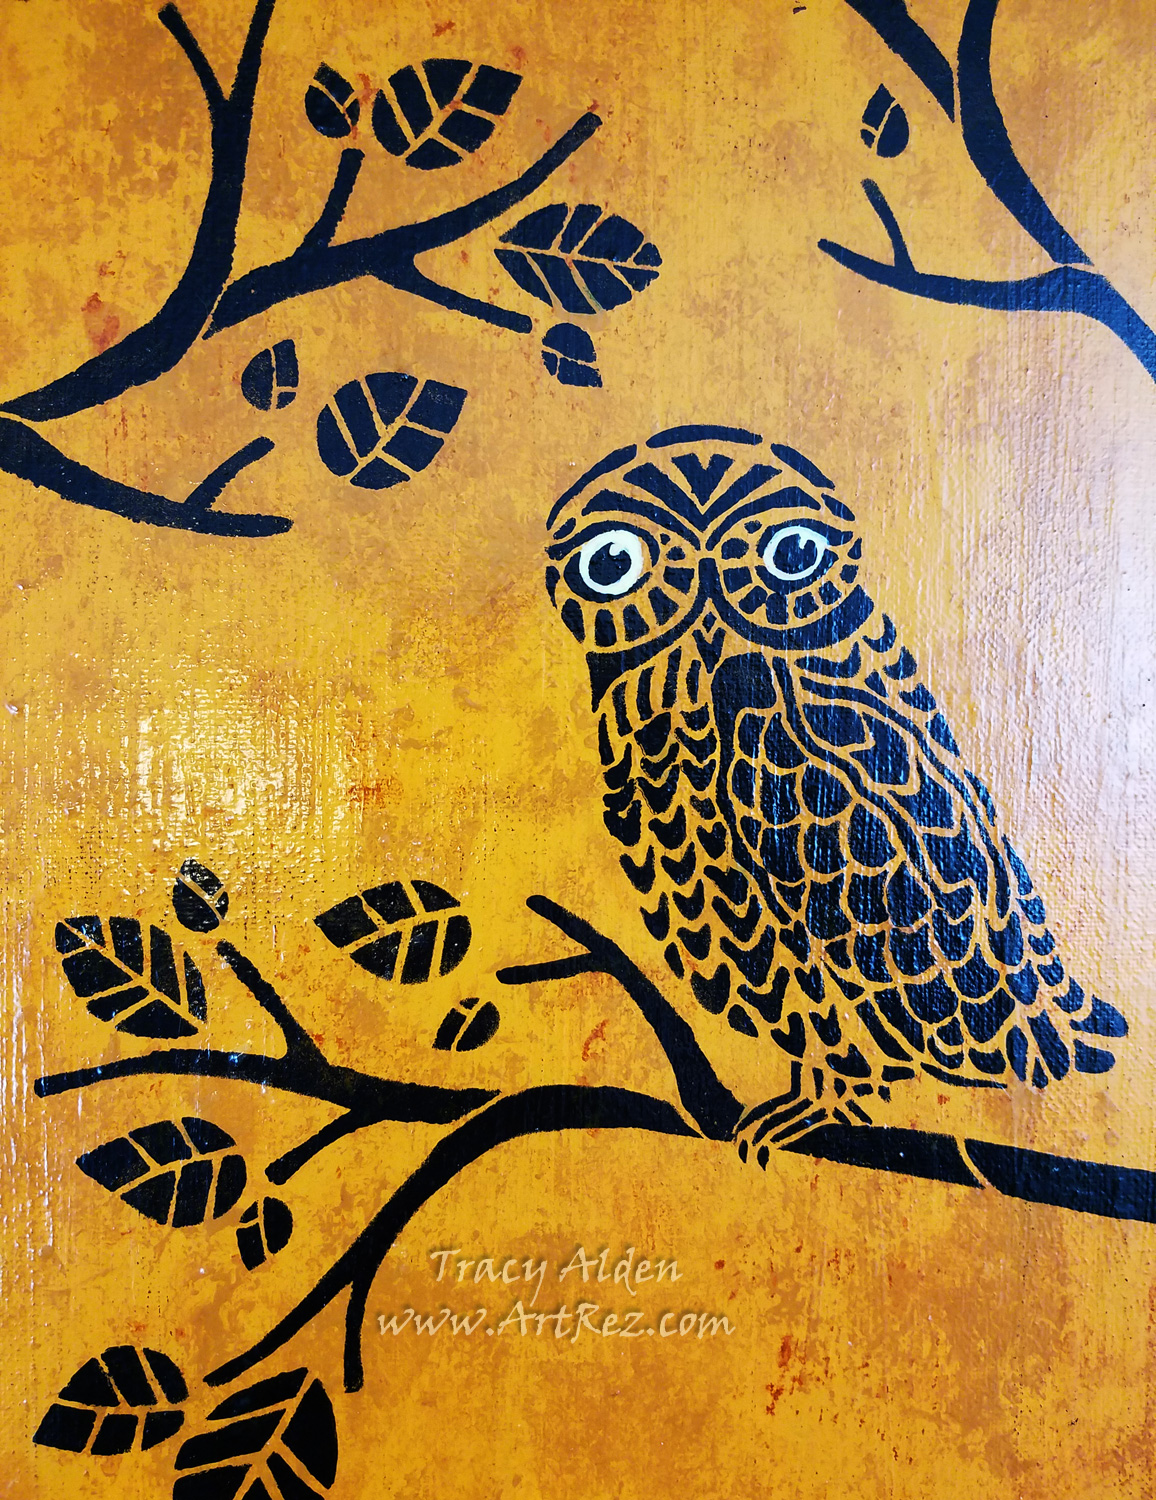
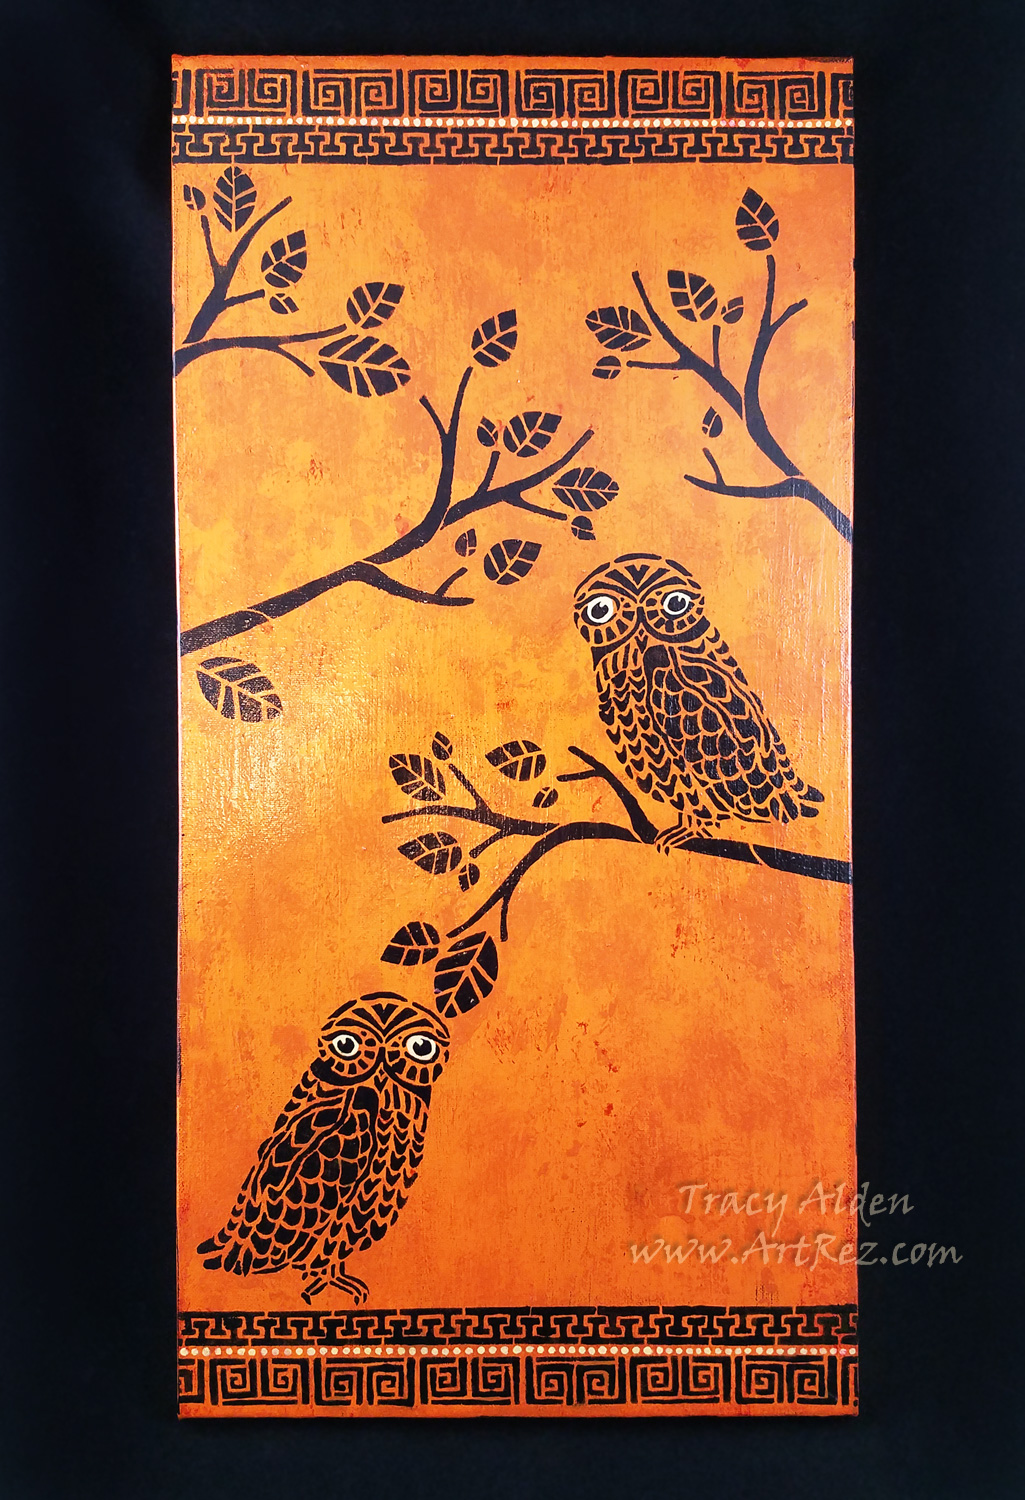
Now completed, Athena’s ever watchful owls seem to be right off an ancient fresco!
Until Next Time, Safe Travels!
A #Cre8time voyage to find Pirate Treasure!
With Fall fast approaching, I am once again looking at new ways to jump start my creativity. I finally decided to order pieces from Relics & Artifacts® by Sandra Evertson to try out. The line has been catching my interest for a few years every time I see them at craft and hobby trade shows and on social media. Locally no stores currently carry their product line however it is rather easy to order the Matte Resin Craft Blanks from their website (they ship VERY quickly and package the art supplies wonderfully!). The resin blanks were larger than I expected, had a nice weight, tooth to the surface (great for paint application) and fine detail.
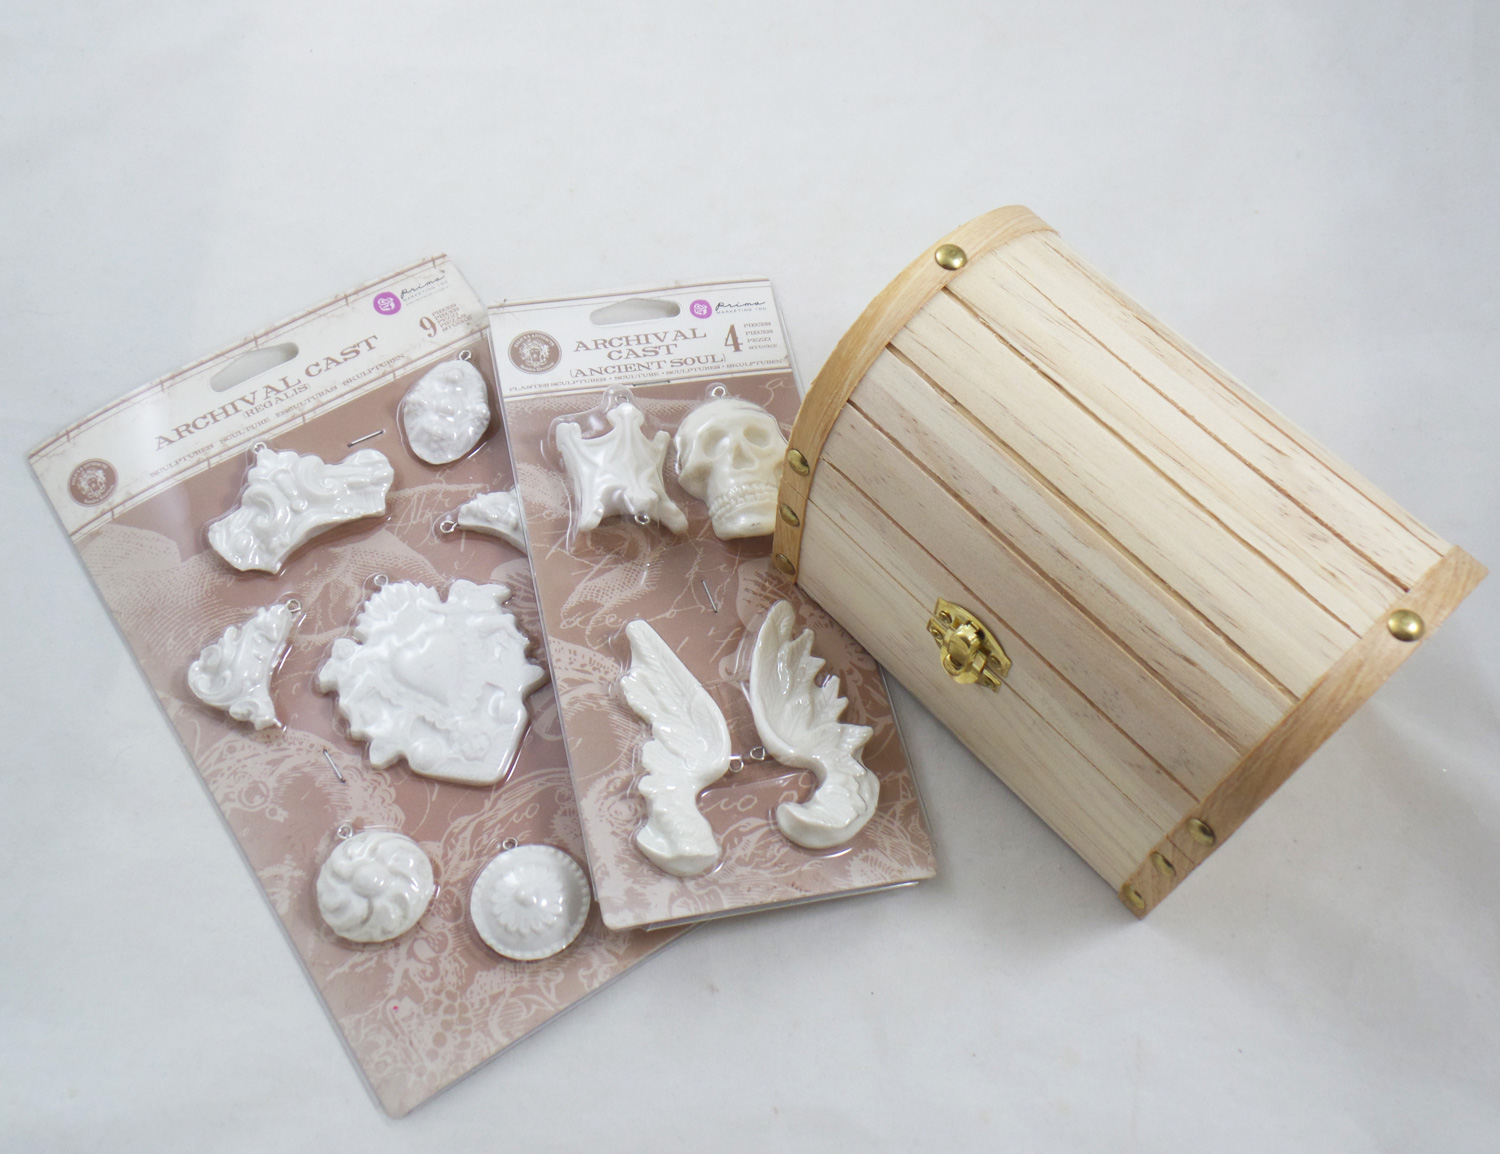
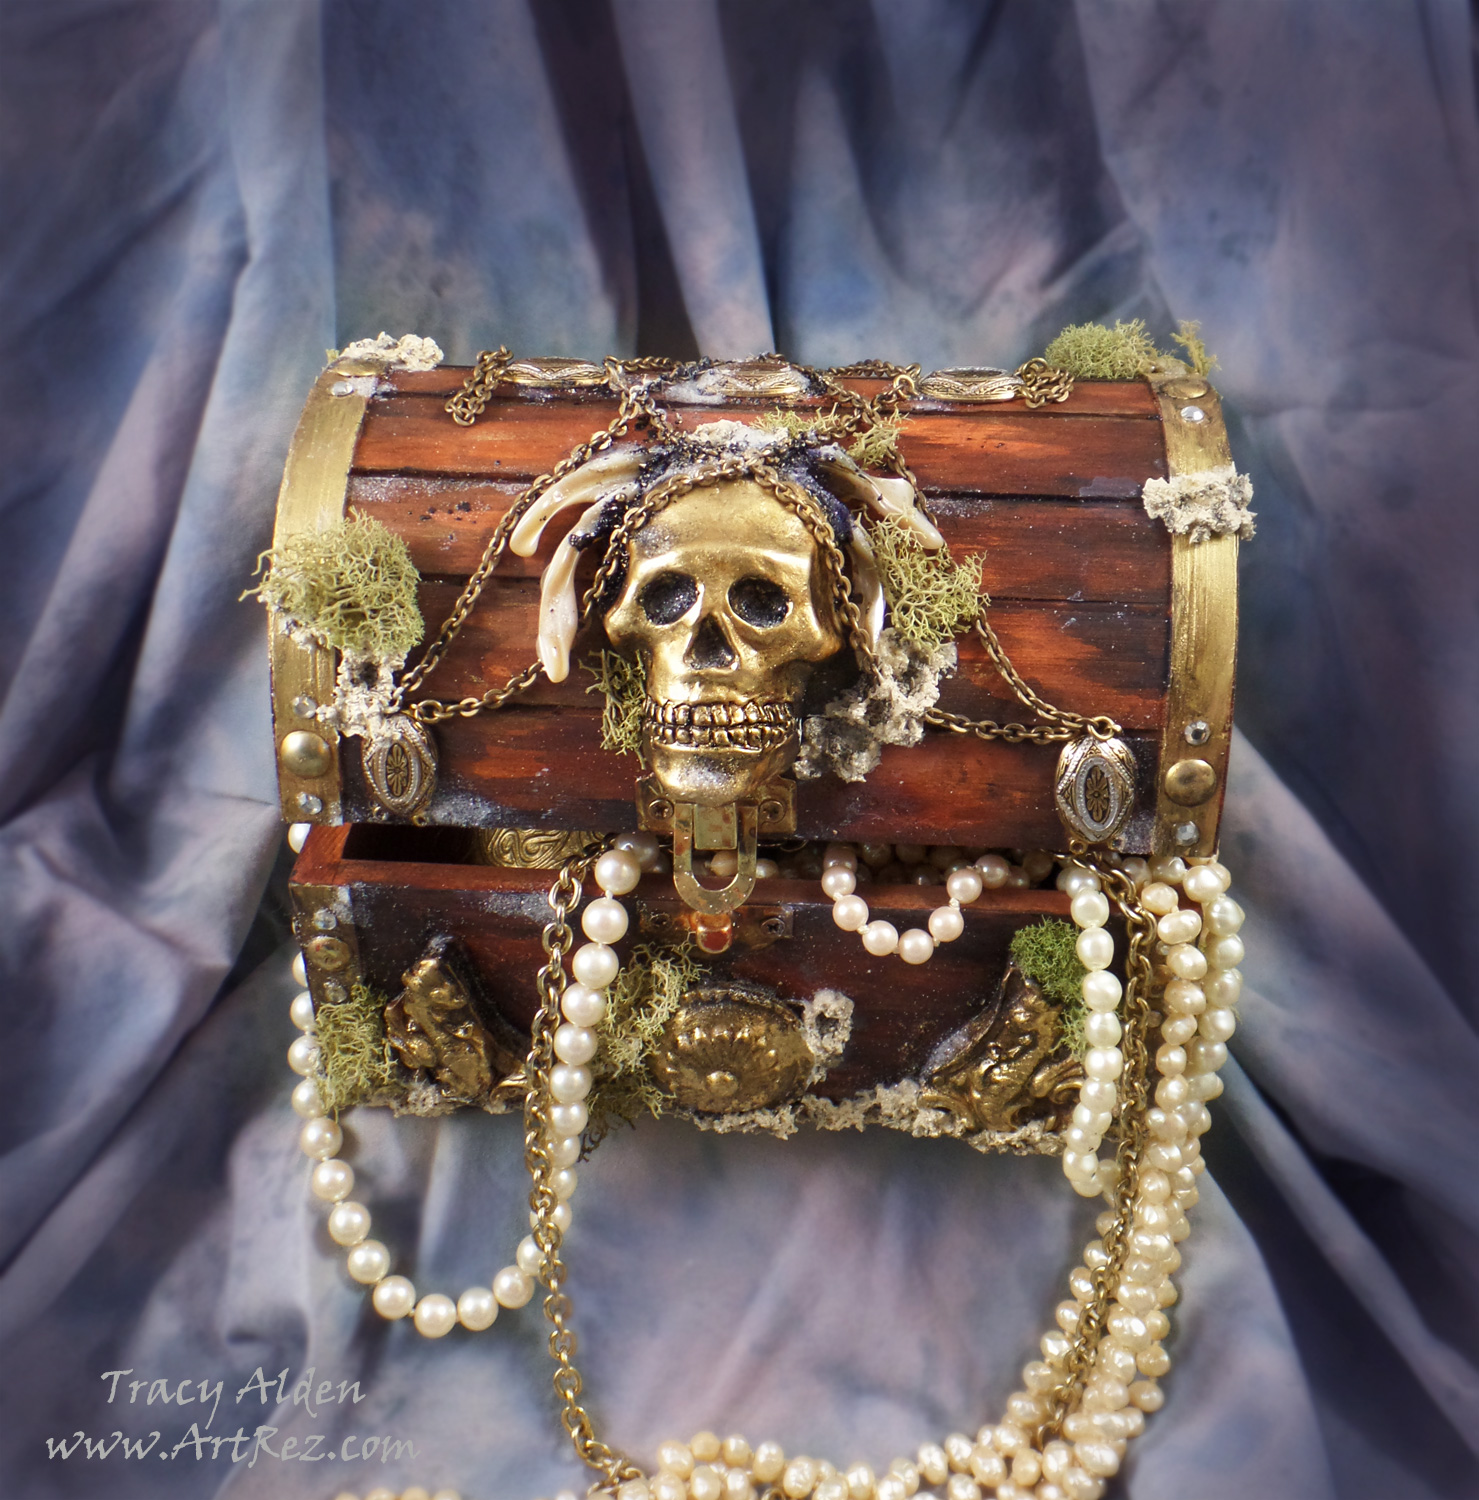
I bought 4 sets but the pieces in the Ancient Soul and Regalis sets got my mind whirling immediately. The skull focal in the Ancient Soul set had me thinking of a Jolly Roger and a sunken treasure chest. I collected some vintage jewelry supplies and started my craft voyage into uncharted seas….
Supplies:
Unfinished Wood Trinket Box (I found one at Jo-Ann)
Relics & Artifacts® Ancient Soul and Regalis Matte Resin Craft Blanks
Alumilite Metallic Powder Gold
Liquitex Gloss Varnish
Beacon Gem-Tac Adhesive
Stampendous Crystal Snow White Glitter, Ultra Fine
Paint Brushes
Acrylic Paint in Metallic Light Gold, Black, Burnt Umber, Terra Cotta, White and Yellow Ocher
Baking Parchment Paper (as a work surface)
2 Flat head jewelry pliers
1 Broken bracelet, chain necklace, shell beads and flat backed rhinestones 4mm, jumprings
4 used and dried tea bags
Dried Green Moss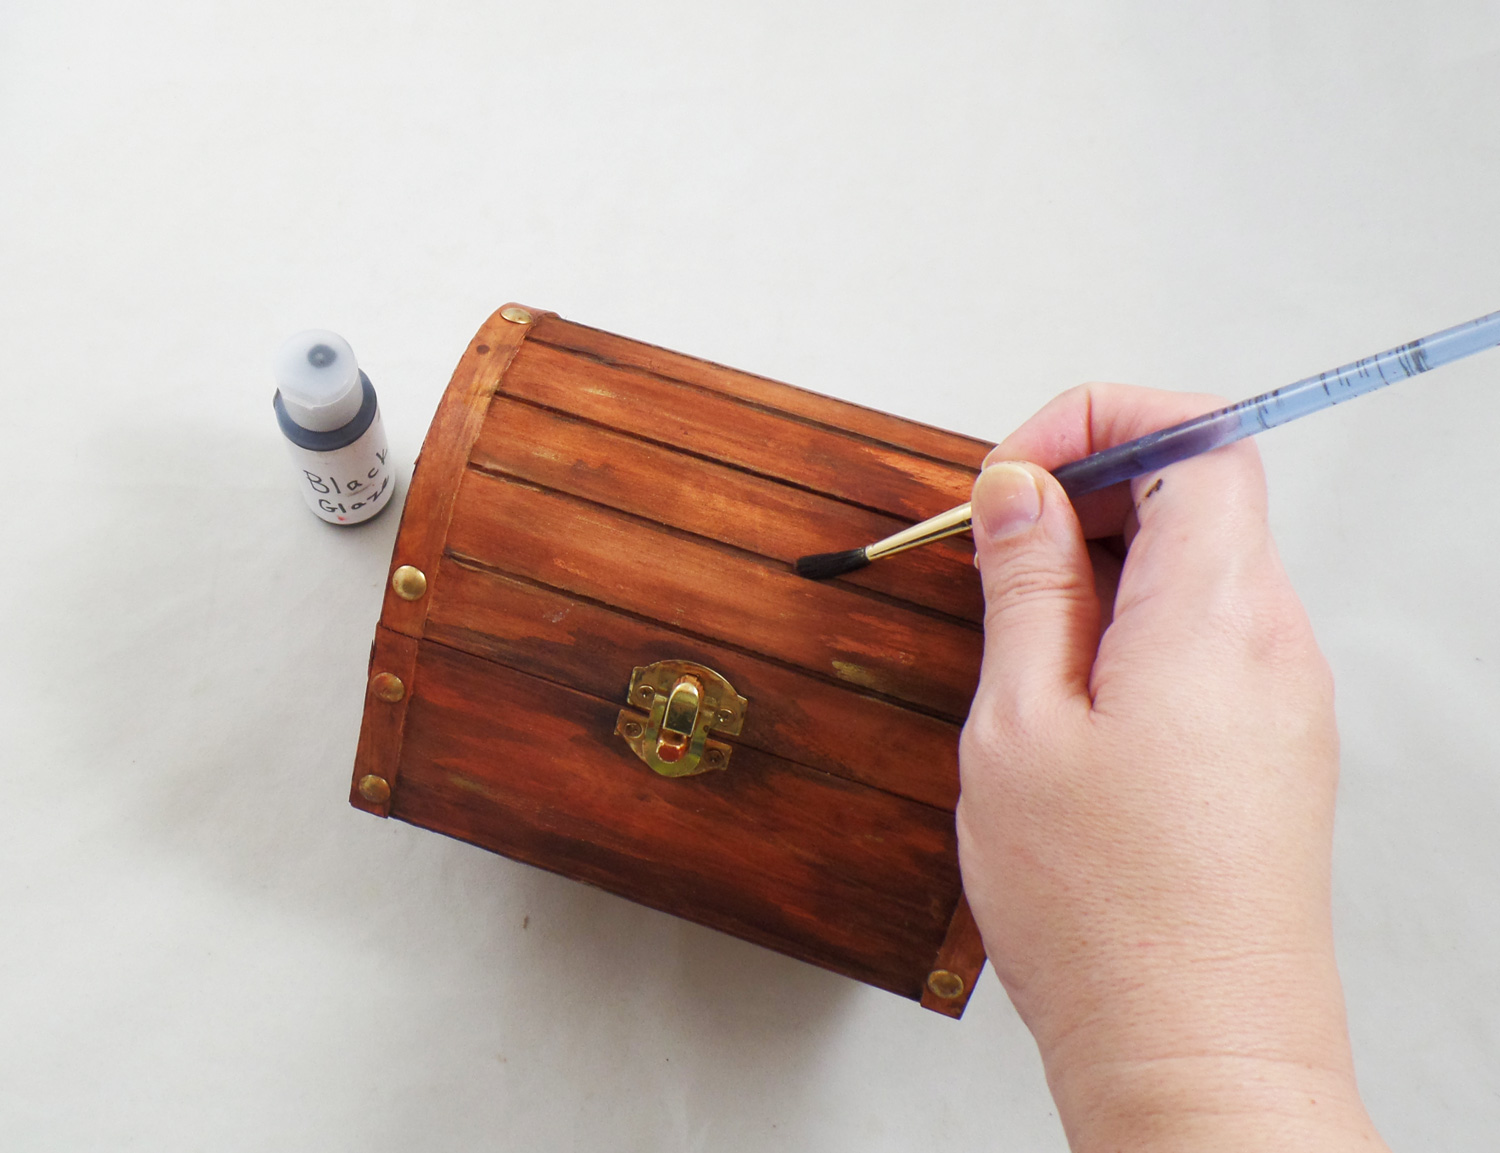
I started by painting the inside and outside of the unfinished wood box. I diluted the paint with water to create a color wash that would stain the wood but still leave the wood grain visible. First coat of diluted paints was the Terra Cotta, then the Burnt Umber and finally the Black in the nooks and crannies.
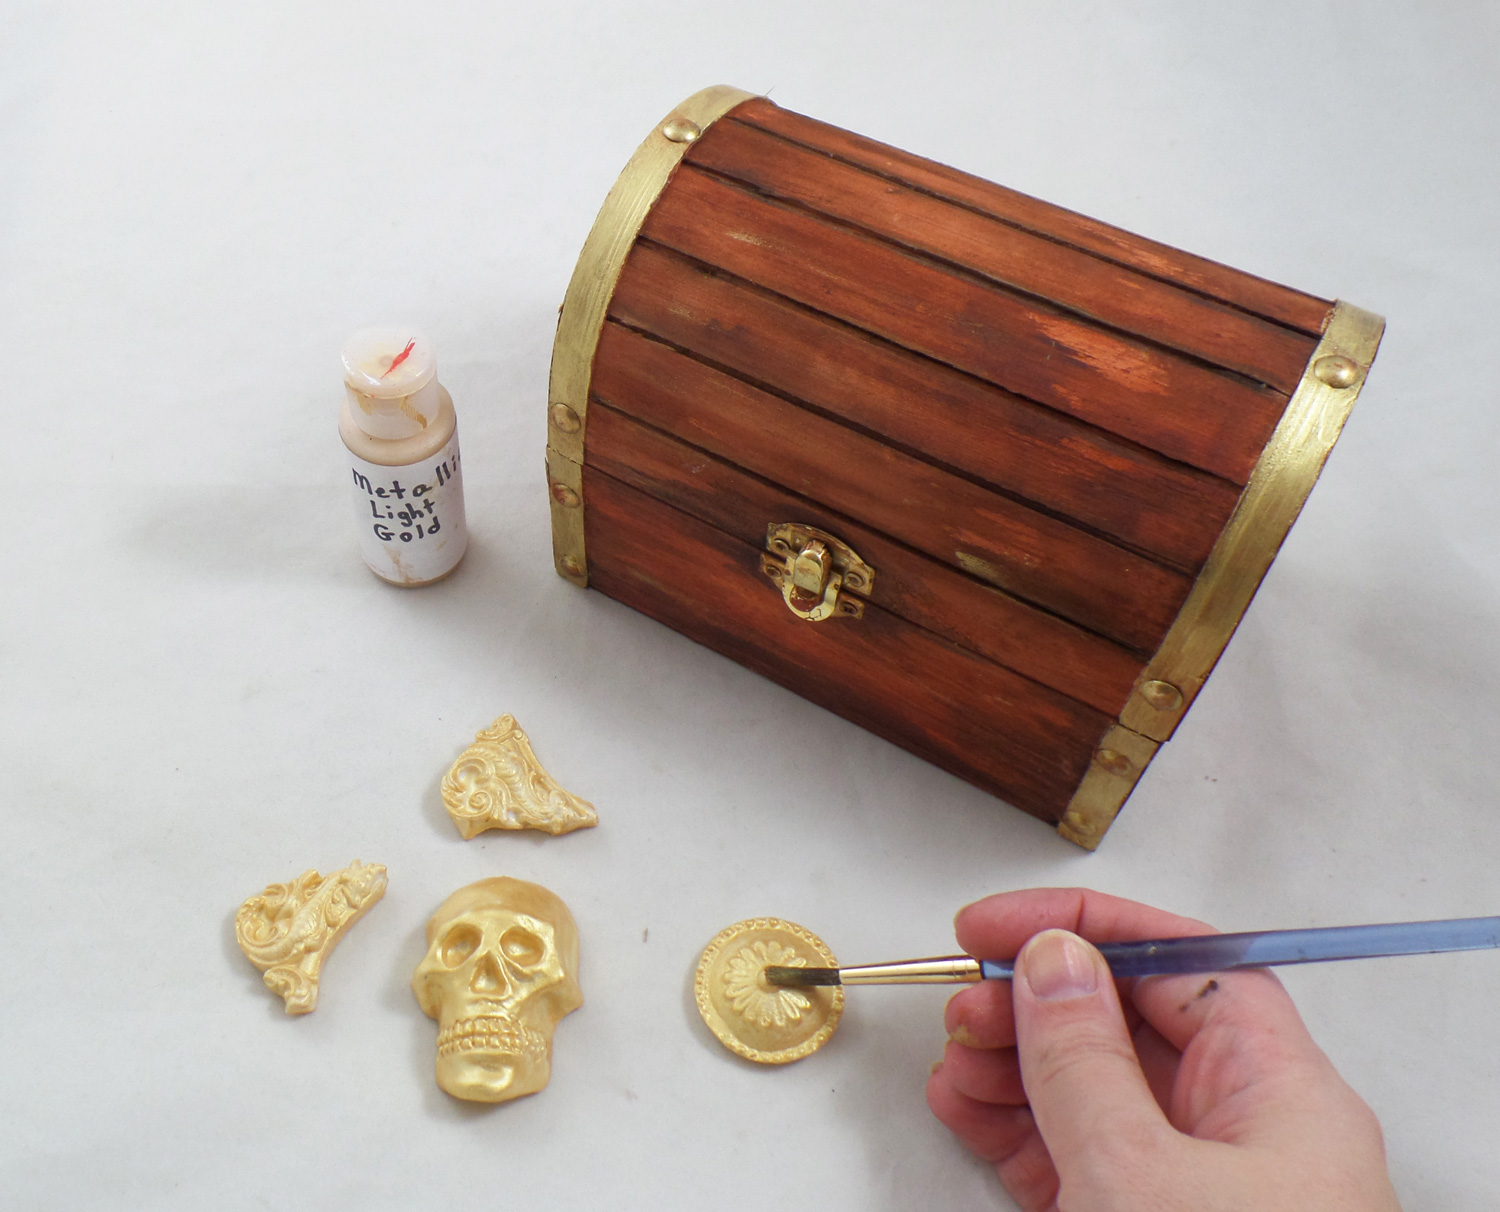
While I let the wooden box dry I removed the eye pins carefully with pliers that are put into Relics & Artifacts® pieces by the manufacturer, since I wasn’t going to make them into jewelry. I painted the pieces and the trim on the box with Metallic Light Gold paint. They needed two coats because most metallic paints need several coats for full coverage. The resin pieces were easy to paint and I didn’t have a single issues with the paint beading up or sliding off like with other resin blanks on the market!
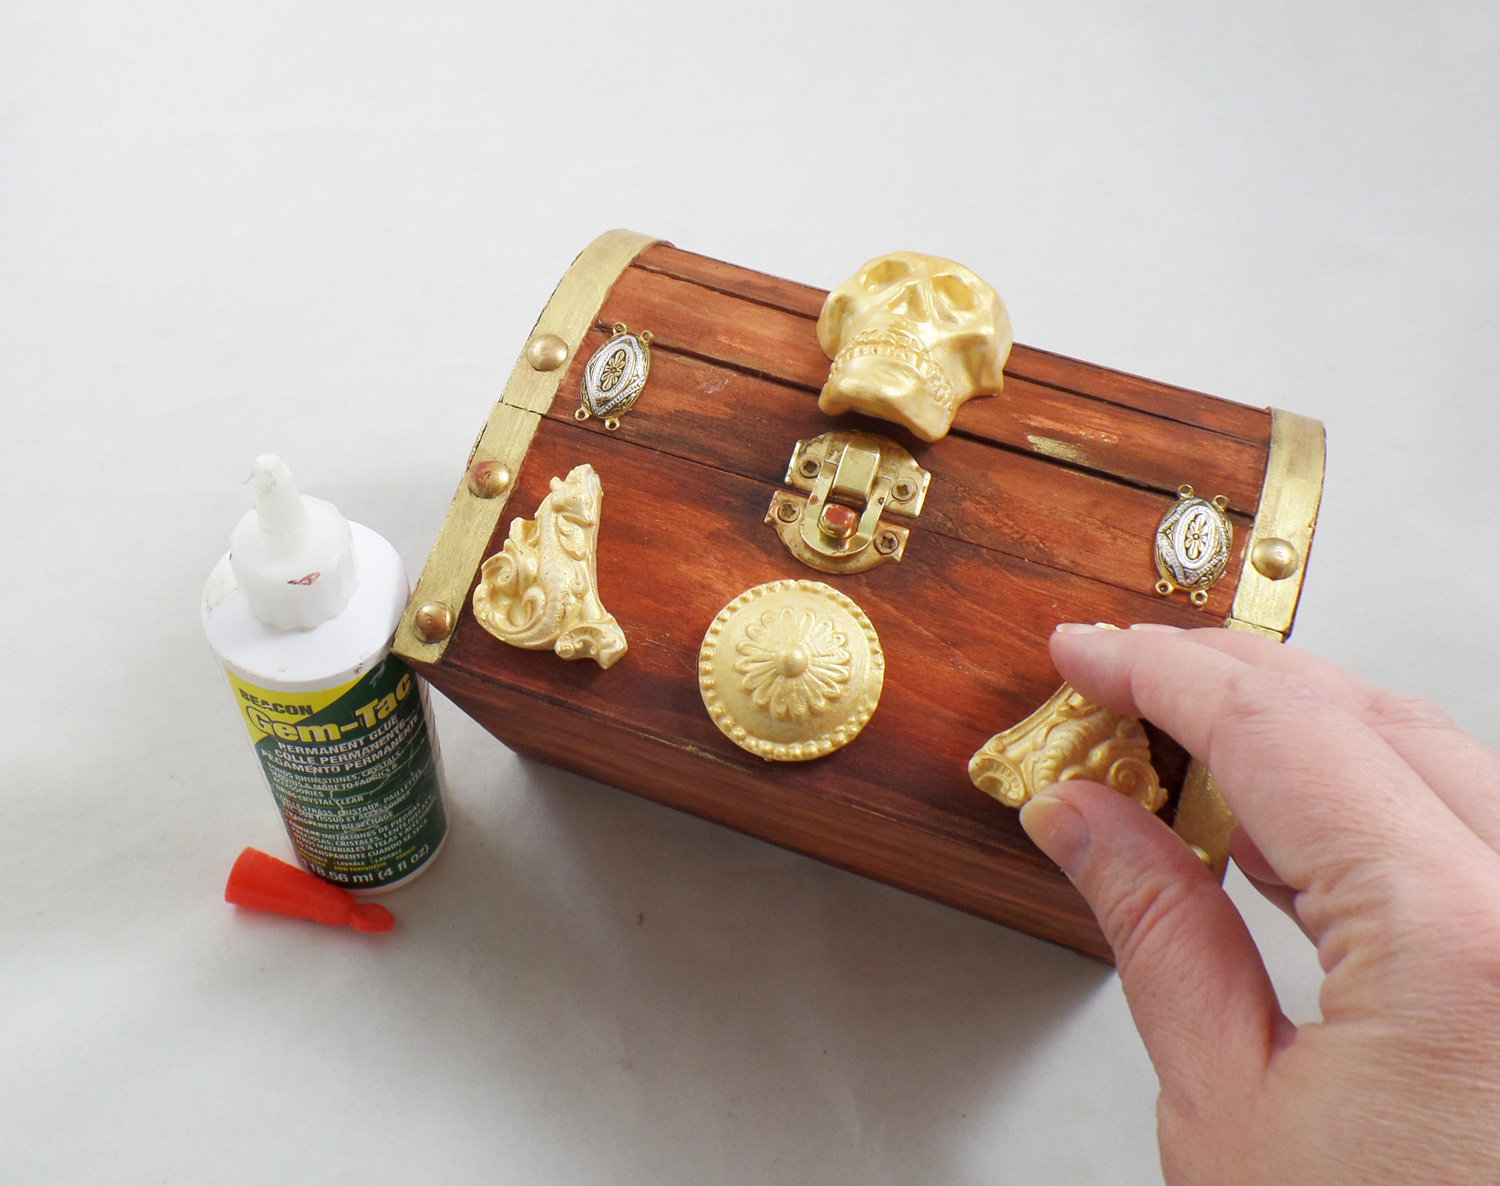
Once all the pieces were dry I applied them to the wood box with Beacon Gem-Tac Adhesive. A broken bracelet with beautiful metal spacers I took apart and glued the spacers to the box to give the illusion of metal brackets bolted to the box. Once the glue was dry I did another color wash of the Burnt Umber and Black acrylic paints all over the box and glued on embellishments to give them an aged appearance. I attached broken chain from an old necklace to the bracelet spacers, glued onto the box, with jumprings.
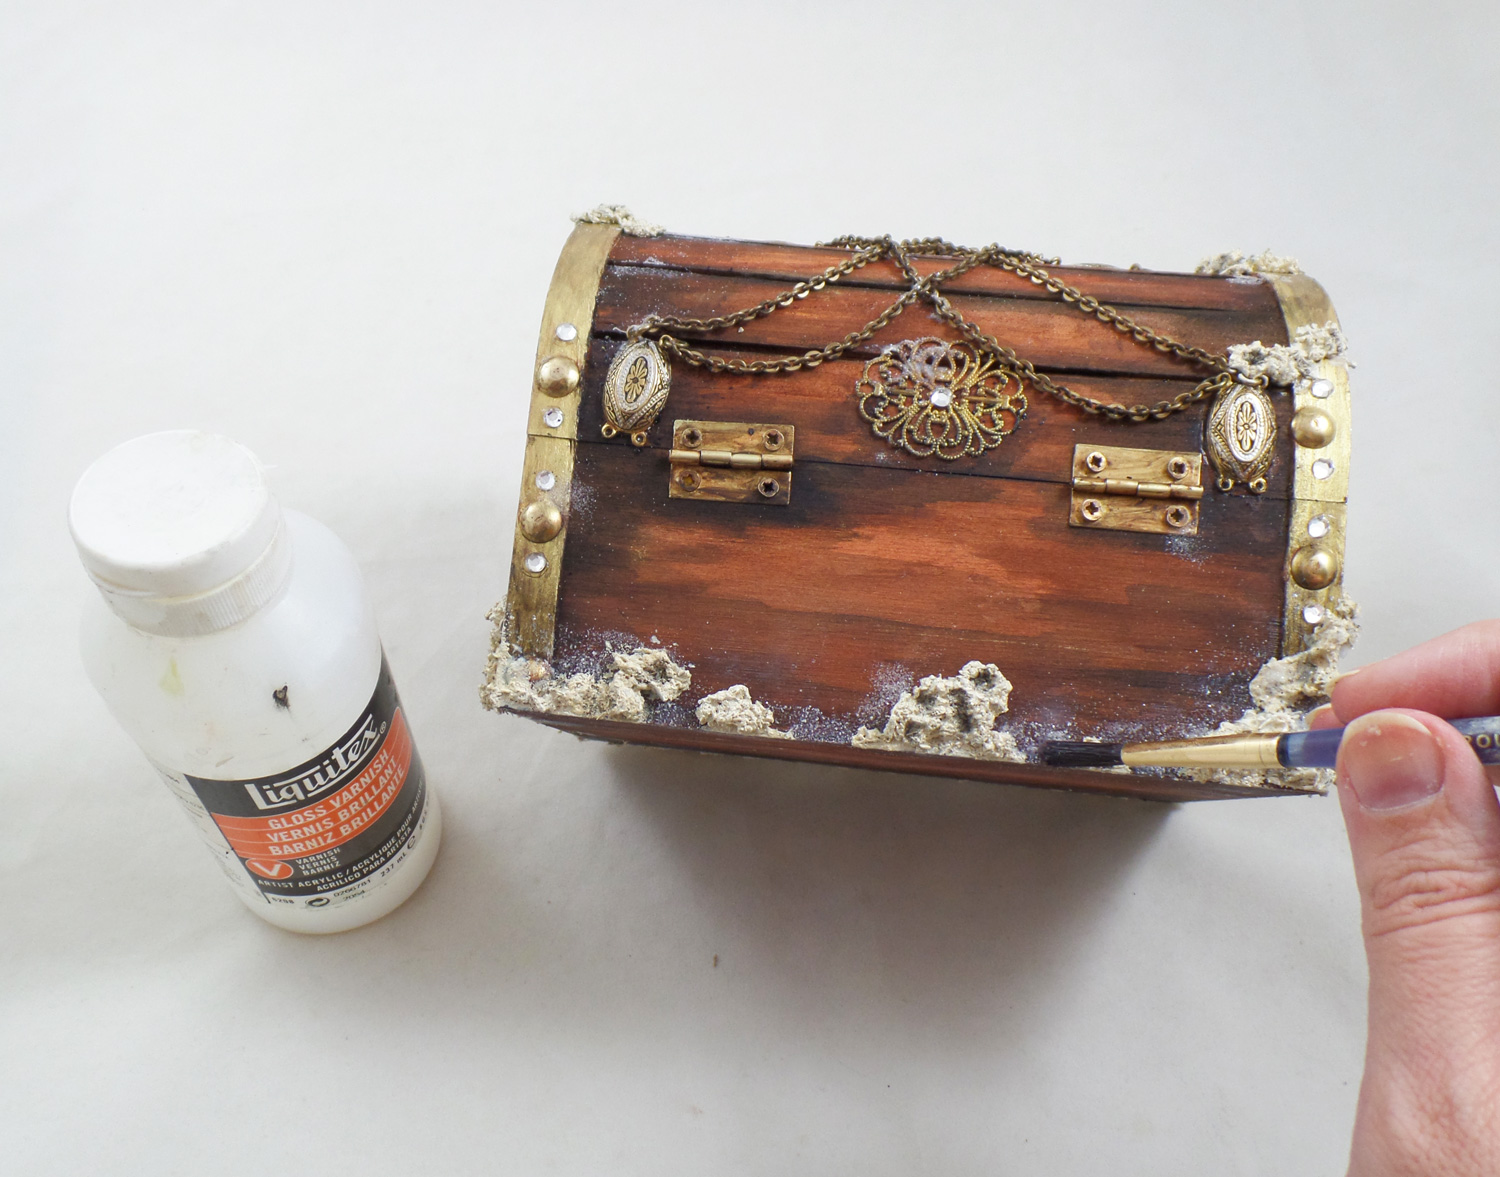
In a small cup I mixed up some White and Yellow Ocher acrylic paint with dried tea leaves and a little Beacon Gem-Tac Adhesive. I applied it around the bottom and sides of the box in small clumps to give the illusion that barnacles had started to grow around this long forgotten treasure. Once the faux barnacles were dry I did a Black acrylic paint wash to give them detail. I added some Liquitex Gloss Varnish over and around the edges of the barnacles and sprinkled on Stampendous Crystal Snow White Glitter. Once dry it looked like salt deposits from sea water.
I randomly applied more spots of varnish and glitter to give a grungy, salty appearance to the treasure chest. I glued on tiny bits of moss on the box along the edges and embellishments.
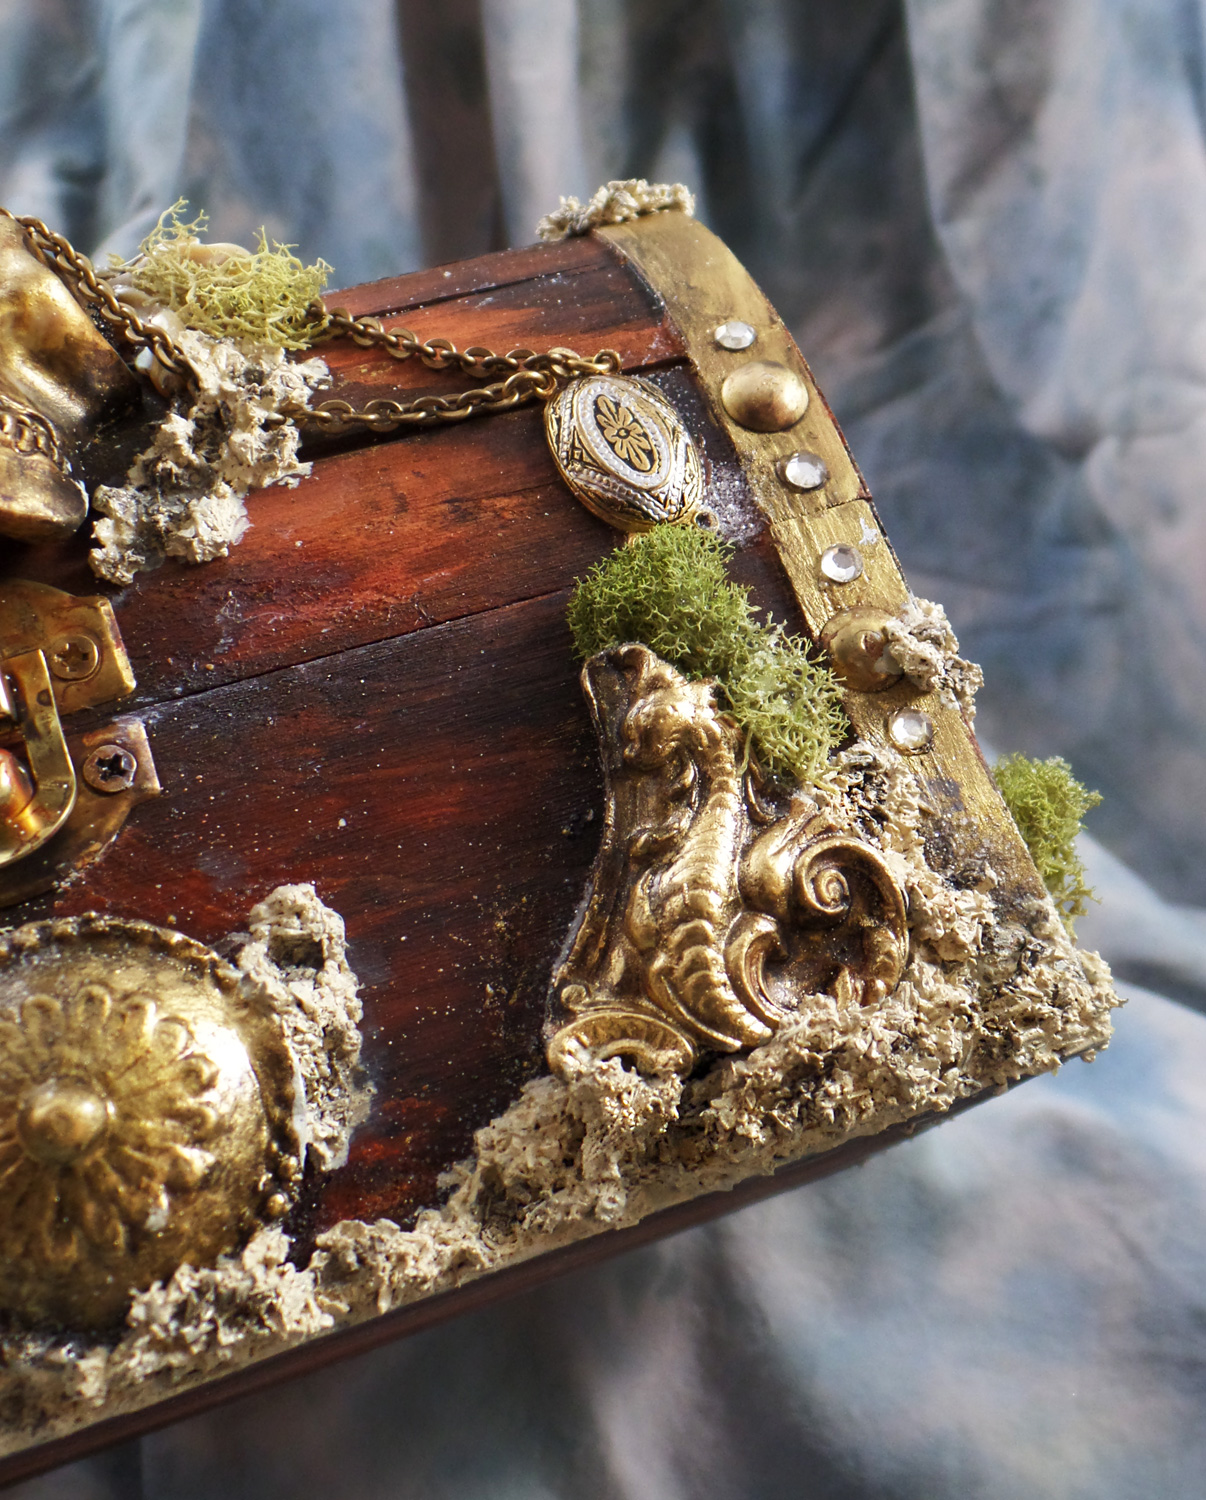
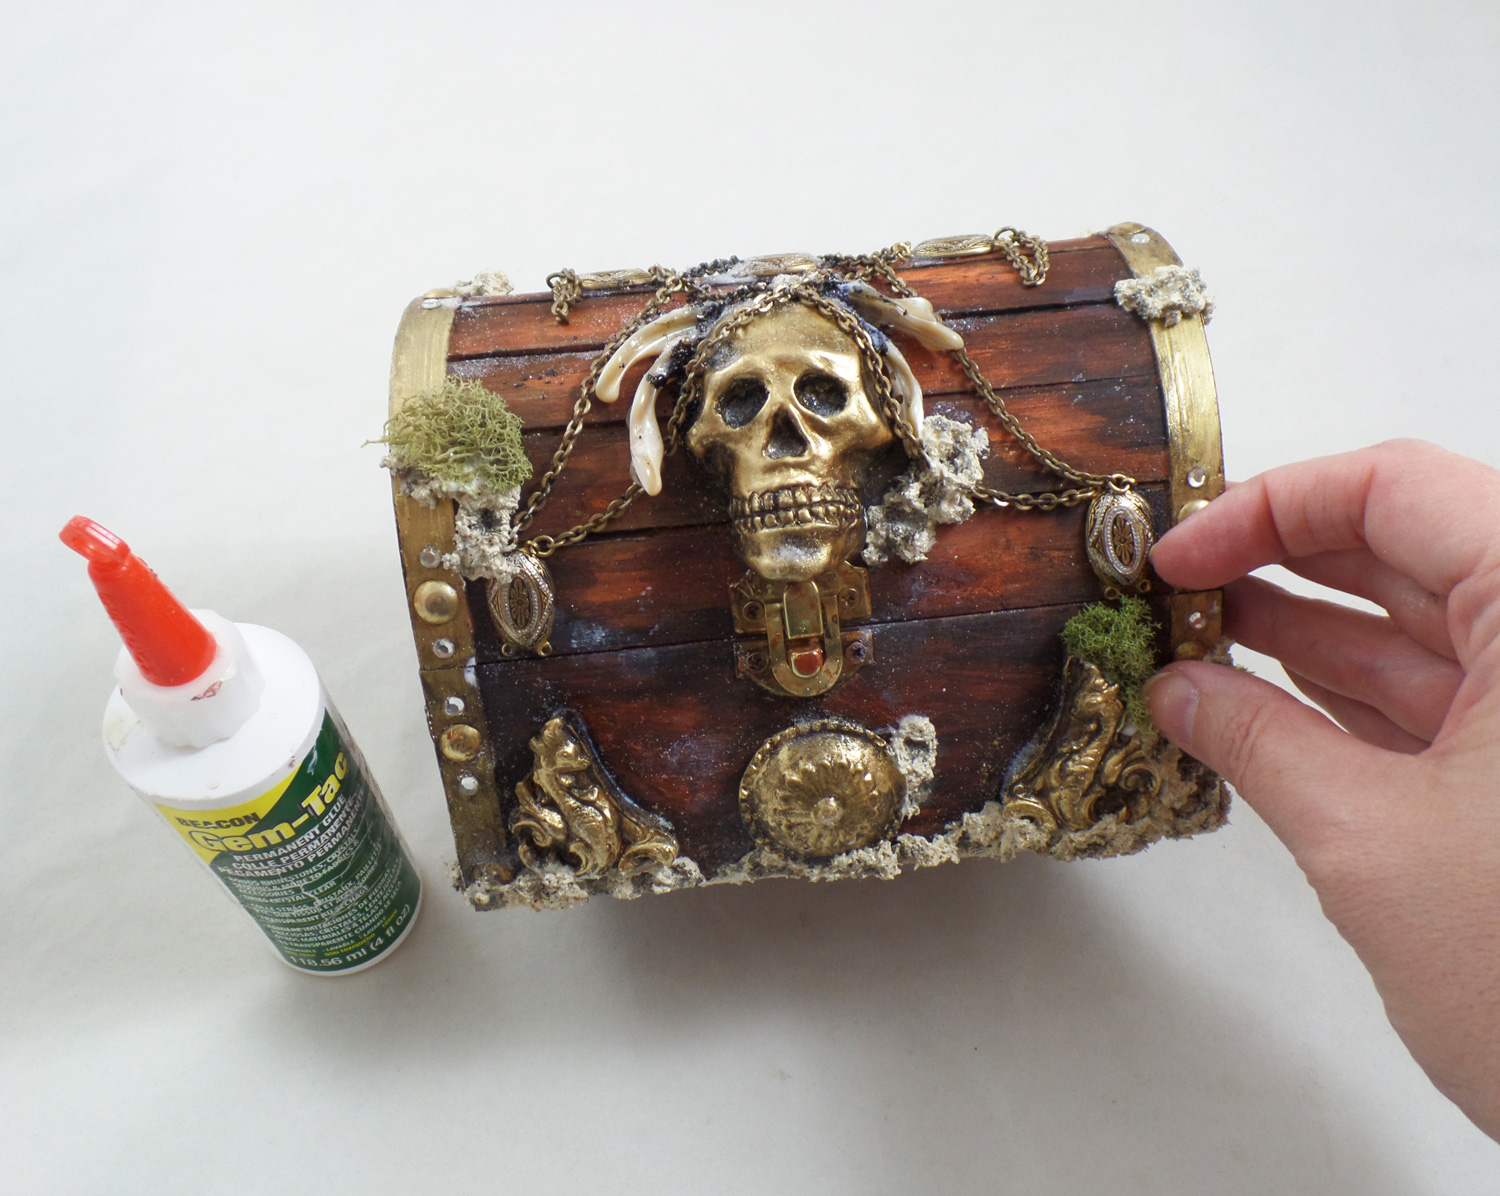
When applying the faux barnacle mixture to the box I was sure to press it against the resin pieces and edges of the box for a good bond. To make it look like the barnacles had grown haphazardly I pushed the back end of a paint brush here and there into the tea leaves and paint mixture.
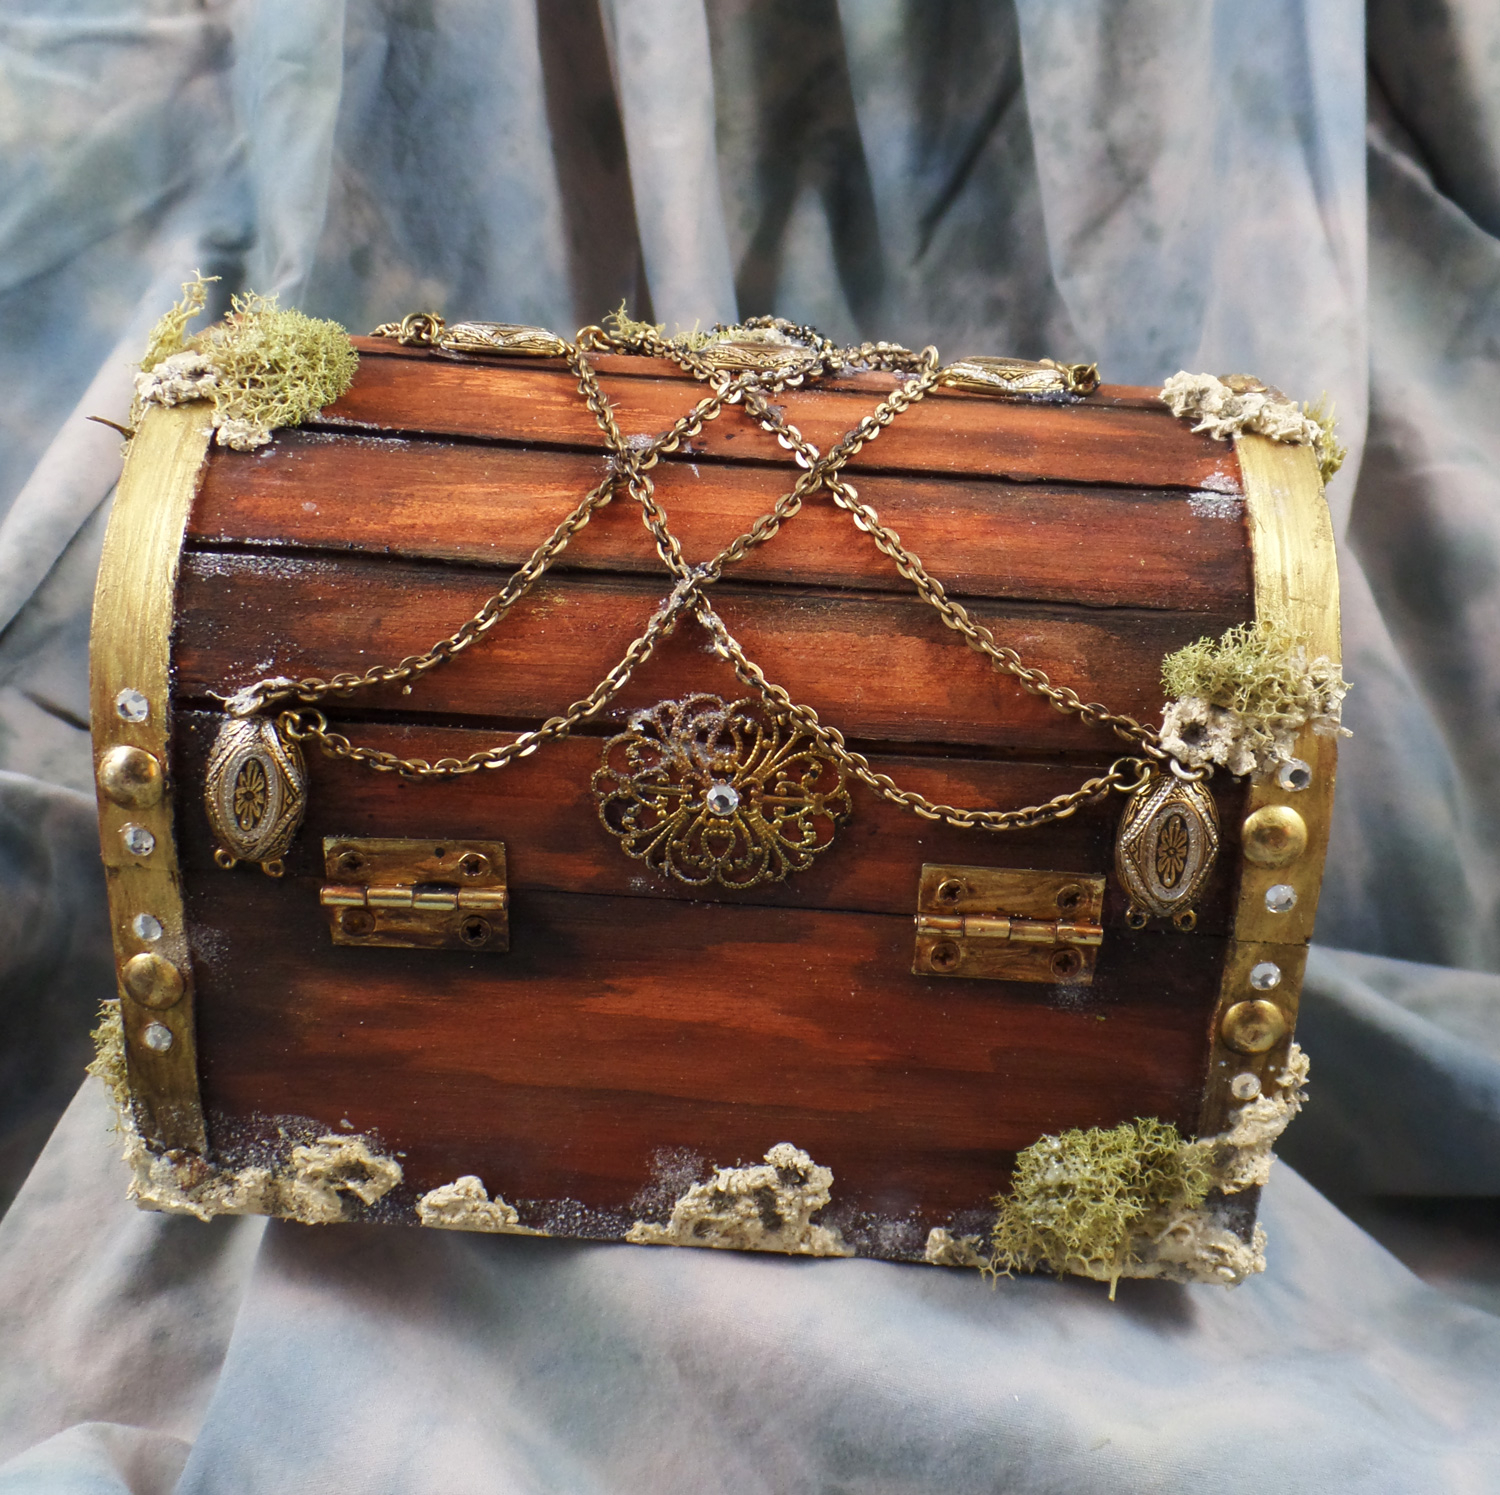
Not forgetting the back of the treasure chest, I had glued on more bracelet pieces, metal embellishments and tiny vintage glass rhinestones. With the chain linked into the bracelet spacers, draped back to front on the chest, my Pirate Treasure Chest was complete!
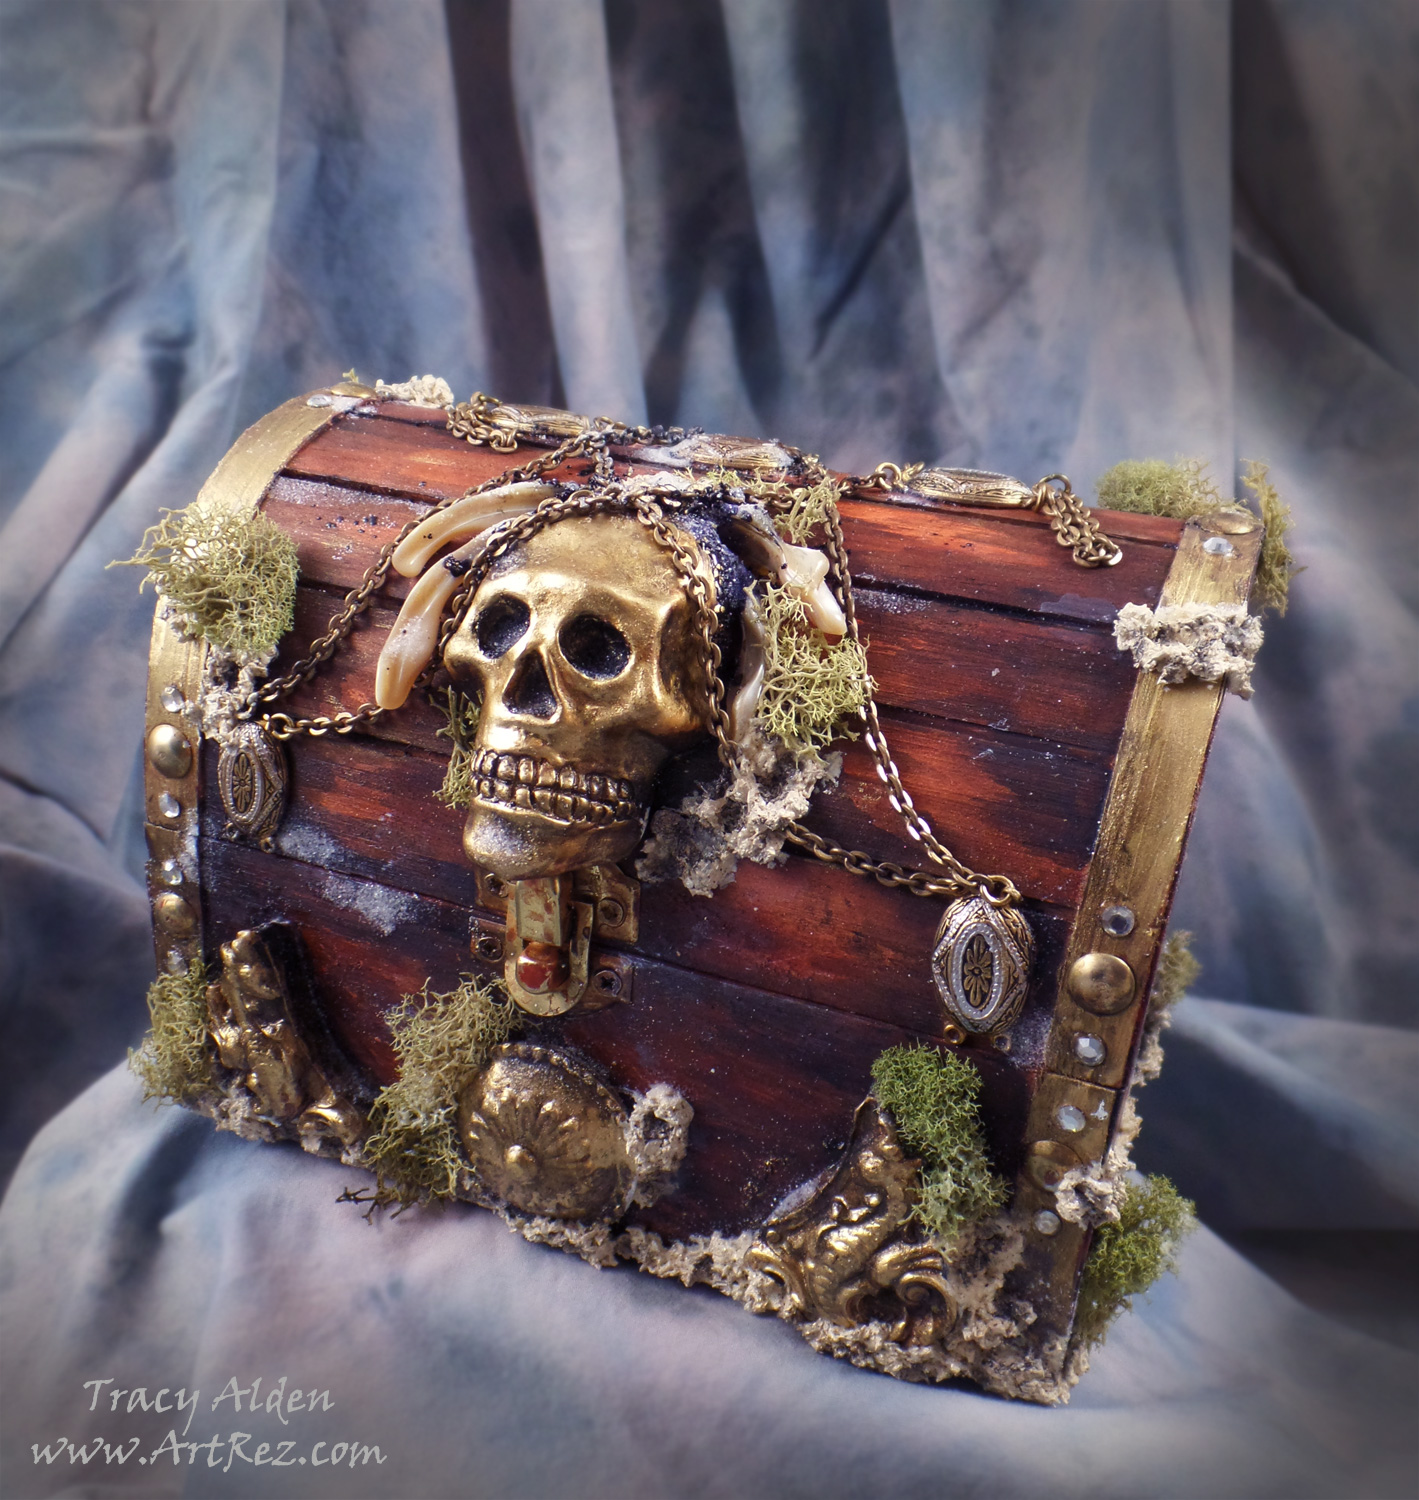
I really love how this piece came out and can’t wait to try out more of the Relics & Artifacts® line with future art projects.
What lovely mixed media treasures will you create?
Until Next Time, Safe Travels!

Ancient and Contemporary Inspired Artistry