- Acrylic, Association For Creative Industries, Chalk Paint, Contests, Convention, Diamond Art, FaveCrafts, History Inspired, Home Decor, Mixed Media, Mod Podge, Throwback Thursday
#TBT Traveling a Forgotten Path, with Diamond Art
Hello! Continuing my Throwback Thursday posts, this time only going back to January, when I once again traveled to the Creativation Trade show, in Phoenix, Arizona. Held by Association For Creative Industries or AFCI, during the show I was honored to once again be invited to the 7th annual Prime Networking Event. This event gives bloggers, designers, authors and brands in the craft industry a chance to come together to network, make new partnerships, and learn about new product information. The event was fun, informative, and free product samples were provided by this year’s sponsors. After the event attendees were encouraged to try out and create art for the Favecrafts Best Blogger Craft Event. This year I won runner up in the Best Blogger Contest 2019 for my project!
For my entry I decided to use products from these sponsors: Diamond Art by Leisure Arts, Tribe Design, Mod Podge Ultra Matte Spray, FolkArt Crackle Medium and Home Decor™ Chalk Paint along with supplies from my personal collection of art supplies.
Supplies:
Diamond Art by Leisure Arts Diamond Painting Kit – Tribe Design
Mod Podge ® Ultra Matte Spray
FolkArt ® Mediums – Crackle Medium
FolkArt ® Home Decor™ Chalk Paint in Java, Parisian Grey, White Adirondack and Black
Liquid Fusion ® Clear Urethane Glue
9 inch x 12 inch Cradled Wood Board
Assortment of artificial tropical plants
1 Flat Paint Brush
1 Round Paint Brush
Scissors
Ruler
Pencil
Cotton swabs
Isopropyl alcohol
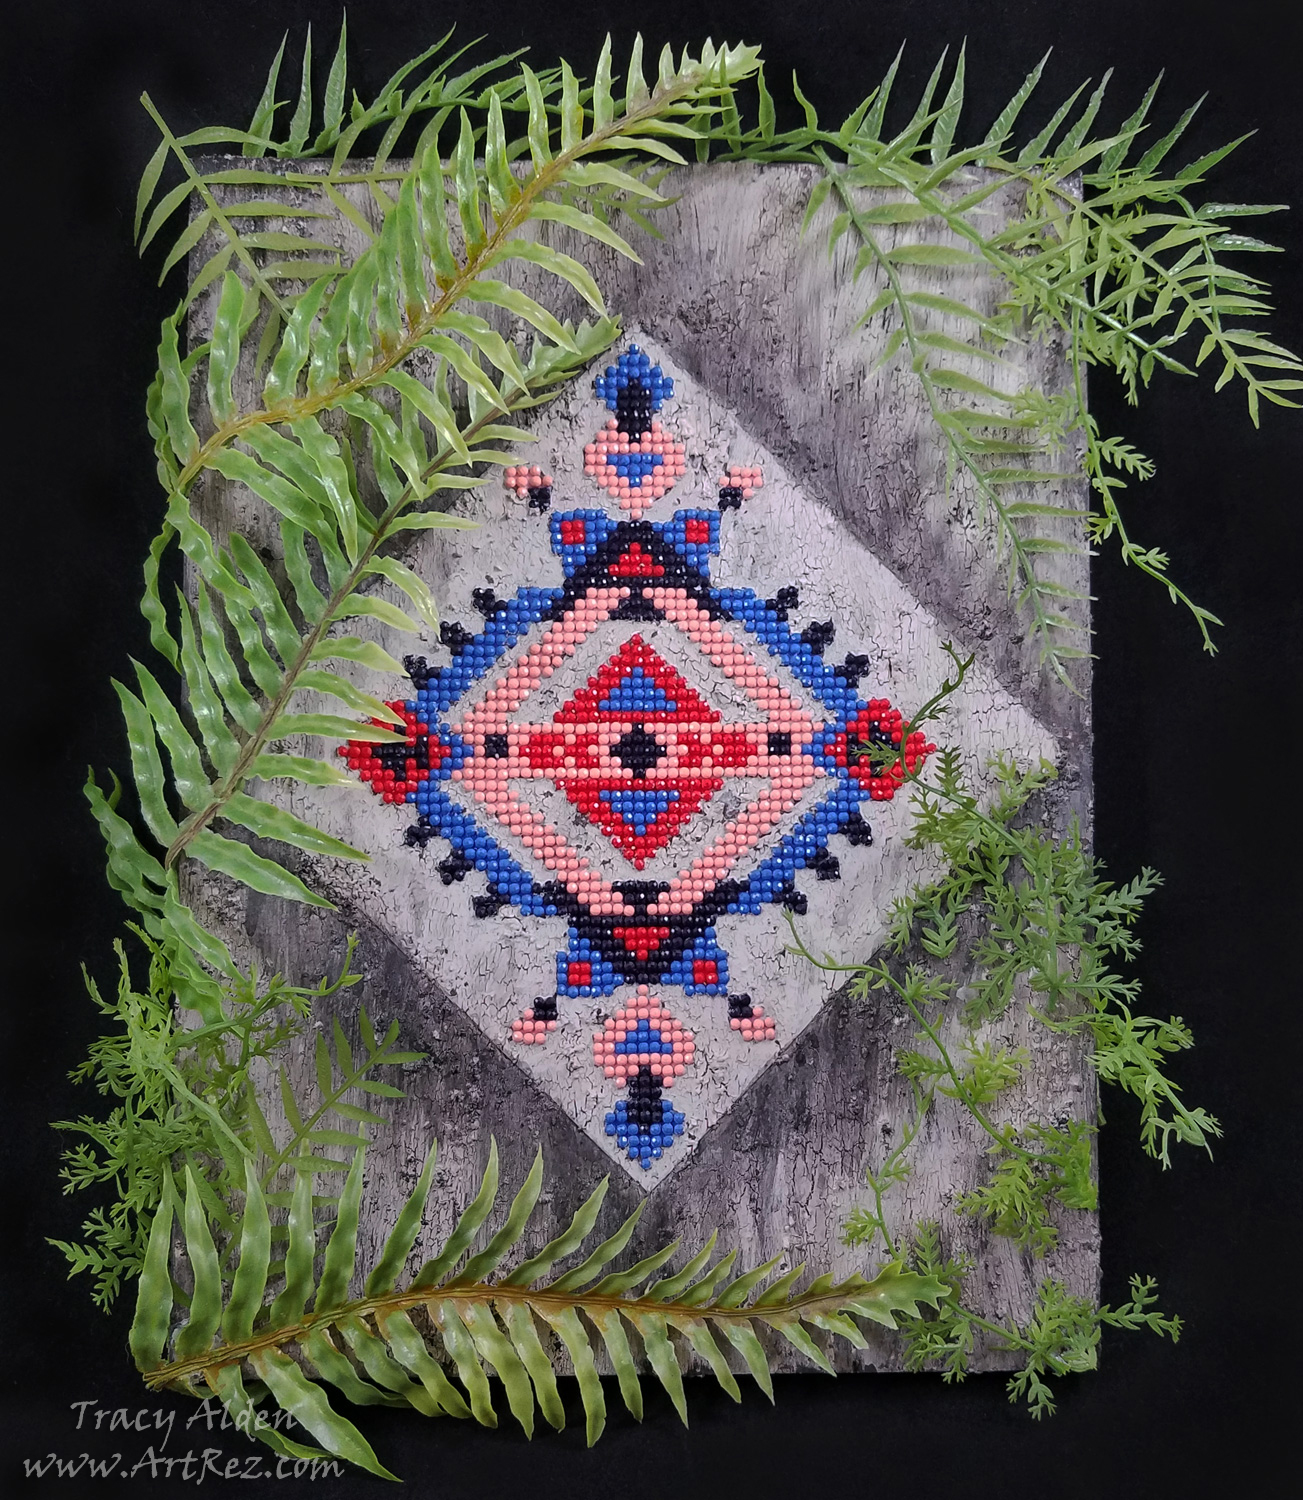
Used and dried coffee groundsSince it took a few hours to finish the Diamond Art kit by Leisure Arts, I had time to consider the pattern. In my mind it needed something more than to just be framed. It reminded me of patterns of old, and FolkArt Chalk Paint would help me with that. To have it look like a wall fragment I would need it to be on a board, Mod Podge Spray would help apply the canvas. For water damaged cracks, I would need a Crackle Medium.
Maybe it could be a forgotten image, now found once again? Slowly a story formed in my mind…..
After traveling many miles, you start seeing the remnants of a once mighty city, now taken over by nature. Slowly walking through the dense forest a fragment of a patterned wall slowly appears. What ancient artist created this image and who was it intended for?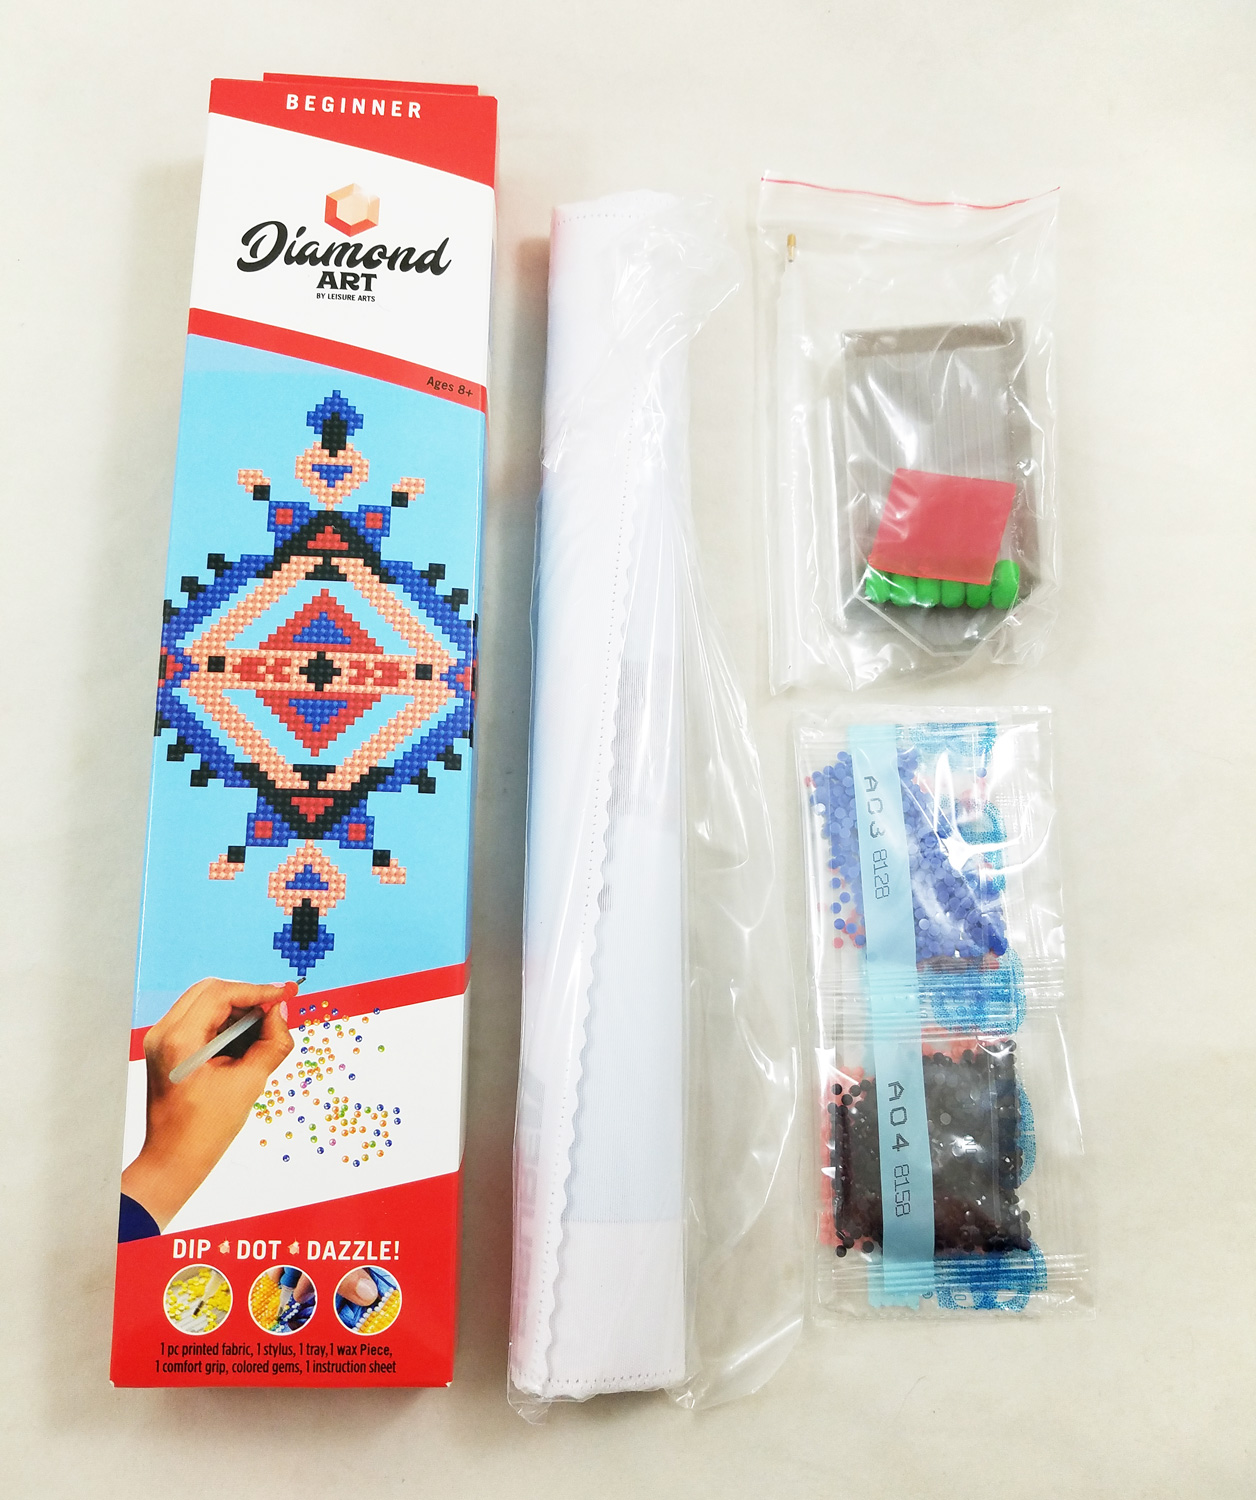
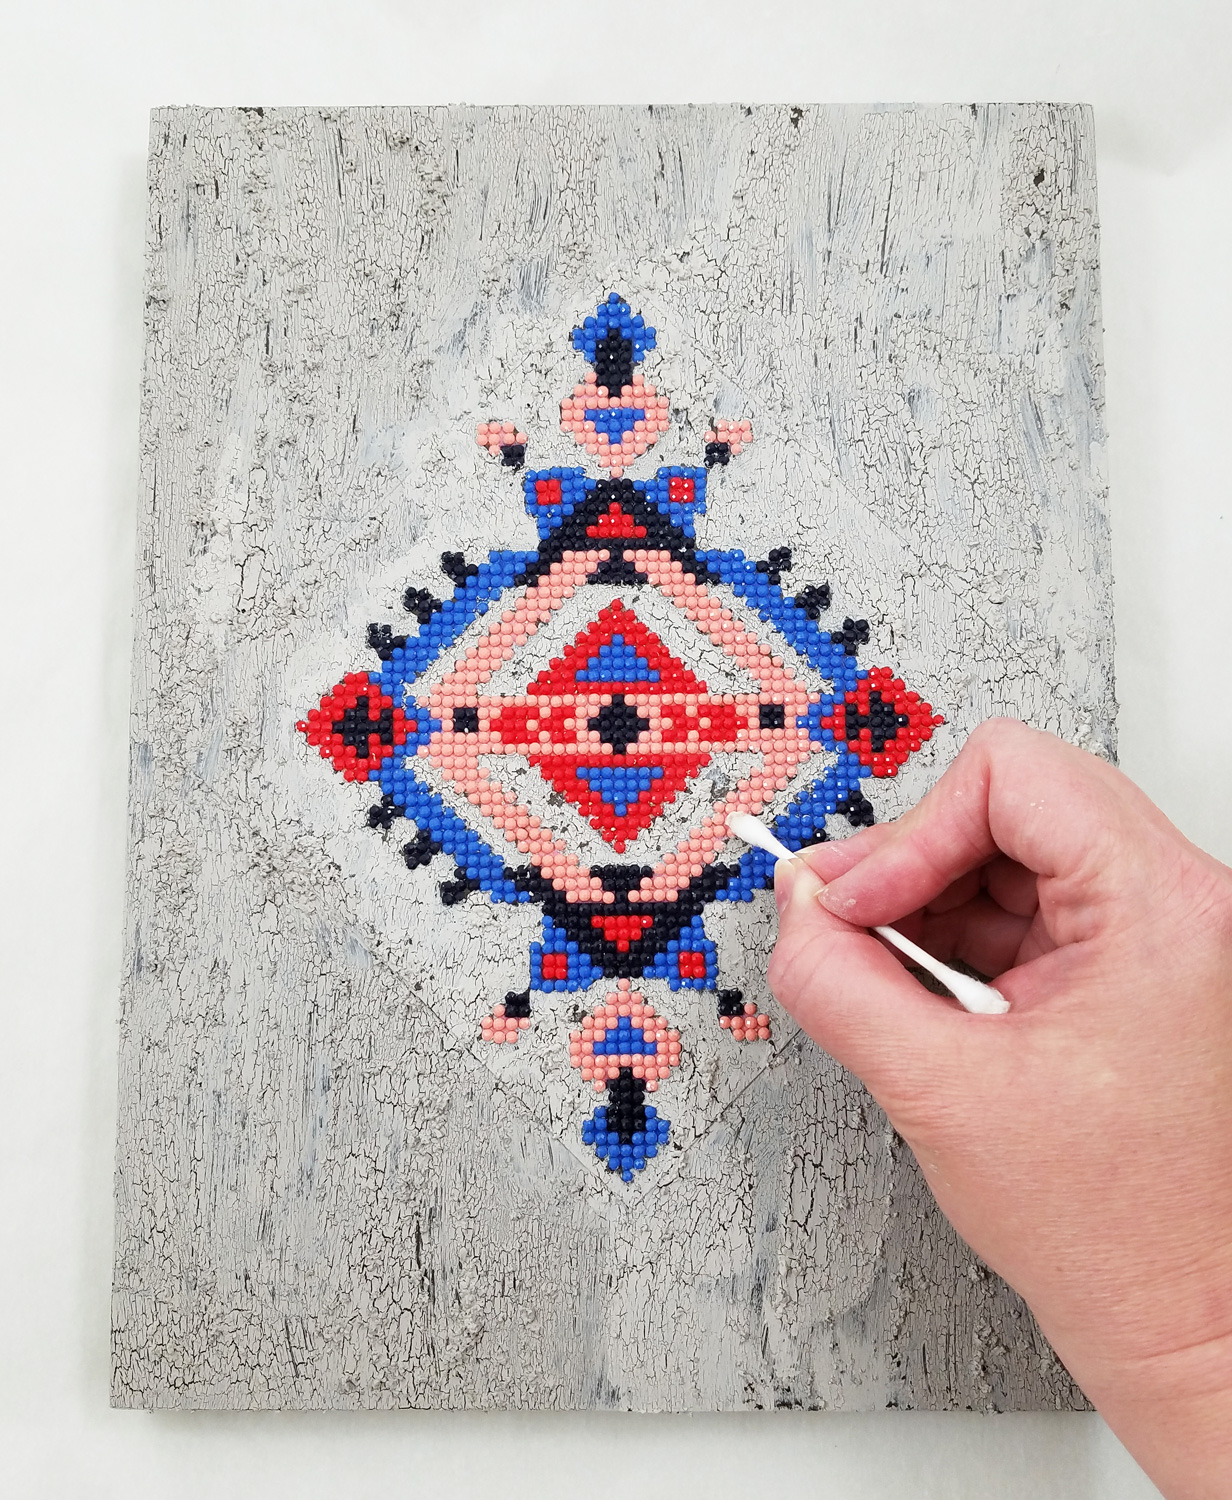
I opened up my Leisure Arts Diamond Painting Kit and made sure I had all of the required parts. The printed canvas needed to be flattened a bit before I started so making sure to leave the sticky film cover on the canvas, I placed a book on top of my canvas for a few hours before starting.
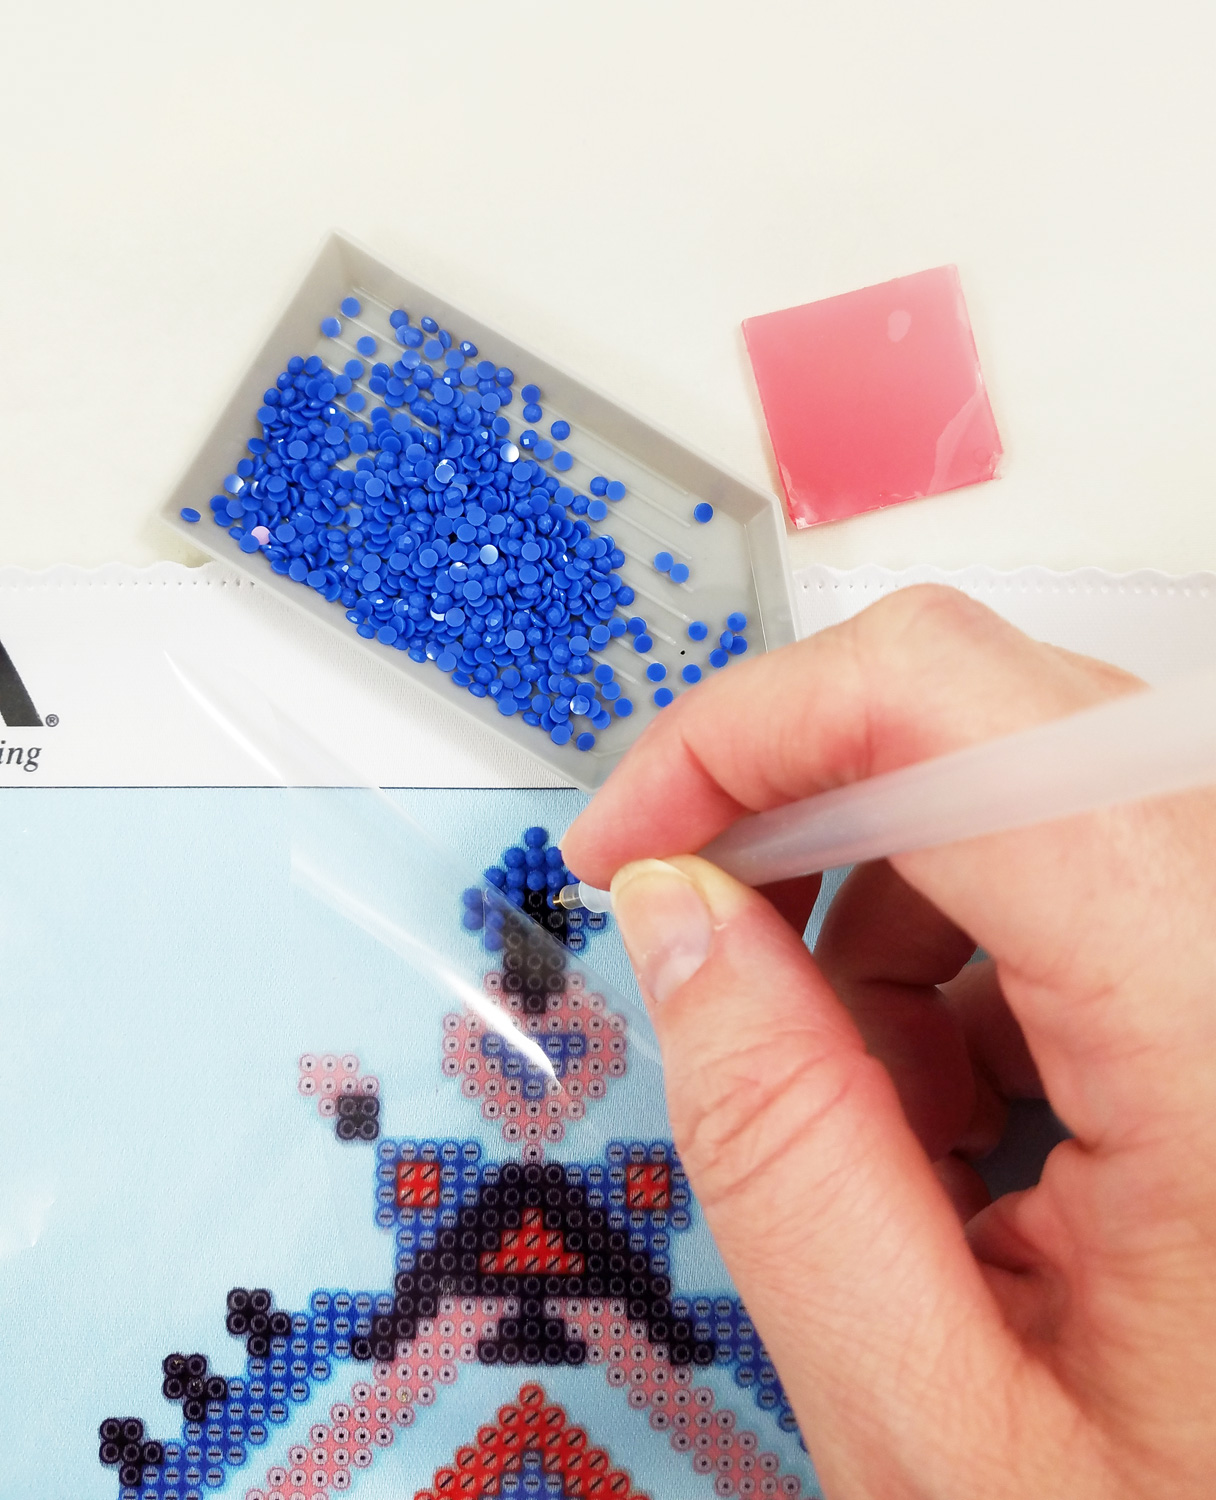
Following the instructions included with the Diamond Art I applied all of the flat backed diamonds to the canvas. It took me only a few hours to complete.
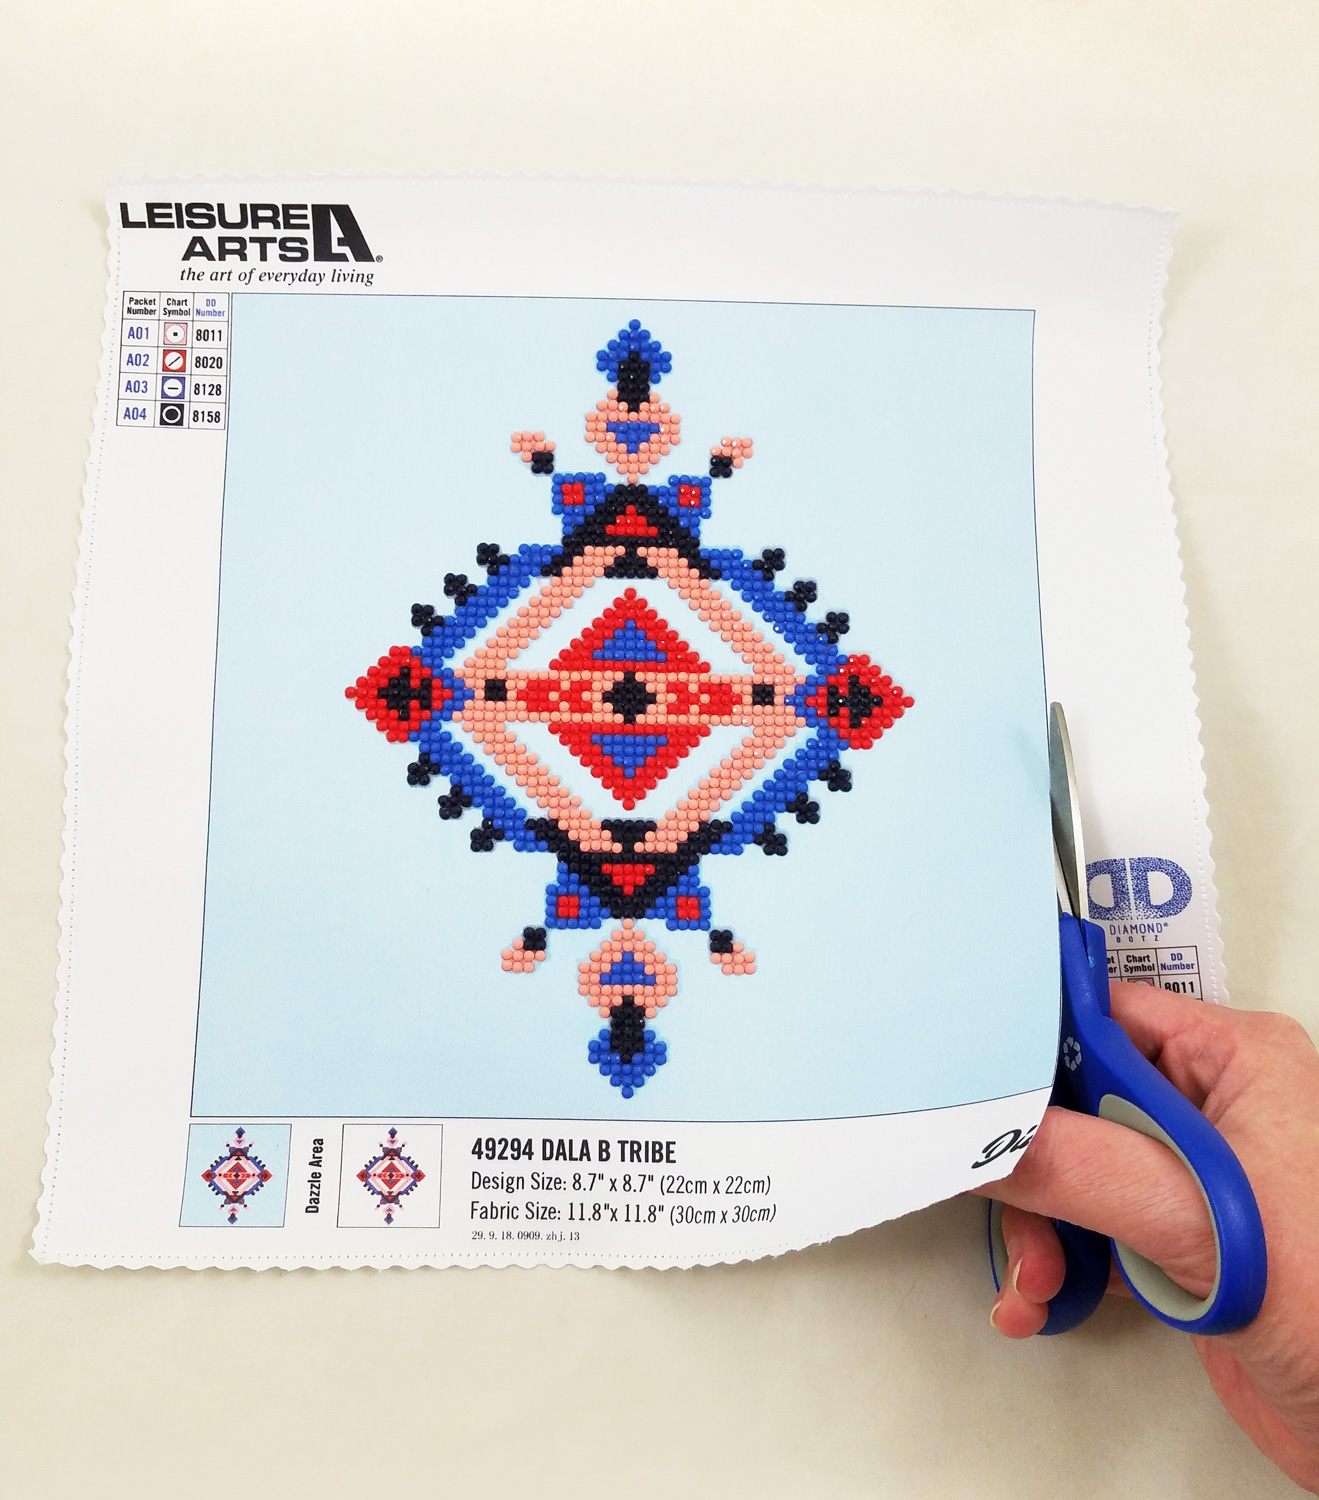
Next I trimmed the Diamond Art canvas to the very edge of the blue background with a pair of sharp scissors.

I carefully used a pencil and ruler to mark as close as possible to the Tribe Design pattern, creating a slightly elongated diamond outline. I then trimmed the canvas further with the scissors, using my pencil lines as my guide.
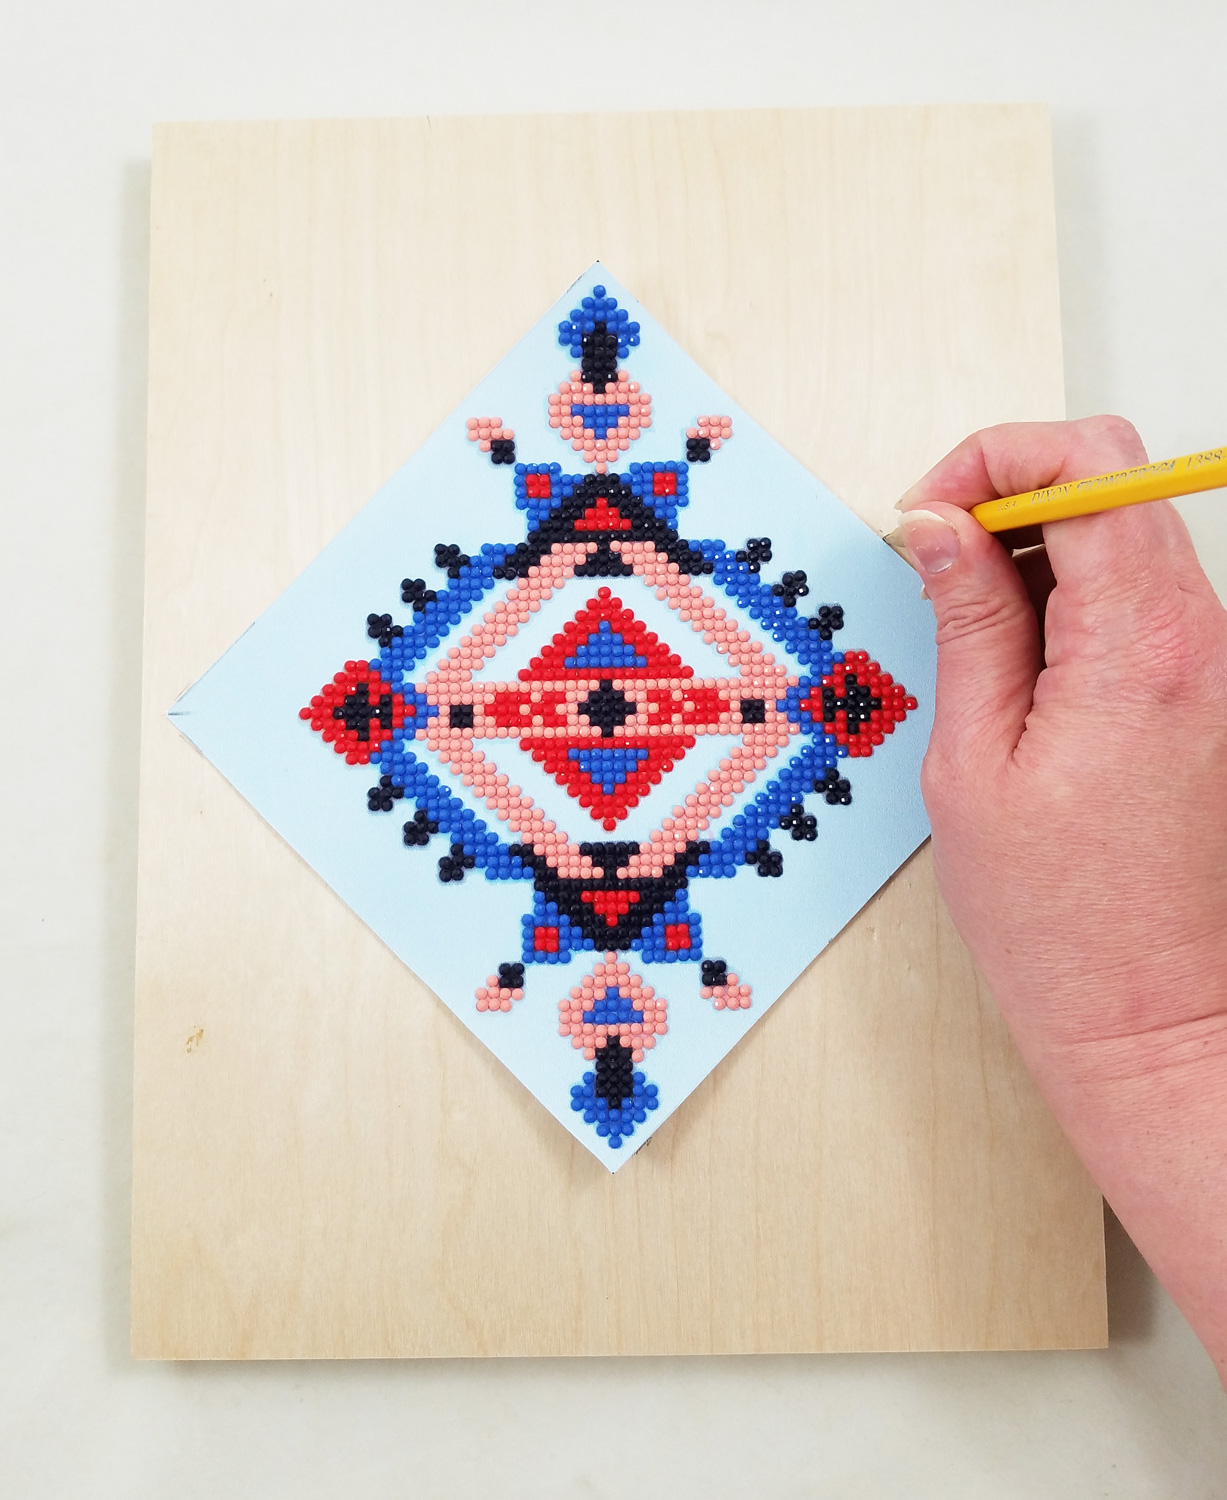
Now that the Diamond Art canvas was cut to size, it fit neatly on the wood board I wanted to attach it to. Once again, I used my pencil to mark out the exact placement of my canvas on the wood board.
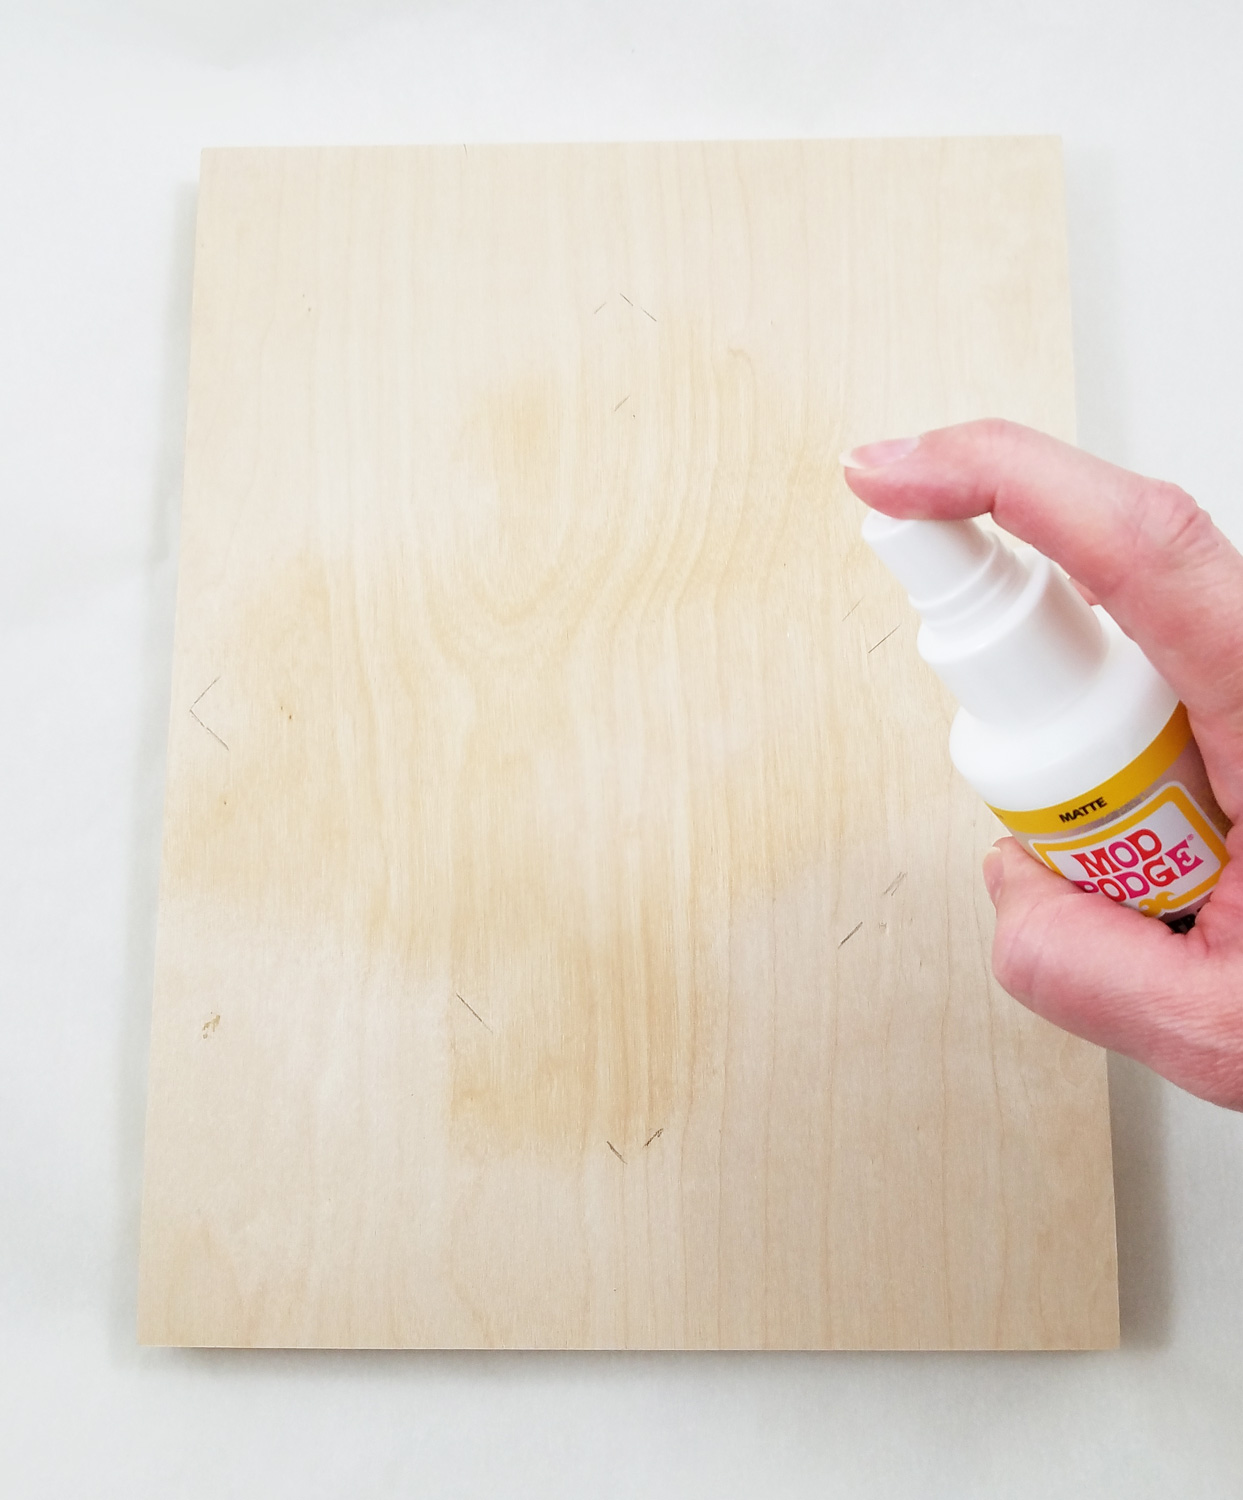
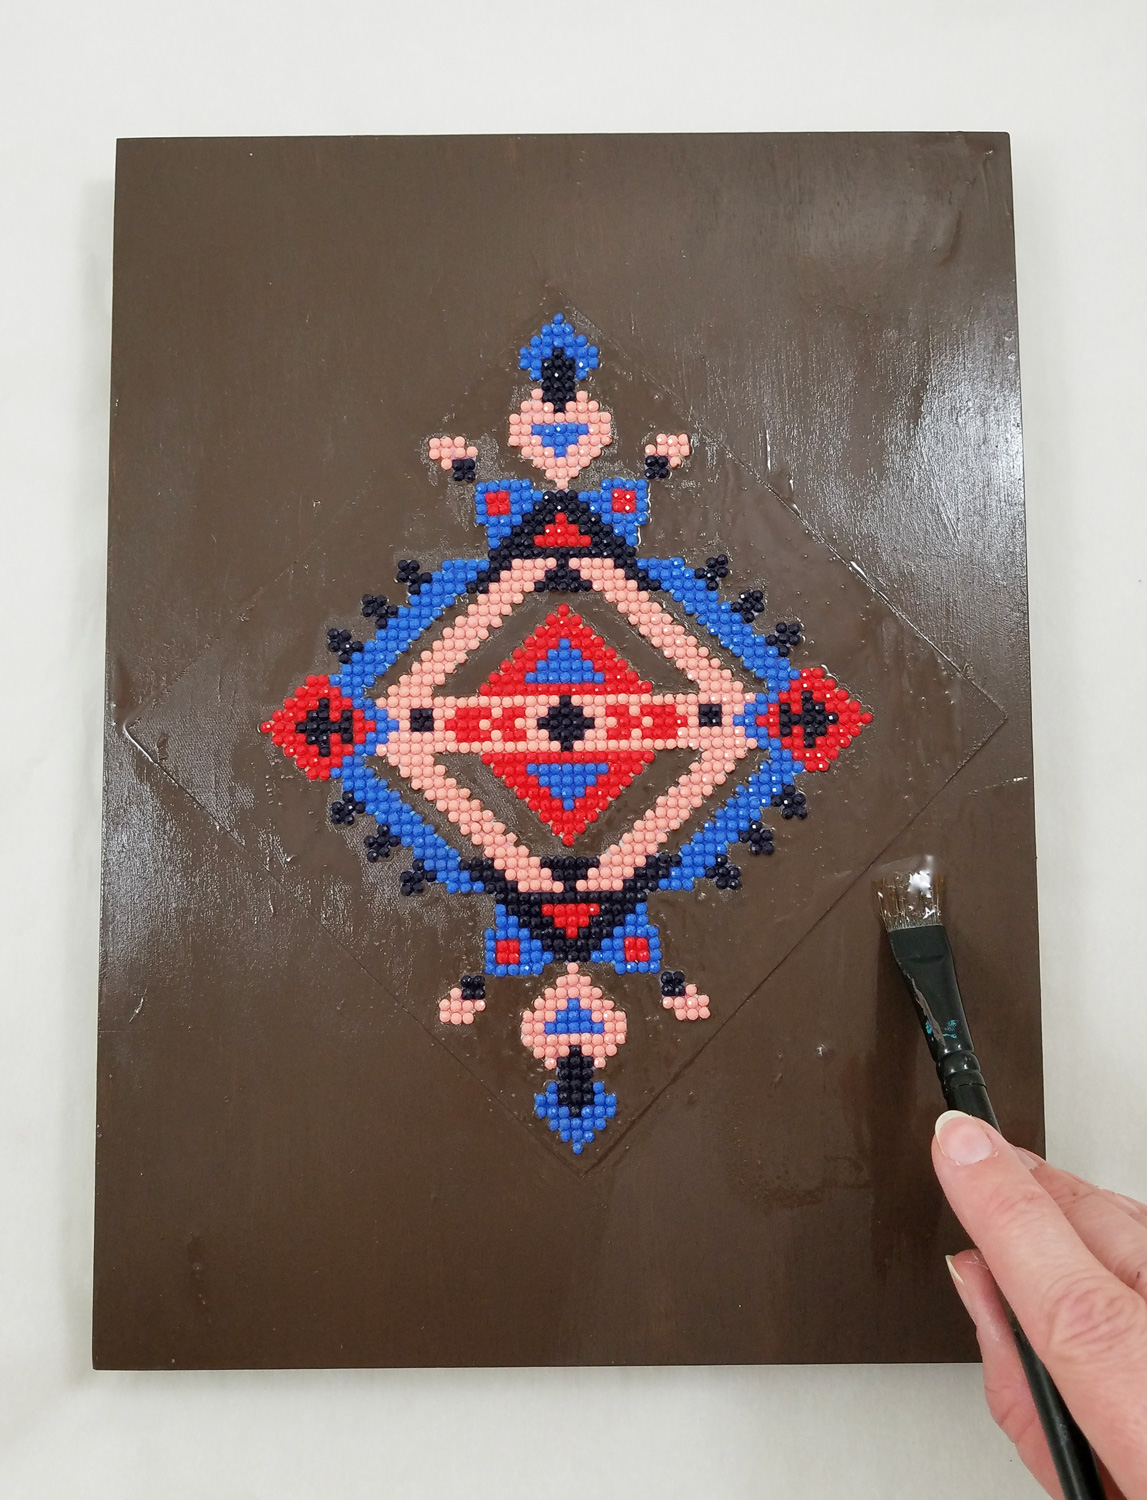
Making sure my wood board was clean of dust or particles I sprayed it with Mod Podge Ultra Matte in the pencil outline of the diamond.
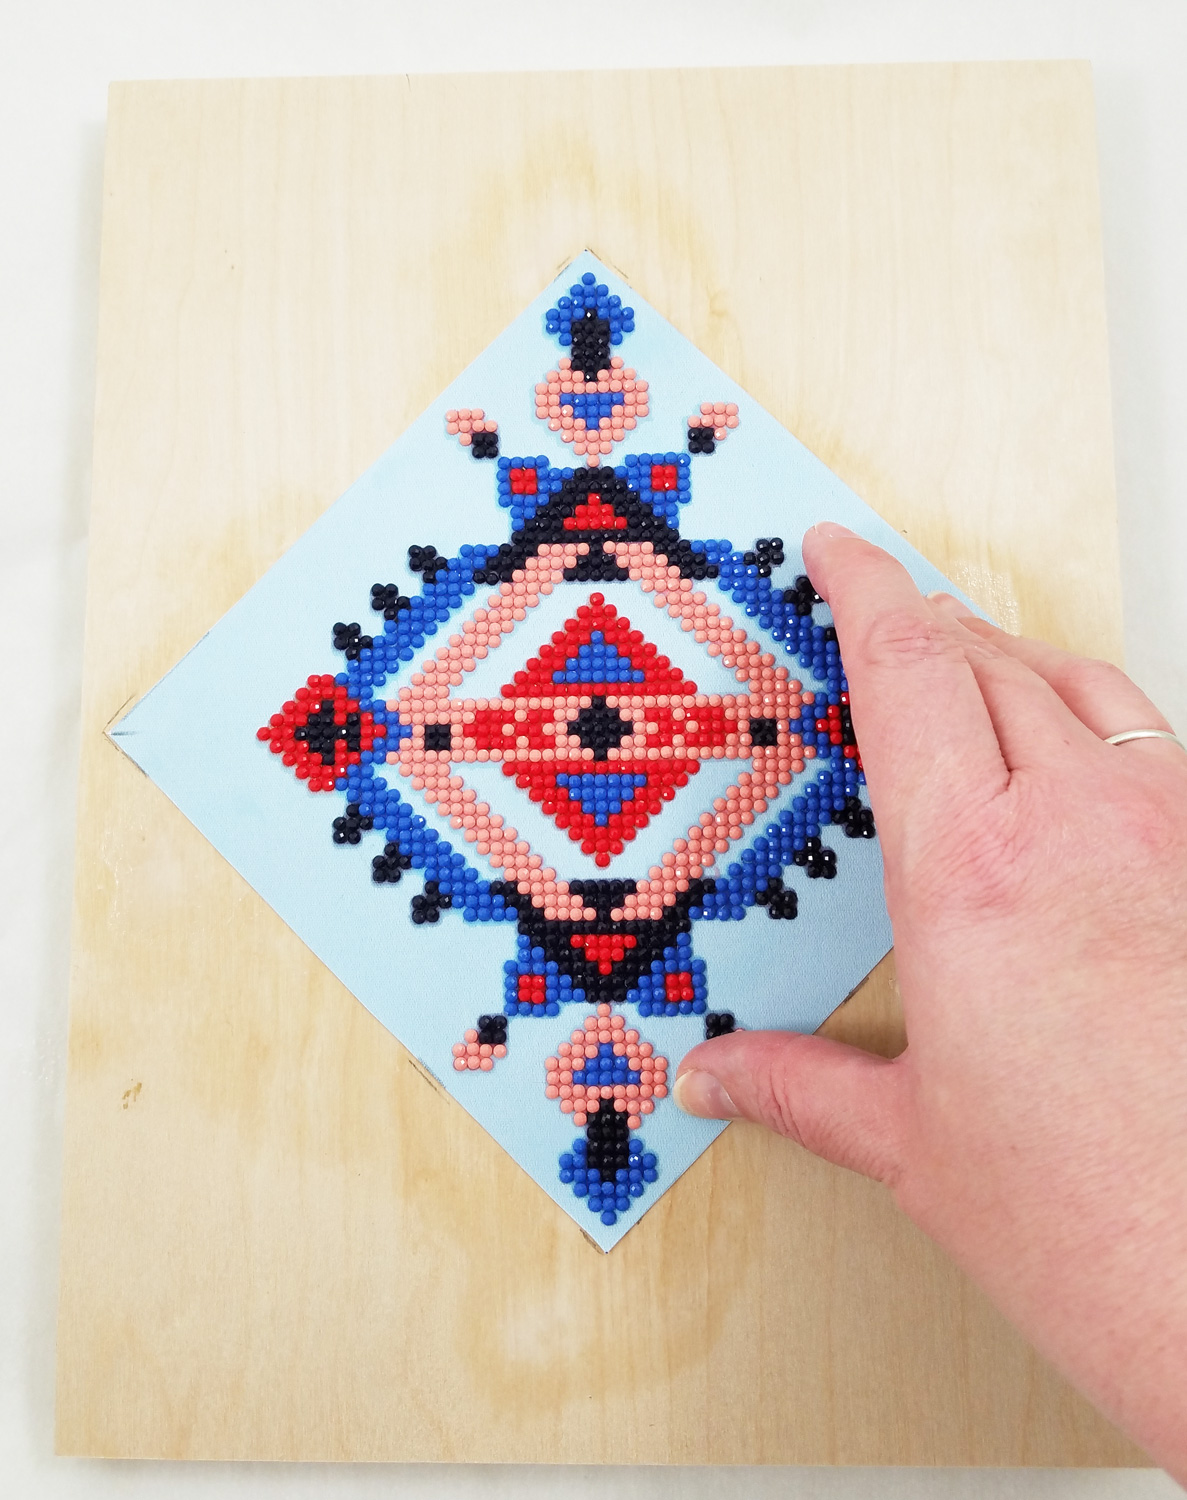
Quickly and carefully I applied the diamond canvas to the coated wood board. I applied firm pressure to the canvas. The spray version of Mod Podge Matte makes it much easier to apply fabric without a worry of oversaturation or bubbles forming. I let the Mod Podge fully dry.
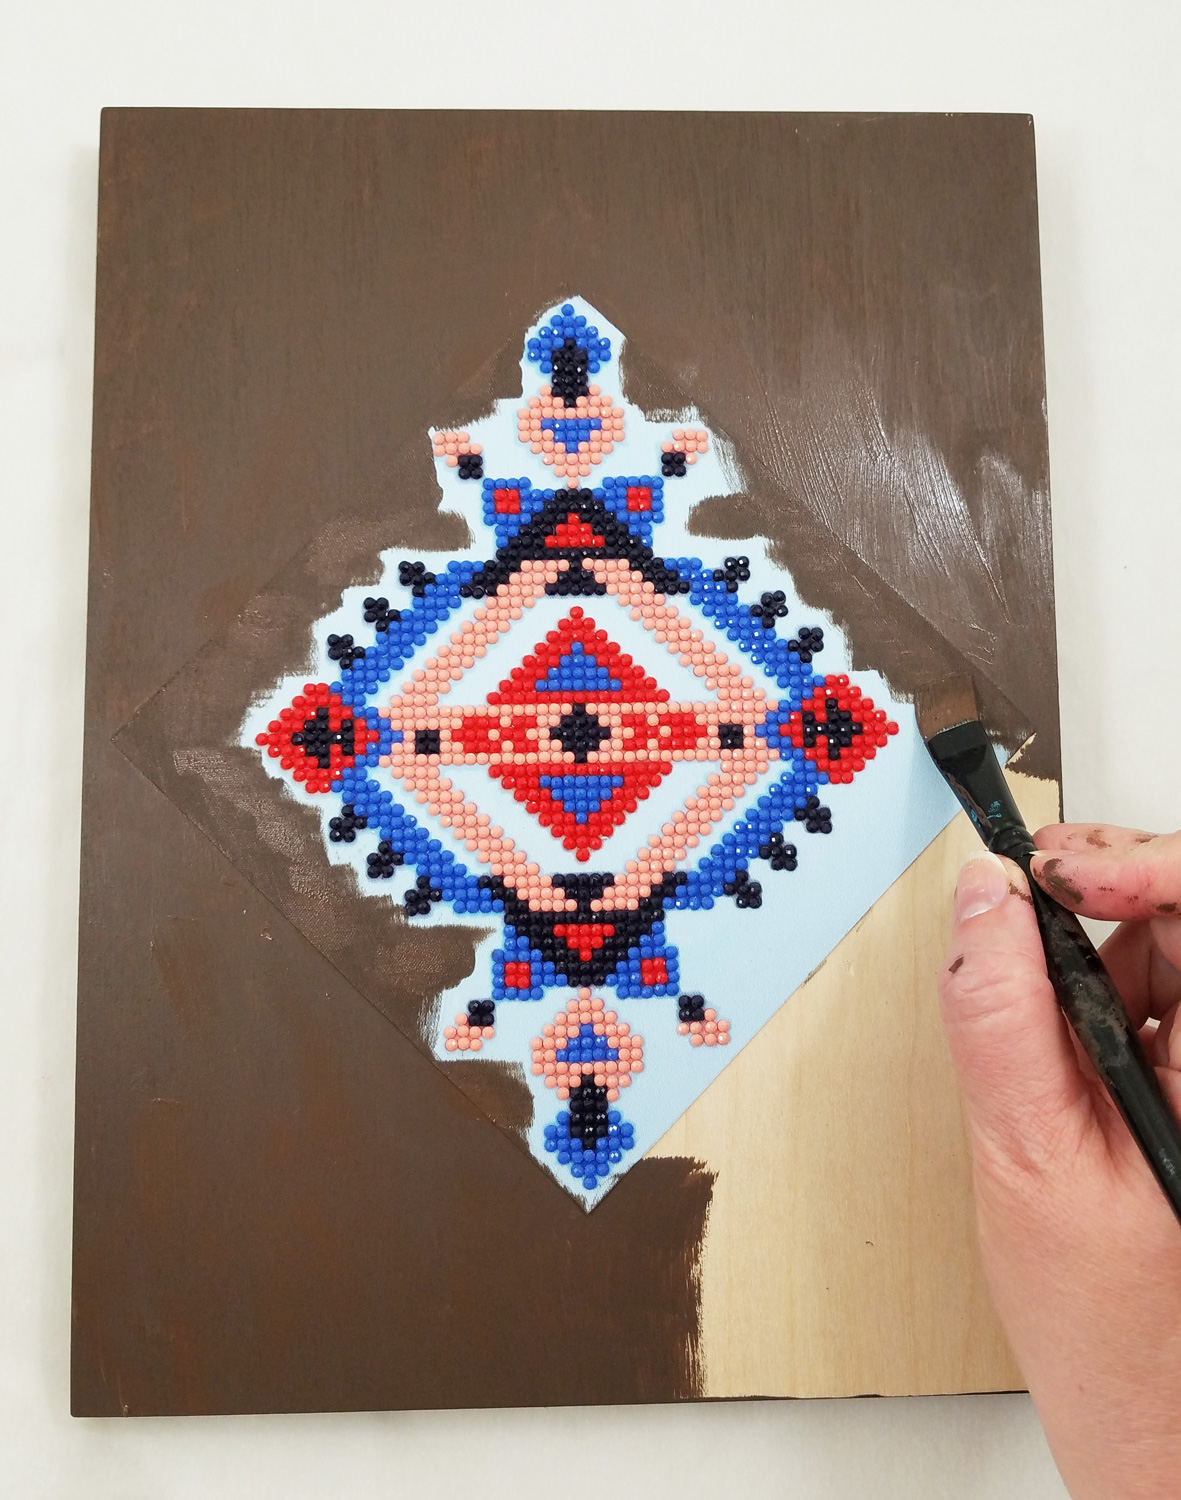
Making sure to cover the sides and front of the wood board I applied on FolkArt Home Deco Chalk Paint in Java. Using the flat paint brush to apply paint to the open sections of the wood board and the round brush for the detailed sections around the diamonds. The Tribe Design canvas had a tendency to soak up more paint, so I applied a bit more paint to make sure there was even coverage.
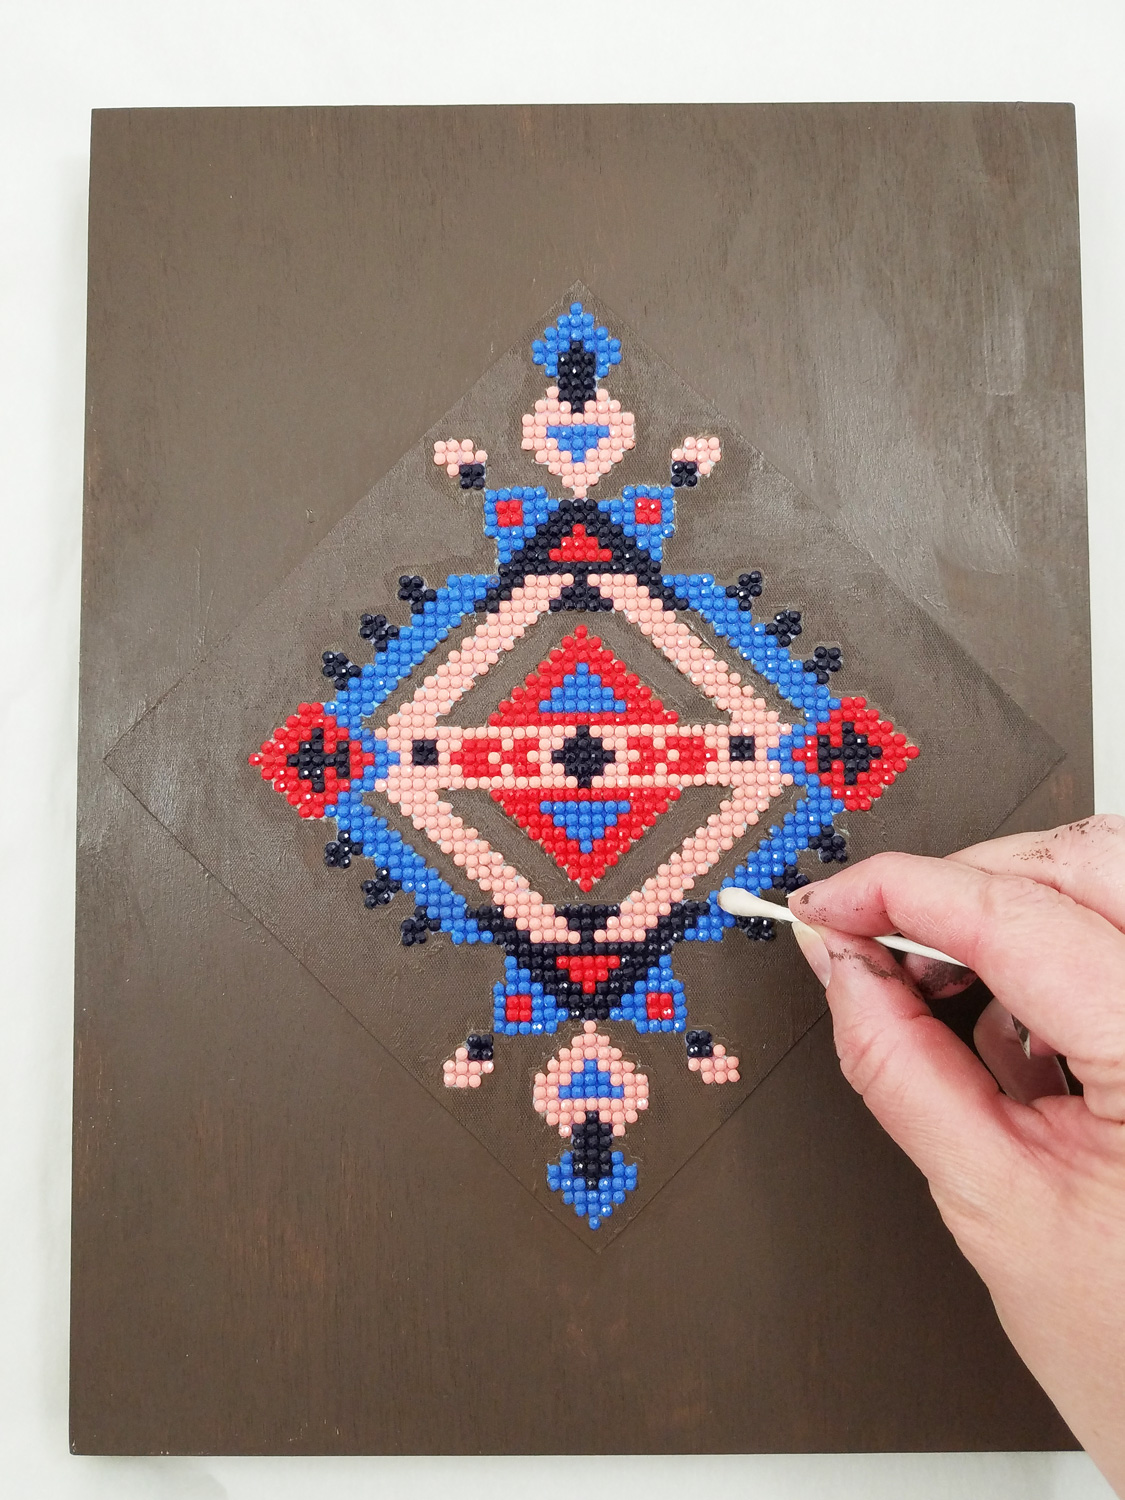
Before the paint fully cured I used cotton swabs dipped in isopropyl alcohol to remove any paint that accidently covered the diamonds. I then let the paint fully cure before the next step.
On the now dry paint I applied FolkArt Crackle Medium, careful to not over brush and to only apply the medium in one direction. This would ensure a better crackle formation later on. I let this layer fully dry.
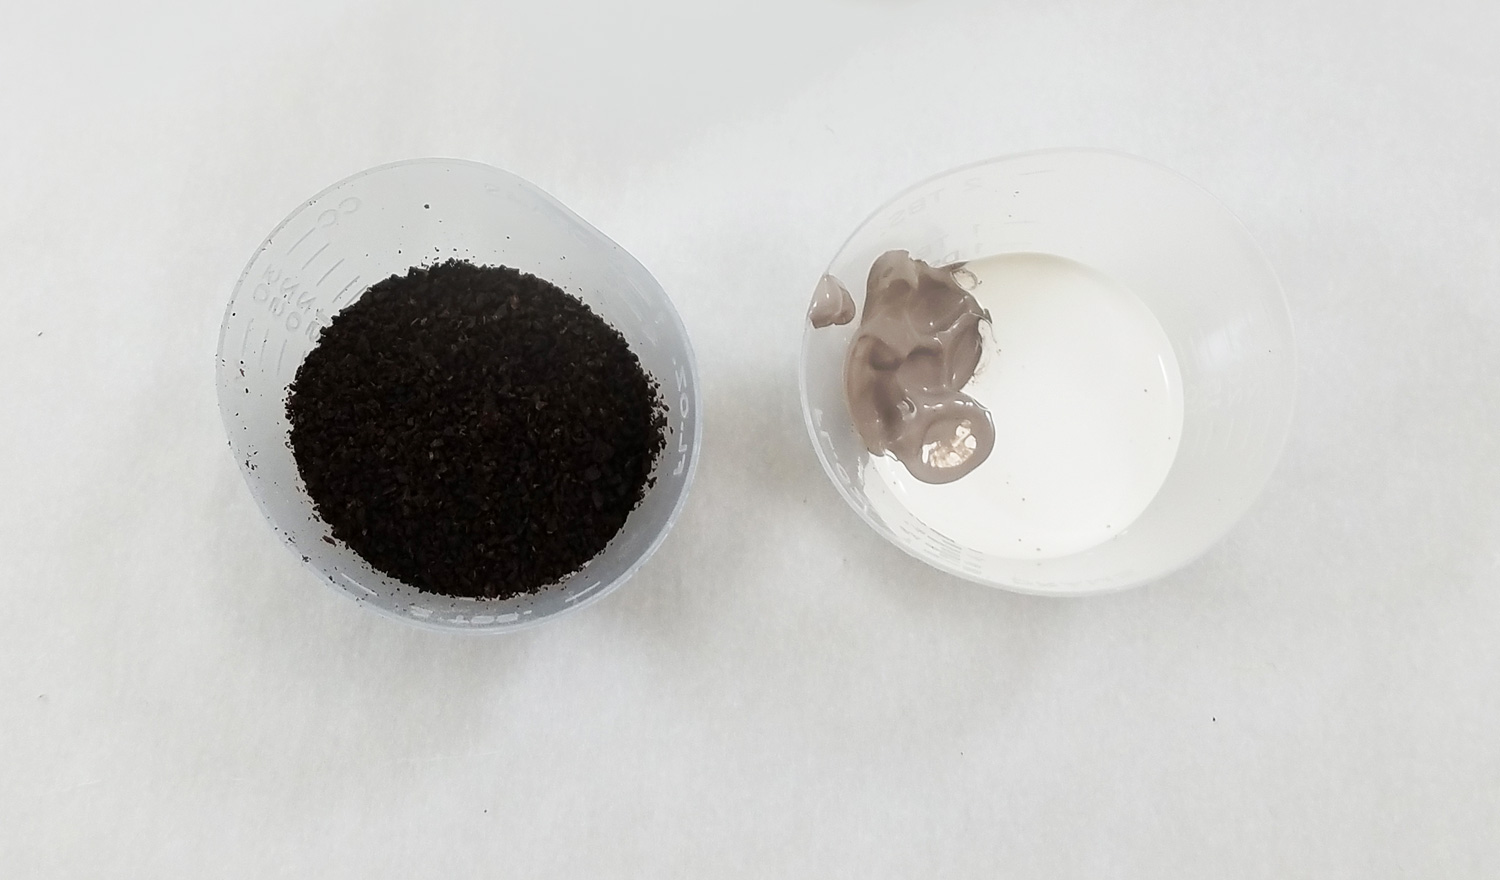
To create a highly textured topcoat I mixed a tablespoon of used and dried coffee grounds in a small cup, with 4 parts FolkArt Home Decor Chalk Paint in White Adirondack, with 1 part Parisian Grey.
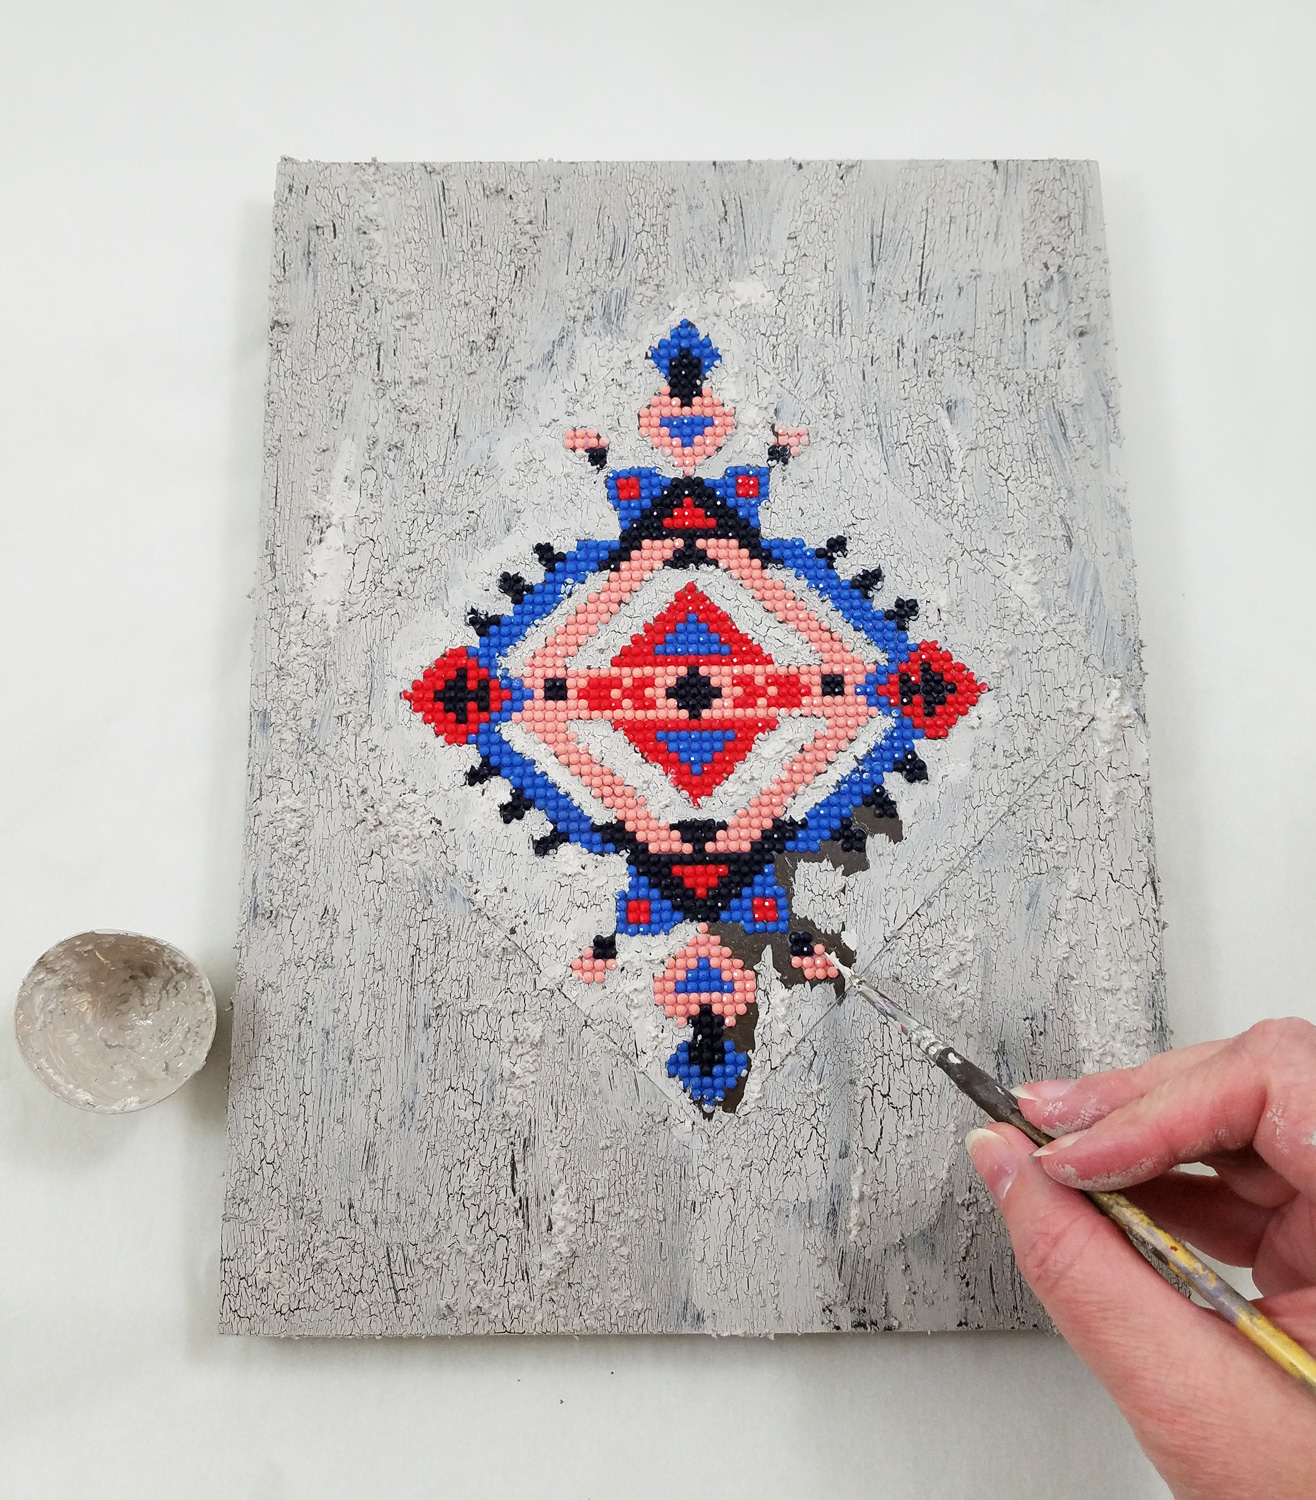
I quickly applied my textured topcoat to the crackle layer, making sure once again to not over paint, and for the most part, go only one direction with the brush strokes. Any time the paint built up too much on the brush I cleaned the paint brush with a paper towel and then reapplied fresh paint mixture to the brush.
Once again before the paint fully cured I used cotton swabs dipped in isopropyl alcohol to remove any paint that accidentally covered the diamonds. I then let the paint fully cure before the next step.
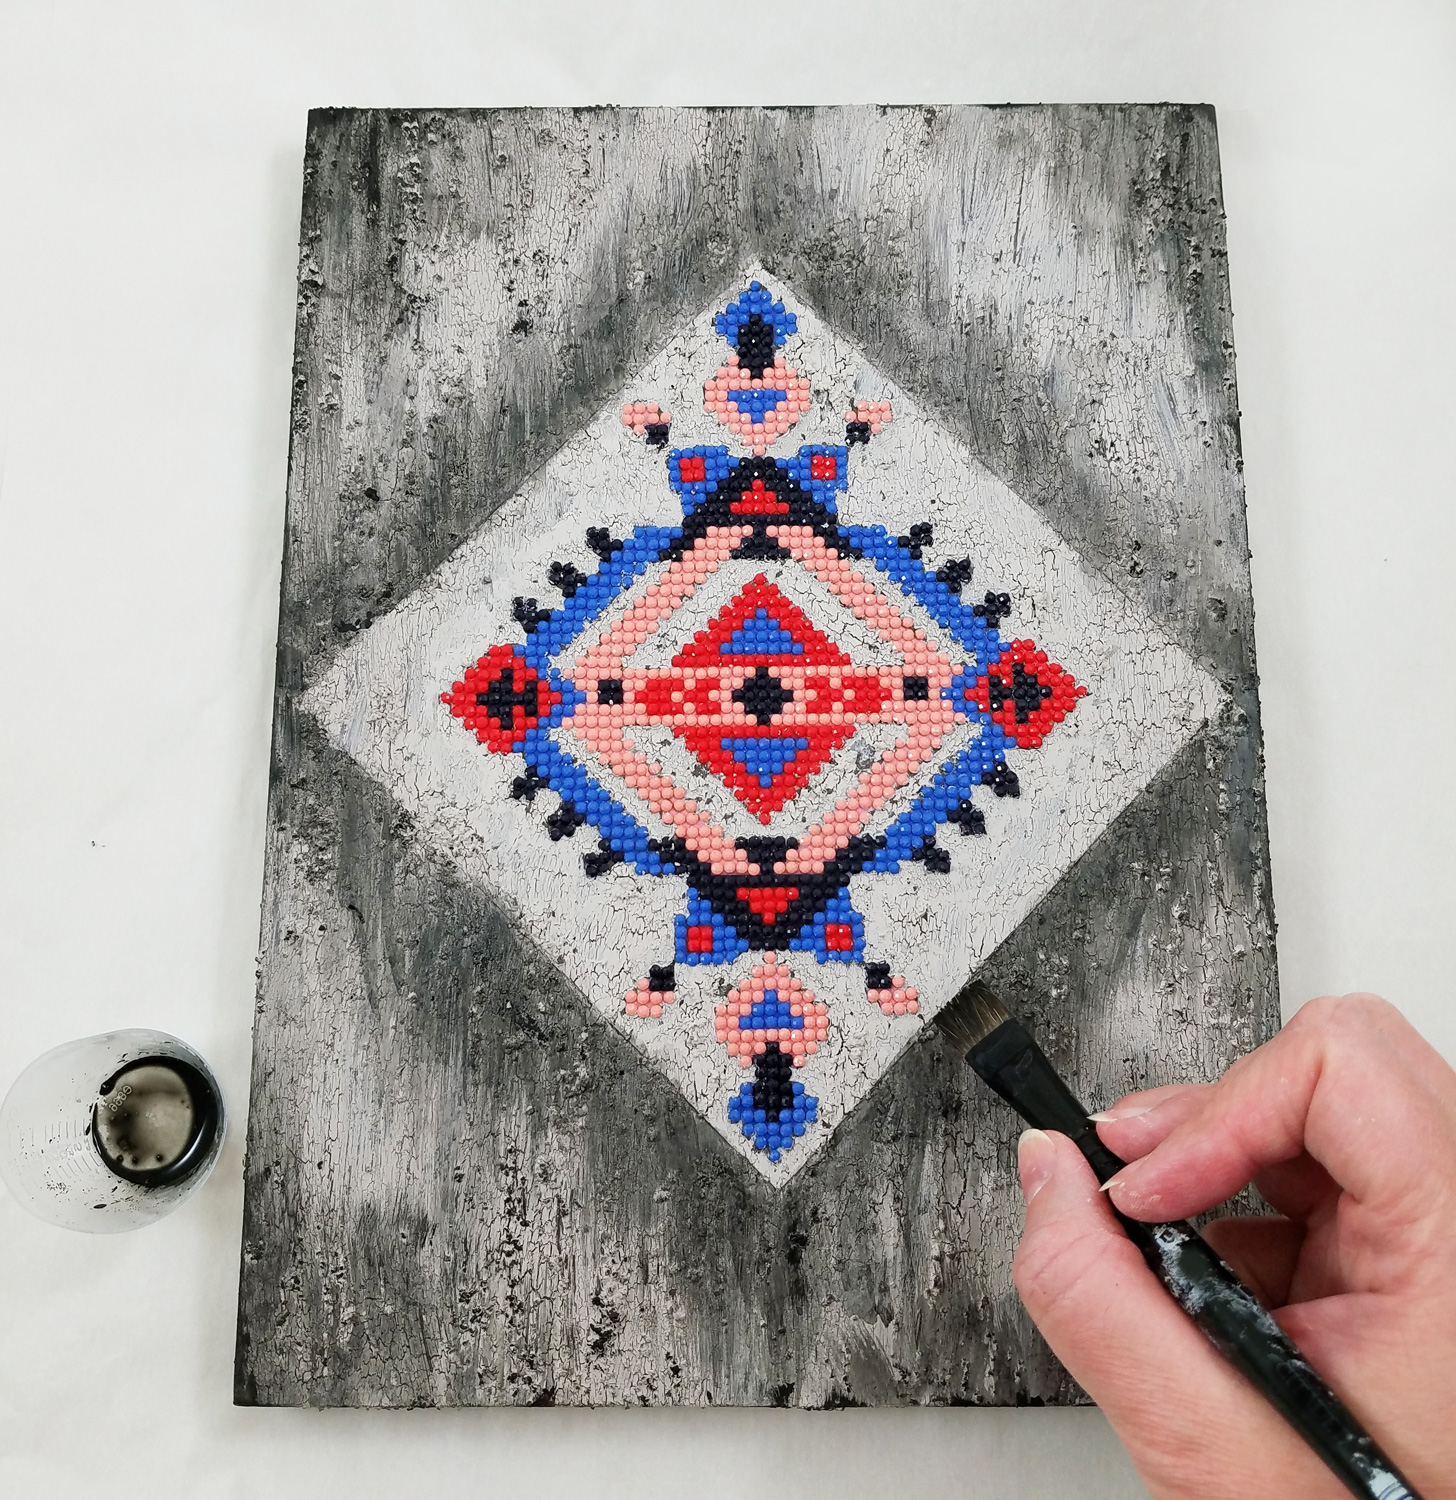
In a small cup I heavily diluted some Black FolkArt Home Decor Chalk Paint with some water and applied it to the cracks, textured elements and raised portions of the wood board, careful to avoid the flat backed diamond pattern. I left the paint to fully dry.
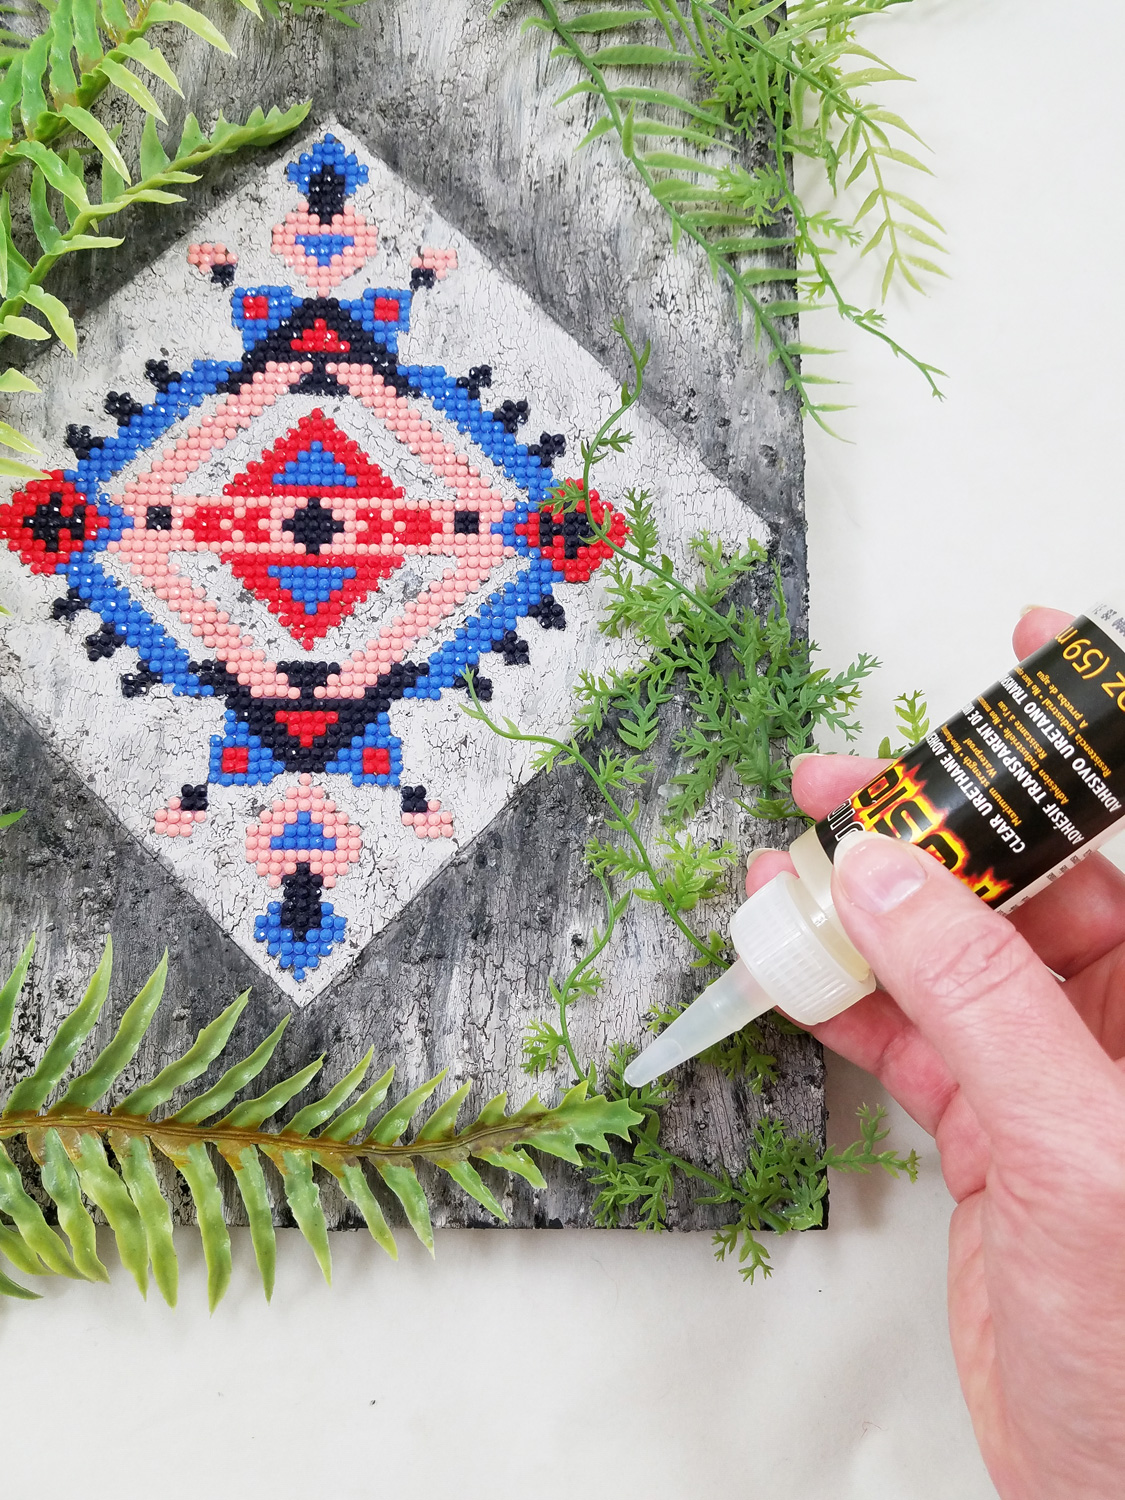
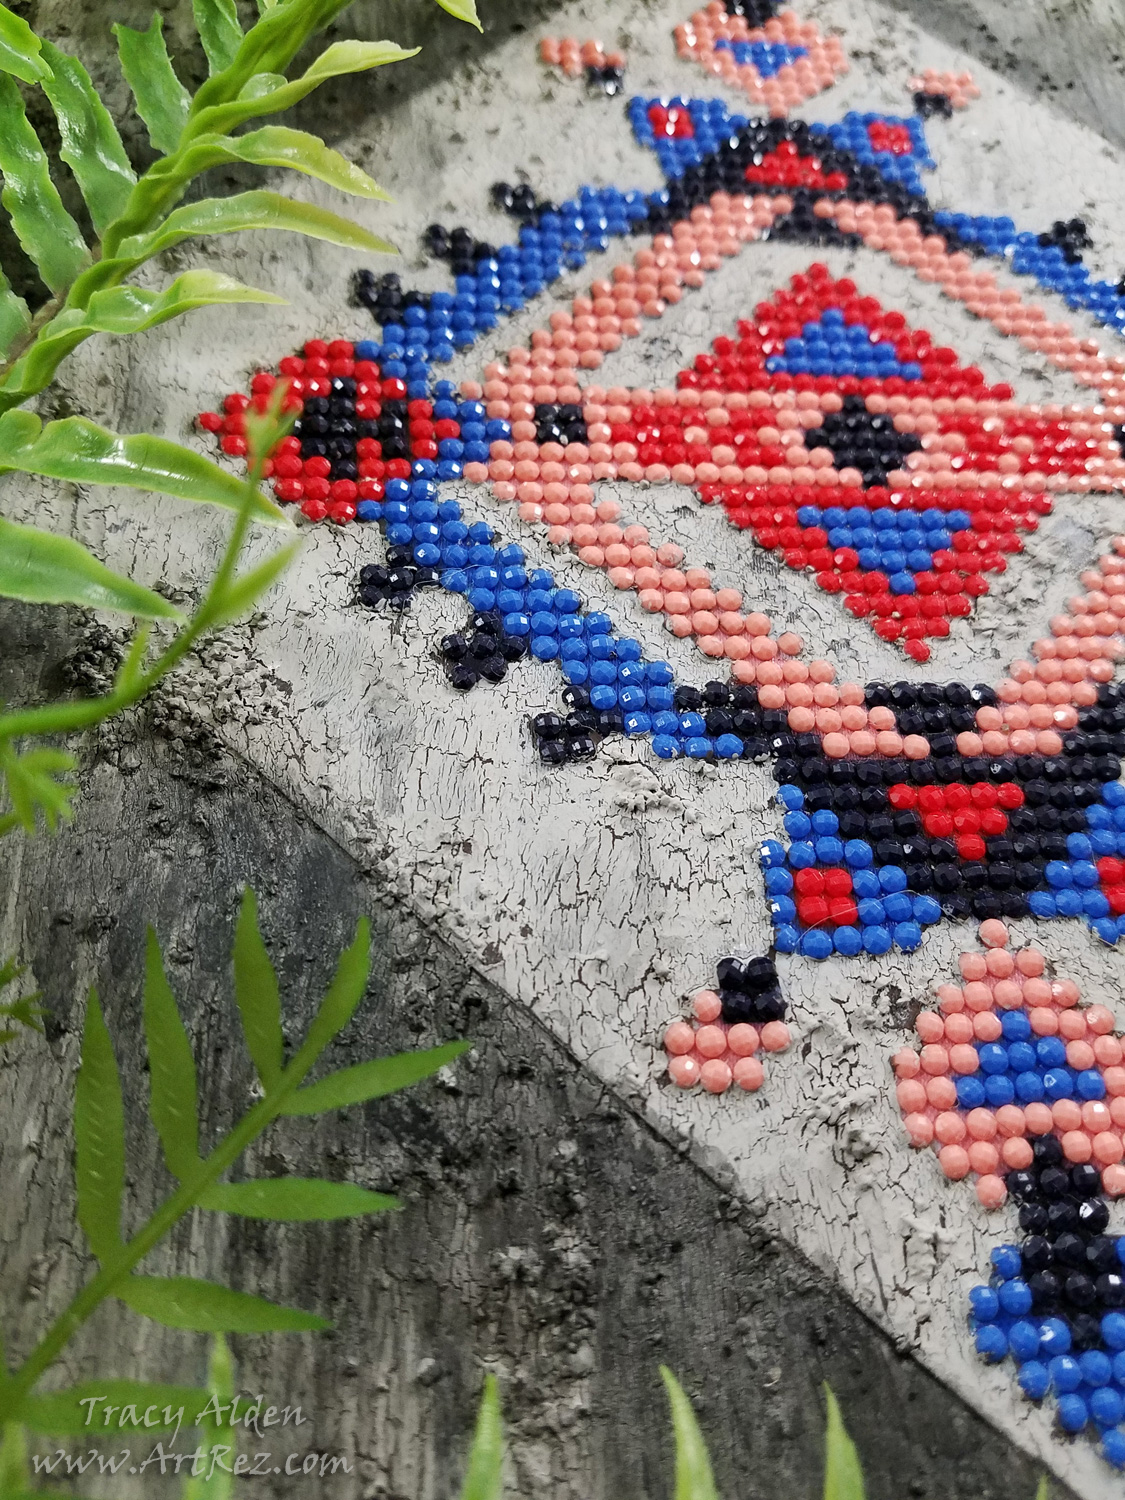
I cut and placed the artificial tropical plants on the board, finding the placement I liked best, gluing the plants in place with Liquid Fusion Clear Urethane Glue. Once the glue was fully cured my pieces was ready to be displayed.
Until next time, safe travels!
*This is an affiliate post, which means I received an assortment of products as a compensation for the creation of art. To read my full disclosure, click here. Sparkling Masquerade Mask with Testors Craft Intense Glitter Paint
My last two blog posts, found Here and Here I talked about the 6th annual Prime Networking Event in January. At this event, bloggers, designers, authors and brands in the craft industry came together to network, make new partnerships, and learn about new product information. Educational, informative, with food, drinks and free product samples provided by this year’s sponsors. Afterward, the event attendees were encouraged to try out and create art for the Favecrafts Best Blogger Craft Event.
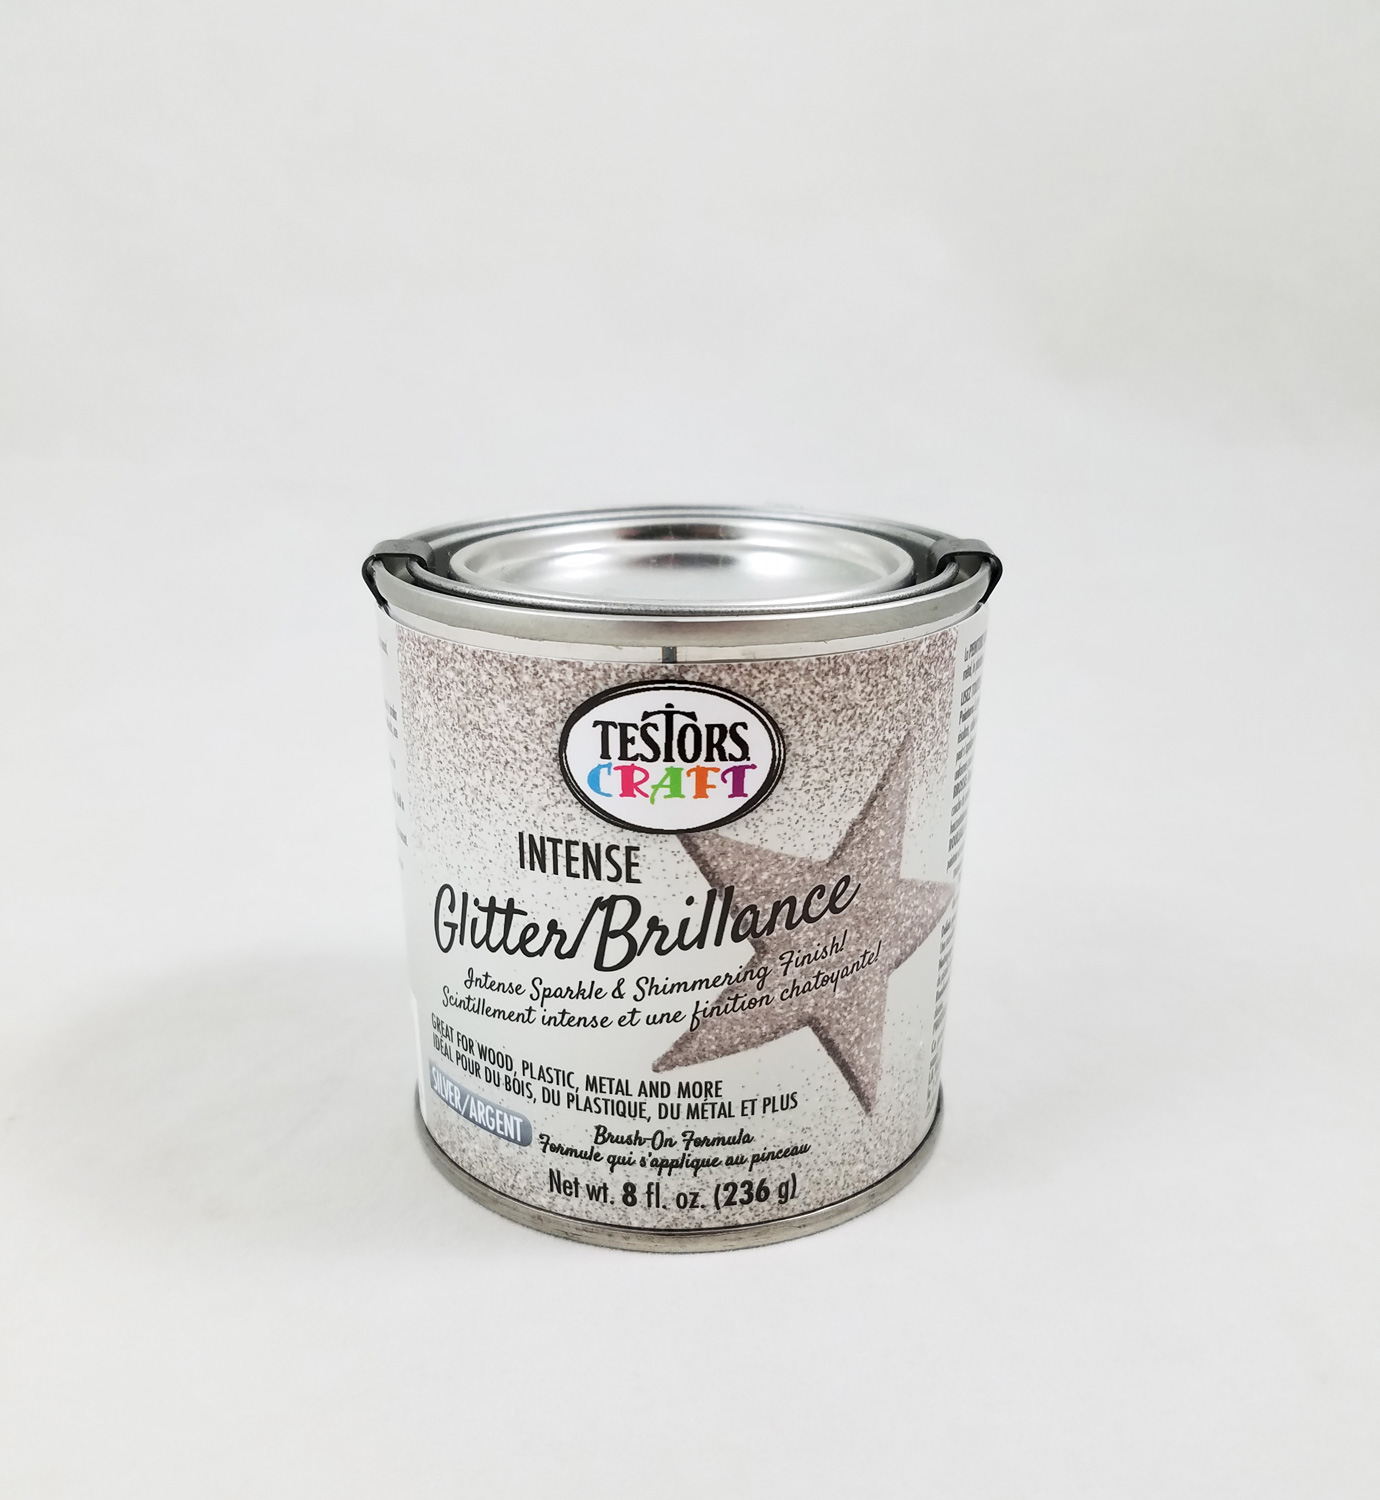
A sponsor at the event was Rust-Oleum with the Testors paint brand (Testors once its own company is now part the Rust-Oleum Group). During the blogger event attendees were asked to cast a vote for their favorite new Testors Craft/Rust-Oleum product. The winner of that vote was the Testors Craft Intense Glitter paint. As per the label it can be applied to wood, plastic, metal and more, with excellent adhesion, perfect for special occasion tablescapes and home accessories. Testors Intense Glitter paint is water based, low VOC and the glitter is made out of very small Mica particles (Mica is a naturally occurring mineral found in granite, rocks and crystals).
Many at the event were excited with this new paint and were excited to try it. However I will let you in on a secret: while a fan of the Rust-Oleum/Testors paint lines I am not a huge fan of glitter. I know I probably broke a crafting world rule by saying that but I have never found myself using much glitter in my projects. I use it mostly as a highlight, a minor shimmer or a tiny amount encased by resin. I have found many glitter paints in the past to be messy, have bad adhesion and not cover well. That being said I wanted to give this new paint a chance.
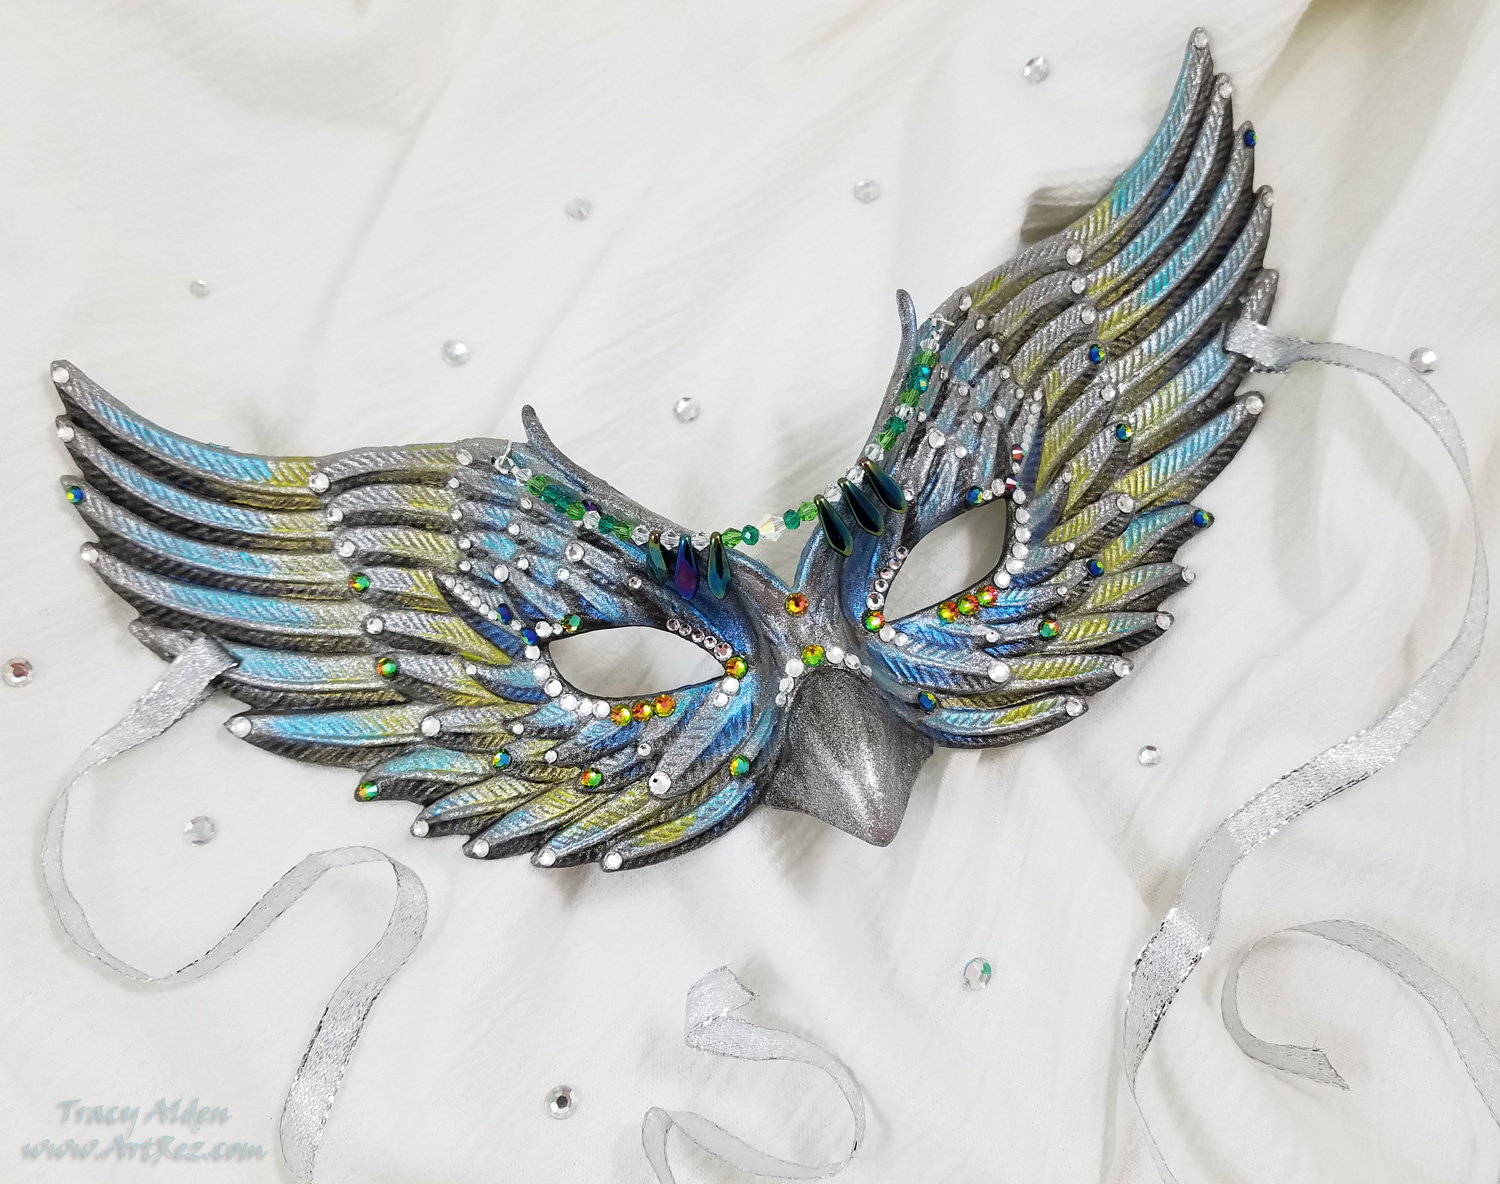
Upon opening the can of paint I realized how tiny the particles of glitter were. I painted a small swatch onto plastic, which it coated smoothly and even, when dry it looked amazing. I was staring to understand why so many were eager to try this paint. Inspiration for this project came from not wanting to coat furniture or small wood objects with glitter. I wanted to try turning something common into something beautiful. Grabbing a plastic Halloween mask from a .99 cent store I wanted to give this paint a true test, only to be very happy with my end results!Supplies:
Testors Craft Intense Glitter Paint
Plastic Owl Mask from a .99 cent store
Multi Surface Acrylic Paint in Grey and Black
Metallic Multi Surface Acrylic Paint in Blue and Green
2 Paint Brushes
Beacon Gem-Tac Glue
Swarovski Rhinestones Flatback Vitrail Medium SS20
Clear Crystal Rhinestone Flatback 4mm and 3mm
Crayon
Silver Ribbon
Beads, Bead Thread and Jumprings *optional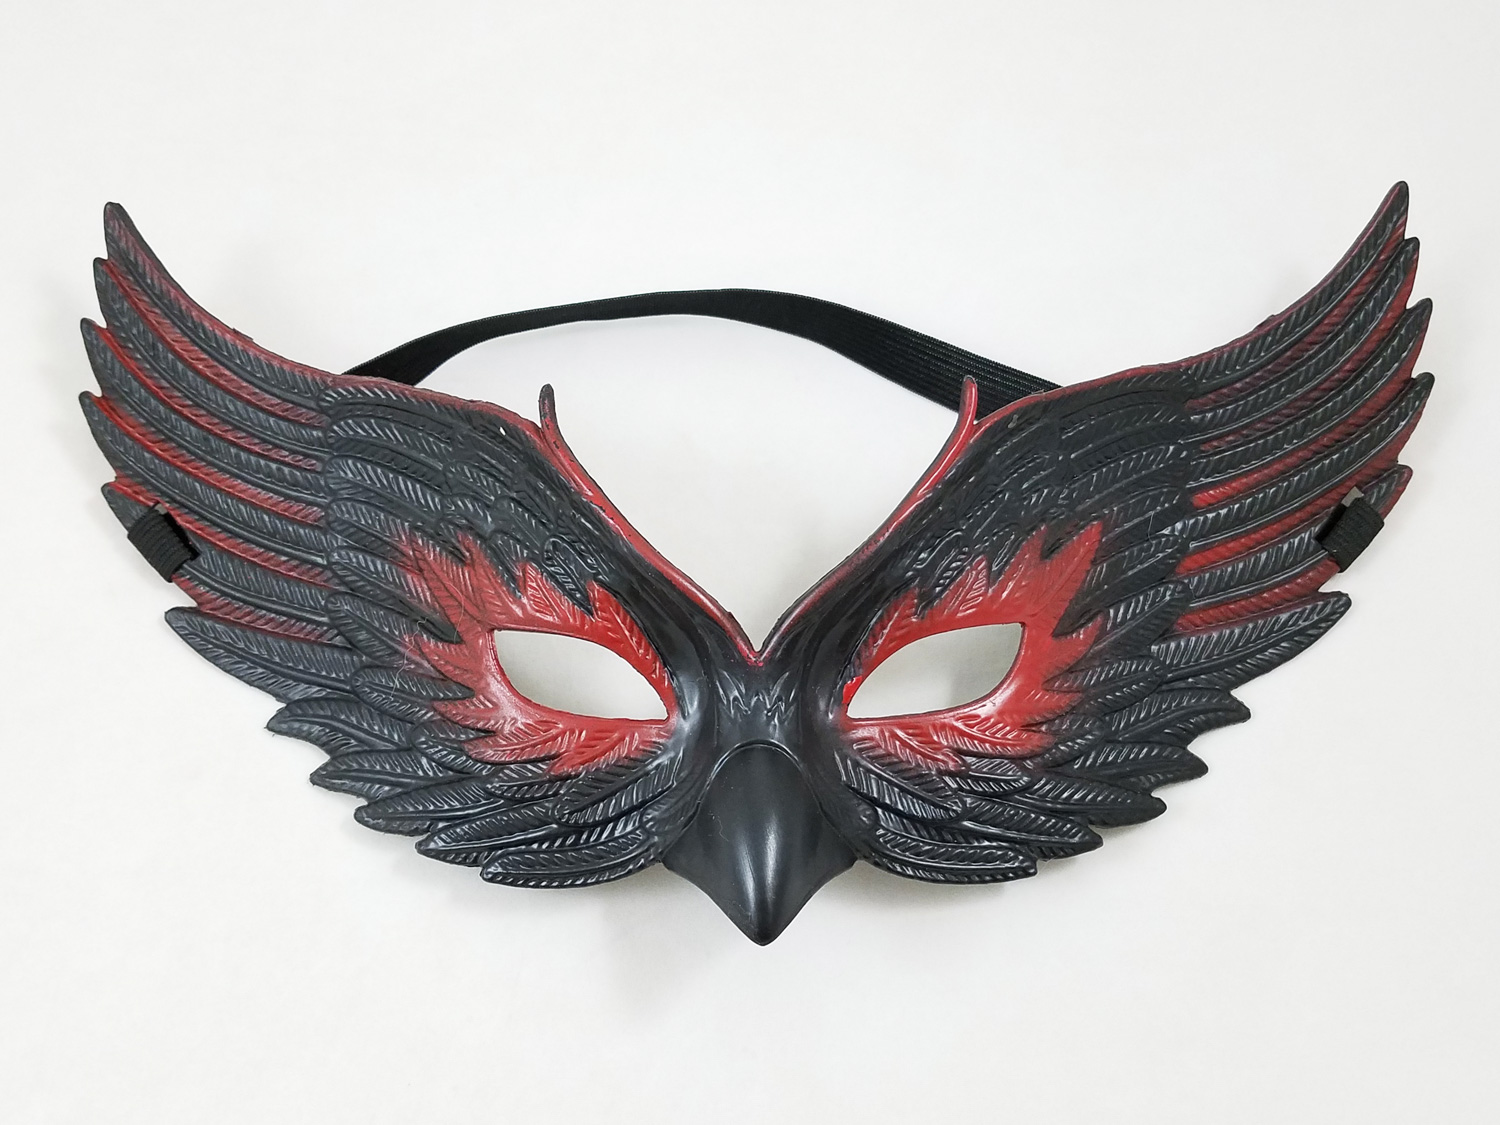
Starting by cleaning the plastic Halloween mask with soap and water, I made sure to remove any oils or dirt left from the manufacturing process. I cut off the elastic headband and filed any sharp edges.
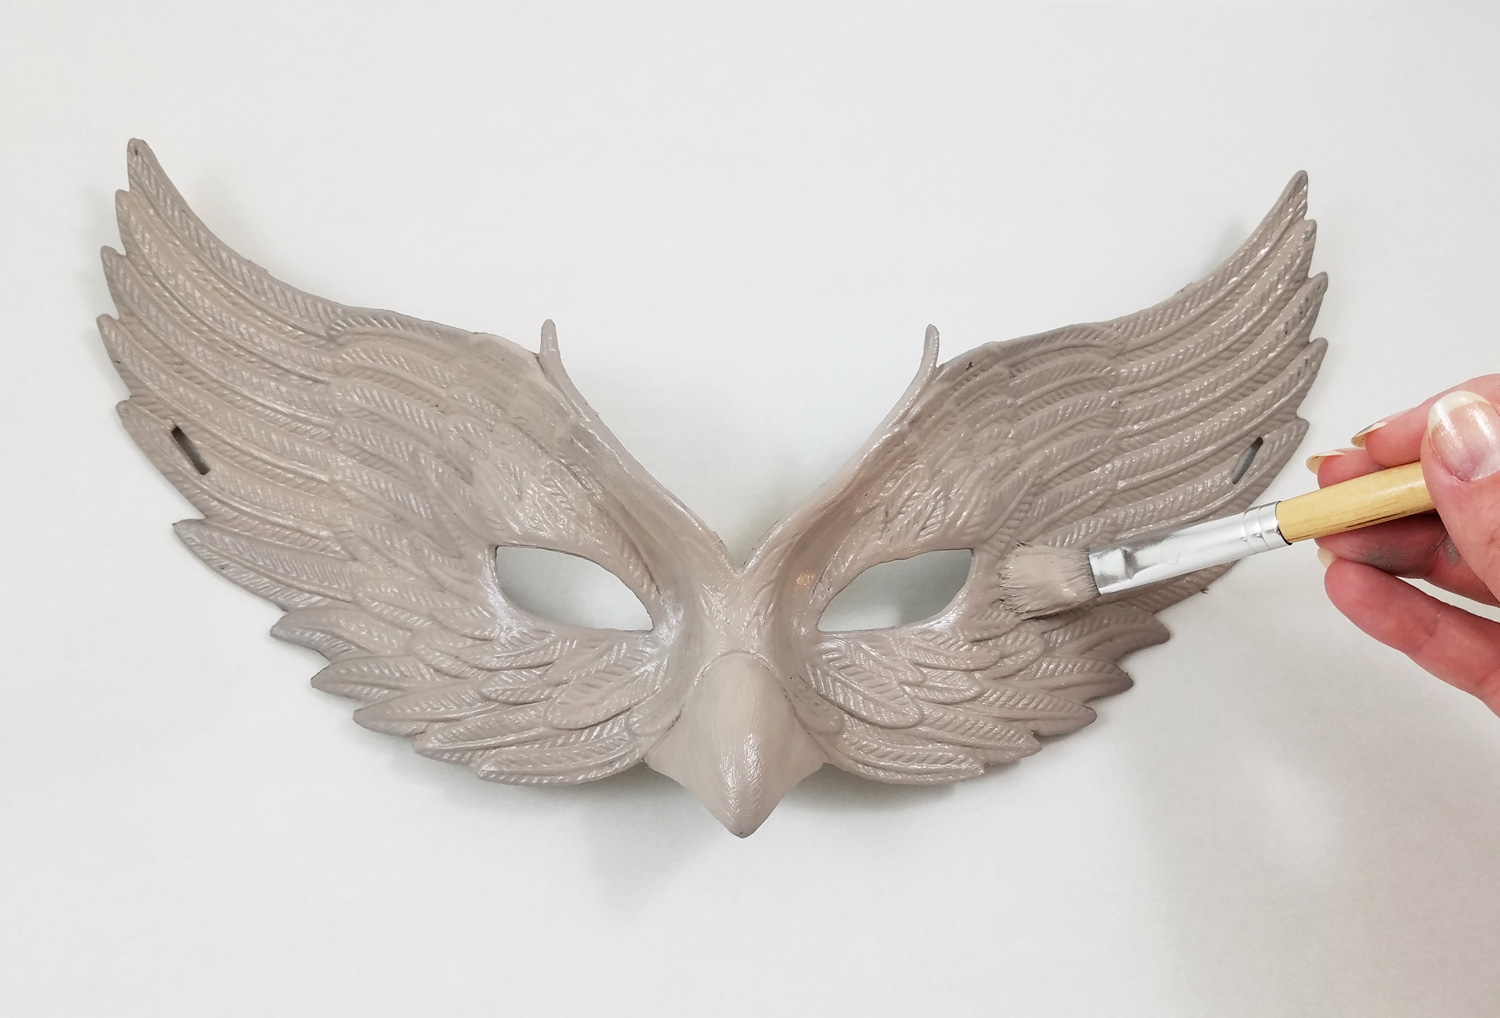
I noticed on the can of Testors Craft paint it said for best results to use a acrylic paint base coat similar in color to the glitter. Using a multi surface acrylic paint I painted the front and back of the mask, making sure to get complete coverage over the original black plastic.
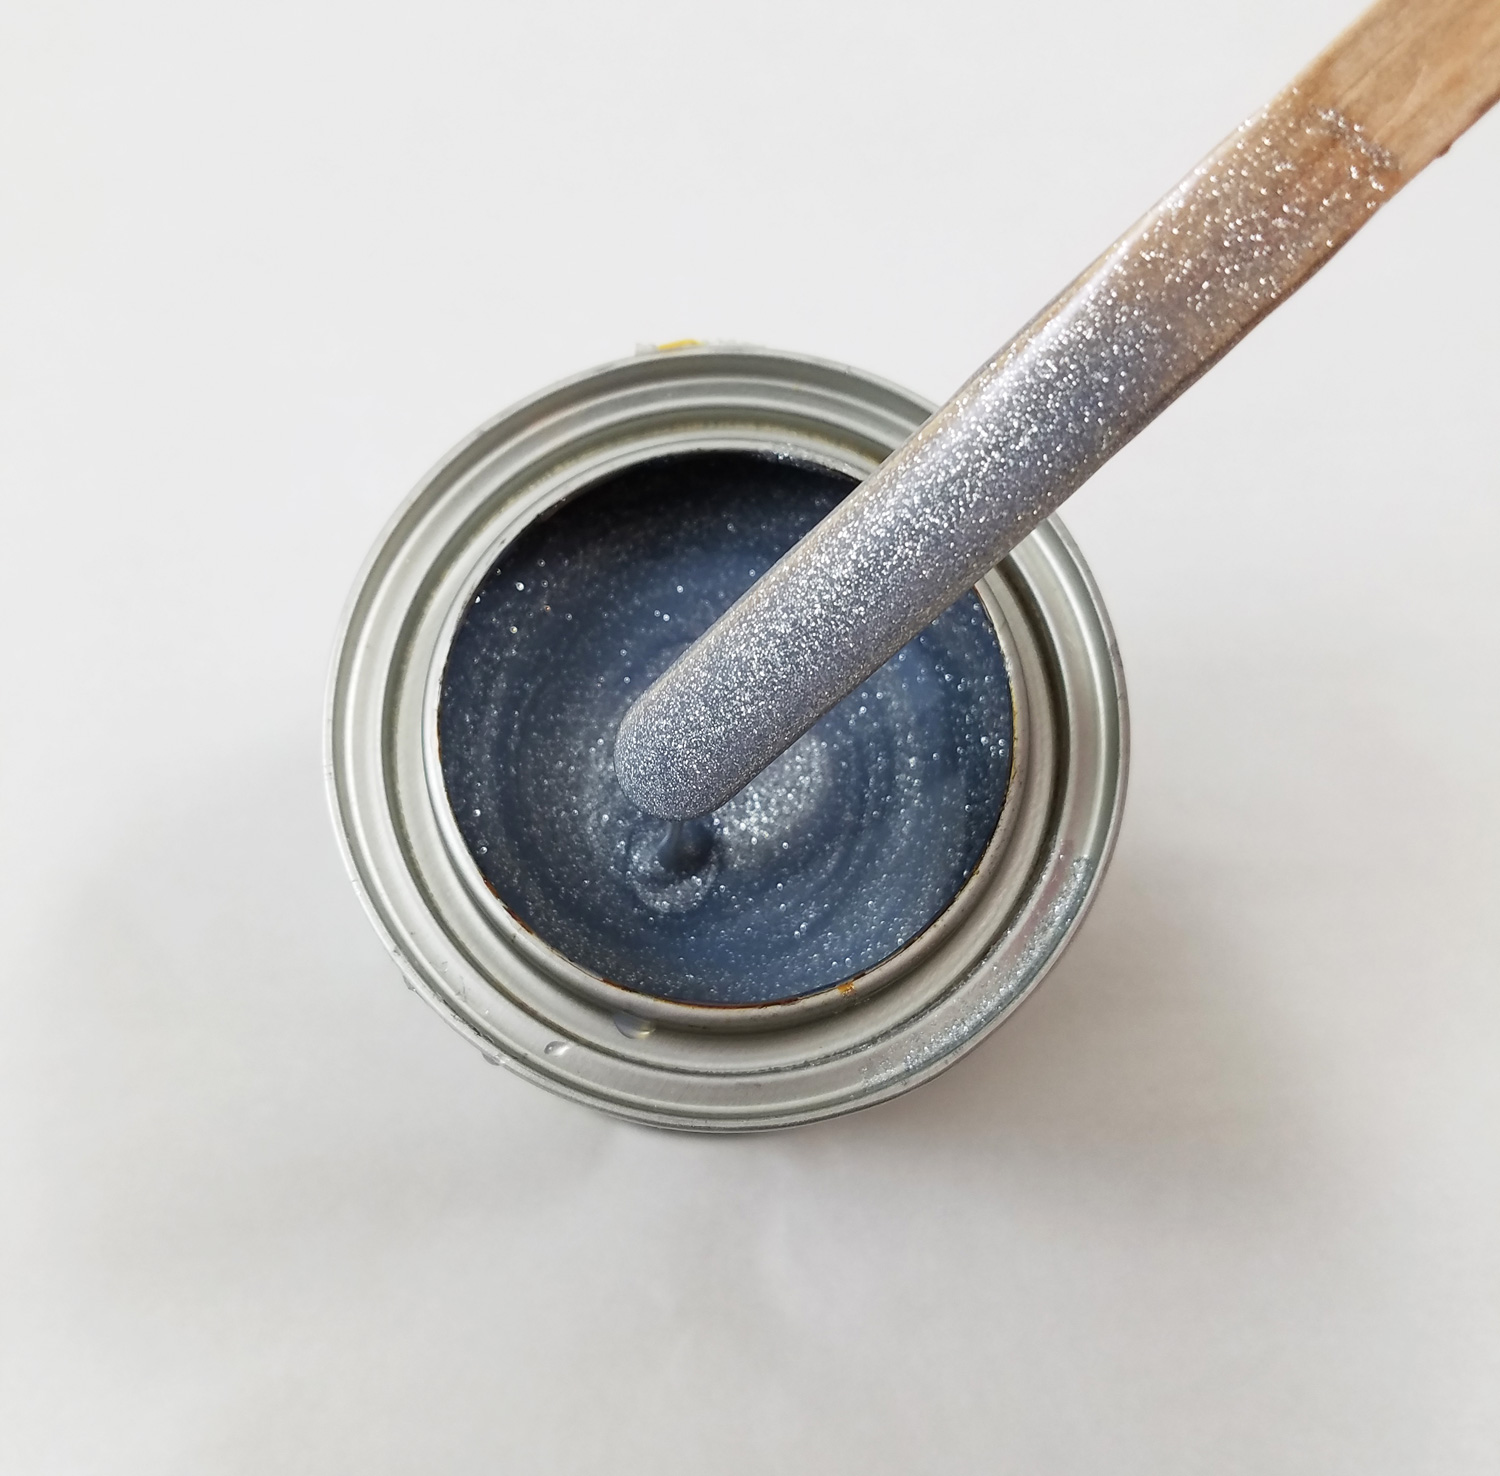
As you can see from the photo there is a intense amount of glitter in this paint. Before applying the paint to any surface make sure to stir thoroughly the Testors Craft Intense Glitter paint. This step MUST be repeated before each application because there is so much glitter in the paint it settles to the bottom when resting.
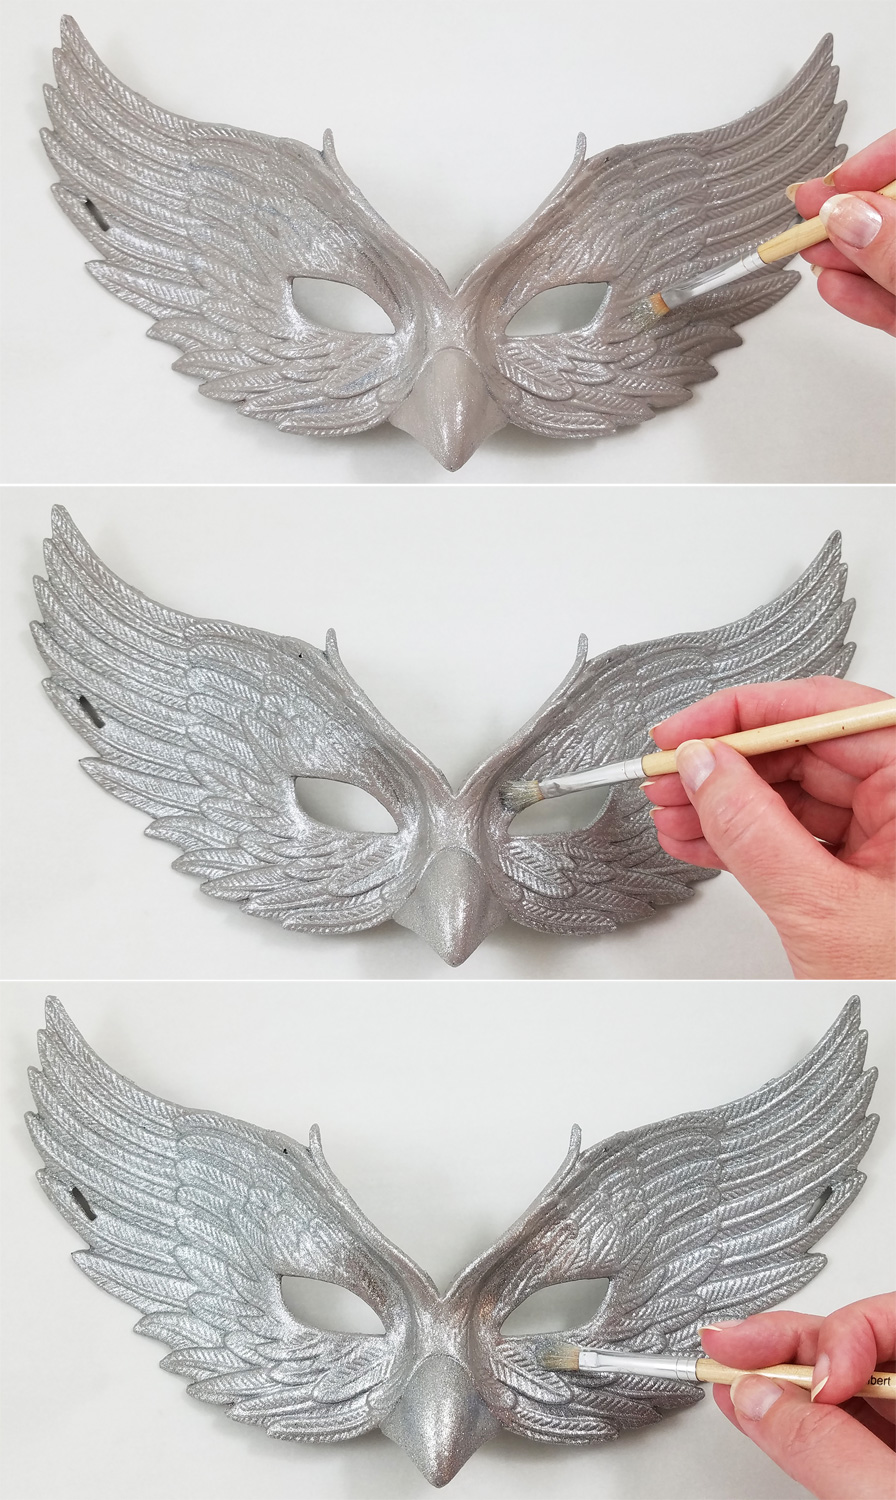
I applied one coat of paint brushing it on in uniform direction. With no need to rush, slow, steady and even brush strokes got the best and most even application of the paint. As long as you do not overload the brush the paint is not a messy paint and sticks well to the plastic surface. It dries in about one hour to touch and can be painted with a second coat in 4 hours. In the top photo you can see one coat of paint, each additional image with another coat of paint. I chose to paint three coats to get the most vibrant and intense glitter coverage, though I could have easily gotten away with 2 coats of paint.
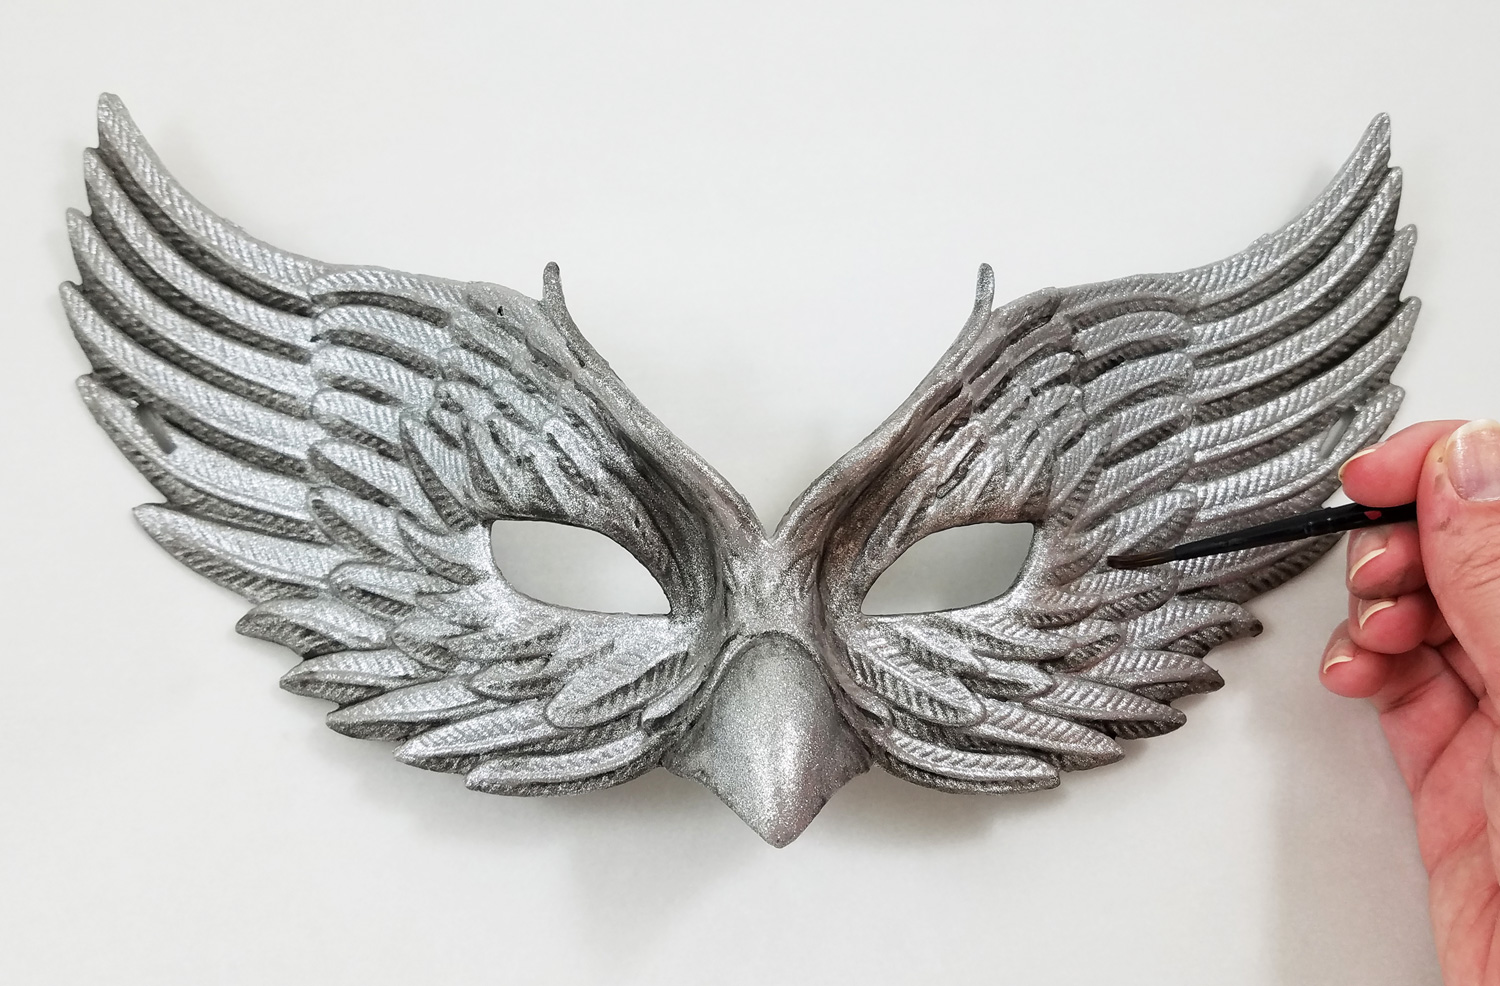
By applying a light color wash of black multi surface acrylic paint in the groves of the feather details, it added more contrast to the mask. I let the paint dry fully.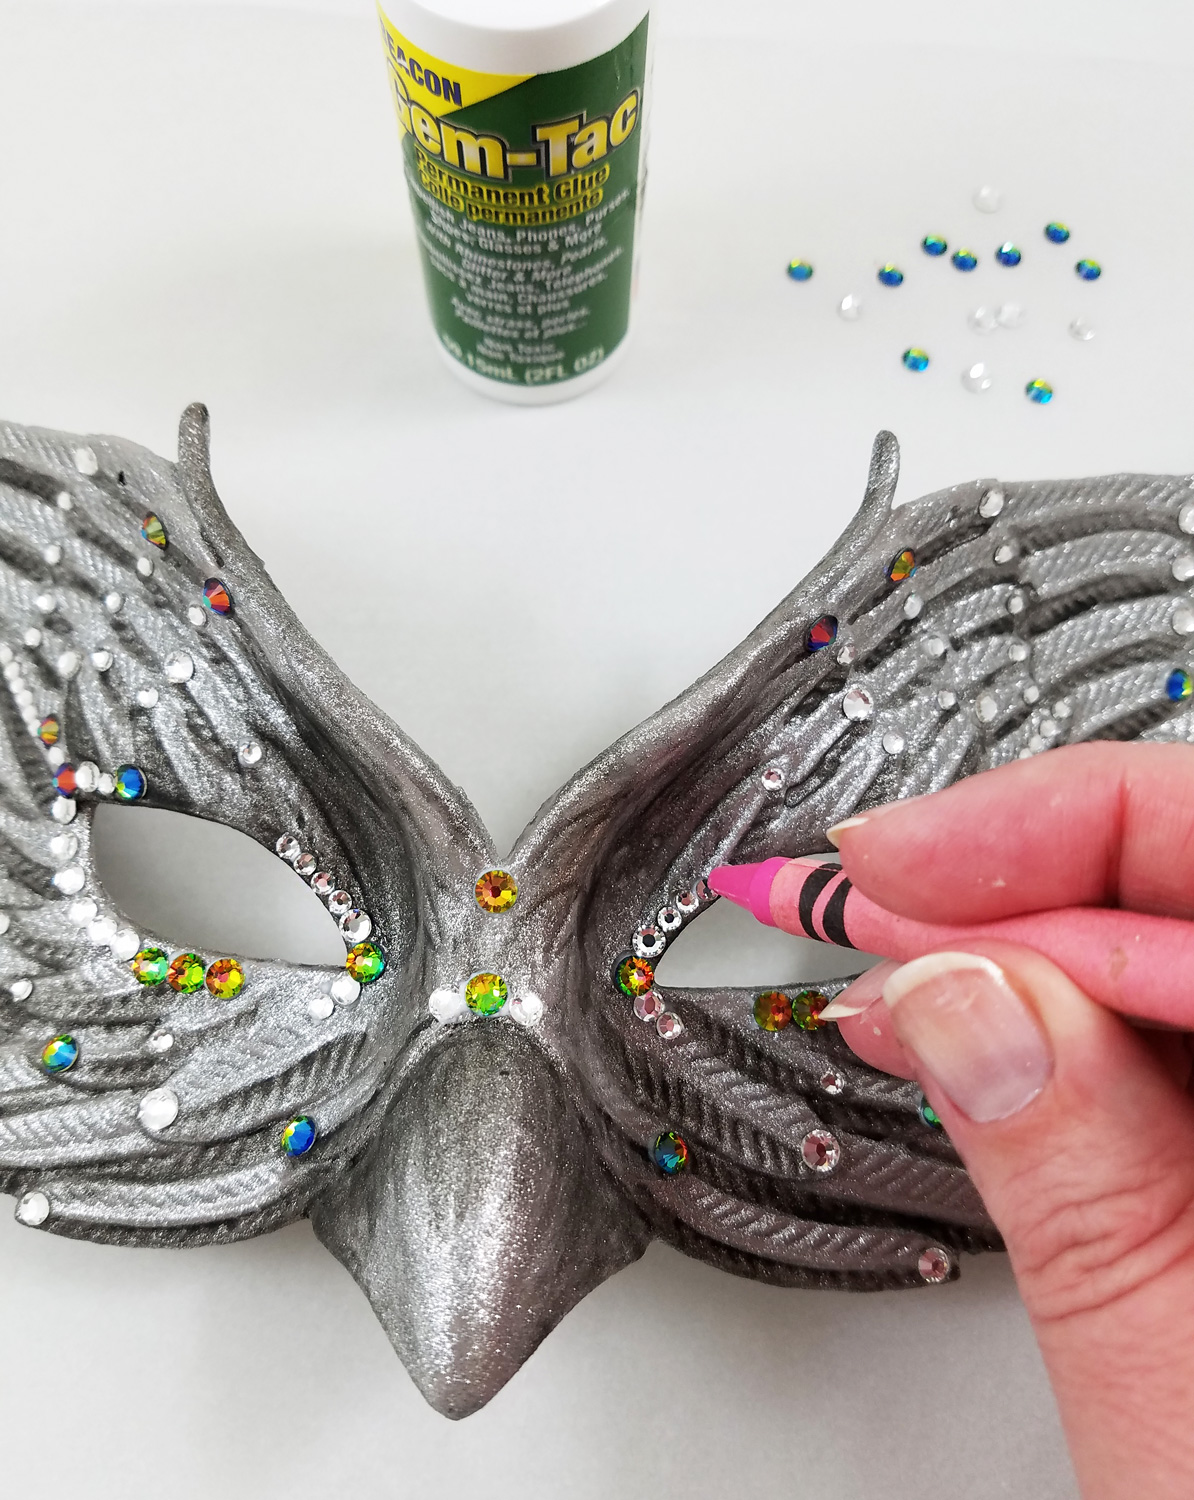
Beacon’s Gem-Tac is my go-to glue for applying small decorative elements to most craft surfaces. By squeezing small dots of glue on different portions of the mask I added flatback crystal rhinestones to add that extra special sparkle and shine. Applying flat backed rhinestones can be tedious but using an old costuming trick you can quickly apply them: pick up each rhinestone by pressing the top of each stone with a crayon. The wax is soft enough it temporarily sticks to the rhinestone allowing you to move it to wherever you would like it applied.
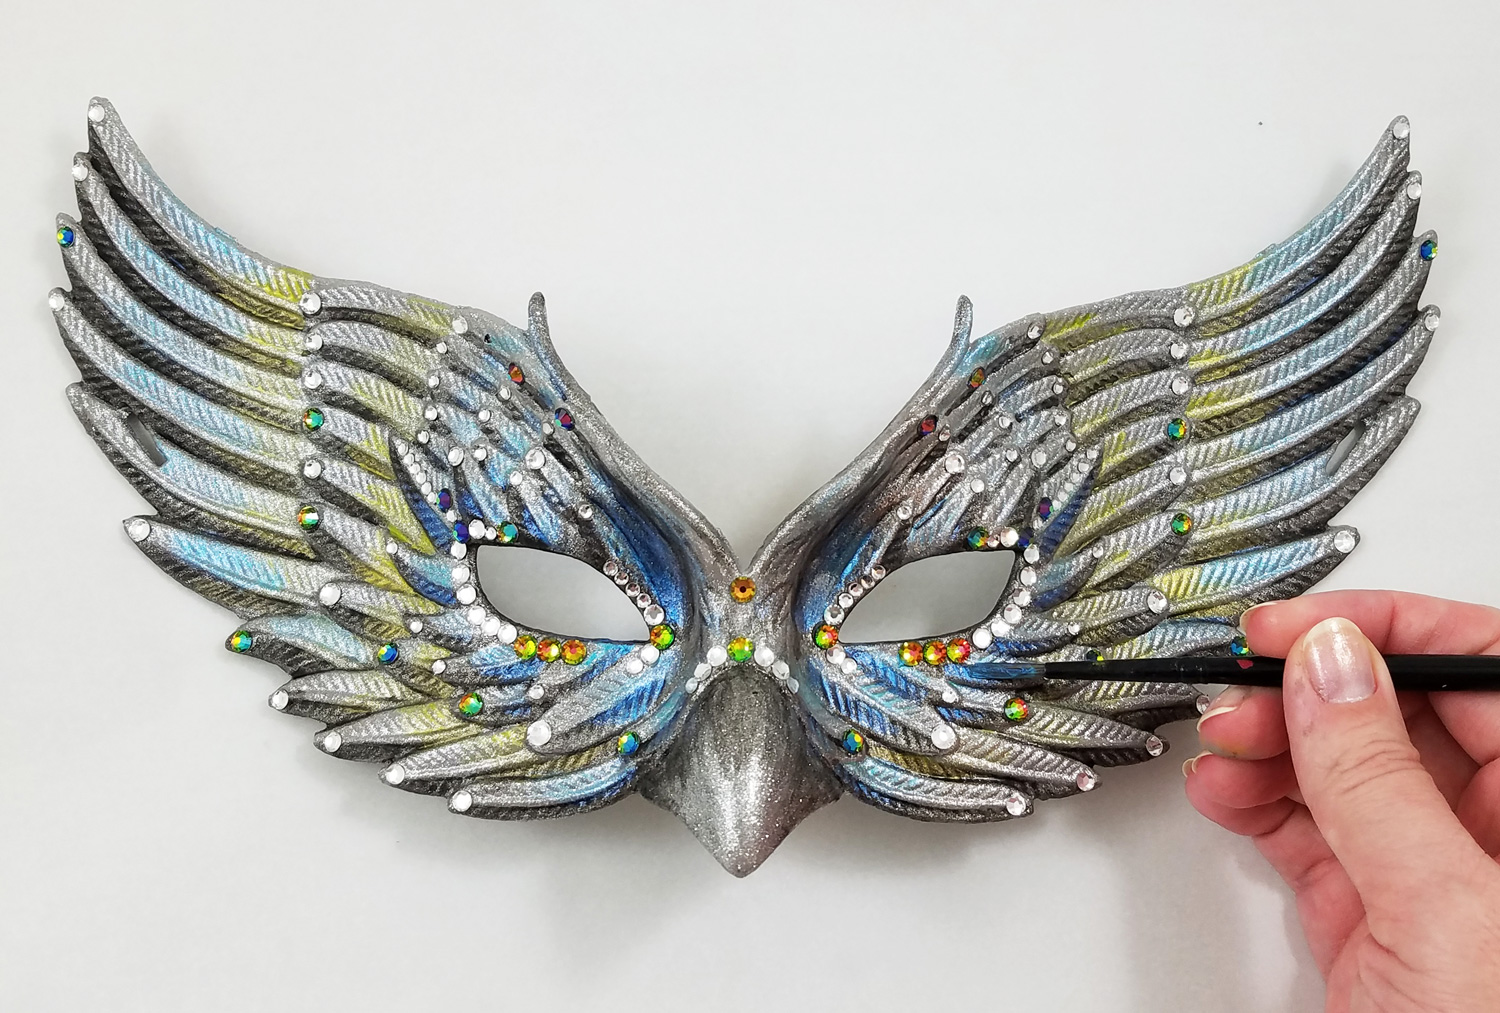
I loved the look of the rhinestones to the mask but I felt it was missing a little something. I went ahead and created a second acrylic paint color wash but this time with metallic blue and green paint. I applied this color directly on top of each glittered feather element of the mask and in the eyelid creases. This created a lovely transparent metallic hue. I let the paint dry fully.
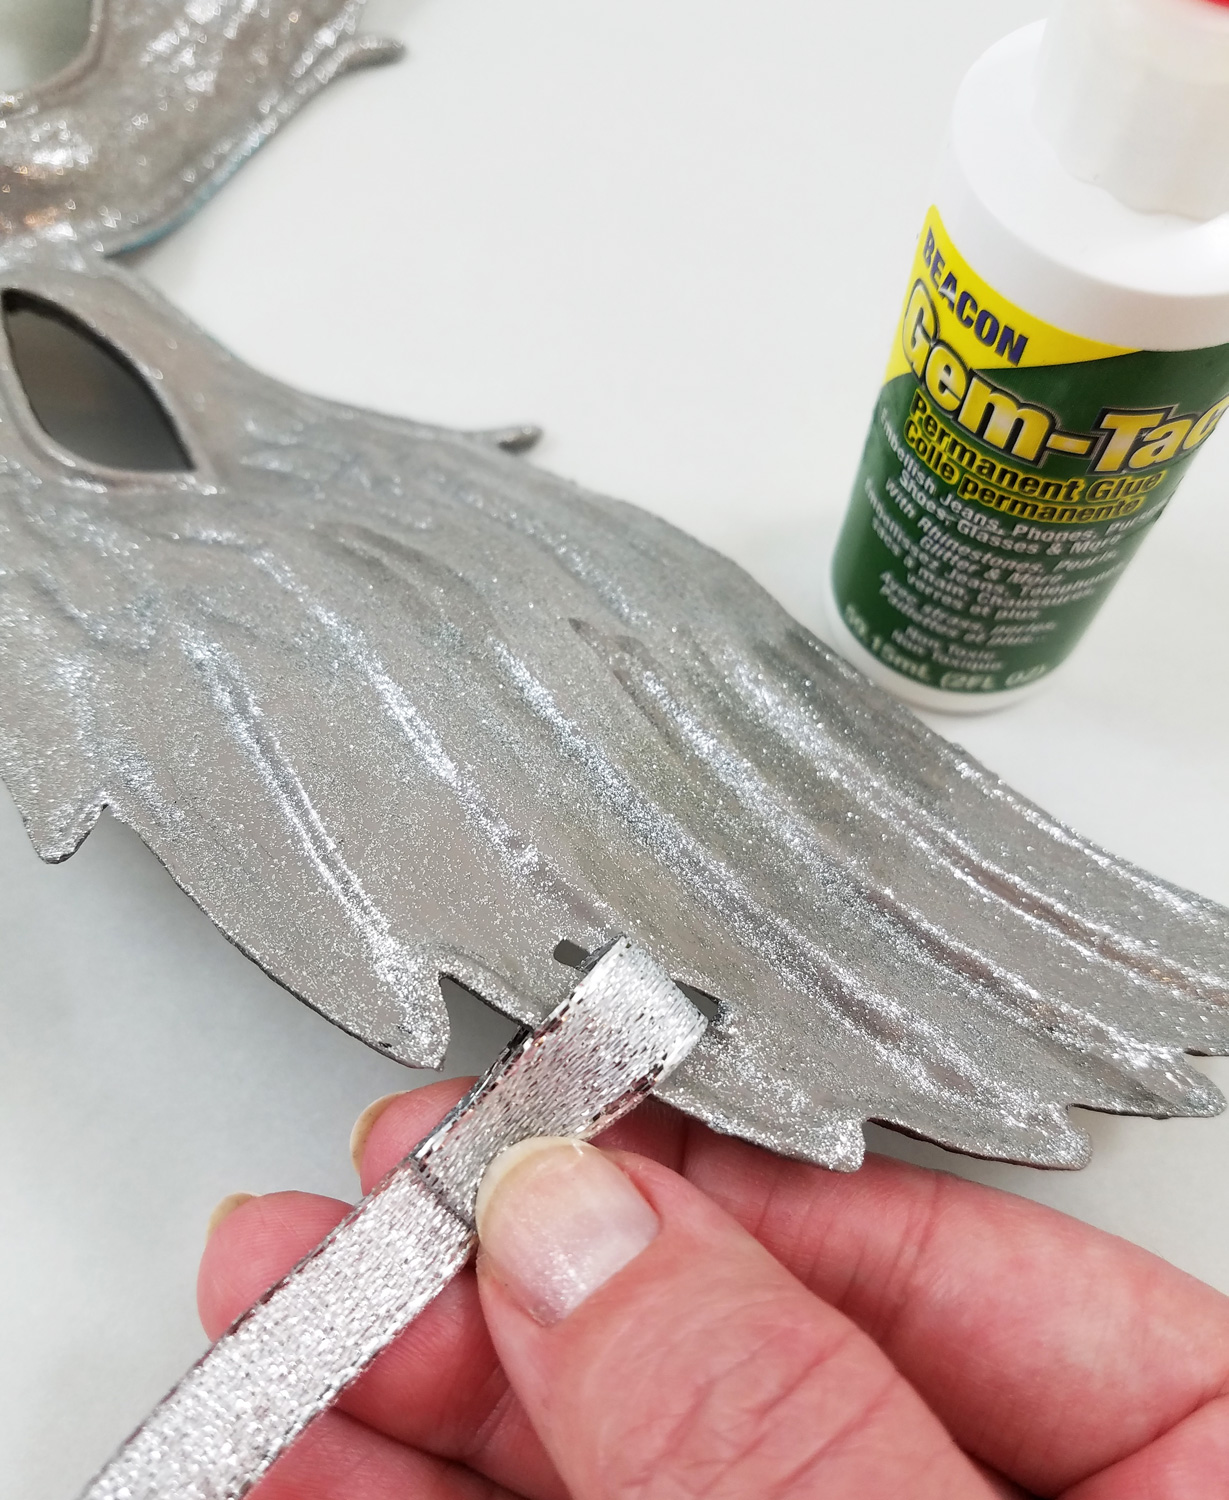
Silver ribbon was threaded through each side of the mask where the black elastic use to be. I folded the end of the ribbon under and glued it in place, pressing down firmly with my fingers and used a clothespin to hold in place while the glue dried.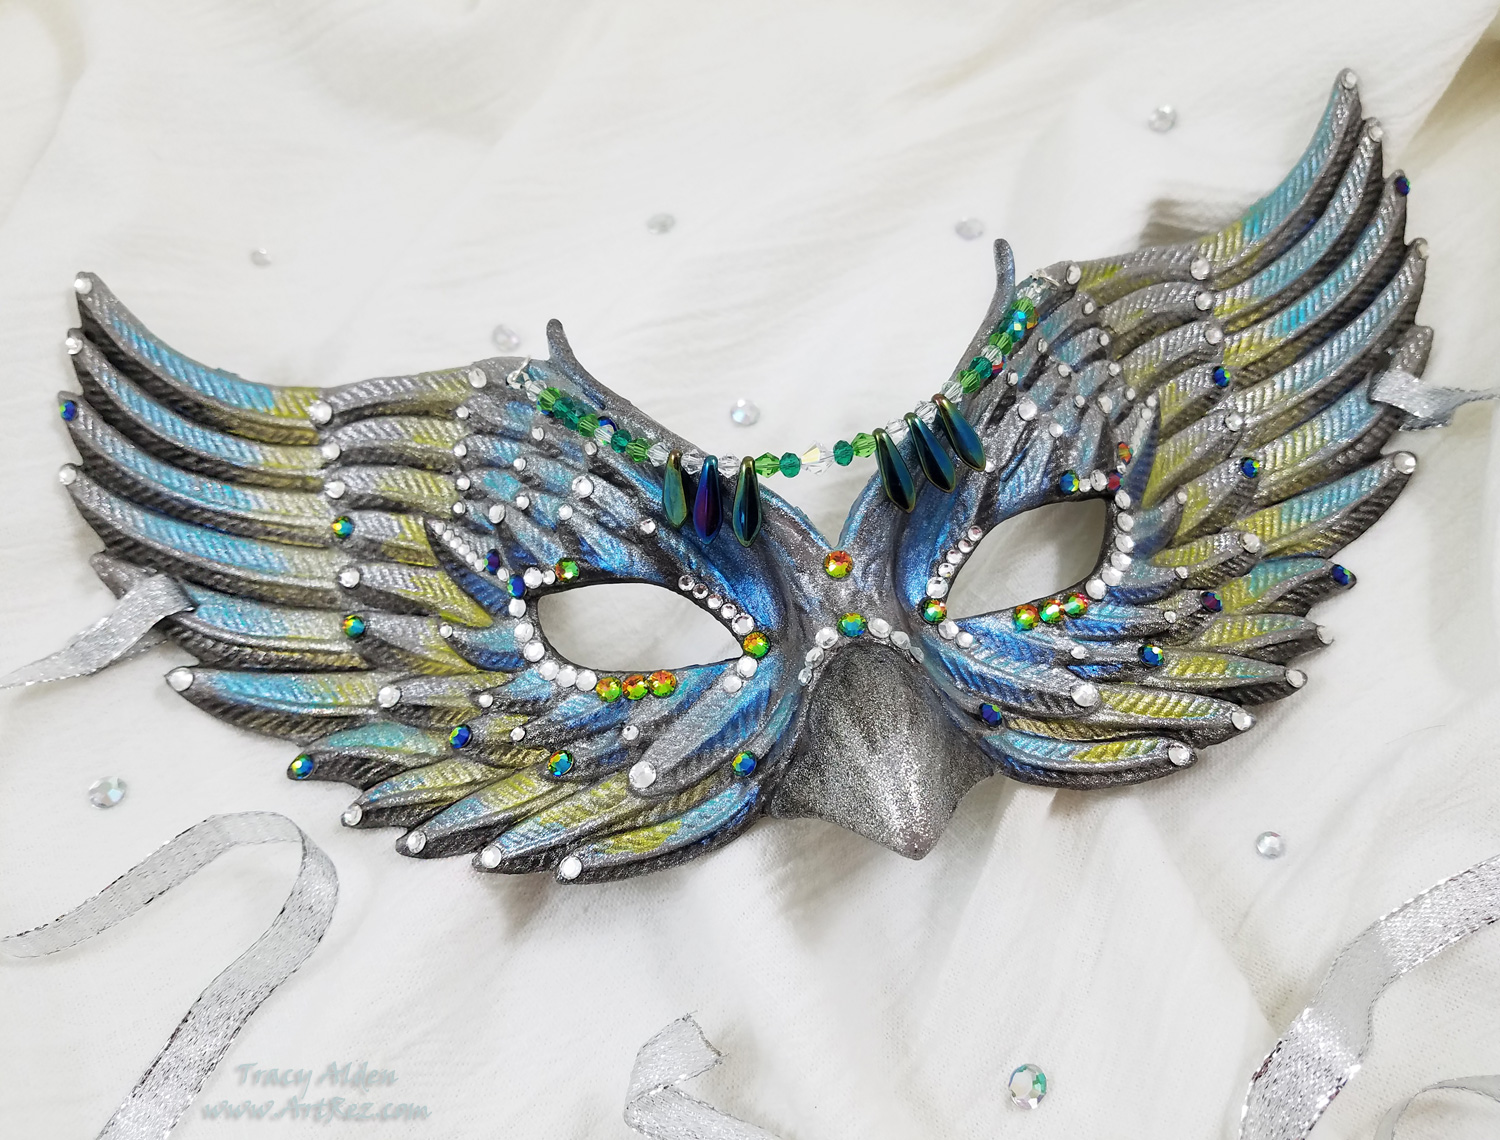
One more element of sparkle was added by stringing some crystal beads onto a 9 inch length of beading thread and threading it through two tiny holes that were part of the original mask. Now the masquerade mask was finished, ready to be worn or displayed.Testors Craft Intense Glitter paint truly won me over and I look forward to finding out what other paint applications I can try!
Until Next Time, Safe Travels!
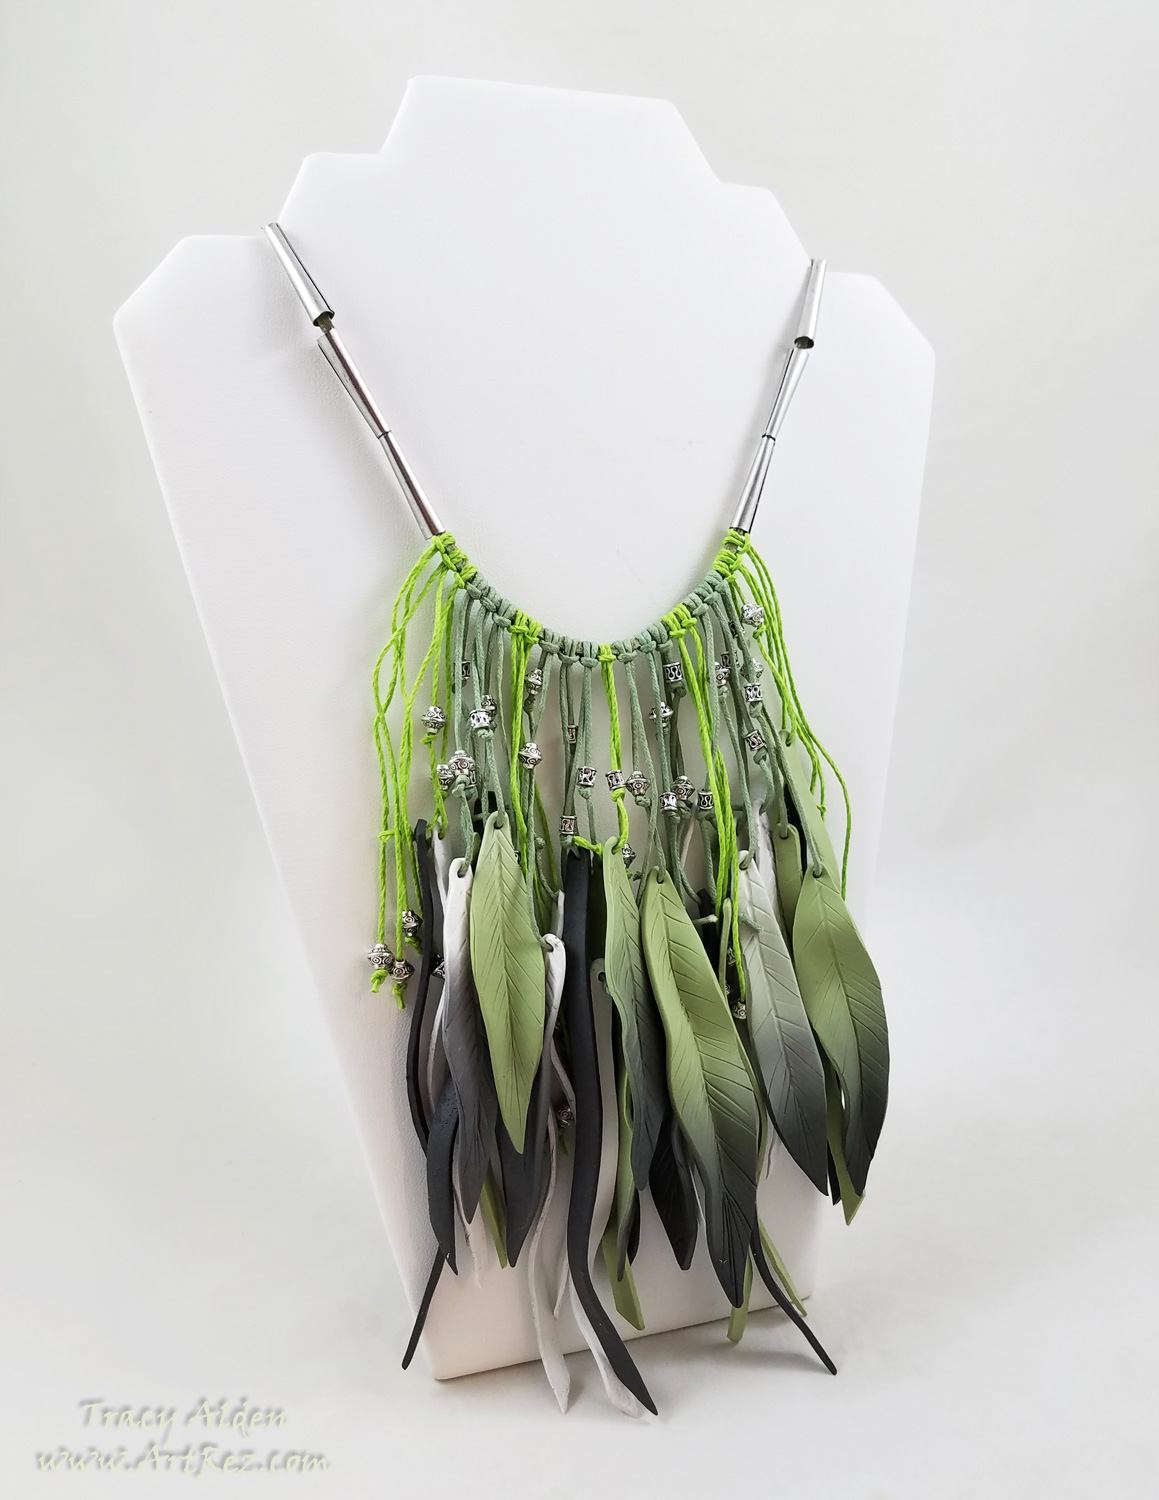
Feather Inspired Boho Necklace with Sculpey Soufflé
In January I traveled to the Creativation Trade show, in Phoenix, Arizona. Held by Association For Creative Industries or AFCI, during the show I was invited to the 6th annual Prime Networking Event. At this event, bloggers, designers, authors and brands in the craft industry came together to network, make new partnerships, and learn about new product information. The event was Educational, informative, had great food and drinks and free product samples provided by this year’s sponsors. After the event attendees were encouraged to try out and create art for the Favecrafts Best Blogger Craft Event.
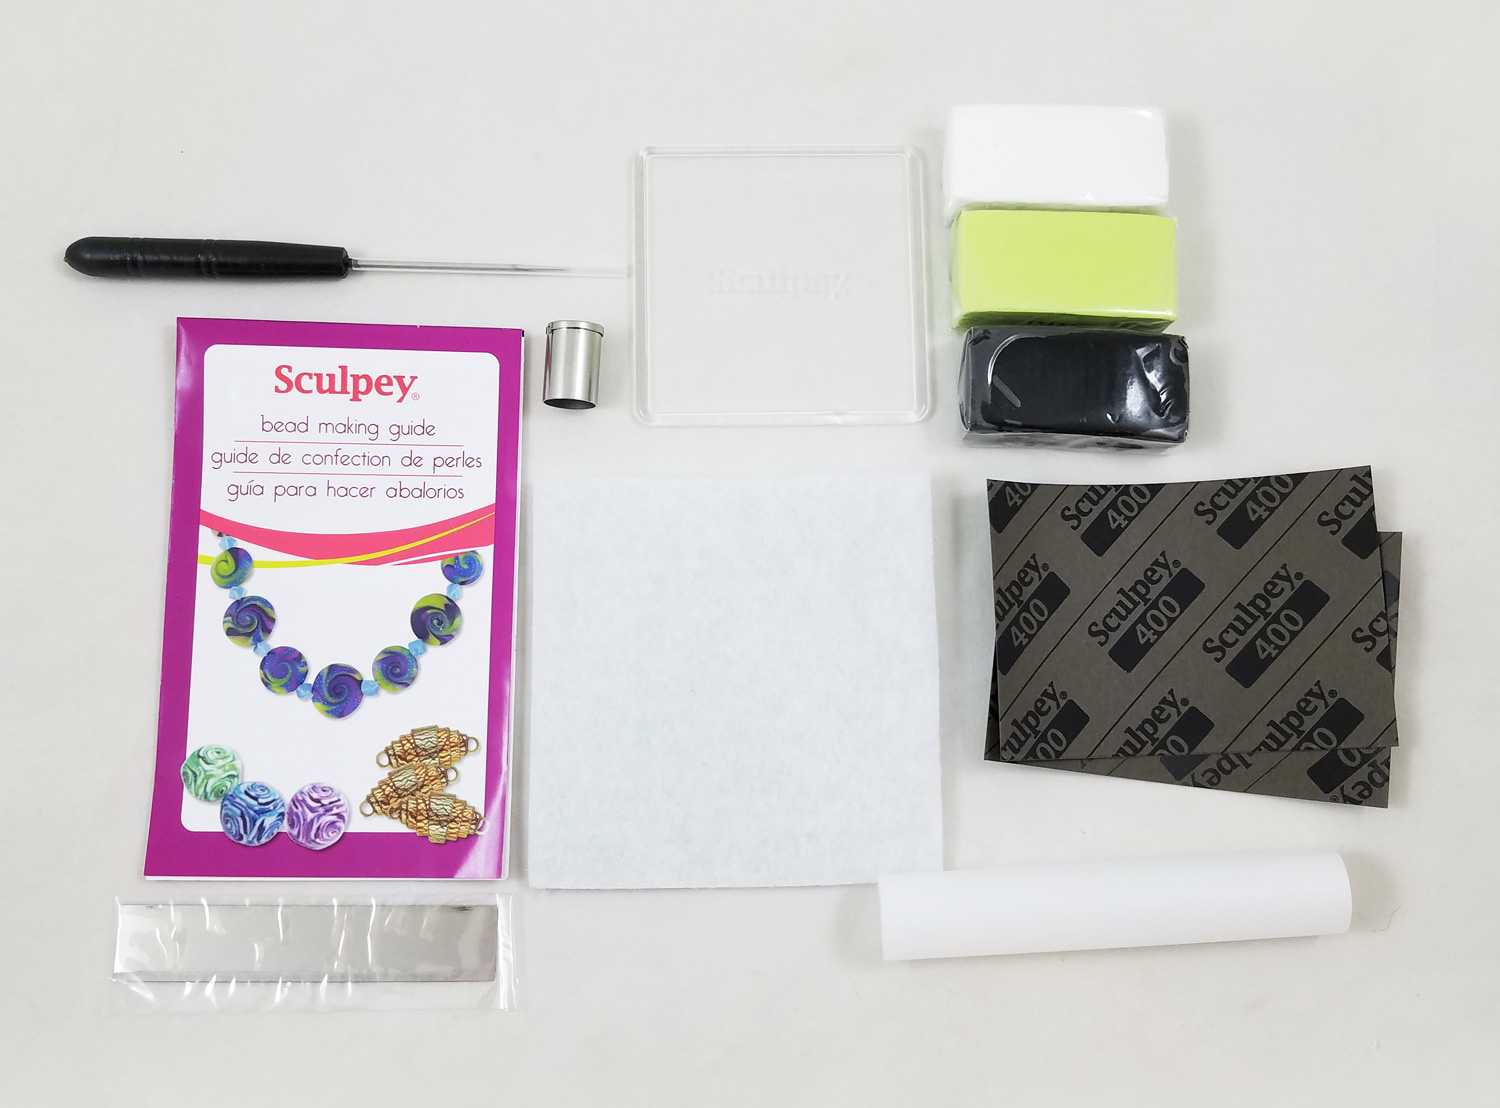
One of the sponsors was Polyform Products, who supplied a wonderful kit including a Sculpey® Bead Making Kit and three half bricks of Sculpey® Soufflé™ in Igloo, Pistachio and Poppy Seed.
The Souffle clay colors of the kit reminded me of the feathers of the Great Green Macaw. In particular the neck and chest feathers, in tones of green, black and fluffy white, that many Macaws can be seen preening while relaxing. This color inspiration helped me visualize a Boho necklace, faux leather in style, since Souffle Clay once baked in an oven has a matte finish, somewhat like leather.
Supplies:
Sculpey® Soufflé™ in Igloo, Pistachio and Poppy Seed
Sculpey® Bead Making Kit
Ceramic tiles
1 Coffee Straw
Pasta Machine
Paper Towels
Metal Spacer Beads
Cone Tin Beads
Toothbrush
Darice 100% Natural Hemp Cord, 20 lb. Assorted Brights
Cord Faux Suede Olive-Brown 3MM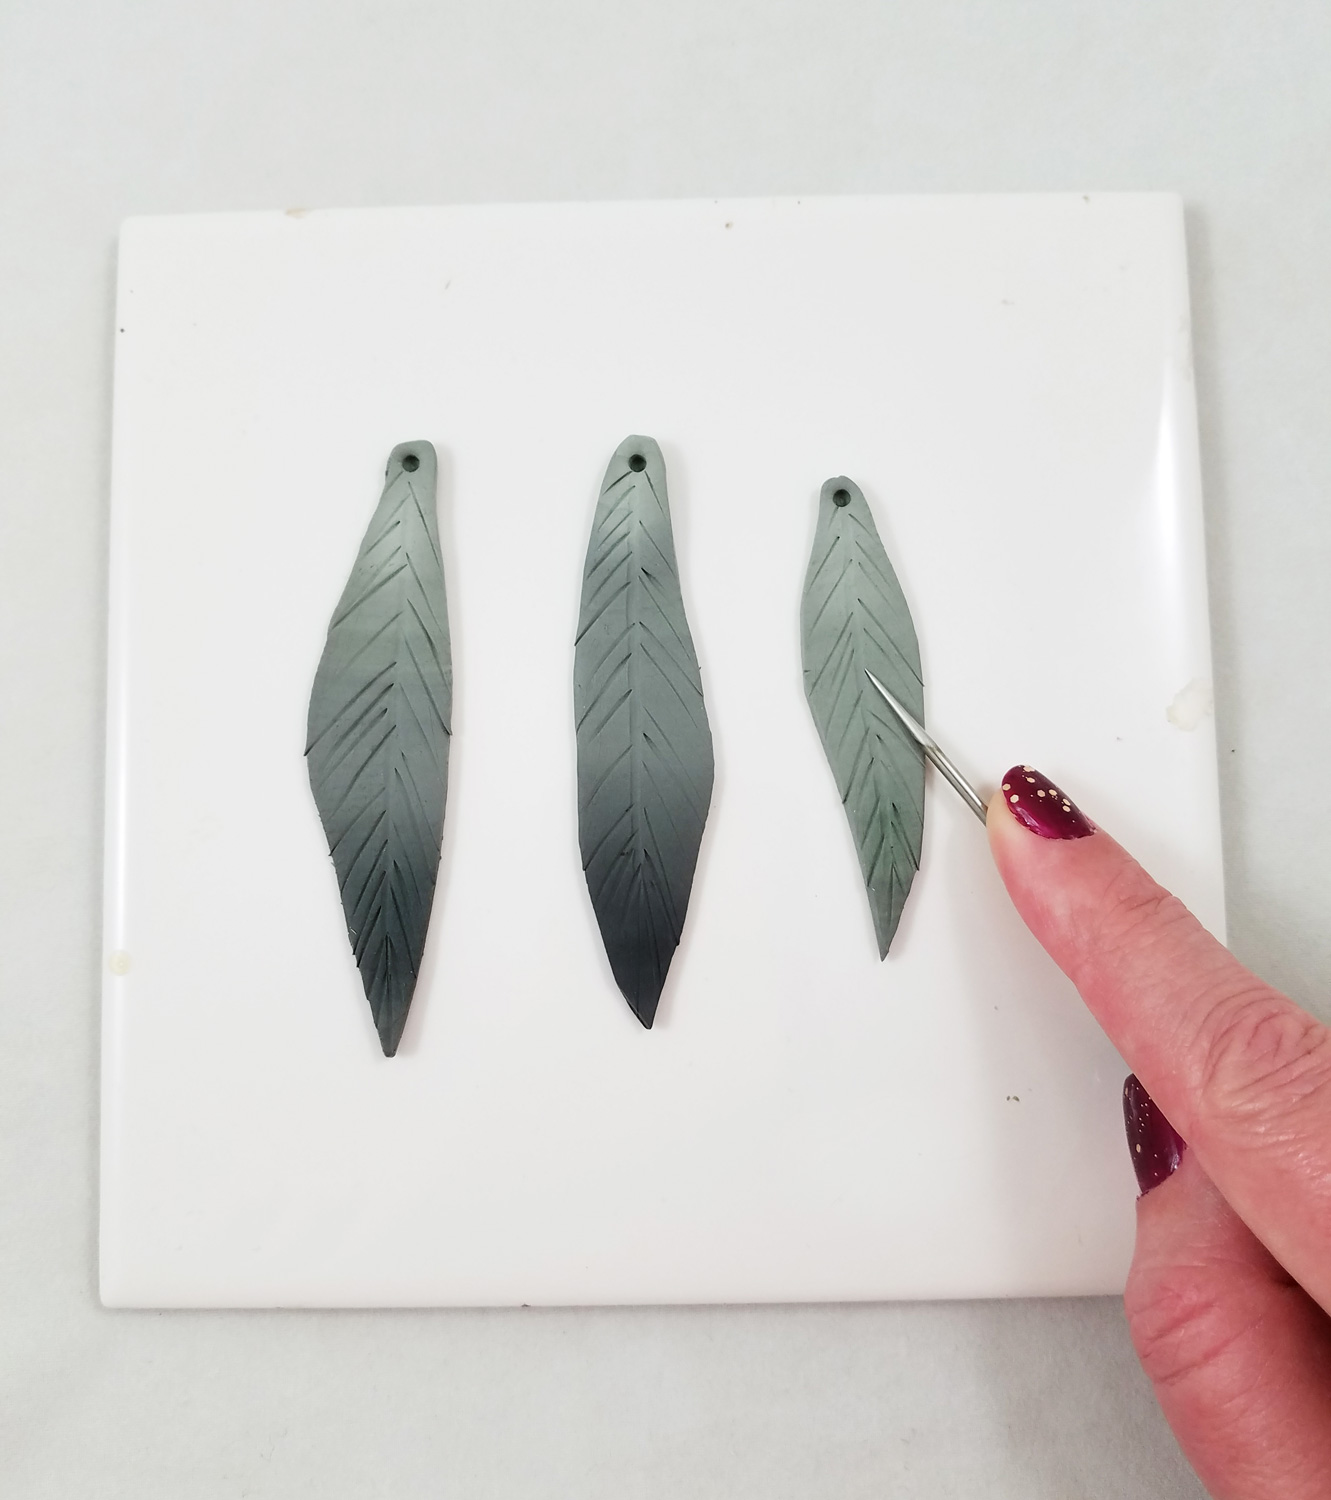
Working with the Sculpey Soufflé I quickly learned it is softer than most polymer clay, requiring little to no conditioning. Using the cutting blade, included in the bead making kit, I cut each brick in half, saving half of each clay brick for the second part of the project. I rolled out each half brick of clay with a pasta machine (devoted to craft use only) set on the thickest setting.
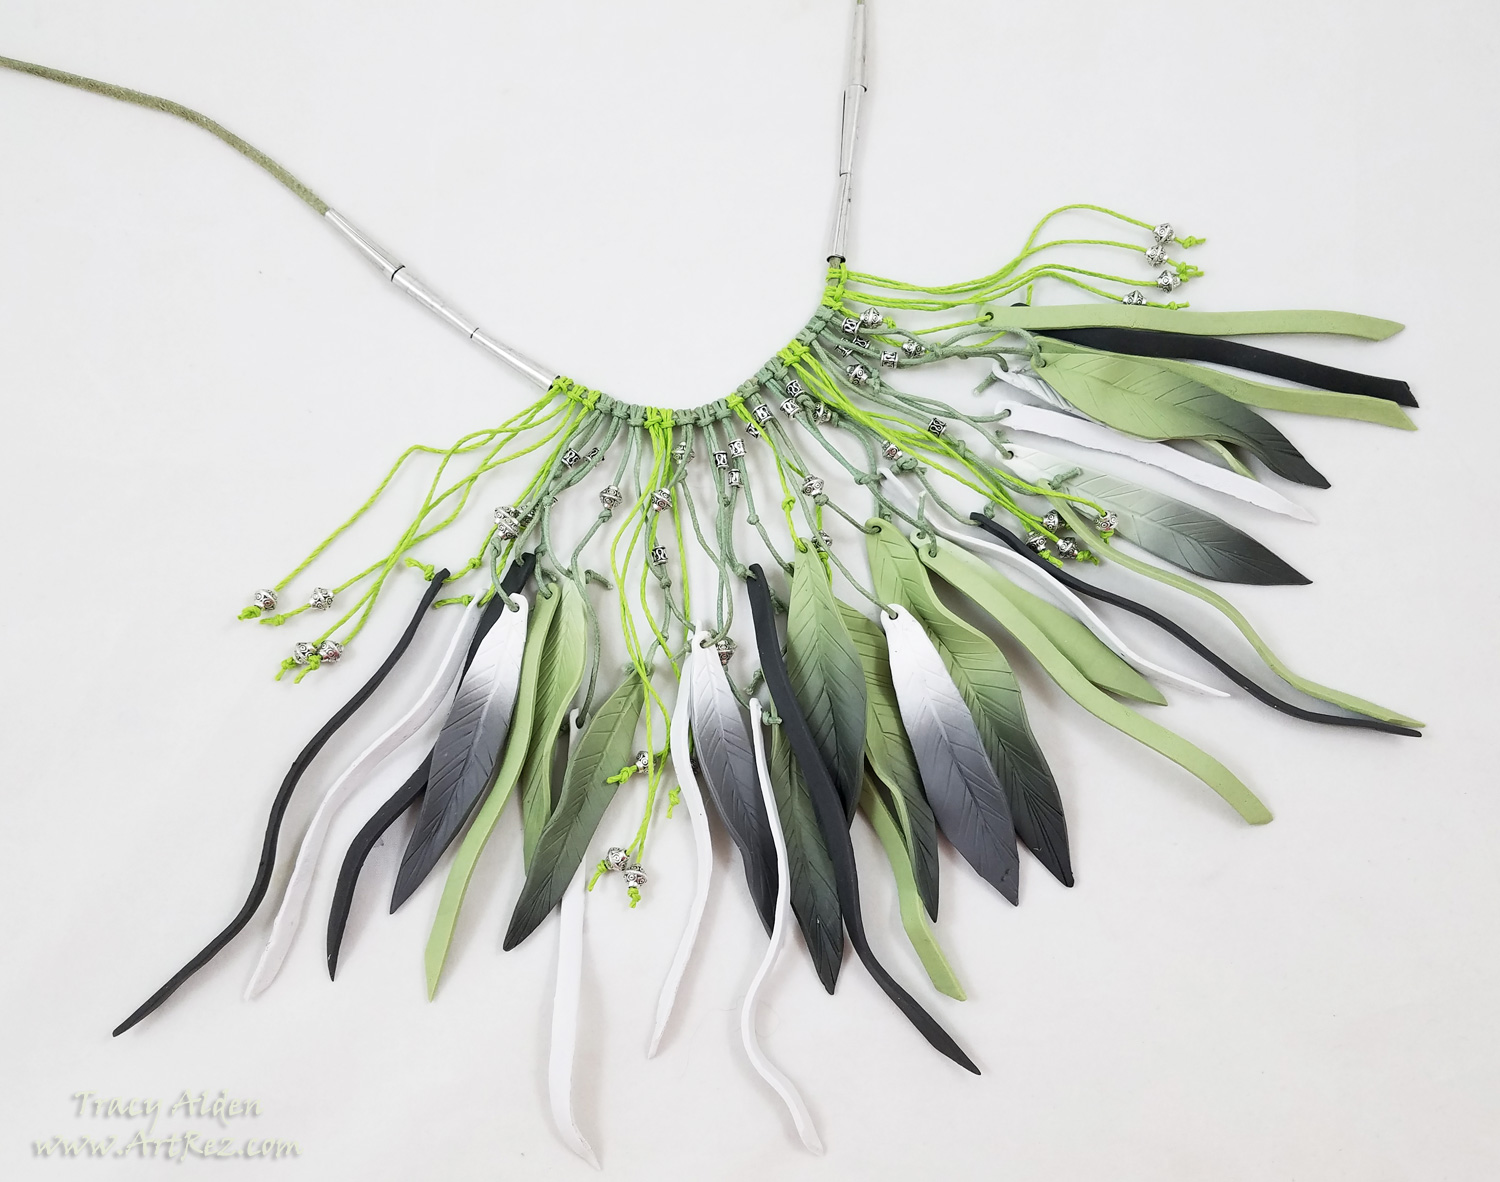
Using the Skinner Blend technique, which creates beautiful gradients in clay, I blended two of each color of clay. Now having pieces of clay with blends of green with black, white with black, green with white, I cut out 14 feather shapes using the cutting blade. I didn’t need to use a template because I wanted the organic look of naturally fallen feathers. Using a coffee straw I punched out a hole on the top of each feather. To give detail to the clay feathers I used the needle tool, included in the bead making kit, to draw on the clay, not going too deep but just enough to get create lines as shown in the photo above.
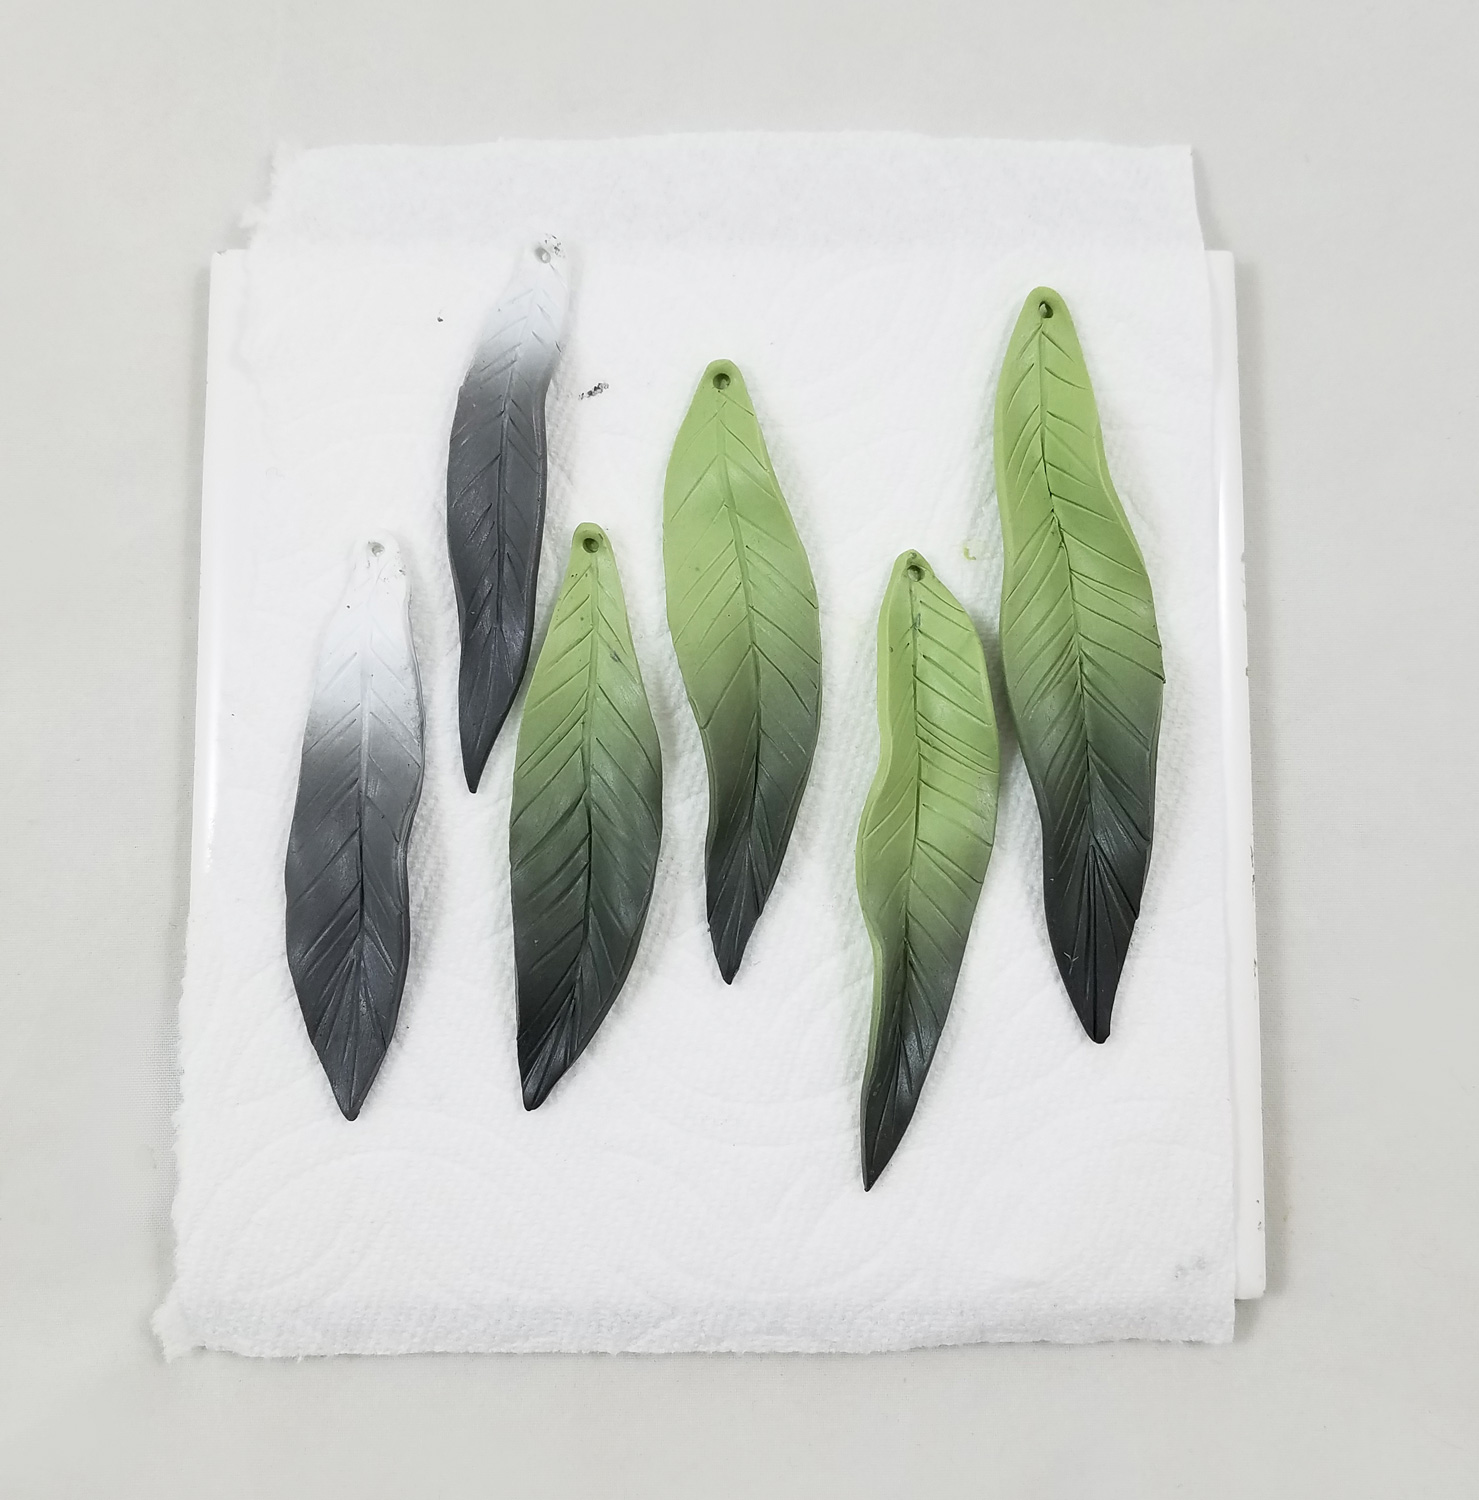
I placed a paper towel on a ceramic tile and carefully put my detailed feather pieces on top. I bent and curved the feather to give them a more natural flow. I baked the clay feathers on the tile as per the manufacturers instructions.
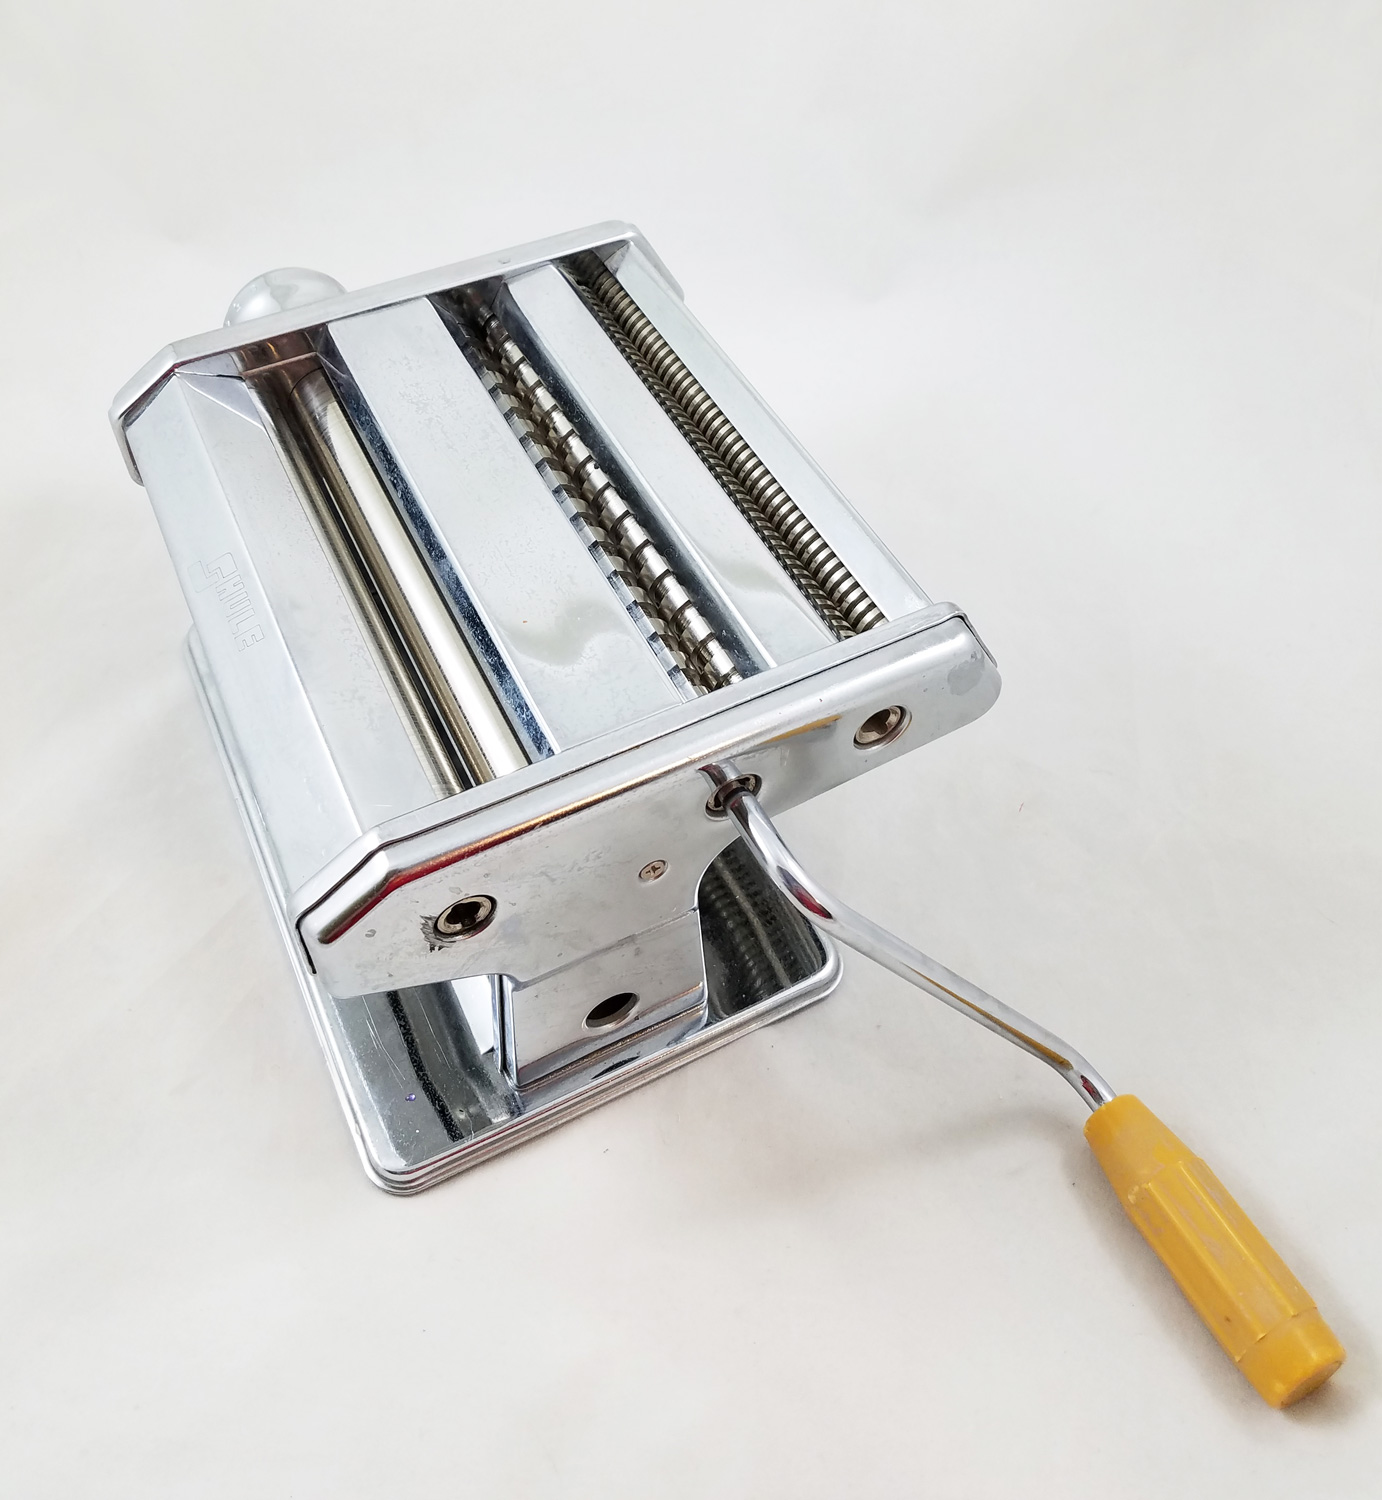
To condition and roll out polymer clay easier I use a Pasta Machine I got at a kitchen supply store. It also happens to have two noodle cutting rollers, that normally I ignore when using for clay. However the Fettuccine noodle roller was about to become very handy for the next part in my project.
*The use of a pasta machine with noodle cutting rollers is not necessary if you rather cut each strip out by hand.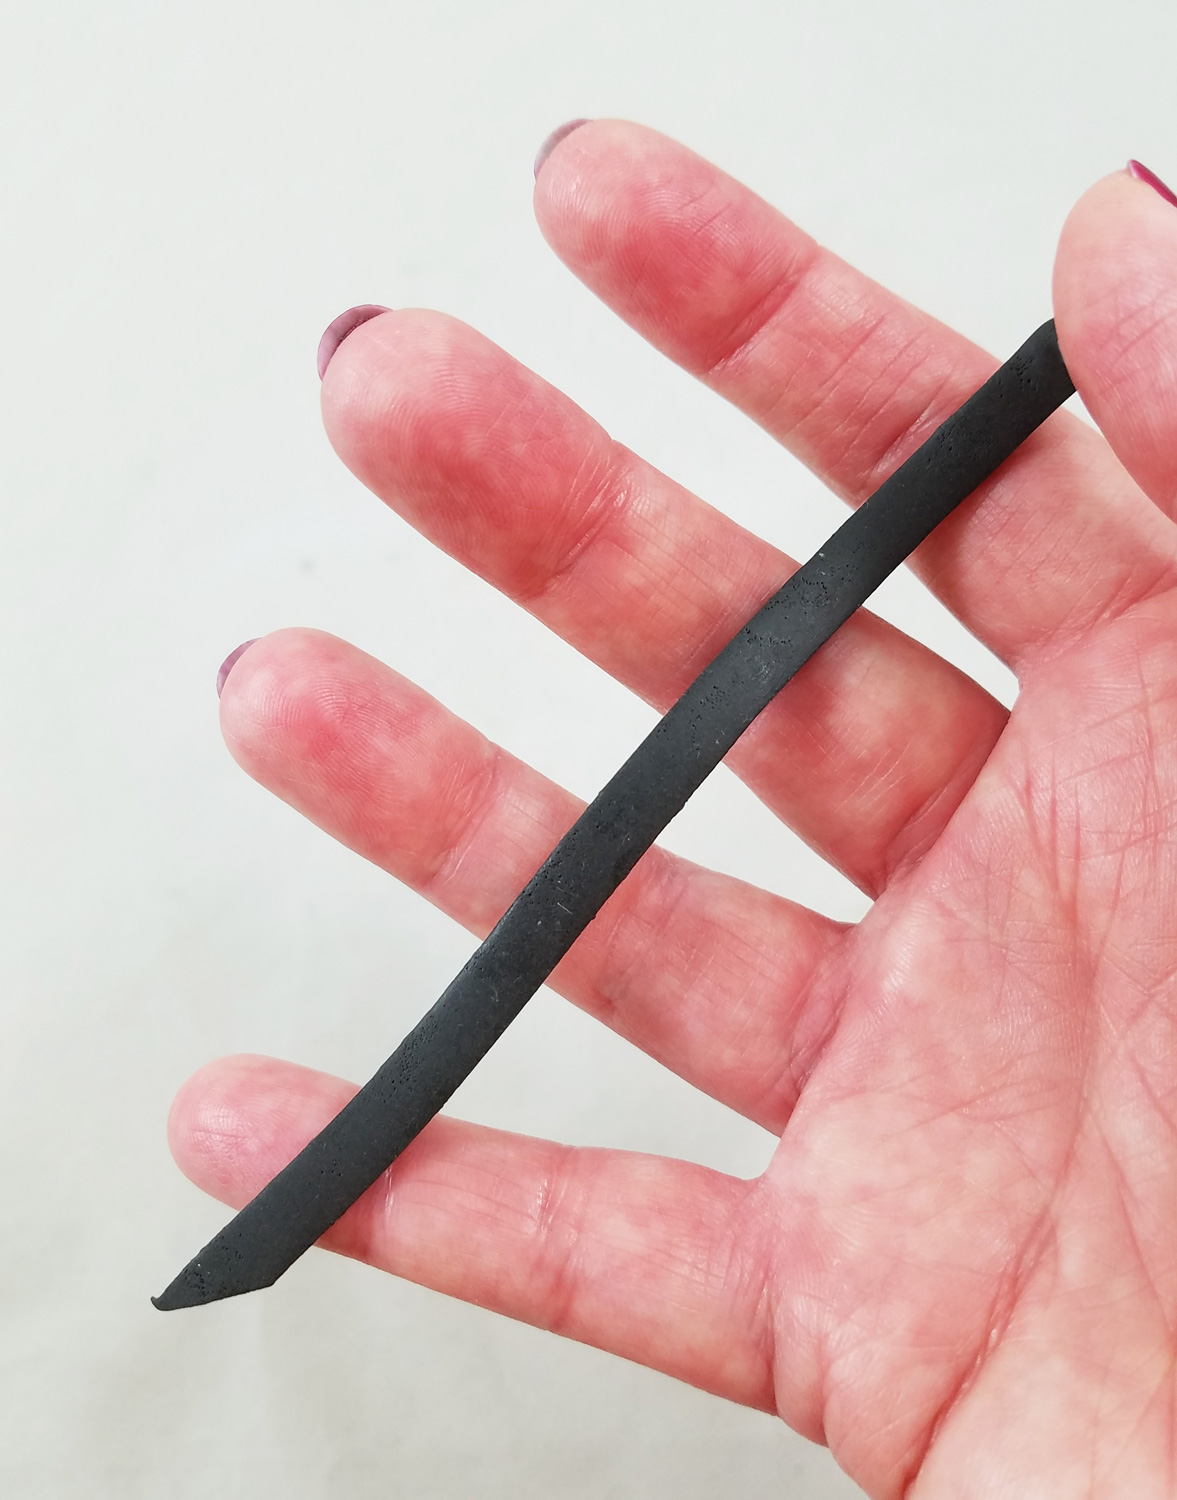
I rolled out the reserved half bricks of clay with the pasta machine on the thickest setting. Then I ran each portion of clay through the Fettuccine cutting roller, making sure to run the white, then green and black clay last to avoid color transfer of clay. Each strip of clay was easily textured with a tooth brush to emulate the appearance of leather. Using a coffee straw I punched out a hole on the top of each strip of clay.
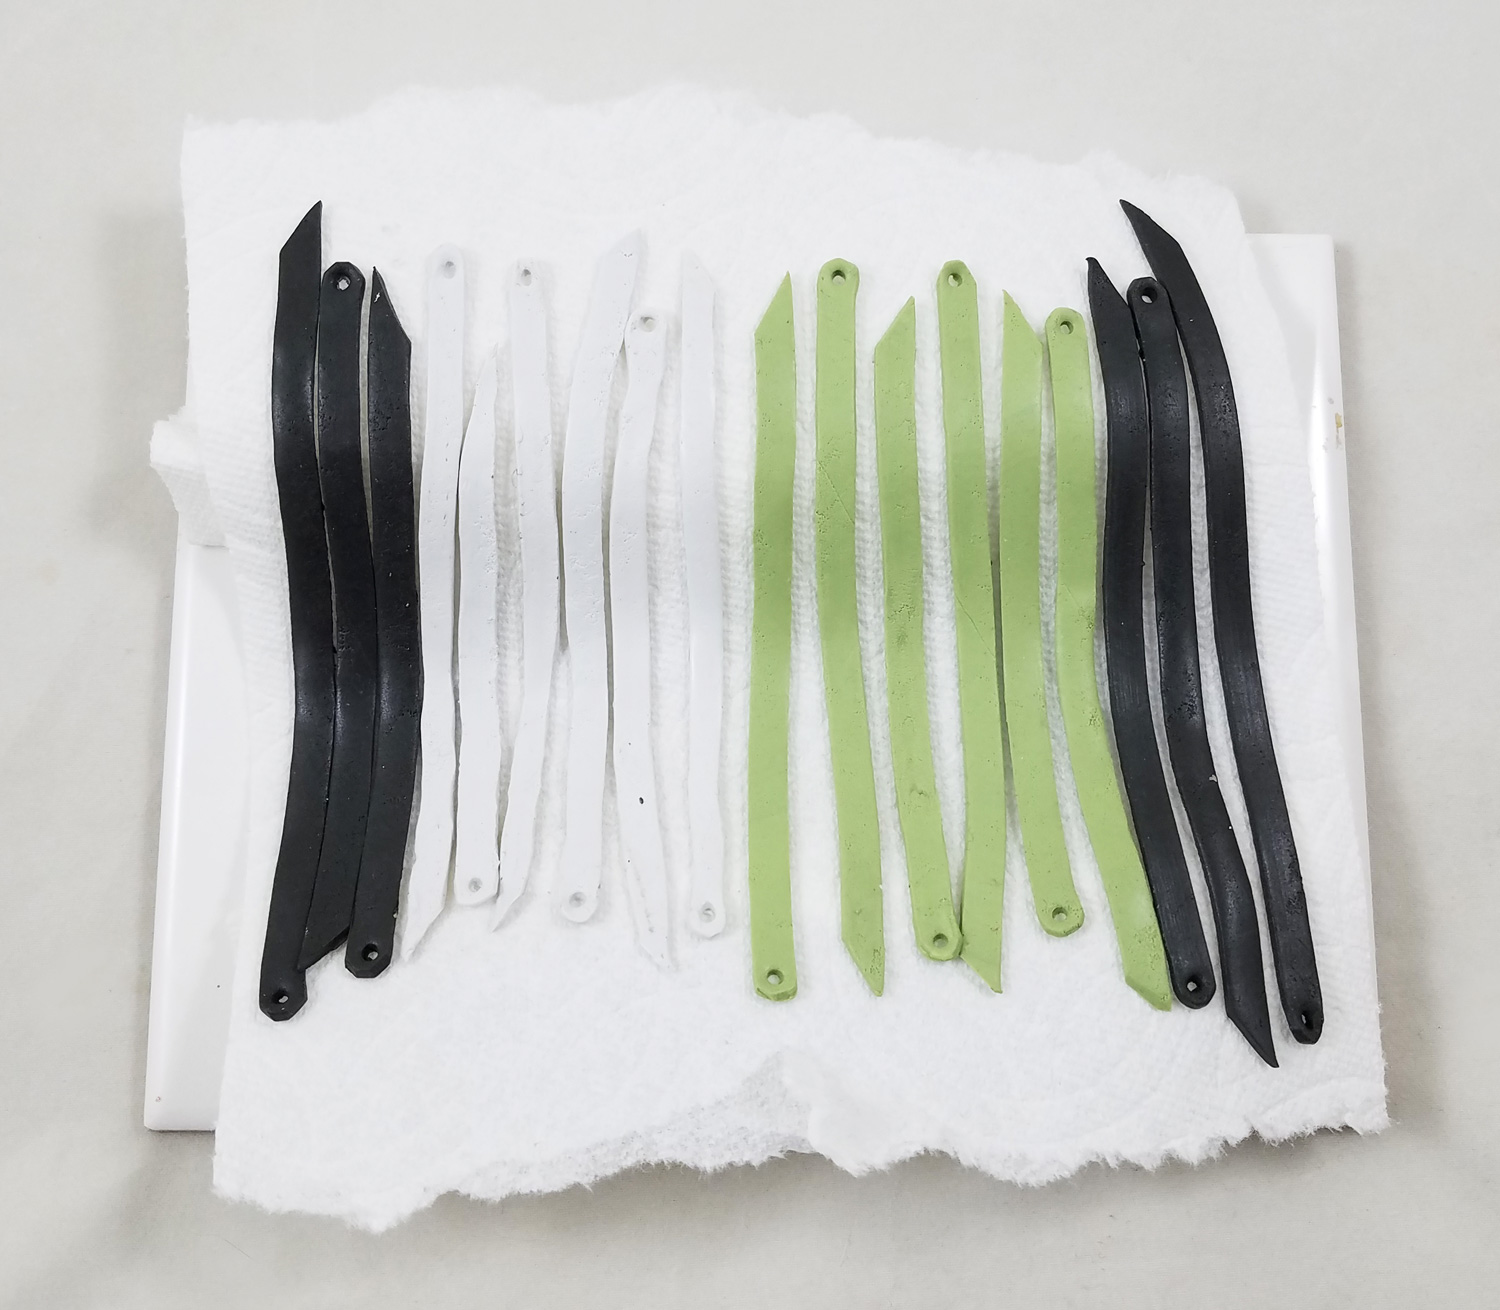
I crumpled two paper towels into rolls and placed a third paper towel on top of a ceramic tile. I carefully placed my strips of clay on the paper towels. I baked the clay strips on the tile as per the manufacturers instructions. Sculpey Soufflé once baked is more flexible than traditional polymer clay allowing for long and/or large art pieces to be created, yet be still resistant to cracking and breaking.
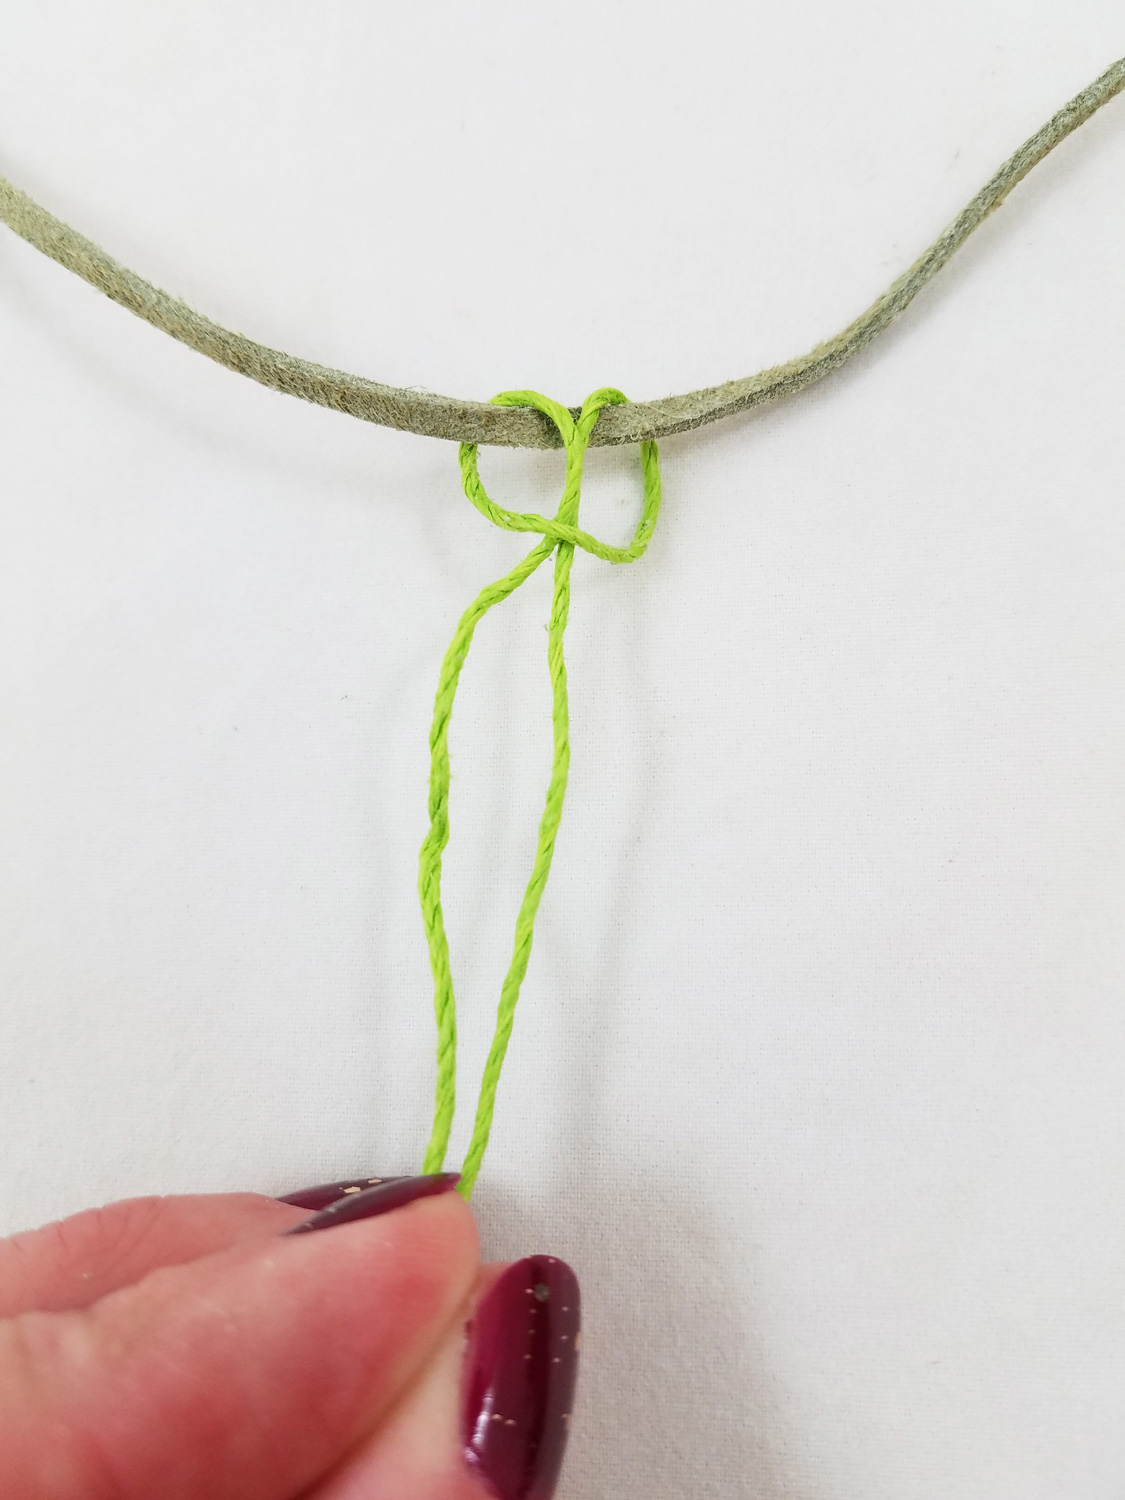
I cut a 24 inch portion of Faux Suede Olive-Brown Cord to be the start of my necklace. I cut a 10 inch portion of green Natural Hemp Cord and attached it to the suede cord using a Lark’s head (Cow Hitch) knot.
I slid a metal bead onto the hemp cord and did a overhand knot at the end of the cord. I repeated this on the second portion of the cord.
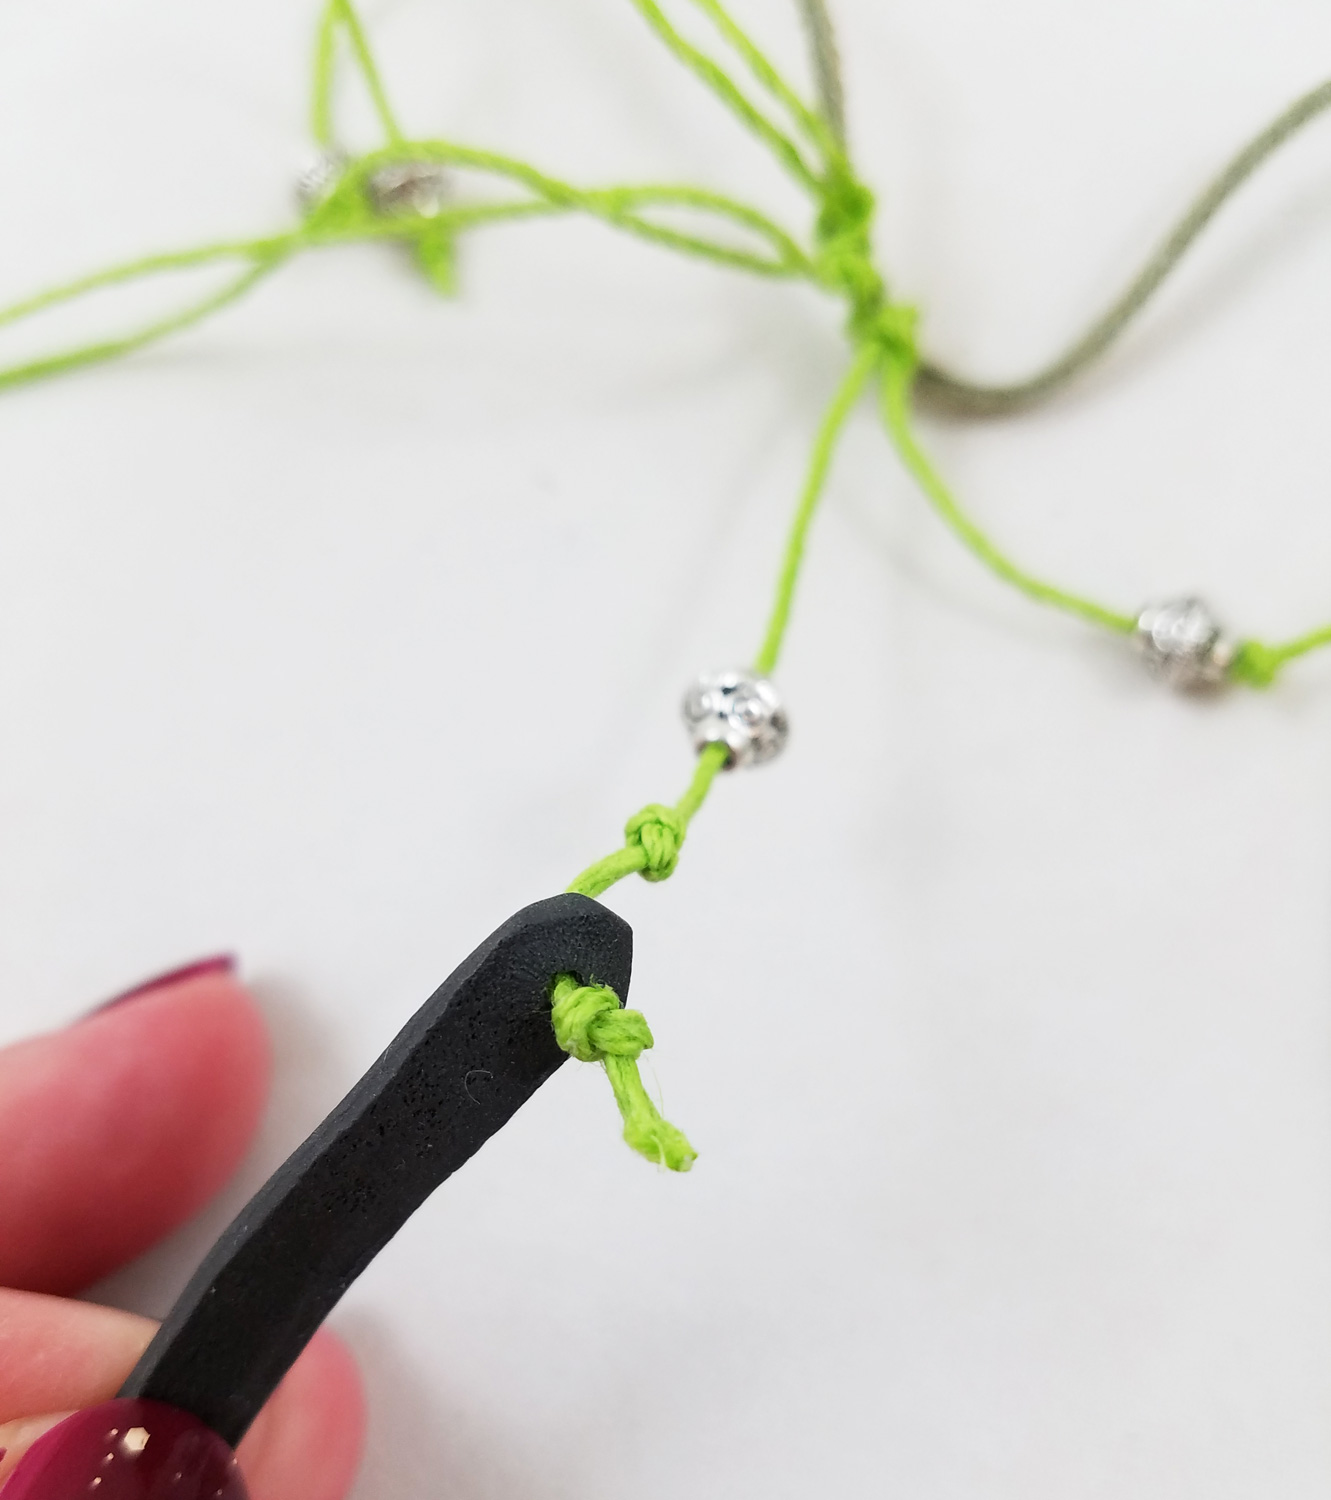
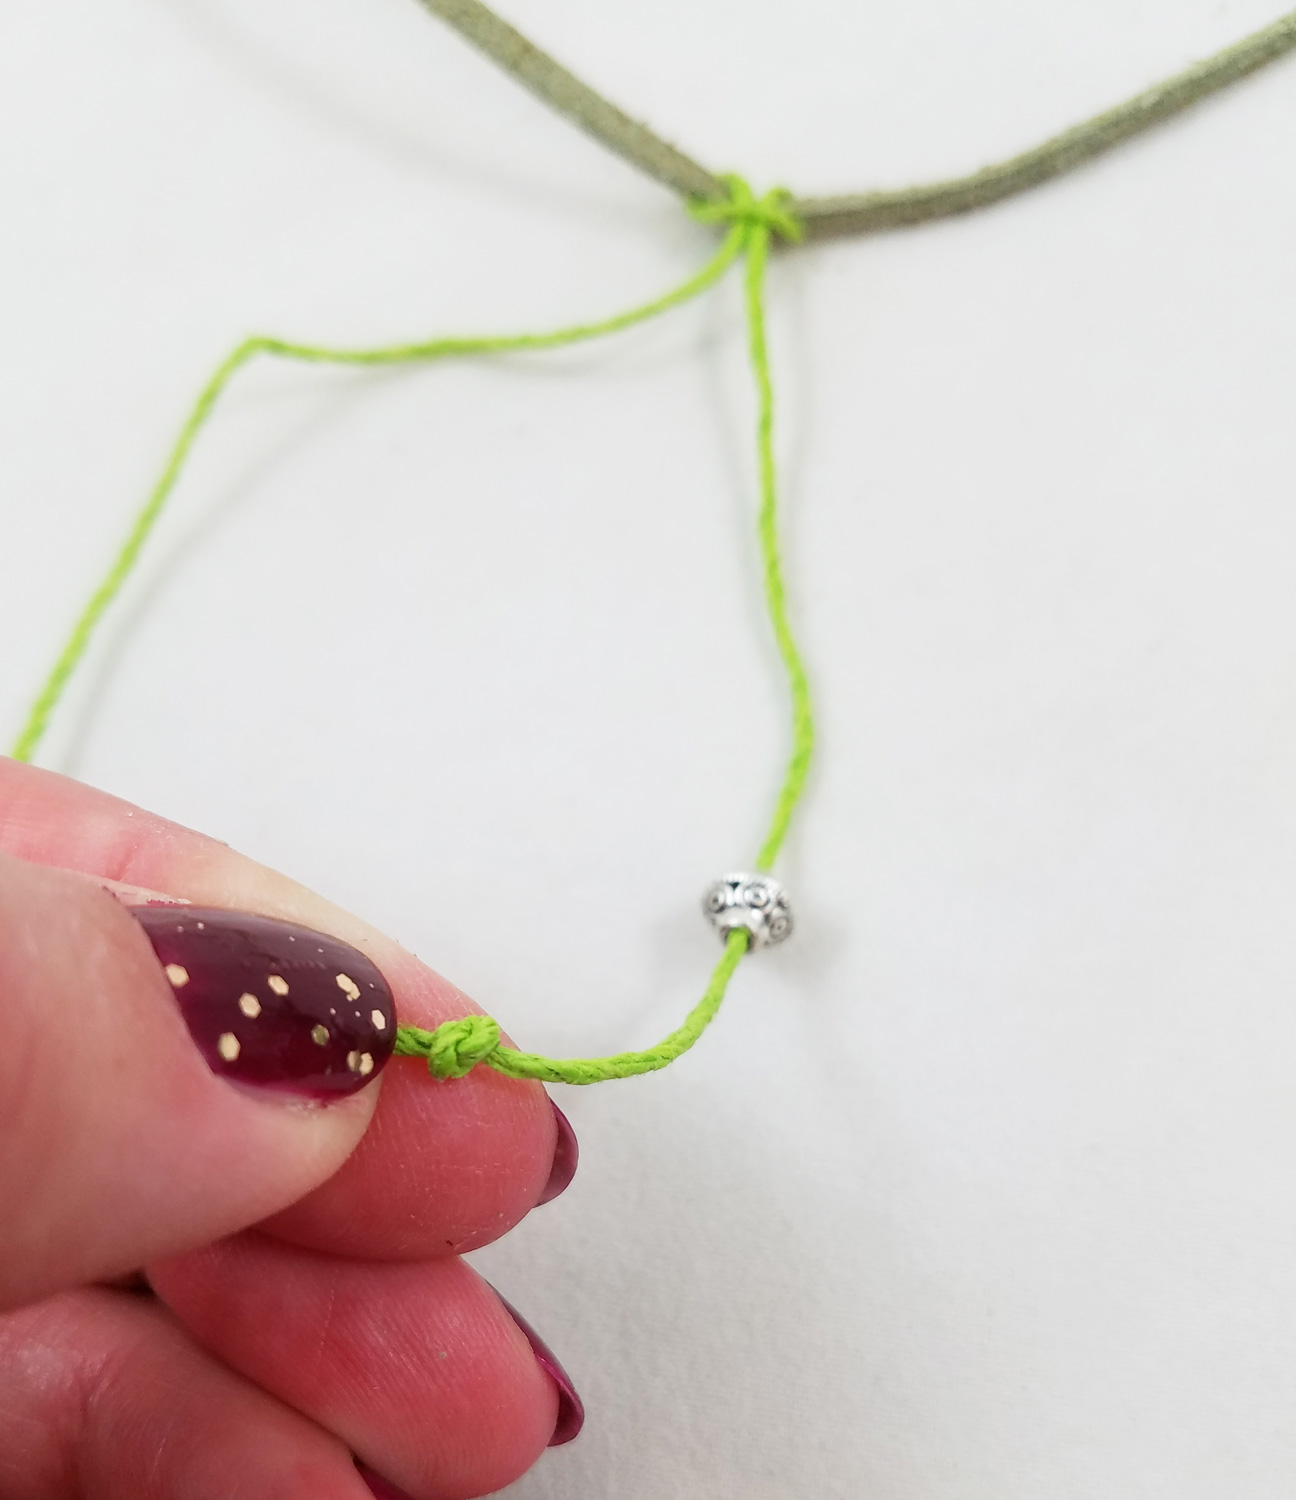
I added an additional 10 inch hemp cord length to the suede using a Lark’s Head knot, adding metal beads and securing them with overhand knots. Adding another hemp cord length I slid metal bead further down the cord, towards the Lark’s head knot. I did an overhand knot, slid on a strip of baked polymer Souffle clay and secured it with a overhand knot. I repeated this process for all of the other cured clay pieces.
I slid on three Cone Tin Beads on each side of the suede and did a simple slide knot to finish the necklace.
I am now a huge fan of Sculpey Soufflé, with its flexibility and matte finish it allows this cascade of cord, clay and metal beads to be lightweight, durable and fashionable!Until Next Time, Safe Travels!

Ancient and Contemporary Inspired Artistry