An Artistic Halloween Haunting Recap!
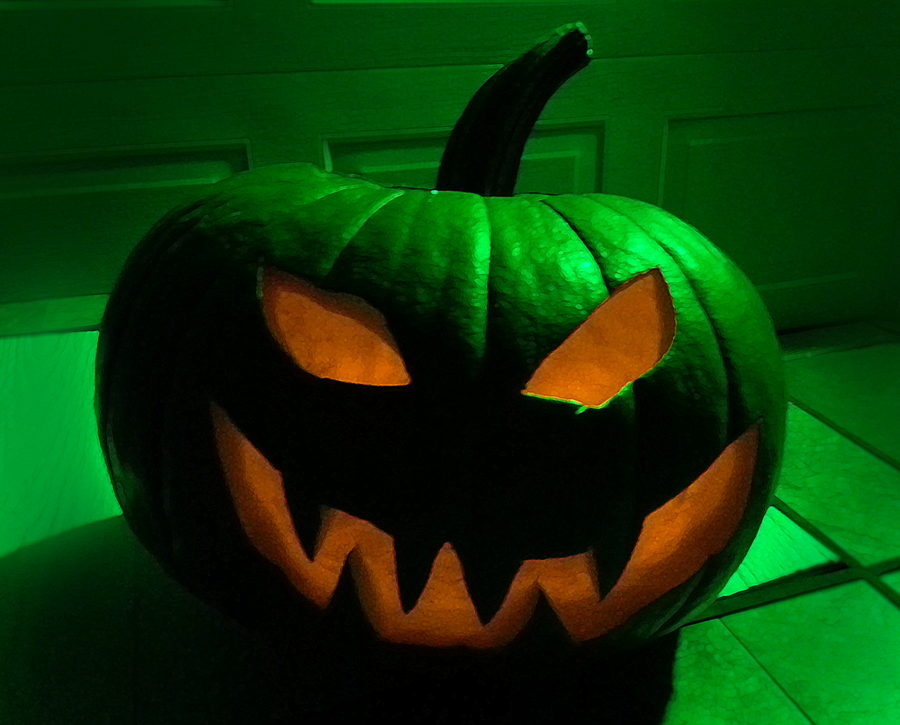
Welcome to my Artistic Halloween Haunting Recap! The month of October and all of the Halloween goodness flew by so fast, but I wanted to share some of my ghoulish crafting fun before Halloween is just a faint promise of next year.

Using some wonderful chains, crystals and beads from Fiona Accessories I created this jewelry assemble for my spellbinding costume of a Gothic witch. The sterling silver snake pendant was hand crafted in Nepal and really played well with the raven skull I had bought recently.
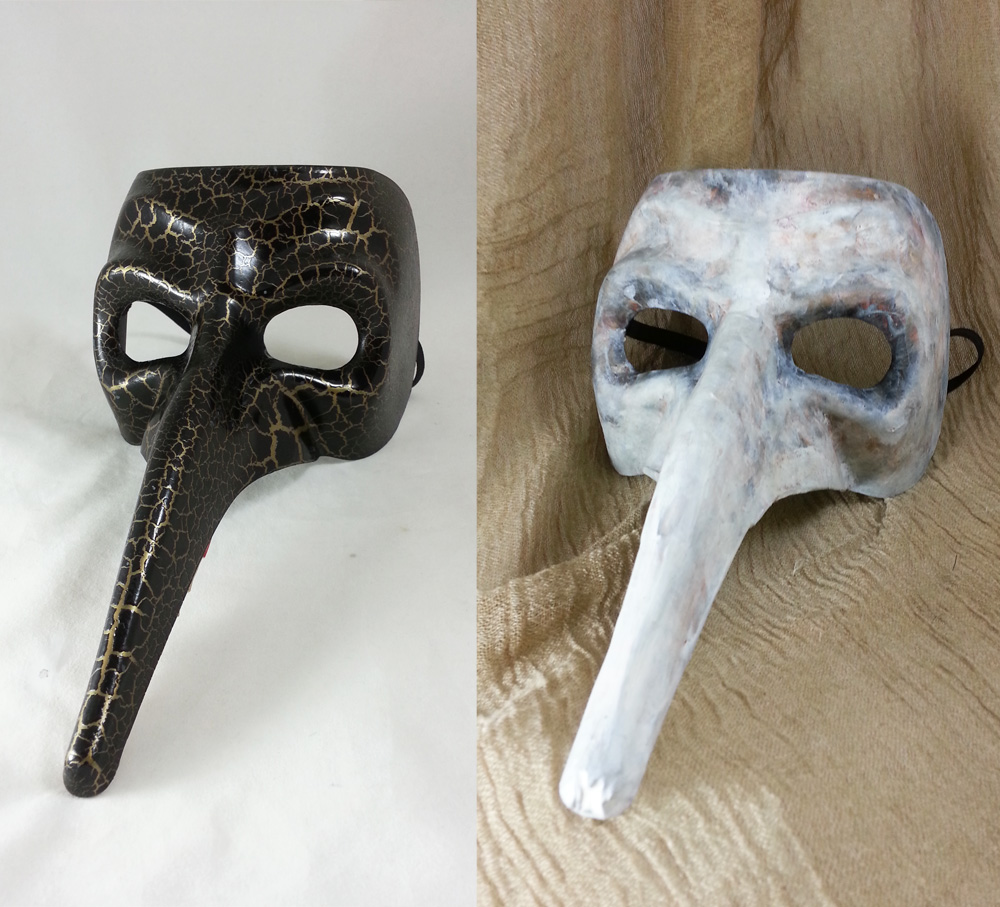
I transformed this plastic Italian Carnival mask into a Plague Doctor mask using paper mache, paint and Liquitex Matte Varnish. However I wasn’t finished there and created the rest of the look:

With the addition of a black heavy weight line robe, hood, gloves, hat and walking stick it made a perfectly frightening Plague Doctor costume for my husband.
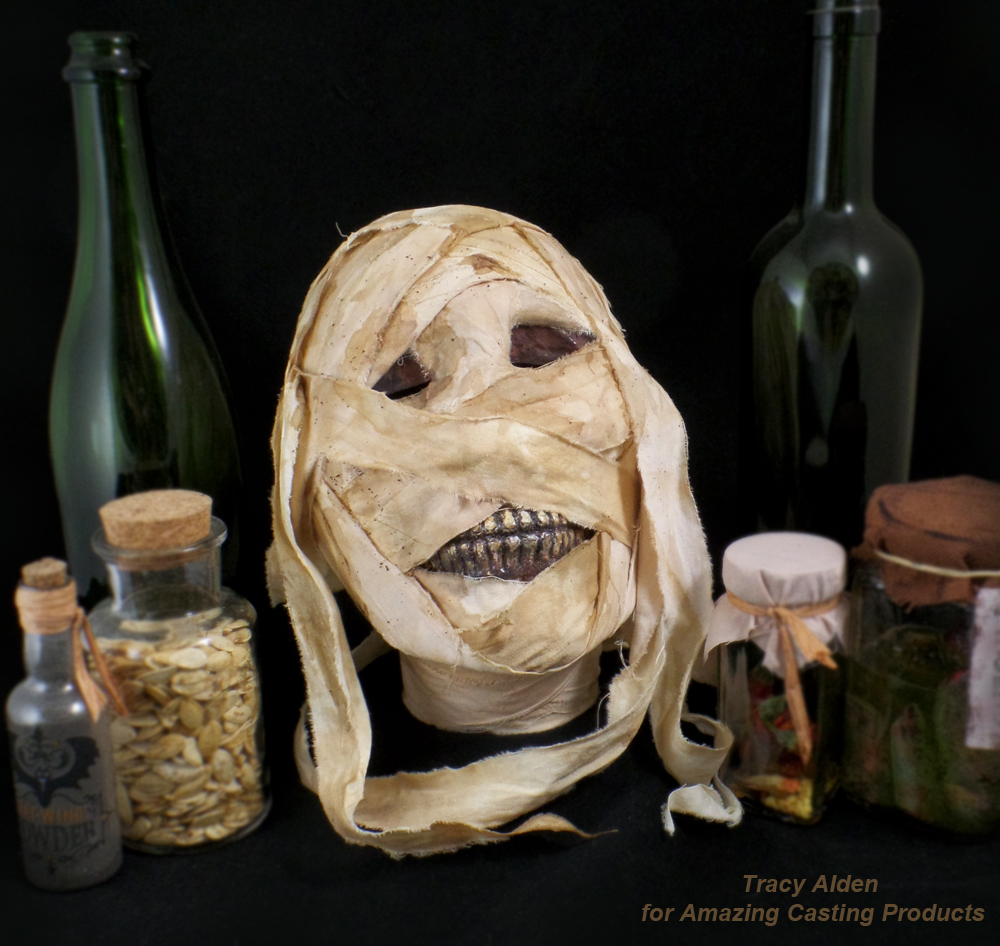
I created a replica mummy head using a plastic Halloween skull and the help of Amazing Casting Products. Clicj HERE for this Upcycled Mummy’s Curse!
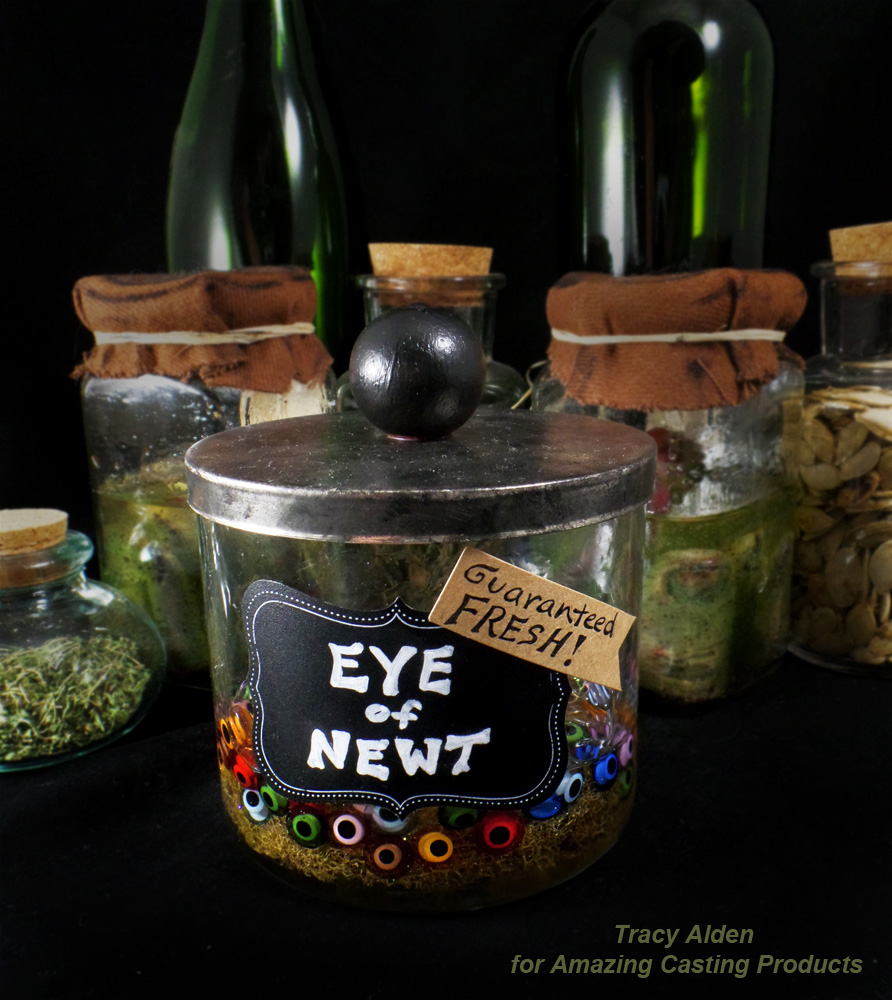
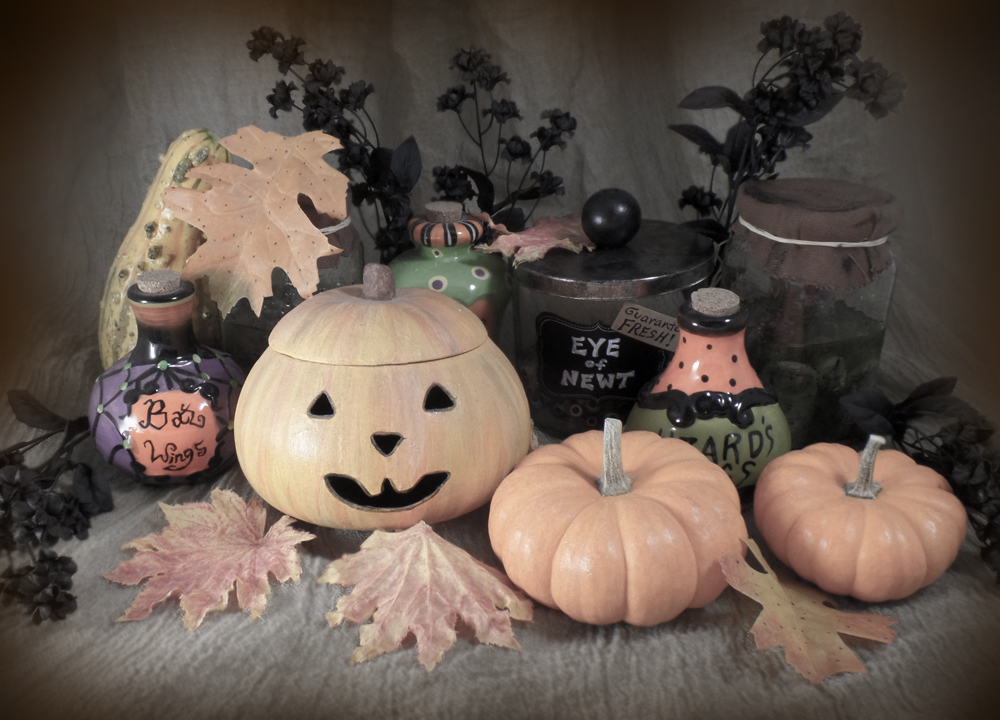
Taking inspiration from one of William Shakespeare’s most famous plays, Macbeth, I created a Eye of Newt Apothecary Jar, spooky enough to keep any monster happy!
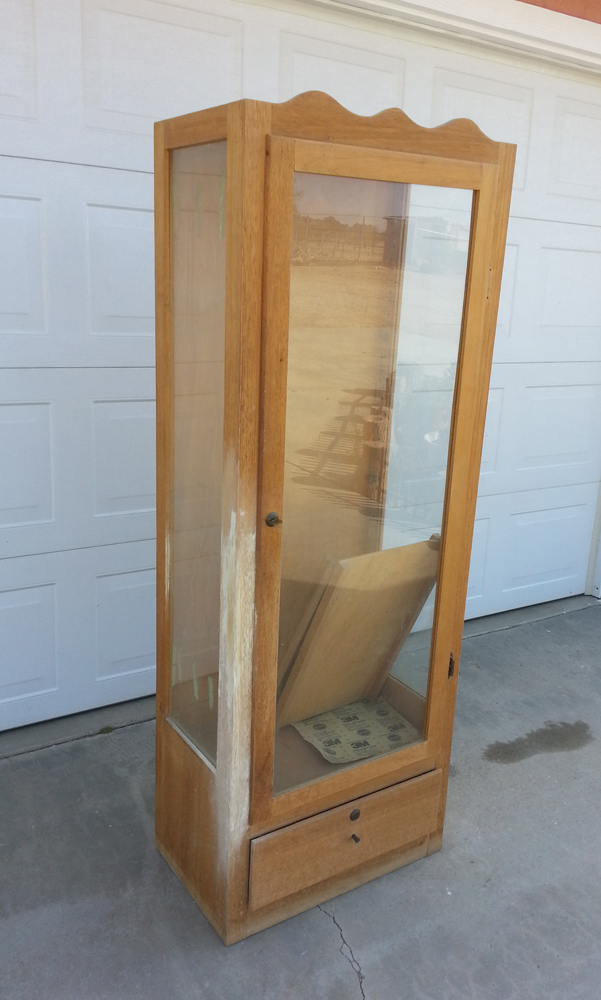
Last but not least my husband and I finally took the time to refinish a old cabinet that had been in the family longer than me. After patching, sanding, staining and varnish it was ready to become a Halloween curio cabinet!
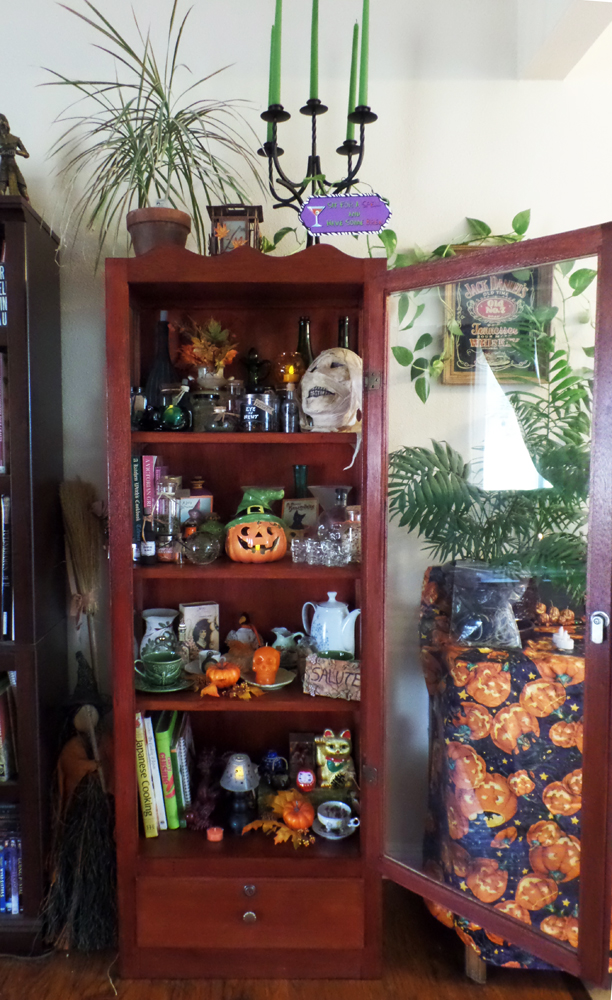
Not bad for our first attempt at giving new life to an old piece. Once filled with fun holiday decor it made a perfectly frightening Halloween decoration. With Halloween gone and past now I can fill it with with antiques and little curios befitting of Fall.Now to start on art projects for Fall and the coming Winter!
Until Next Time, Safe Travels!
A Crafty Halloween Throwback Thursday
Welcome to my Halloween Throwback Thursday! Halloween as I have often noted is one of my favorite holidays, I just love making all kinds of spooky and fun art. This week I was able to start unpacking all of my plastic tote bins filled to brim with ghoulish decor. I was reminded of my Halloween projects I have created for Amazing Casting Products and I wanted to share a few of my favorites!
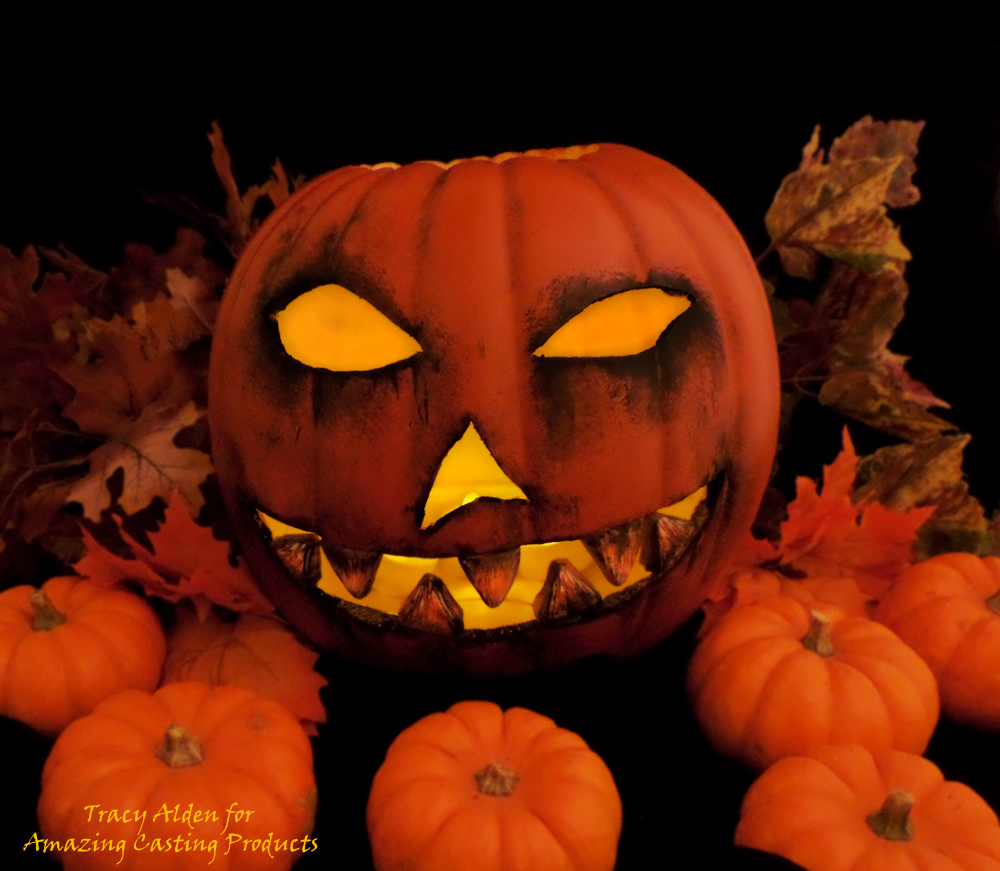
How to enhance a Pumpkin’s Smile with resin teeth using Amazing Casting Resin and Mold Putty.
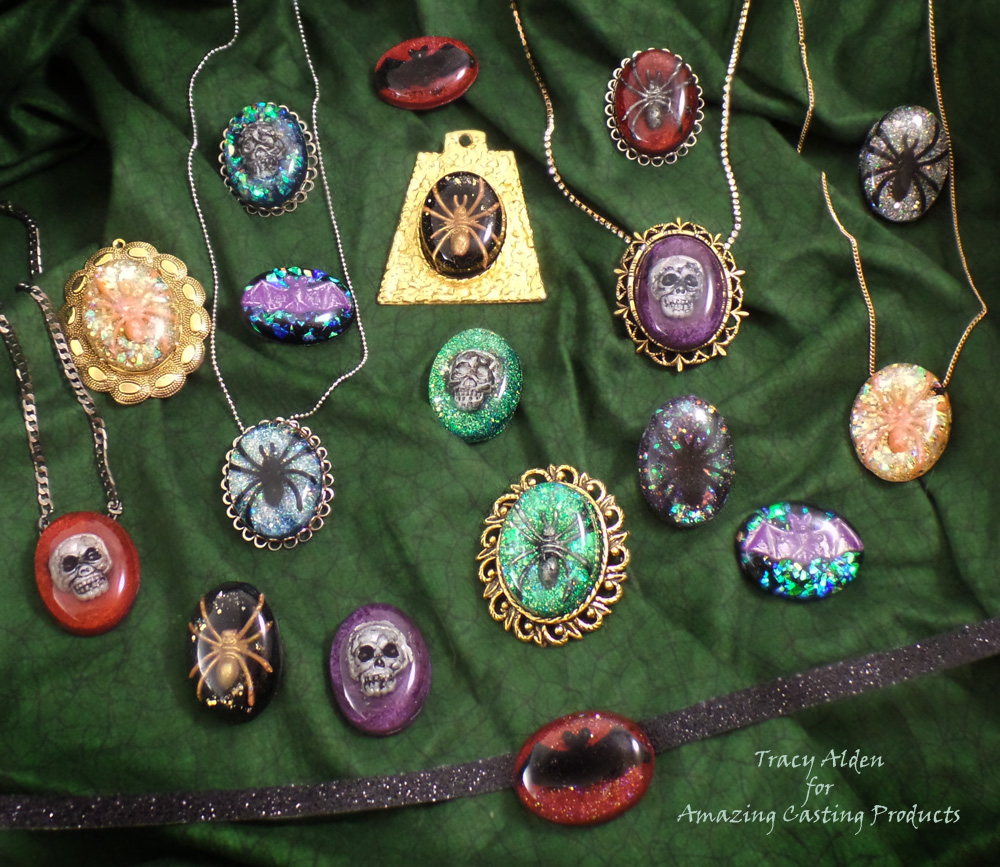
How to make Halloween party favors go from groan to glam with Resin Cabochons made with Amazing Clear Cast.
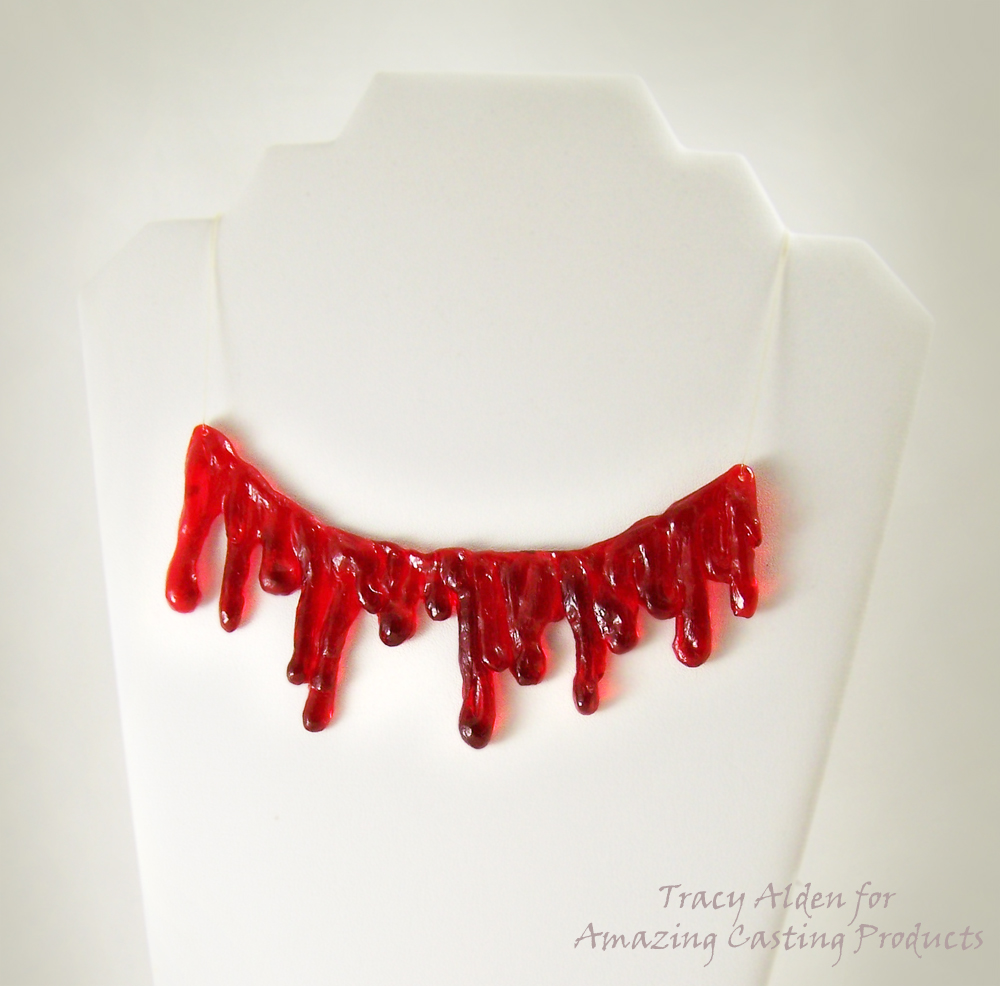
Running out of time on what Halloween costume to wear…. take a look at a Resin Blood Drip Necklace using Amazing Mold Rubber.
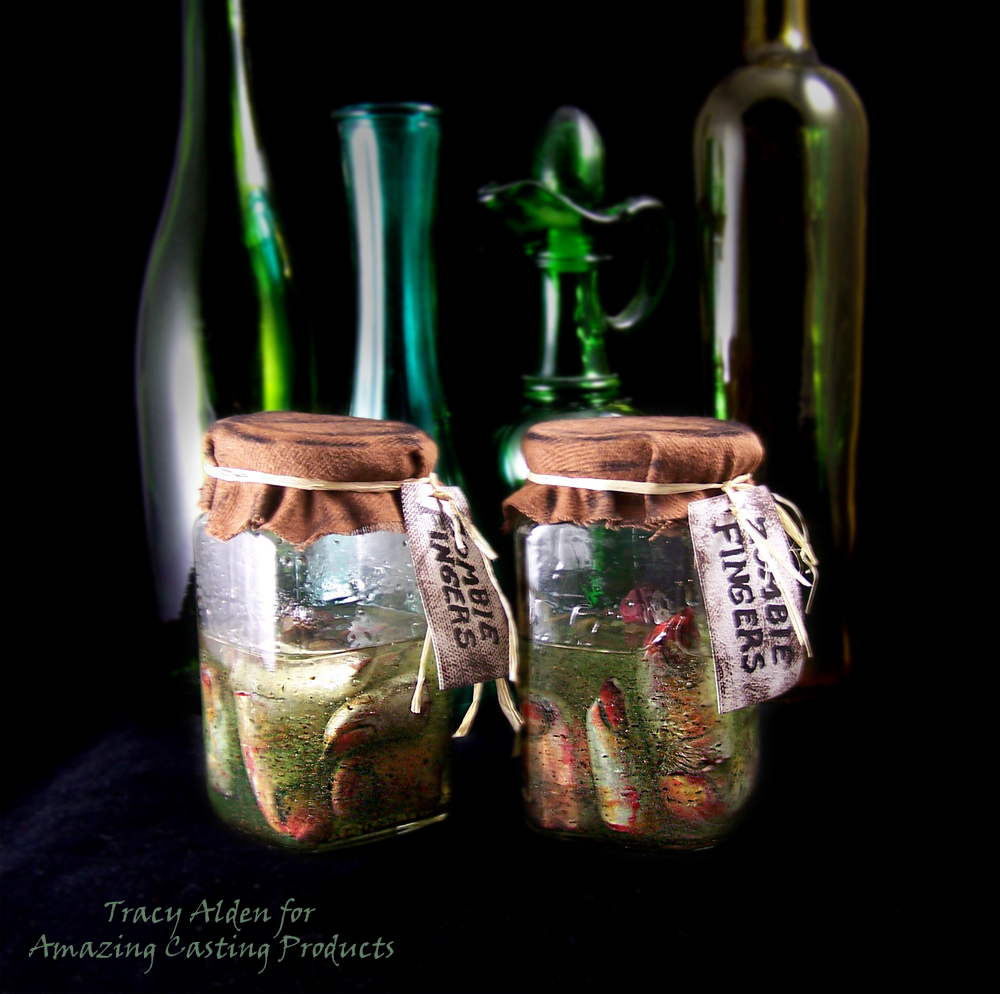
Need that perfect addition to a spooky apothecary? Try you hand at a upcycled Zombie Finger Apothecary Jar using Amazing Casting Products.
I hope sharing some of these projects has you mind a whirl with some Halloween craft project inspiration!
Until Next Time, Safe Travels!
Upcycle Plastic Skulls into Ghoulish Glam Decor
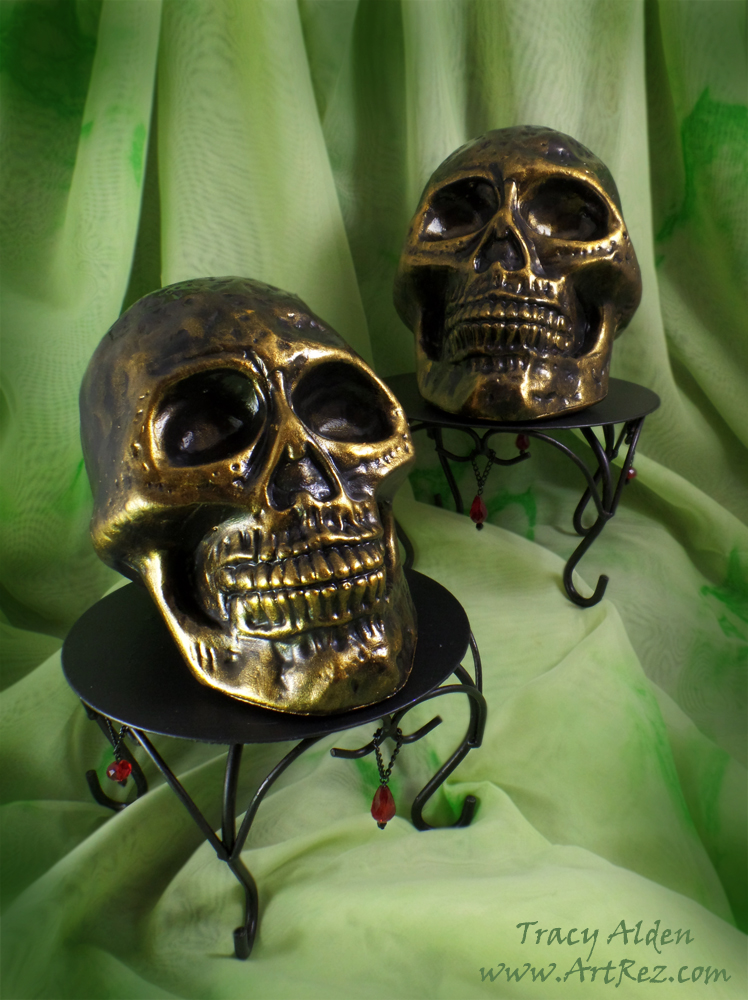
The first day of October: the leaves are starting to fall and the temperatures are slowly starting to drop at night! With only a month left to get all of my Halloween projects, I have been traveling to all sorts of places for interesting supplies. One of my favorites is the many local Thrift Stores in our area that support local charities. At this time of year many will get in all kinds of Halloween items and one store had a lot of plastic skulls. I noticed that while the paint job on the skulls wasn’t particularly grand the sculpting of the skulls was nice. It got me thinking how they would look if I changed the paint and finish, replicating the look of ceramic!
Supplies:
Plastic Skulls and Metal Candle Stands
Liquitex Gloss and Matte Varnish
Black Chalk Board Paint
iZink Pigment Ink bottle – Gold
Fiona Accessories Red Crystal Drop Beads, Black and Red Crystal Rondelle beads
Beadsmith 1 Step Looper Tool
Black enameled chain, jump rings and headpins
Paint Brushes
Cosmetic Sponges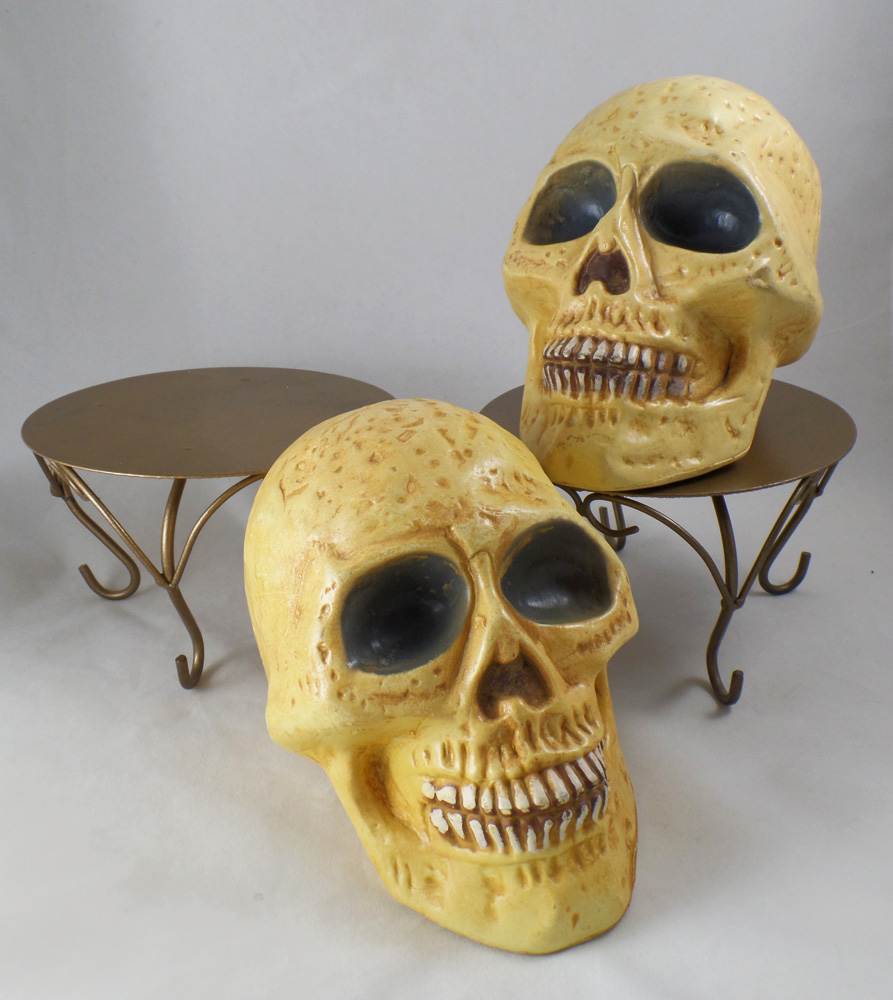
Along with the skulls I found some old candle stands with a old bronze finish. I noticed the skull fit perfectly on them so I bought them along with the skulls. I scrubbed the plastic skulls and candle stands, removing any dust, stickers and uneven edges.
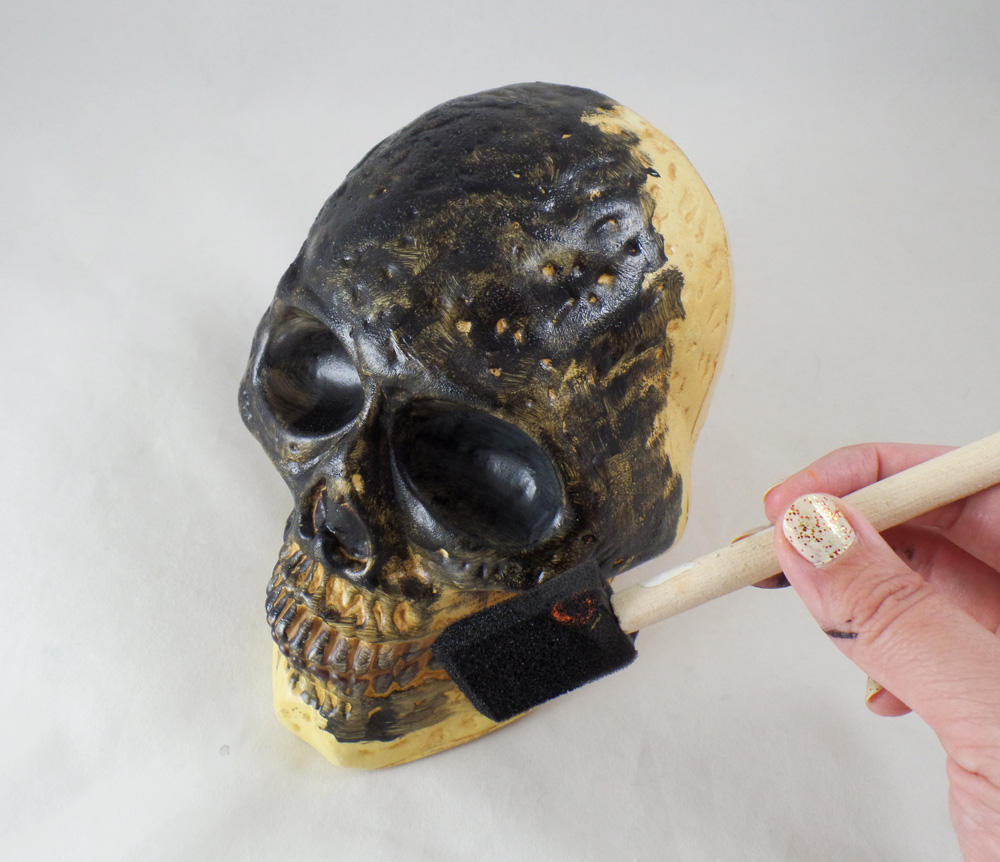
While I could have easily spray painted the pieces, I wanted to go with a nontoxic and child friendly direction by using chalk paint. I painted the skulls and candle stands with 3 layers of black chalk paint. Most chalk paints require a 1-2 hour dry time between coats of paint for best coverage and adhesion of the paint.
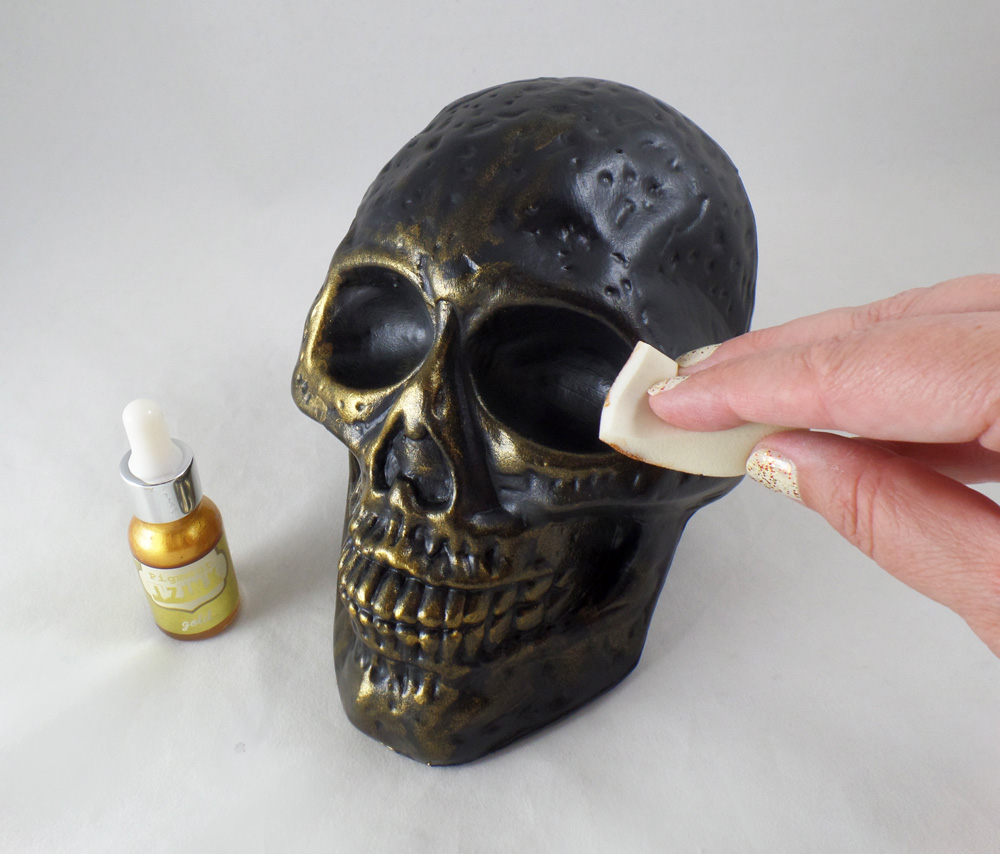
The skulls already looked better than they used to but I wanted them to look more like ceramic. Using a cosmetic sponge I applied Gold iZink Pigment Ink to the raised portions and detailed parts of the painted skulls. The ink dries rather quickly allowing me to add several layers on sections for a dramatic effect.
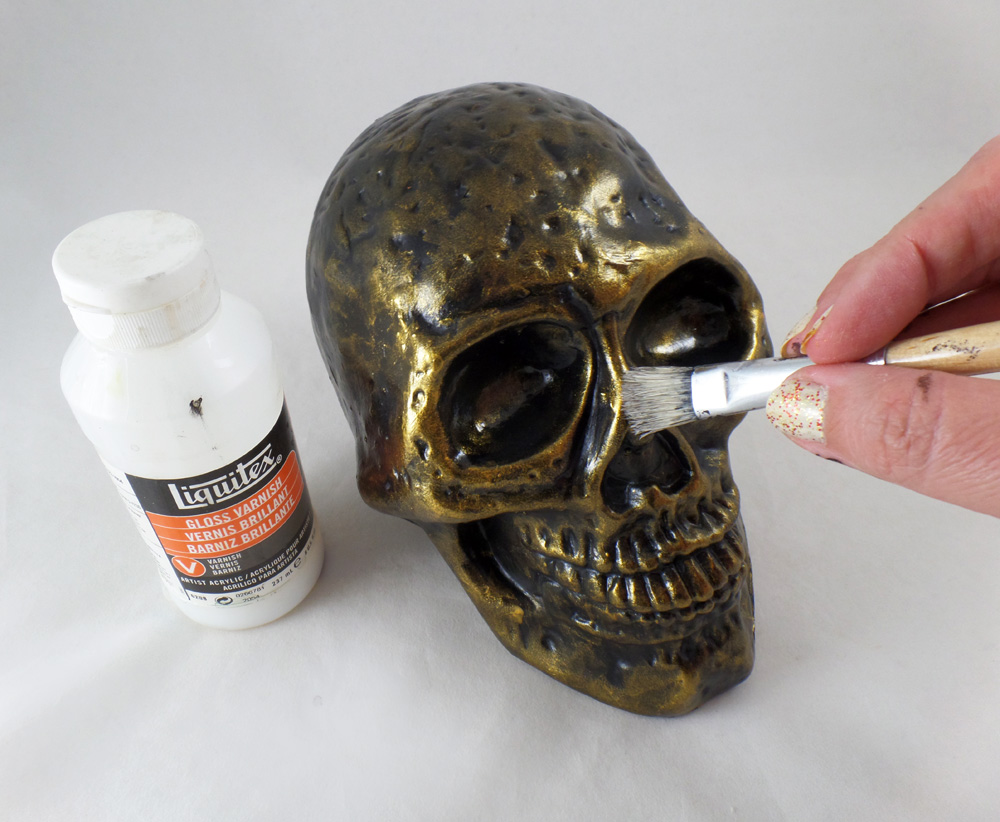
I applied Liquitex Gloss Varnish to the sections on the skulls with gold ink to make the gold tone visually stand out more and give the illusion of ceramic.
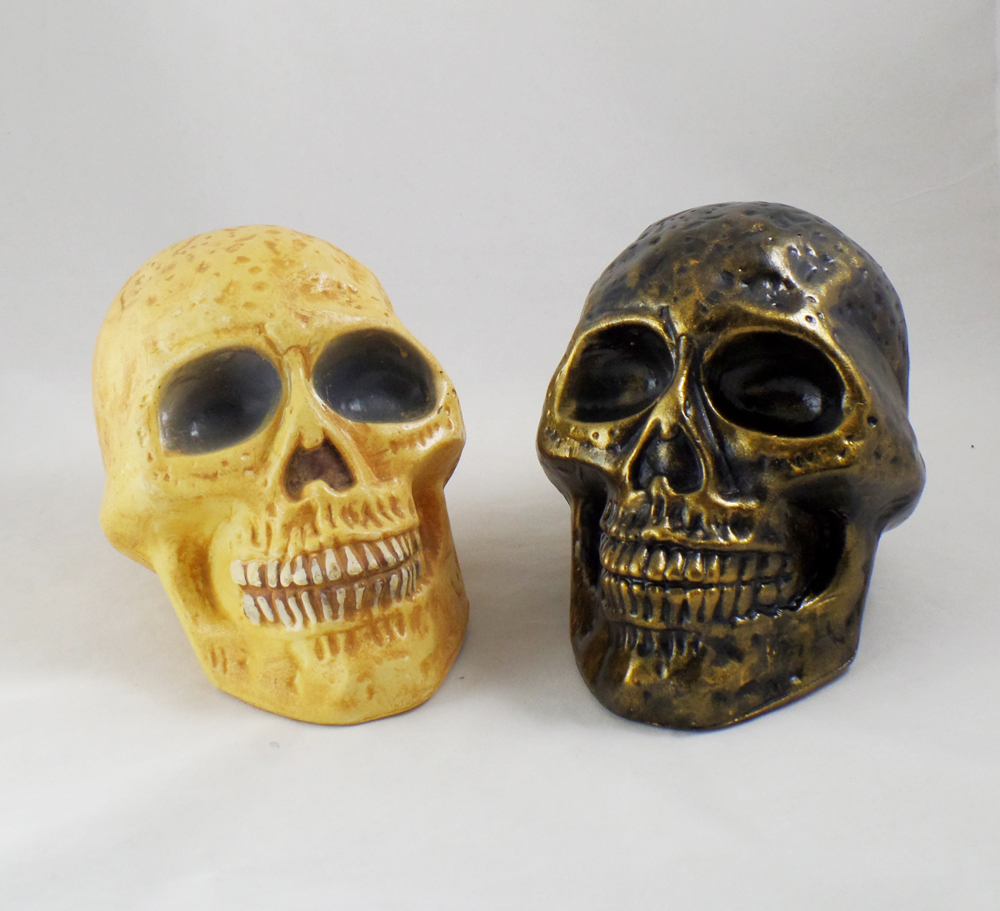
Compared to the original factory paint I was pretty happy with the new version, replicating the look for ceramic. However I felt the skulls needed something more.
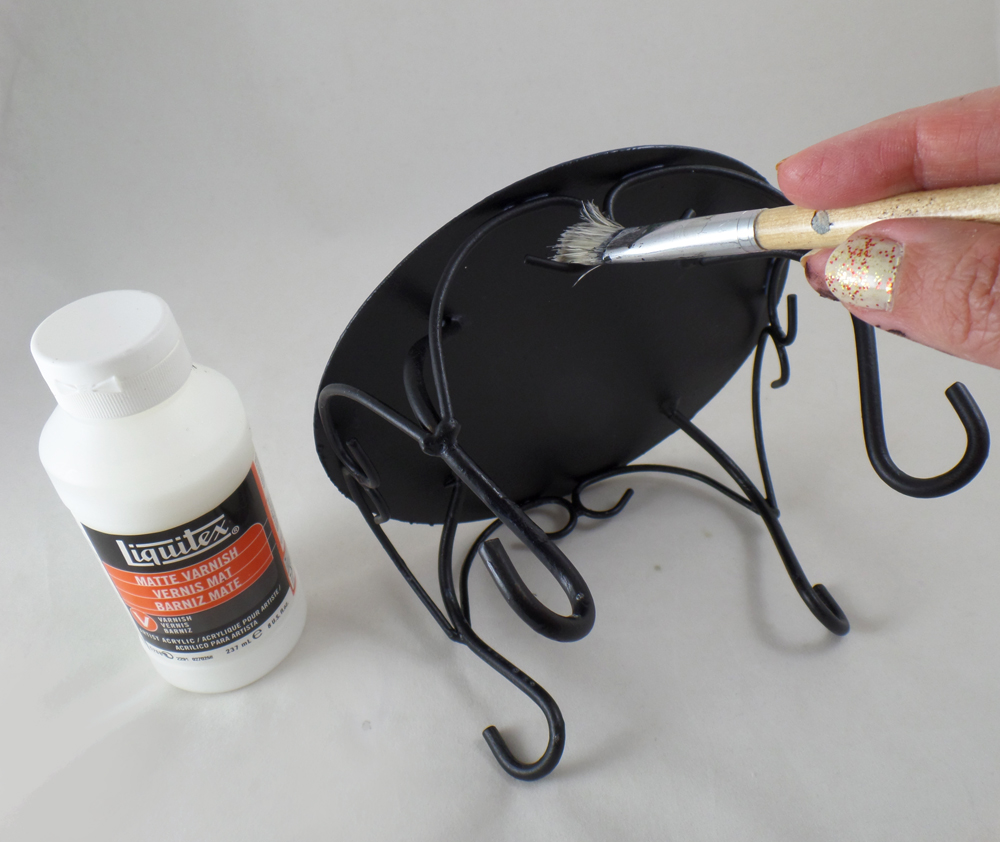
With the candle stands already painted with black chalk paint all I needed to do was paint them with Liquitex Matte Varnish to seal and protect the stands.
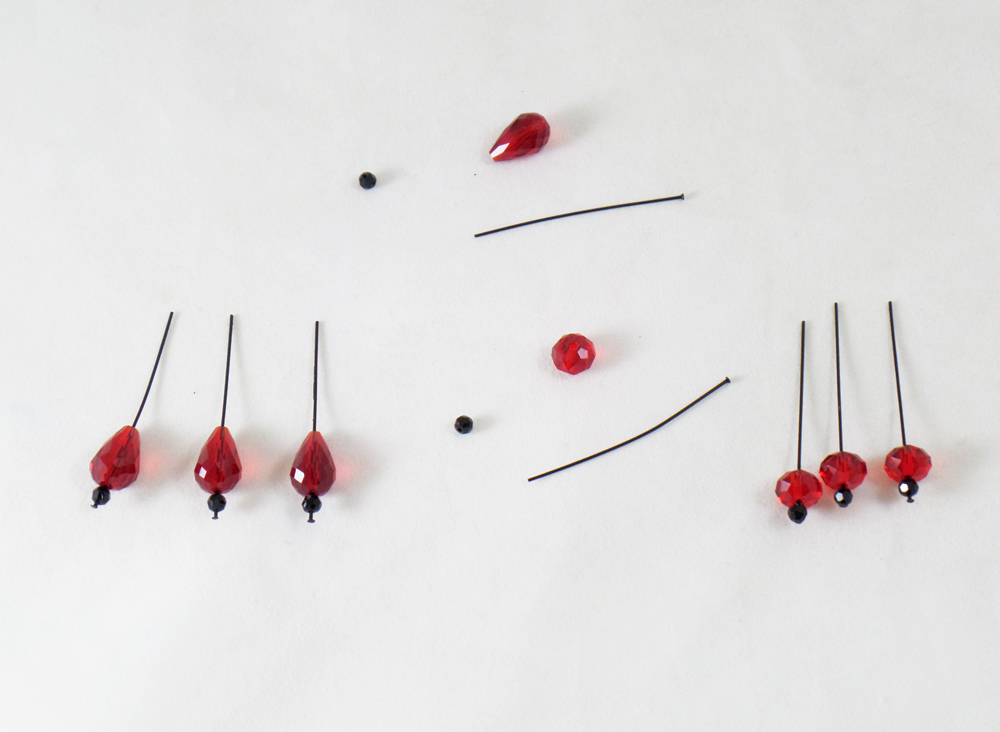
On four black enameled headpins I threaded on one black crystal rondelle and one red drop. On four more black enameled headpins I put one black crystal rondelle and one red rondelle. These will become embellishments for the candle turned skull stands.
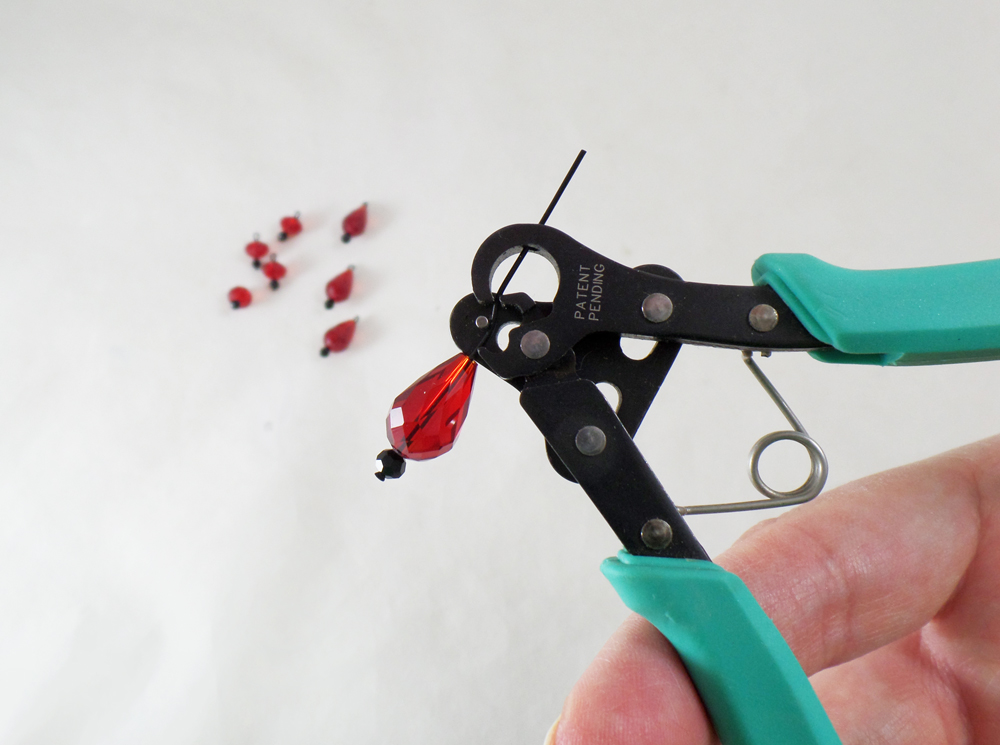
Starting with two beads threaded on a headpin I threaded the wire through the Beadsmith 1 Step Looper Tool, cutting and creating the loop I needed for the start of the beaded dangles. I repeated this the rest of crystal drops and rondelle beads on the headpins.
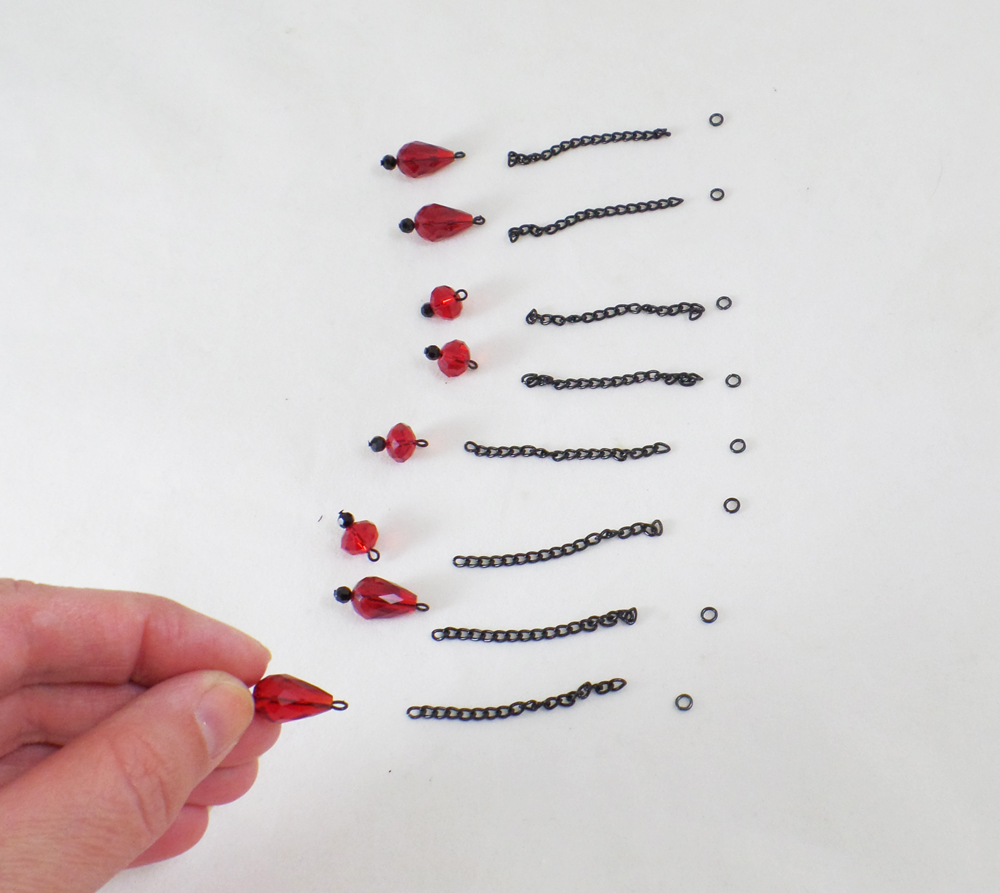
I cut black enamled chain into 2 inch lengths and placed eight black enamel jump rings with each chain and crystal bead drop.
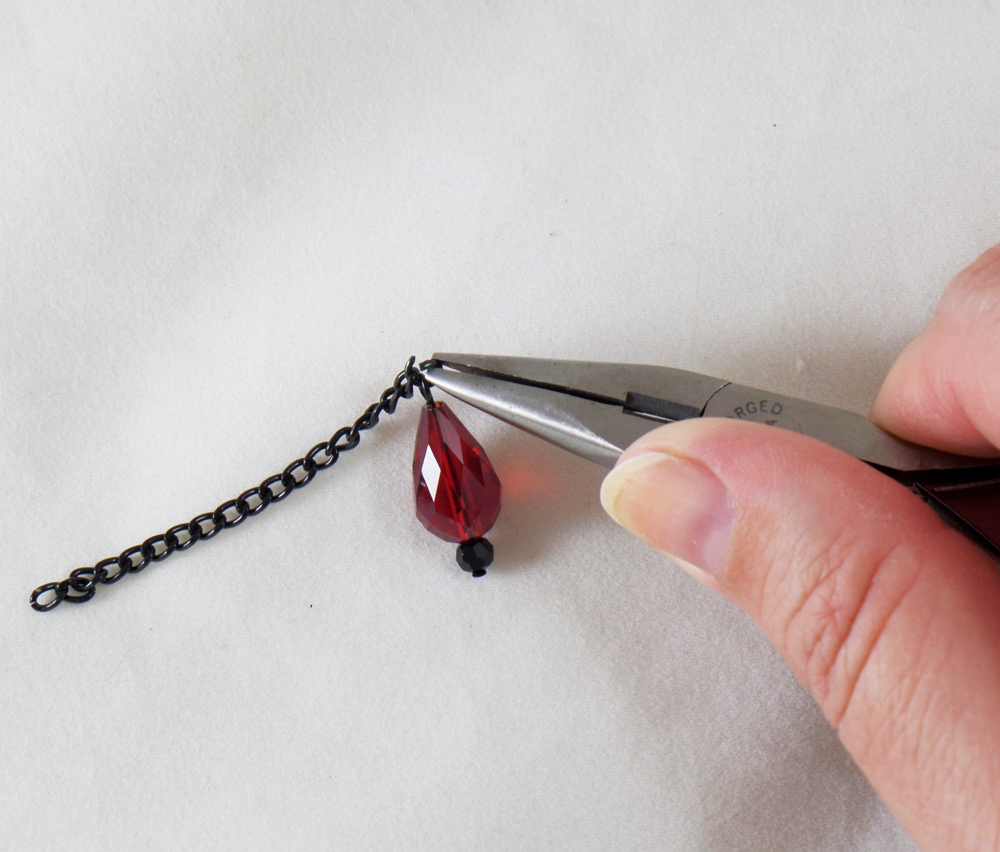
I opened up a jumpring with flat nose pliers and put the jumpring through one of the crystal bead headpins, and one of the cut lengths of chain.
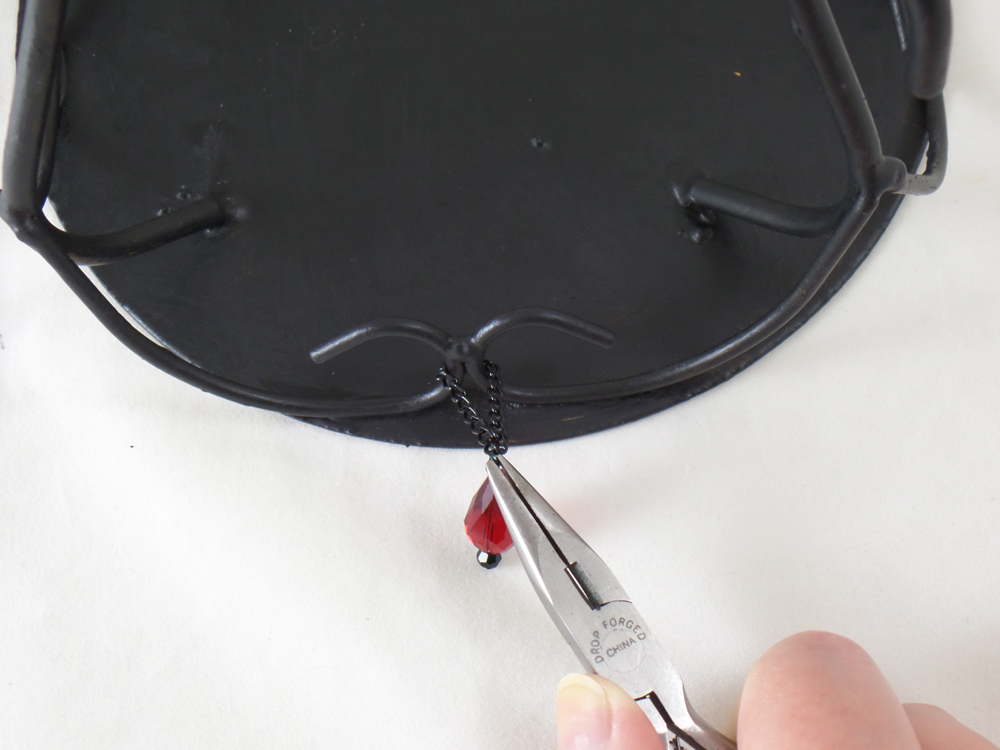
Flipping over a candle/skull stand I lopped the chain around one of the metal curls. I picked up the end of the chain not looped on the jump ring and carefully hooked the still open jump ring on it. I closed the jump ring with the pliers, making sure both ends of the chain and beaded headpin were threaded on the ring. Chain and beaded headpins were added to all four sides of the stand, then the stands were flipped over allowing the chain and beads to become a decorative element.
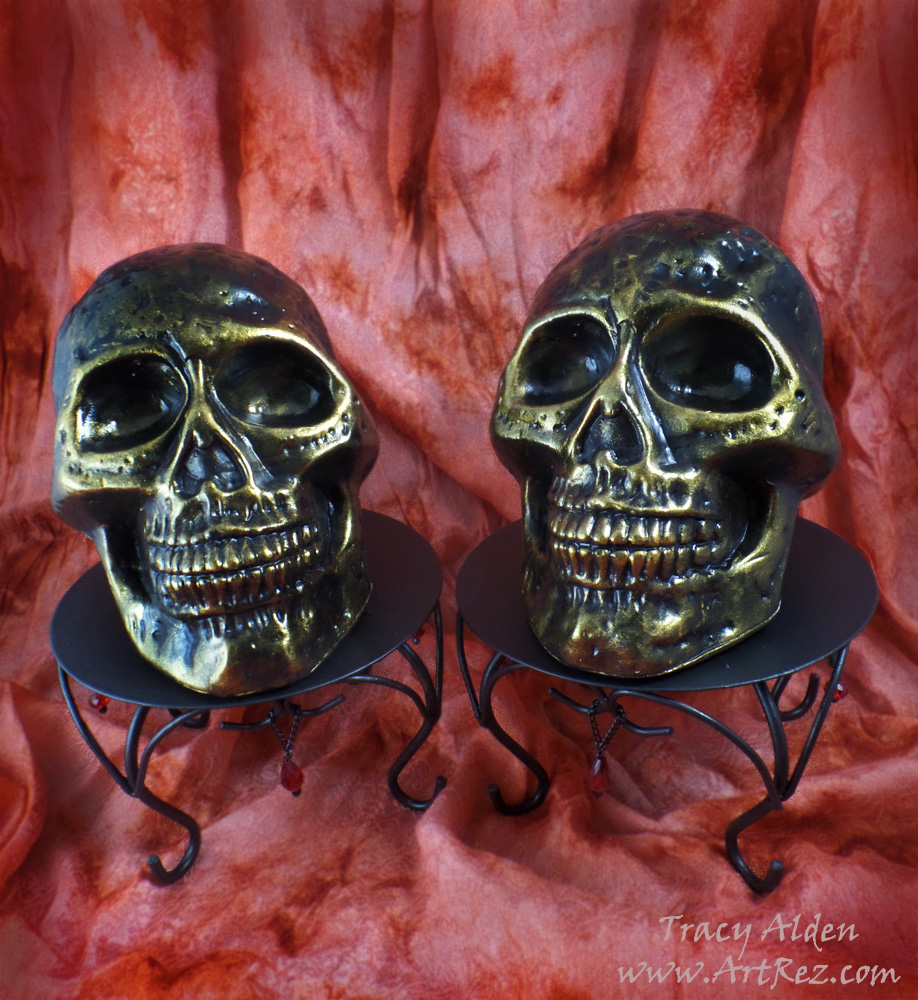
I placed the plastic skulls on their stands and placed them along with my ever growing collection of Halloween decor!
What old decorations might you find in your travels that you can upcycle?
Until Next Time, Safe Travels!
Metallic Resin Charm Necklaces
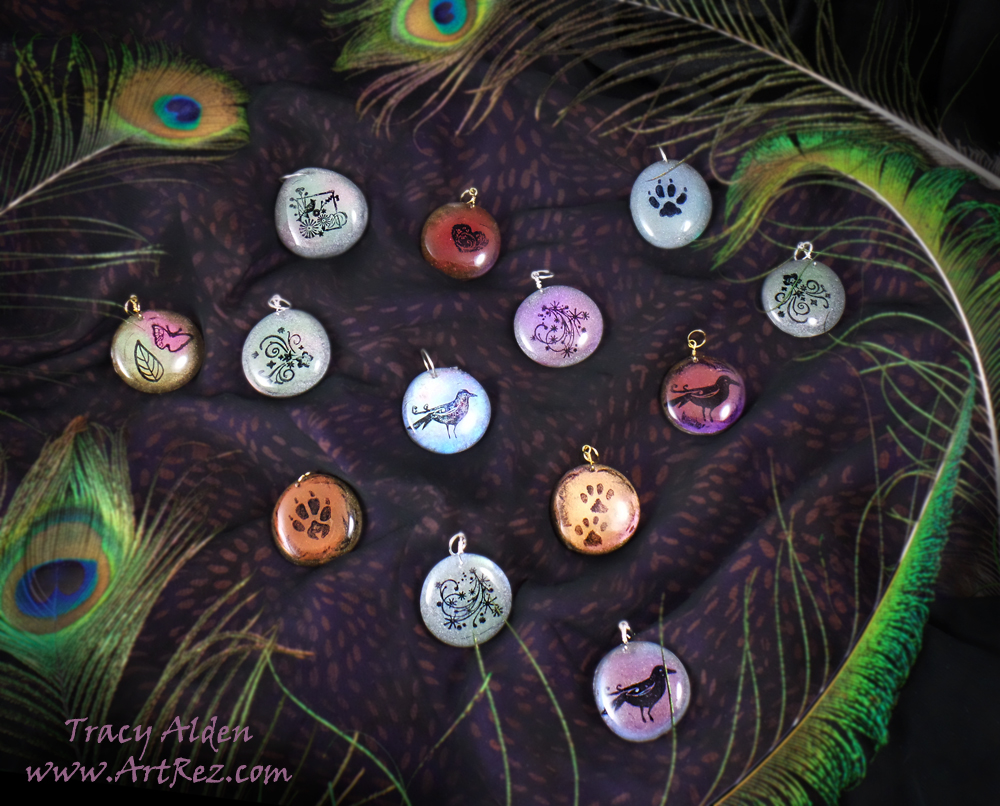
Sometimes inspiration for my craft projects is right in front of me, and surely this was one of those cases. I collect all kinds of little stones, trinkets and pieces of glass and often put them on display around the house in eclectic little assortments. I noticed the larger decorative glass pebbles I have, that can be found at most craft stores, have wonderful little round shapes that make me think of shapes of charms and pendants. I knew Amazing Remelt would make not only quick but glass-smooth molds and Amazing Clear Cast would be perfect to pour into the molds to create the charms, so off I went looking for my supplies!Supplies:
Amazing Remelt
Amazing Clear Cast
Alumidust
Alumilite Metallic Powder
StazOn Ink
Stir Sticks
Mini Stamps
Decorative Glass Pieces
Small Hand Drill
Ribbons, Cording and Metal Wire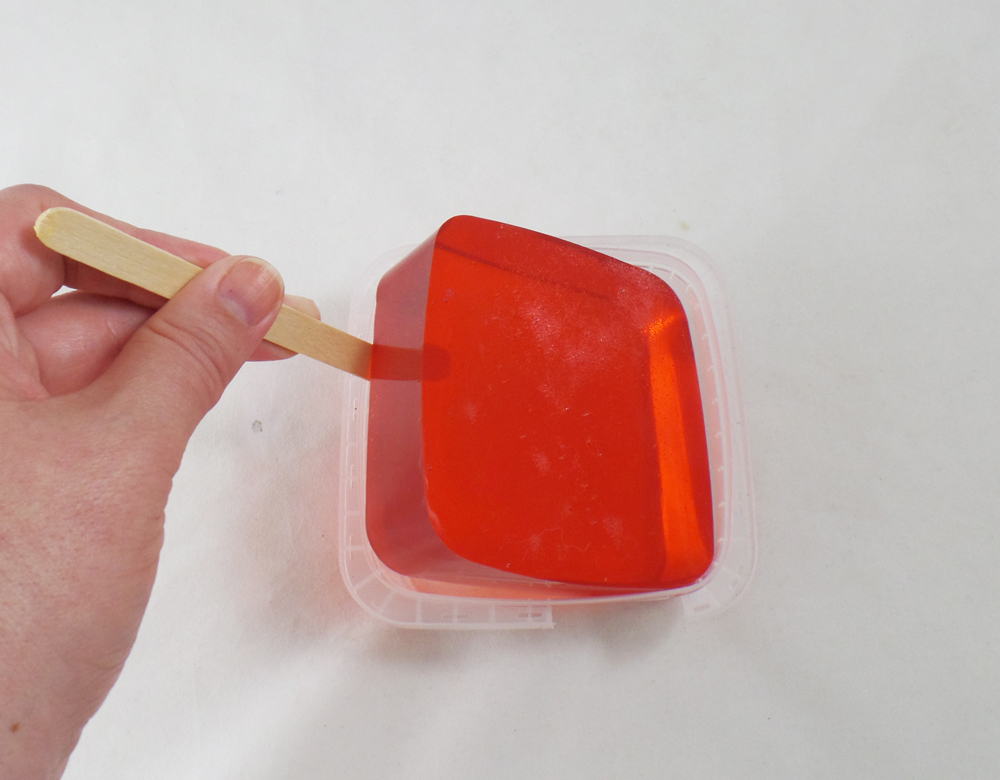
I started off with removing several blocks of Amazing Remelt from their containers. They are easy to remove by running a stir stick around the edges and gently lifting the Amazing Remelt from the container.
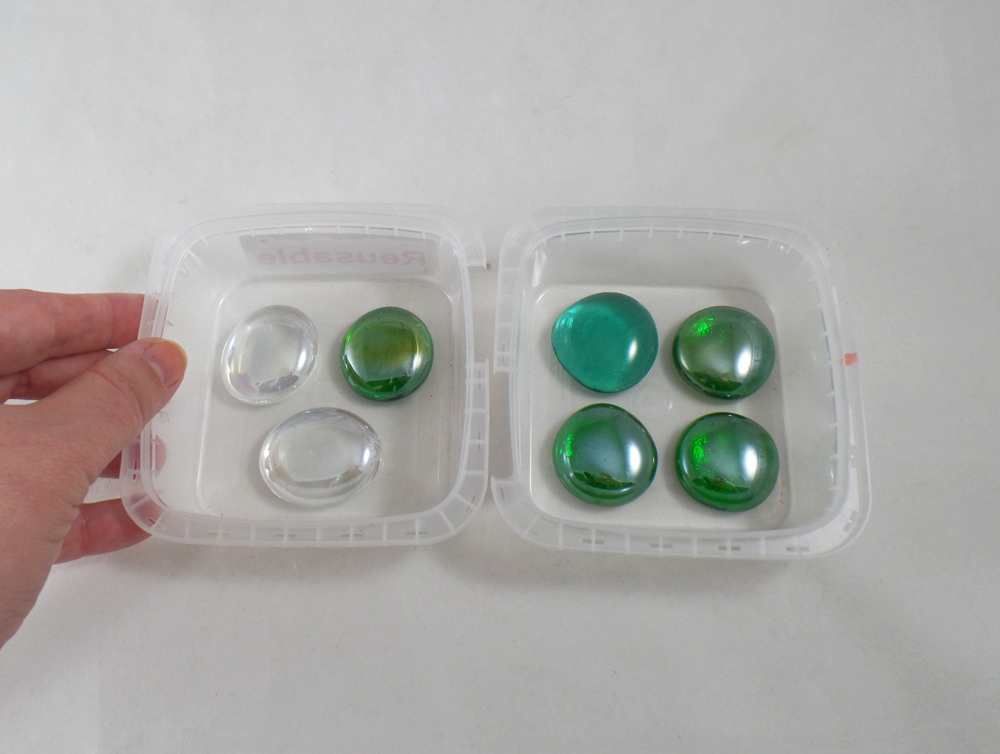
The Amazing Remelt containers acted as my mold boxes and I placed the glass pieces in the containers, making sure to leave some space between each piece so the mold will have separate spaces for each piece. You do not need to use an mold release on these pieces as they are smooth and non-porous.
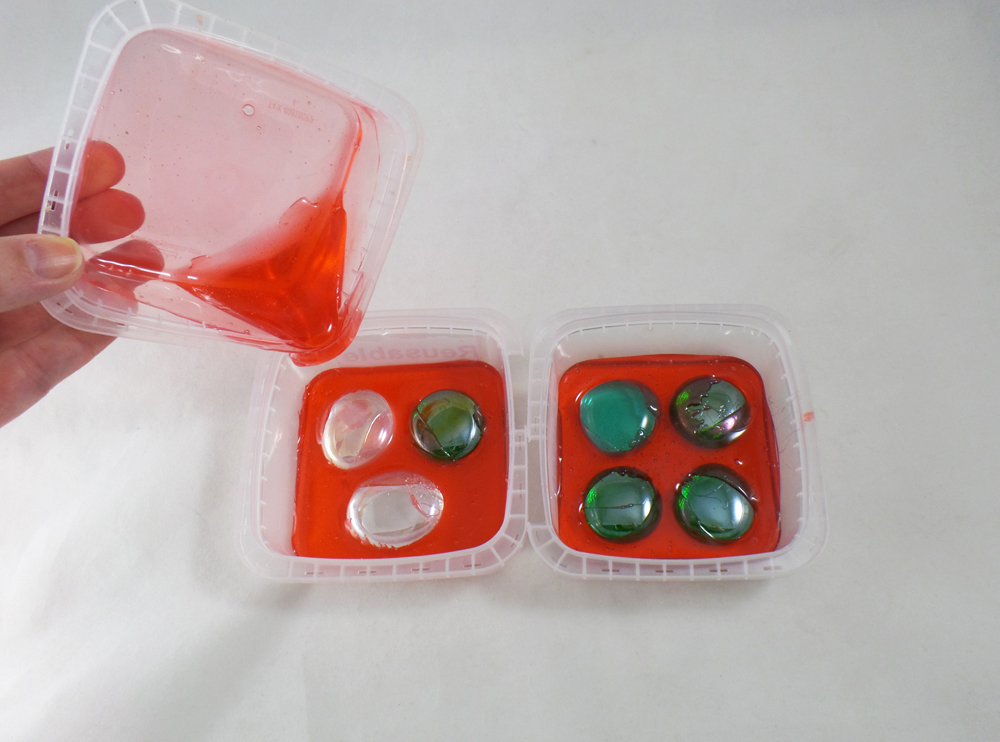
I heated one half of a Amazing Remelt brick in the microwave until liquid, in one of the containers it came in. I poured the heated Remelt in the two containers holding the glass pieces, but only a thin enough layer to cover the bottom and a bit of the sides of the glass. This layer acts as an anchor for the pieces without having to glue the glass in place, I let this layer cool completely.
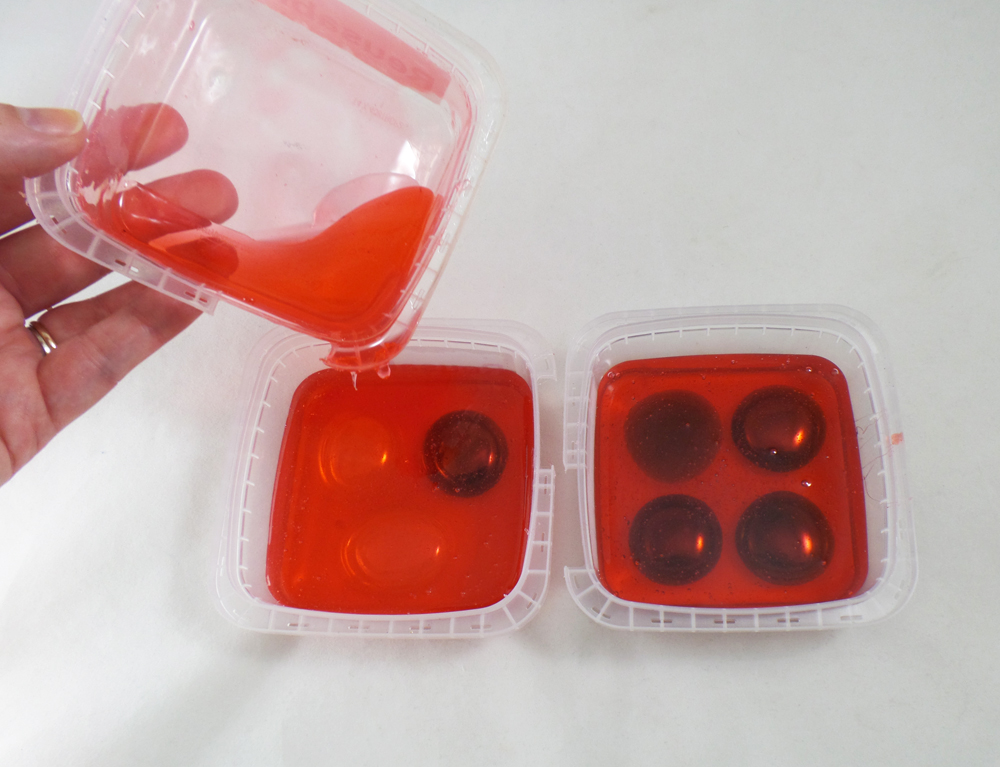
The second pour of Amazing Remelt I covered the glass pieces completely and let them cool to finish the molds.
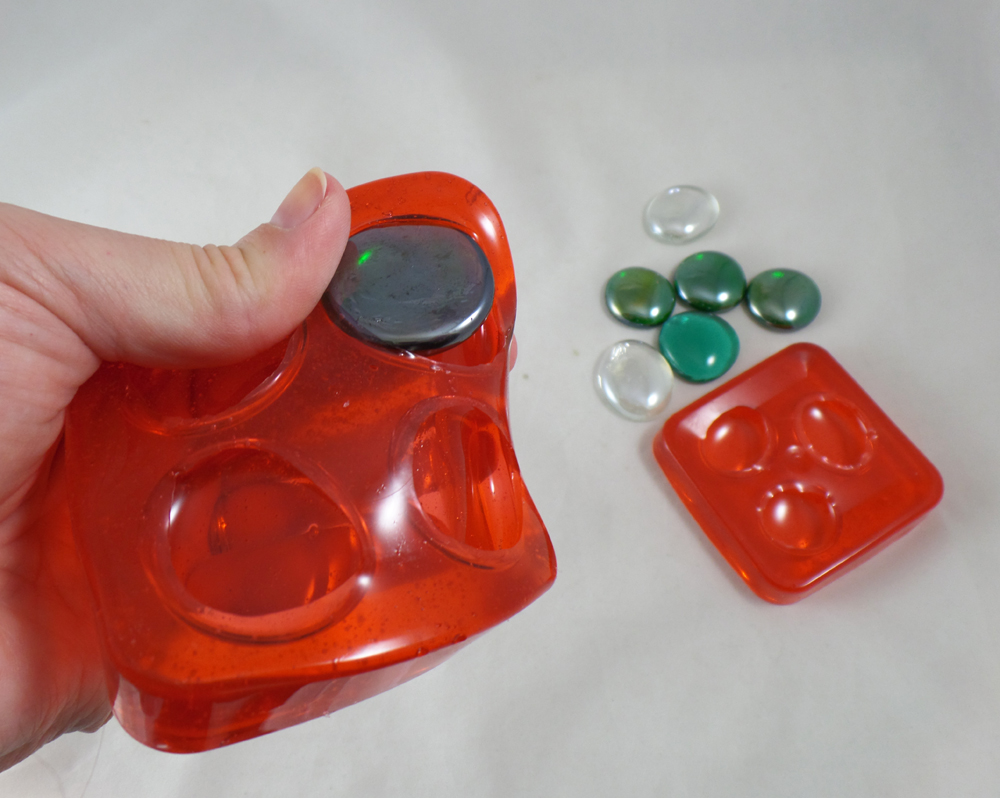
Once the molds were cool and no longer tacky I carefully removed them from the containers and flexed the molds until the glass pieces popped out.
I mixed up a small batch of Amazing Clear Cast and filled each round in the mold halfway and let it cure to a hard yet somewhat tacky state.
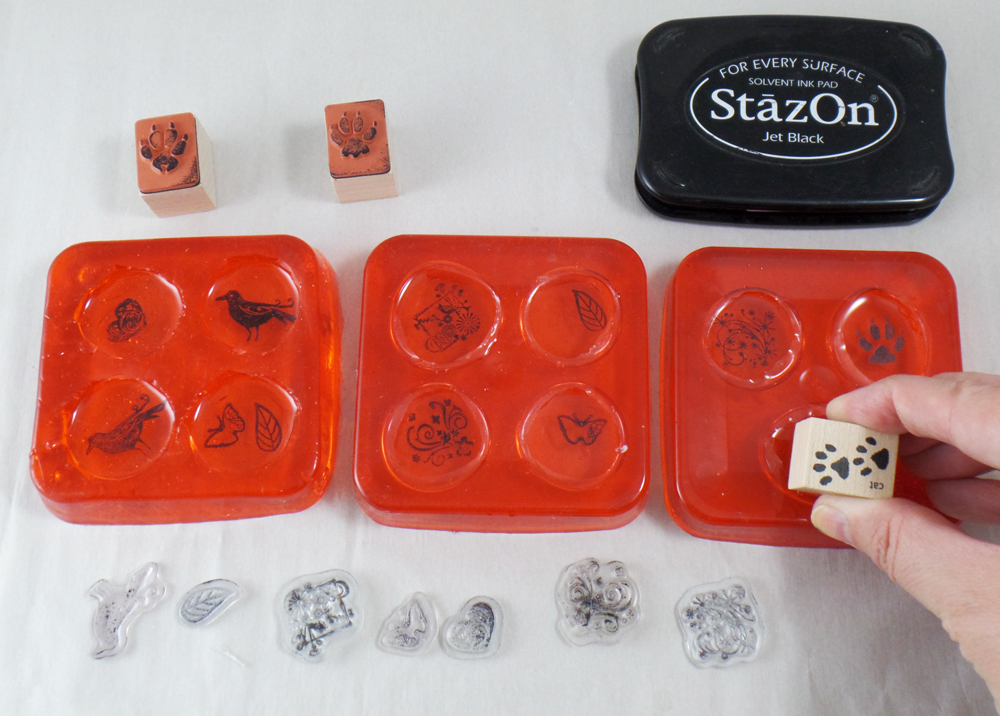
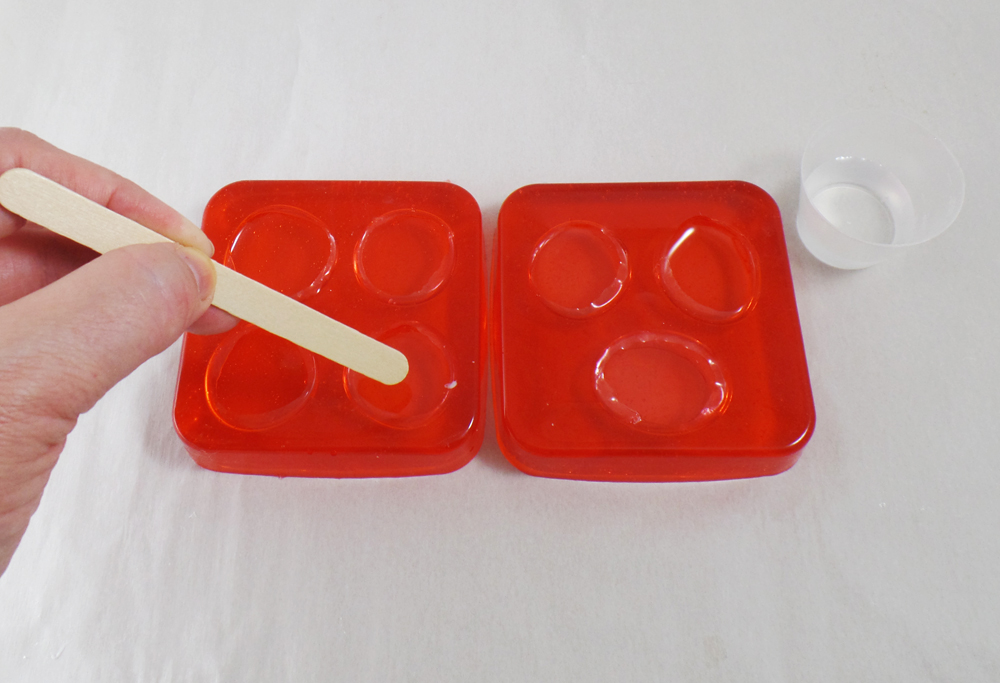
I then carefully inked and stamped little stamps with StazOn Ink into the tacky resin. The tacky state of the resin prevents the stamp from sliding and “grabs” onto the stamp, making sure I got a good stamped image.
*Pick your favorite stamps! As long as the stamp can fit the mold opening you can use any number of stamp images.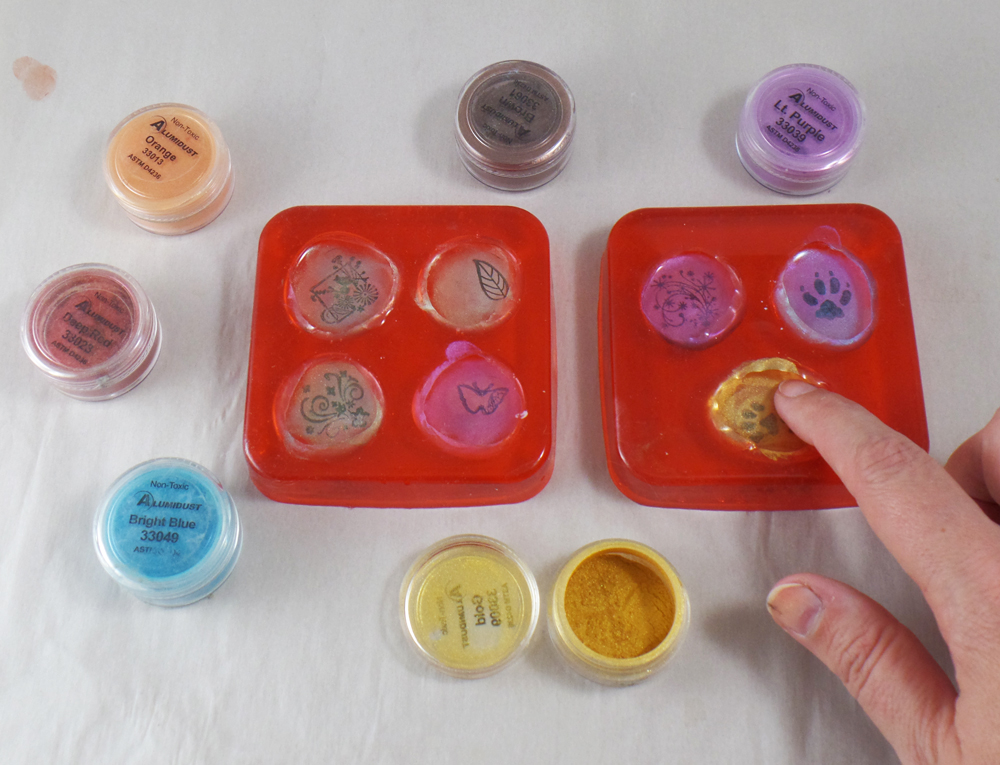
I rubbed Alumidust, in several different colors on the first layer of resin that was now stamped. Just like with the stamps there is no rhyme or reason to the color choices, just have fun with all the Alumidust colors!
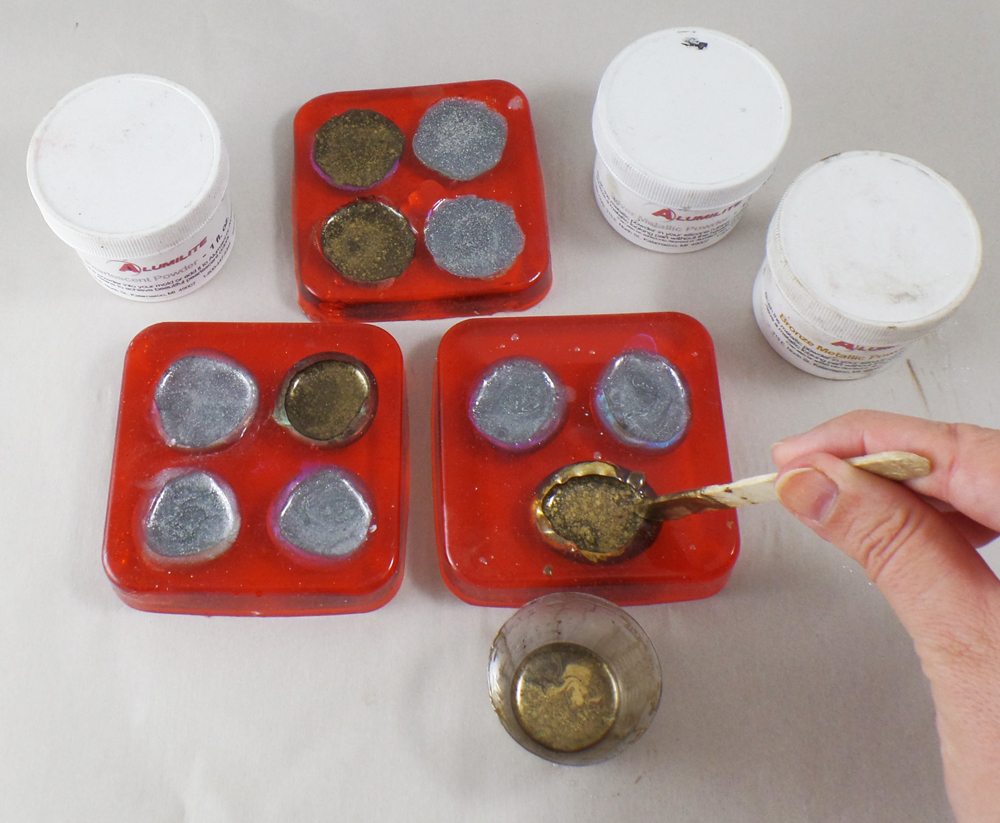
I mixed up two batches of Amazing Clear Cast mixed with Alumilite Metallic Powder, one silver and one bronze, and poured it in the molds as a second layer. I let it cure overnight.
* If you live in an high humidity area you might notice the when you pop out the resin pieces the next day they will be hard but slightly tacky. Just remove them from the molds and place them on parchment paper and wait for the resin to completely harden outside of the molds.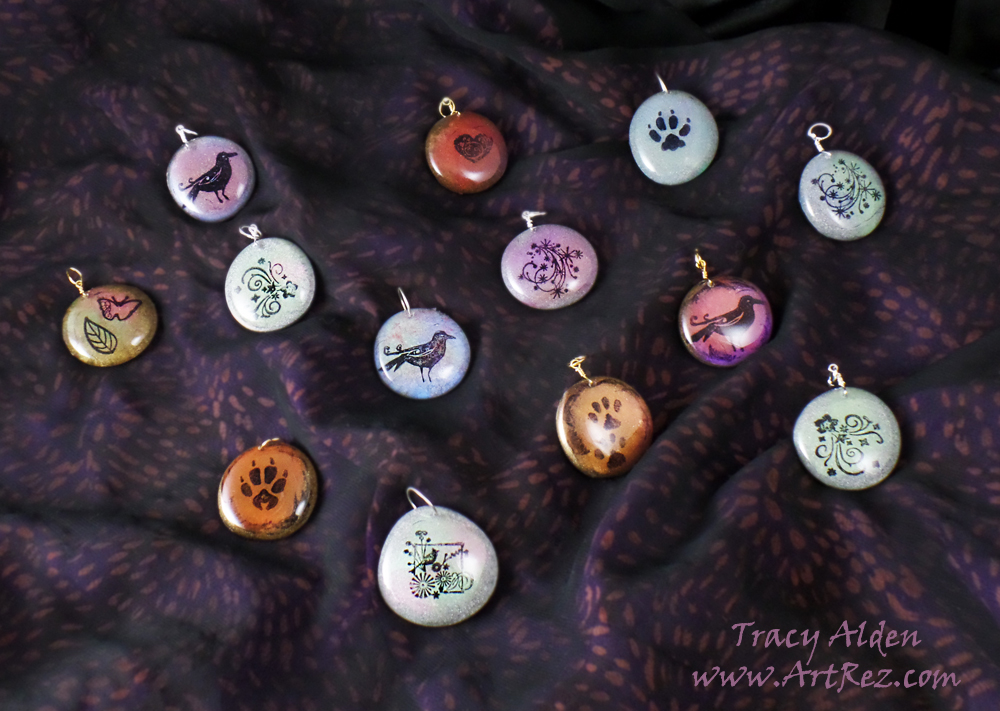
Once all of the pieces were fully cured, I carefully sanded any uneven edges and drilled holes with a hand drill. I scrubbed them clean and threaded jewelry wire and jump rings through the drilled holes. Now they are ready for ribbons, thread or chain!
Want to see more of Amazing Casting Products tutorials and inspiration? Hop on over to their Blog to see all kinds of Amazing Artists’ Designs!Until Next Time, Safe Travels!Day of the Dead Papier-mâché #Cre8time Inspiration
I am a huge fan of Day of the Dead festivals and artwork, even if it is a wee bit ahead of the calendar date! I was inspired to create these pieces after going to Linpeng International Inc./Fiona Accessories to visit with Fiona and Jimmy Lin. They are truly wonderful and talented people with a dedication to creating beautiful hand painted beads, jewelry and beading supplies, and I am grateful for meeting Fiona at the Craft and Hobby Association Trade Show in 2014. At this visit, as usual, we discussed beads and jewelry, went over new ideas and displays, but Jimmy showed me something a bit different this time: little packages of Acrylic flat back gems, normally used for scrapbooking, in a wide variety of colors. He asked me if I could think of any other applications and the first thing that came to mind was covering papier-mâché skulls with the gems for Day of the Dead decor.
Supplies:
Fiona Accessories Acrylic flat back gems Flower and Diamond shaped in sizes 14mm, 19mm, 22 mm and 20x30mm
Mini acrylic flat backed gems (normally for scrapbooking, nail or shoes)
Liquitex Gloss Varnish
Acrylic Paint
Paint Brushes
Papier-mâché mask and skull by Darice and often sold at Michaels late Summer into Fall
Beacon Gem-Tac (Great stuff, non-toxic and flexible)
Sakura Pigma Micron Pen Set (I just love using their pen sets for any illustrations I do)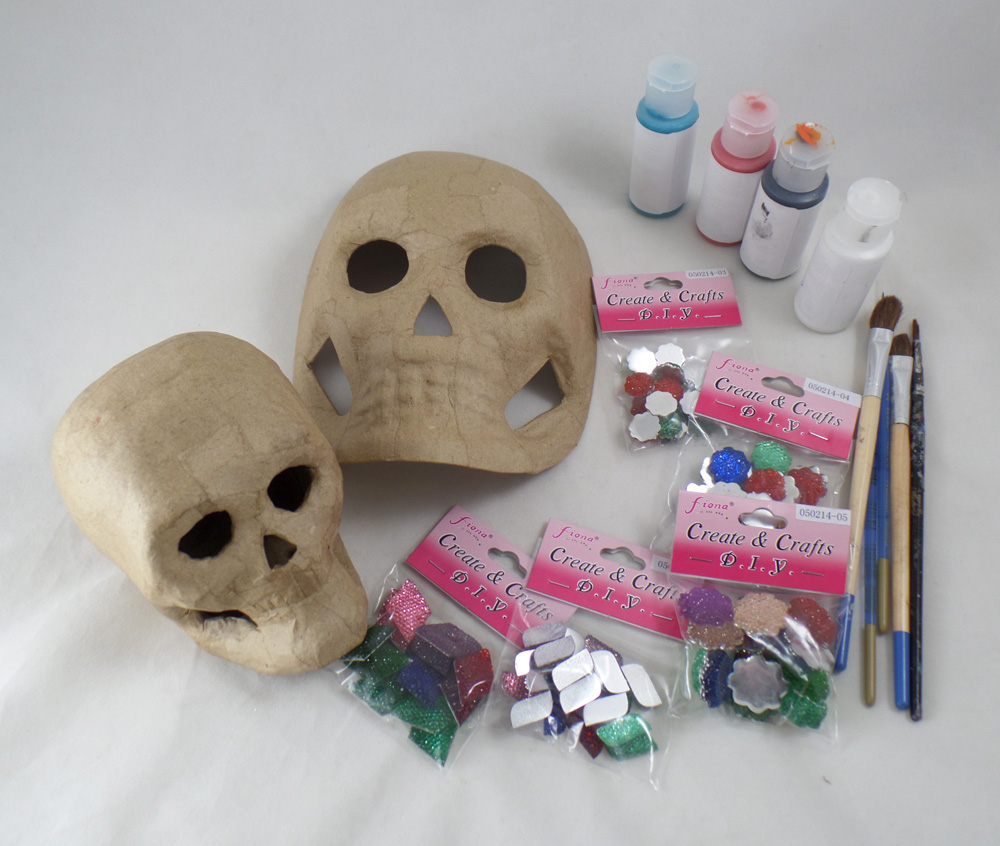
First I gathered all of my supplies, picking colors of paint, acrylic gems, brushes and which papier-mâché pieces I felt would look the best for what I had in mind.
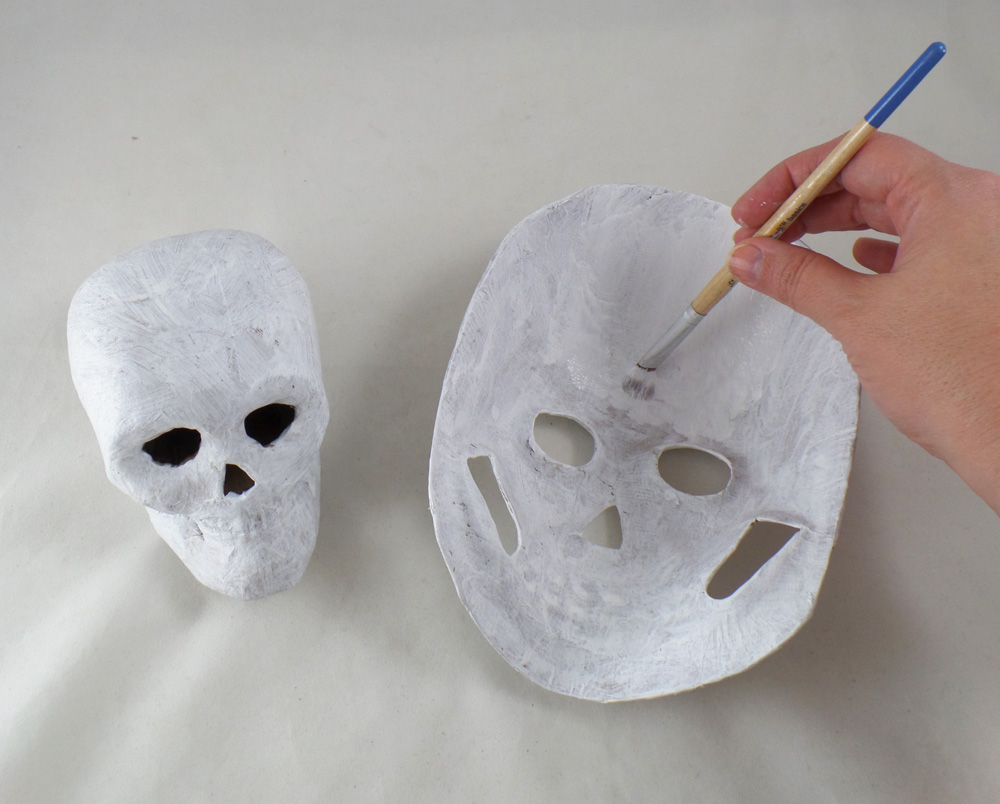
I started by applying white acrylic paint to the entire surface of the papier-mâché skulls. I let each layer of the paint dry completely before adding the next layer to prevent the papier-mâché from getting too wet and losing shape. I noticed that 2-3 coats of paint are normally required to get complete coverage.
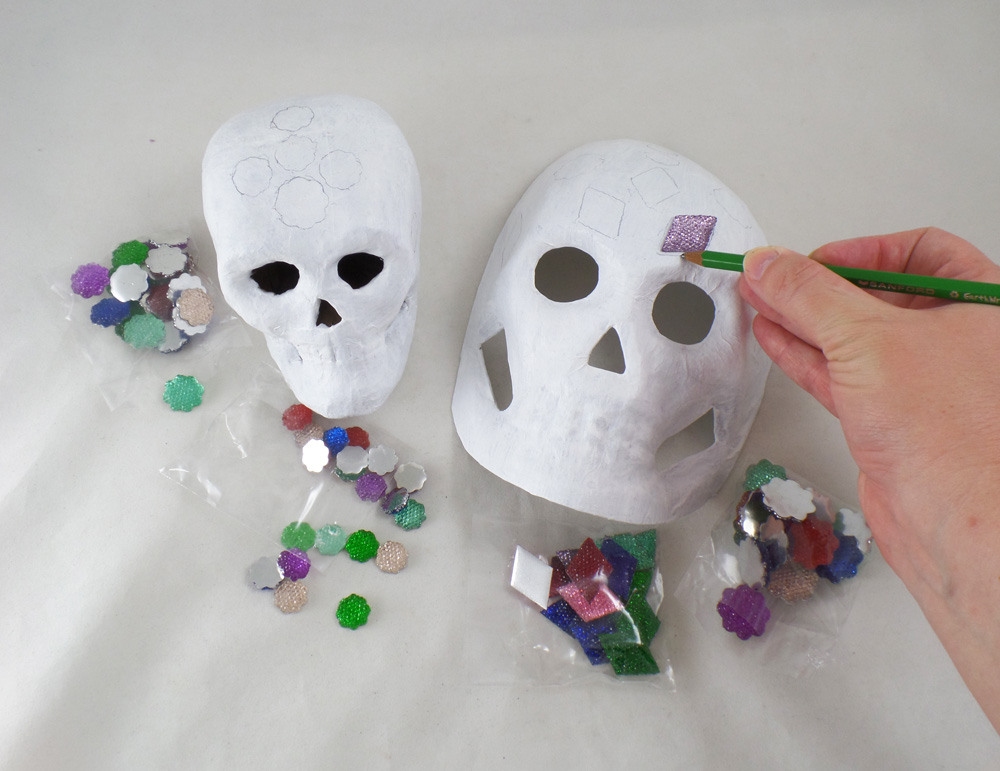
I started to loosely place where I would like the Fiona Accessories Acrylic flat back gems to sit on the papier-mâché and traced outlines in pencil, but I did not glue them on at this point. This would give me outlines to follow and color in with the pens and paint before applying the gems.
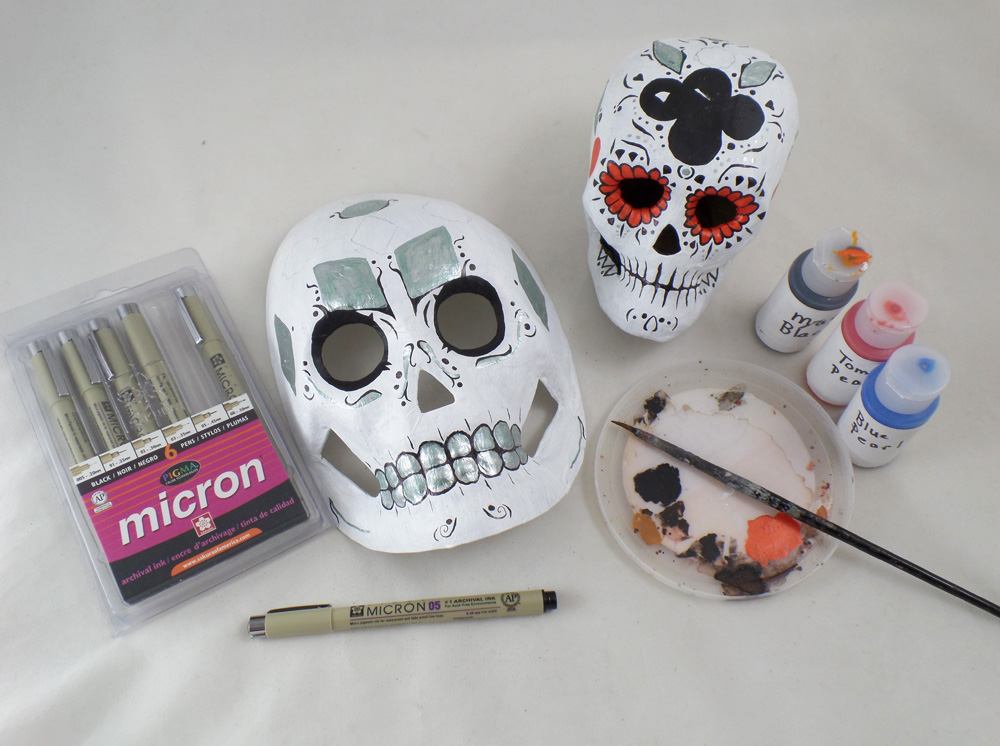
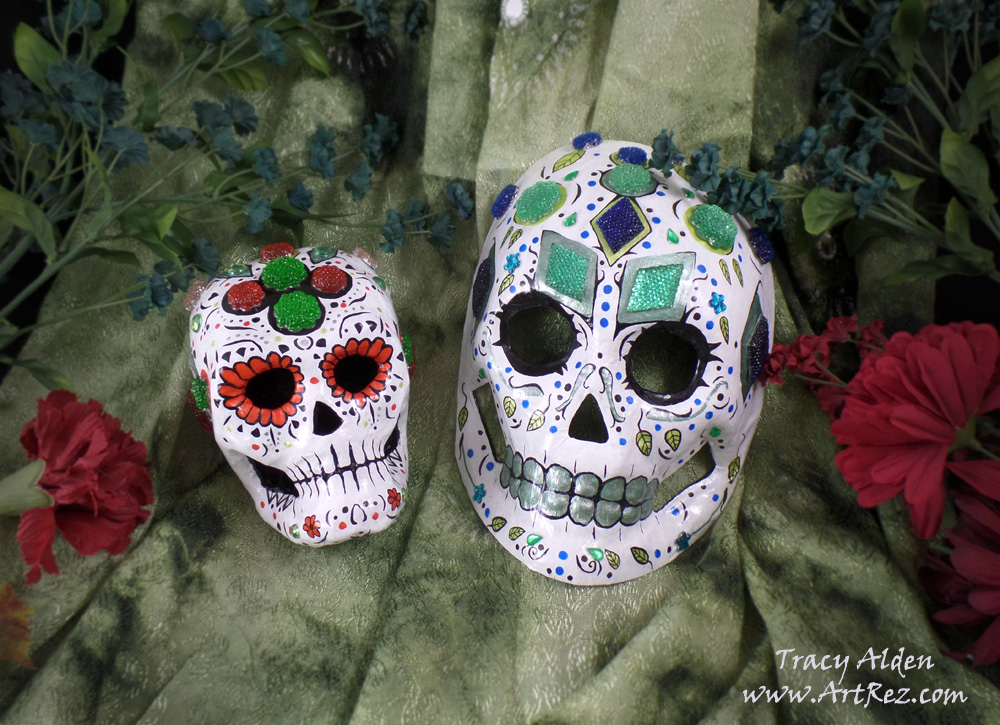
There is no set pattern or design to Day of the Dead masks, as it is a wonderfully free form style of art, allowing the artist to put any variety of shapes, symbols and scroll-work on their pieces. I have a fondness for plant life and organic shapes so I painted flowers, vines and geometric patterns across the pieces in silver, black, red and blue. I outlined key elements with Sakura Pigma Micron pens to make them visually pop more.
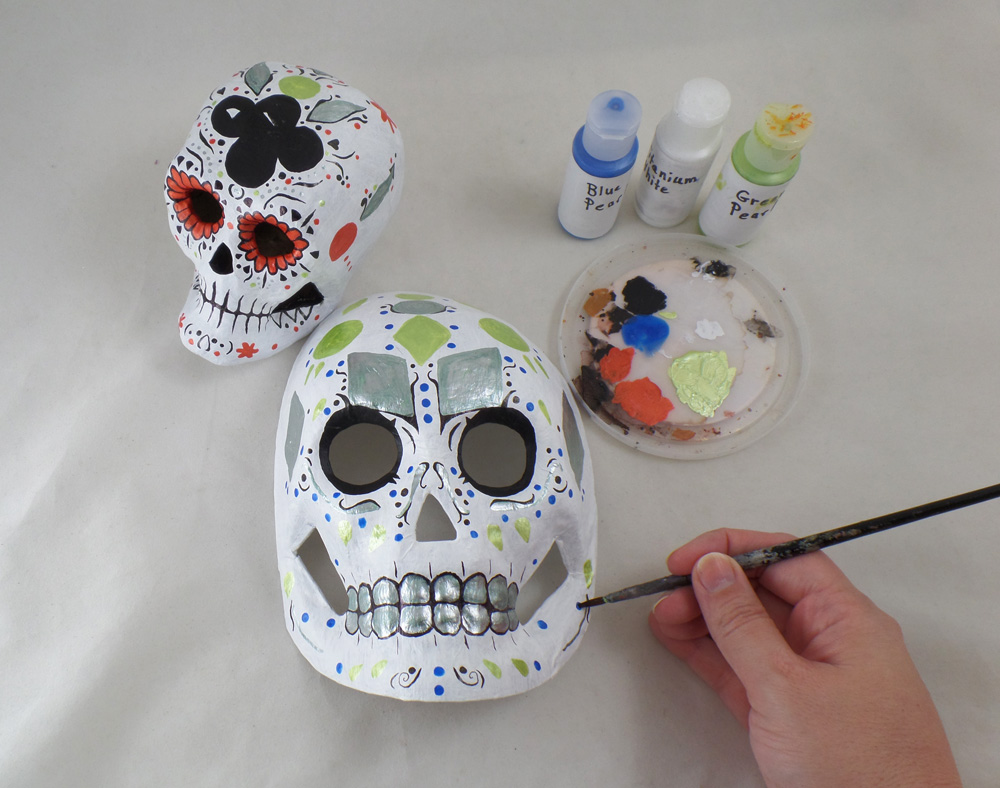
Since I really liked how the silver paint looked I added some leaves and geometric shapes in green pearl paint, along with flowers in red pearl paint. The paint having a slight shimmer would play off the sparkle of the acrylic gems. Applying the paint and drawing with the pens can take some time but I find it rather relaxing and meditative.
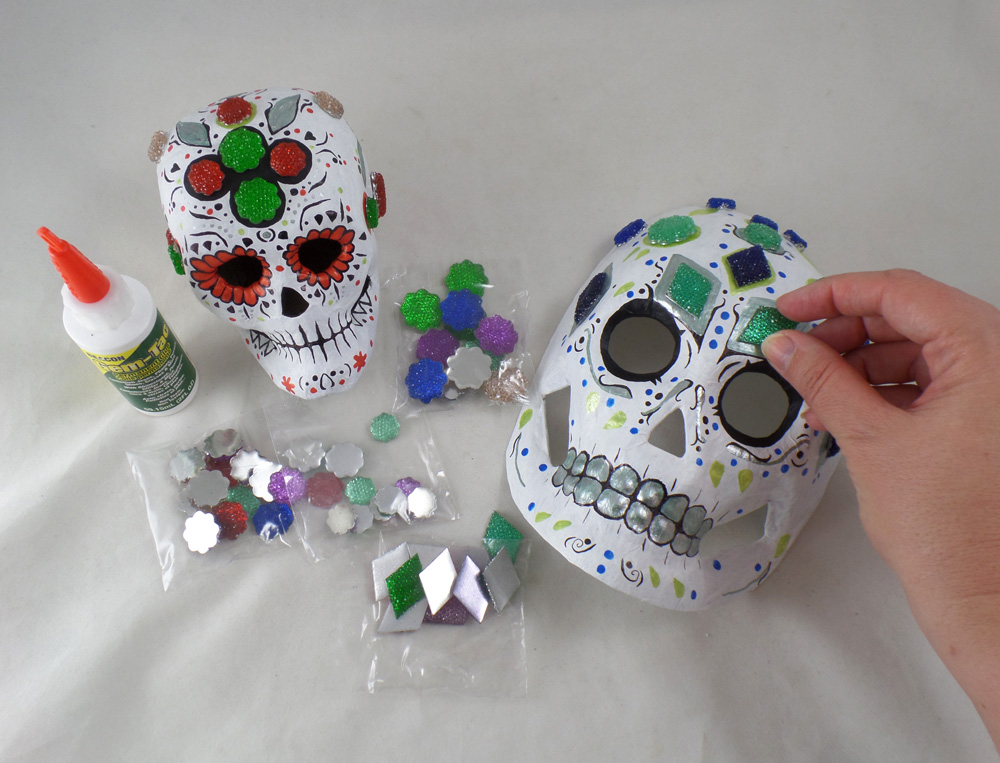
Once the paint was fully dry I applied the Fiona Accessories Acrylic flat back gems to the papier-mâché skulls with Beacon Gem-Tac. A small drop of the Beacon Gem-Tac will go a long way and dry perfectly clear; just holding the gem in place for a few seconds is all that is needed to get the gem to stick to the skulls.
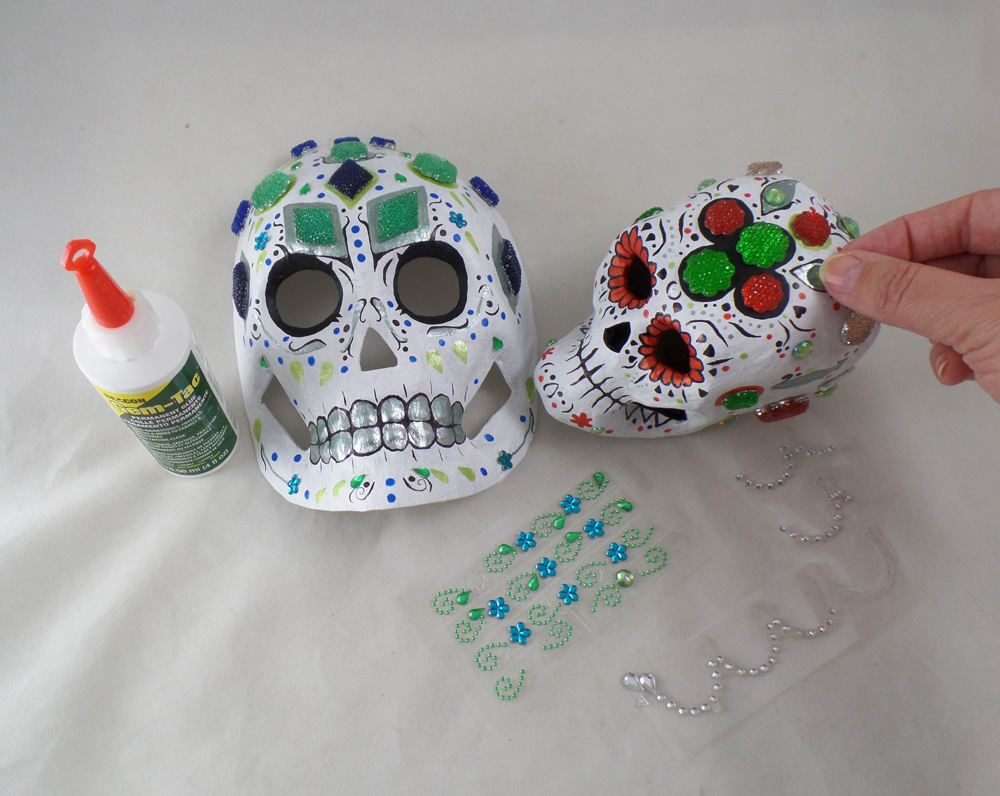
Once all the large acrylic gems were applied to the papier-mâché skulls I filled in the open areas with more paint and pen details, then adding mini acrylic gems with more Beacon Gem-Tac. I let the glue fully dry before going onto the next step.

To make sure all of the detail and gems were protected I applied three coats of Liquitex Gloss Varnish to the skulls, letting each layer dry completely before applying the next.
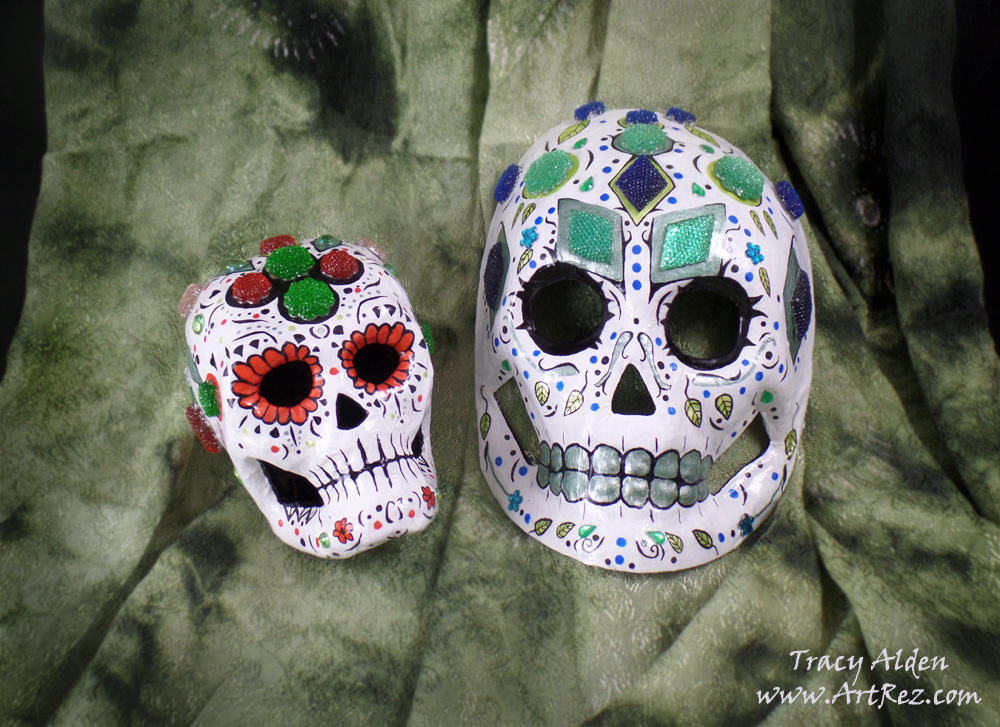
Once the varnish was dry I was able to add them to the rest of my Day of the Dead artwork collection!
Want to share your projects with Fiona Accessories‘s products? Post any projects and ideas on their Facebook Page! 🙂
Until Next Time, Safe Travels!

Ancient and Contemporary Inspired Artistry