#TBT The Upcycled Mummy’s Curse! A spoOky DIY
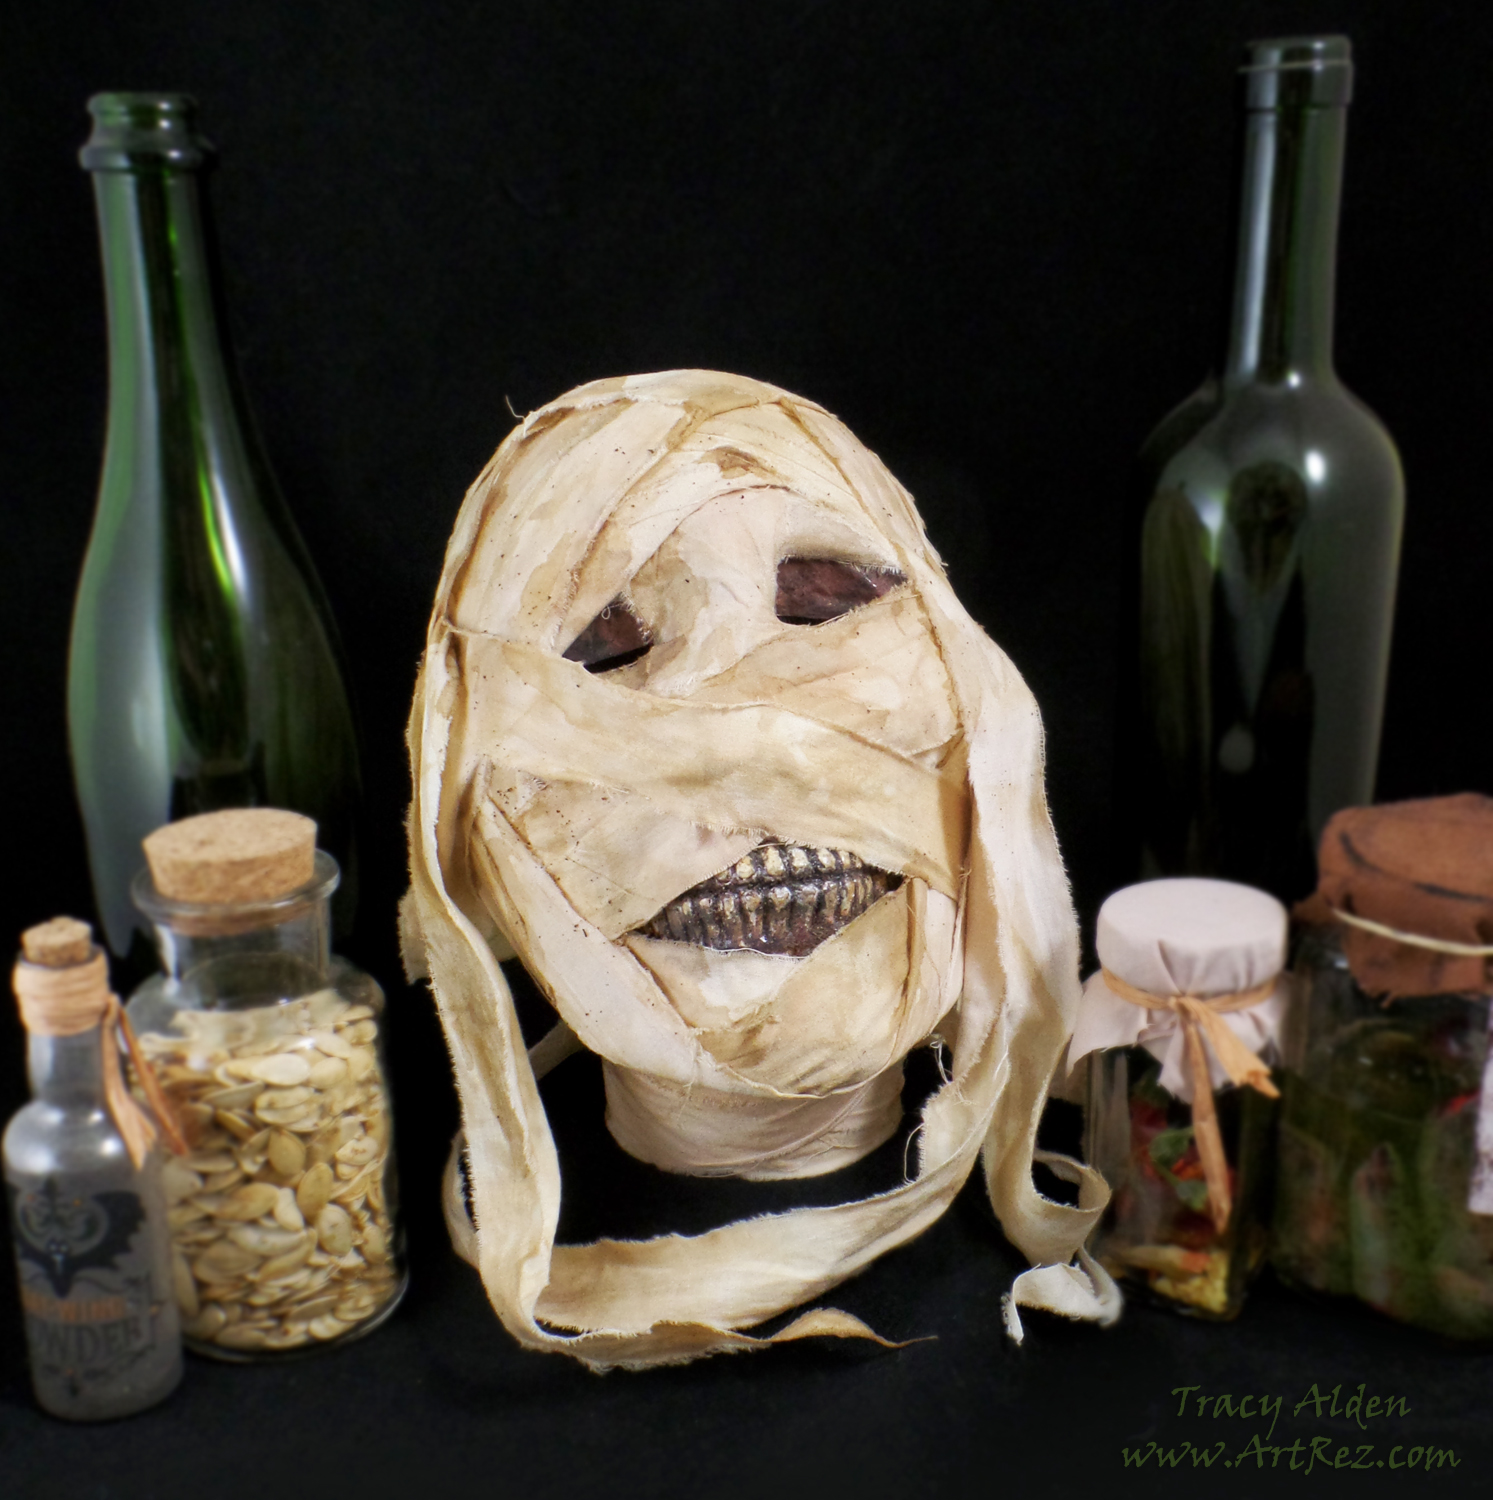
Continuing my Throwback Thursday posts, this time highlighting my love of Halloween, Ancient Egypt and upcycled crafts! Posted in 2015 on the Amazing Casting Products blog, I had some rather odd inspiration for this project and it all started with me finding some fun plastic Halloween skulls at a Thrift store. With two of them, I made Ghoulish Glam Skulls and the rest I saved for Halloween decor around the house.
While I was outside in the garden one of our dogs, Luna, decided to play in the house, the skulls were close to her toys and she cracked one of them. I of course couldn’t be angry with her playing though her rather adorable “I totally did NOT do that” face also helped. When I was about to throw out the skull, an idea came to me: why not use the cracked skull as a base for a Halloween mummy head prop?
Supplies:
Amazing Casting Resin
Alumilite Dyes
Liquitex Gloss and Matte Varnish
Acrylic Paint
Aluminium Foil and Paper Bags
Stir Sticks
Plastic Halloween Skull
Cotton Muslin Fabric
Black leaf tea bags
Beacon’s Gem-Tac
Paint Brush
Paper Tape Roll
Hot Glue Gun and glue sticks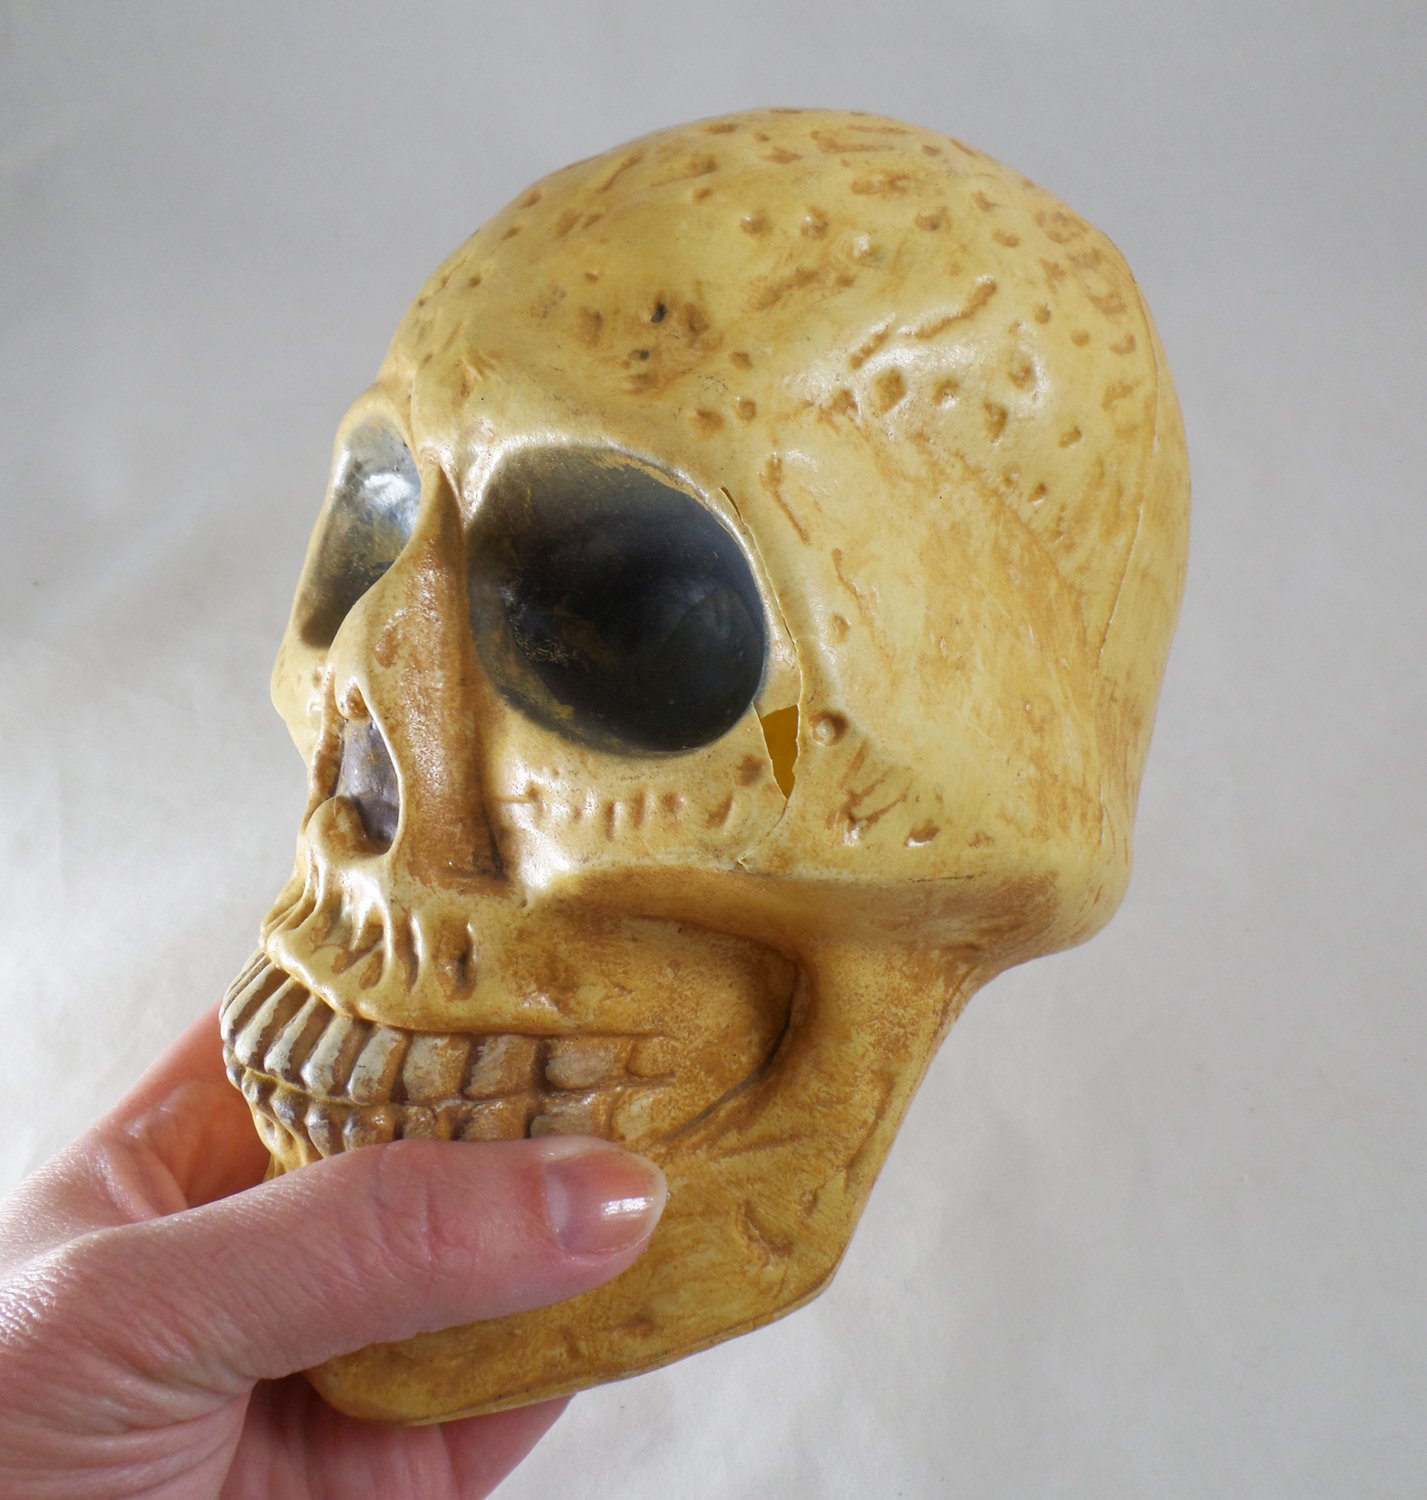
With the crack being along the side of the eye socket and most of the left side of the skull I needed to stabilize the now-fragile skull. I thought of using Casting Resin but I needed to seal the hole before filling the skull with resin. I taped up the crack with clear packing tape, creating a temporary seal for the resin.
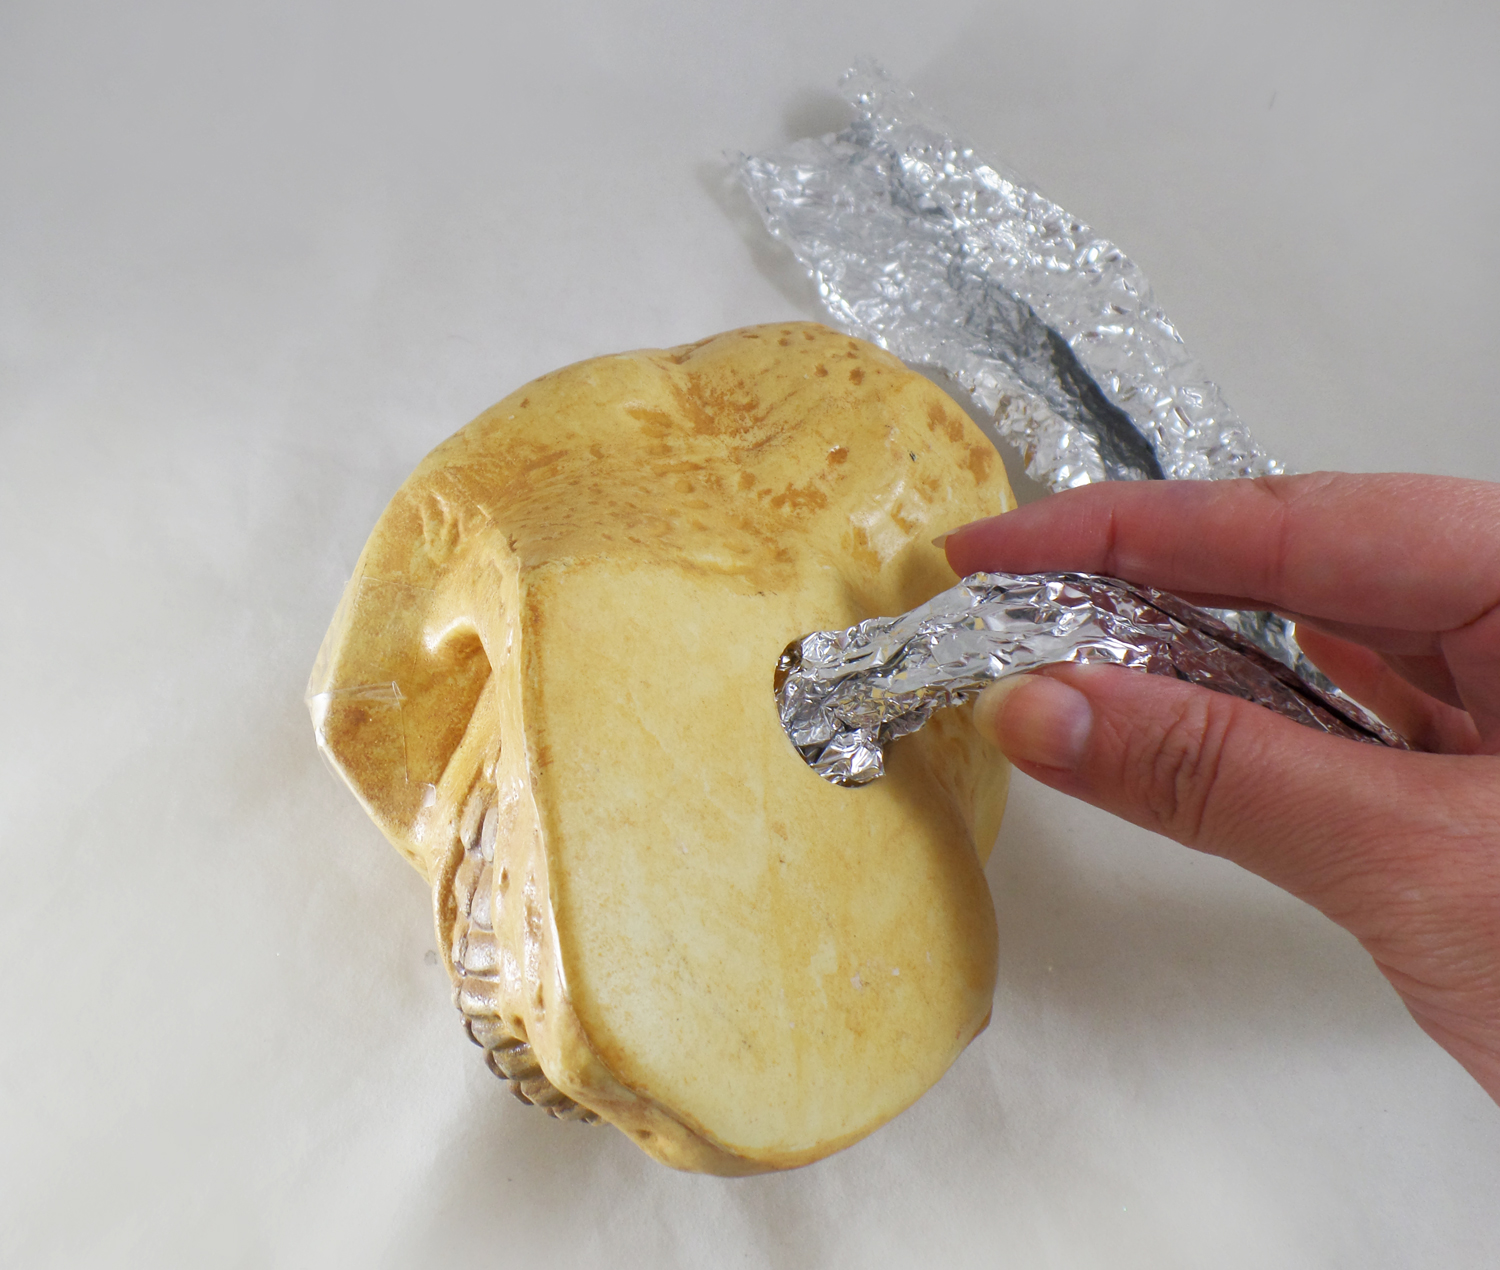
Knowing that if I were to fill up the whole skull with Casting Resin it would not only require a lot of resin but make the skull on the heavy side I needed to put some sort of filler inside the skull. Using used clean paper bags and crumpled aluminum foil I slipped them inside the skull through a hole in the bottom.
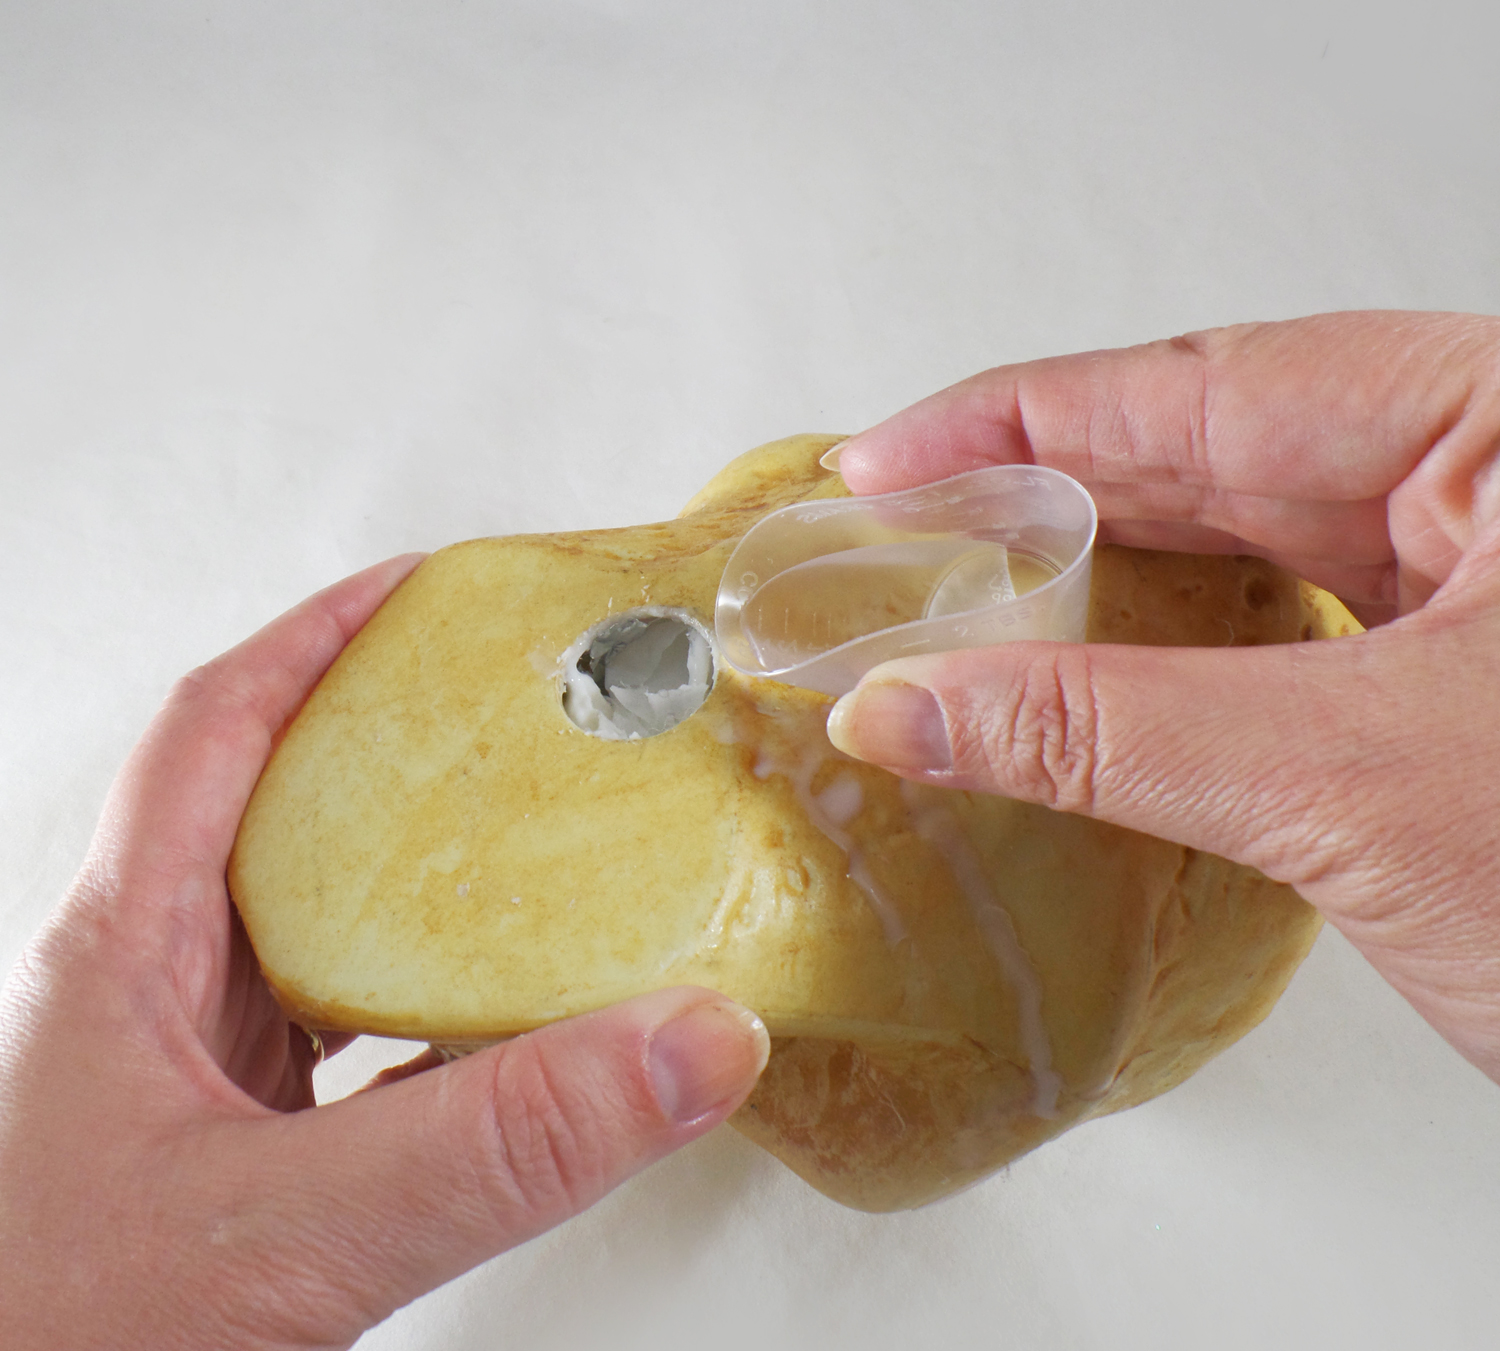
Next I made small batches of Amazing Casting Resin and poured it through the hole in the bottom of the skull. By pouring small batches and then tilting the skull I was able to make sure all of the inside of the skull was equally covered with resin, stabilizing the plastic skull. This process went very quickly because Amazing Casting Resin sets up in 10-15 minutes. I ended up using 3/4 of a resin kit to fill the inside of the skull.

Once I had filled up the inside of the skull I hot glued a tape roll to the bottom of the skull to create a neck for the mummy head. Any gaps between the tape roll and the skull I filled in with aluminum foil and hot glue.
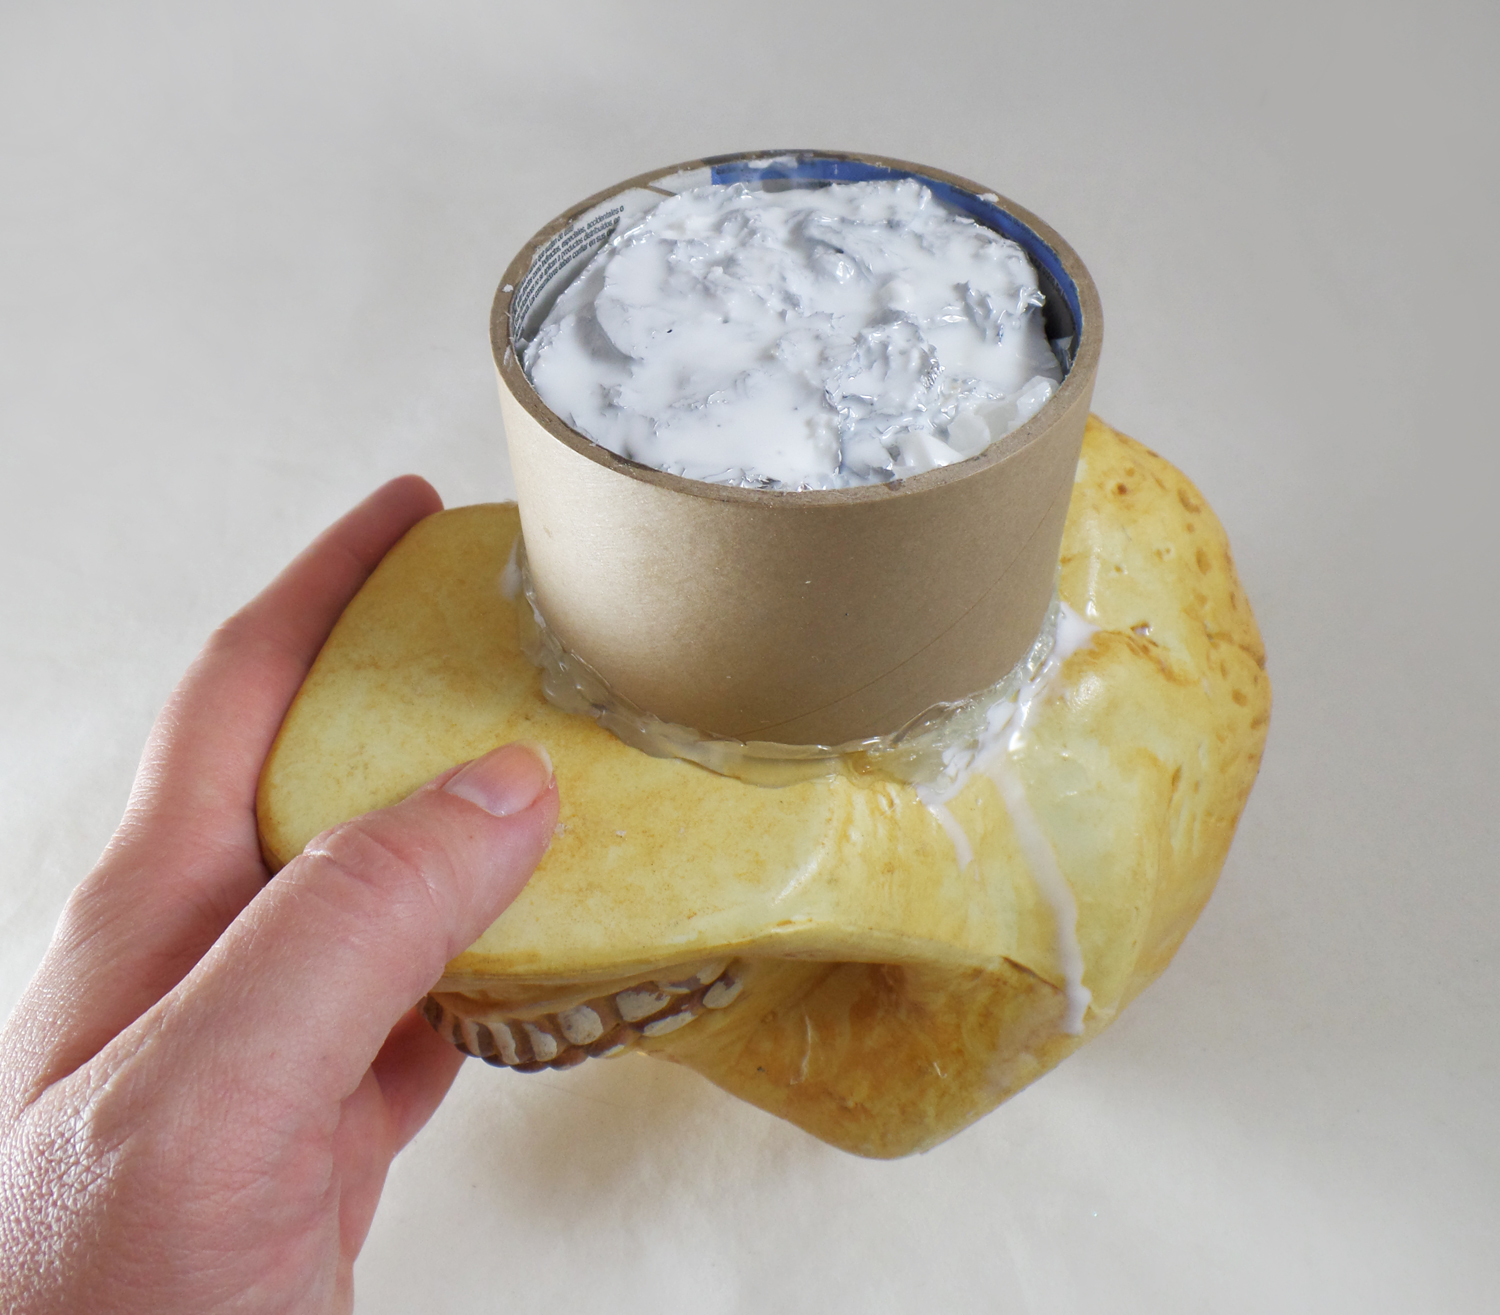
I then mixed up some Casting Resin and poured it into the newly formed neck of the mummy head. I put some extra foil into the neck cavity and filled it up with more Casting Resin, using up all of the kit.
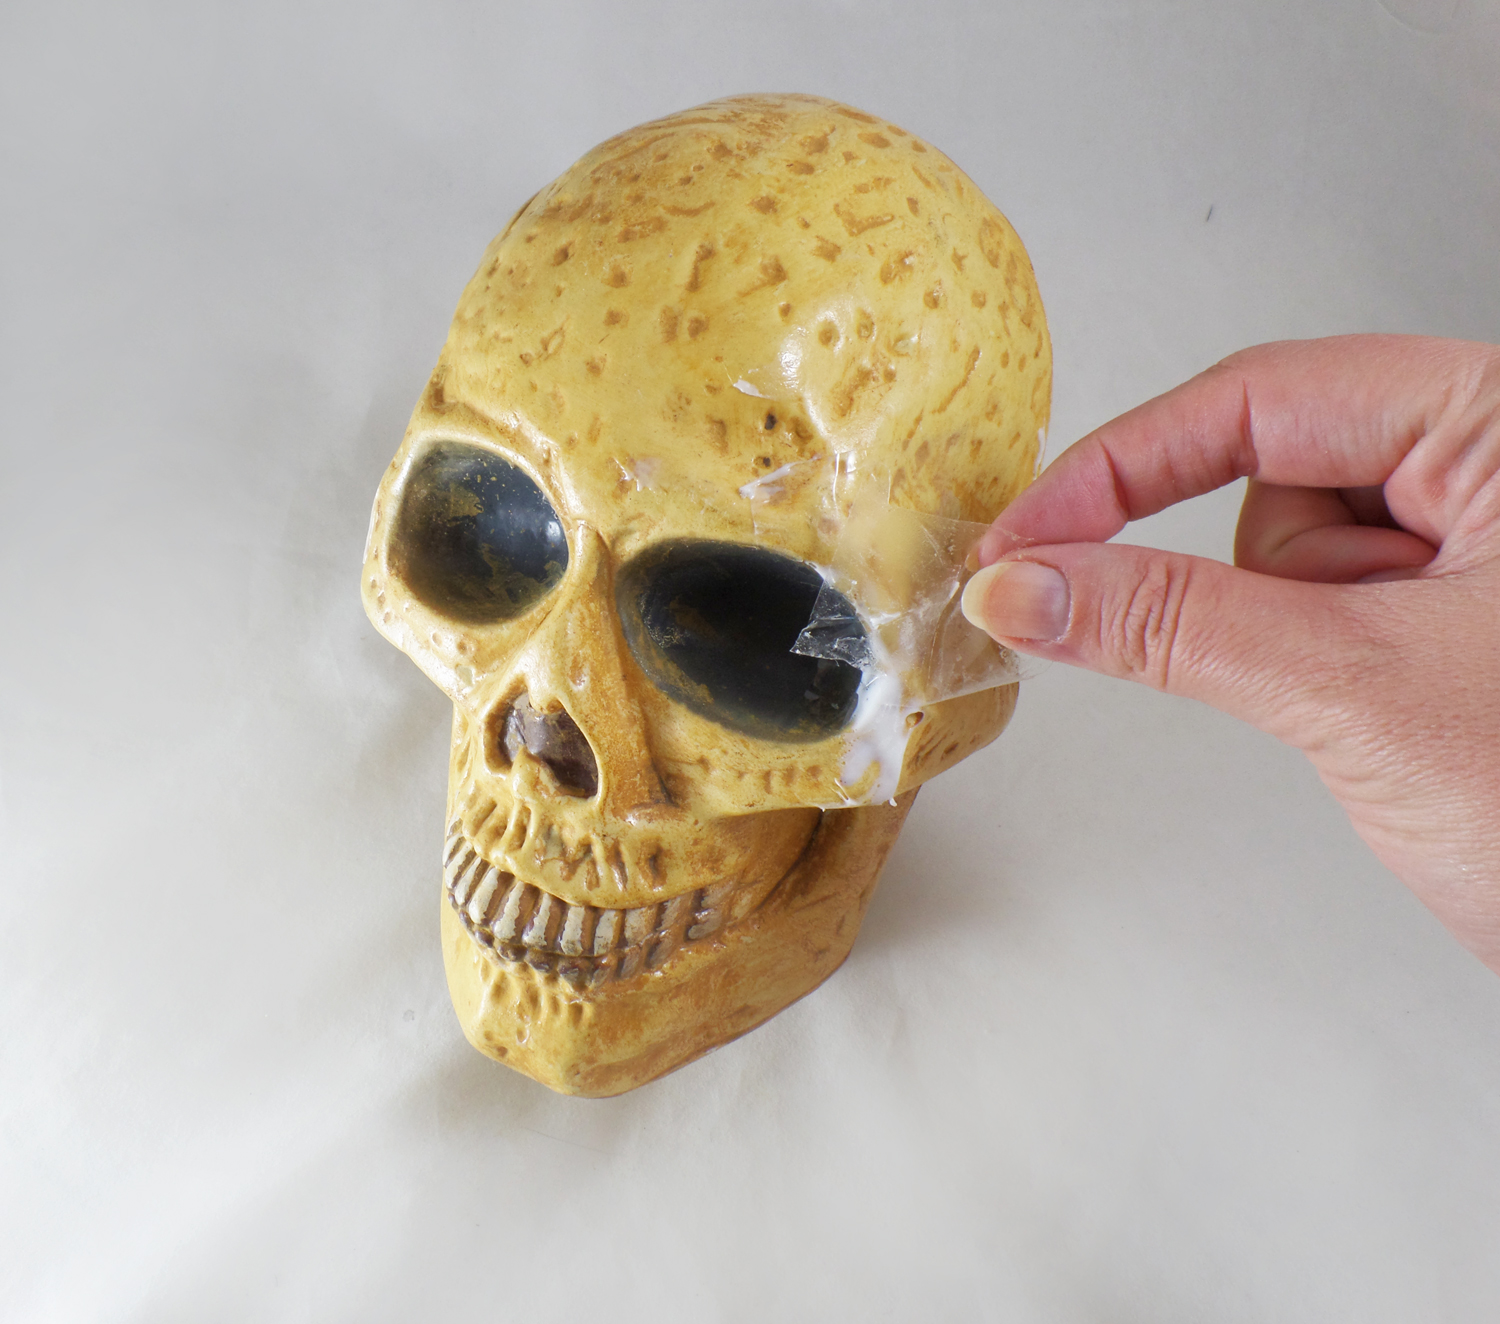
Once the resin was cured, I removed the tape from the now resin-filled crack and removed any excess resin spills off the skull.
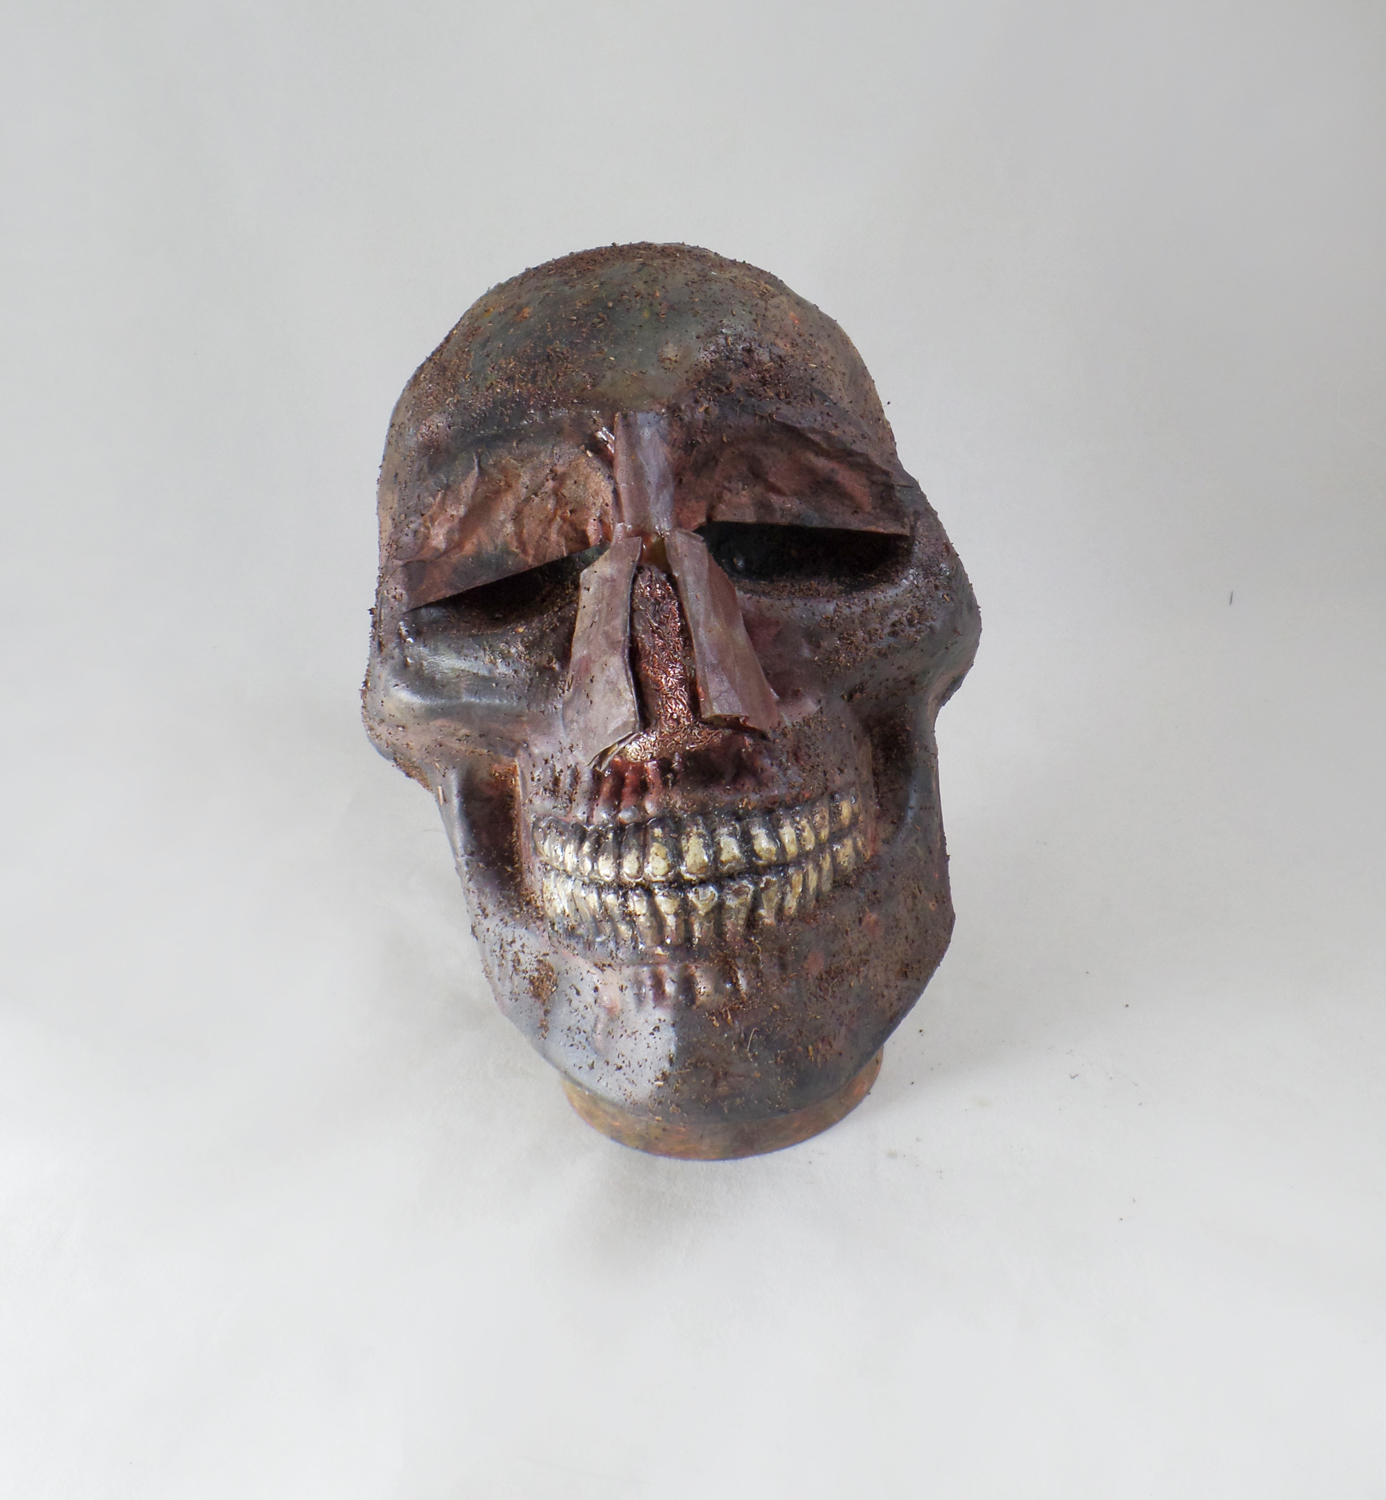
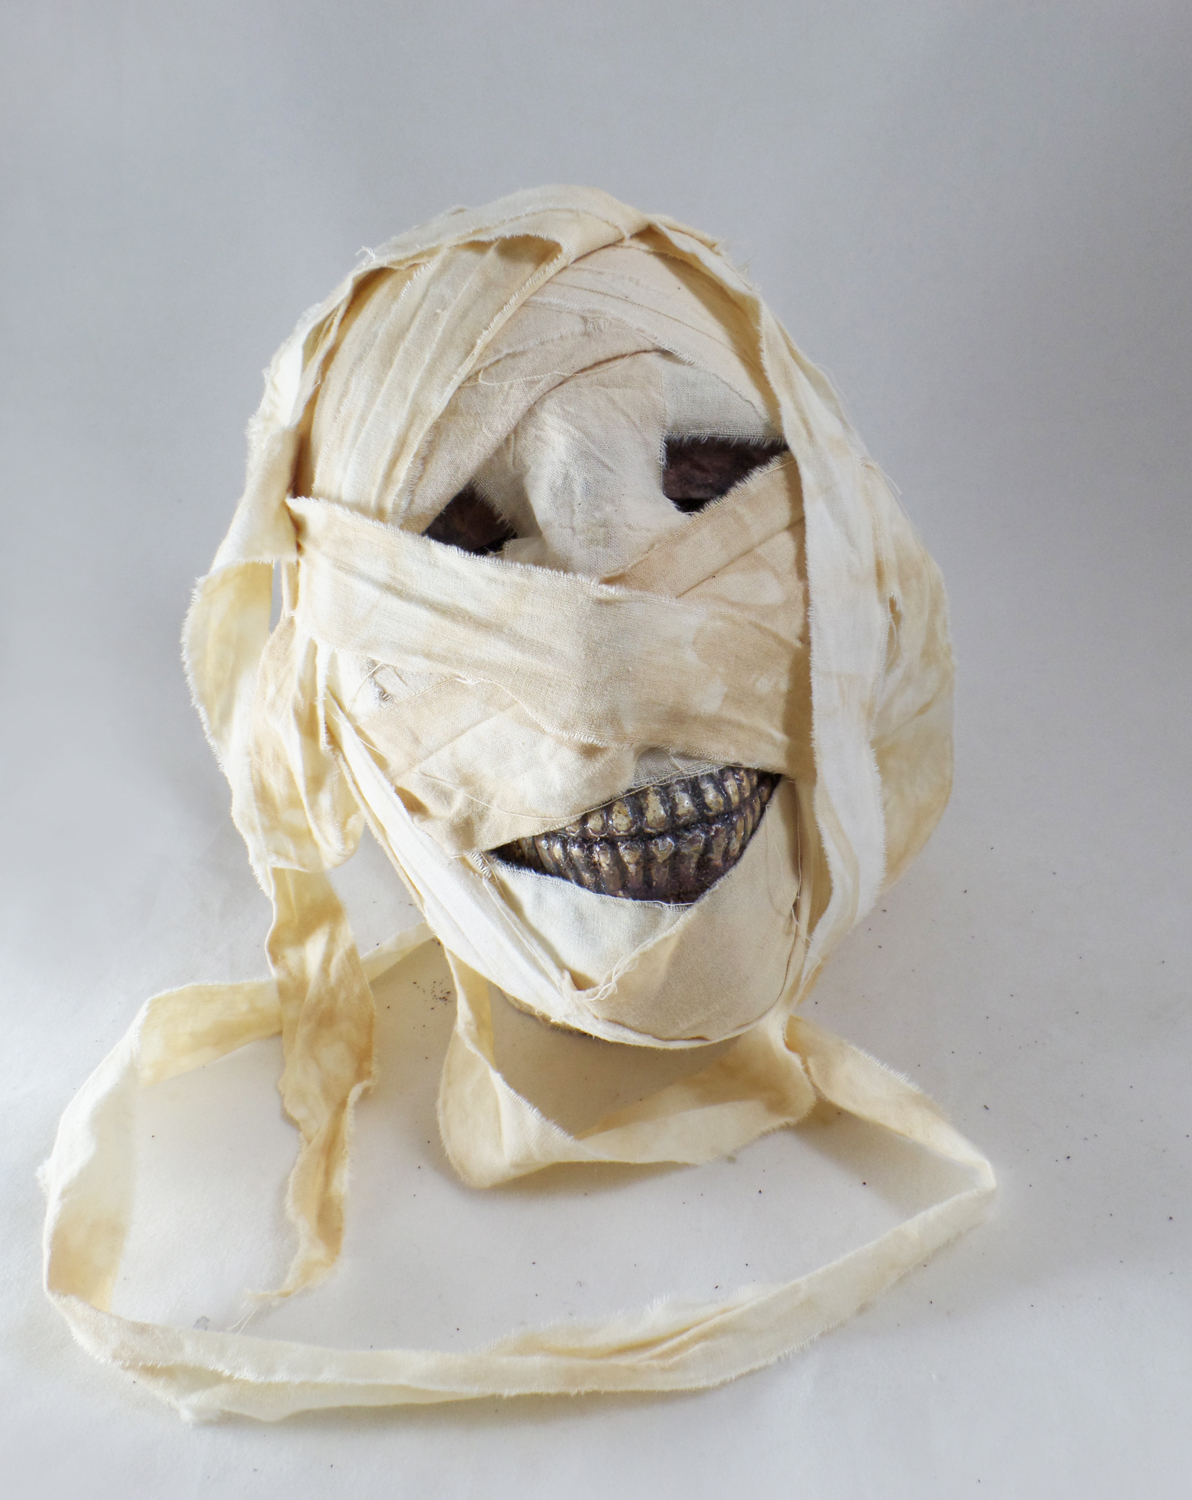
Since not much of the plastic would be visible under the wrappings but I didn’t want it looking like a skull. I painted the skull with a mixture of yellow, brown and black acrylic paint. I glued on used tea bags to create eyelids and created a nose out of paper bags and tin foil. I glued on some loose tea grounds to give the look of sand/dirt and sealed it with Liquitex Matte Varnish.

To create wrappings: I dyed cotton muslin fabric in a bath of hot black leaf tea and bags. I let it soak for a few hours to stain and then let the fabric dry. Once dry I tore the fabric into 2 inch strips to make wrappings. I started applied the wrappings to the skull with a bit of Beacon’s Gem-Tac and started to wind it around the skull. I didn’t use any set pattern or style; I just had fun and made sure to cover up any of the more skull-like features of the head.
Once I was finished wrapping the skull I liked the overall look, but felt it needed something more to create the look of age.
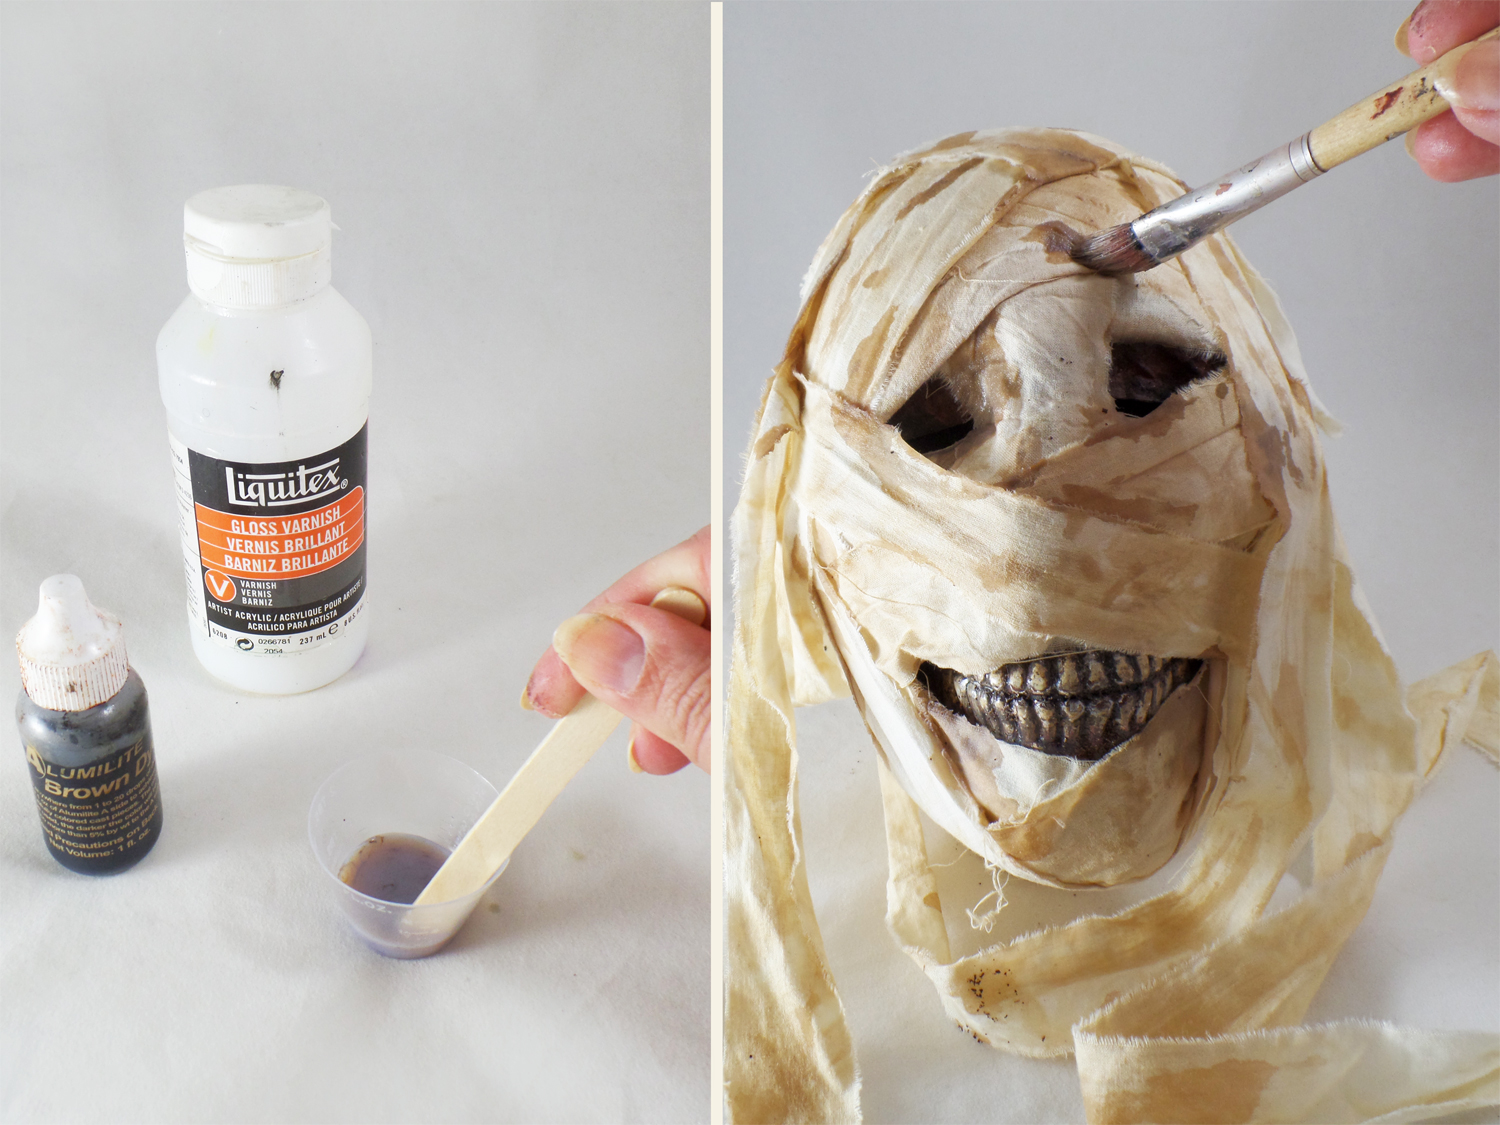
Since real mummies still have old oils and resin still visible on the surface of their wrappings, I created some out of Liquitex Gloss Varnish mixed with some Brown Alumilite Dye. I used the varnish instead of resin because I wanted to control how it dripped and needed it to dry quickly. The Alumilite Dye allowed me to tint the varnish without losing the transparent nature of the varnish.
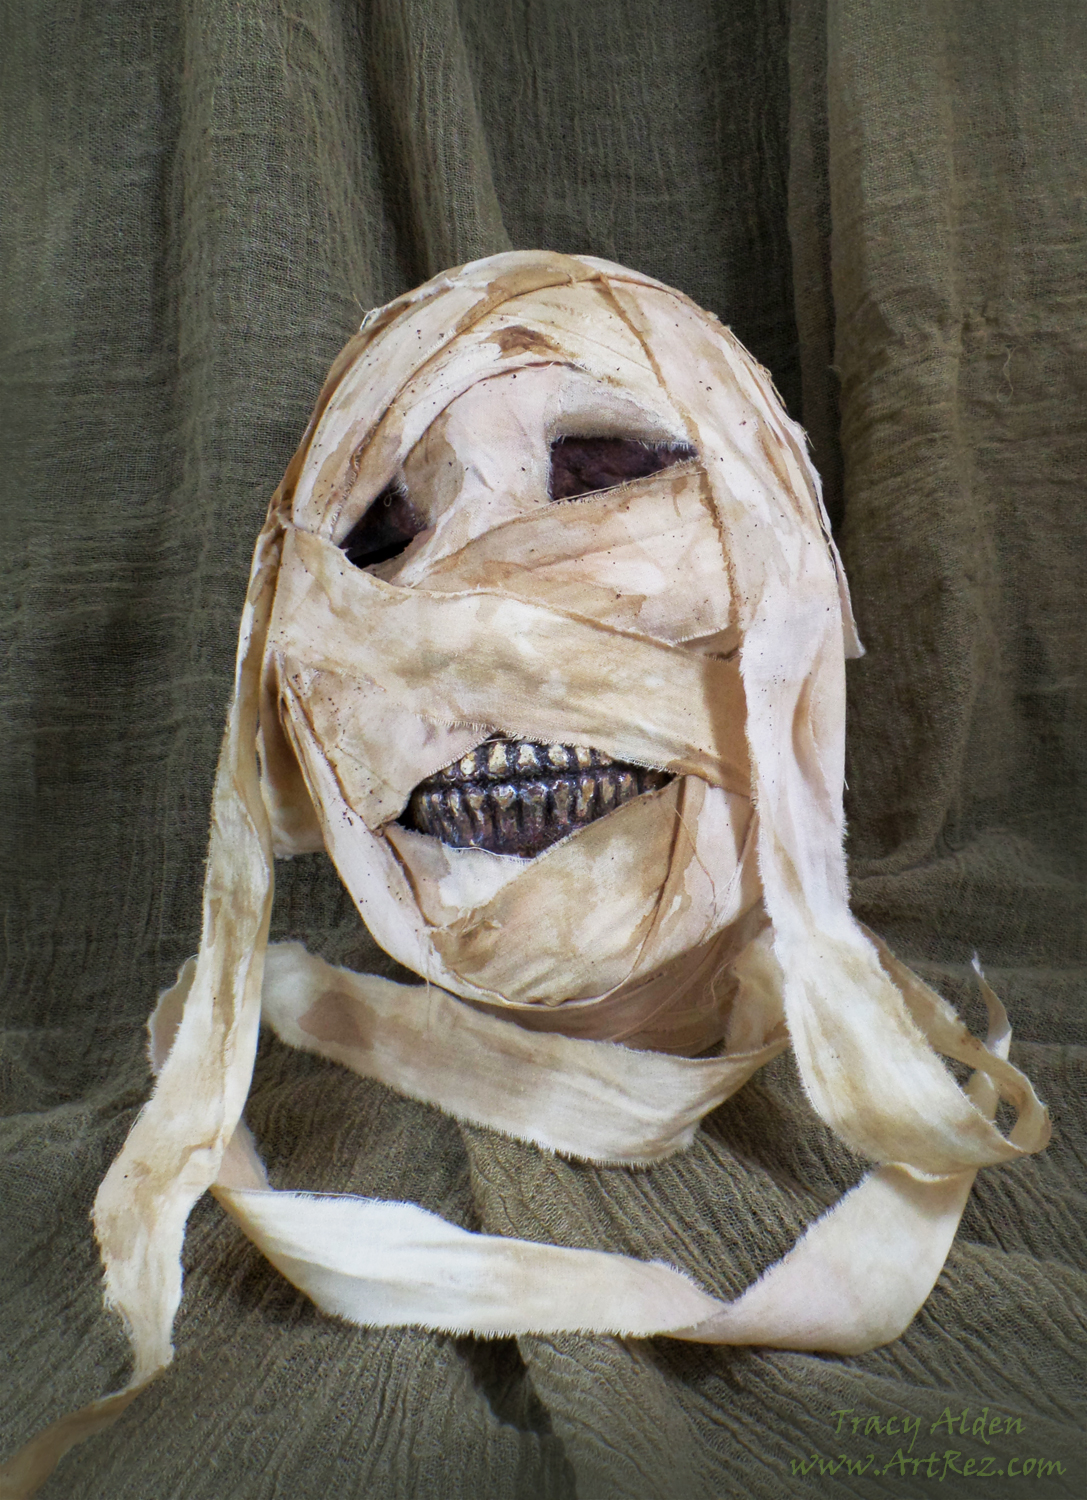
Once dry, this spooky décor is a perfect addition to my creepy curiosity cabinet on display for Halloween!
Until next time, safe travels!
This is an affiliate post, which means I received an assortment of products as a compensation for the creation of art. To read my full disclosure, click here.
Upcycled Fabric Cedar Sachets

Since I was a child I was raised to save fabric. My childhood was full of stories from my grandmother, who lived through the Great Depression and my mother, who lived through WWII, on how they learned to be frugal and resourceful, saving things to turn into something new. Outgrow a shirt? Pants have too many holes? Curtains sun damaged? Fabric left over from making a dress? Save the fabric! The years have sped by, and in this modern world the ease and access to any number of arts and crafts supplies is astounding. However there is a want and even a need to reduce, reuse, or recycle long forgotten craft supplies.
One of my favorite upcycled crafts I was raised on making was fabric sachets. Both pretty and practical, these little bits of fabric, crafted into any number of shapes, stuffed with cedar, would decorate the house, protect our clothing from insects and remind us of loved ones present and past.Supplies:
Fabric scraps
Small pieces of lace and/or trim
Small lengths of ribbon or thin strips of fabric such as linen or muslin
Thread
Sewing needle
Buttons
Fabric Scissors
Cedar shavings (many pet shops and hardware stores have large bags available)
Cedar Essential oil
Mixing bowl
Sewing Machine *if not hand stitching
Ruler
Pencil
Paper
Craft scissors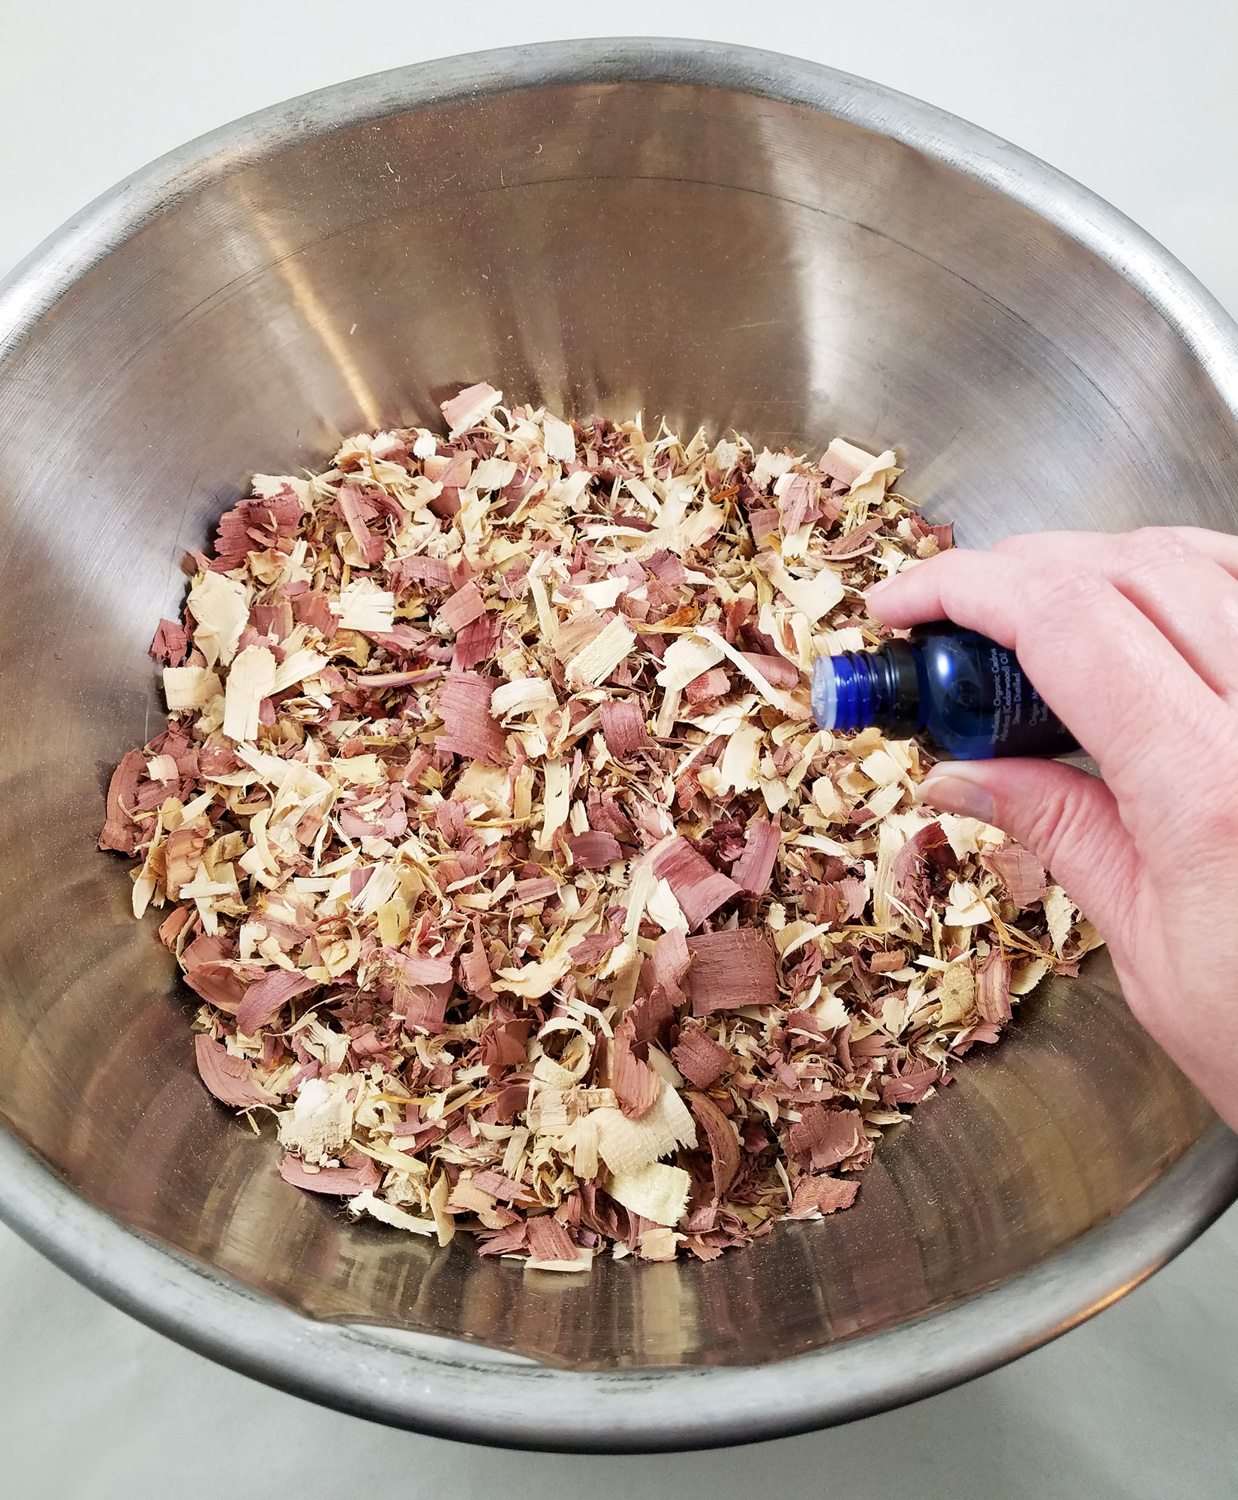
Pour the cedar shavings into the mixing bowl and remove any large chunks of wood or bark from the mix. Sprinkle lightly the cedar essential oil and stir the shavings. Repeat this about 4 times to make sure the shavings have an extra boost of cedar scent. Let the shavings sit and soak up the oil, which can take 5 to 10 hours.
In this pile I have fabric scraps, remnants, old bed linen, swatches of clothing, table cloths and more. The only requirement for any fabric pieces to use in this project is that is to be lightweight and ideally cotton, hemp, linen, muslin or other plant fiber based materials. These will allow the scent of the cedar to release easier over time.
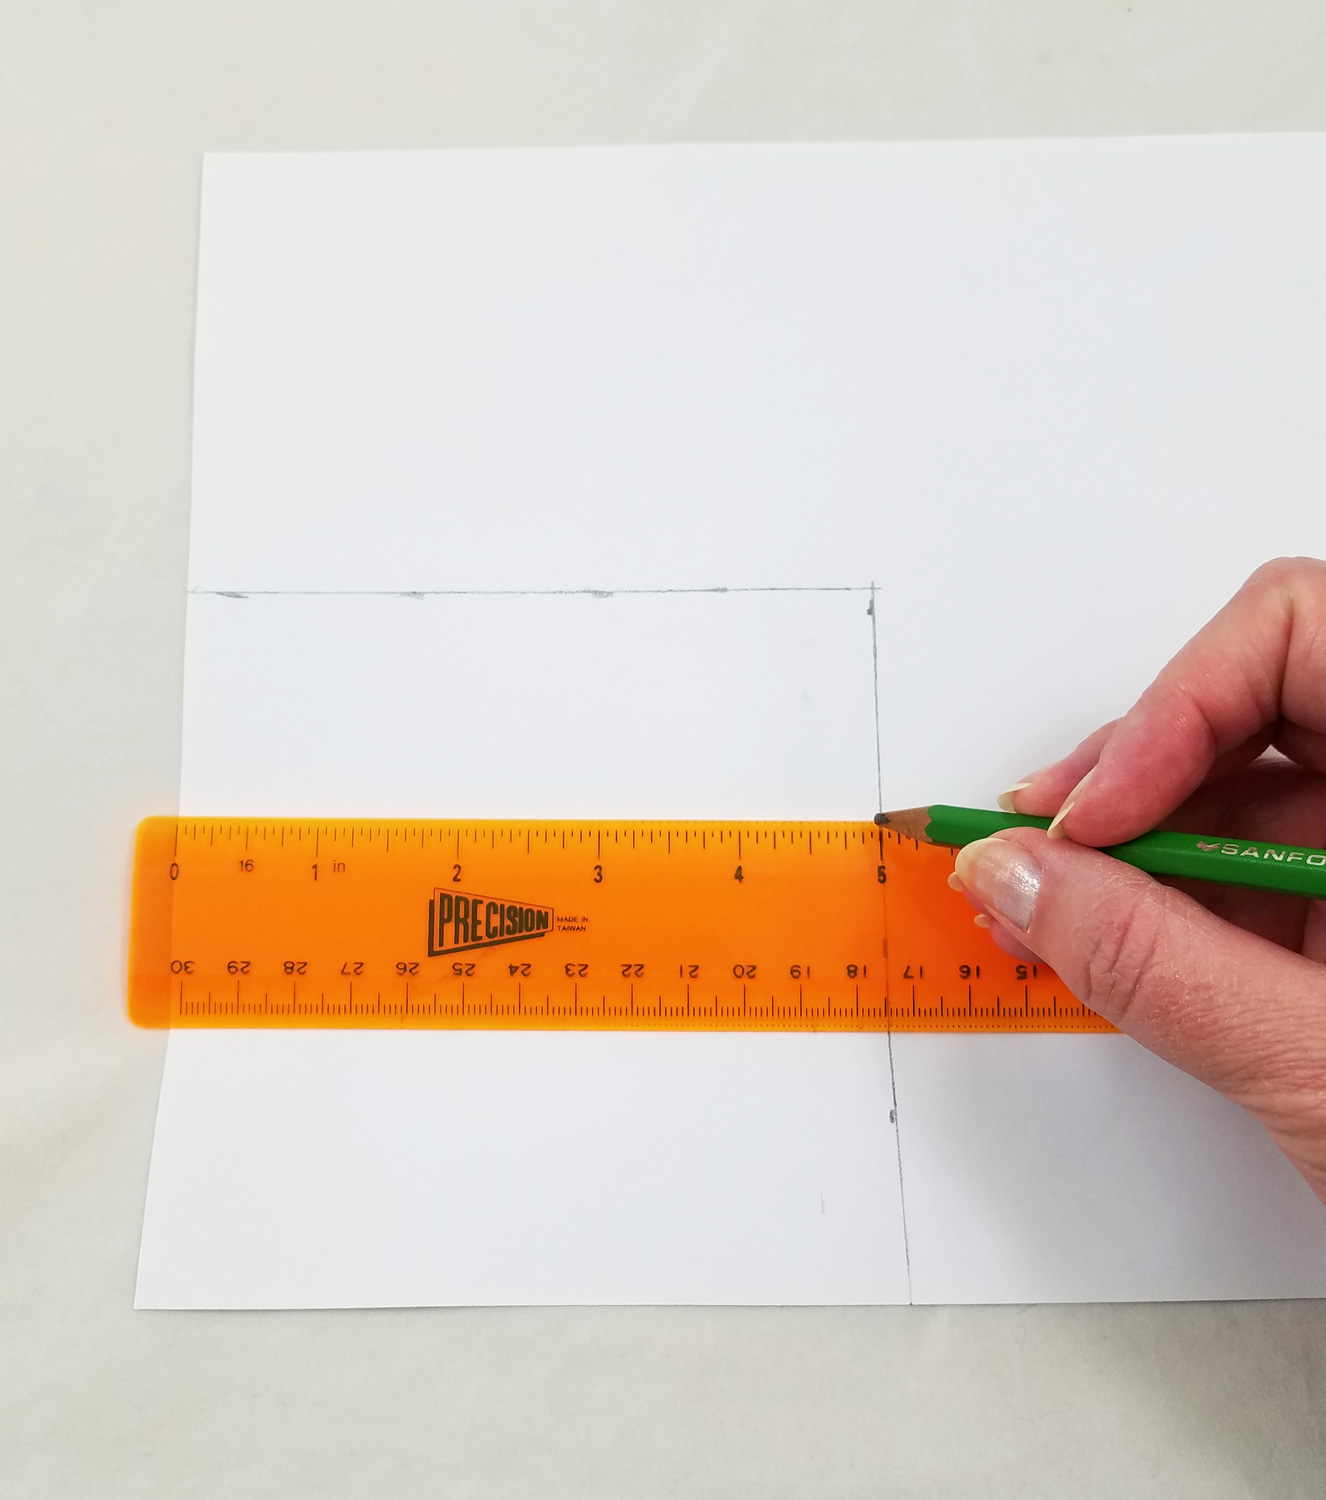
Using a ruler and pencil draw a 5 inch by 5 inch square. This is the starting size for the heart pattern.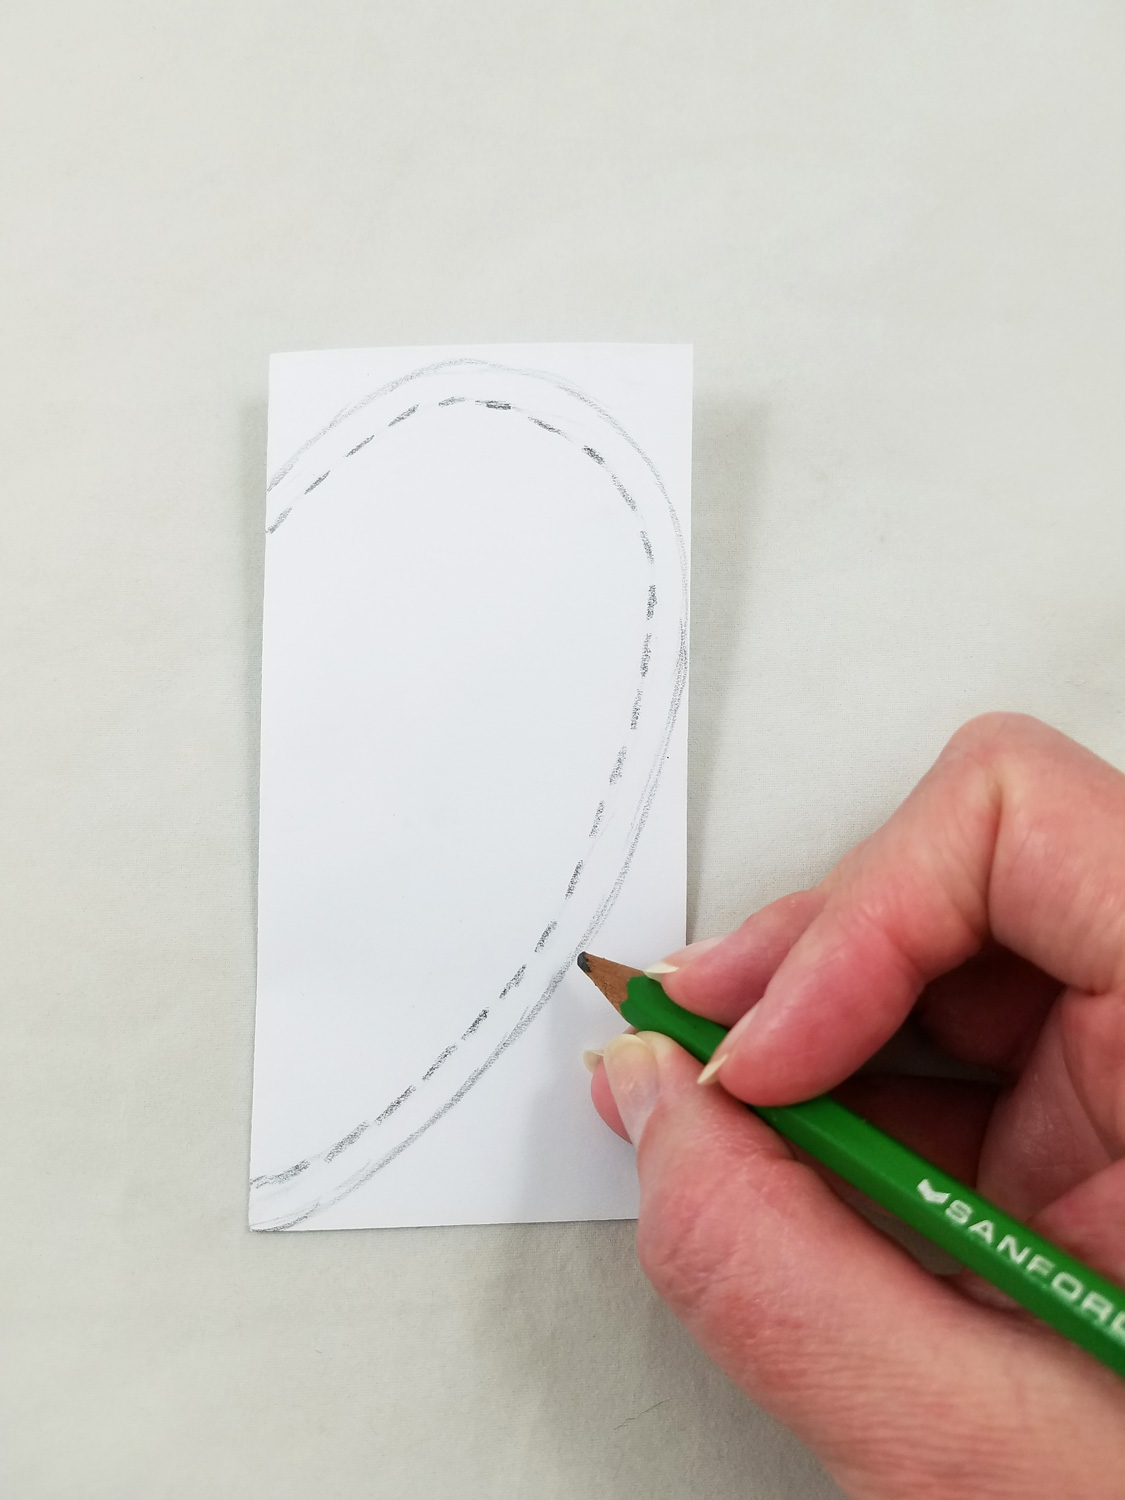
Cut out the 5inch square and fold in half. Staying just within the lines of the paper, draw half a heart. Then within that line draw a second dotted line, ¼” width. This will be the guide for a ¼” seam.
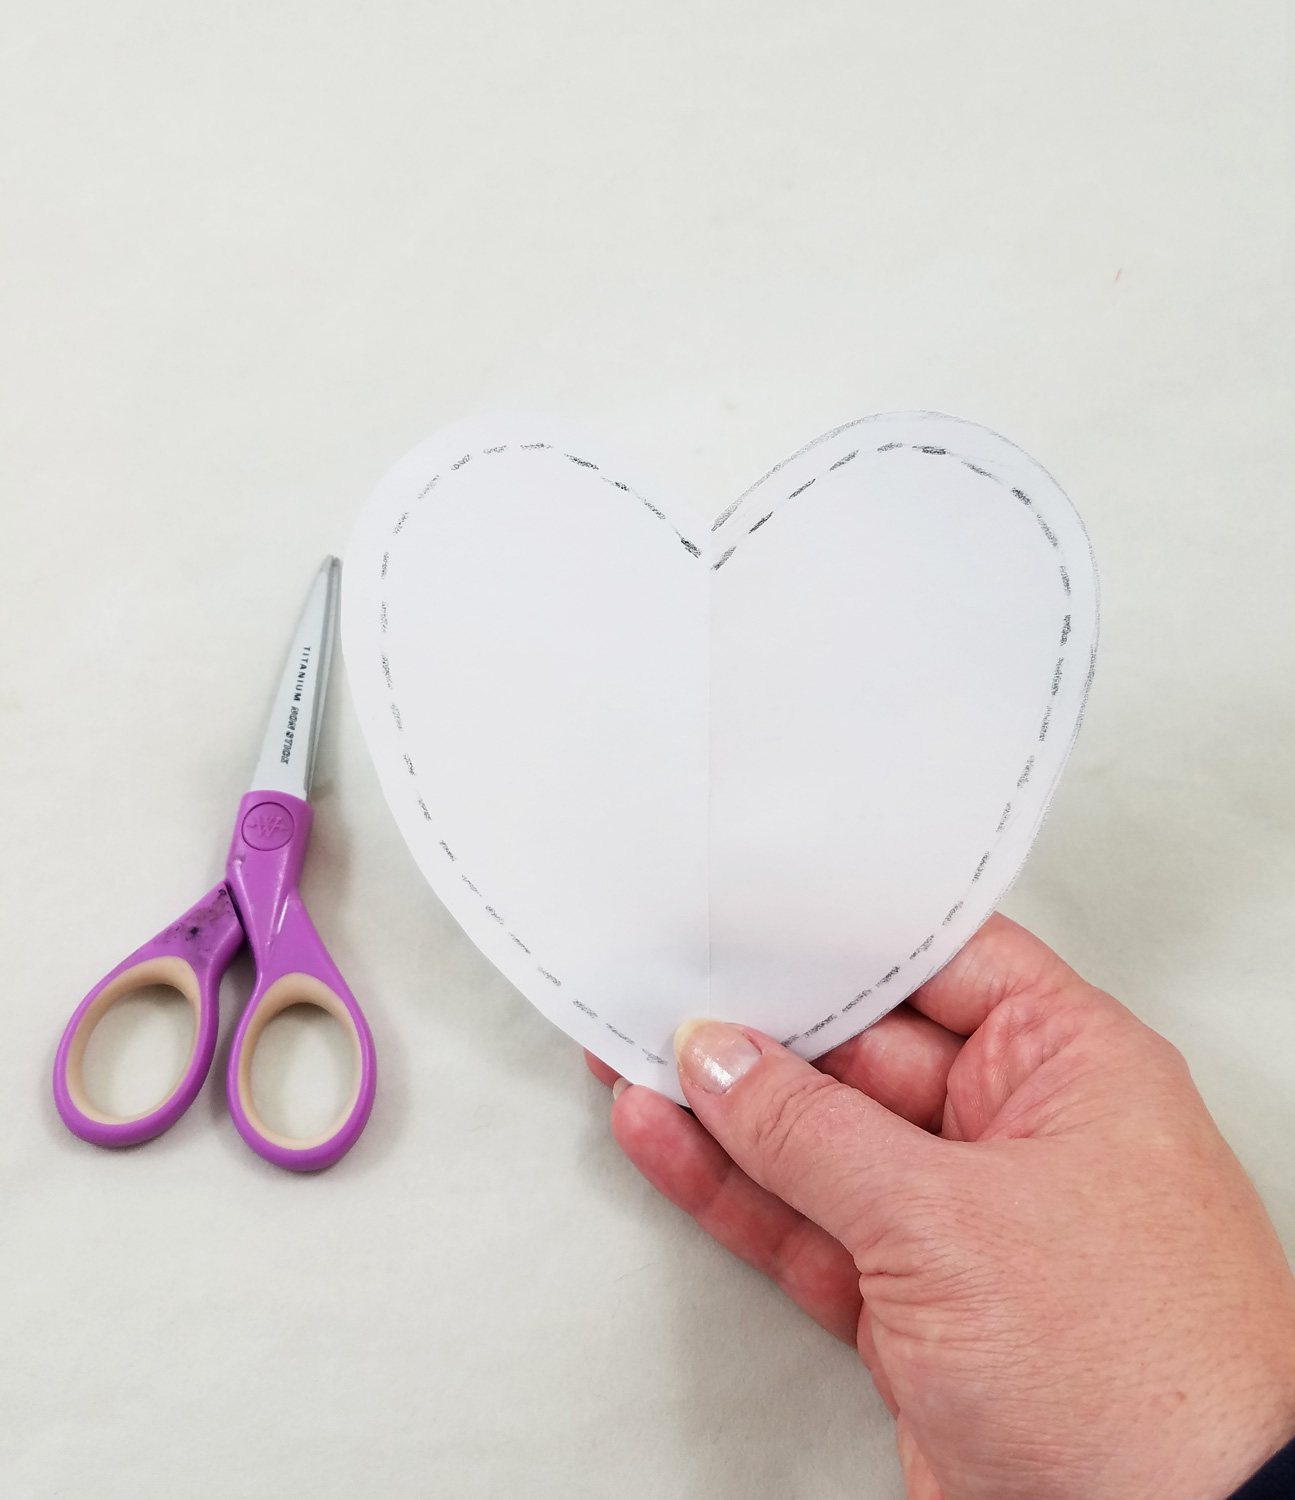
Cut out the paper heart and draw in the ¼” seam allowance dotted line on the second side.
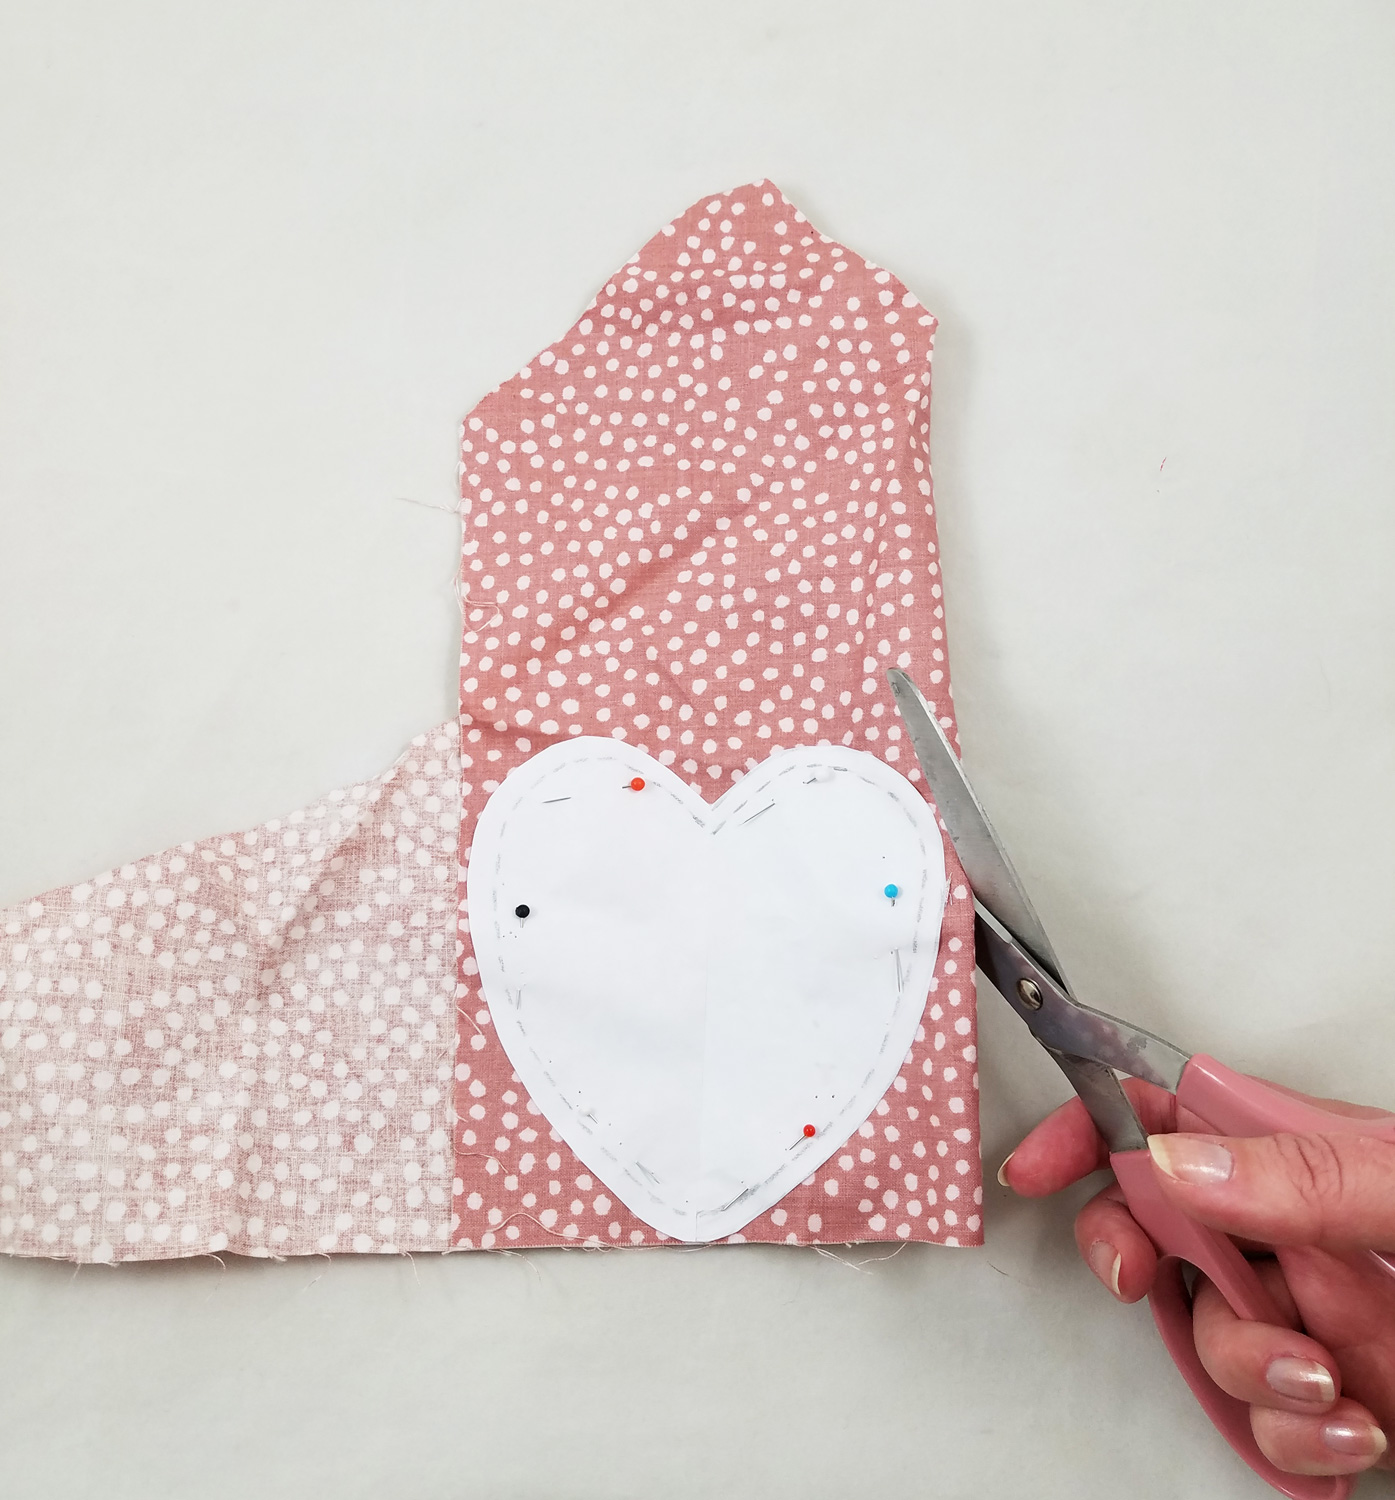
Use the pattern to cut out 2 fabric hearts for each sachet. If possible fold fabric and pin the pattern onto the fabric to cut two fabric hearts at a time if the remnants are large enough.

Do not worry if the fabric pieces are only wide enough to cut one heart out, as you can always cut more of a contrasting or complementary fabric.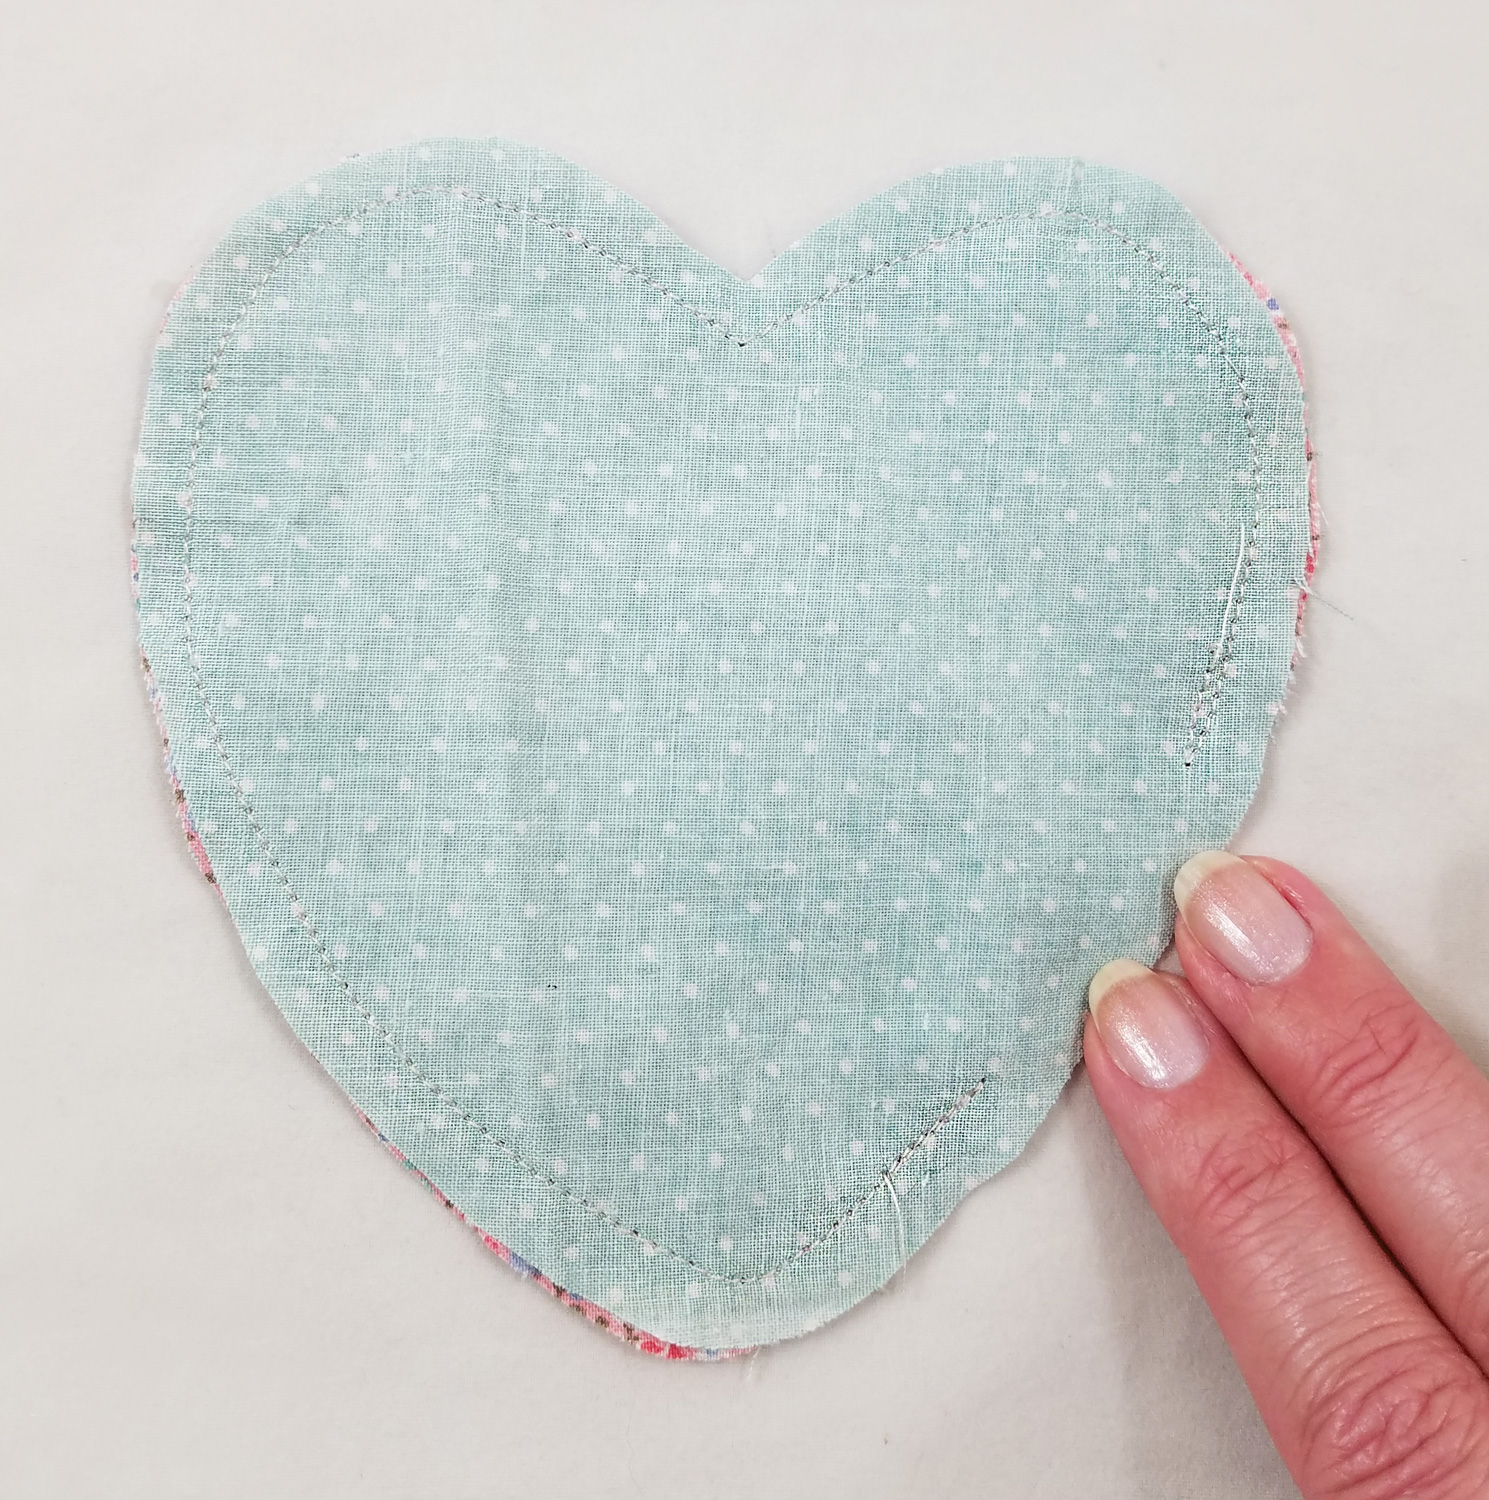
Place the right sides of the fabric hearts together and stitch around the heart with a ¼” seam. Make sure to do a reverse stitch when you start to sew and at the end, as it will strengthen the stitch and prevent it from unraveling when turning rightside out and stuffing the fabric heart. Make sure to leave a portion unstitched, making an opening to turn the fabric heart rightside out.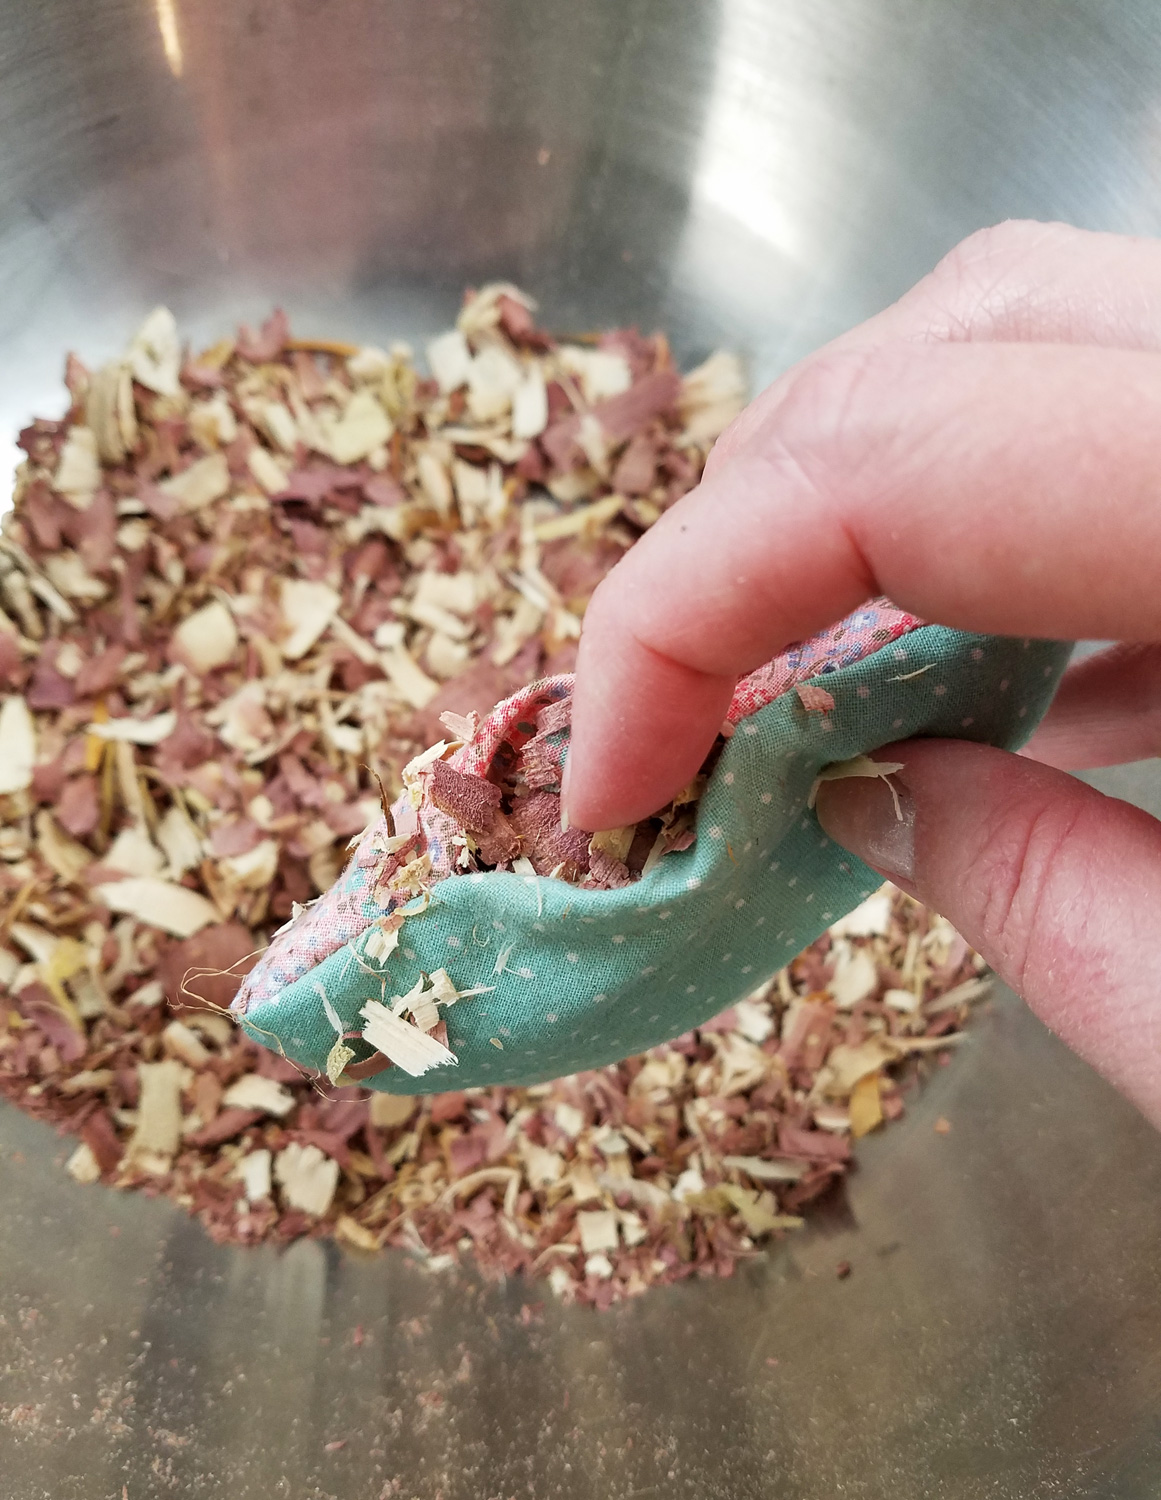
Snip any corners of fabric that might pull or tuck when turned rightside out, such as the dip in the heart or the point of the heart. Turn rightside out and use the eraser end of a pencil to push the heart into shape. Stuff each heart with cedar shavings.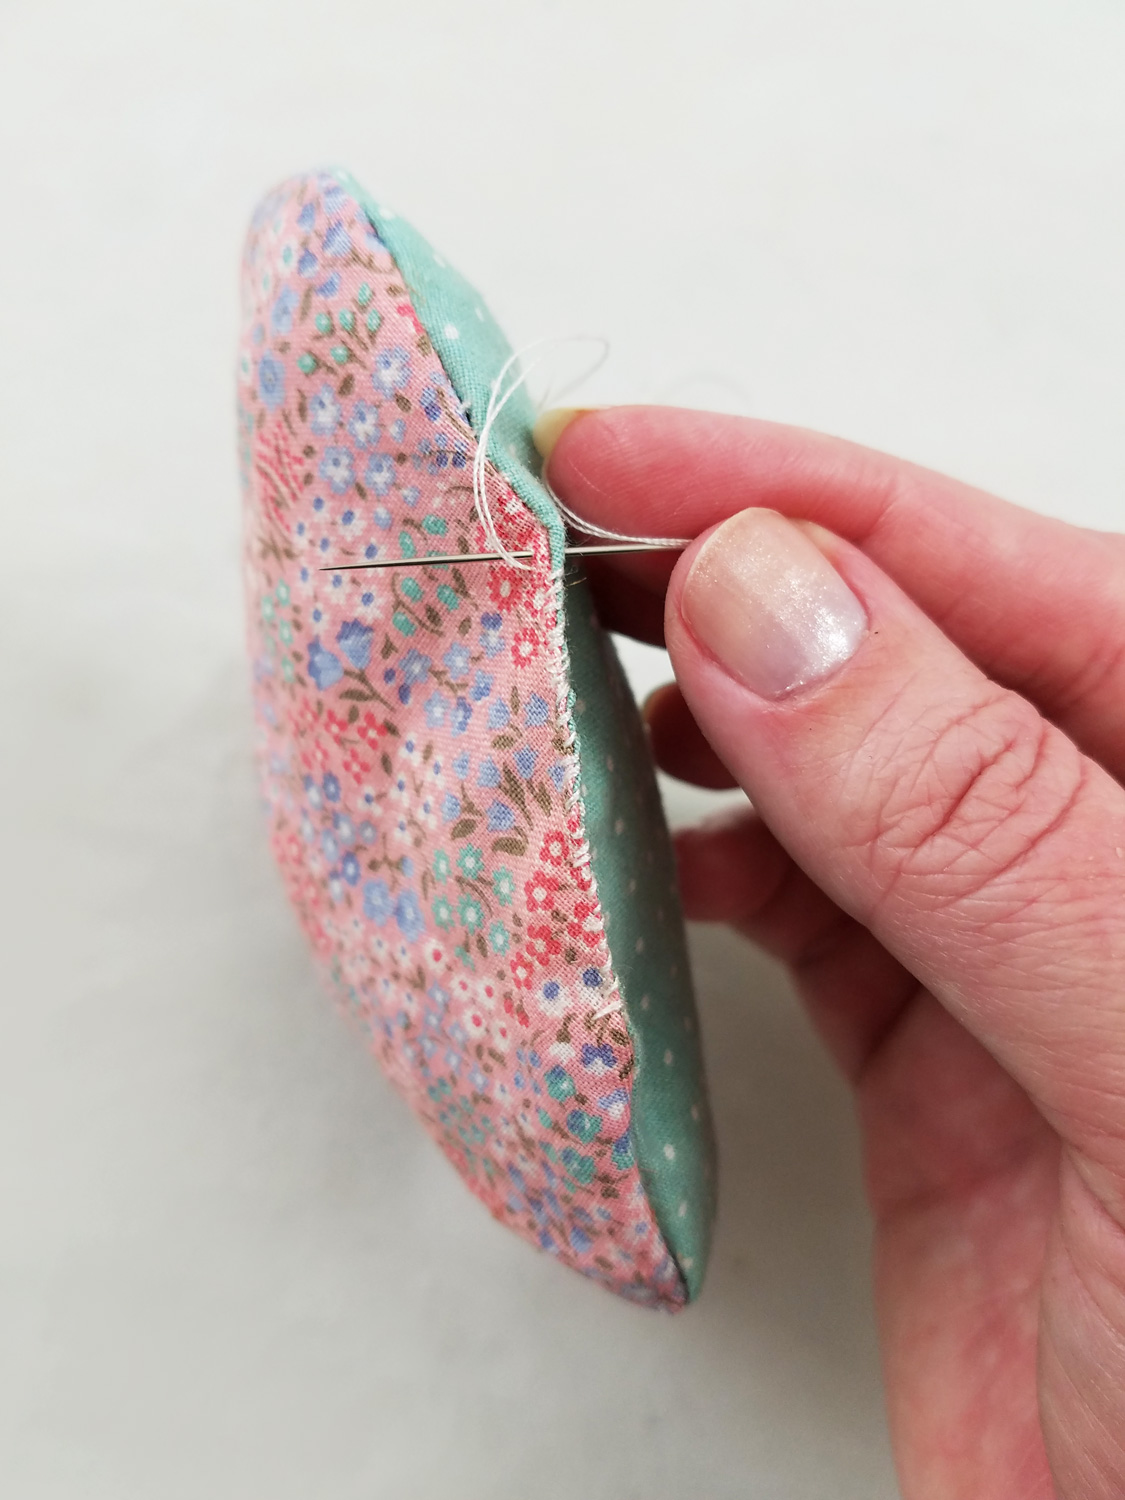
I used an Overcast Stitch to sew up the open part of the heart, as any lace or trim later will cover up the stitches. If you do not want to add lace or trim later, use a Slip Stitch to sew shut the heart.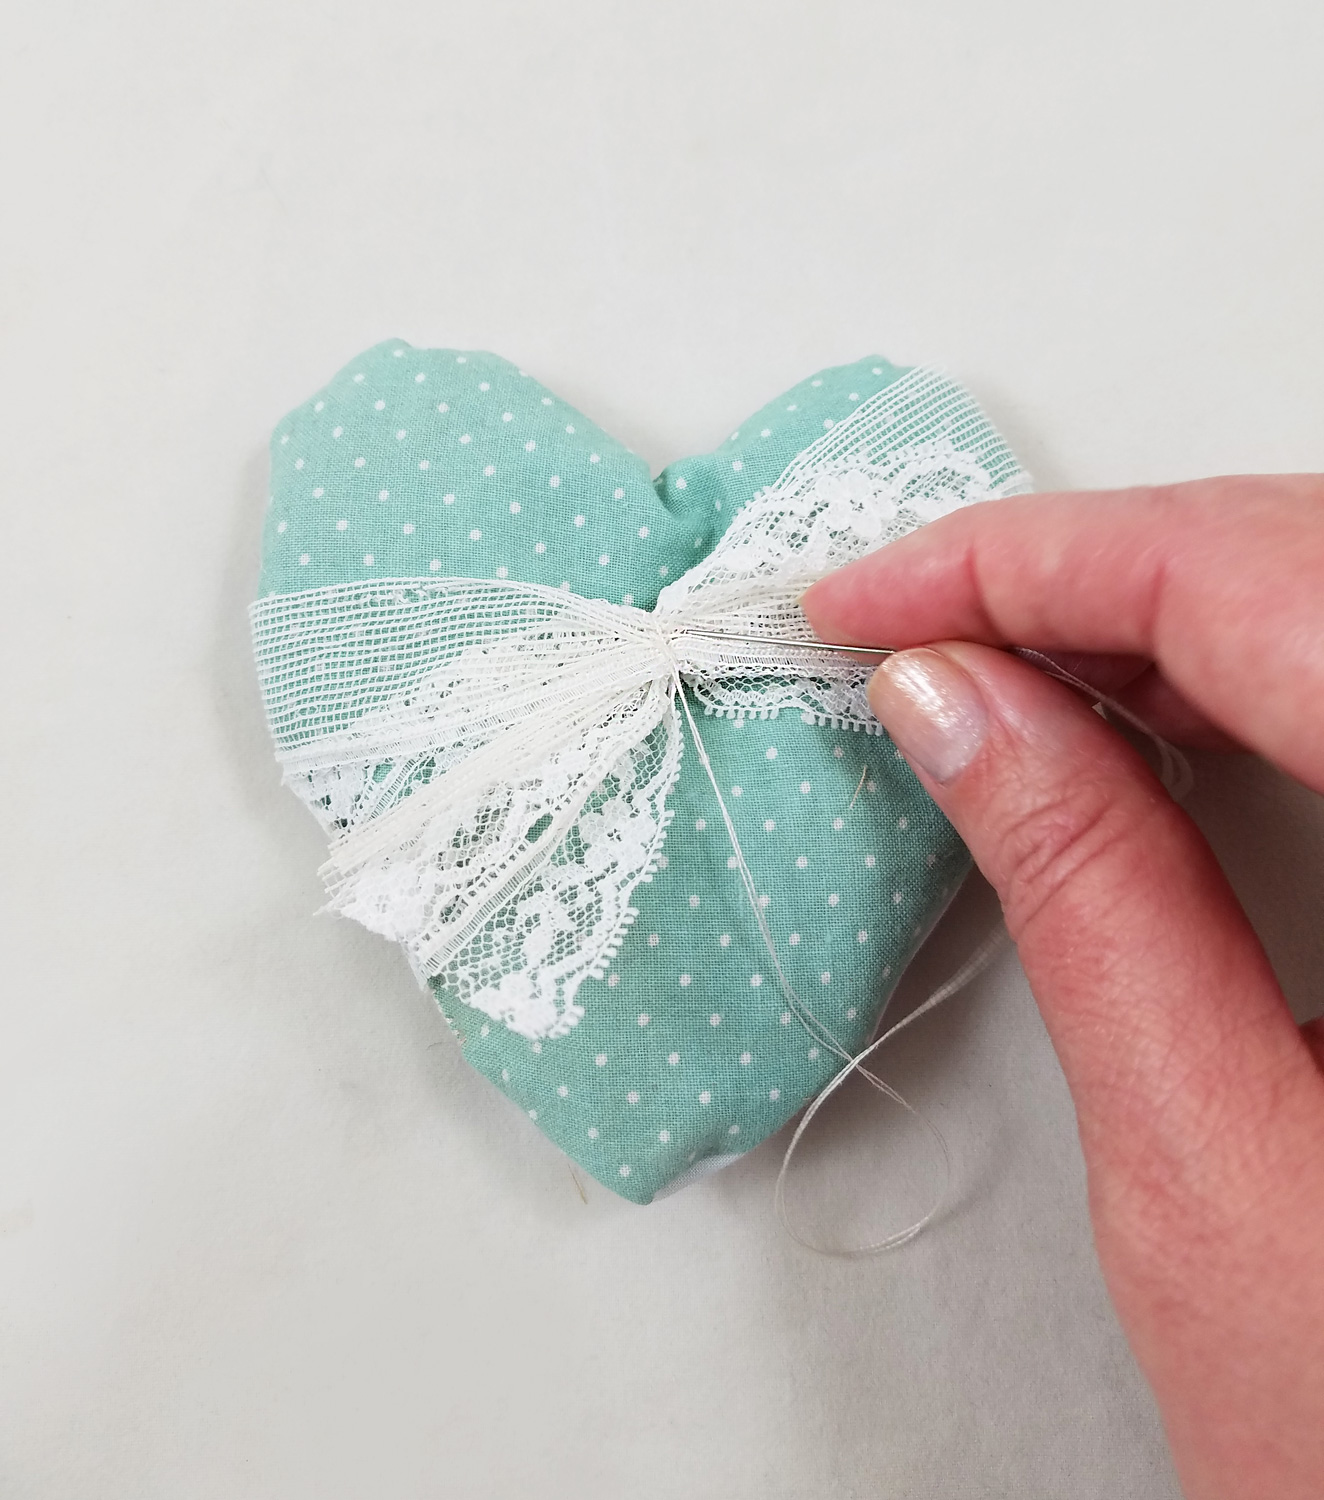
Using a small piece of lace or fabric create a sash that goes around both sides of the heart, making sure to cover the stitch that closed the heart. Gather and stitch together the sash, in the front of the heart. If you do not want a gathered front sash you can always stitch closed the sash on the back of the fabric heart.
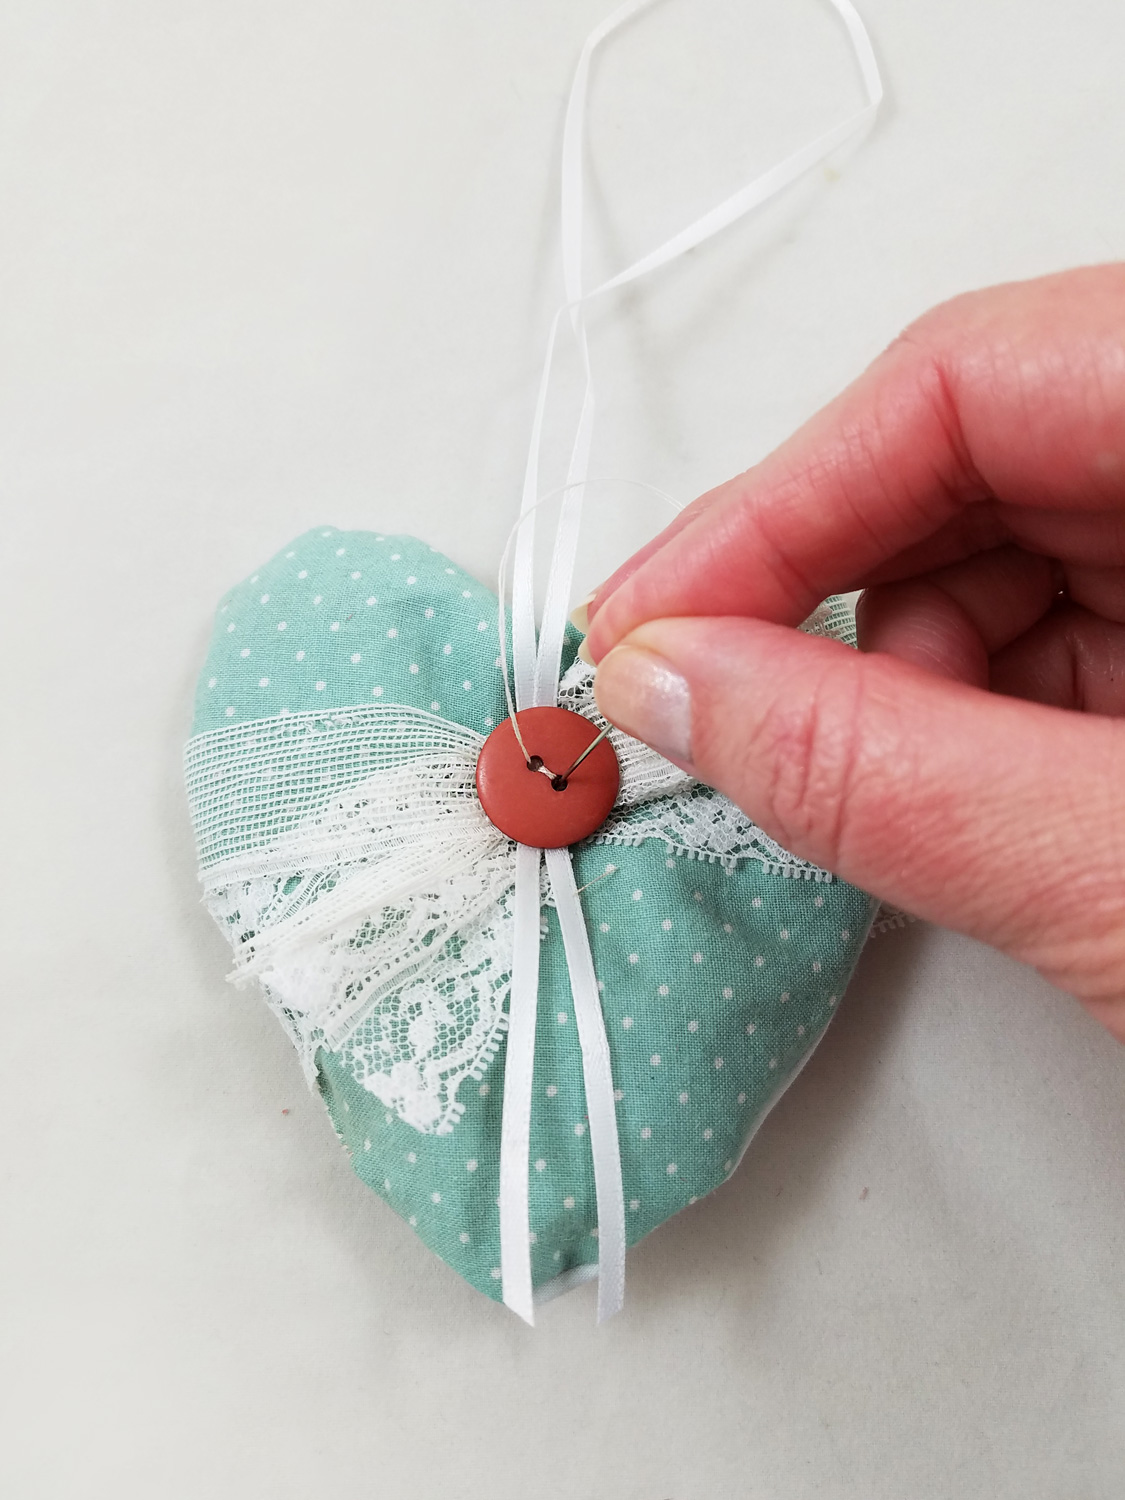
Loop a piece of ribbon and stitch the ribbon and a button through the sash and the fabric heart to create a secure hanger for the sachet. Hang your newly created sachet on doorknobs, hangers, coat racks or in boxes or dressers
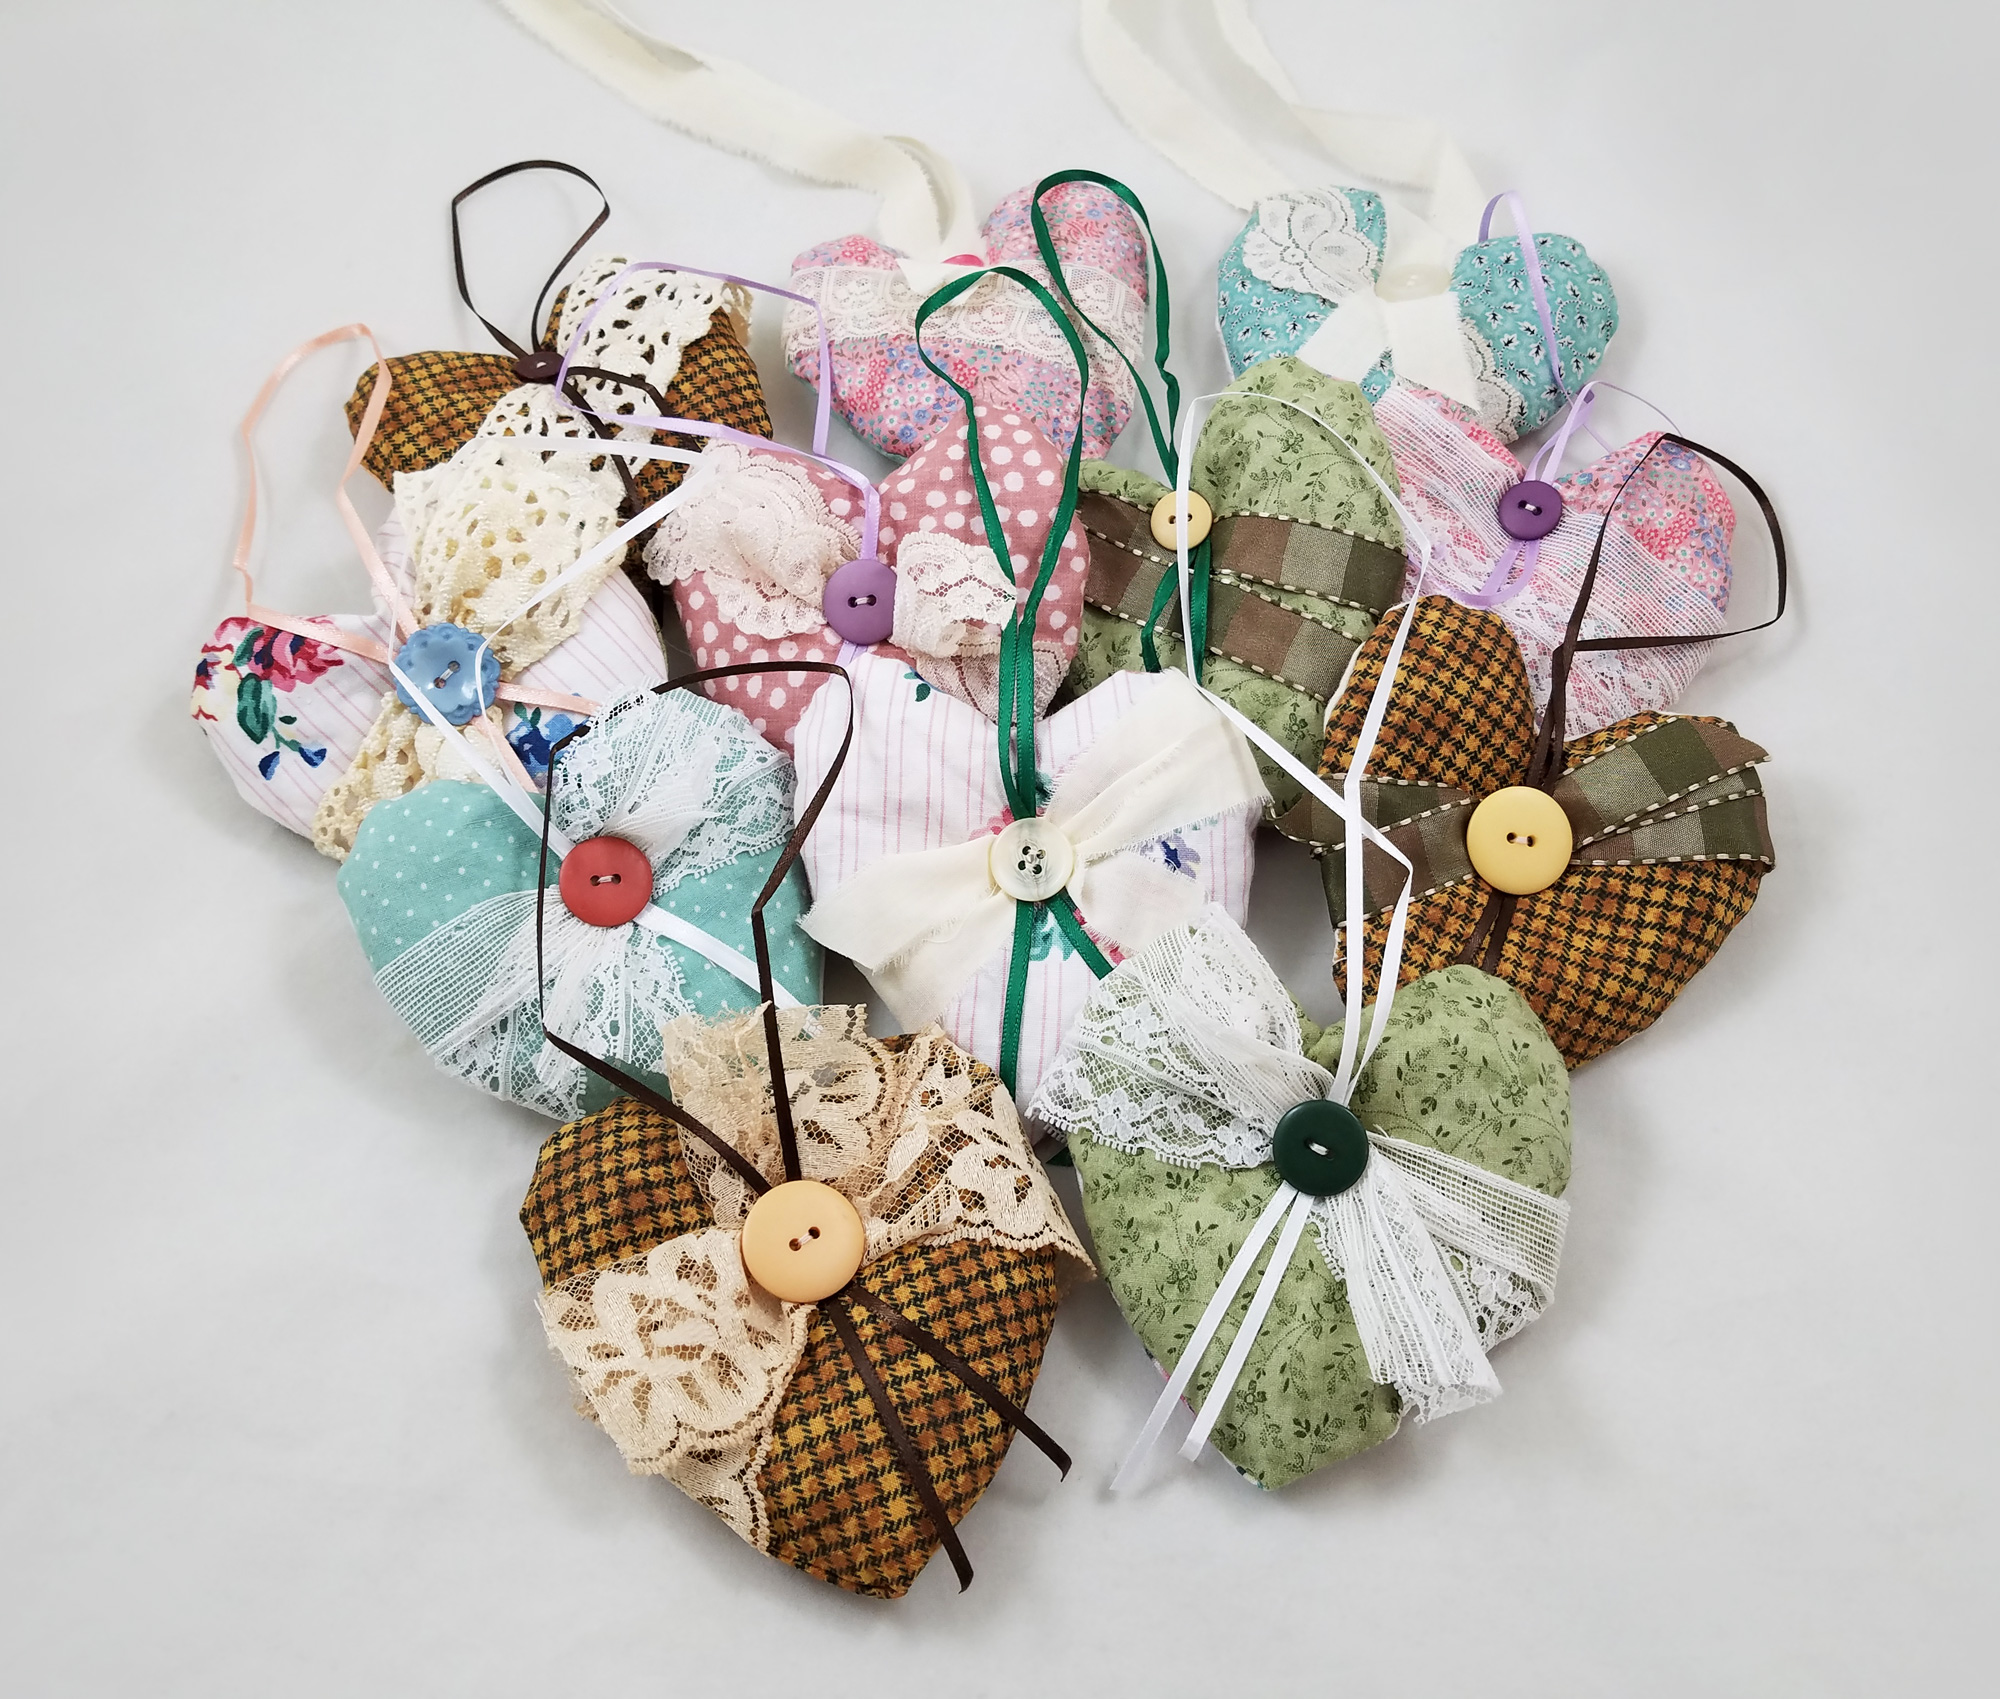
Different lace and trim placements make each sachet a unique piece. Try making sachets in different shapes, sizes and fabrics. Not a fan of cedar? Switch out the cedar for dried rose petals, rosemary or lavender!Happy Holidays and until next time, safe travels!
A #Cre8time voyage to find Pirate Treasure!
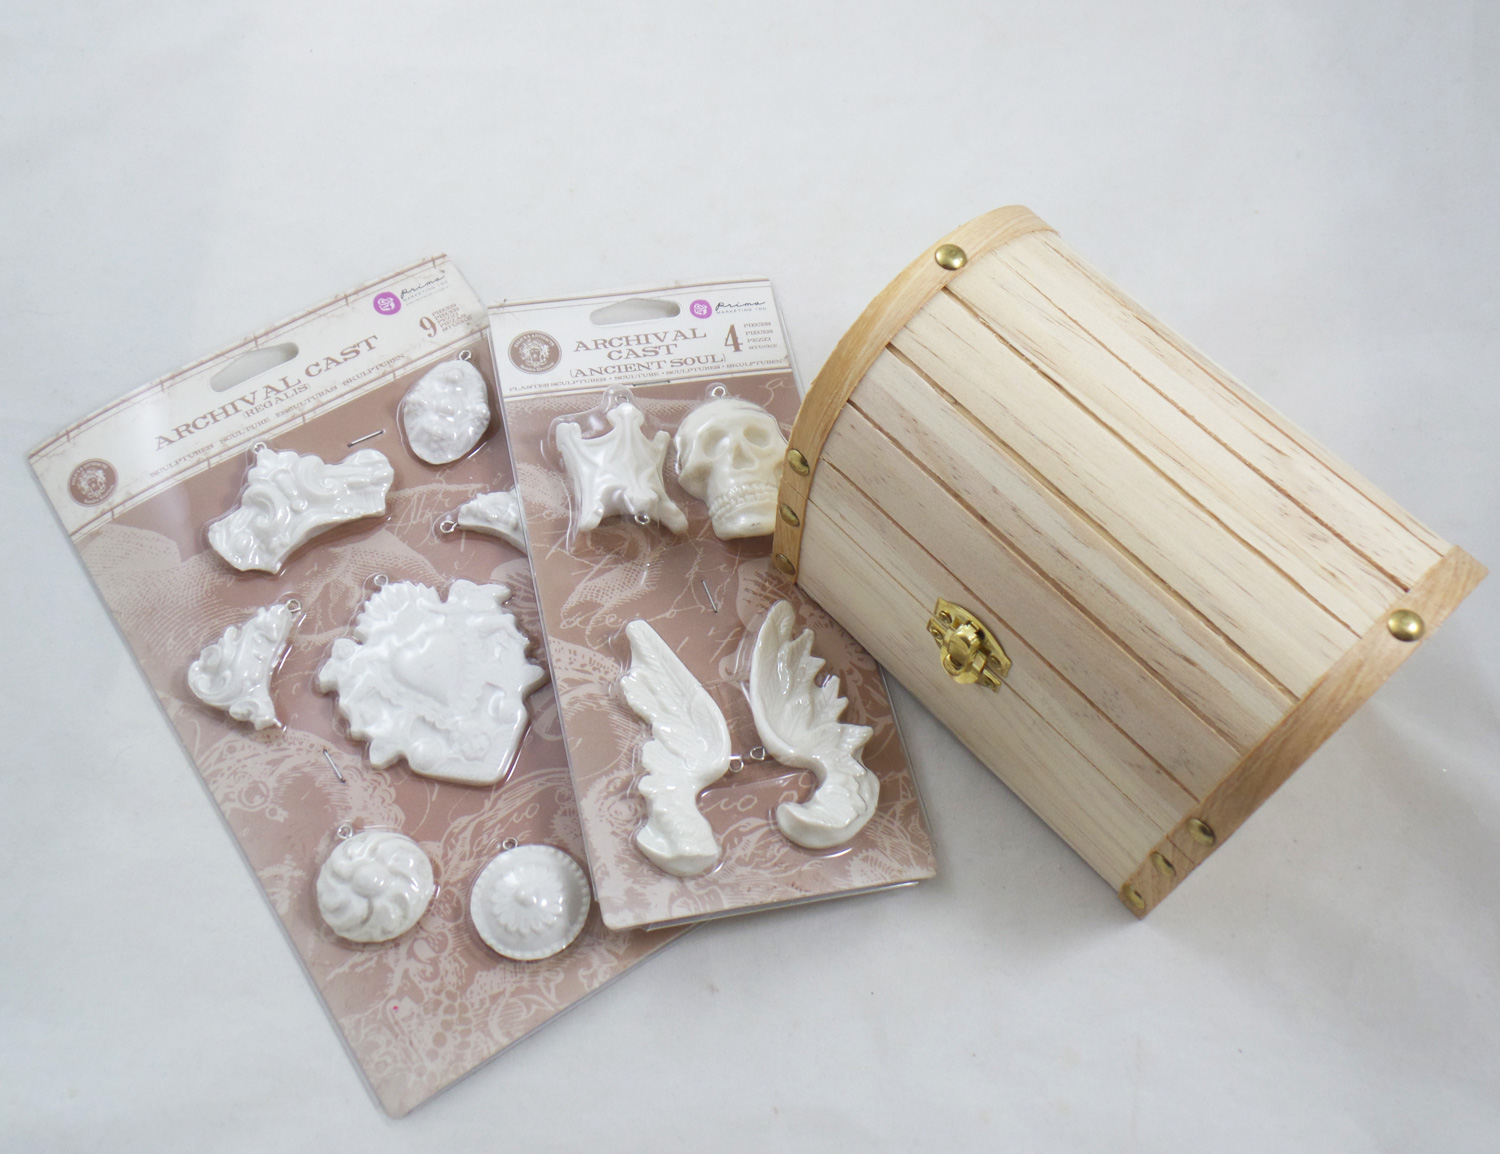
With Fall fast approaching, I am once again looking at new ways to jump start my creativity. I finally decided to order pieces from Relics & Artifacts® by Sandra Evertson to try out. The line has been catching my interest for a few years every time I see them at craft and hobby trade shows and on social media. Locally no stores currently carry their product line however it is rather easy to order the Matte Resin Craft Blanks from their website (they ship VERY quickly and package the art supplies wonderfully!). The resin blanks were larger than I expected, had a nice weight, tooth to the surface (great for paint application) and fine detail.
I bought 4 sets but the pieces in the Ancient Soul and Regalis sets got my mind whirling immediately. The skull focal in the Ancient Soul set had me thinking of a Jolly Roger and a sunken treasure chest. I collected some vintage jewelry supplies and started my craft voyage into uncharted seas….
Supplies:
Unfinished Wood Trinket Box (I found one at Jo-Ann)
Relics & Artifacts® Ancient Soul and Regalis Matte Resin Craft Blanks
Alumilite Metallic Powder Gold
Liquitex Gloss Varnish
Beacon Gem-Tac Adhesive
Stampendous Crystal Snow White Glitter, Ultra Fine
Paint Brushes
Acrylic Paint in Metallic Light Gold, Black, Burnt Umber, Terra Cotta, White and Yellow Ocher
Baking Parchment Paper (as a work surface)
2 Flat head jewelry pliers
1 Broken bracelet, chain necklace, shell beads and flat backed rhinestones 4mm, jumprings
4 used and dried tea bags
Dried Green Moss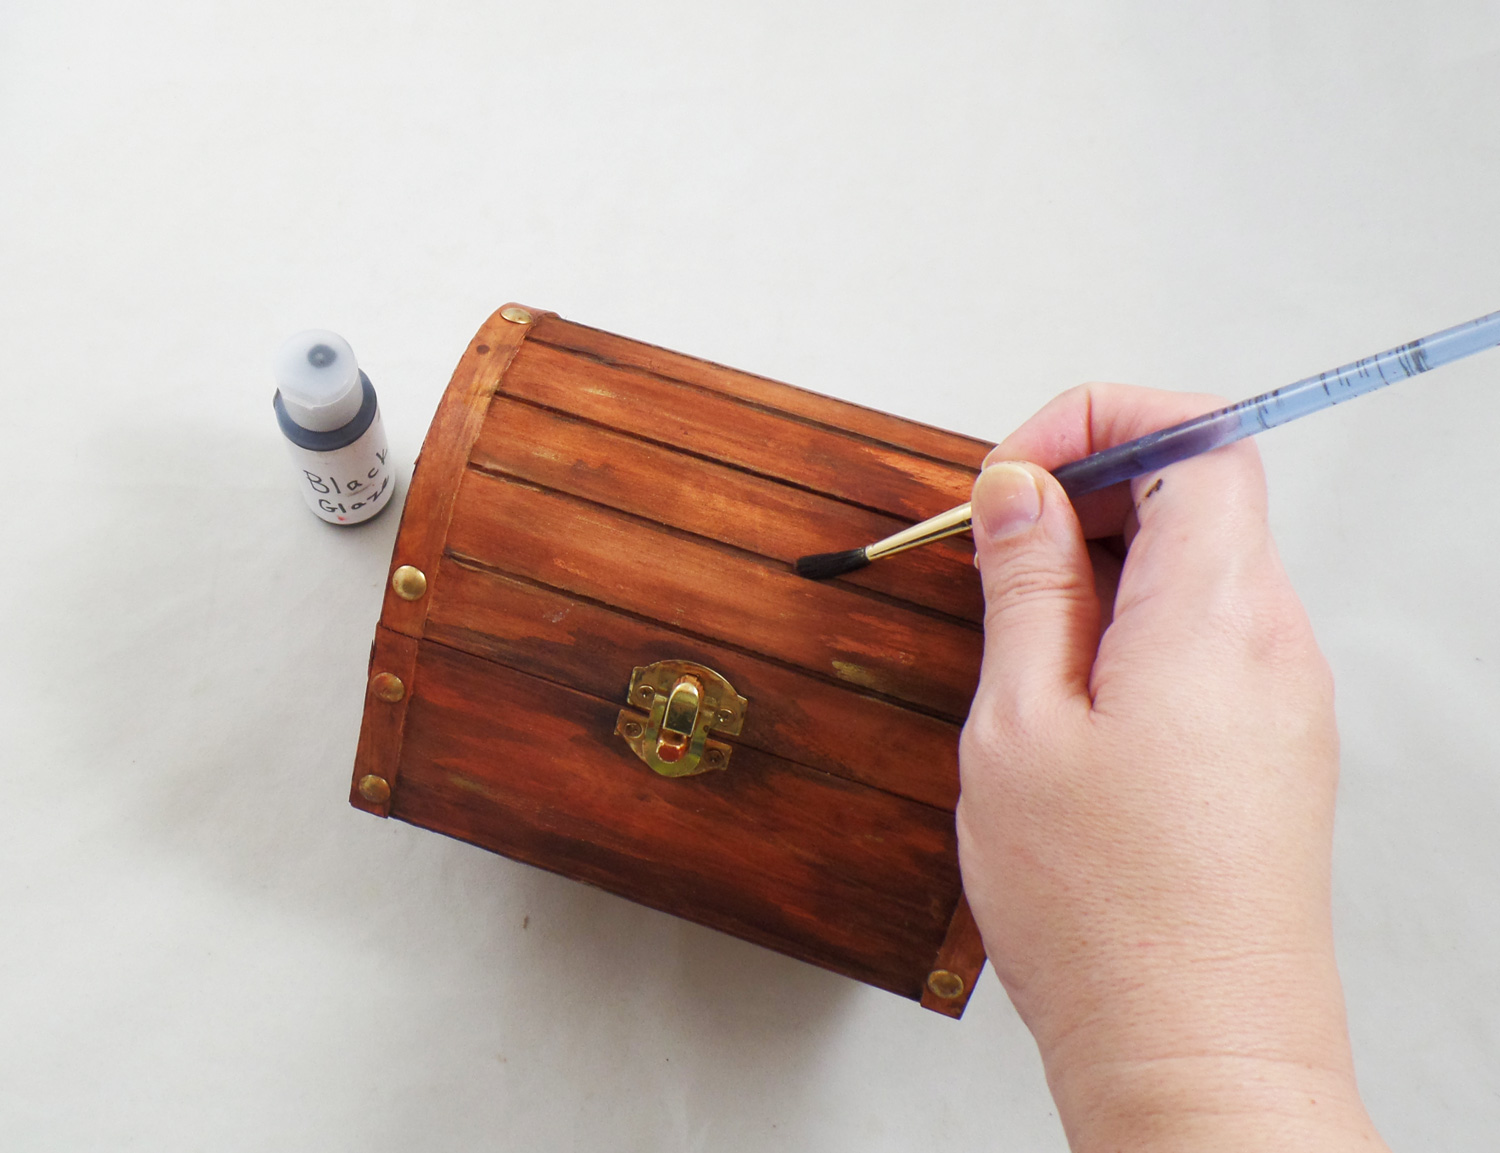
I started by painting the inside and outside of the unfinished wood box. I diluted the paint with water to create a color wash that would stain the wood but still leave the wood grain visible. First coat of diluted paints was the Terra Cotta, then the Burnt Umber and finally the Black in the nooks and crannies.
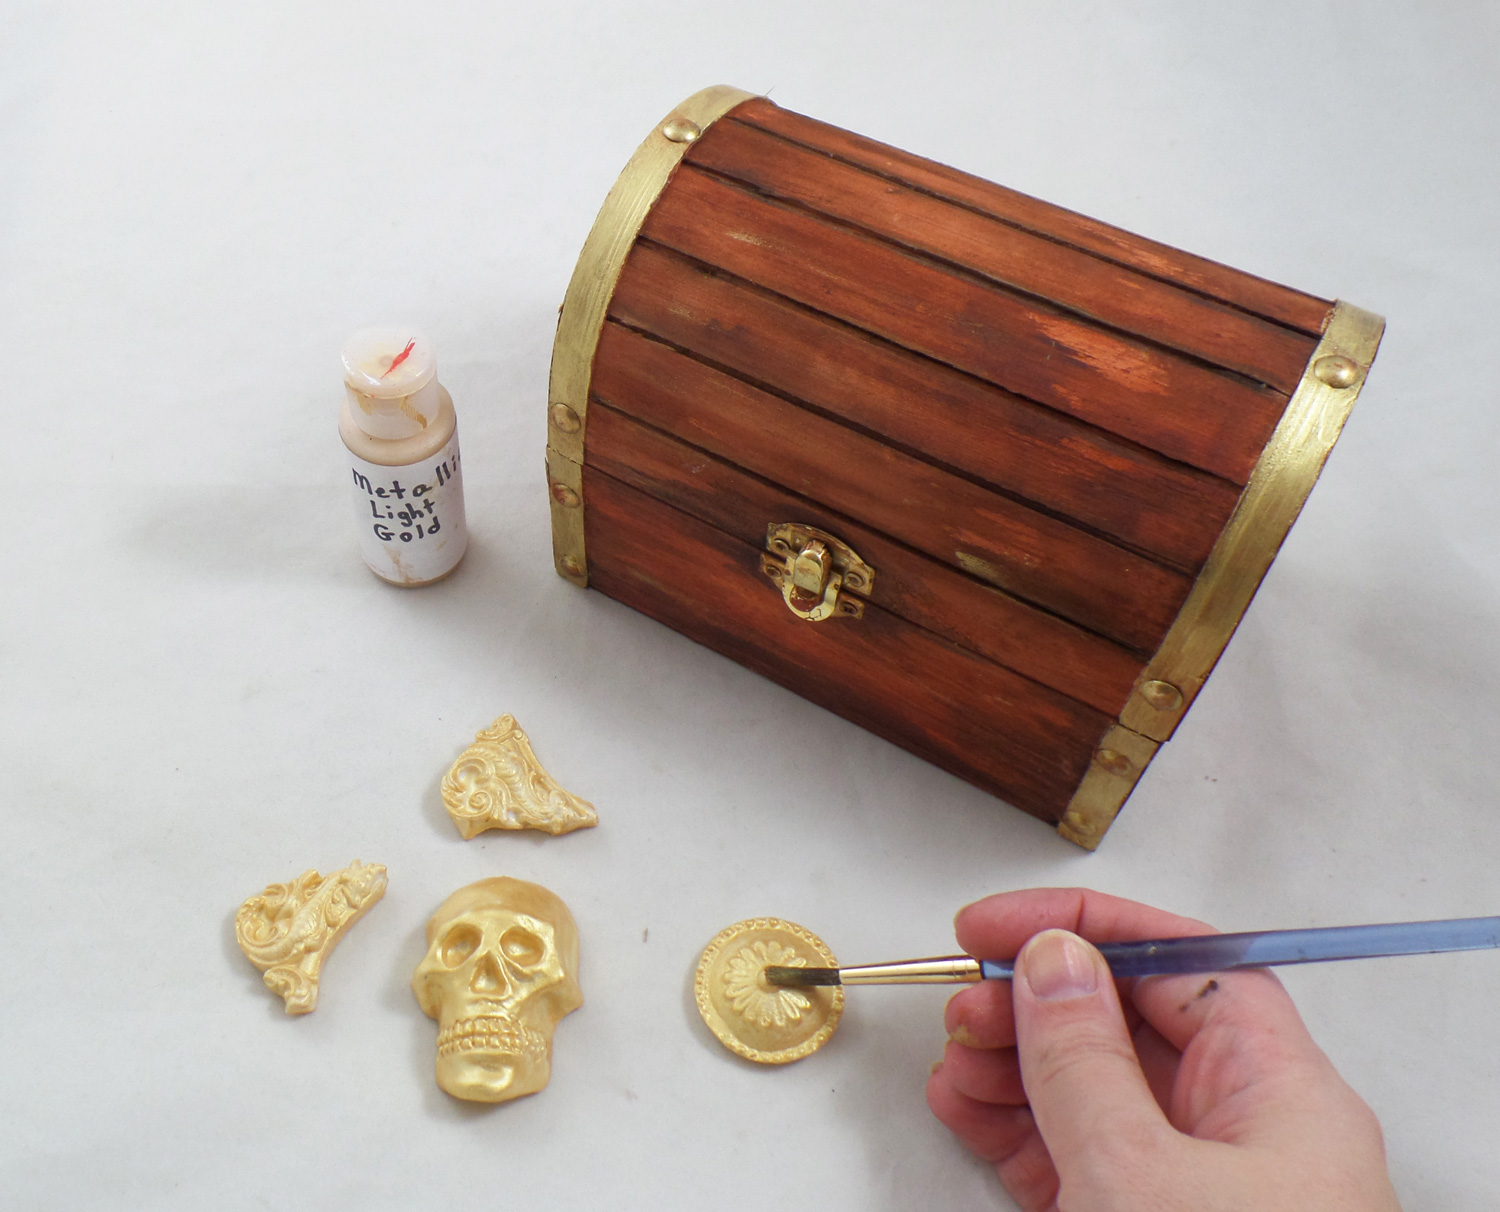
While I let the wooden box dry I removed the eye pins carefully with pliers that are put into Relics & Artifacts® pieces by the manufacturer, since I wasn’t going to make them into jewelry. I painted the pieces and the trim on the box with Metallic Light Gold paint. They needed two coats because most metallic paints need several coats for full coverage. The resin pieces were easy to paint and I didn’t have a single issues with the paint beading up or sliding off like with other resin blanks on the market!
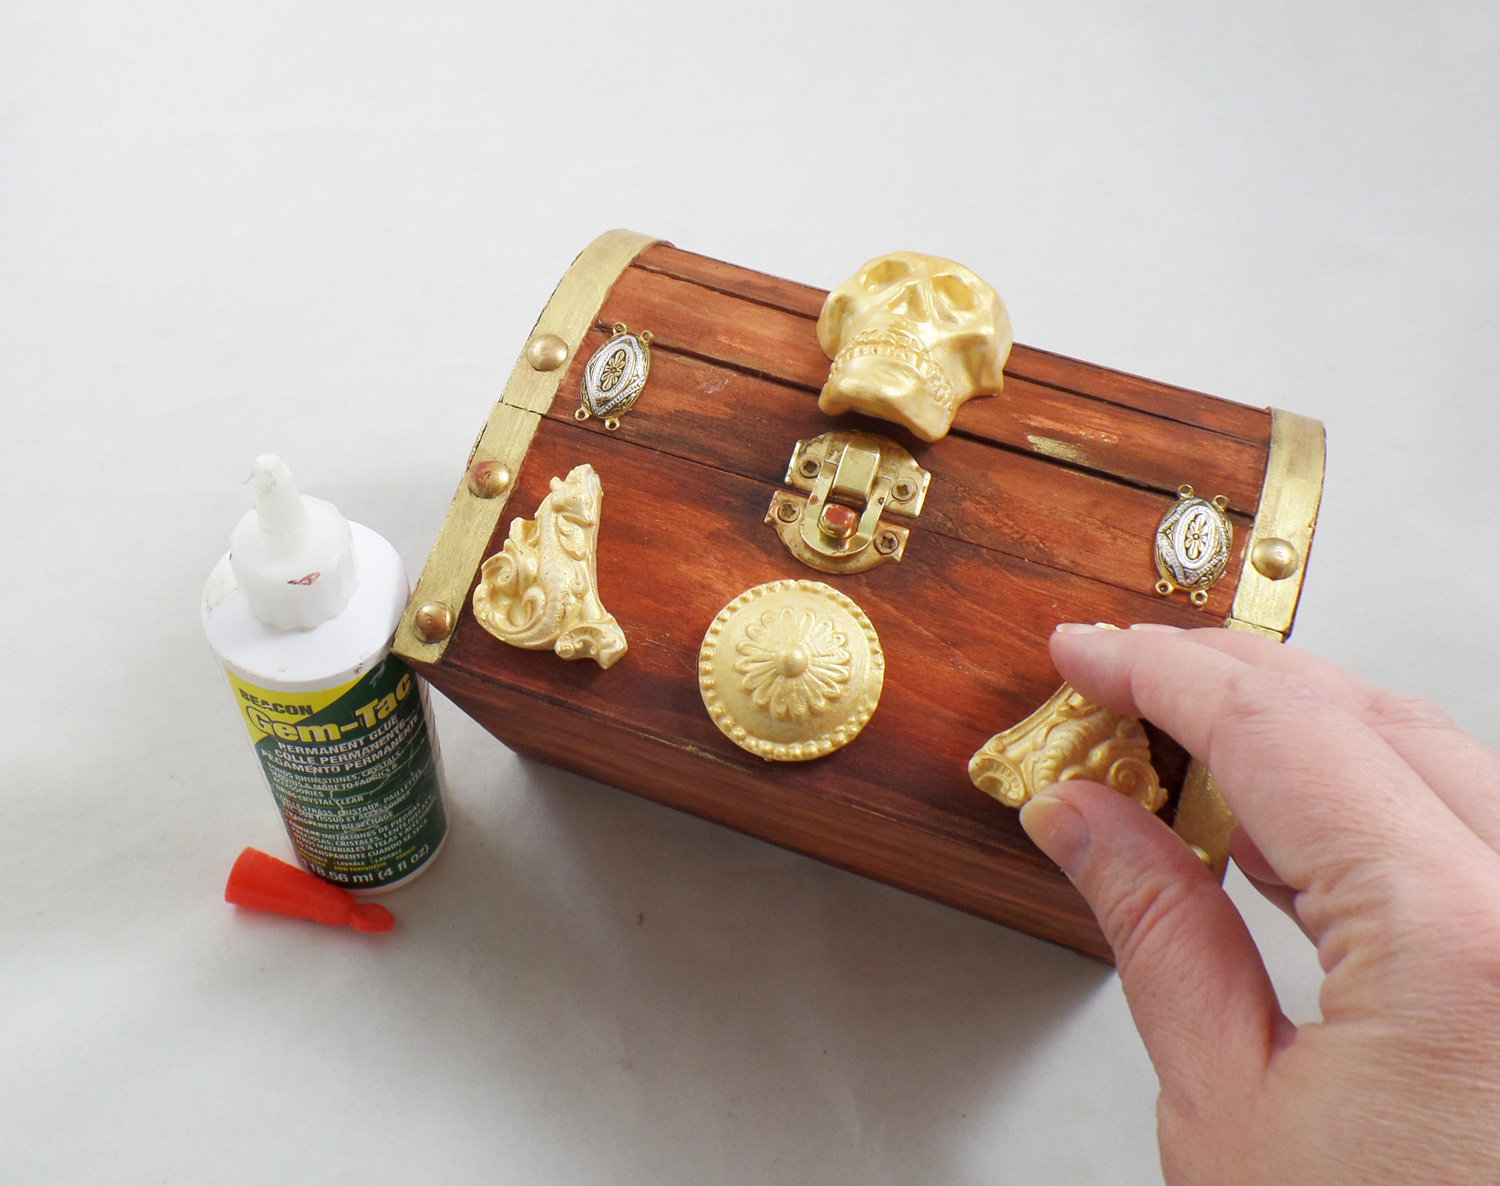
Once all the pieces were dry I applied them to the wood box with Beacon Gem-Tac Adhesive. A broken bracelet with beautiful metal spacers I took apart and glued the spacers to the box to give the illusion of metal brackets bolted to the box. Once the glue was dry I did another color wash of the Burnt Umber and Black acrylic paints all over the box and glued on embellishments to give them an aged appearance. I attached broken chain from an old necklace to the bracelet spacers, glued onto the box, with jumprings.
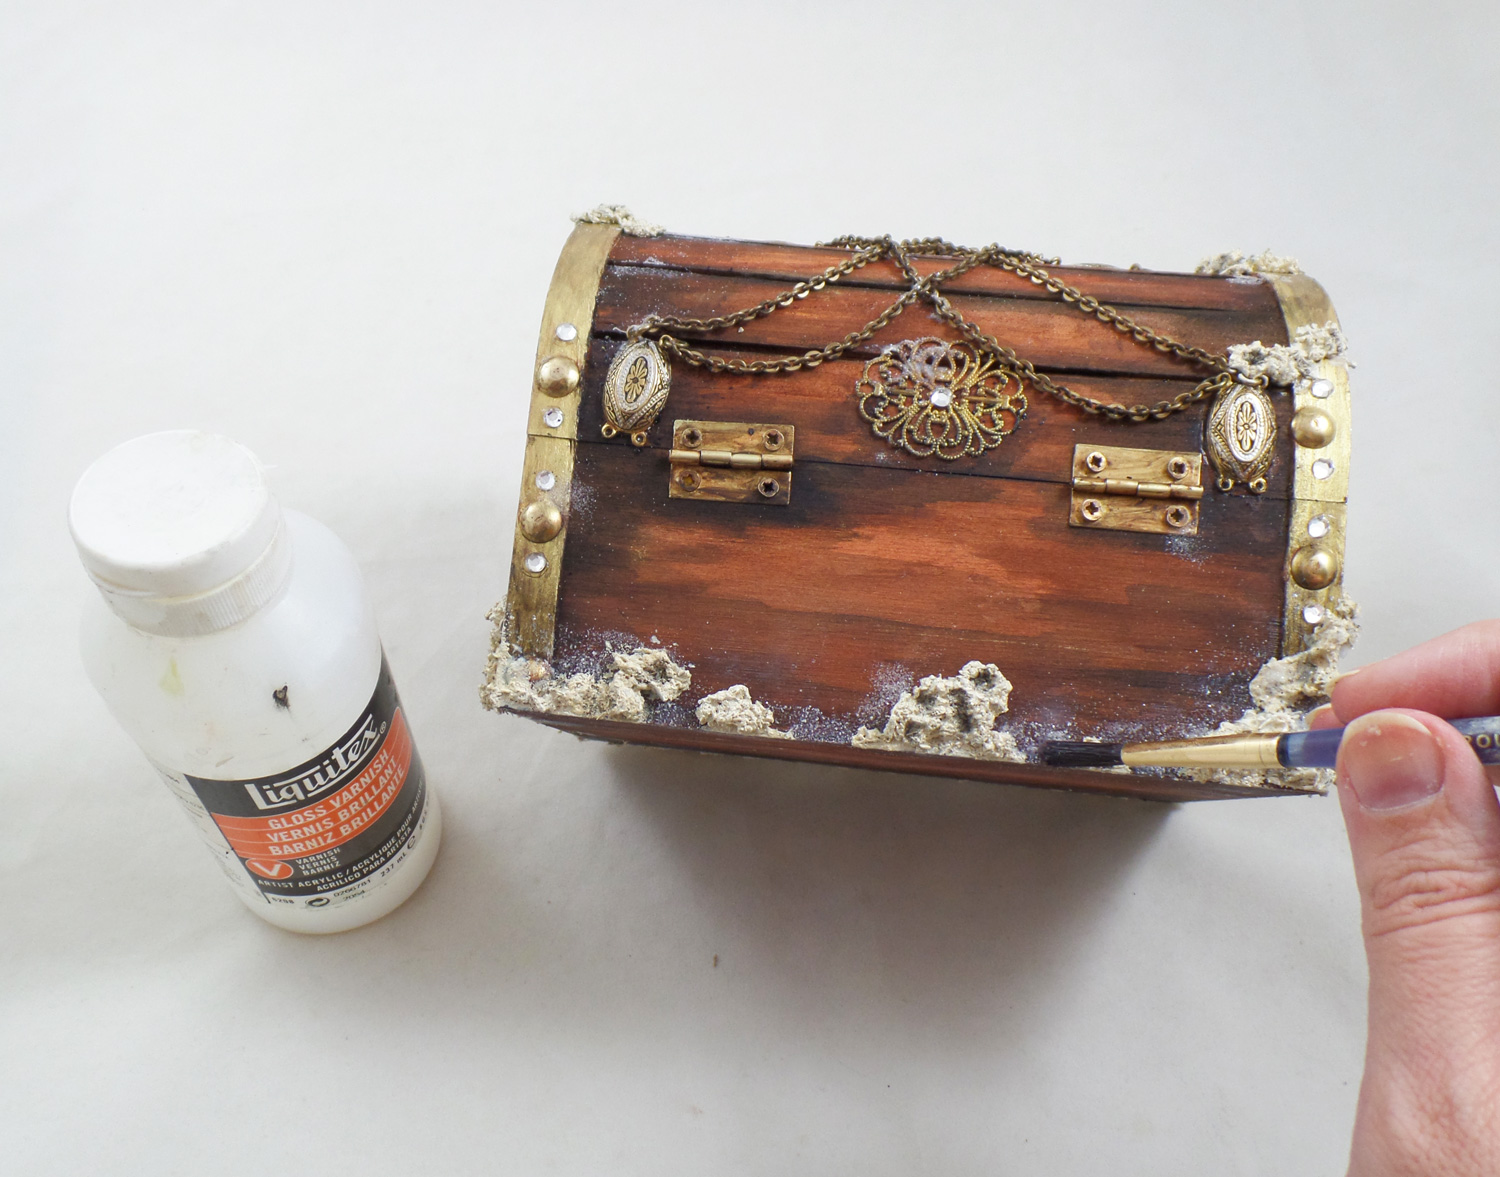
In a small cup I mixed up some White and Yellow Ocher acrylic paint with dried tea leaves and a little Beacon Gem-Tac Adhesive. I applied it around the bottom and sides of the box in small clumps to give the illusion that barnacles had started to grow around this long forgotten treasure. Once the faux barnacles were dry I did a Black acrylic paint wash to give them detail. I added some Liquitex Gloss Varnish over and around the edges of the barnacles and sprinkled on Stampendous Crystal Snow White Glitter. Once dry it looked like salt deposits from sea water.
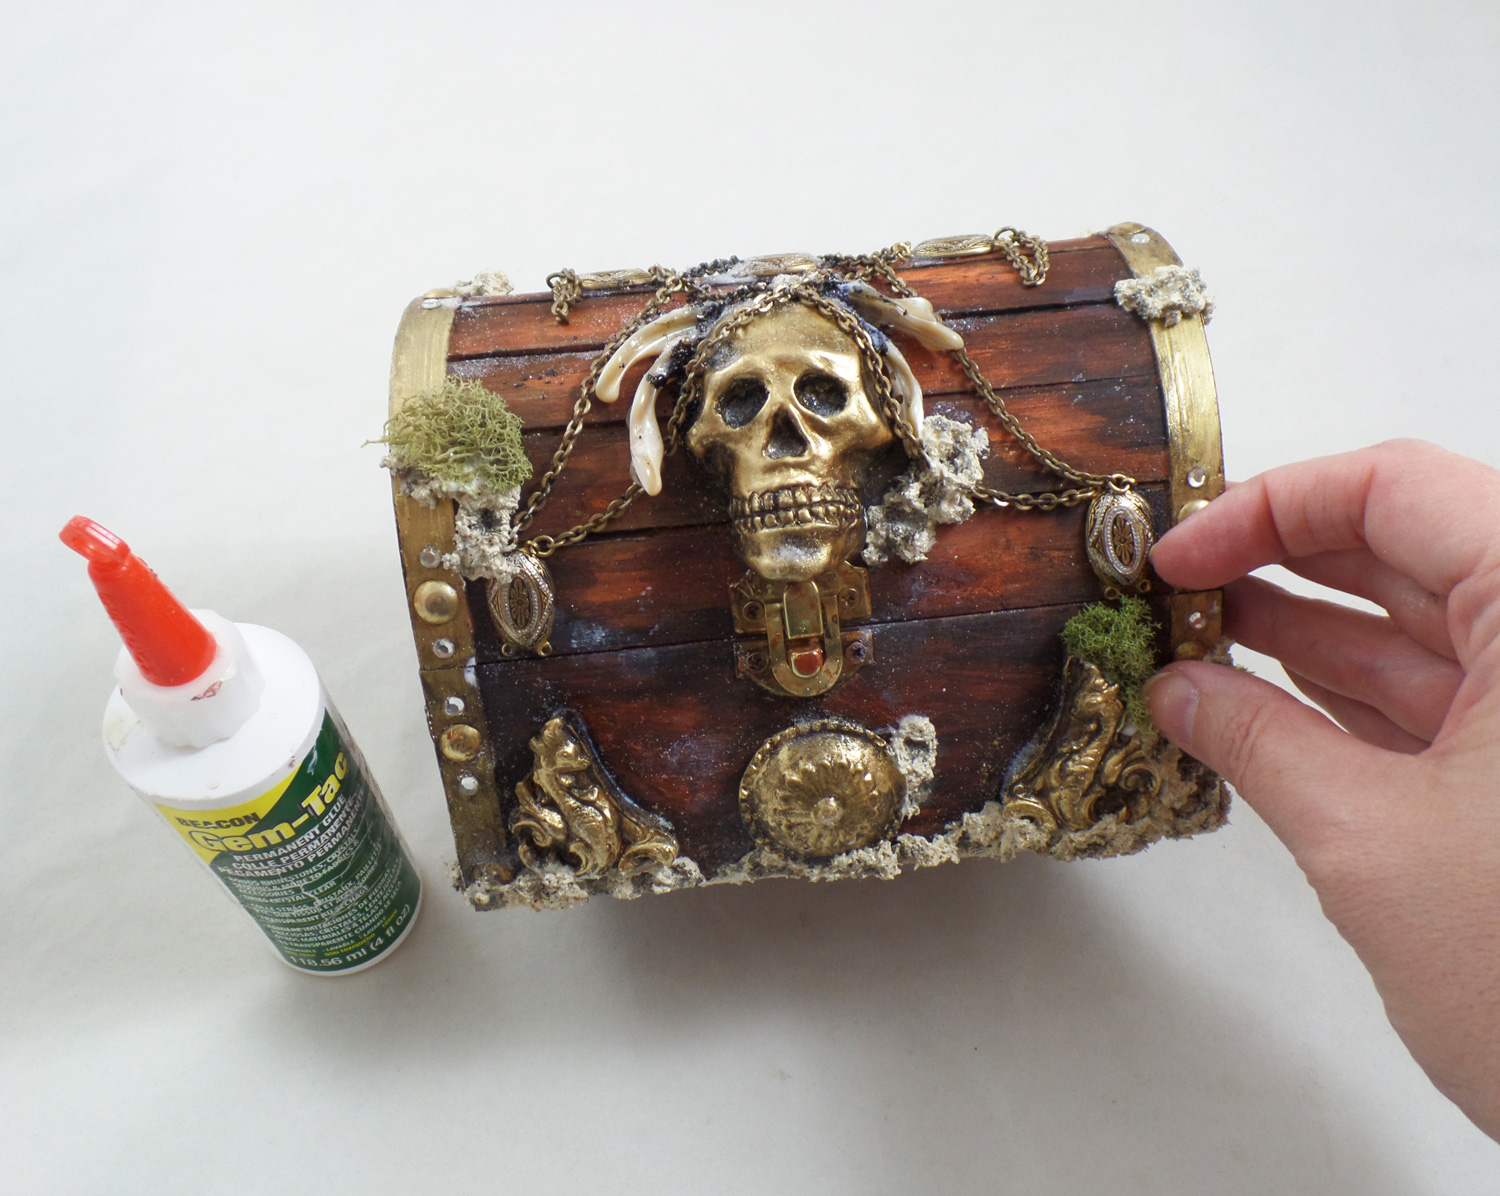
I randomly applied more spots of varnish and glitter to give a grungy, salty appearance to the treasure chest. I glued on tiny bits of moss on the box along the edges and embellishments.
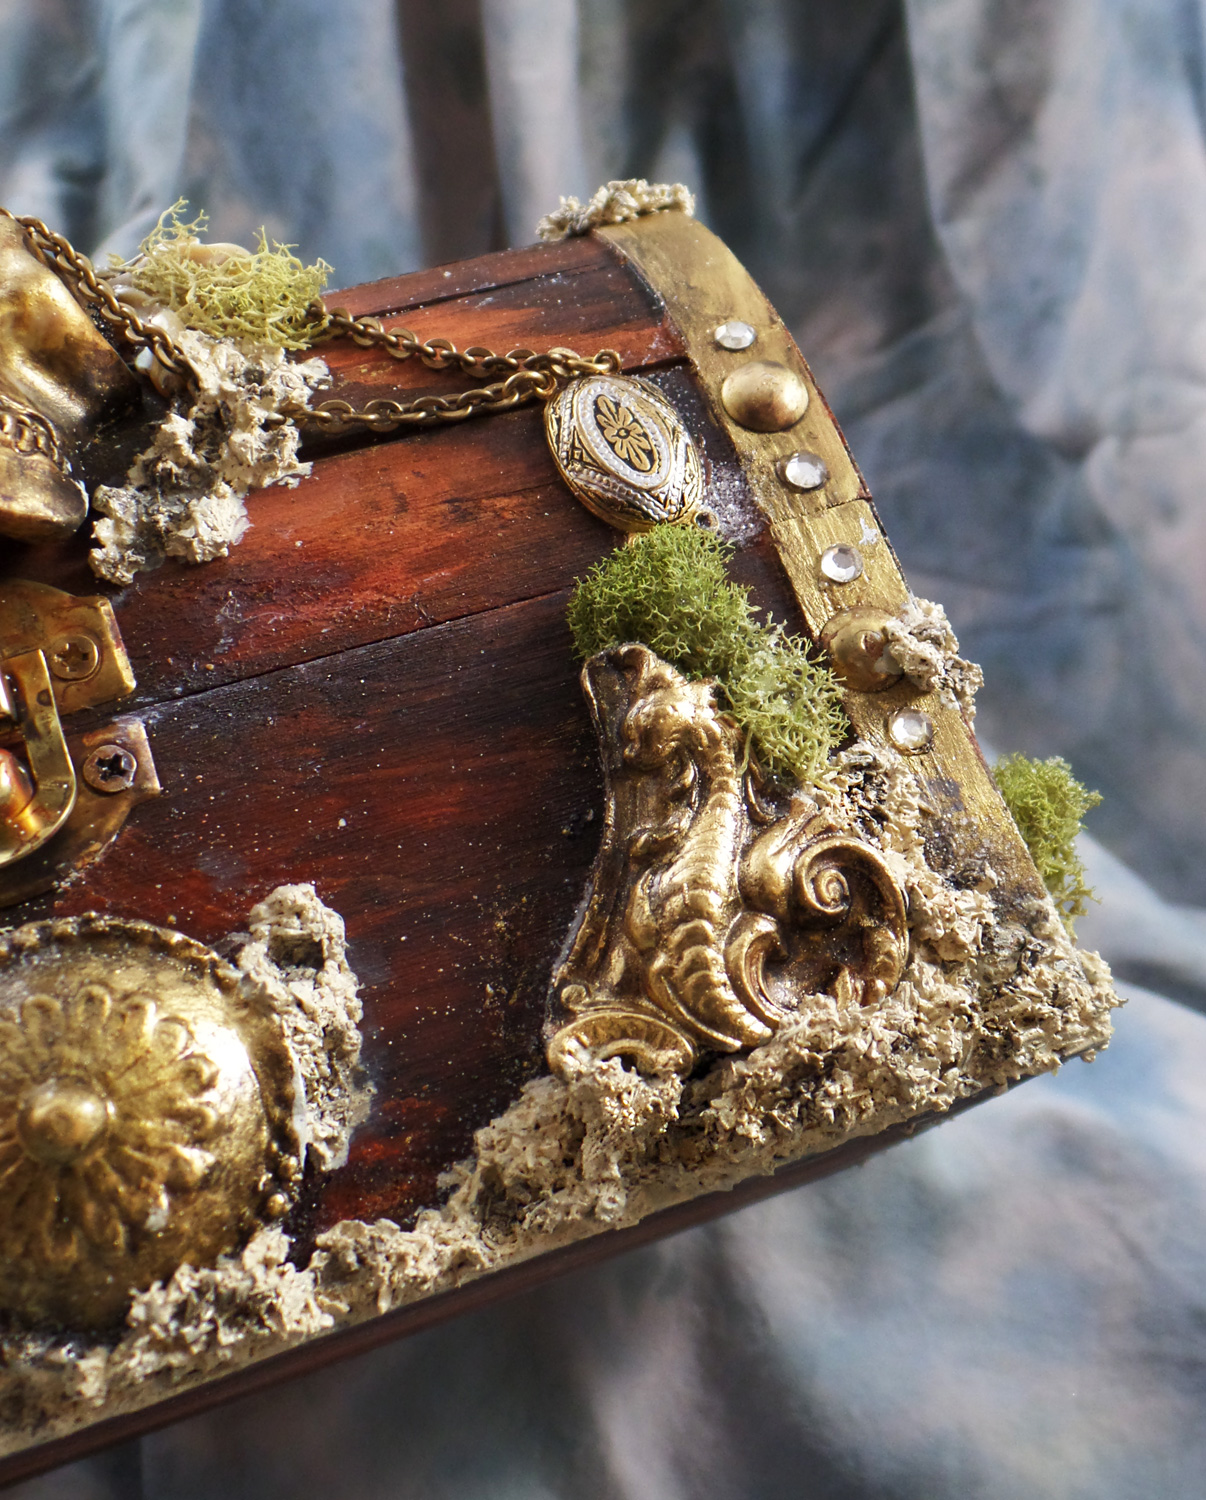
When applying the faux barnacle mixture to the box I was sure to press it against the resin pieces and edges of the box for a good bond. To make it look like the barnacles had grown haphazardly I pushed the back end of a paint brush here and there into the tea leaves and paint mixture.
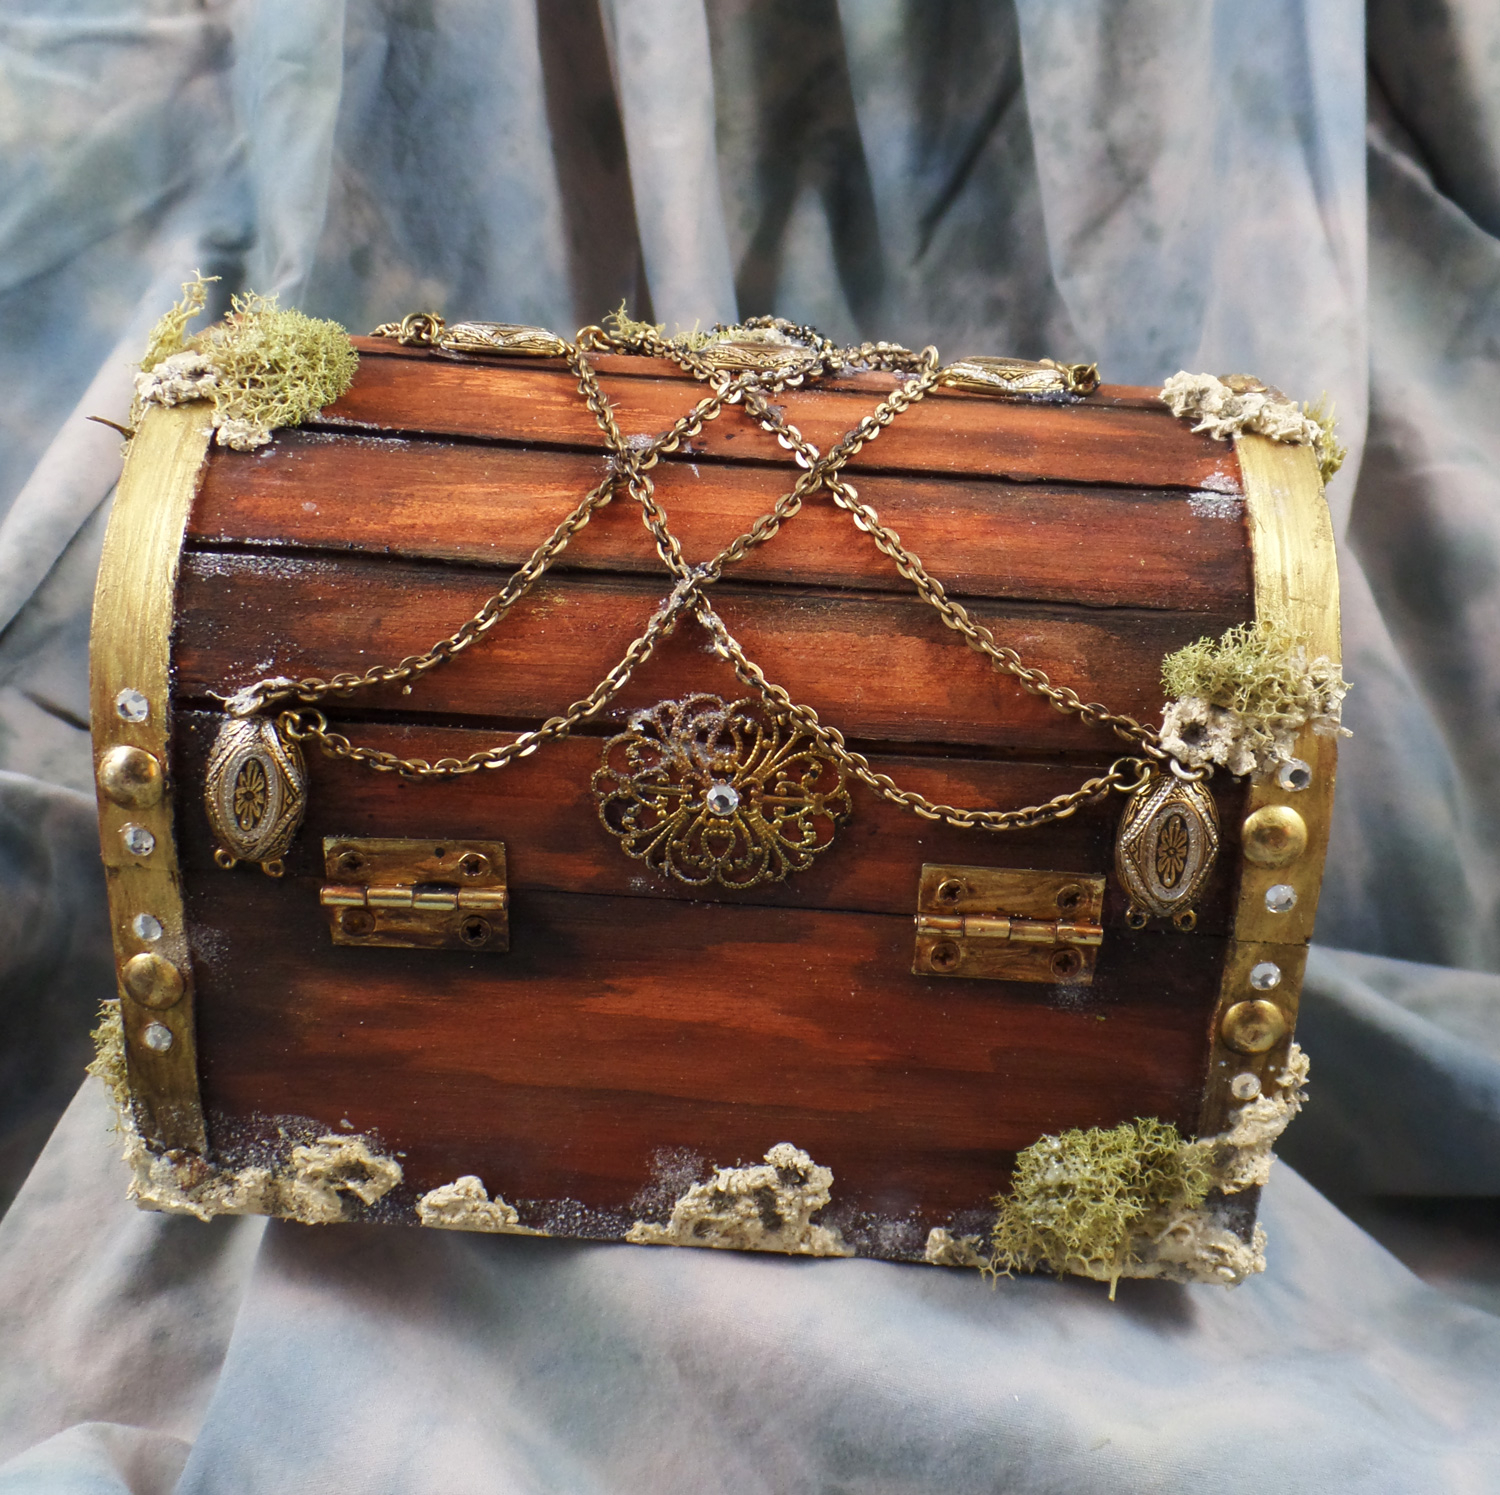
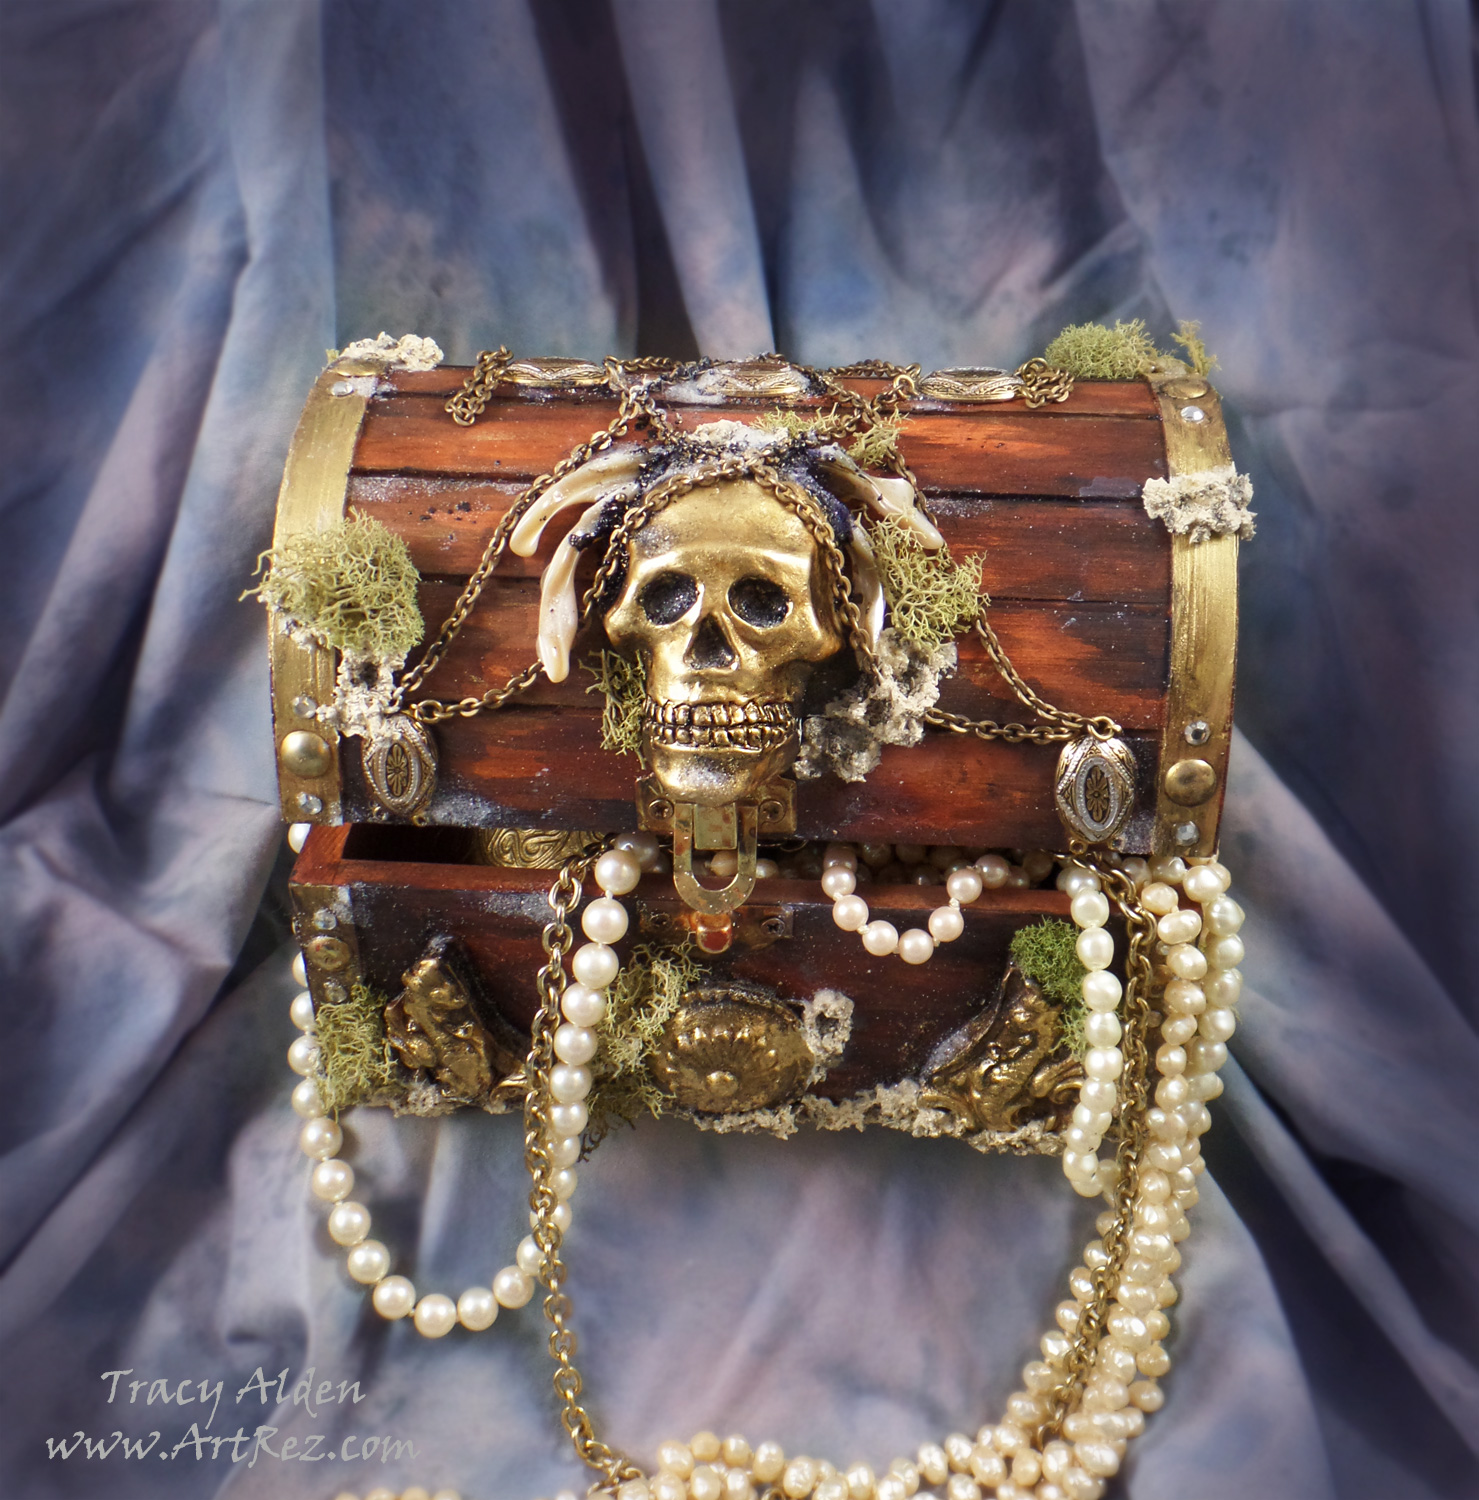
Not forgetting the back of the treasure chest, I had glued on more bracelet pieces, metal embellishments and tiny vintage glass rhinestones. With the chain linked into the bracelet spacers, draped back to front on the chest, my Pirate Treasure Chest was complete!
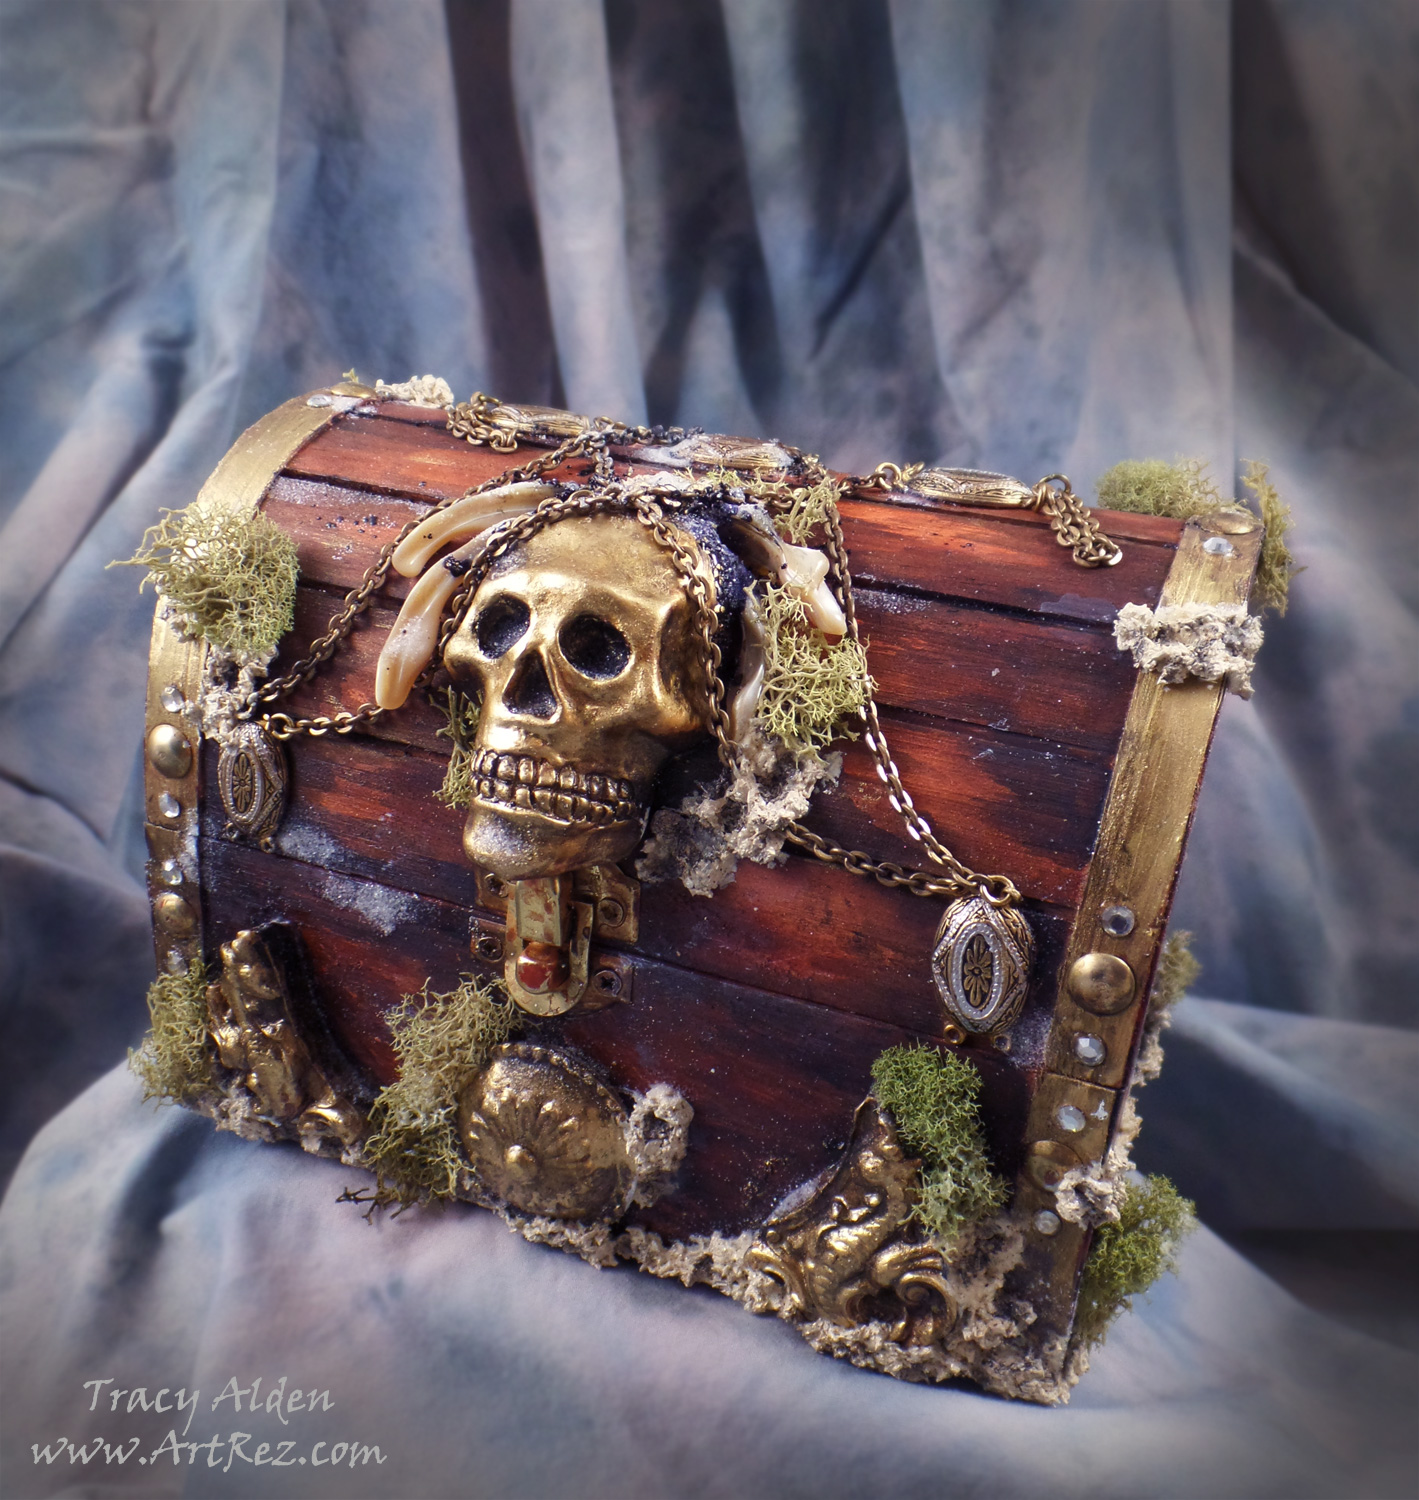
I really love how this piece came out and can’t wait to try out more of the Relics & Artifacts® line with future art projects.
What lovely mixed media treasures will you create?
Until Next Time, Safe Travels!
Upcycle Plastic Skulls into Ghoulish Glam Decor
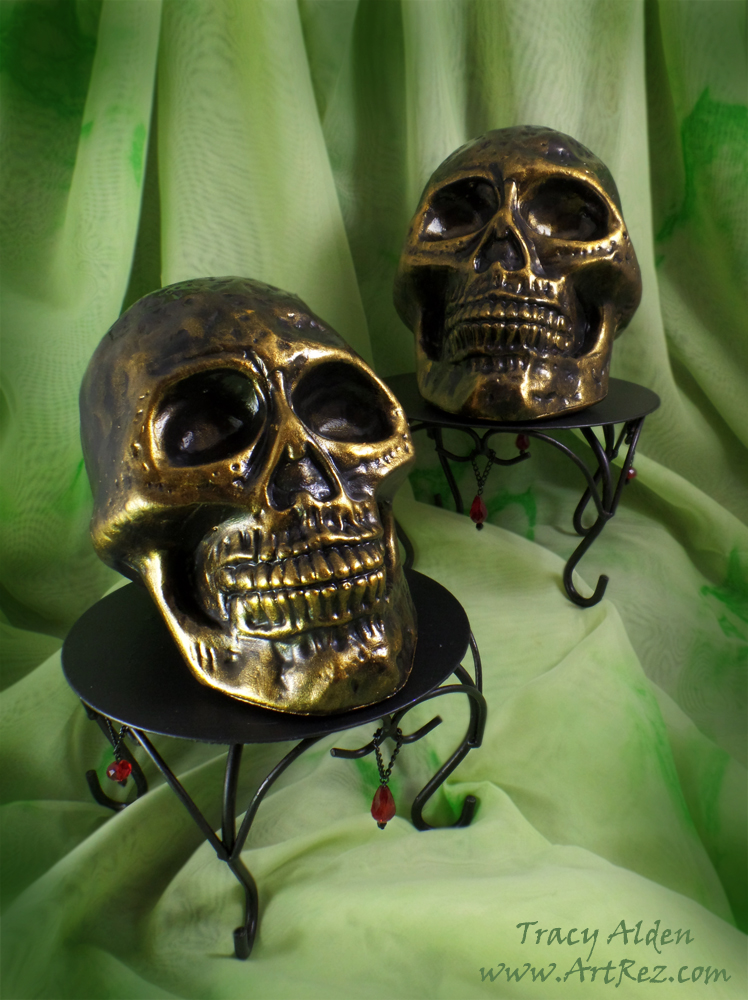
The first day of October: the leaves are starting to fall and the temperatures are slowly starting to drop at night! With only a month left to get all of my Halloween projects, I have been traveling to all sorts of places for interesting supplies. One of my favorites is the many local Thrift Stores in our area that support local charities. At this time of year many will get in all kinds of Halloween items and one store had a lot of plastic skulls. I noticed that while the paint job on the skulls wasn’t particularly grand the sculpting of the skulls was nice. It got me thinking how they would look if I changed the paint and finish, replicating the look of ceramic!
Supplies:
Plastic Skulls and Metal Candle Stands
Liquitex Gloss and Matte Varnish
Black Chalk Board Paint
iZink Pigment Ink bottle – Gold
Fiona Accessories Red Crystal Drop Beads, Black and Red Crystal Rondelle beads
Beadsmith 1 Step Looper Tool
Black enameled chain, jump rings and headpins
Paint Brushes
Cosmetic Sponges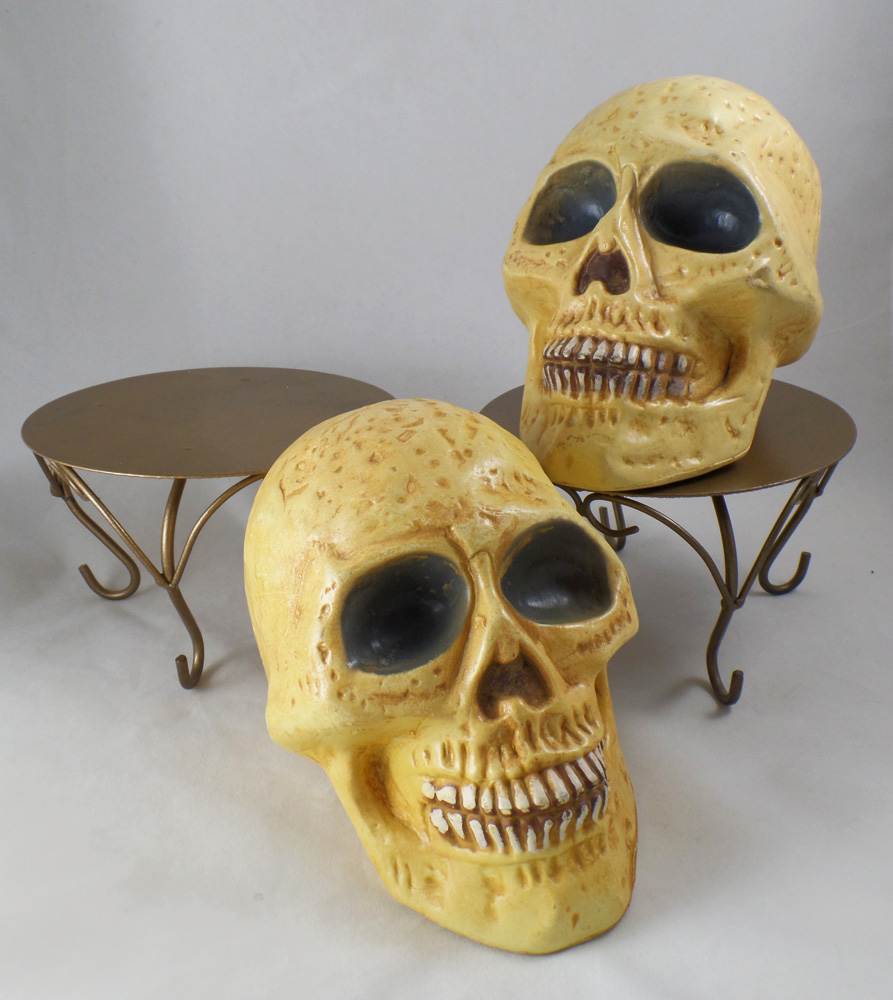
Along with the skulls I found some old candle stands with a old bronze finish. I noticed the skull fit perfectly on them so I bought them along with the skulls. I scrubbed the plastic skulls and candle stands, removing any dust, stickers and uneven edges.
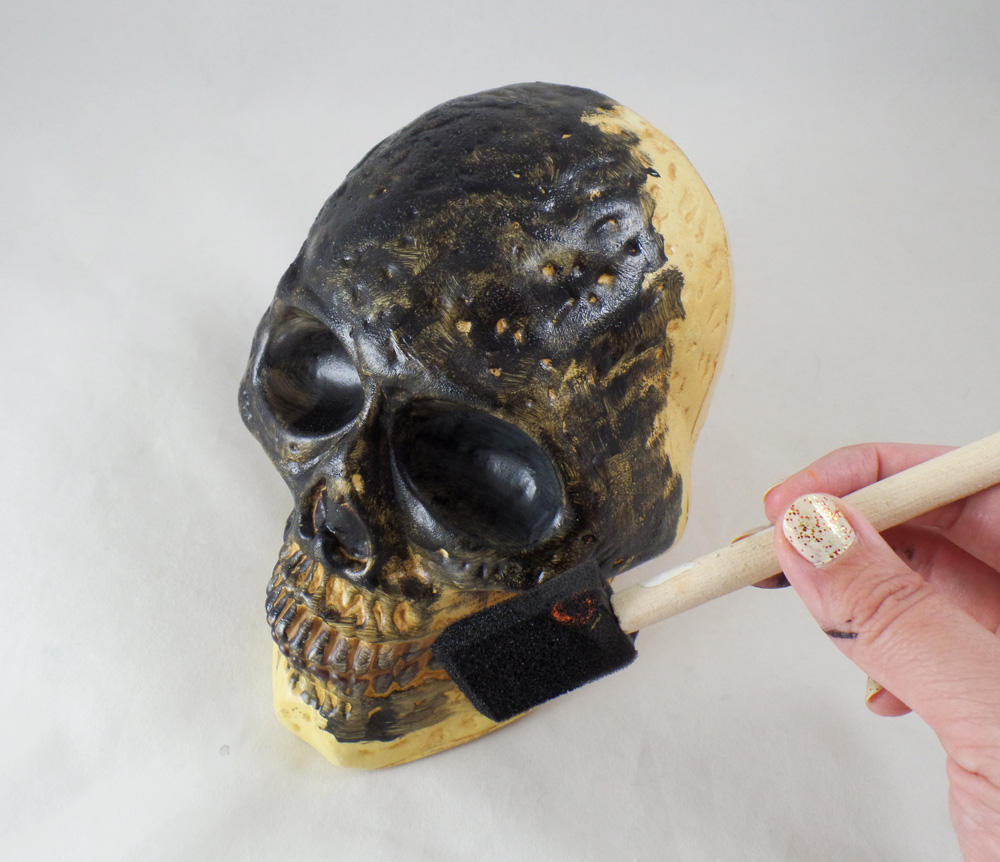
While I could have easily spray painted the pieces, I wanted to go with a nontoxic and child friendly direction by using chalk paint. I painted the skulls and candle stands with 3 layers of black chalk paint. Most chalk paints require a 1-2 hour dry time between coats of paint for best coverage and adhesion of the paint.
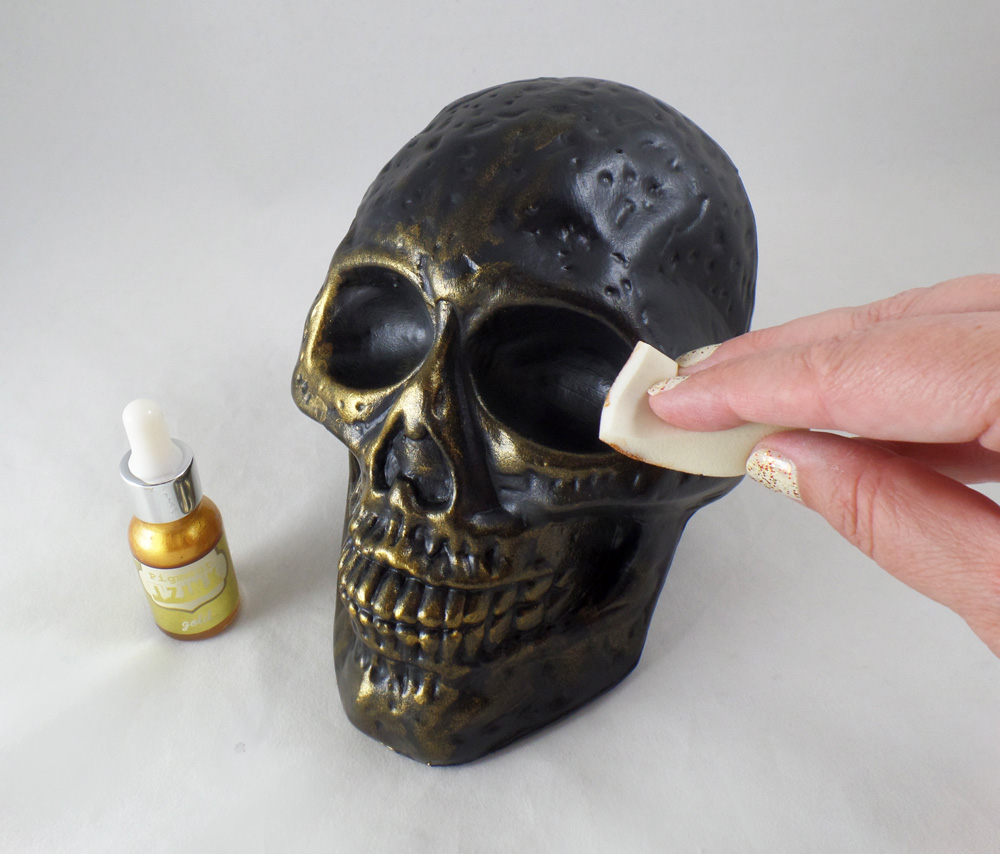
The skulls already looked better than they used to but I wanted them to look more like ceramic. Using a cosmetic sponge I applied Gold iZink Pigment Ink to the raised portions and detailed parts of the painted skulls. The ink dries rather quickly allowing me to add several layers on sections for a dramatic effect.
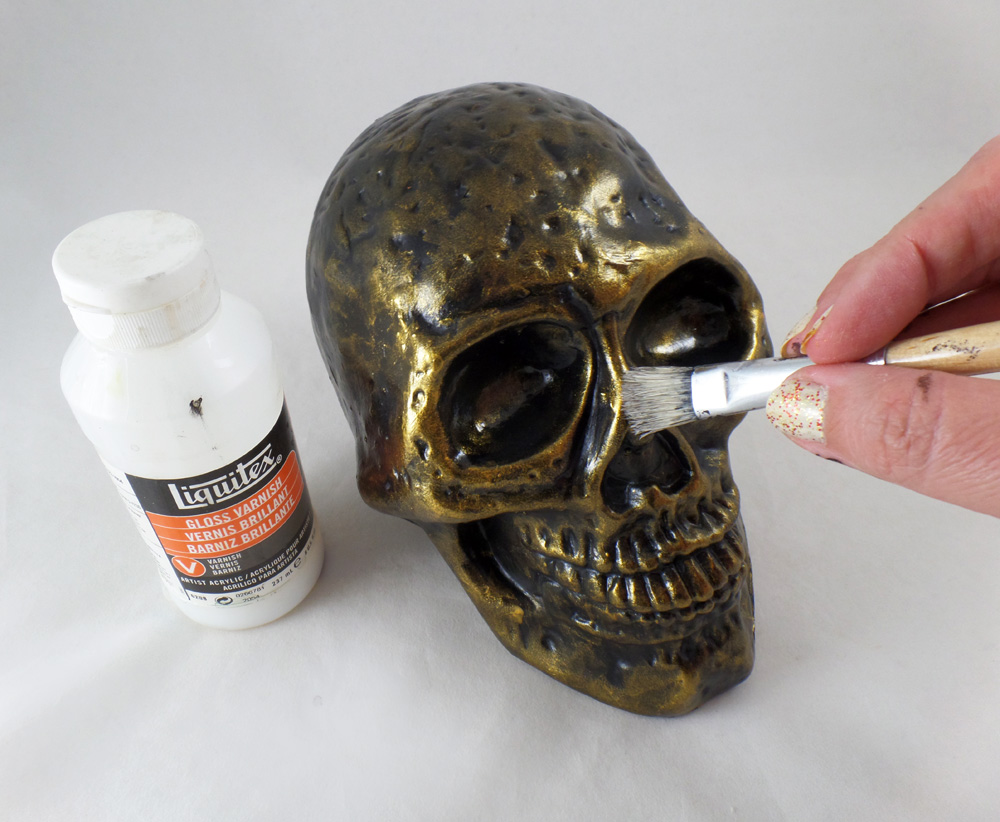
I applied Liquitex Gloss Varnish to the sections on the skulls with gold ink to make the gold tone visually stand out more and give the illusion of ceramic.
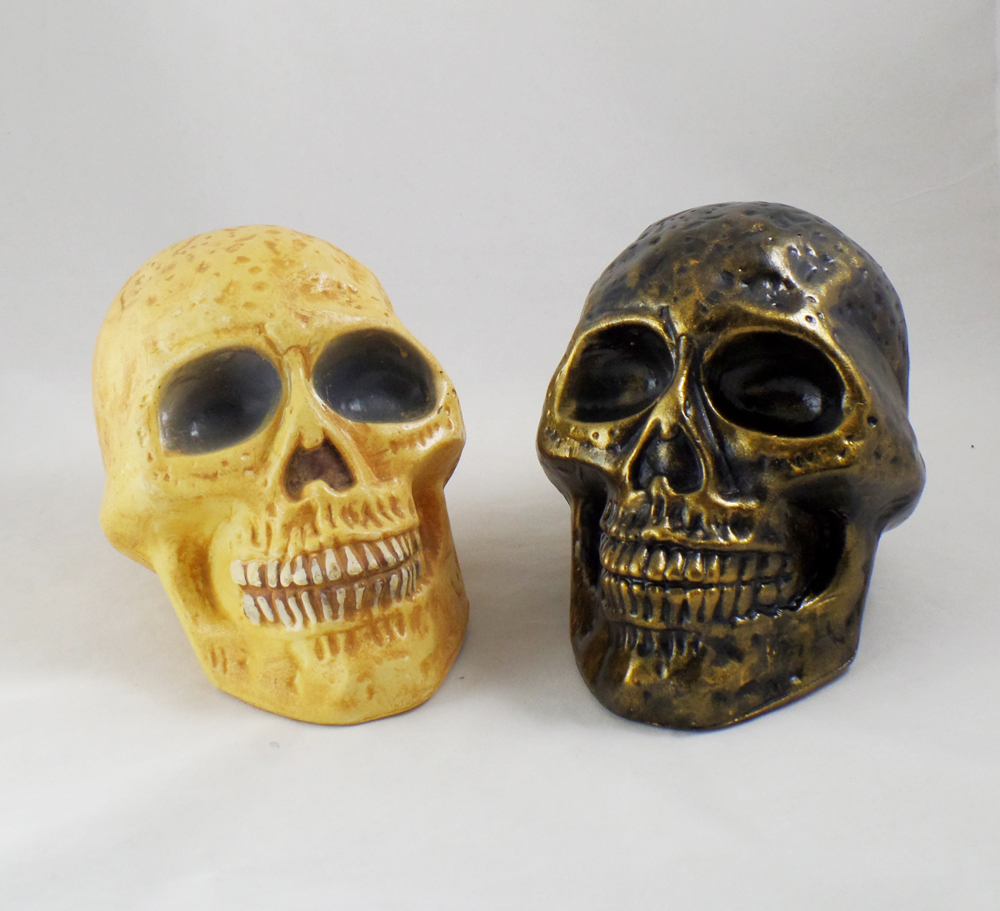
Compared to the original factory paint I was pretty happy with the new version, replicating the look for ceramic. However I felt the skulls needed something more.
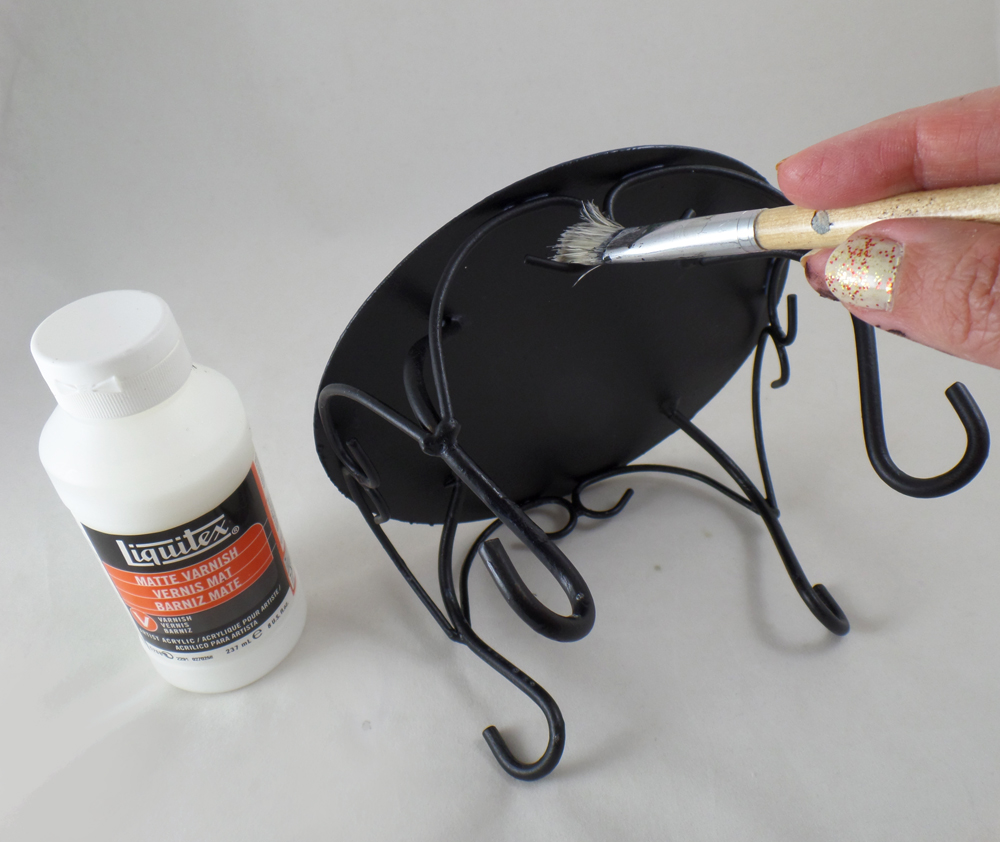
With the candle stands already painted with black chalk paint all I needed to do was paint them with Liquitex Matte Varnish to seal and protect the stands.
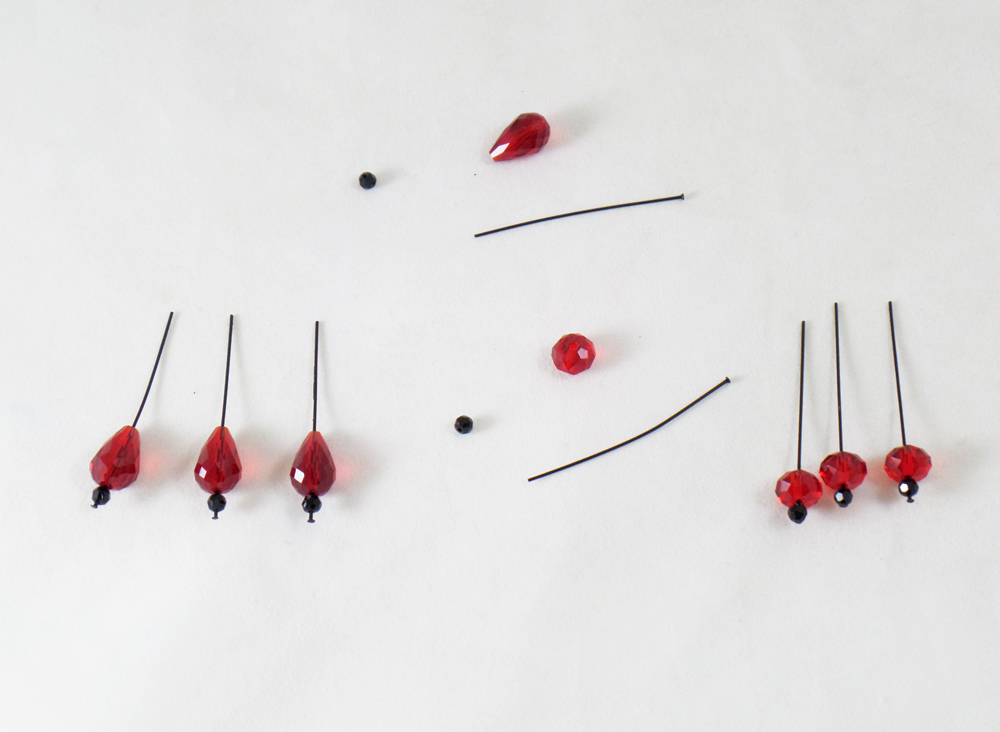
On four black enameled headpins I threaded on one black crystal rondelle and one red drop. On four more black enameled headpins I put one black crystal rondelle and one red rondelle. These will become embellishments for the candle turned skull stands.
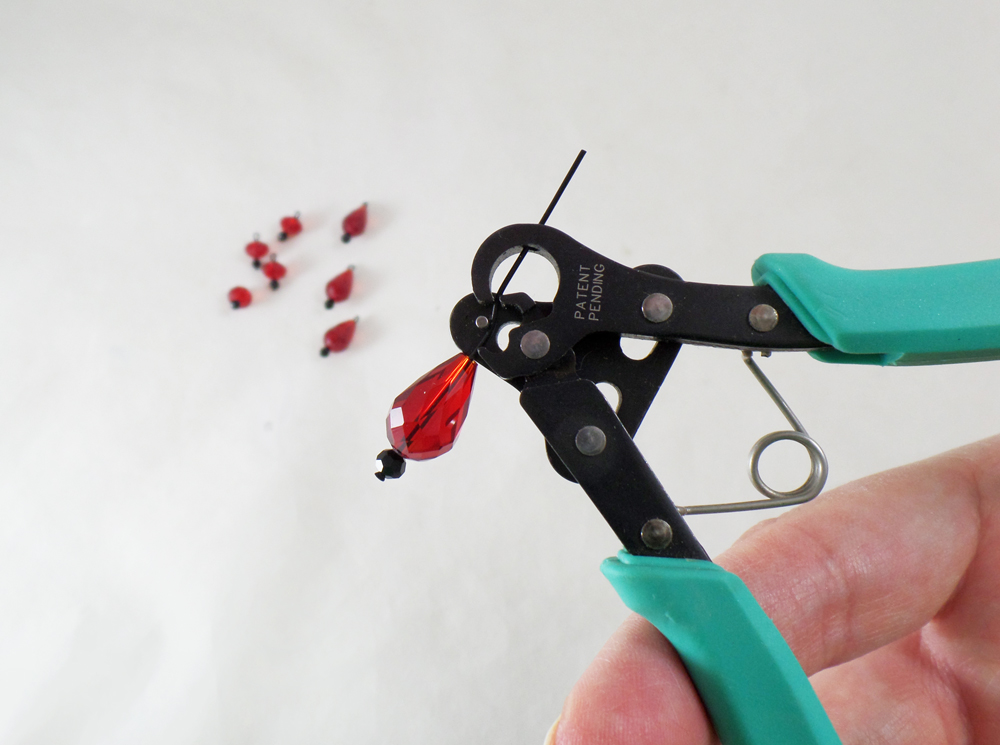
Starting with two beads threaded on a headpin I threaded the wire through the Beadsmith 1 Step Looper Tool, cutting and creating the loop I needed for the start of the beaded dangles. I repeated this the rest of crystal drops and rondelle beads on the headpins.
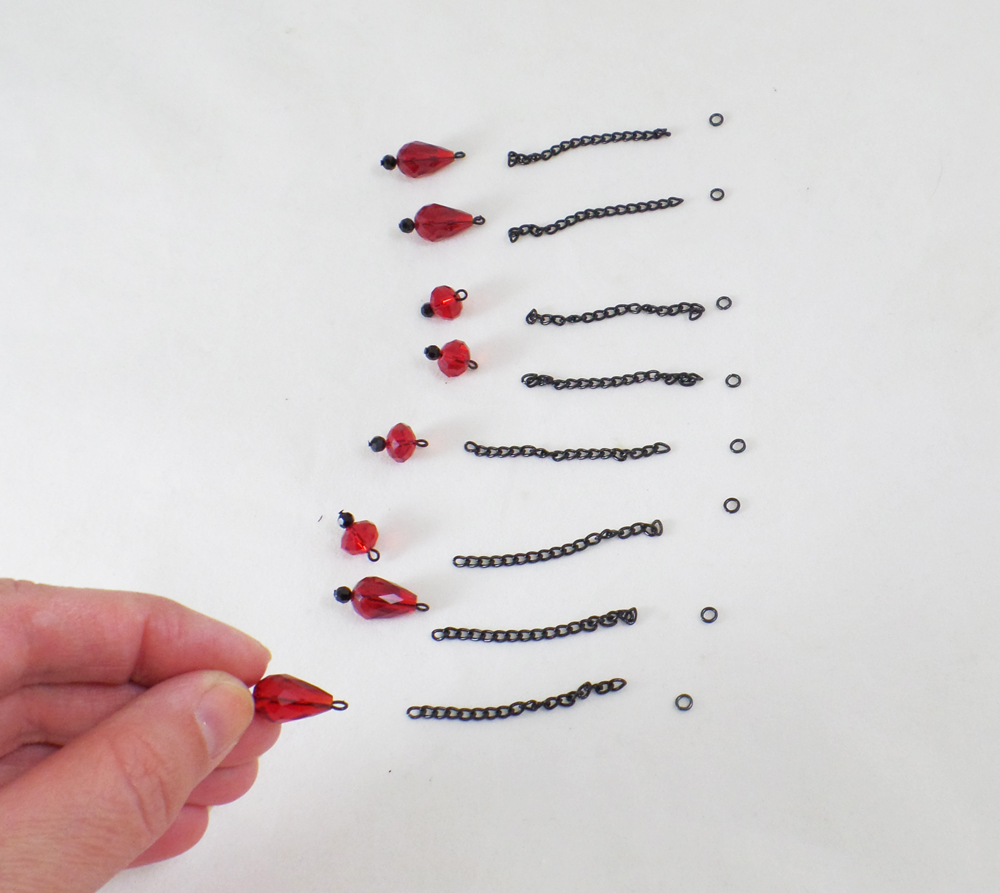
I cut black enamled chain into 2 inch lengths and placed eight black enamel jump rings with each chain and crystal bead drop.
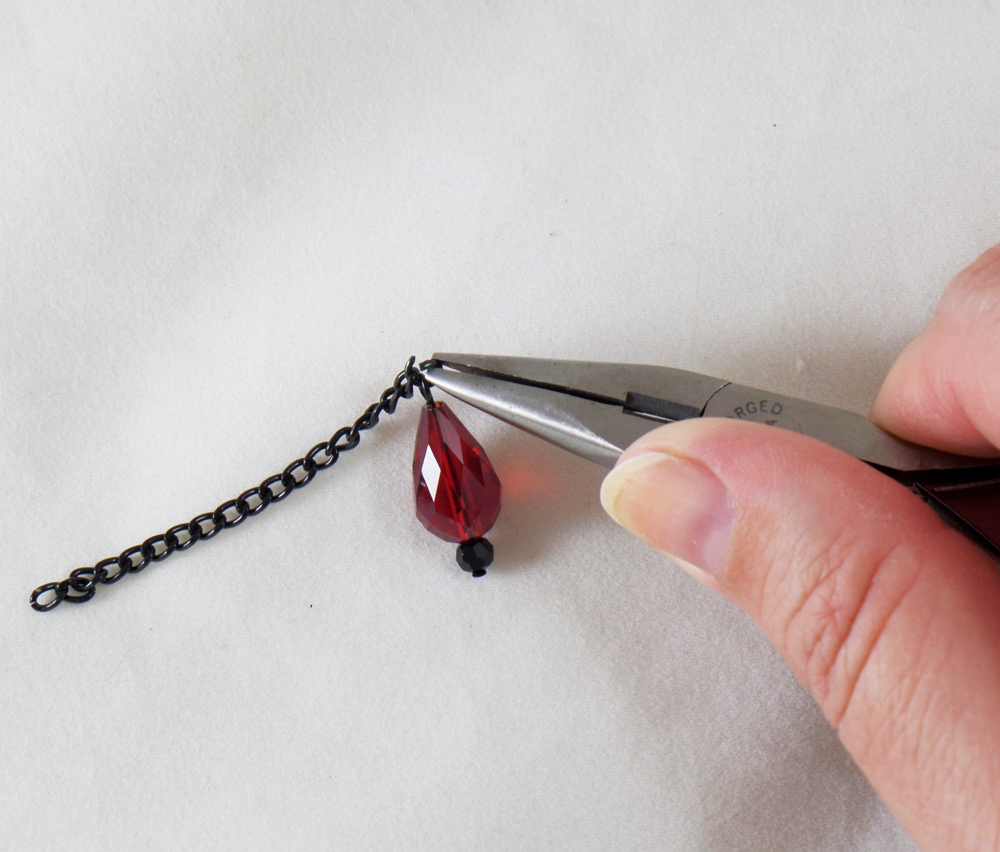
I opened up a jumpring with flat nose pliers and put the jumpring through one of the crystal bead headpins, and one of the cut lengths of chain.
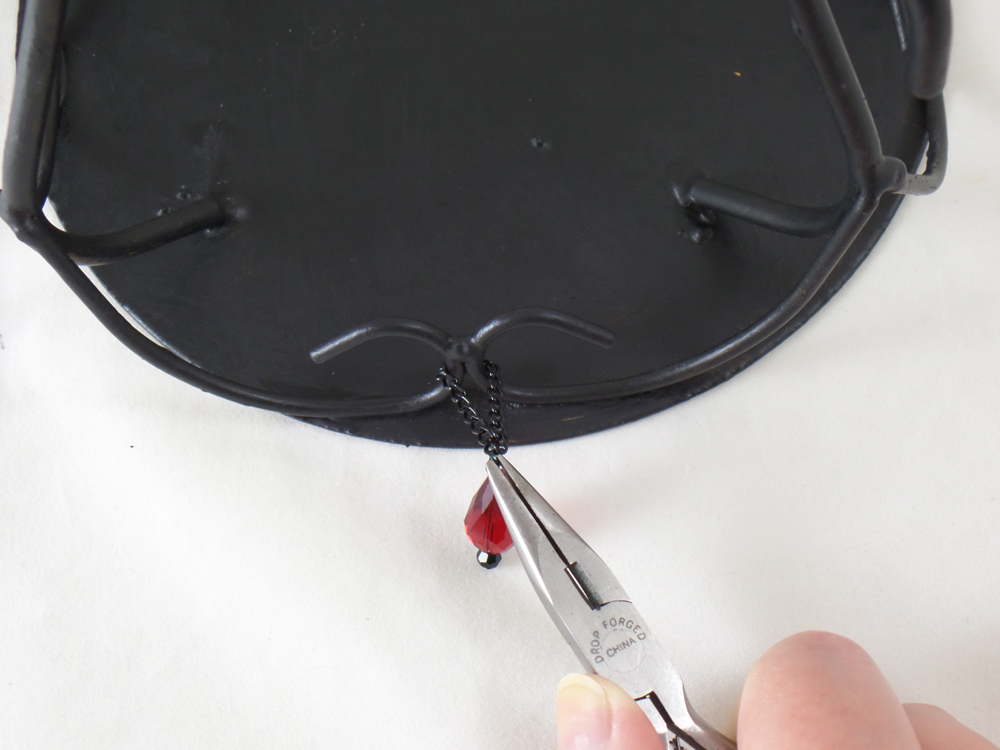
Flipping over a candle/skull stand I lopped the chain around one of the metal curls. I picked up the end of the chain not looped on the jump ring and carefully hooked the still open jump ring on it. I closed the jump ring with the pliers, making sure both ends of the chain and beaded headpin were threaded on the ring. Chain and beaded headpins were added to all four sides of the stand, then the stands were flipped over allowing the chain and beads to become a decorative element.
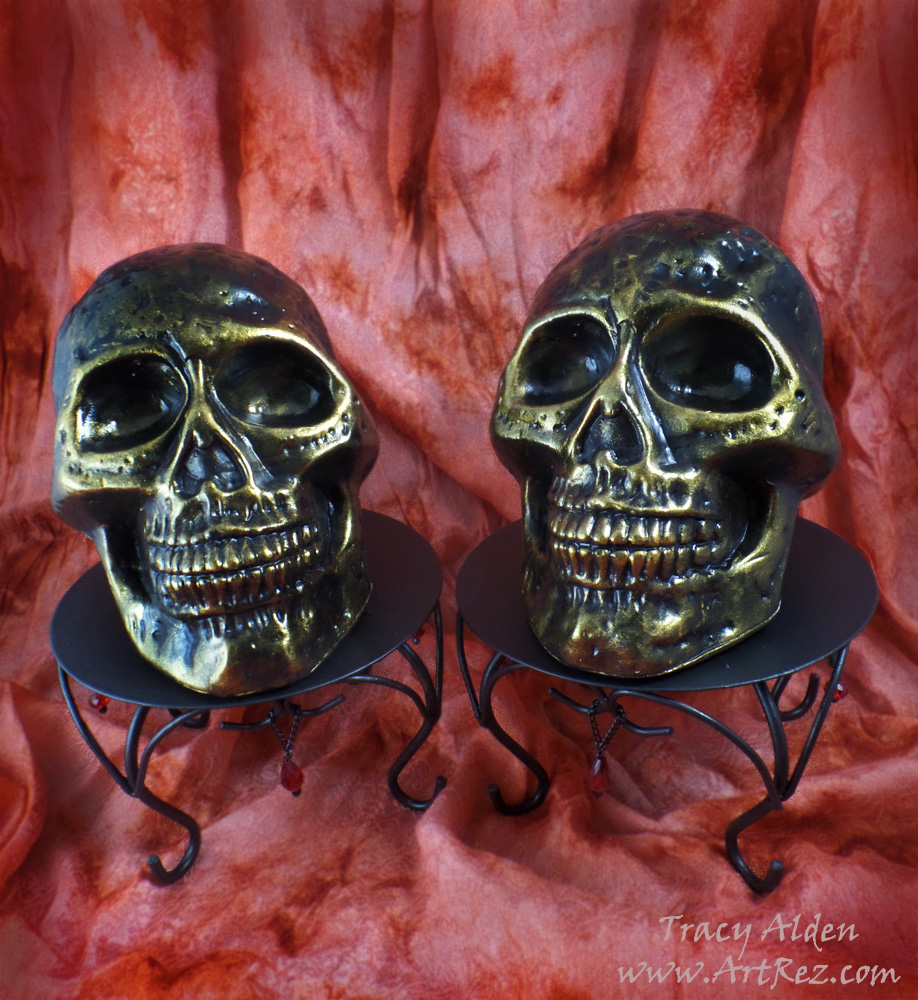
I placed the plastic skulls on their stands and placed them along with my ever growing collection of Halloween decor!
What old decorations might you find in your travels that you can upcycle?
Until Next Time, Safe Travels!

Ancient and Contemporary Inspired Artistry