Crafty Adventures with Resin and Orchids
Many of my art projects are tests of both art products and my ability to create. I can collect supplies, start working on something, even get a basic idea of what I would like to do, and end up making something completely different. Being able to adapt and still make a complete project that I can be happy with is my ideal goal, and thankfully this one ended up that way.
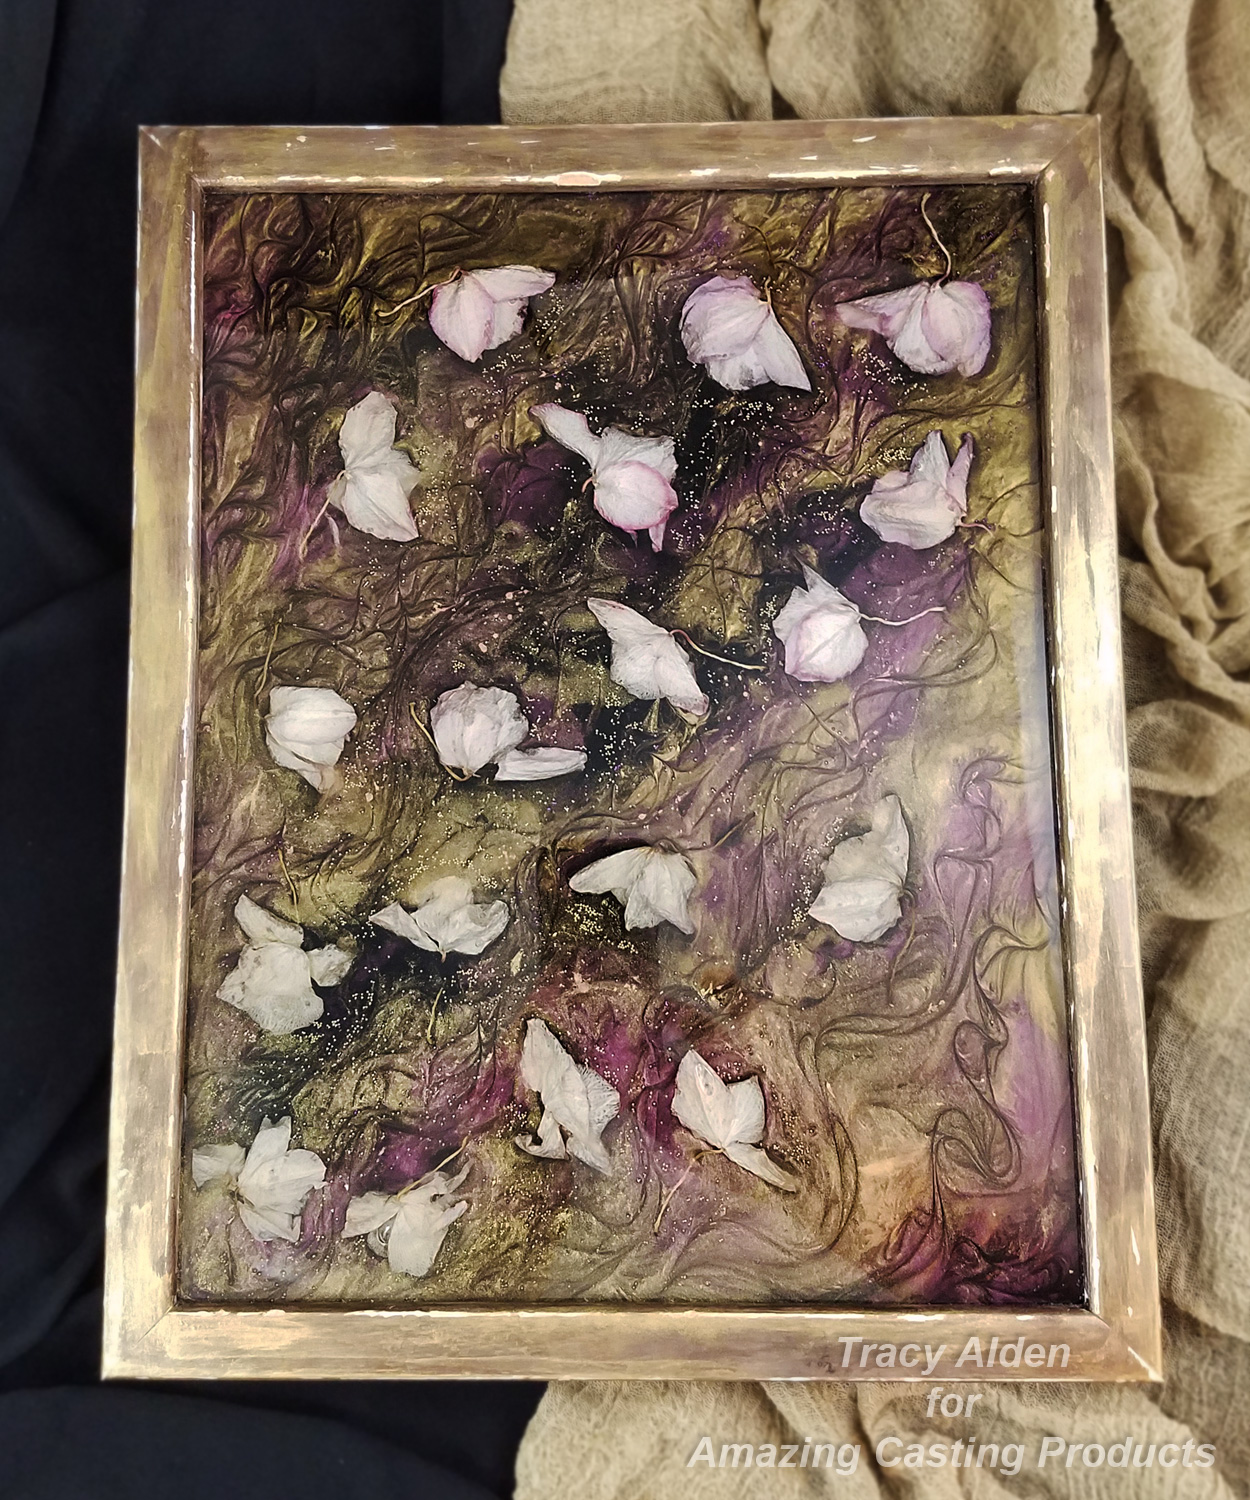
Starting with a small collection of orchid blooms that I had dried, I wanted to try to preserve in resin. Dried orchid blooms are very delicate, easily crumbling if mishandled. I decided a frame was the best choice to display the dried orchids and be able to hold the resin in place.
Supplies:
Amazing Clear Cast Resin
Black Alumilite Dye
Alumidust powders Light Pink, Interference Red, Yellow Gold and Brown
Liquitex Gloss Varnish
Dried Flowers
Toothpicks
Stir Sticks
Paint Brush
Acrylic Paint
Picture Frame
Micro Hole-less Glass Beads in Gold and Purple
Measuring Cups
Parchment Paper (Found in the Baking section of most stores) to protect work surfaces
Glue
Baby Wipes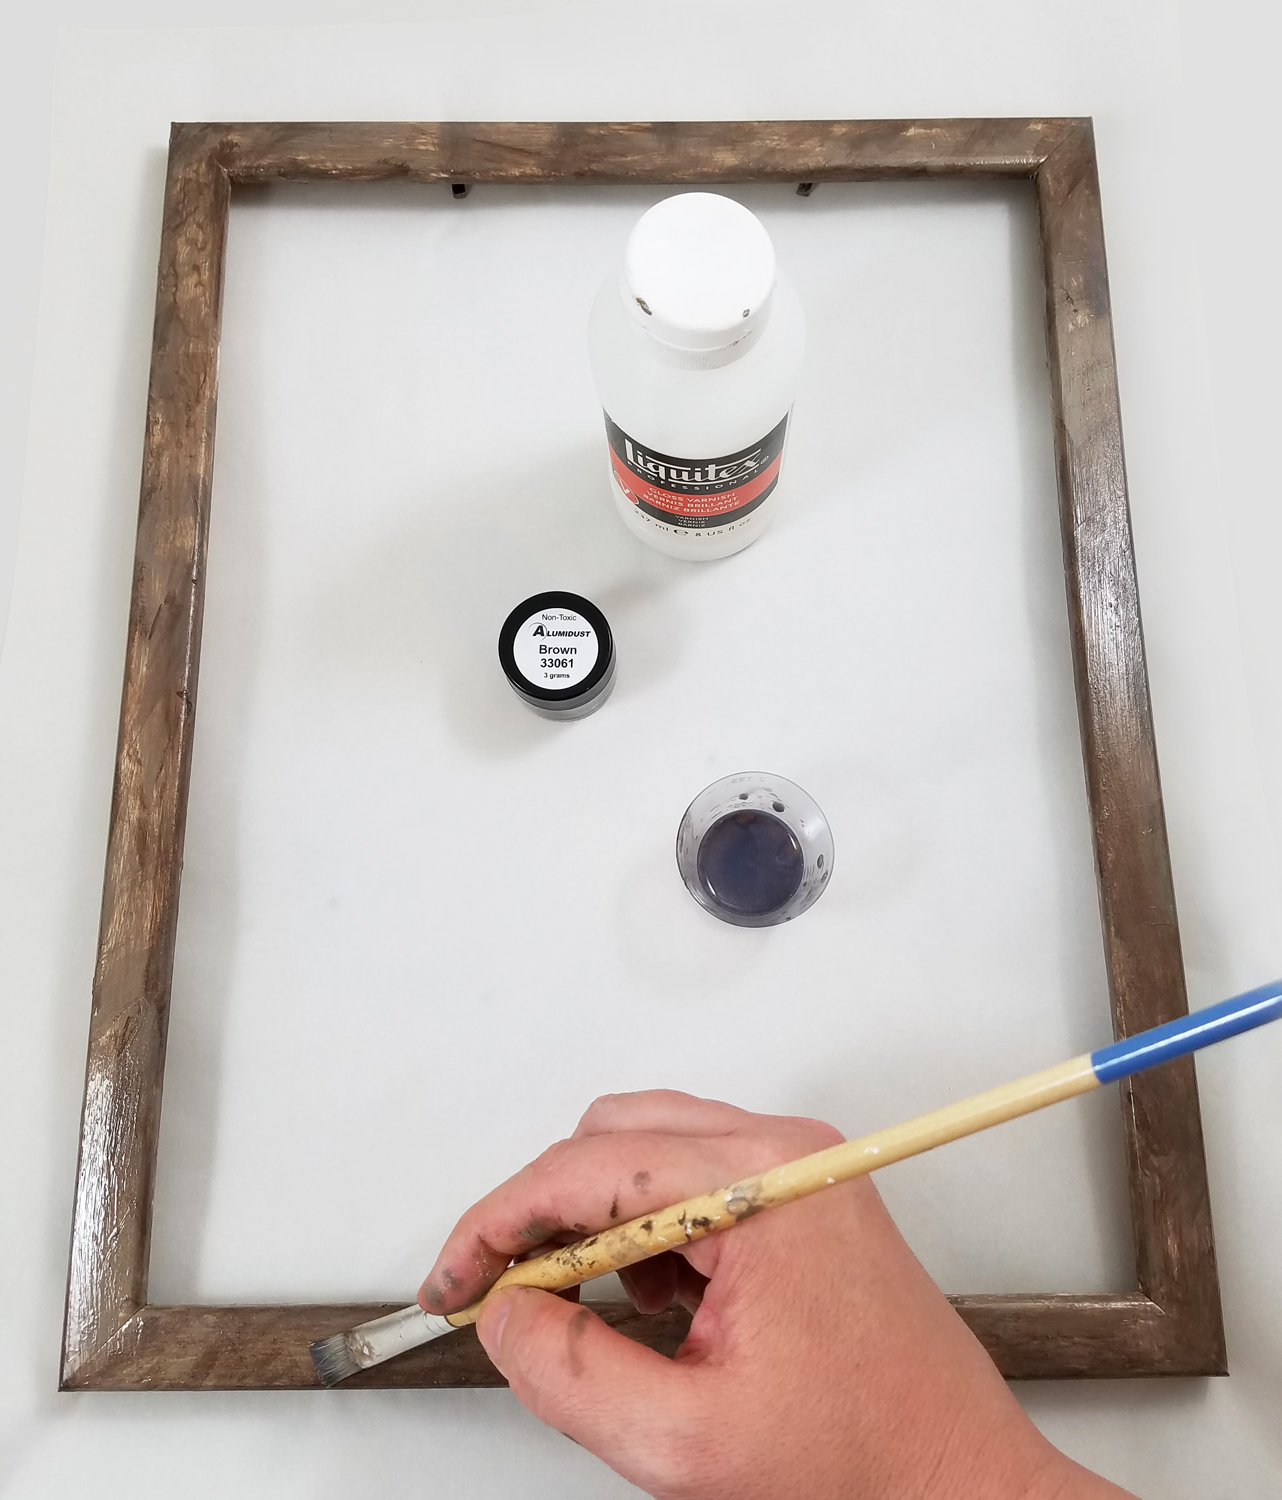
I started with removing the glass and back panel of an old frame. I scrubbed the frame clean and painted the back and front of the frame with 2 coats of paint. I mixed some Brown Alumidust powder with Liquitex Gloss Varnish, as a protective varnish layer over the paint. I let the varnish dry overnight.
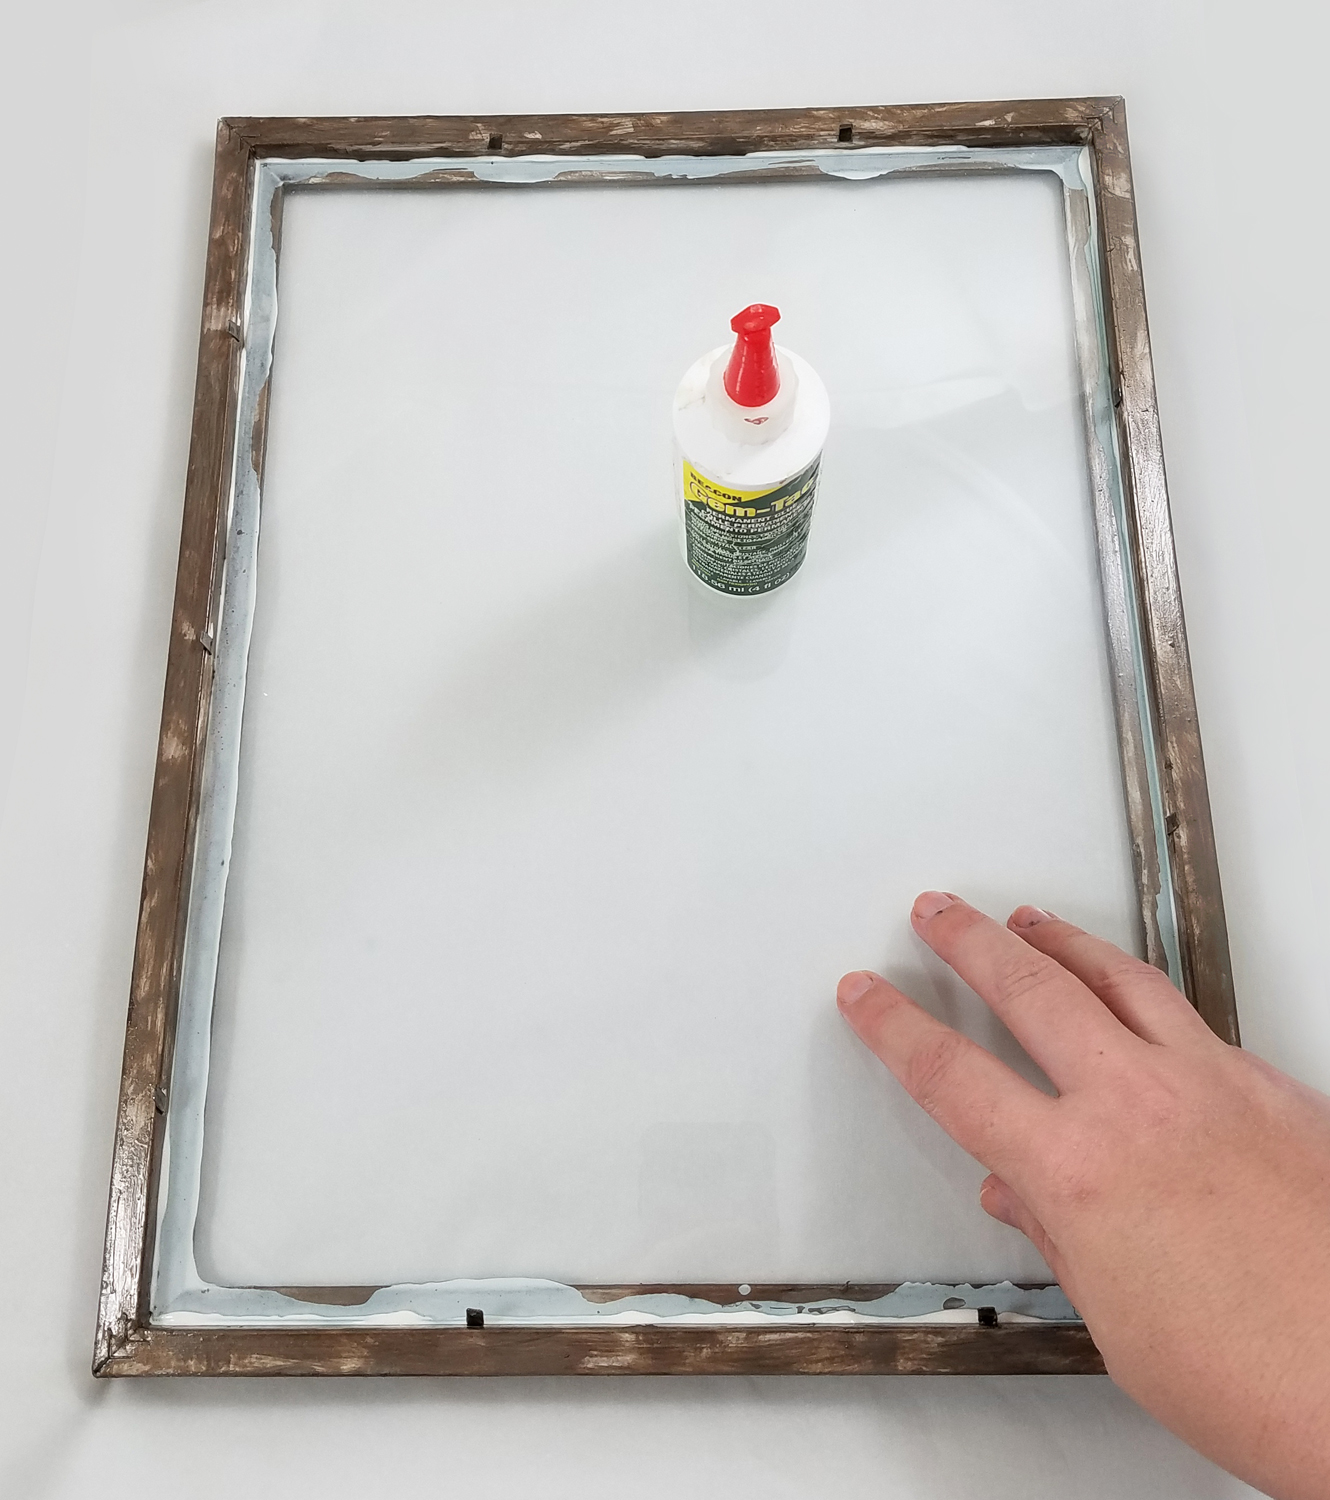
I cleaned the glass panel and put it back into the frame. I glued the glass in place to make sure it wouldn’t shift while I worked on it and so resin wouldn’t leak around the edges later. I was careful to have a solid line of glue all the way around the frame and let it dry completely.
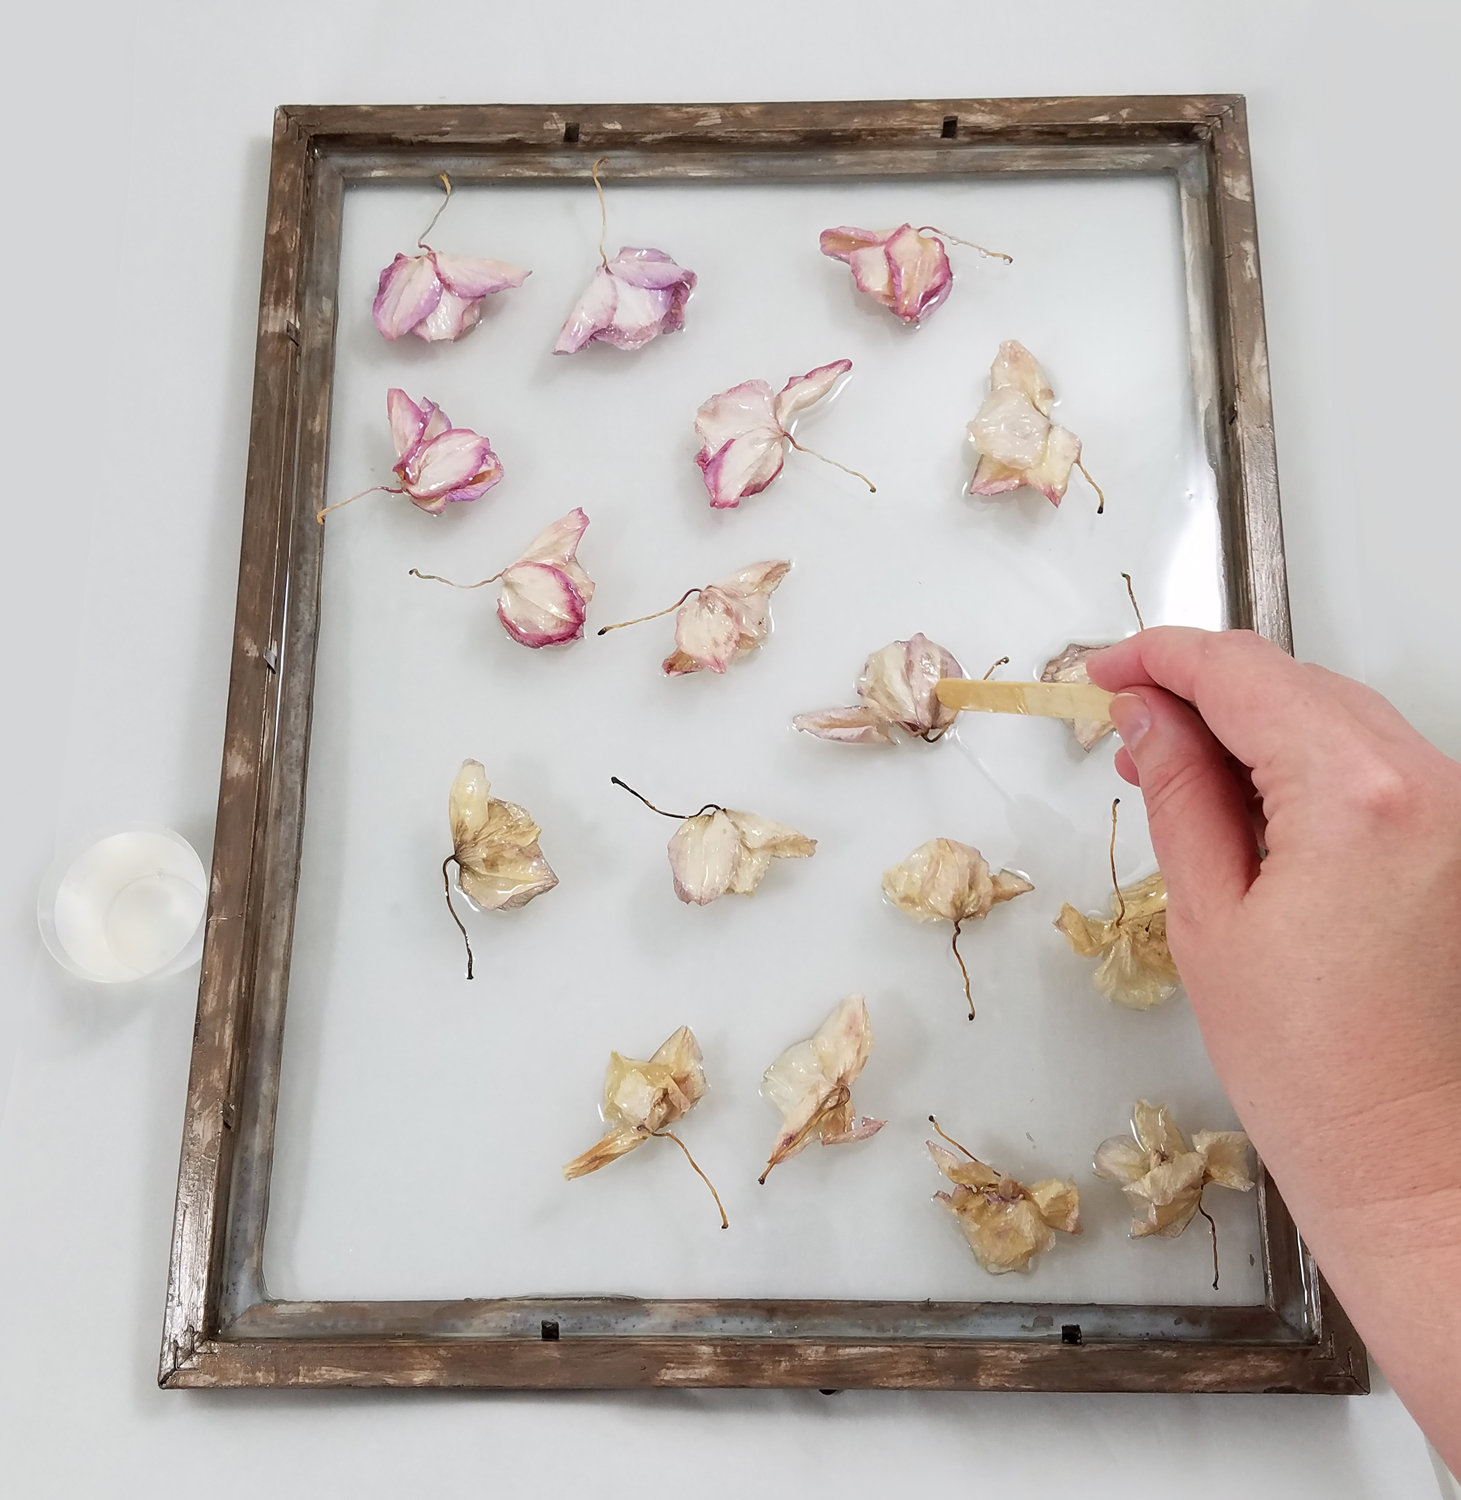
I mixed up some Amazing Clear Cast Resin, making sure to slowly stir to reduce air bubbles and let it sit for 5 minutes. I poured the resin into the frame and carefully placed the dried orchid blooms into the uncured resin. I found that with the first layer of Amazing Clear Cast Resin the orchid blooms had a tendency to shift in the resin. So the first layer of resin had to be a thin pour and I let that cure to a tacky set.
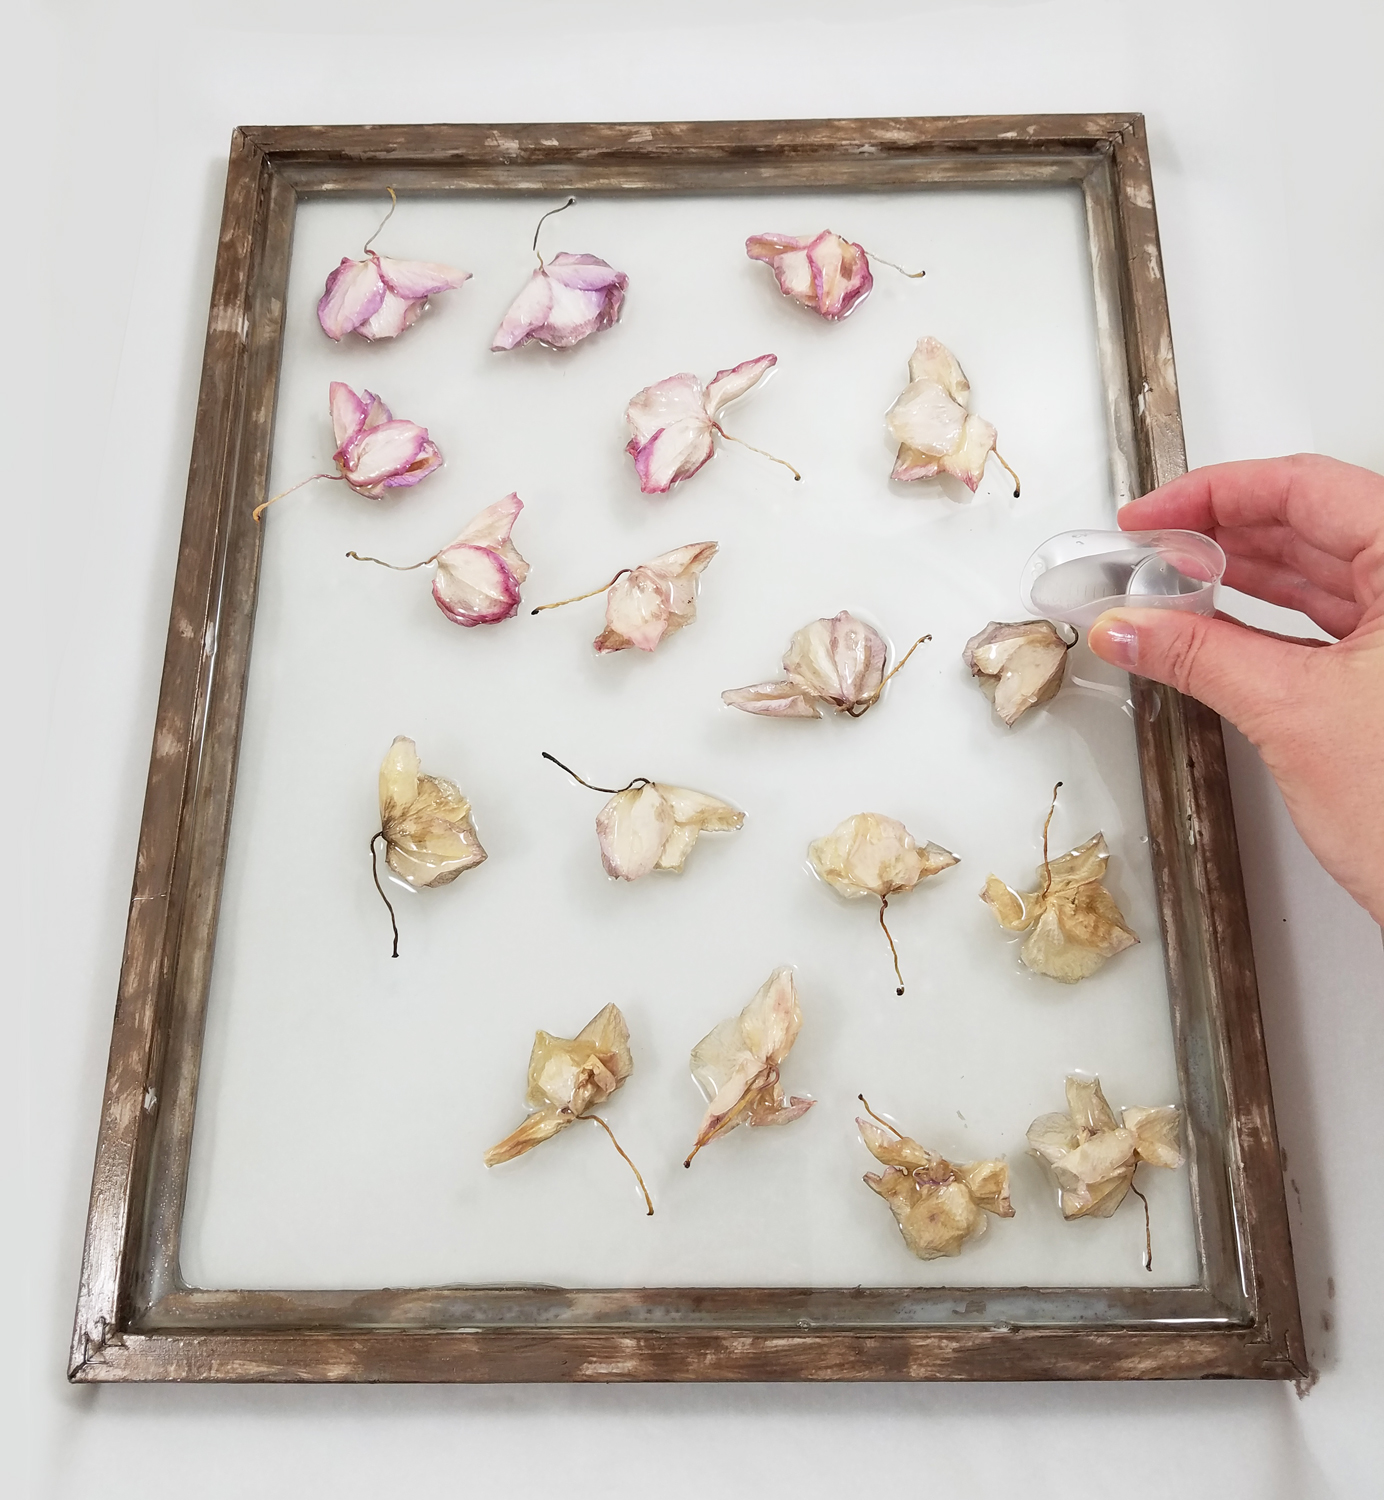
I added a second clear layer of Amazing Clear Cast Resin, to cover and protect the orchids. To make sure the resin completely encapsulated the orchids I would push some of the uncured resin around with a stir stick, moving the resin in and around the blooms. I let this layer of resin cure completely.
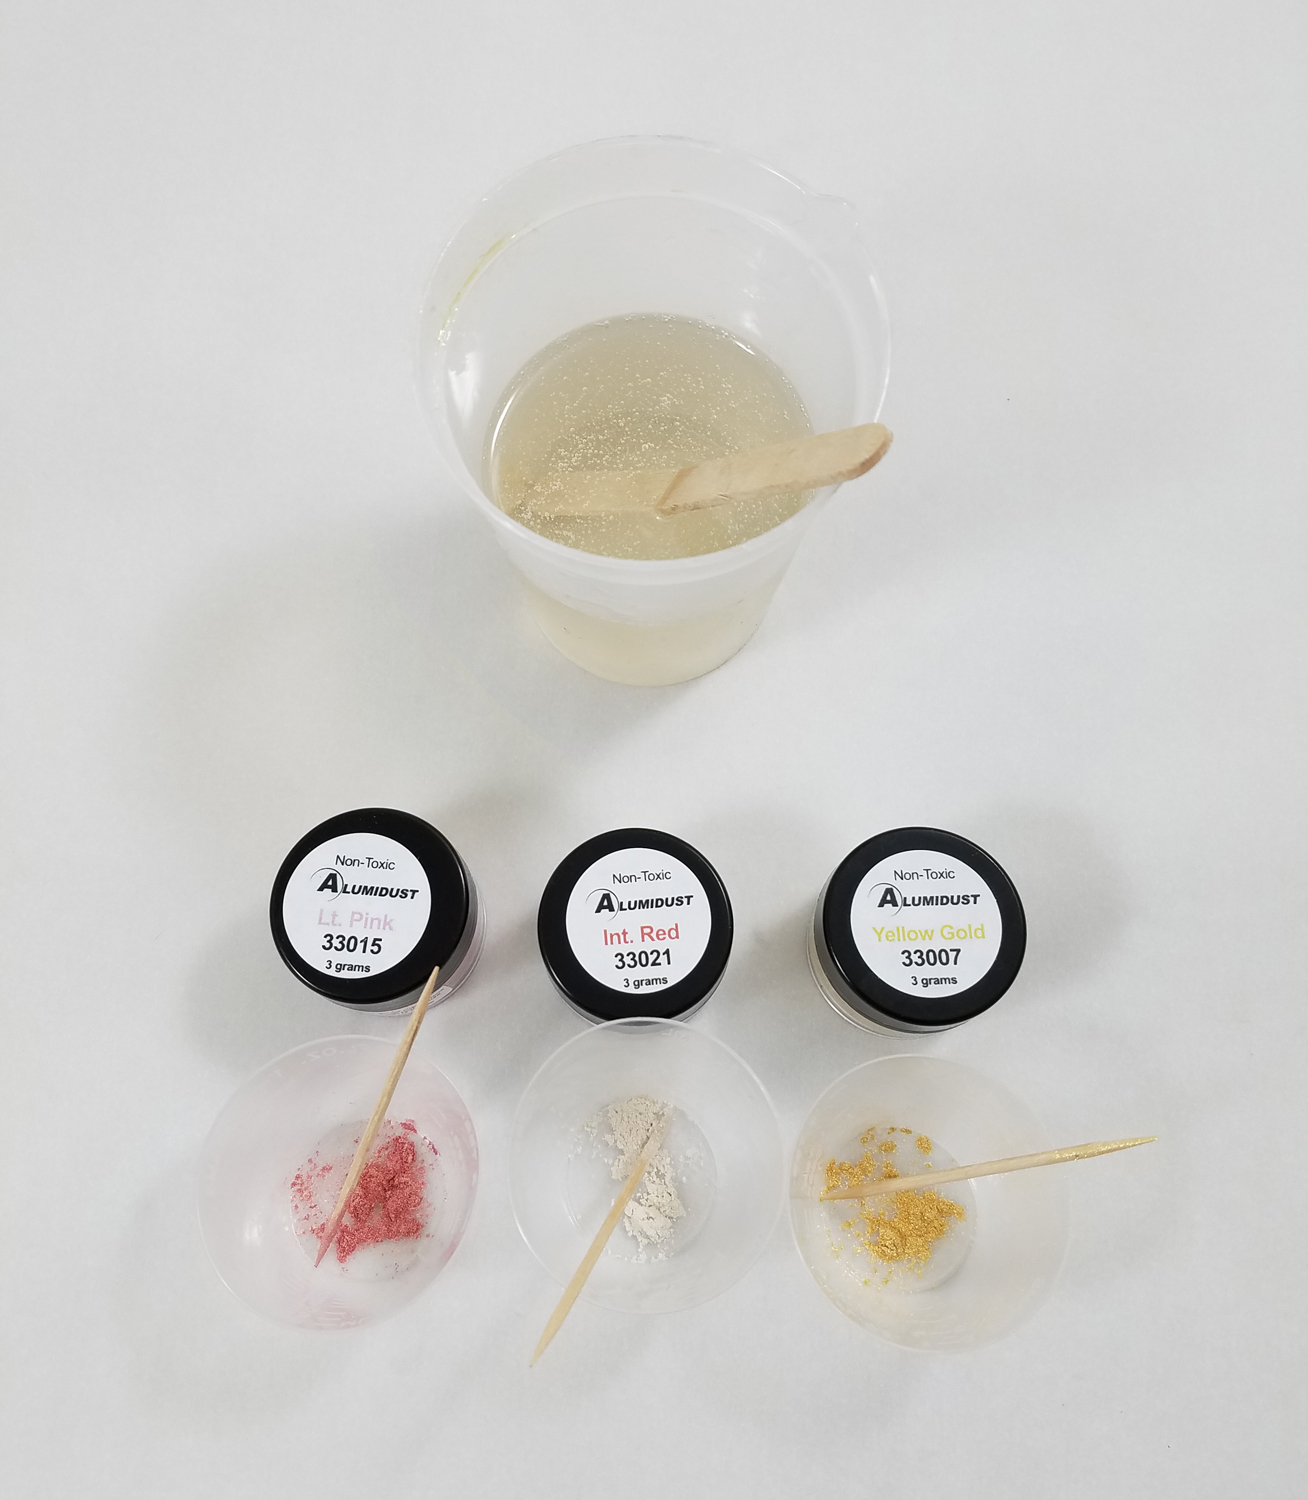
Mixing up a new batch of Amazing Clear Cast Resin, I put a pinch of Light Pink, Interference Red and Yellow Gold Alumidust in separate small measuring cups. I then carefully added the liquid resin into each cup carefully stirring with toothpicks to fully mix in the powders.
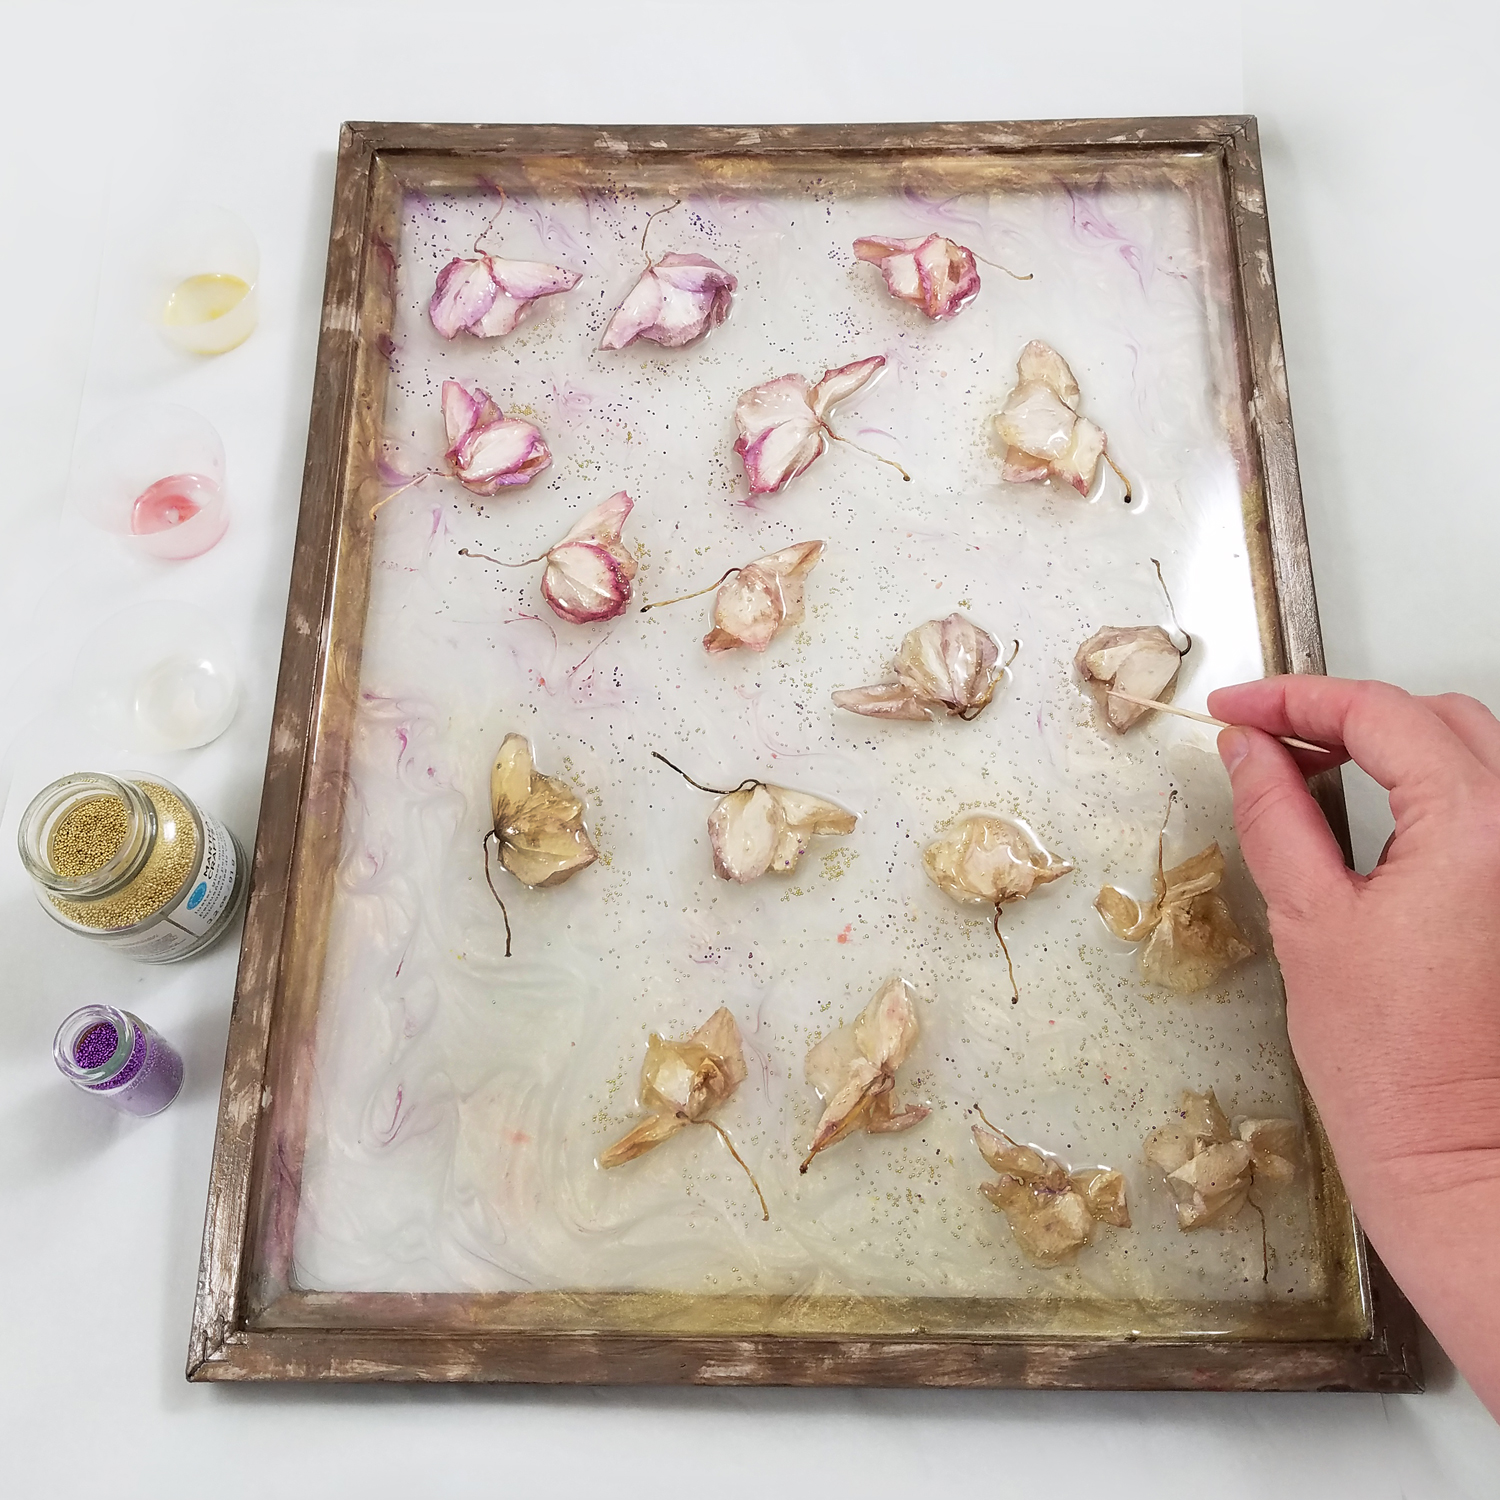
I poured the resin mixed with Alumidust in different spots all over the frame and used a toothpick to drag the colors through each other. This created a lovely ebb and flow of color to the resin, and I honestly lost track of time doing this and found it rather relaxing and meditative in nature. I sprinkled in some Micro Hole-less Glass Beads in Gold and Purple around the blooms in this layer of tinted resin before the resin cured.
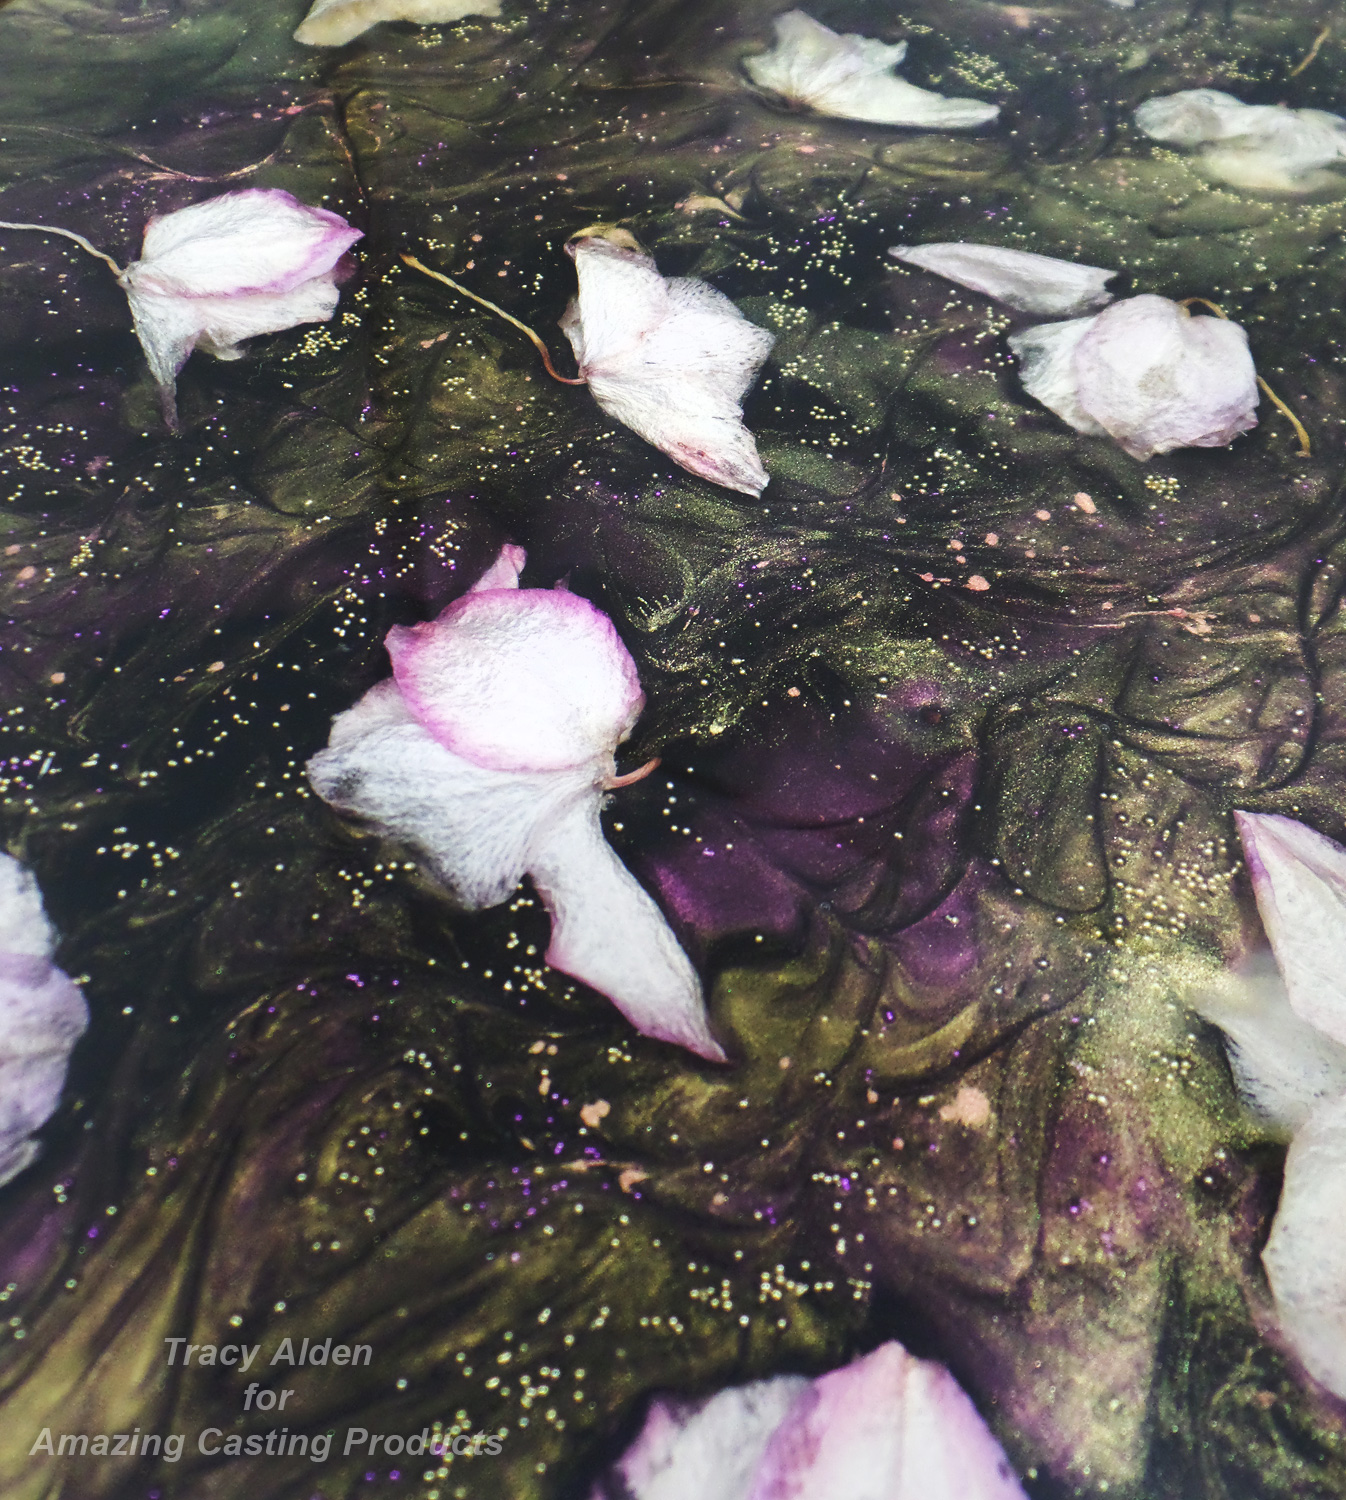
I had planned on doing a final cream color tinted layer for the background, but the lovely powder layer got lost when I tried a test sheet of white paper behind it. I needed more of a color contrast, so I thought about a black tinted layer or resin, using a black cloth to mimic the look, allowing the Alumidust tinted resin layer to visually pop more.
*In the future if I want to use a cream or light colored background I just need to make sure I use more Alumidust or a few drops of Alumilite Dyes to increase the color intensity without the need of a contrasting background.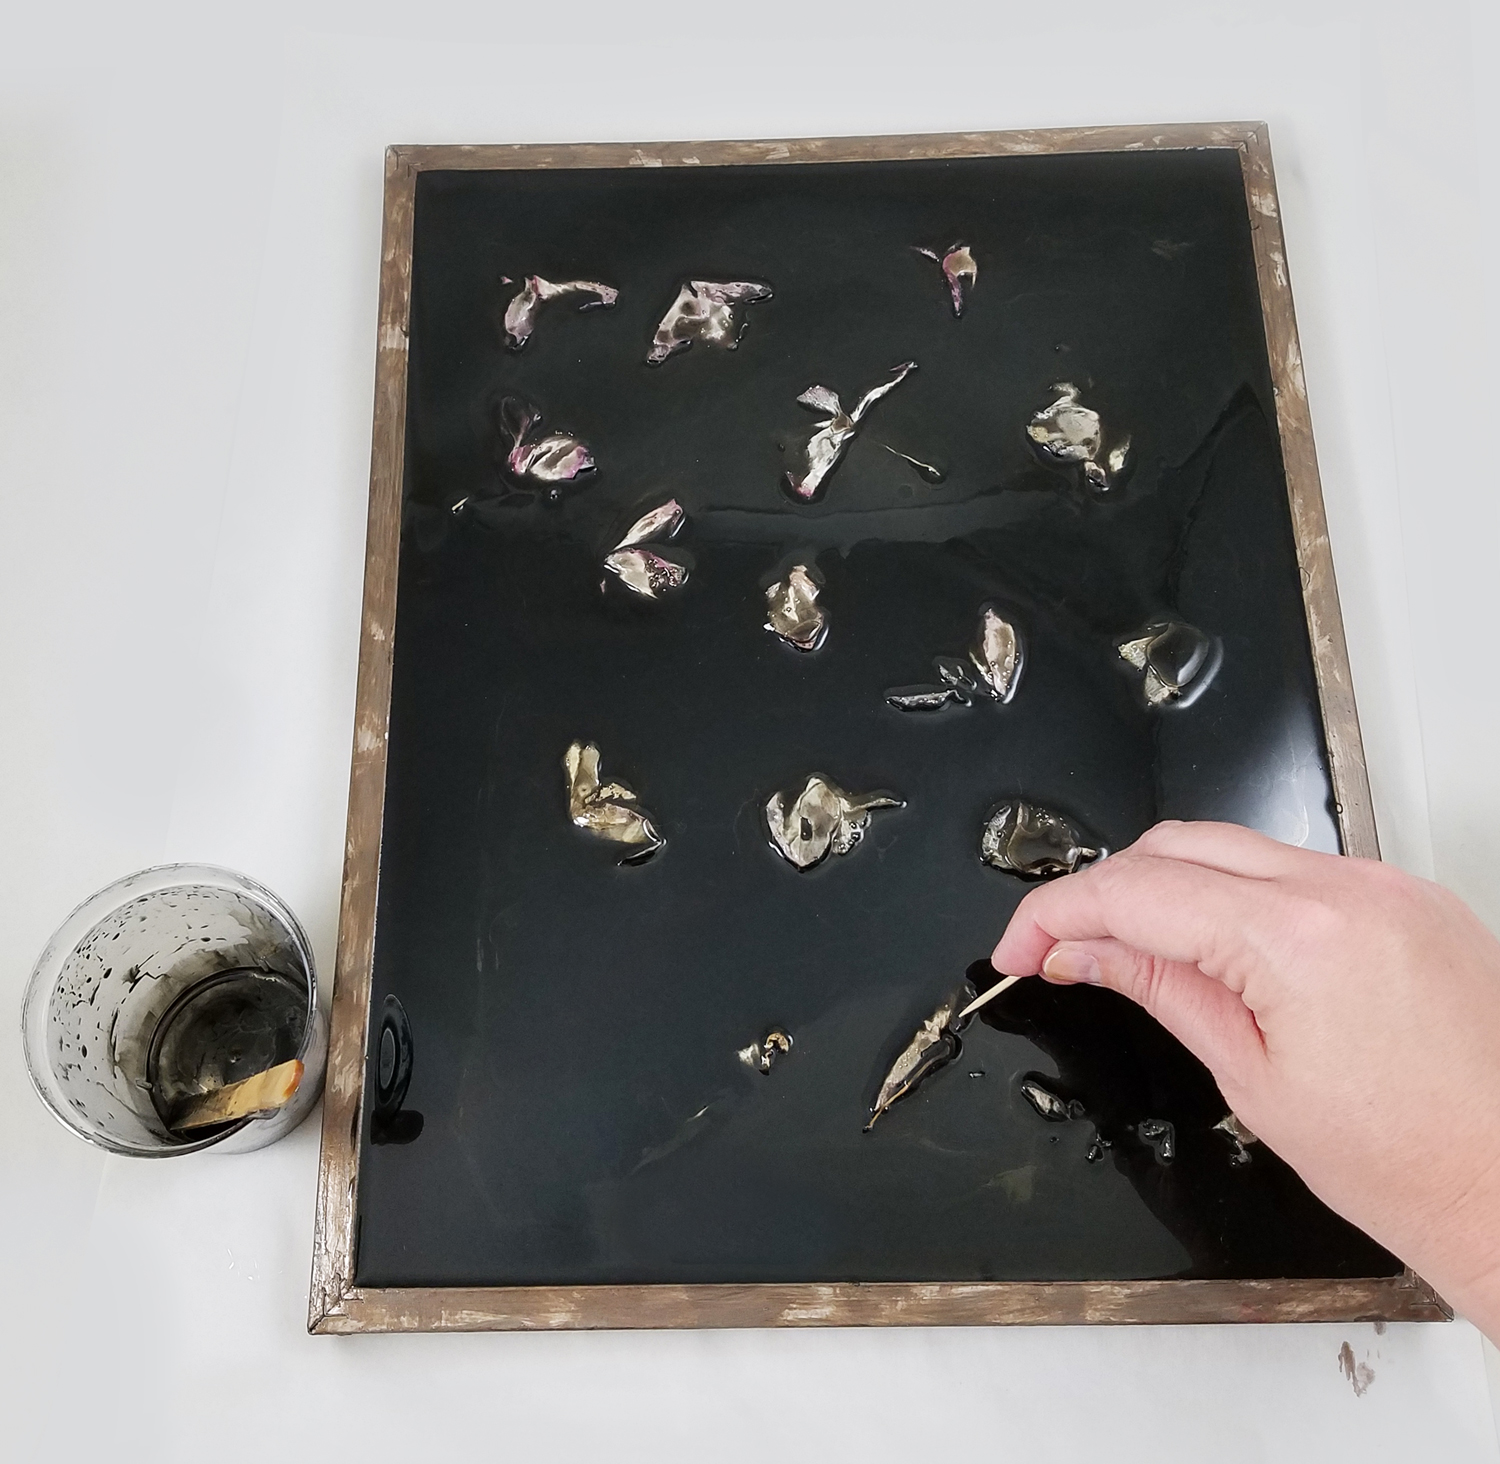
Mixing up a final batch of Amazing Clear Cast Resin I added Black Alumilite Dye Black to the resin, making sure to fully stir in all the dye. I poured the resin over the orchids and previous resin layer, carefully popping bubbles and making sure the tinted resin went into all the nooks and crannies.
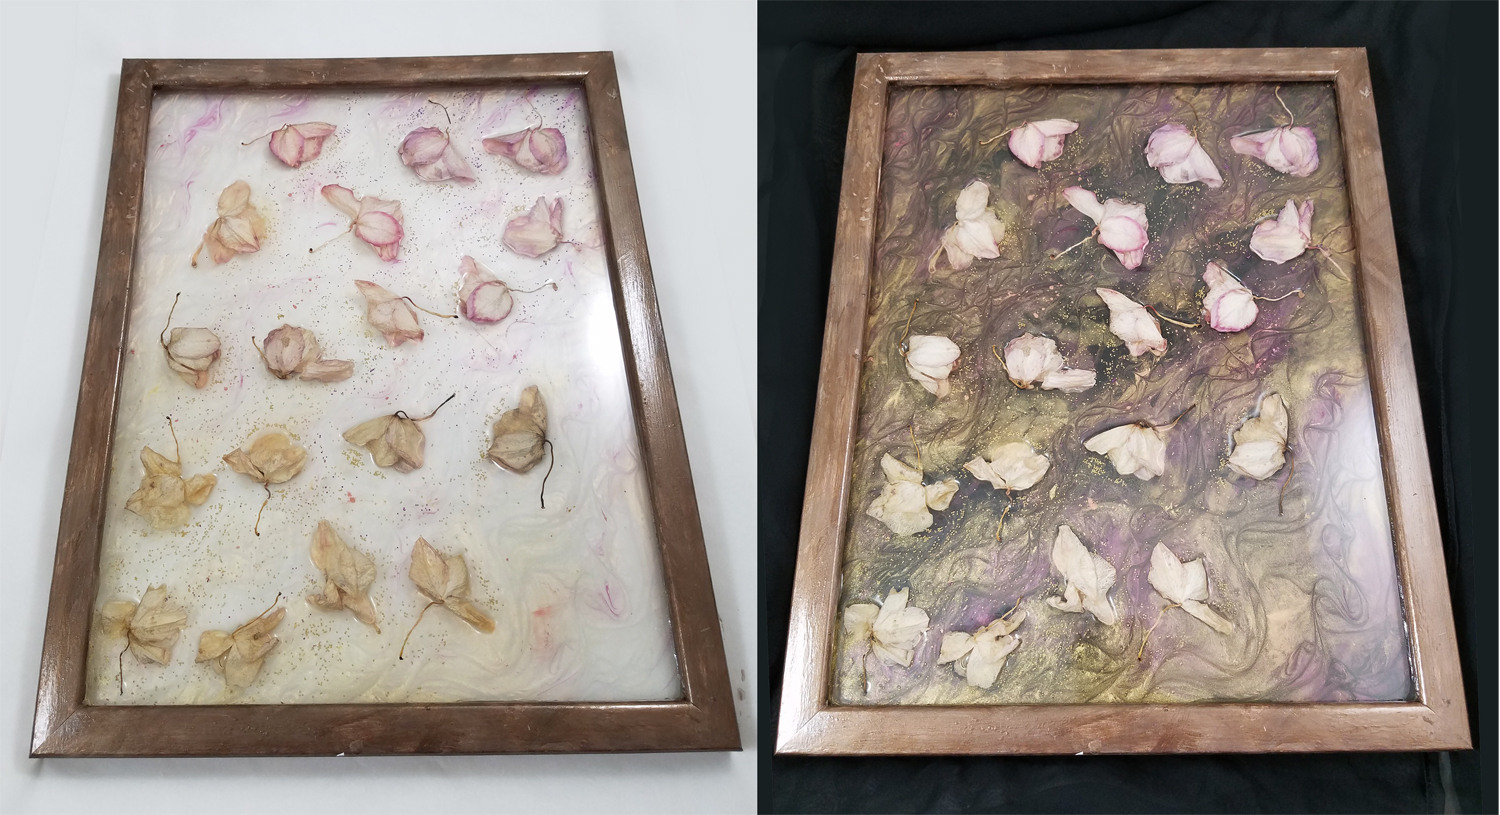
*The dried orchids in this photo are slightly raised as they were not dried flat but collected already dried from a live plant. If the look of filter light going through the resin coated flowers is not the desired appearance just used pressed flowers instead.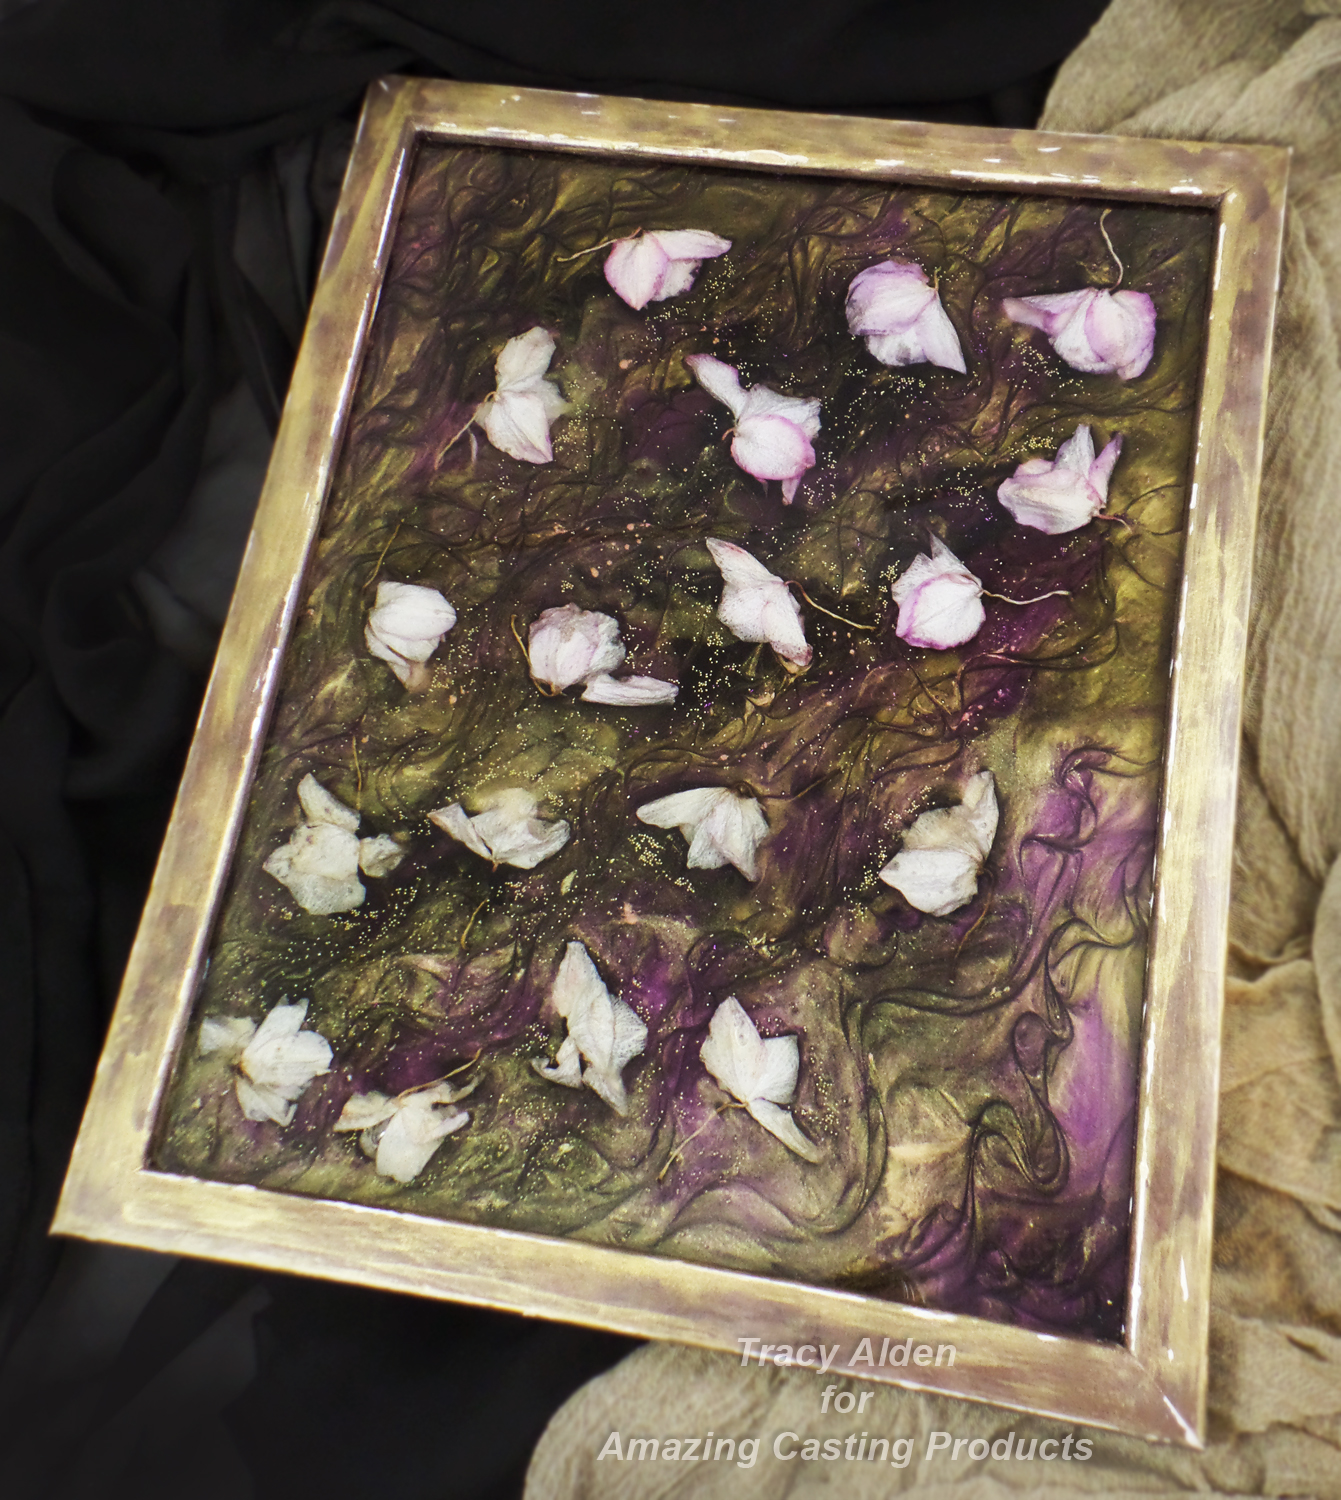
Here it is with the final layer of black tinted resin. The Alumidust not only creates a wonderful metallic shimmer but changes color and tone depending on how the frame is tilted or what type of light source is used!
This test of both dried materials and the ability to quickly change the direction of the project worked out well. The frame looks complicated but it is just four layers of resin poured. No waste of resin just a few popsicle sticks, toothpicks and clean up with baby wipes.
With a simple change of dyes, powders and their concentration any number of lovely art can be created with few supplies!Until Next Time, Safe Travels!A #Cre8time voyage to find Pirate Treasure!
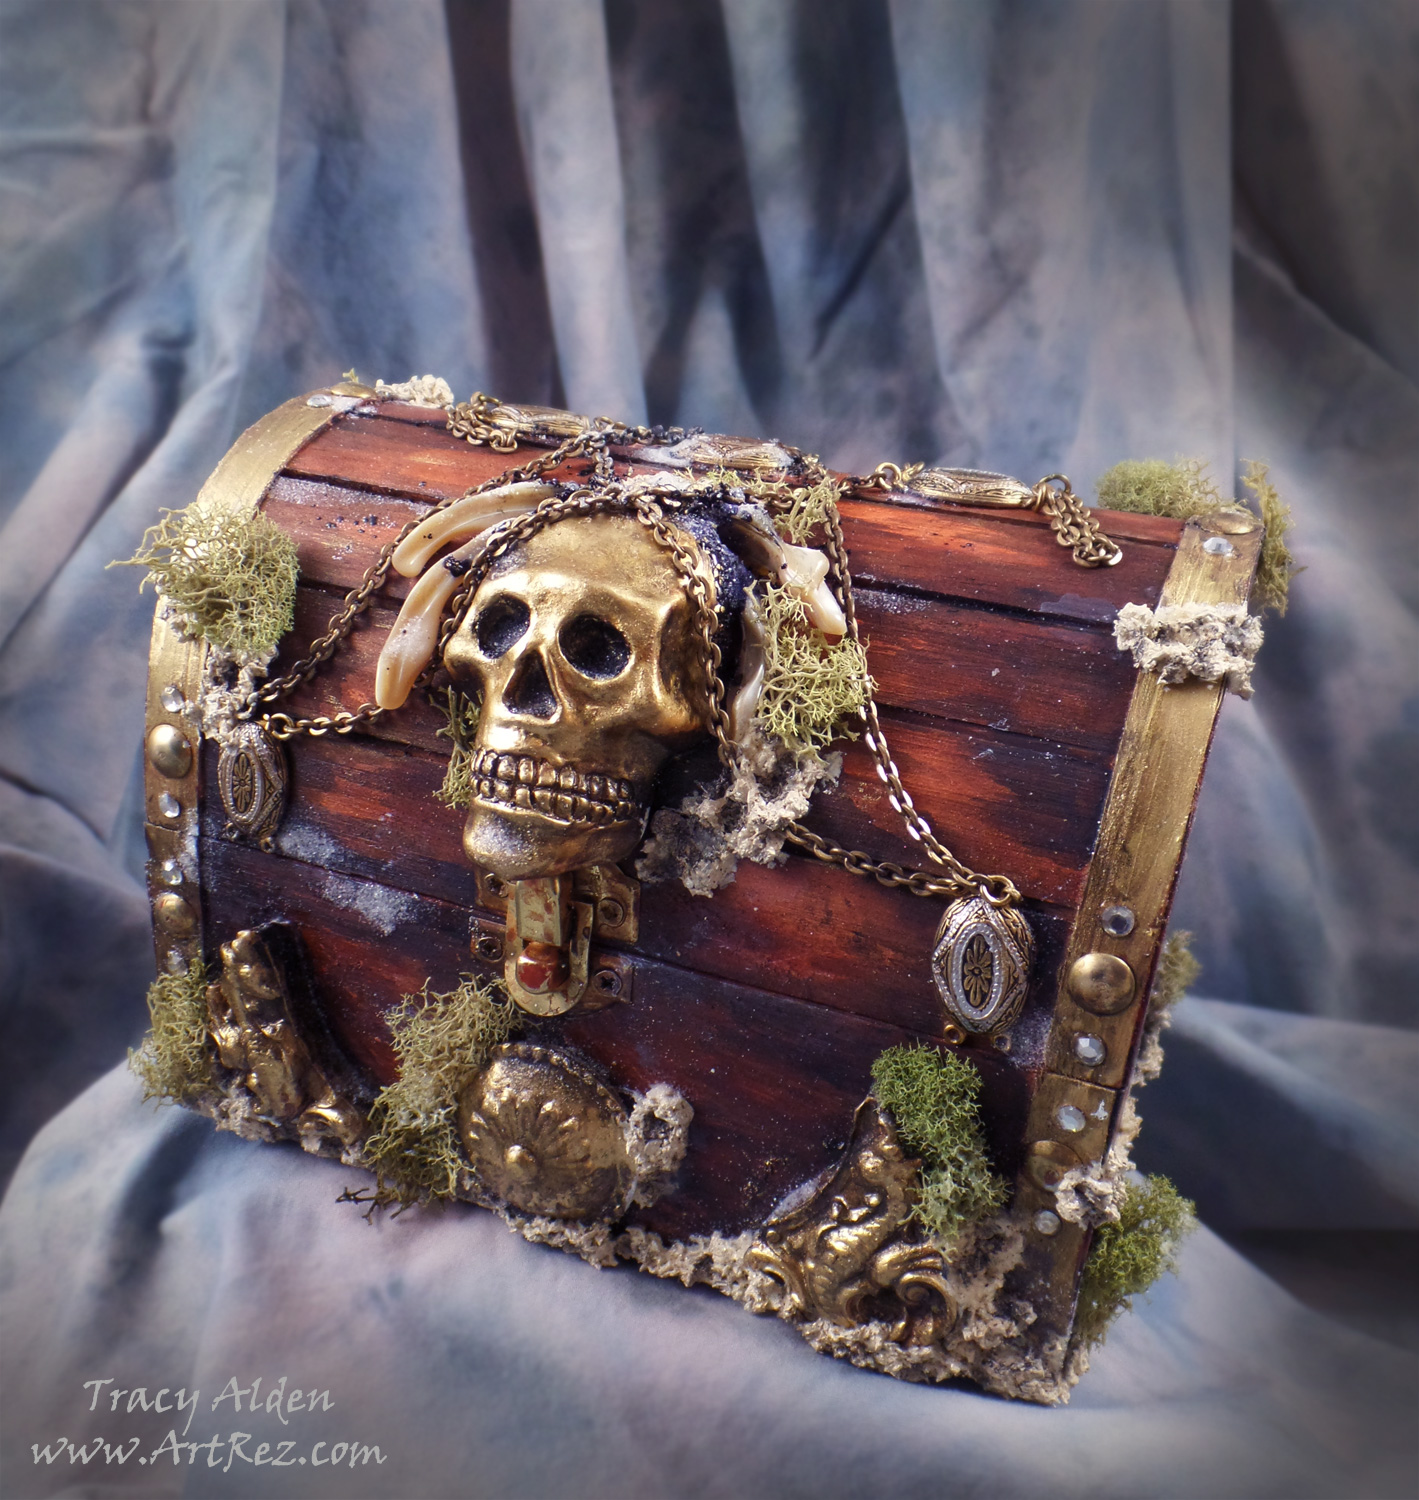
With Fall fast approaching, I am once again looking at new ways to jump start my creativity. I finally decided to order pieces from Relics & Artifacts® by Sandra Evertson to try out. The line has been catching my interest for a few years every time I see them at craft and hobby trade shows and on social media. Locally no stores currently carry their product line however it is rather easy to order the Matte Resin Craft Blanks from their website (they ship VERY quickly and package the art supplies wonderfully!). The resin blanks were larger than I expected, had a nice weight, tooth to the surface (great for paint application) and fine detail.
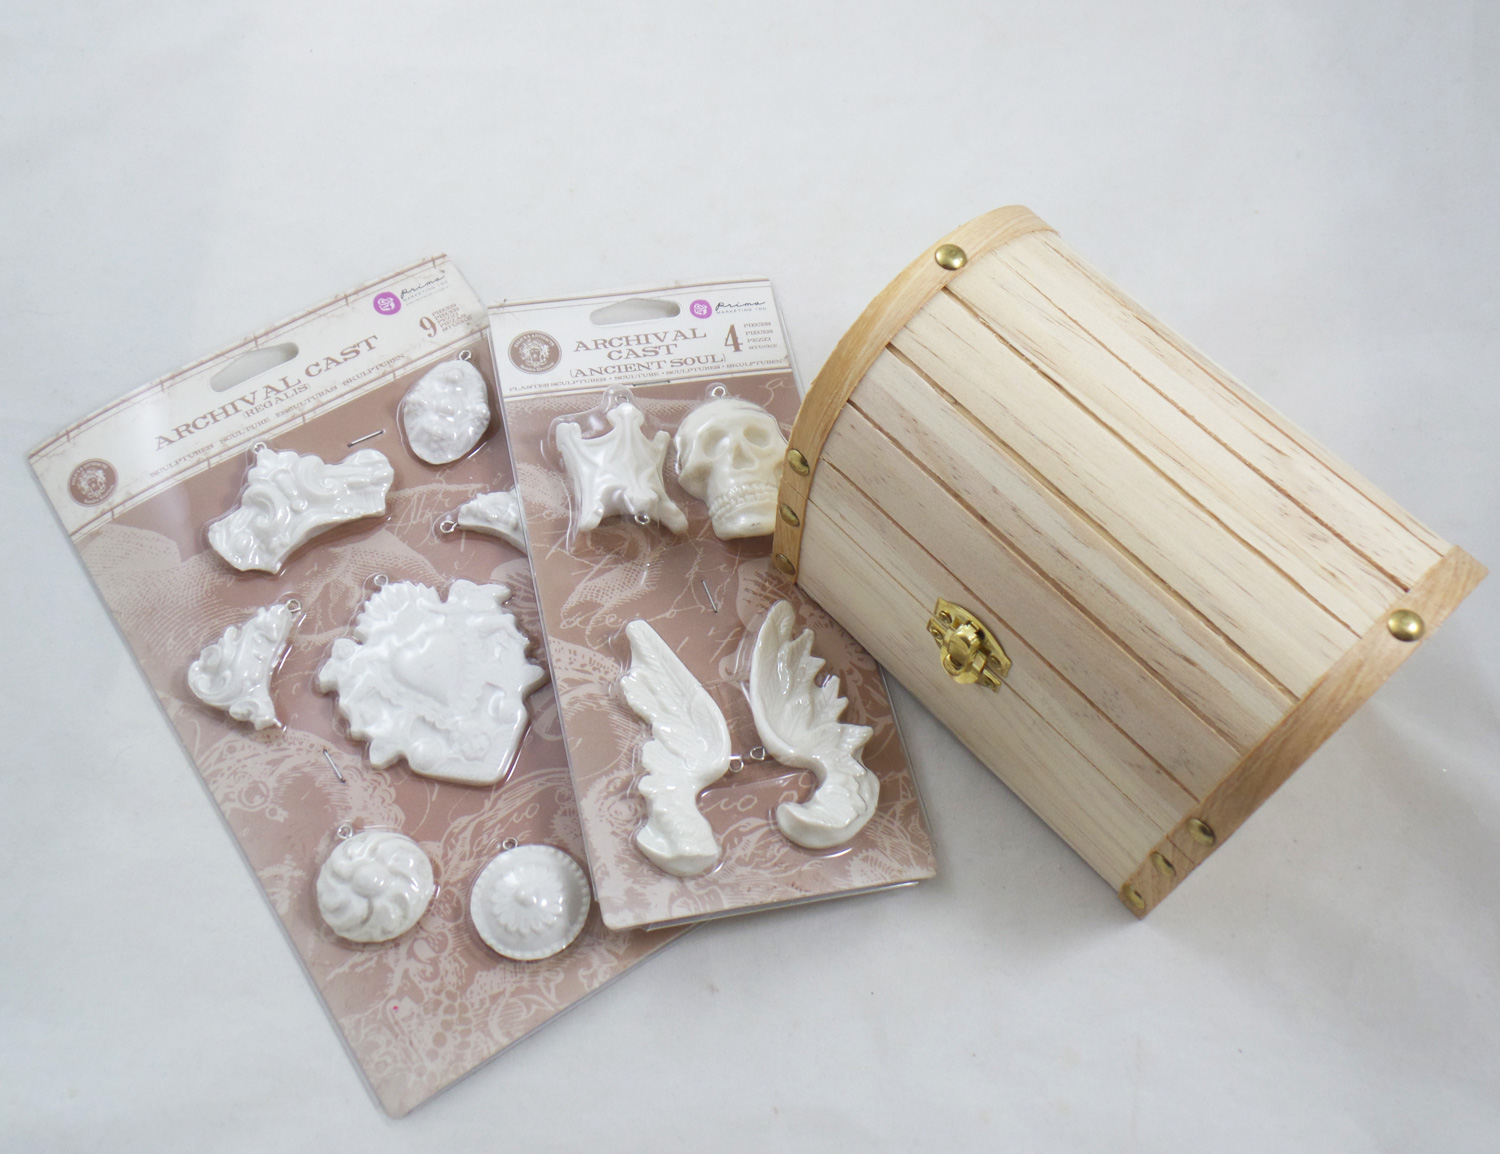
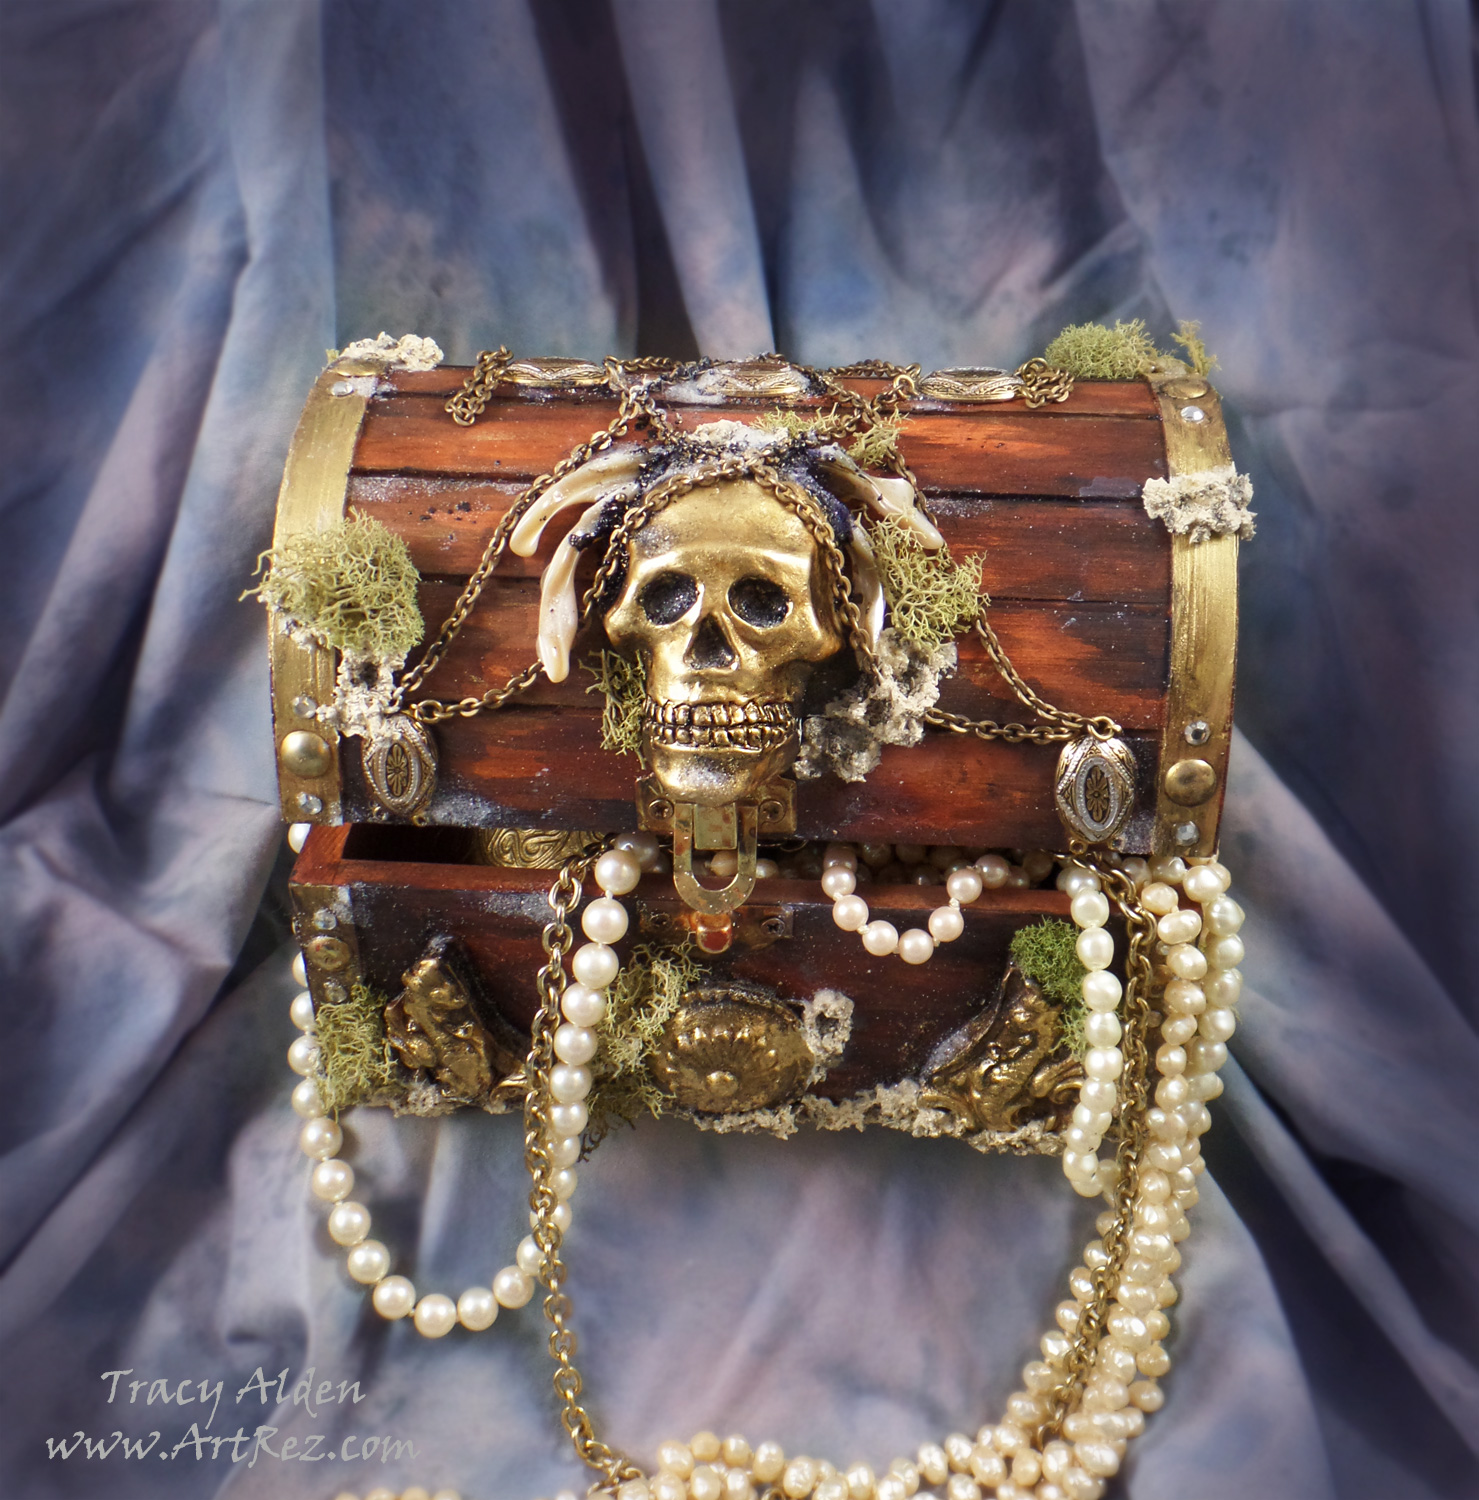
I bought 4 sets but the pieces in the Ancient Soul and Regalis sets got my mind whirling immediately. The skull focal in the Ancient Soul set had me thinking of a Jolly Roger and a sunken treasure chest. I collected some vintage jewelry supplies and started my craft voyage into uncharted seas….
Supplies:
Unfinished Wood Trinket Box (I found one at Jo-Ann)
Relics & Artifacts® Ancient Soul and Regalis Matte Resin Craft Blanks
Alumilite Metallic Powder Gold
Liquitex Gloss Varnish
Beacon Gem-Tac Adhesive
Stampendous Crystal Snow White Glitter, Ultra Fine
Paint Brushes
Acrylic Paint in Metallic Light Gold, Black, Burnt Umber, Terra Cotta, White and Yellow Ocher
Baking Parchment Paper (as a work surface)
2 Flat head jewelry pliers
1 Broken bracelet, chain necklace, shell beads and flat backed rhinestones 4mm, jumprings
4 used and dried tea bags
Dried Green Moss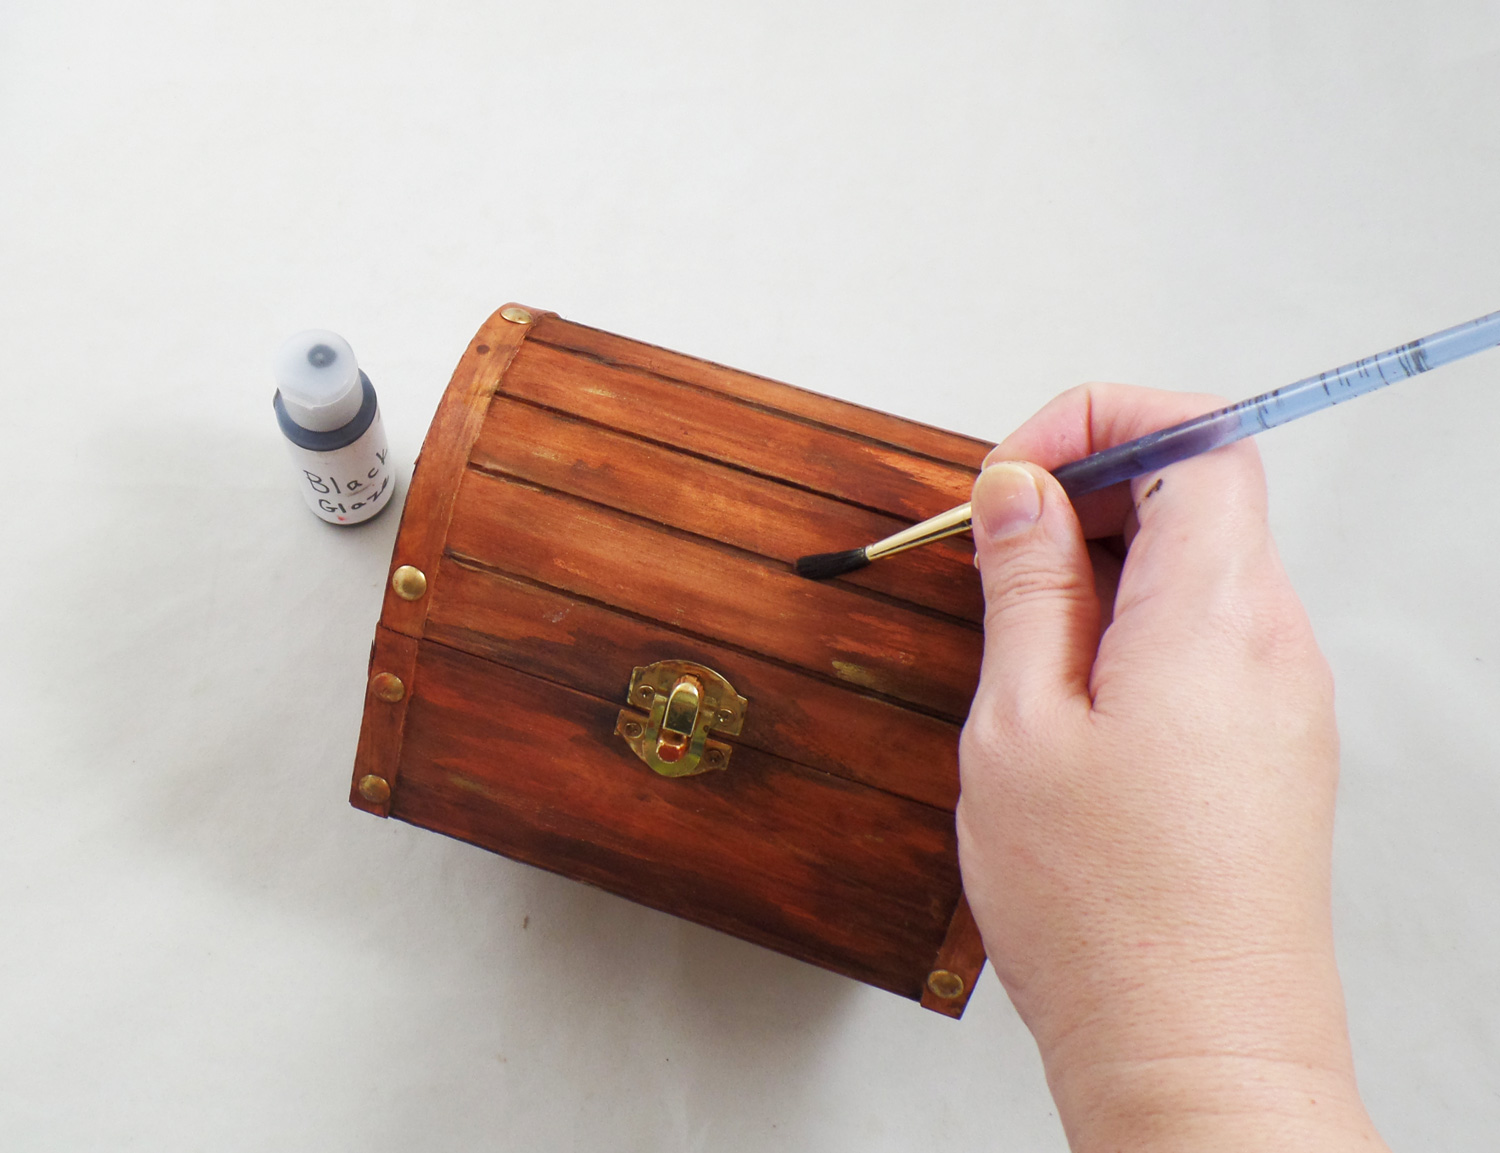
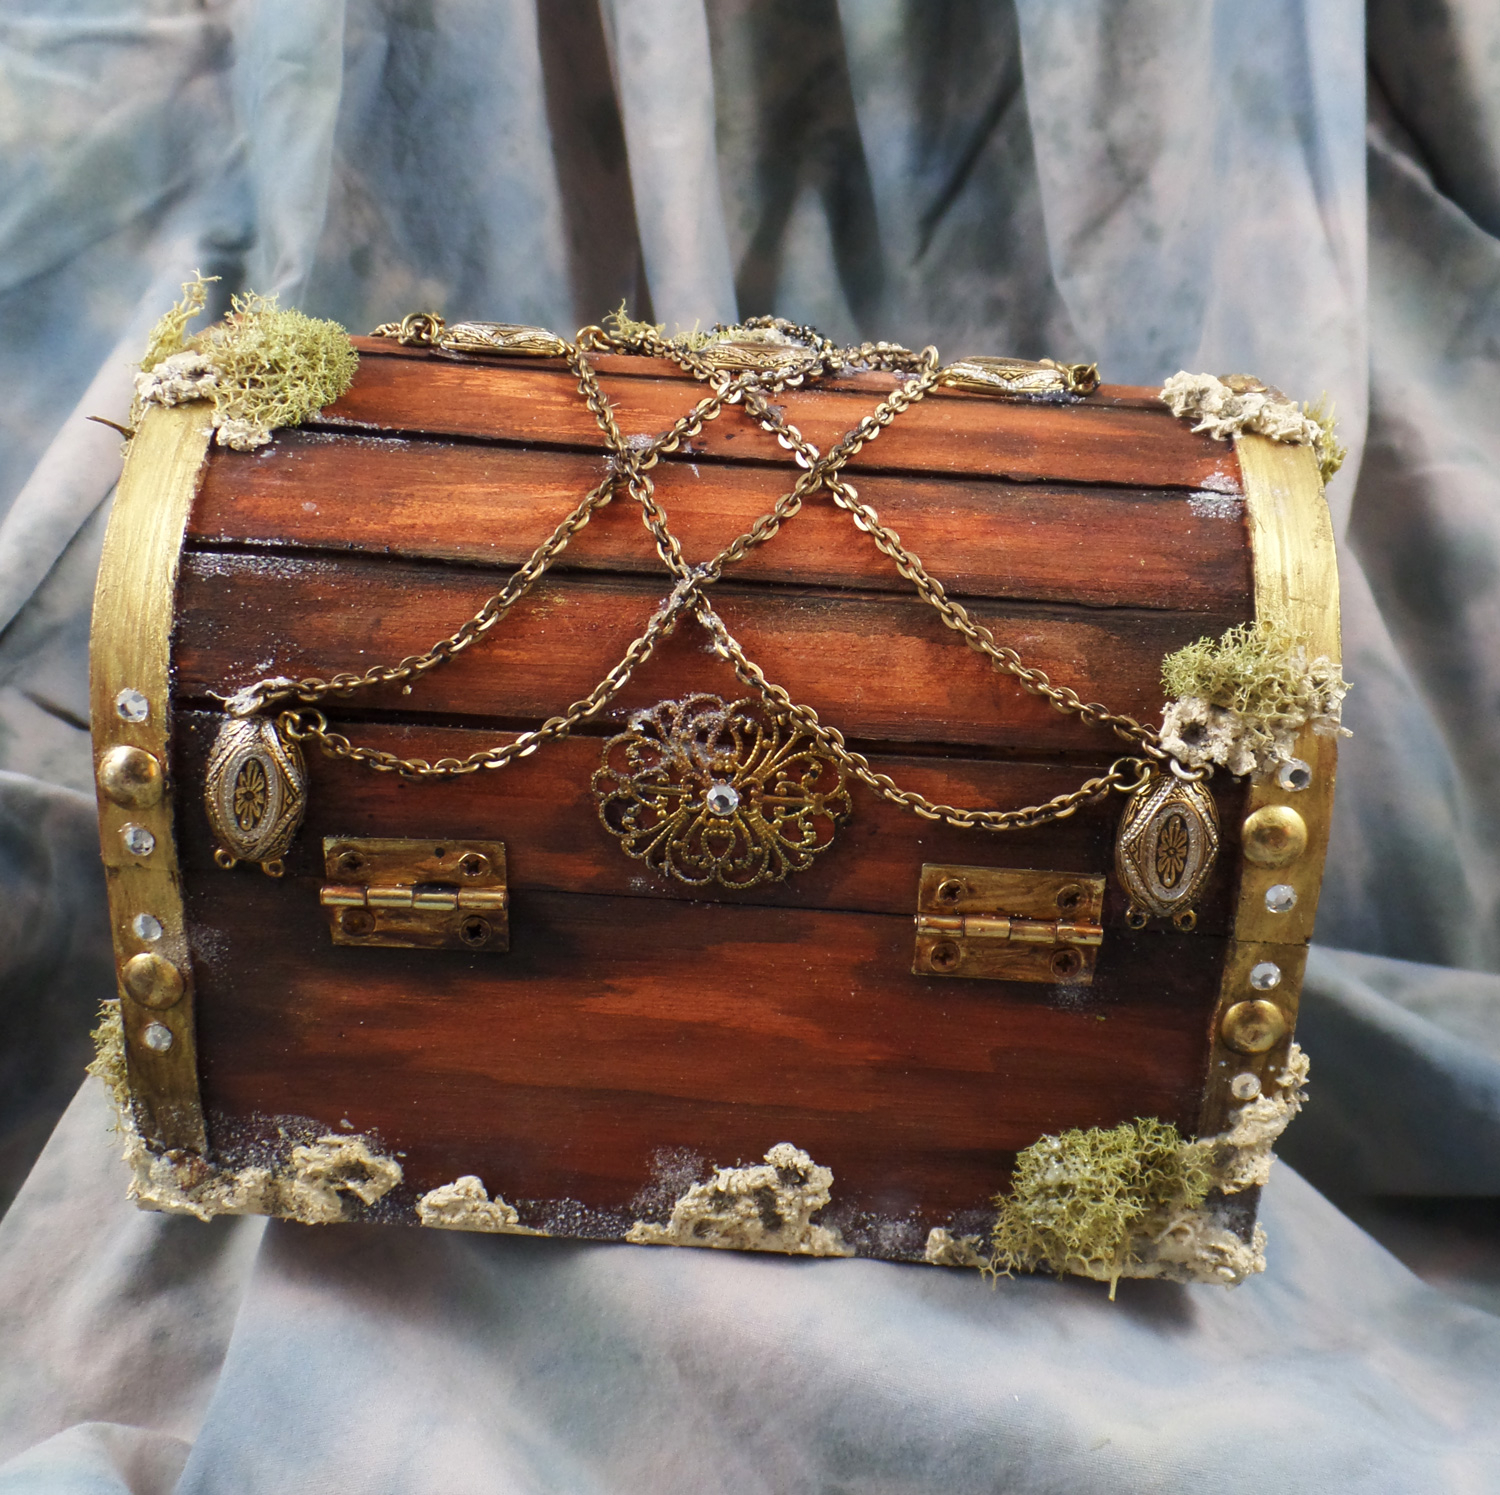
I started by painting the inside and outside of the unfinished wood box. I diluted the paint with water to create a color wash that would stain the wood but still leave the wood grain visible. First coat of diluted paints was the Terra Cotta, then the Burnt Umber and finally the Black in the nooks and crannies.
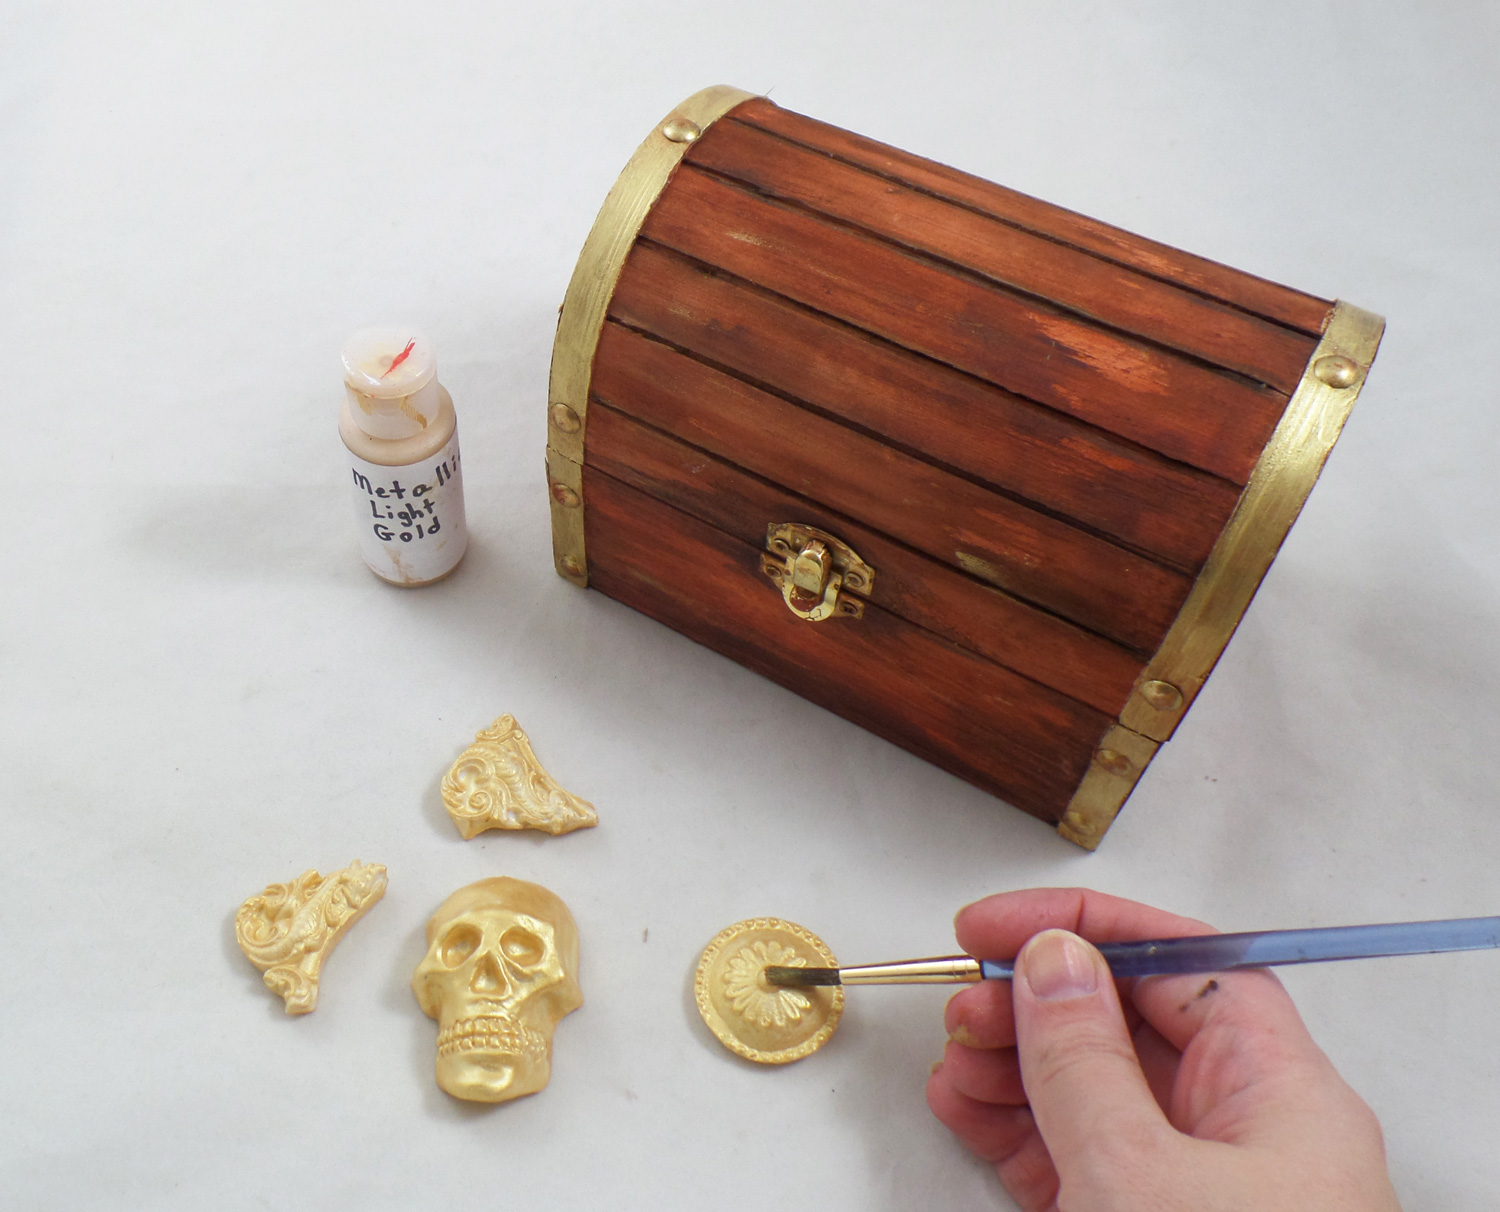
While I let the wooden box dry I removed the eye pins carefully with pliers that are put into Relics & Artifacts® pieces by the manufacturer, since I wasn’t going to make them into jewelry. I painted the pieces and the trim on the box with Metallic Light Gold paint. They needed two coats because most metallic paints need several coats for full coverage. The resin pieces were easy to paint and I didn’t have a single issues with the paint beading up or sliding off like with other resin blanks on the market!
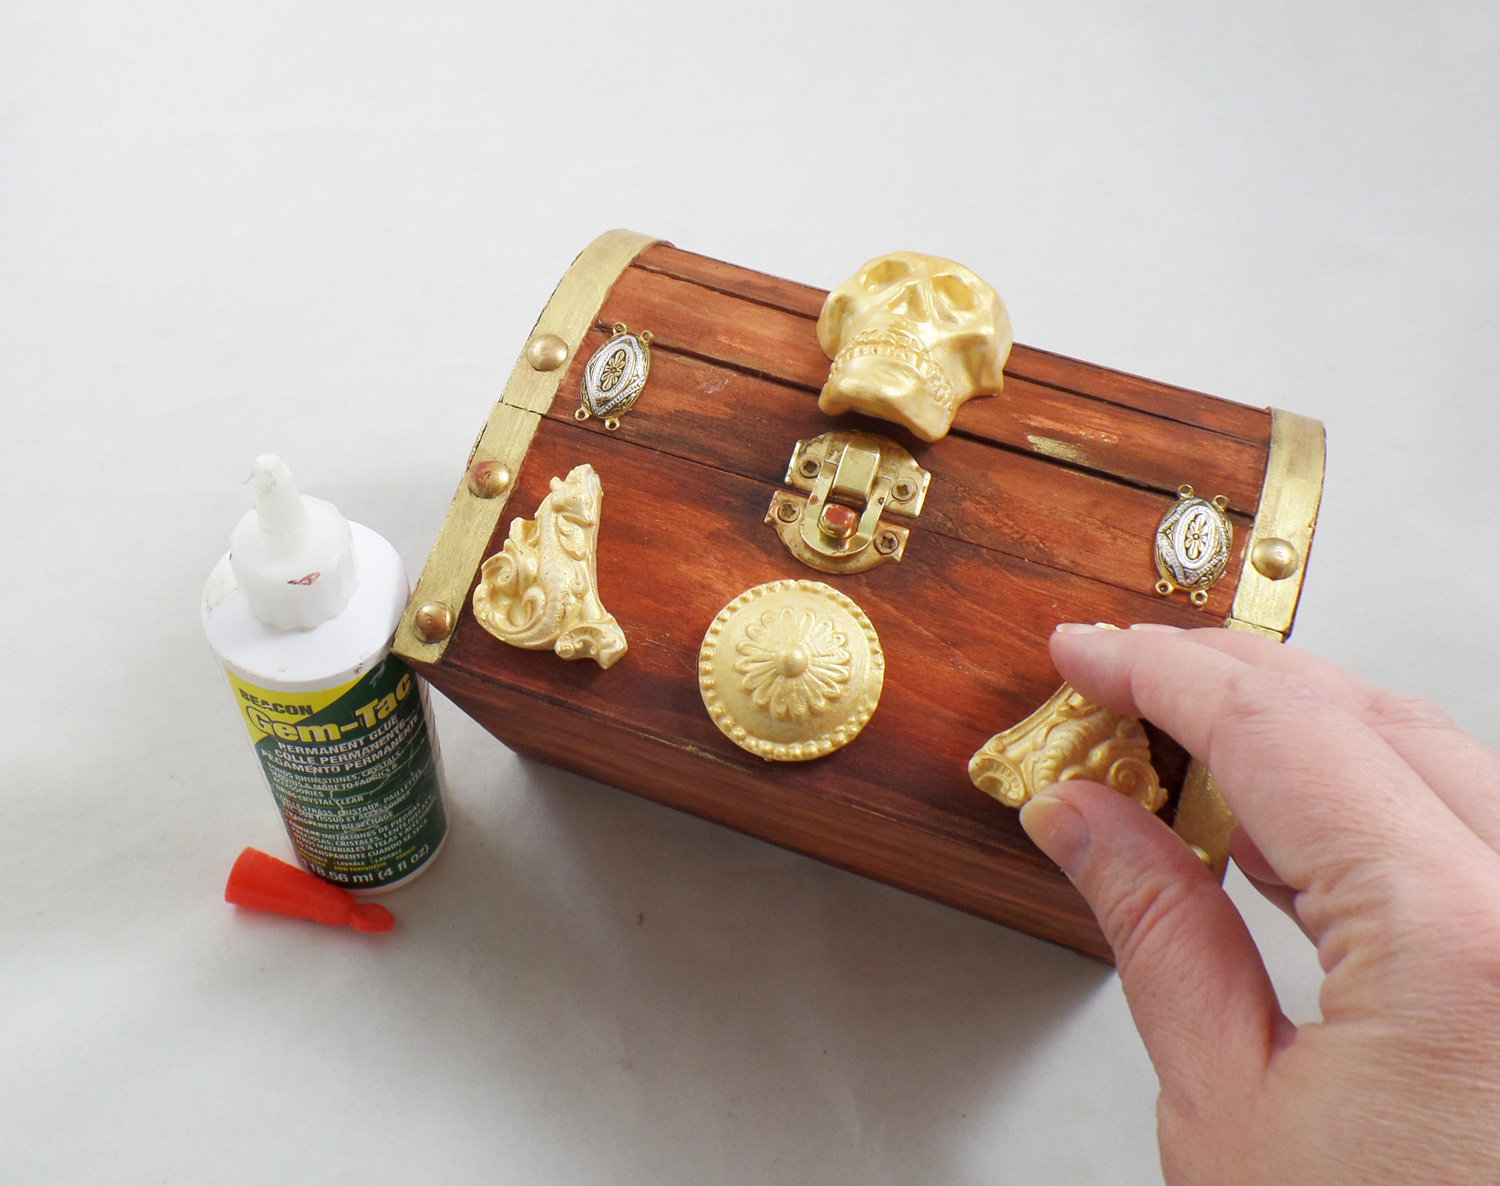
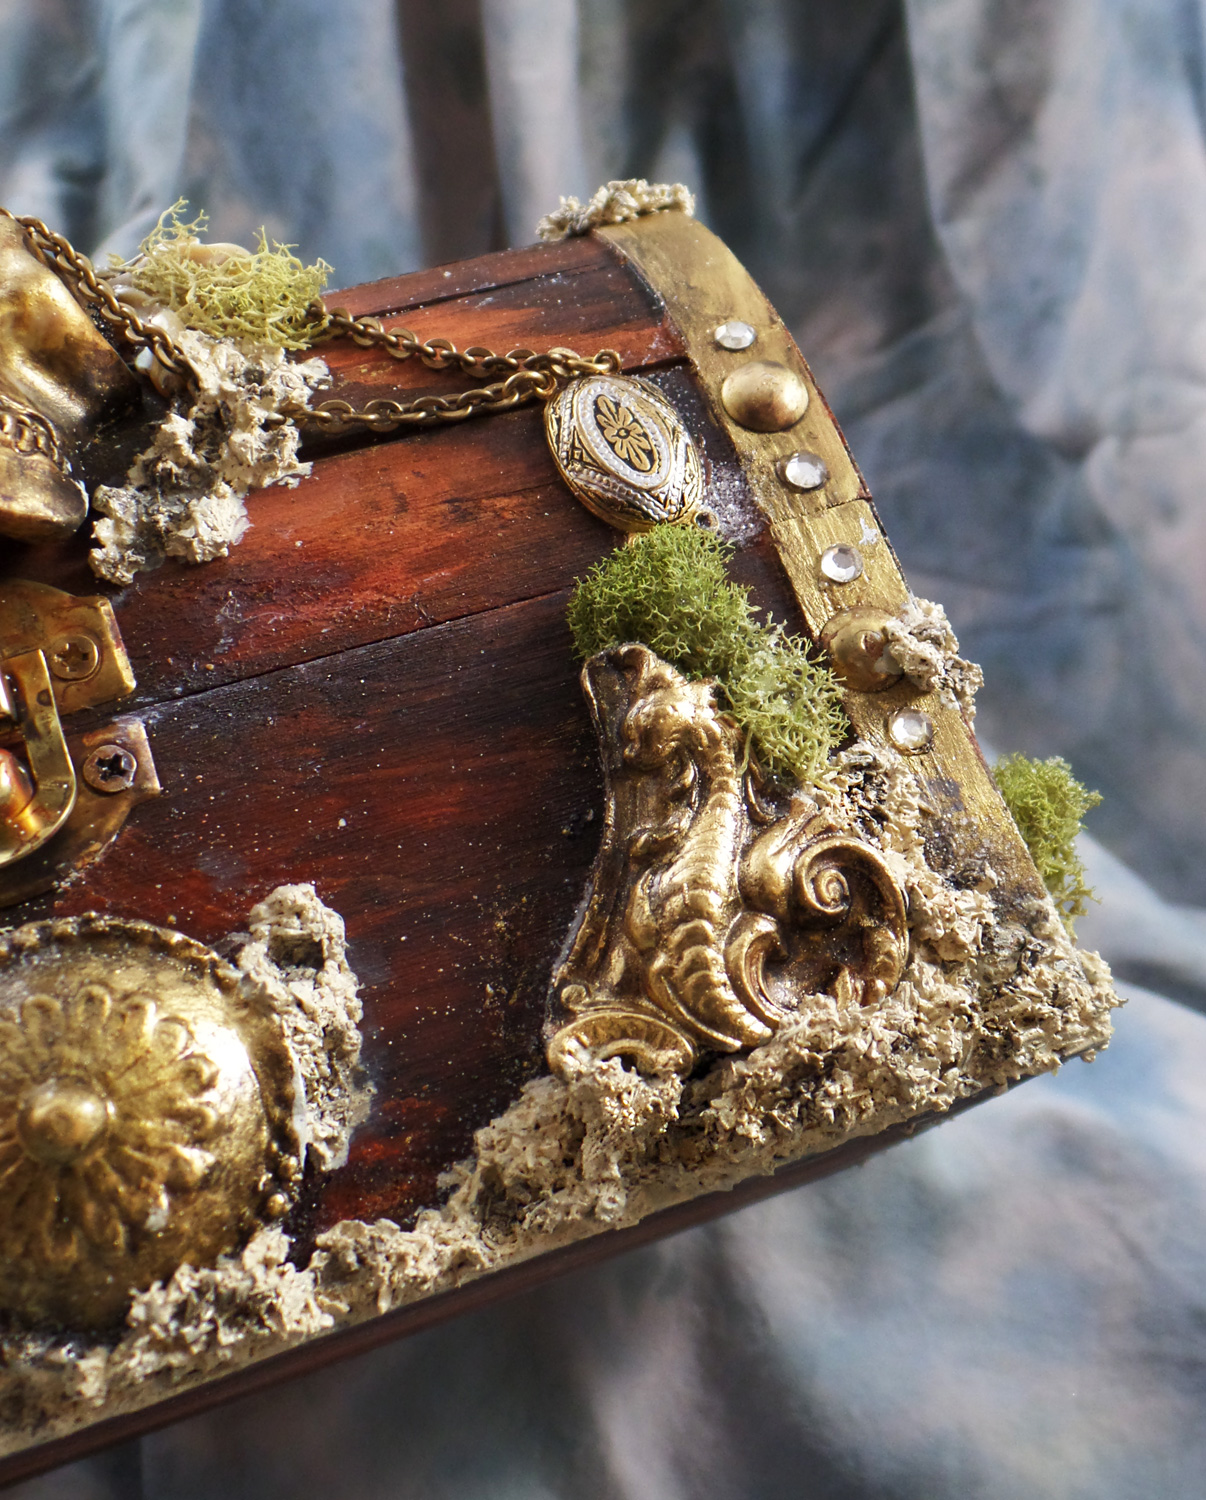
Once all the pieces were dry I applied them to the wood box with Beacon Gem-Tac Adhesive. A broken bracelet with beautiful metal spacers I took apart and glued the spacers to the box to give the illusion of metal brackets bolted to the box. Once the glue was dry I did another color wash of the Burnt Umber and Black acrylic paints all over the box and glued on embellishments to give them an aged appearance. I attached broken chain from an old necklace to the bracelet spacers, glued onto the box, with jumprings.
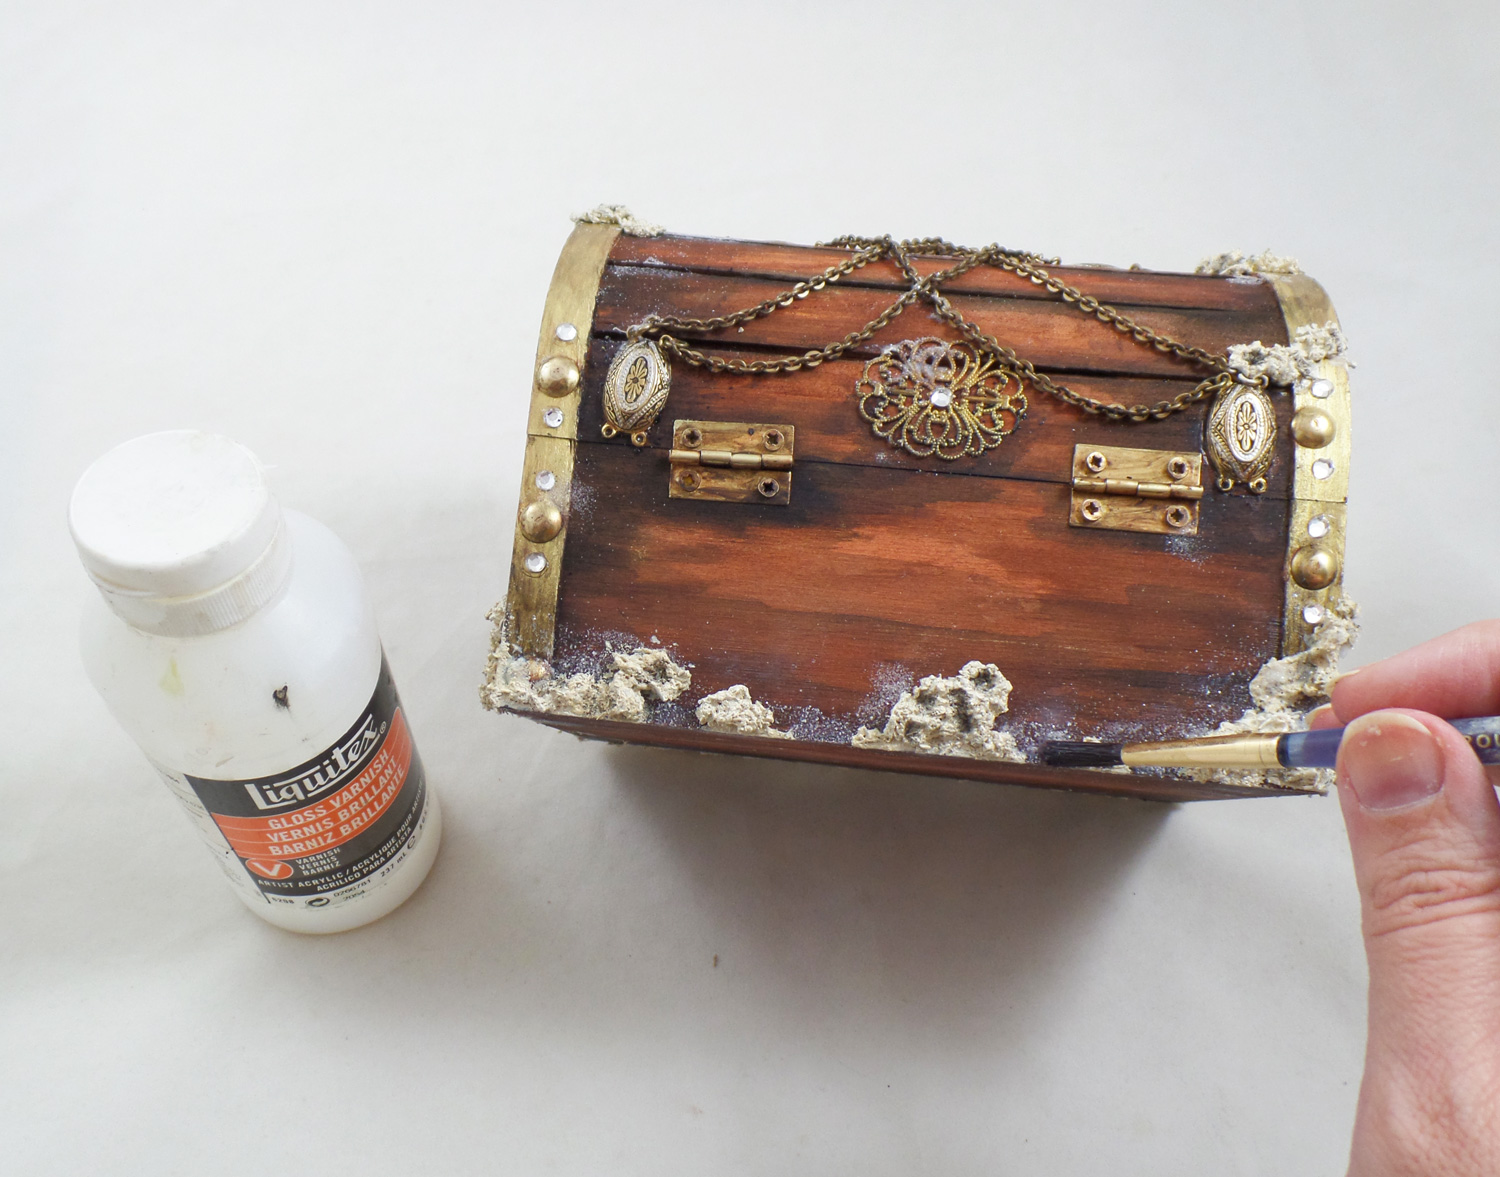
In a small cup I mixed up some White and Yellow Ocher acrylic paint with dried tea leaves and a little Beacon Gem-Tac Adhesive. I applied it around the bottom and sides of the box in small clumps to give the illusion that barnacles had started to grow around this long forgotten treasure. Once the faux barnacles were dry I did a Black acrylic paint wash to give them detail. I added some Liquitex Gloss Varnish over and around the edges of the barnacles and sprinkled on Stampendous Crystal Snow White Glitter. Once dry it looked like salt deposits from sea water.
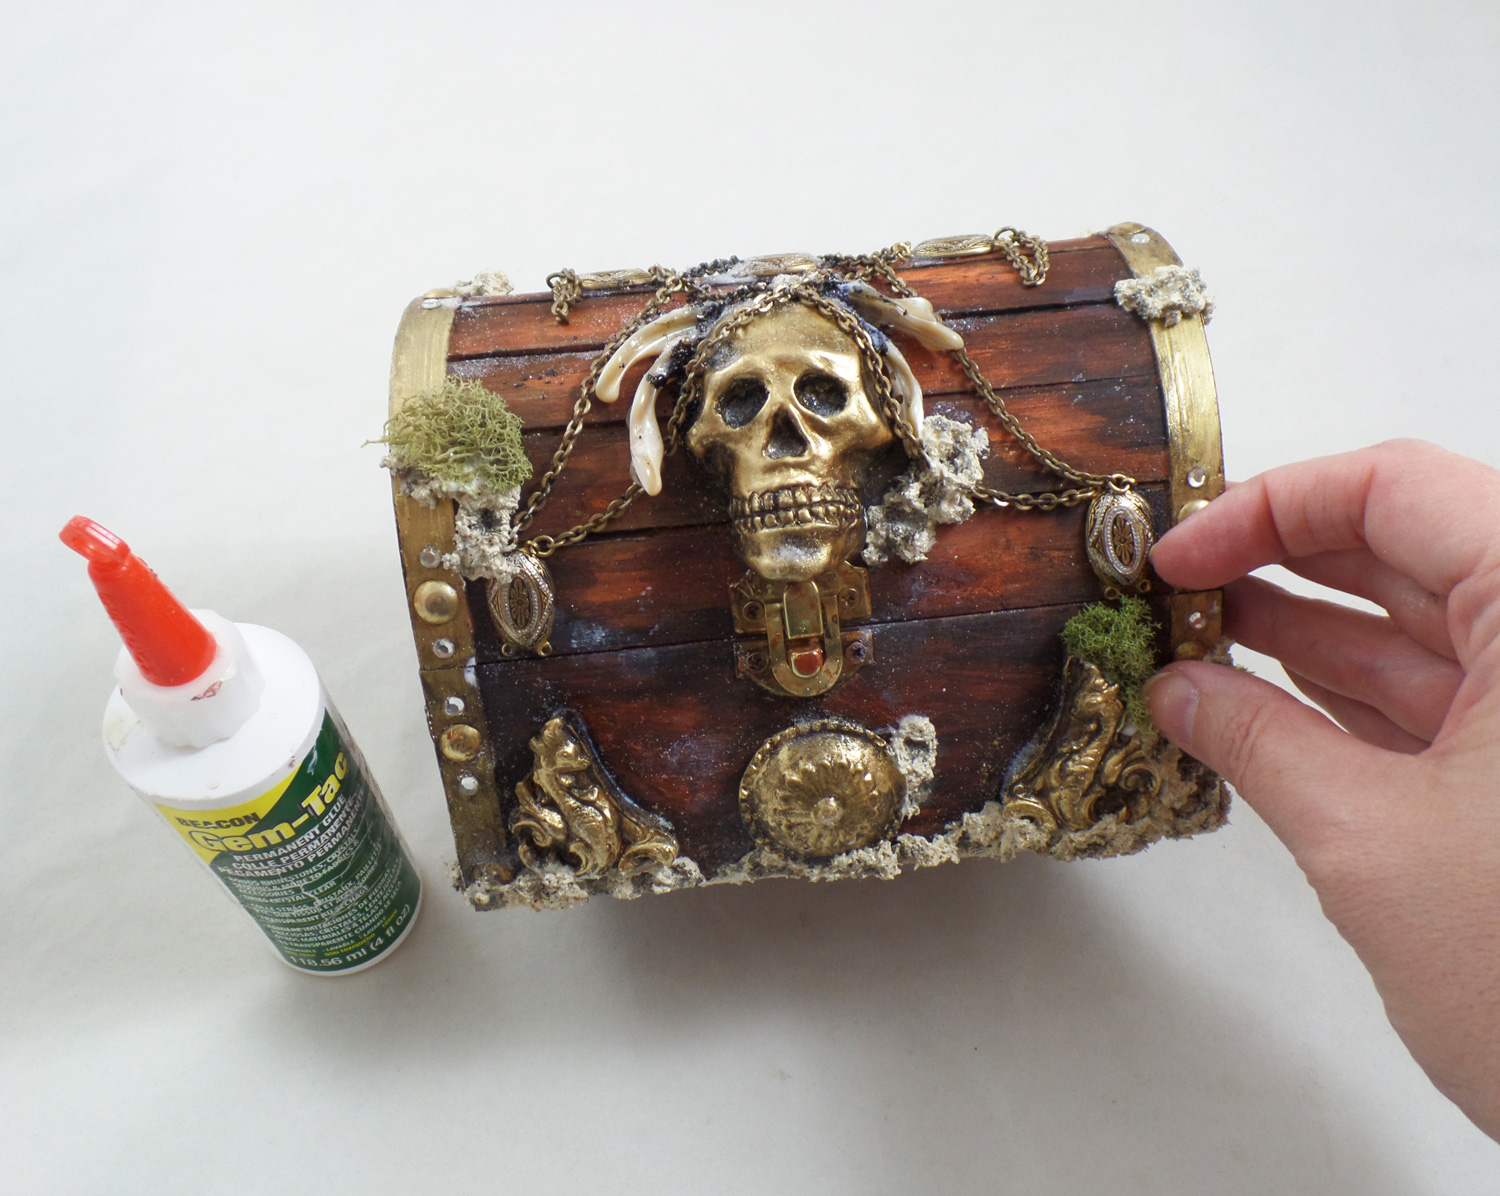
I randomly applied more spots of varnish and glitter to give a grungy, salty appearance to the treasure chest. I glued on tiny bits of moss on the box along the edges and embellishments.
When applying the faux barnacle mixture to the box I was sure to press it against the resin pieces and edges of the box for a good bond. To make it look like the barnacles had grown haphazardly I pushed the back end of a paint brush here and there into the tea leaves and paint mixture.
Not forgetting the back of the treasure chest, I had glued on more bracelet pieces, metal embellishments and tiny vintage glass rhinestones. With the chain linked into the bracelet spacers, draped back to front on the chest, my Pirate Treasure Chest was complete!
I really love how this piece came out and can’t wait to try out more of the Relics & Artifacts® line with future art projects.
What lovely mixed media treasures will you create?
Until Next Time, Safe Travels!
Around the World with 80 Artists
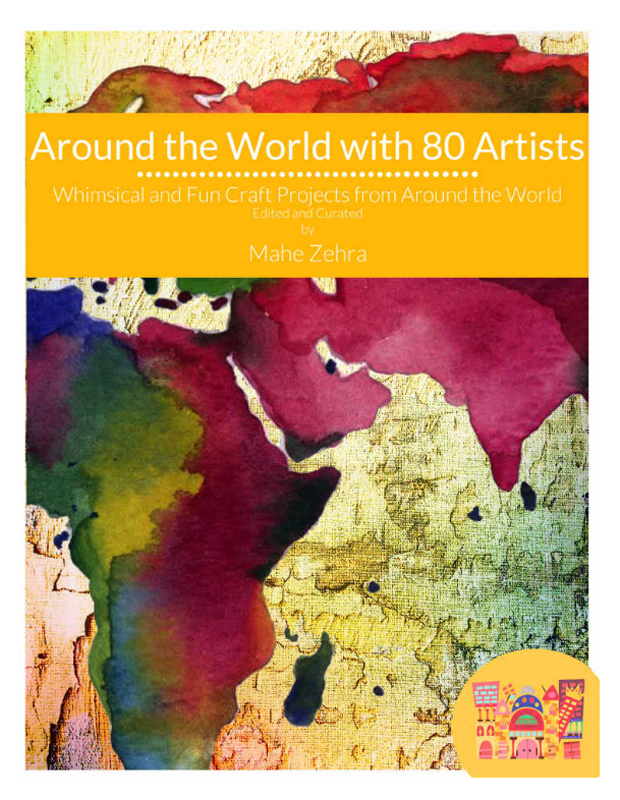
I am proud to announce I am one of the participating artists in the book Around the World with 80 Artists: A Creative Art Academy Arts and Crafts Adventure.
This book is an adventure around the world with 80 artists, 80 plus projects, from 22 countries. All forms of art and craft niches, from mixed media, coloring, cut and create, drawing, card making, scrapbooking and more! Arts and crafts for the beginner to intermediate to the advanced, but most of all you’ll be able to see that creativity is something that holds this earth together and brings us all closer together.
The reason Editor Mahe Zehra Husain came up with this project is an attempt to highlight the theme of creativity around the world. She wanted to counteract the negativity, hate, and terrible things in the news happening all over the world, to remind us of how beautiful this world is if we share our common love for arts and crafts. This book was her way to get so many new artists and creative folk to come together to work on one project with love and creativity flowing in from many different countries of the world.
The Around the World with 80 artists book has reached No. 1 status in Crafts, Hobbies and Home on Amazon! You can download a FREE copy, for today and tomorrow only, even if you don’t own a Kindle. After that the Kindle copy and workbook will become paid and will be priced at $14.99. From the proceeds of the ebook sales and the kickstarter Mahe Zehra Husain will be contributing 20% to the Malala Fund as well.
The book also comes with a downloadable workbook that has all the necessary printable pages. Here is the link for the workbook.
Here is a sneak peak at my tutorial, Adventures in Resin, included in the book.
Until Next Time, Safe Travels!
Crafty Recuperating Recap!

Hello! I am finally back after having to take a unwanted break thanks to getting the flu, then pneumonia which caused a partial lung collapse. Now that I am in better health it’s time to share all the projects I have been making for Amazing Casting Products while I have been recuperating and getting back on track with arts and crafting goodness!
Starting with the photo above I tried my hand at Resin Paper Jewelry, using imported papers from India. They were simple to make, highlighted the beautifully textured paper and became rather sturdy with the coating of resin.
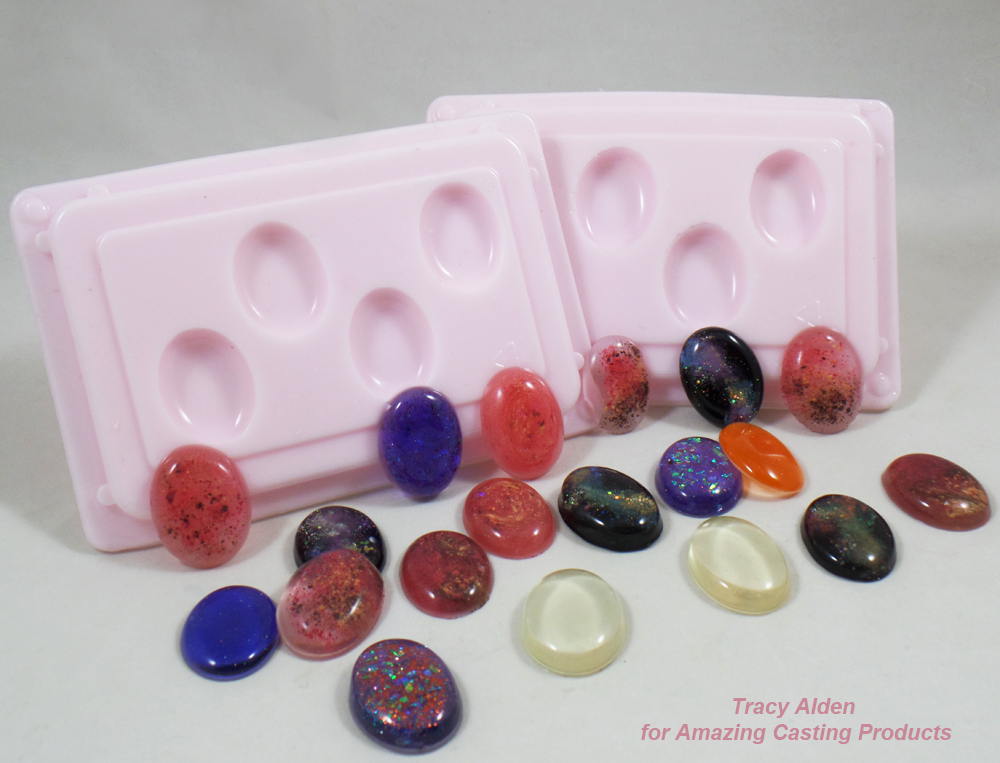
My next project was born out of necessity. I have a collection of polyurethane Cabochon molds my mother had bought and used 45+ years ago. I now use them regularly to create many of my cabochon pieces. However when the molds get old and used a lot they can slowly become brittle. Well, brittle molds don’t take too well to being flexed and I shattered two of my best cabochon molds. See how I created new Cabochon Molds!
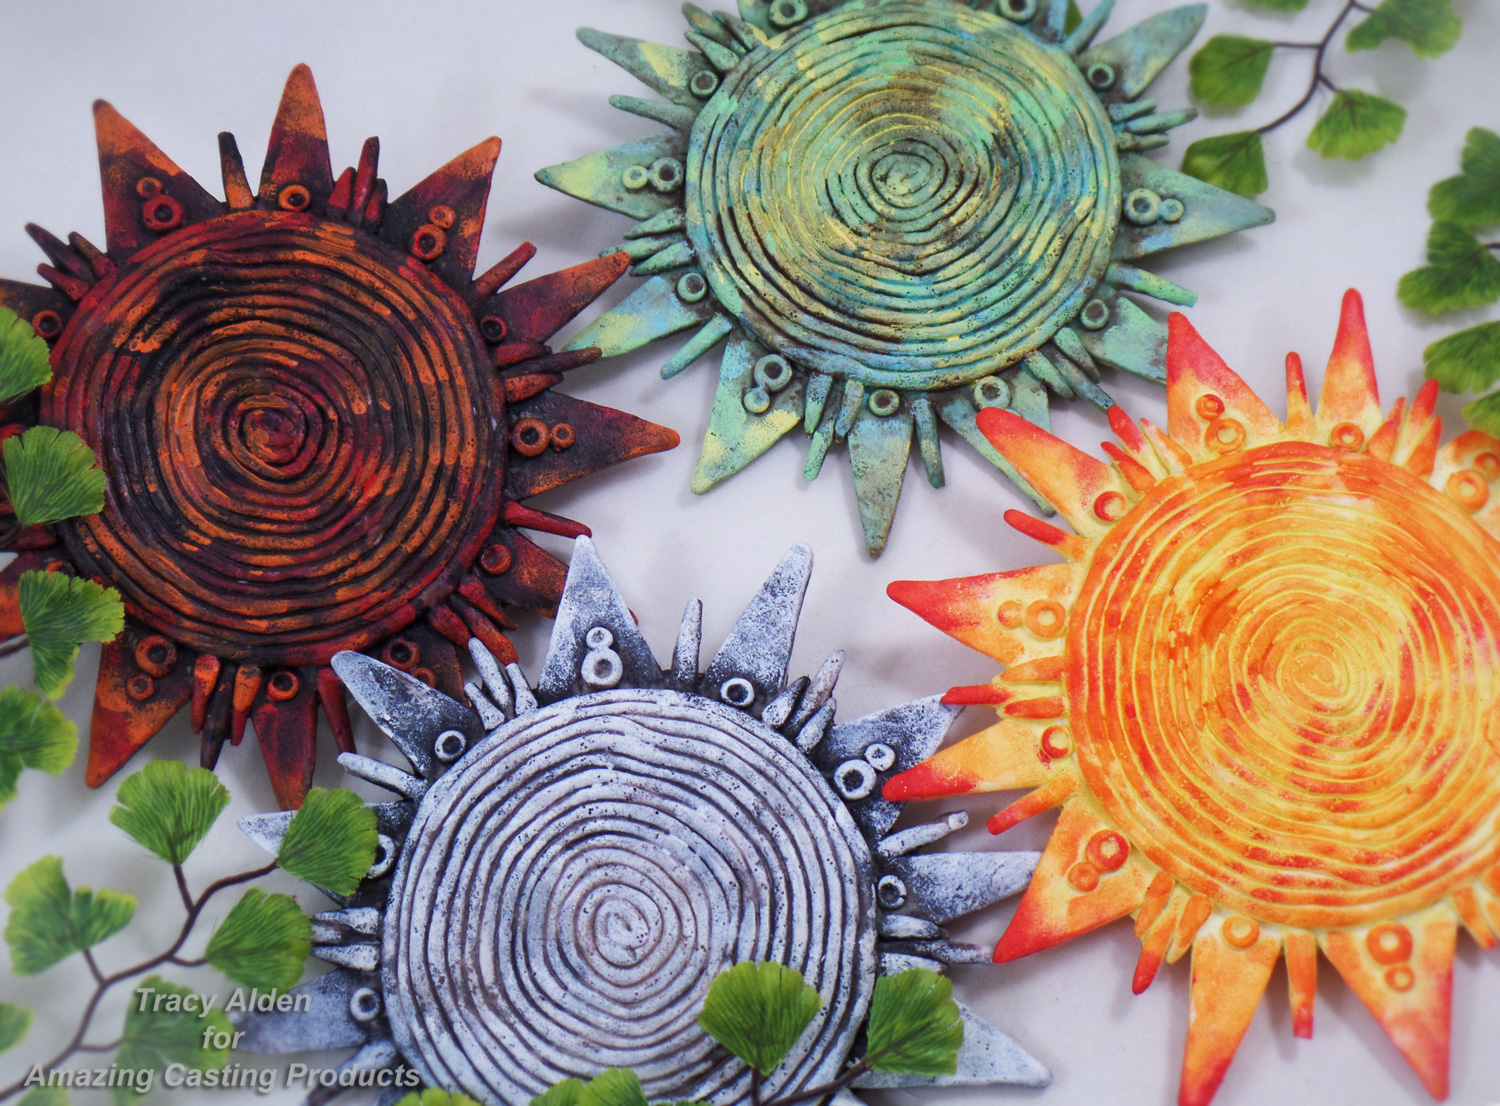
Since I have a fondness for Southwestern art and Celestial patterns, I wanted to try making my own Sun Disk Wall Plaques for my garden.
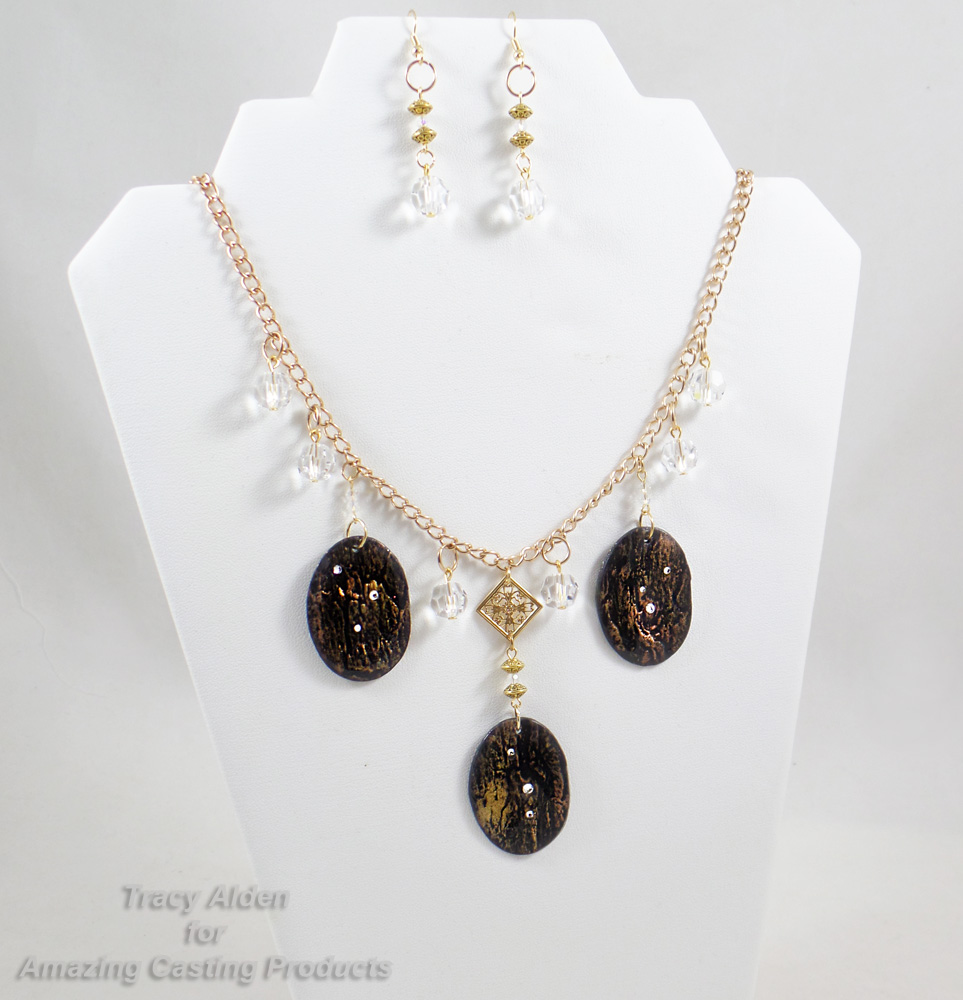
I had fun with a Tree Bark Texture Plate I made years ago but this time I created polymer clay pendants coated in resin and embellished with crystals in this Tree Bark Jewels Necklace.

Seeing the new home decor trend of blue and white country tiles and pottery, I wondered if I could attempt my own version with everyday craft supplies and without the need of a kiln! My Faux Delft Tile Decor ended up being a fun and new way to use acrylic paint, polymer clay and resin.

I spend a lot of time working out ideas and testing out craft supplies to see what might be possible with future projects. Some don’t work out, some are happy accidents and others a success. Here is a few of my Resin Tips and Tricks.
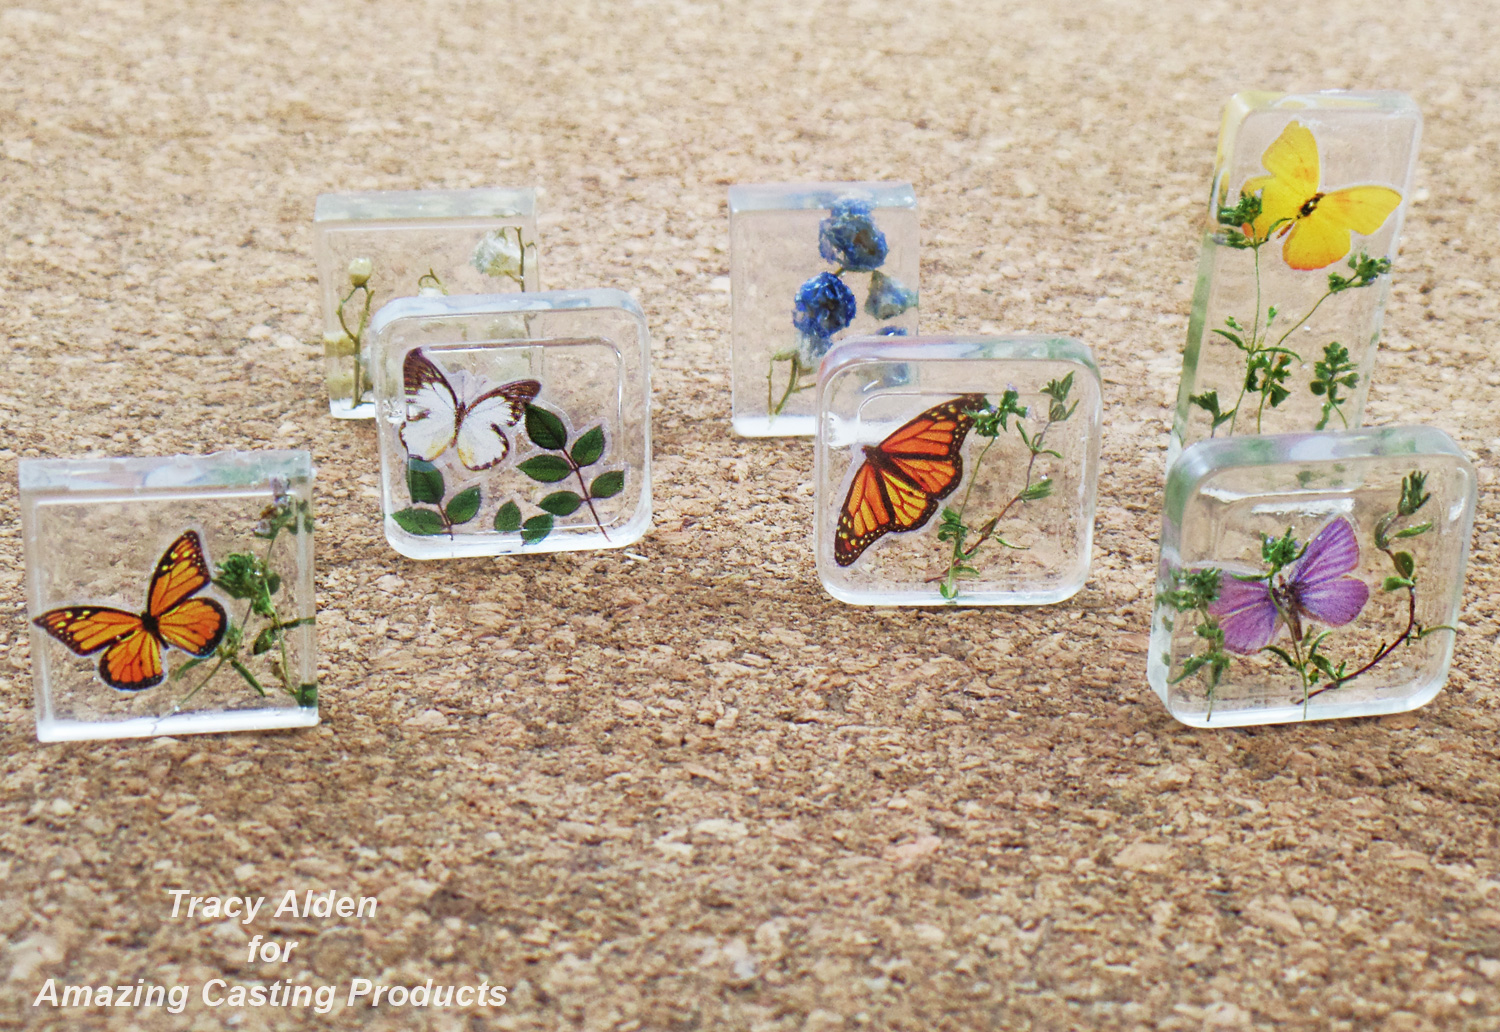
In the process of sorting my beads recently I noticed the hard plastic containers many small beads come in have perfectly smooth and glossy lids. I was able to make new resin pendant molds and create a selection of Springtime Pendants with dried plants, stickers and resin!
I hope these projects keep you inspired and Until Next Time, Safe Travels!
A Crafty Halloween Throwback Thursday
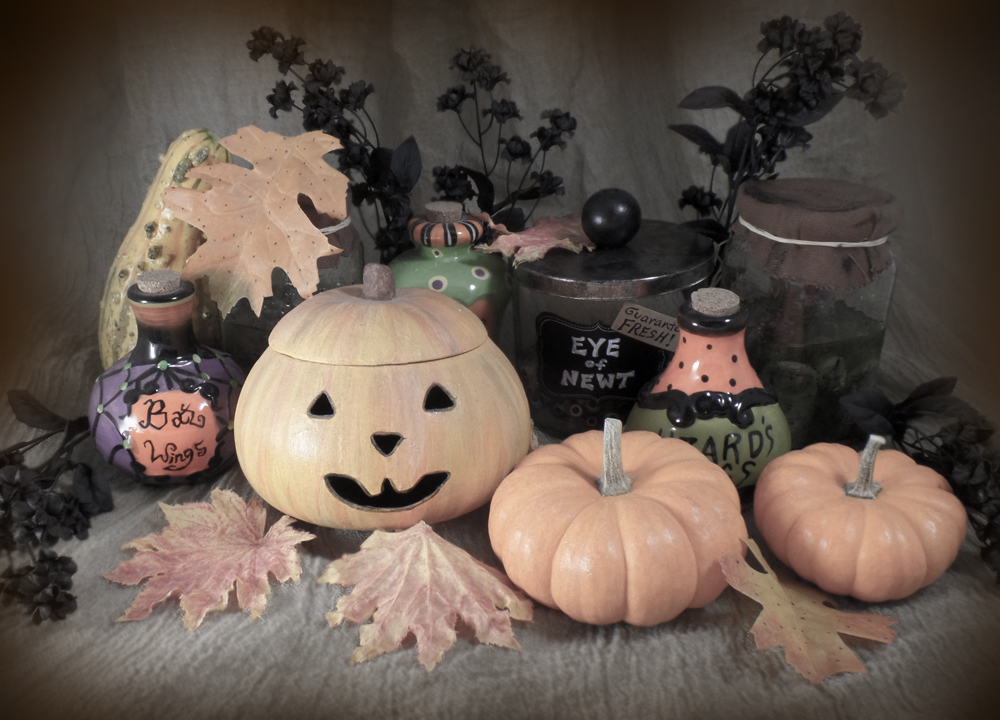
Welcome to my Halloween Throwback Thursday! Halloween as I have often noted is one of my favorite holidays, I just love making all kinds of spooky and fun art. This week I was able to start unpacking all of my plastic tote bins filled to brim with ghoulish decor. I was reminded of my Halloween projects I have created for Amazing Casting Products and I wanted to share a few of my favorites!
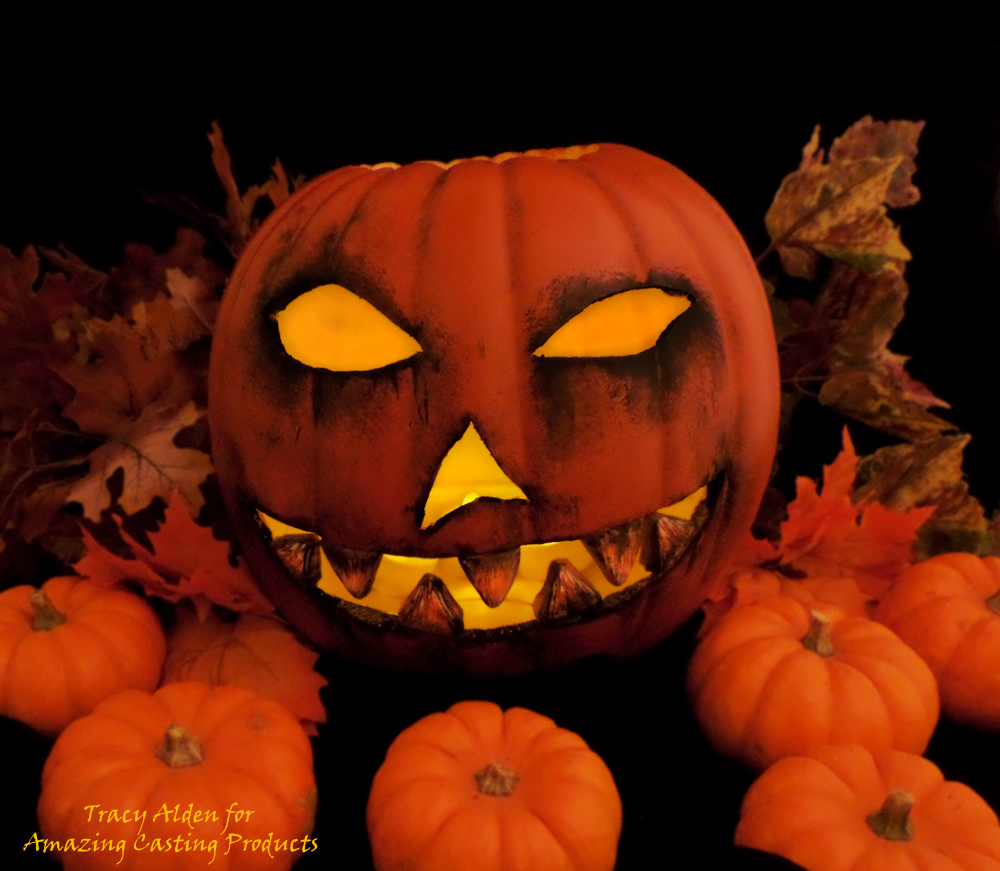
How to enhance a Pumpkin’s Smile with resin teeth using Amazing Casting Resin and Mold Putty.
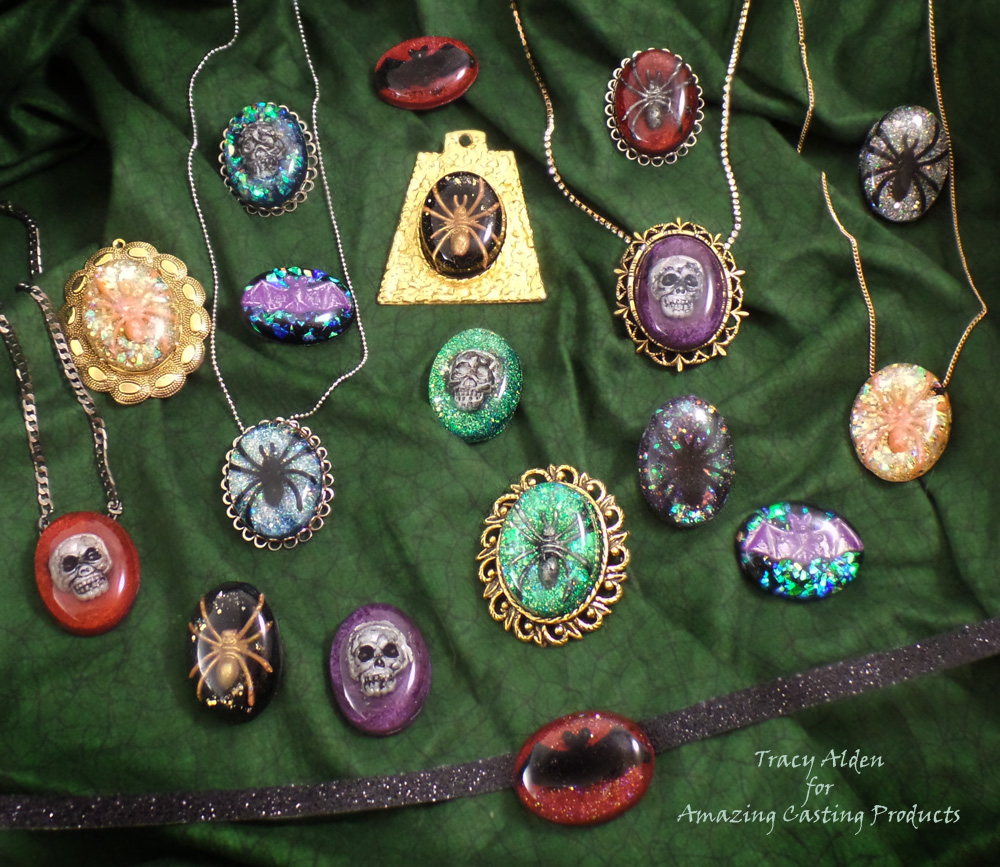
How to make Halloween party favors go from groan to glam with Resin Cabochons made with Amazing Clear Cast.
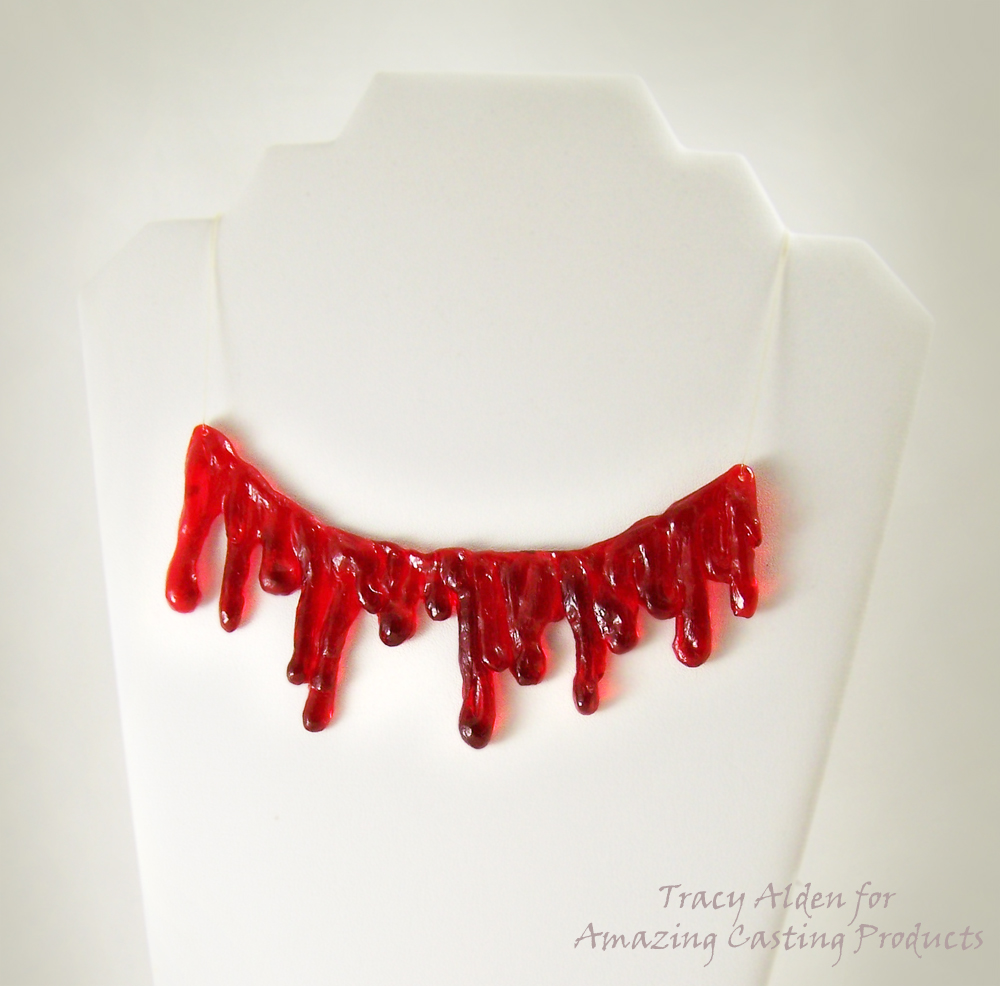
Running out of time on what Halloween costume to wear…. take a look at a Resin Blood Drip Necklace using Amazing Mold Rubber.
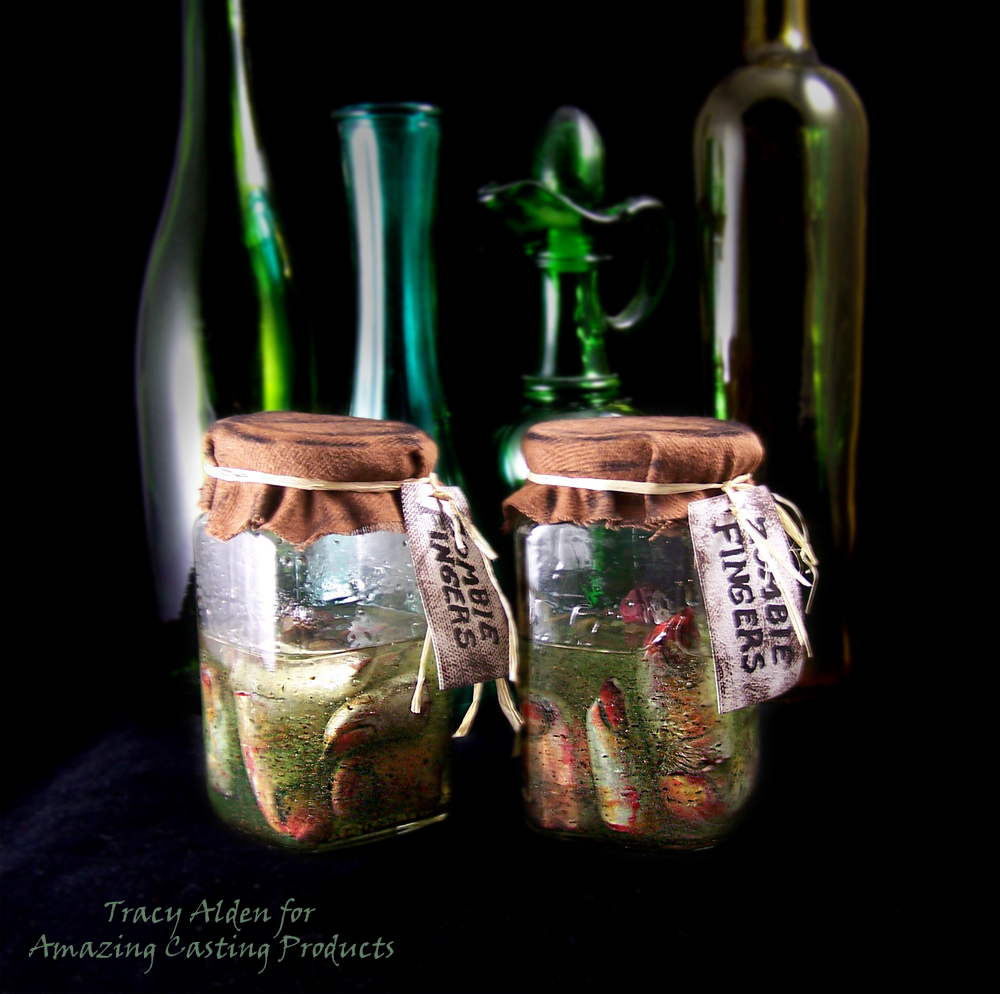
Need that perfect addition to a spooky apothecary? Try you hand at a upcycled Zombie Finger Apothecary Jar using Amazing Casting Products.
I hope sharing some of these projects has you mind a whirl with some Halloween craft project inspiration!
Until Next Time, Safe Travels!

Ancient and Contemporary Inspired Artistry