Craft & Hobby Association Mega Show 2014

It is that time of year again: my CHA Trade Show recap! CHA, otherwise know as the Craft and Hobby Association, decided to change it a bit this year by not having a Winter and Summer show but one big mega show! There were so many vendors, new products, demos, make n takes and networking opportunities at this show! I had a great time and met so many wonderful talented people but it was a very busy show! While this is not by far covering everything and everyone I saw at CHA, the following is some of the highlights I was able to take photos of.
This year I was asked to do demonstrations at the Amazing Crafting Products/Alumilite Booth, showing people how to make their own Art Themed Lapel Pins. I finally got to meet, in person, some of the other members of the Amazing Crafting Products design team.
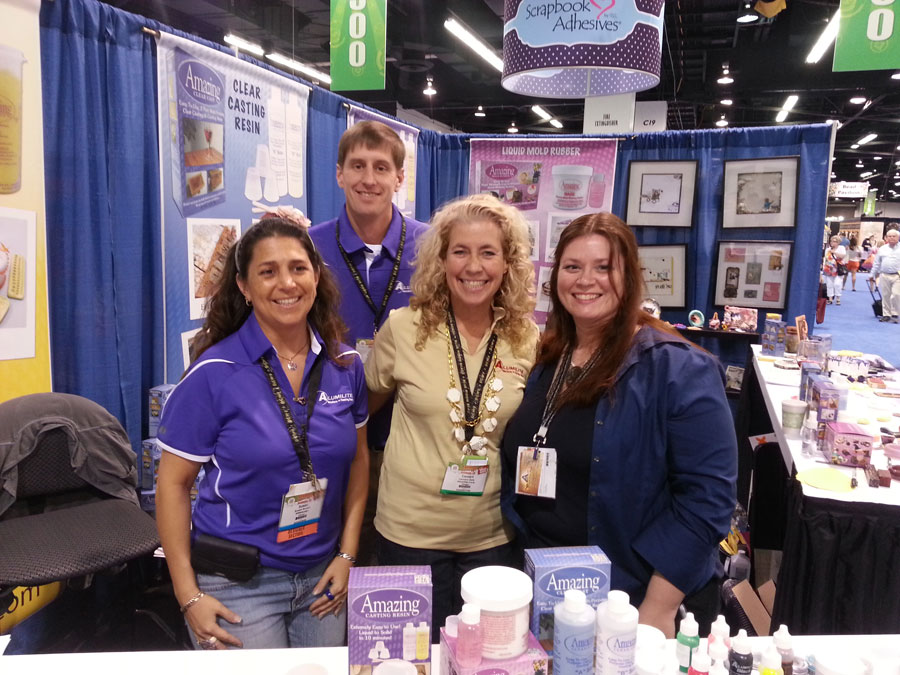
Here is President of Alumilite Mike Faupel, Design Team Leader Susan M. Brown {sbartist}, staff member Carolyn Daly, and I at the Amazing Crafting Products booth.
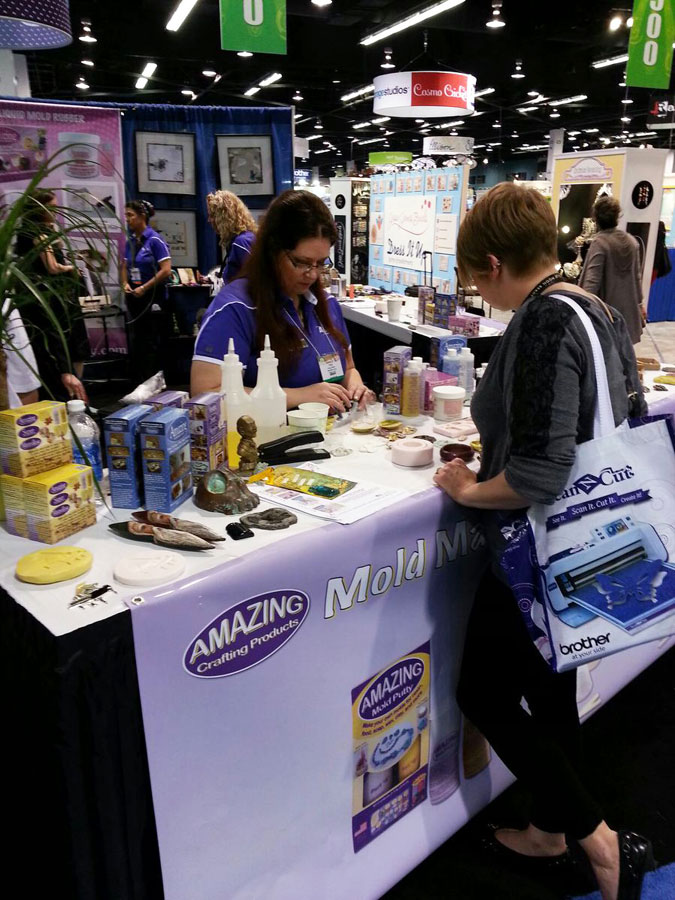
Here I am demoing Amazing Mold Putty. It was wonderful to find so many people with interests in molding and casting their own artwork.
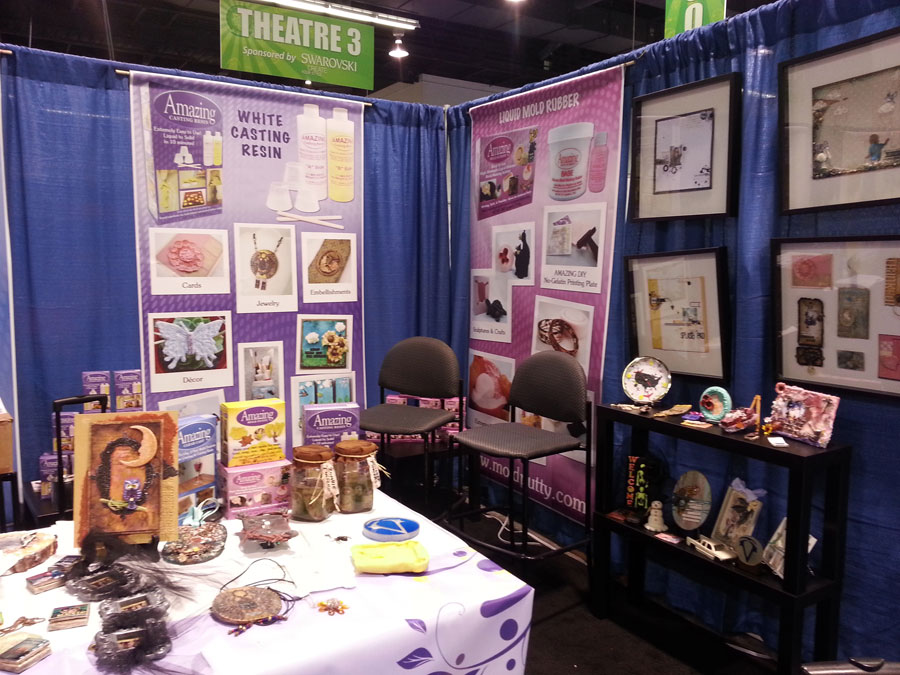
Artwork from the talented design team was on display at the Amazing Crafting Products booth, showcasing the detail and beautiful pieces they were able to make with the products.

Here is one of the demo tables at the Amazing Crafting Products booth, highlighting products and their many uses.

I got to see again the talented and ever gracious Mark Montano. He was signing his book line at the Eclectic Products booth and doing demos of crackle art frames at the DecoArt booth. I now have all of his books!
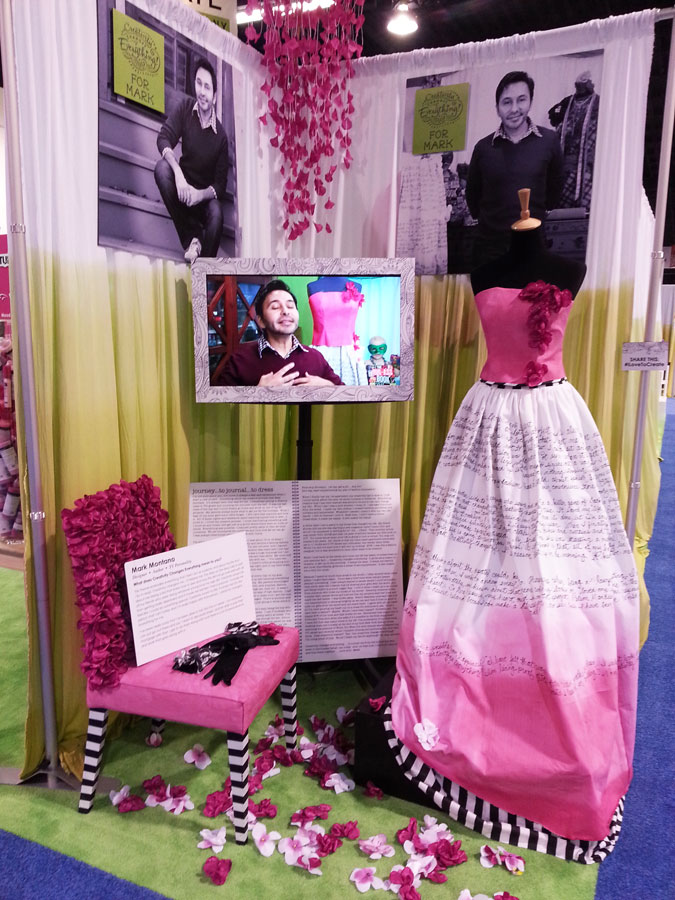
At the iLoveToCreate booth showcased several artists’ work in “Creativity Changes Everything” display. Mark Montano’s work was part of this display. He had created a lovely vignette, representing his creative career in home decor and fashion, along with a diary about his creative life printed directly on a dip-dyed dress.
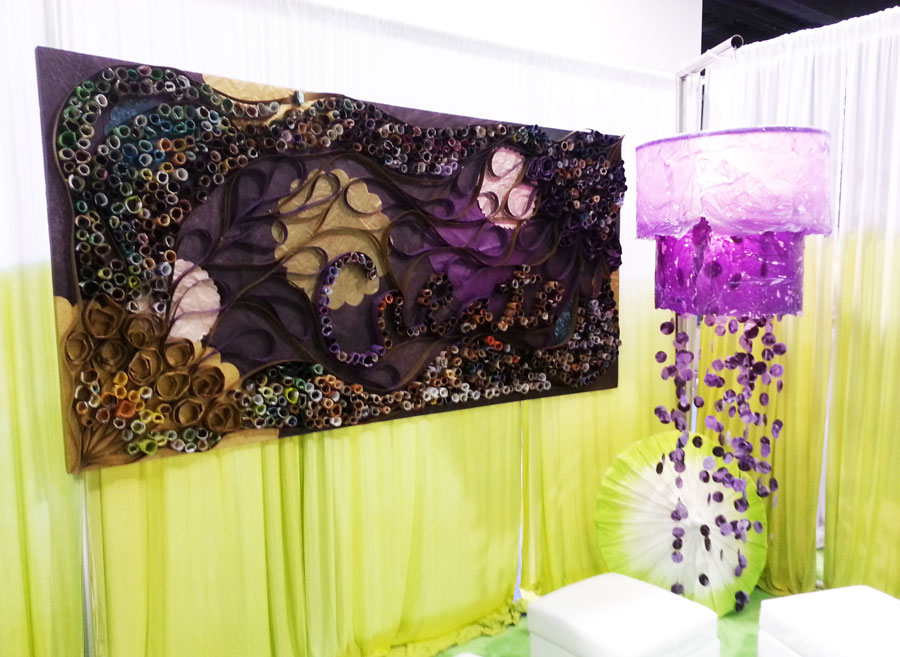
ILoveToCreate booth also had this lovely decopauge piece made from rolled magazines. The lantern was made using Tulip One-Step Tie-Dye, Aleene’s Tacky Glue, and tissue paper!
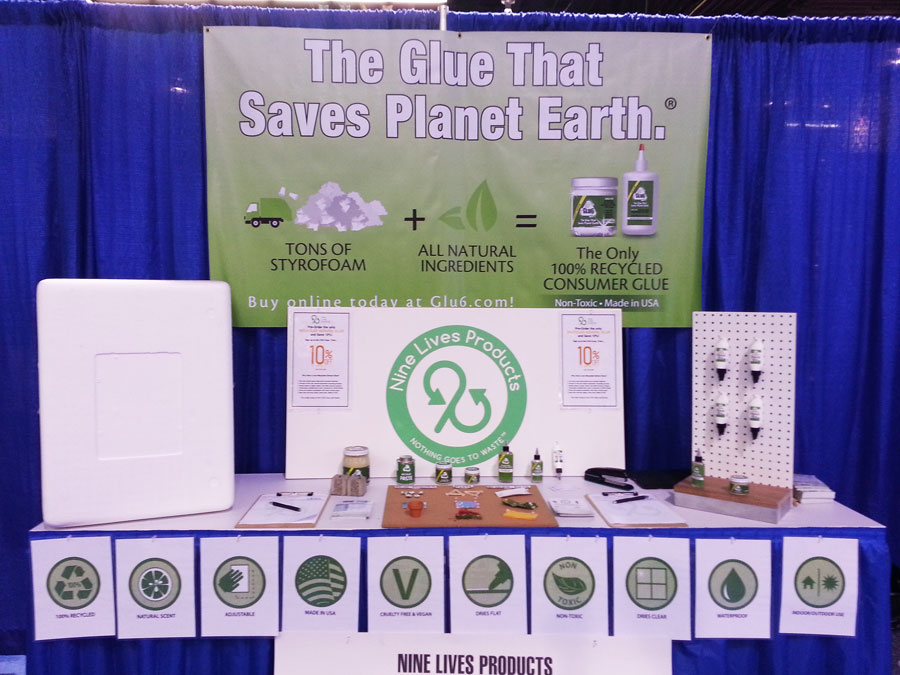
I stumbled across the Nine Lives Products glue booth and was I glad I did! They make glue out of recycling styrofoam waste. They create three types of glue: Glu6 Nonporous, Glu6 Paste and Nine Live School Glue.
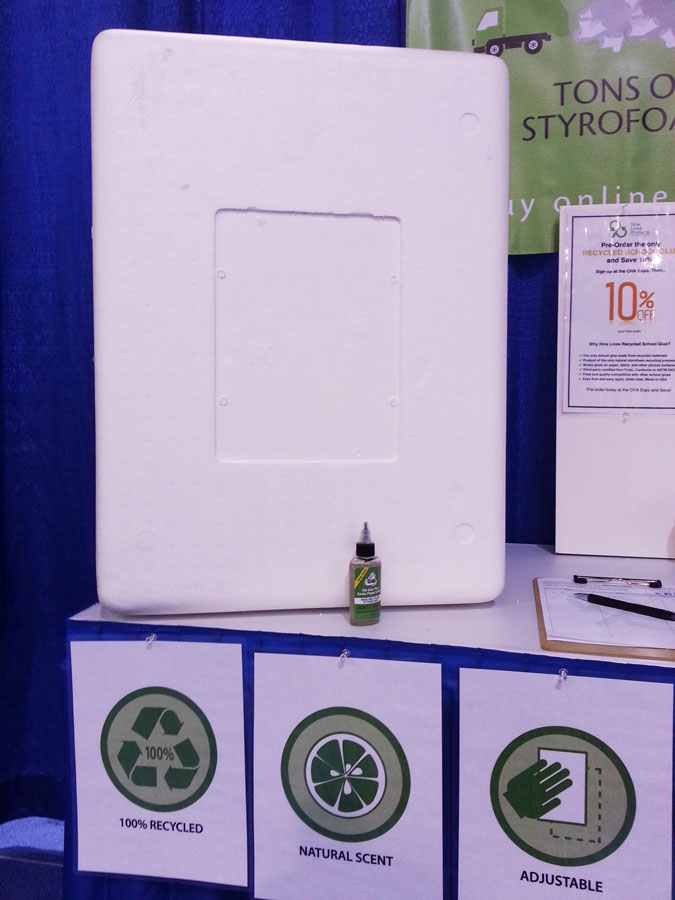
The Glu6 Non-Porous Glue is made from all-natural ingredients that non-toxically dissolve styrofoam waste, shrinking it by more than 30x its original size. The goo left over from this process they turn into non-toxic glue! Styrofoam piece shown in the photo is what goes into one tiny bottle of their glue.

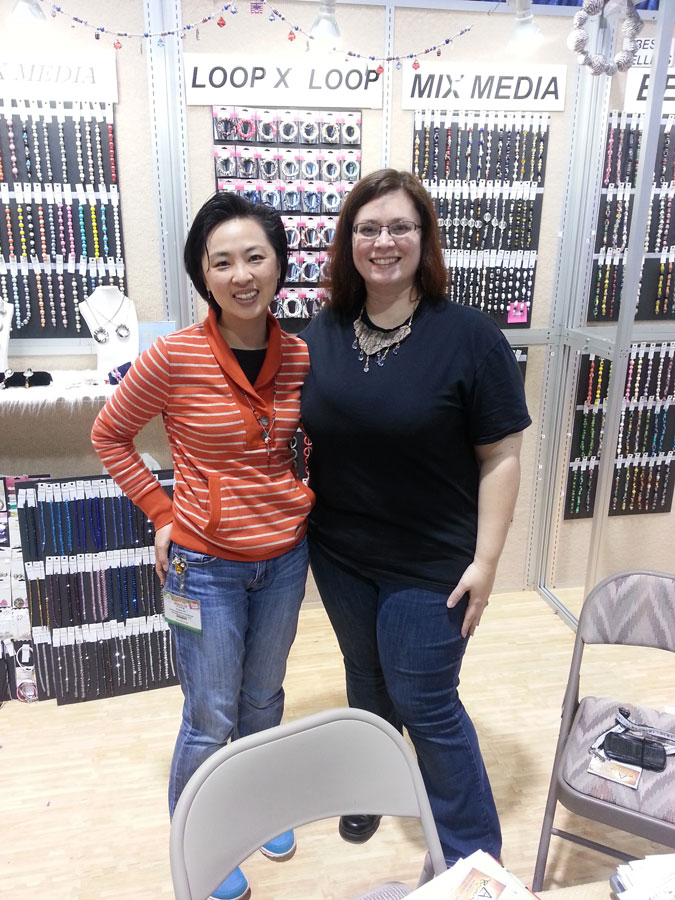
The talented Suzann Sladcik Wilson, book author and CEO of Beadphoria, Inc. was at the Buttons Galore and More booth debuting her beautiful new button jewelry line. Her line of button jewelry kits come in all kinds of different themes, and include everything you need to make lovely rings and pendants.
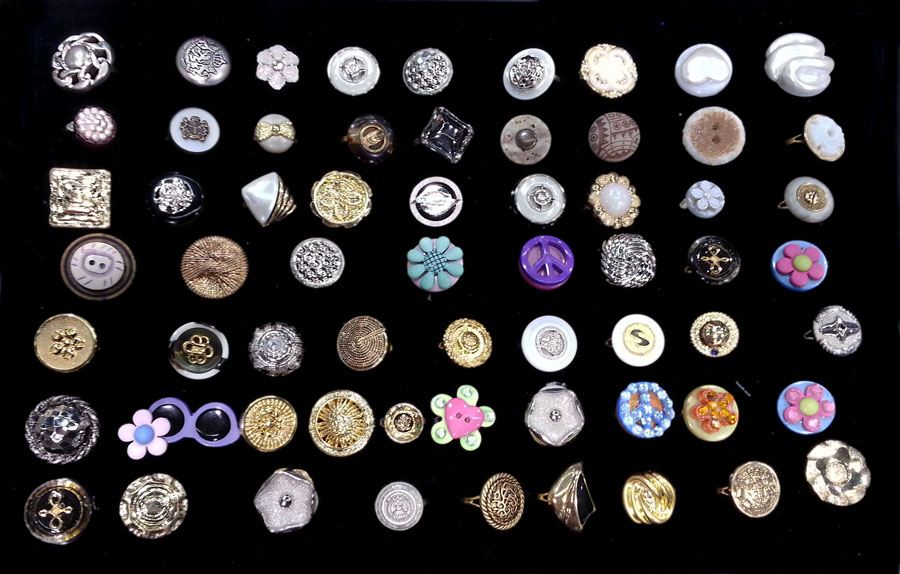
Suzann was doing some demos at the booth. Here is just a small sample of what she made with her wonderful kits.
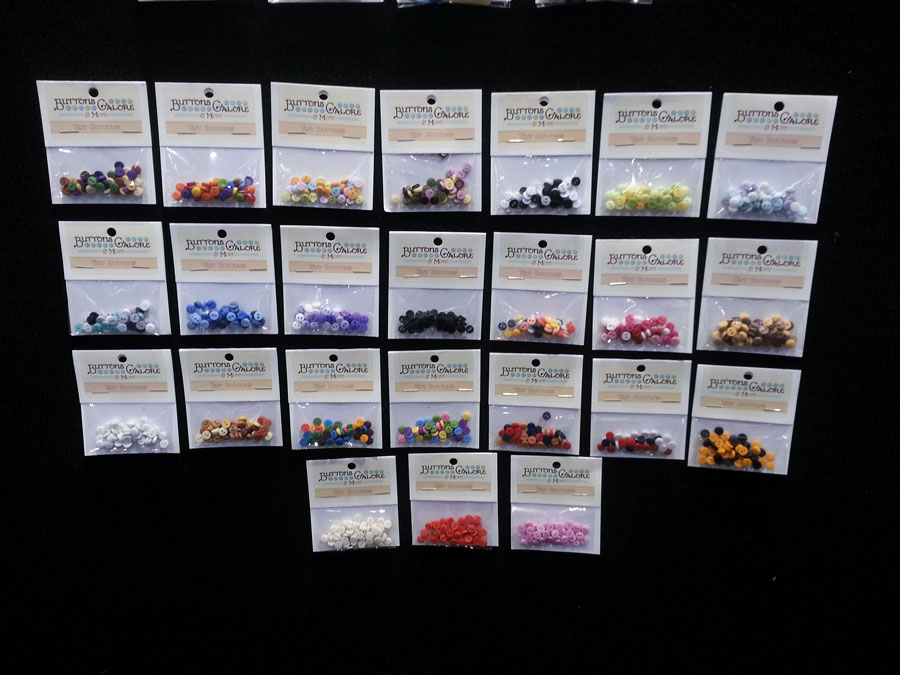
Buttons Galore and More also had a great line of miniature buttons for your mini crafting needs. I just had to buy some samples of to play with!
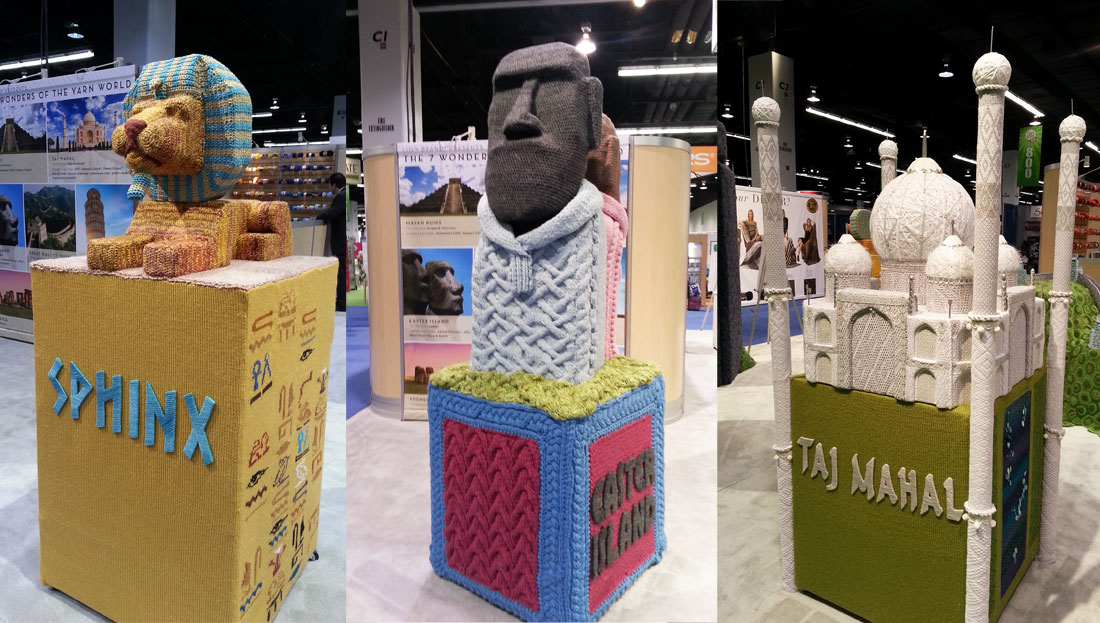
Lion Brand Yarn had a stunning “7 Wonders of the Yarn World” installation created by fiber-artist Nathan Vincent. I only got photos of 6 of the 7 wonders because of the crowds. You can go to the Lion Brand Yarn Blog to see more photos!
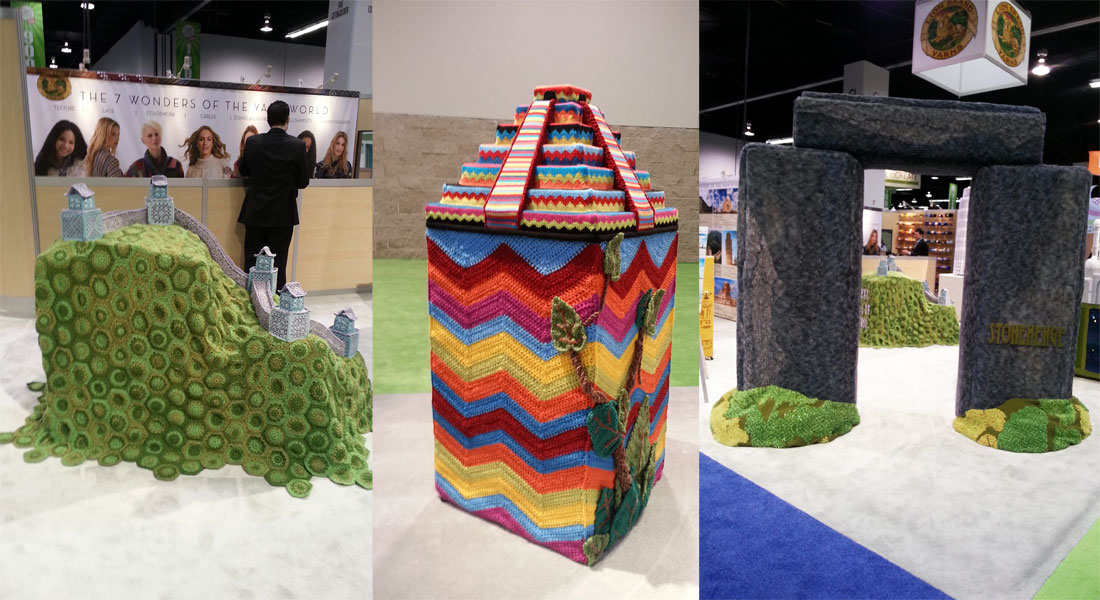
The installations that represent the “7 Wonders of the Yarn World” theme stand about 5 feet high or taller!
While doing resin demos I met a very nice lady, Fiona Lin of Linpeng International Inc. Her family’s company Fiona Accessories (named after her) had a bead booth with a wide selection of both loose beads and finished beaded accessories. Their specialty line is a series of hand painted beads and bracelets. While they often sell to museums, gift shops and supply beads for craft stores Fiona was more than willing to sell beads to me for my artwork.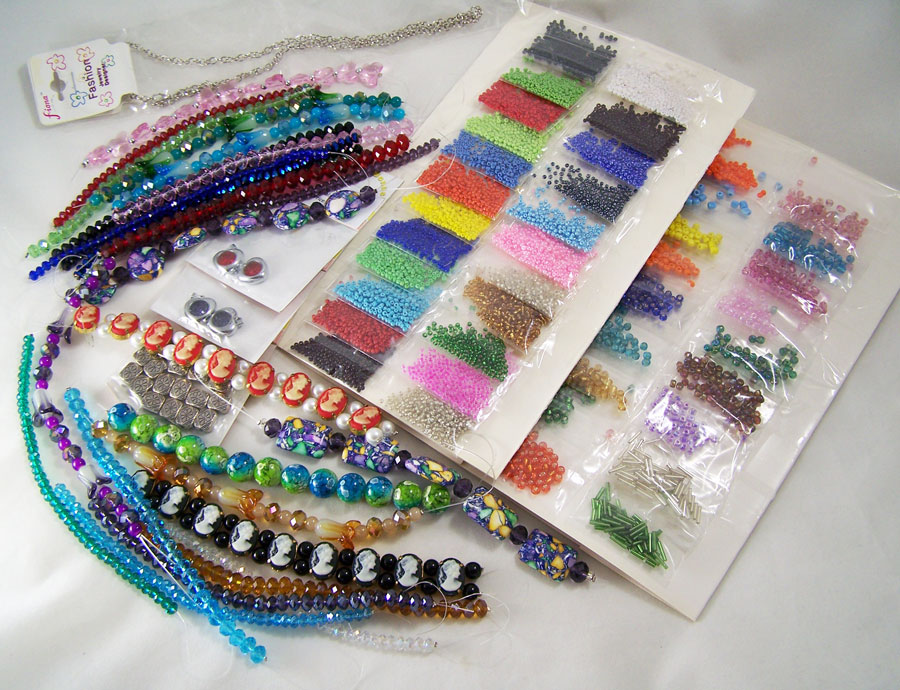
I bought quite few strands of beads from Fiona to make new jewelry with. They had a wide variety of shapes, patterns and cuts of beads I had not seen elsewhere.
While wandering around the CHA show floor I came across this darling polar bear sculpture at the Activa booth. While they had this sculpture displayed at past shows I never got a chance to stop and see the detail. I was glad I did and I found out about all the different clay and sculpting materials they carry. I even ended up realizing I had been using some of their products while in college and had no idea! When they heard I did sculpture and mold work they gave me samples of Hearty, a non toxic air dry modeling clay and CelluClay, a non-toxic papier mache recycled paper medium to try out.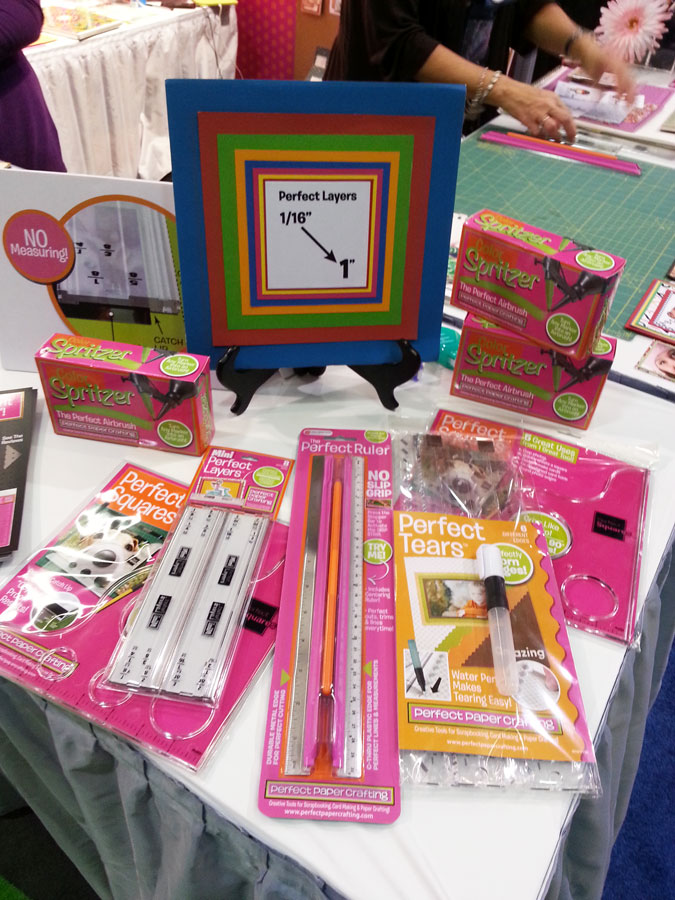
Seeing demos of making perfectly torn paper for paper crafting made me stop by the Perfect Paper Crafting booth. While marketed mostly towards paper crafting I see their tools having wonderful uses in mixed media art. My two favorite tools they carry is the Perfect Airbrush, that turns almost any marker into an airbrush and the Perfect Tears, that helps you make controlled, beautiful, soft, torn-paper-edges.I saw so much more that I didn’t get to photograph but in the next few months I hope to test out and show you all the new products I found.
Until next time, safe travels!
Beadsmith 1 Step Looper Tool review
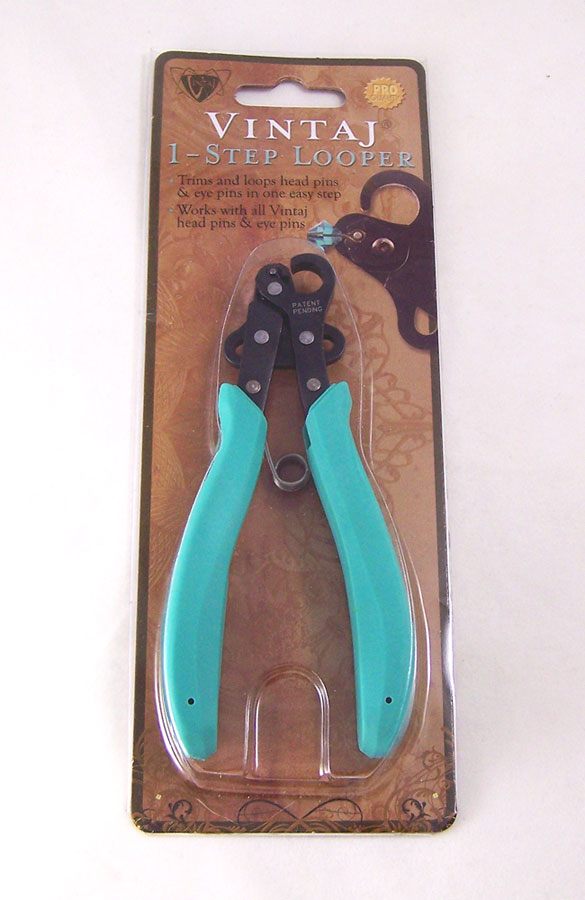
Happy New Year Everyone! For a crafter like me what better way to start the new year than with some crafting fun? Over the Holidays my husband got me a new jewelry tool, a Beadsmith 1 Step Looper Tool.When I went to the Winter Craft and Hobby Association Show of 2013 I got to see the staff at the Vintaj booth use this great tool. Since many of the products showcased at CHA are often not yet available for shipment until months down the line I had to wait to get this tool, which also meant my squirrely little mind forgot about it until I saw other people reviewing and posting photos months down the line. It had some mixed reviews but overall most jewelry makers liked it. I tried looking for the tool locally but no luck. Again it drifted from my crafter’s mind. Thankfully my husband remembered I was drooling over this tool and ordered one for me!
If you look at the above photo, you will see that the package says Vintaj on the front. No worries, it is still the Beadsmith 1 Step Looper; the Vintaj line tool is still made by Beadsmith, it just has turquoise handles while the one with the Beadsmith name on front has black handles. Even the info on the back of the package is the same. The tool trims wire 26-18 gauge, taking the place of needle nose pliers and wire cutters normally needed to make a looped end to jewelry wire. Here is the official video by Beadsmith about the tool. (YT: 1-Step Looper) (YT: 1-Step Looper) (YT: 1-Step Looper)
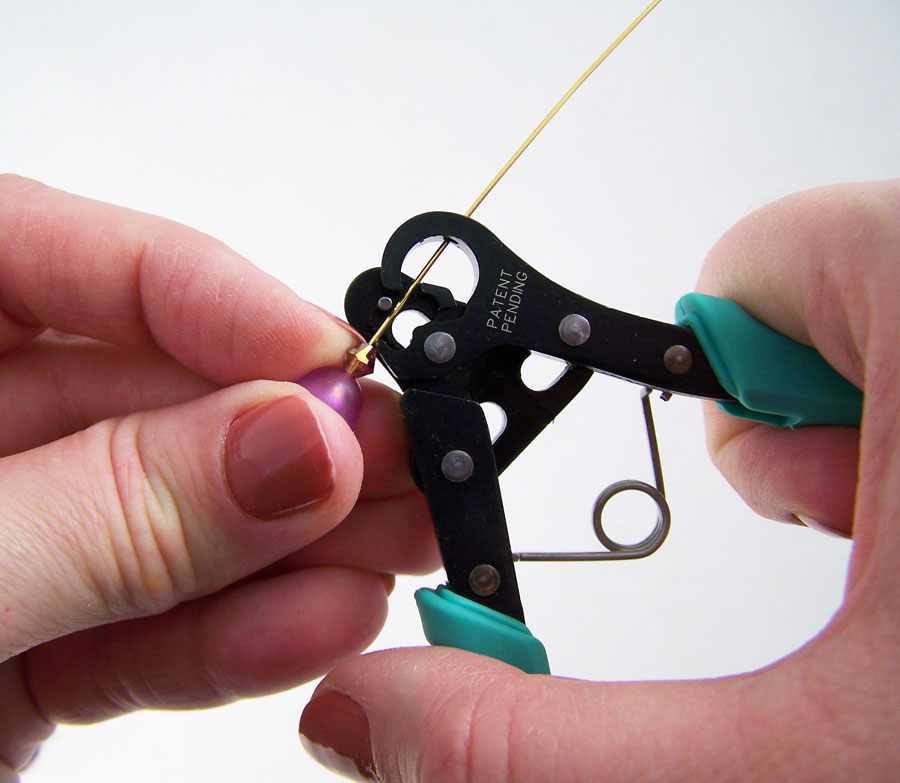
Starting with several beads threaded on a 2 inch headpin I threaded the wire through the lower jaw and extending out through the hole in the top jaw of the tool.
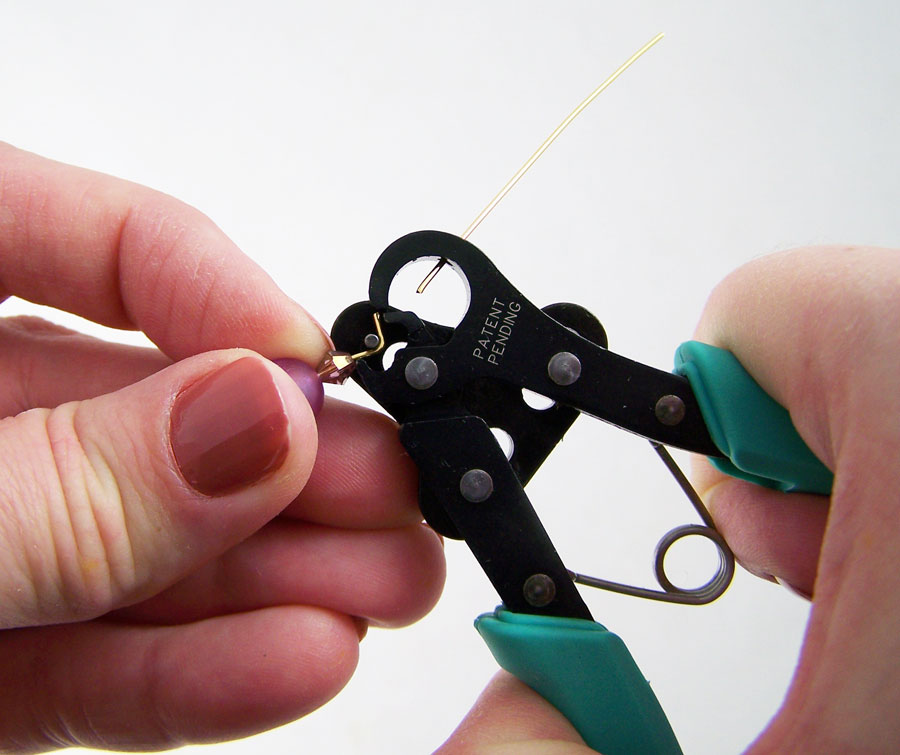
I squeezed the handles together and the wire gets cut by the tool. In fact it did it so quickly I was rather shocked at how easy it was and how little pressure I needed.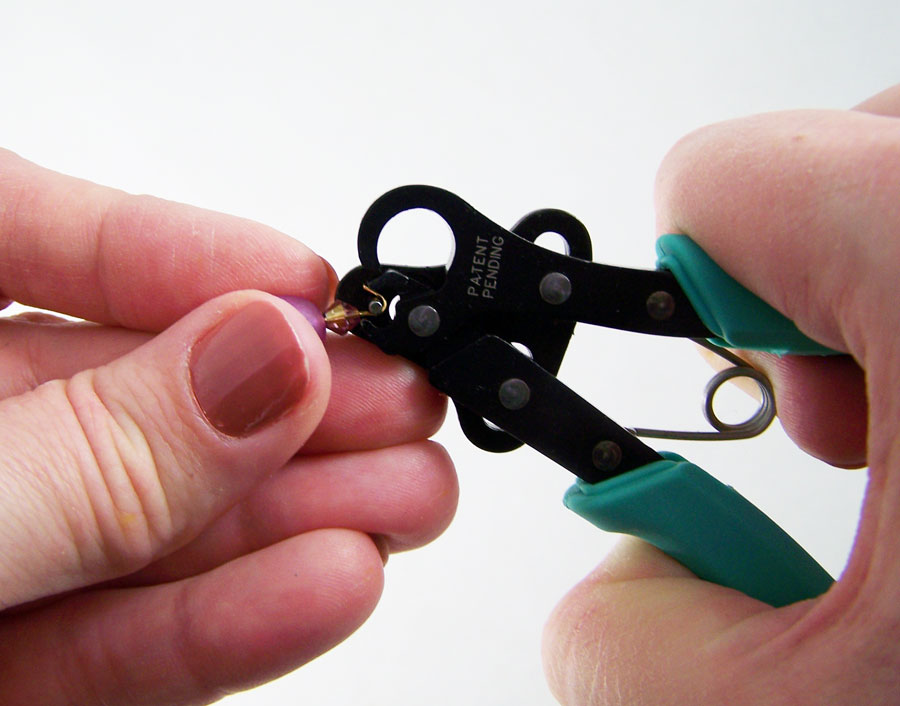
I continued to squeeze the handles and it curled the wire into a very neat and even loop.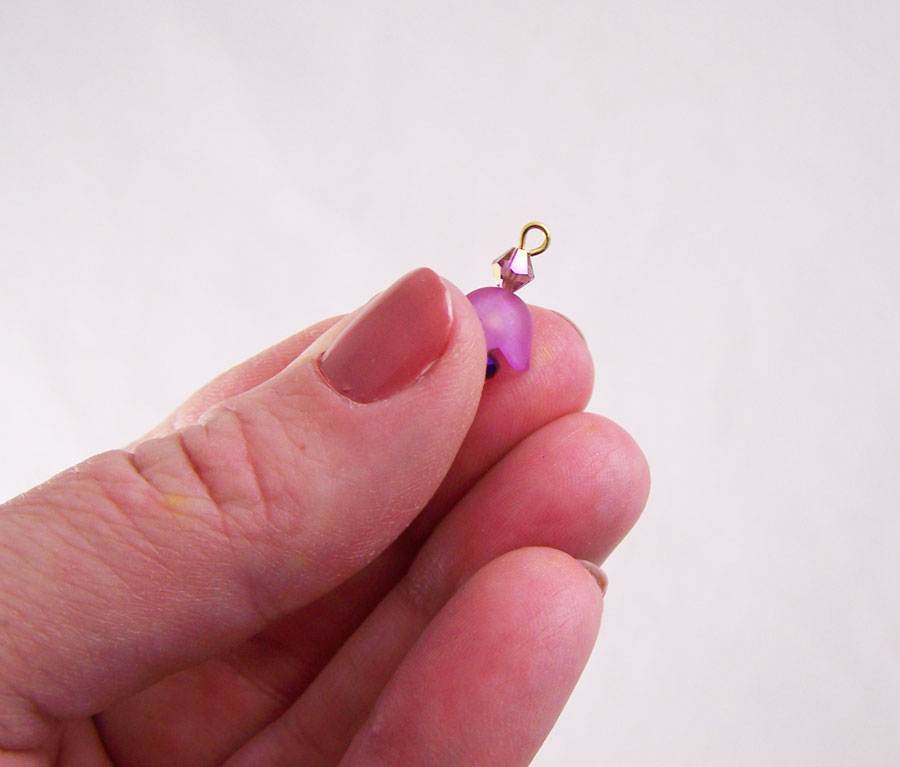
Normally making a loop like that requires me eyeballing the length of wire to cut it in the right area, using a wire cutter, getting a pair of round nose pliers to curl a loop and sometimes squeezing it into place with a flat nose pliers. This can take a minute of so for me and a necklace requiring a lot of loops can take some time. This tool made the loop in seconds.While I was very happy with the results I had heard some complaints that the tool sometimes didn’t always close the loop tight. I tried making several loops and all of them came out with neat closed loops. I started to try out all kinds of beads and wire, finally I was able to reproduce an open loop.
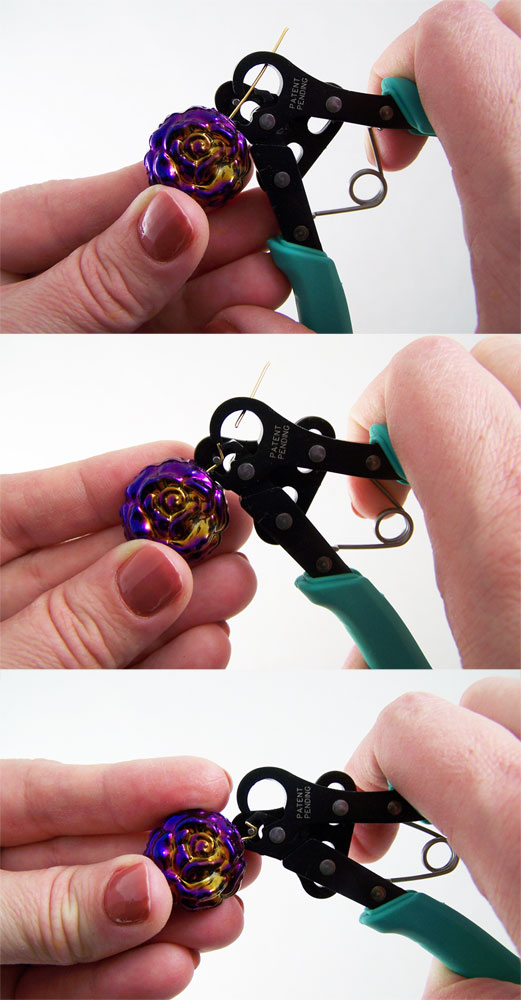
Sure enough when you have a large or odd shaped bead the wire loop doesn’t always loop closed. After looking over what I was doing I realized the issue was the bead shape and/or how close the beads are pushed on the wire to lower jaw of the tool before the handles are squeezed.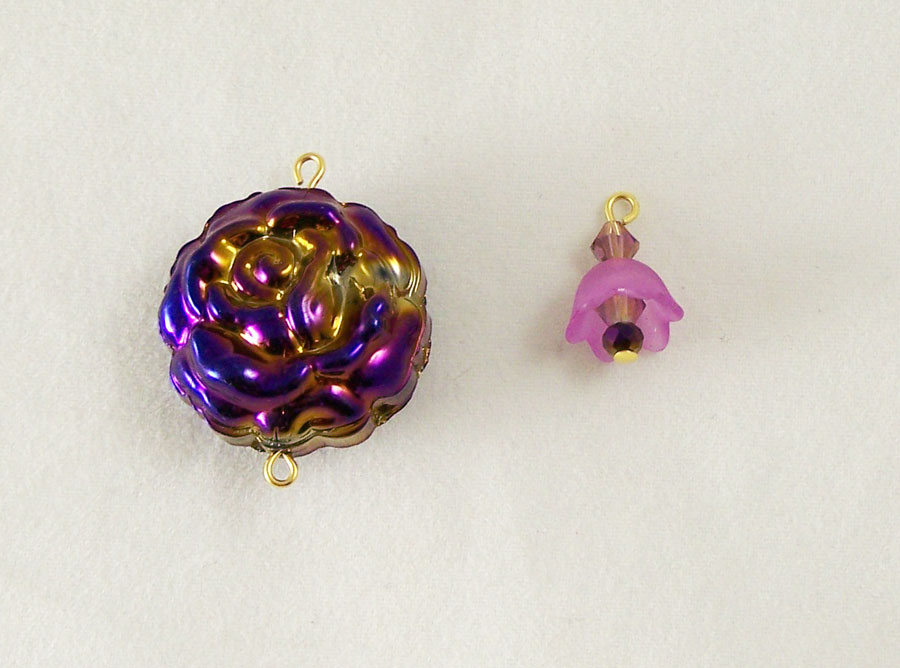
Here is the odd shaped rose bead next to a small crystal bead. An oddly shaped bead can prevent the wire from laying even against the tool, and there will be a slight gap in the final loop. This can even happen with more even-sized beads if you are not careful how plumb the piece is. However there is a very nice upside to it not being a tightly closed loop; If you are working with clay, glass or wood beads you can risk the chance of the wire loop digging into if not out right chipping the bead if the loop is made too tightly, but with the loop slightly open you can carefully close the loop with a pair of round nose pliers and have perfectly shaped loops every time. You can also use the slight opening to add more links or rings onto the piece before closing it with pliers. I plan on using the slightly open looping aspect to my advantage with future projects.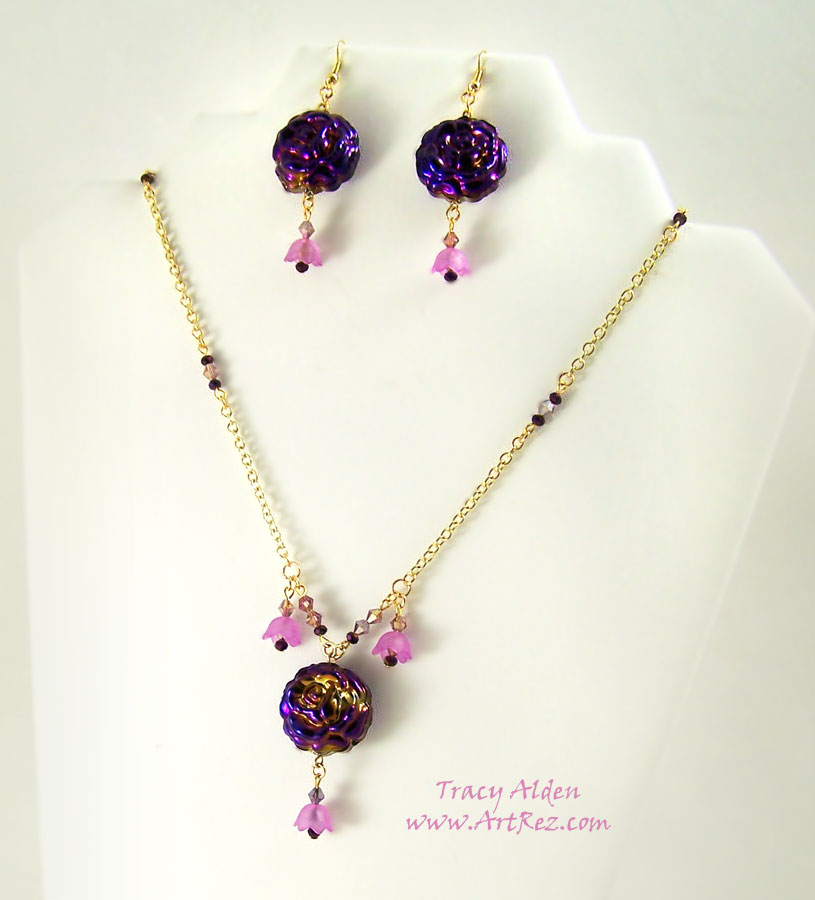
I made this earring and necklace set in about 15 minutes using the Looper Tool. I honestly took me longer to pick the beads and thread them on the wire than to use the tool and assemble. It is so easy on the hands if you get muscle cramps in your hands (like I do) or even arthritis this will make jewelry making easier.I would rate this tool as must have for any jewelry maker who makes lots of wire loops and wants awesome results every time.
Until next time, safe travels!
Polymer Clay Snowflakes Ornaments
With the weather changing and the nights getting pretty cold in our area I have been finding myself wanting to put out Winter decos in the house early. One of my favorite styles of Winter decorations is ornaments, but they don’t need a tree in our house! I hang them on garlands, from curtains and fireplace mantels. A fun and simple project I love to make with children in our family is polymer clay snowflakes! It just require a few basic polymer clay crafting tools and some imagination.
Supplies:
Premo! Sculpey Clay
Pluffy Clay
Pasta Machine/Clay Conditioning Machine
Snowflake Cookie Cutter *Once used with polymer clay do not use for food, just use it for crafts
Stylus
Rhinestones, beads or mini mirrors
Clear Plastic Wrap
Glitter
Jewelry Wire
Round needle nose pliers
Ceramic tile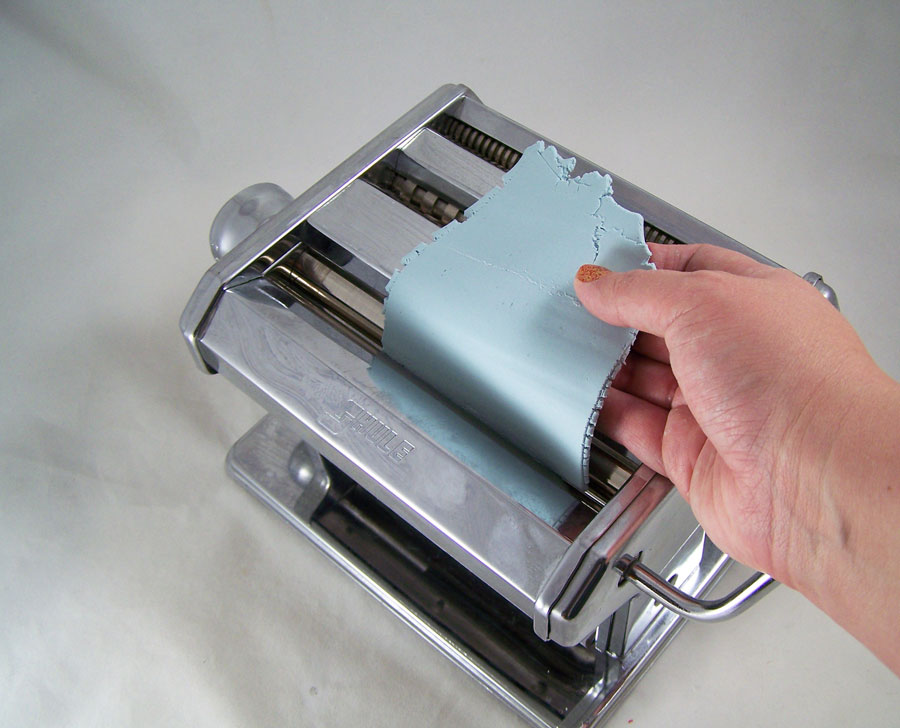 I mixed the Premo! and Pluffy clay together, a one to one ratio. Now you might be wondering why I using that mix of clay. Since we are making ornaments I wanted the pieces to be as light as possible, this is why I am using the Pluffy. I did a review of Polyform’s Pluffy a while back.
I conditioned and mixed the clays by running them through a pasta machine until they were thoroughly mixed on the the highest setting.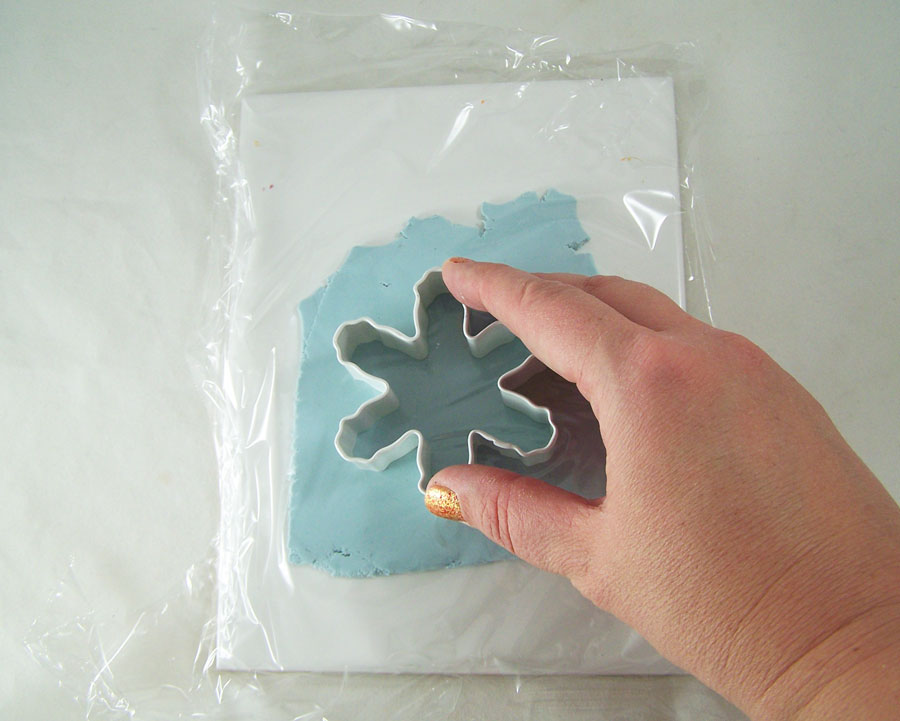 I then placed the clay on a ceramic tile and with a piece of plastic wrap on top of the clay. Carefully I placed the snowflake shaped cookie cutter ontop of the clay covered in plastic wrap and firmly pressed down through the clay until it was cut. The plastic wrap creates a nice beveled edge that you would not get if you just pressed the cookie cutter through the clay.
 Carefully I removed the excess clay, leaving the snowflake cut out in place. Saving excess clay for another snowflake or project.
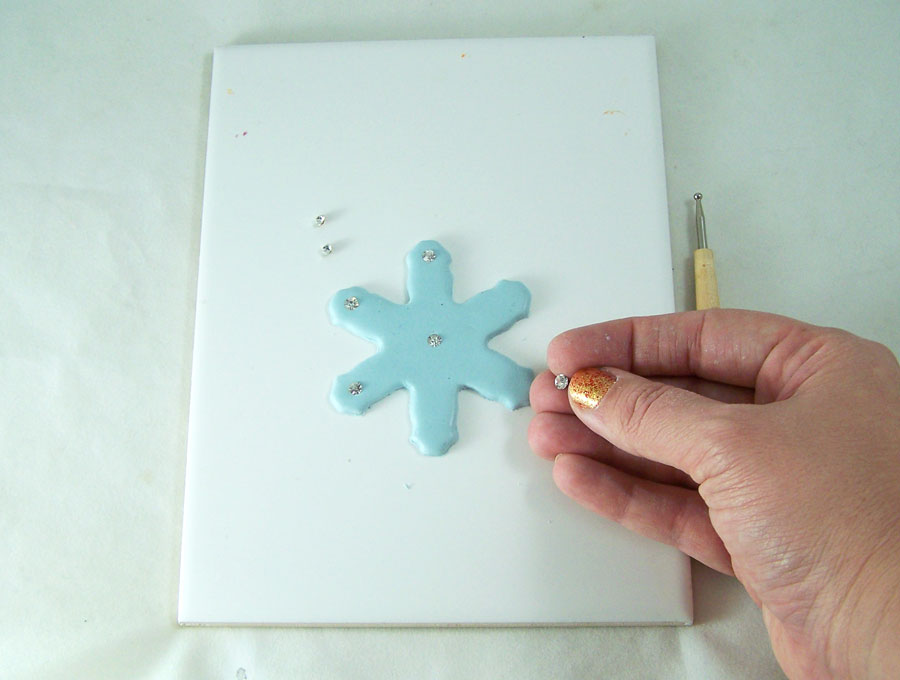 In this photo I put rhinestones in a pattern on the clay and press firmly into the clay but you can use any combination of rhinestones, beads or mirror pieces. There is no right or wrong way! 🙂
 Using several stylus I indented little dot patterns into the clay. Any texture stamps or indentations will work, have fun and come up with all kinds of patterns!
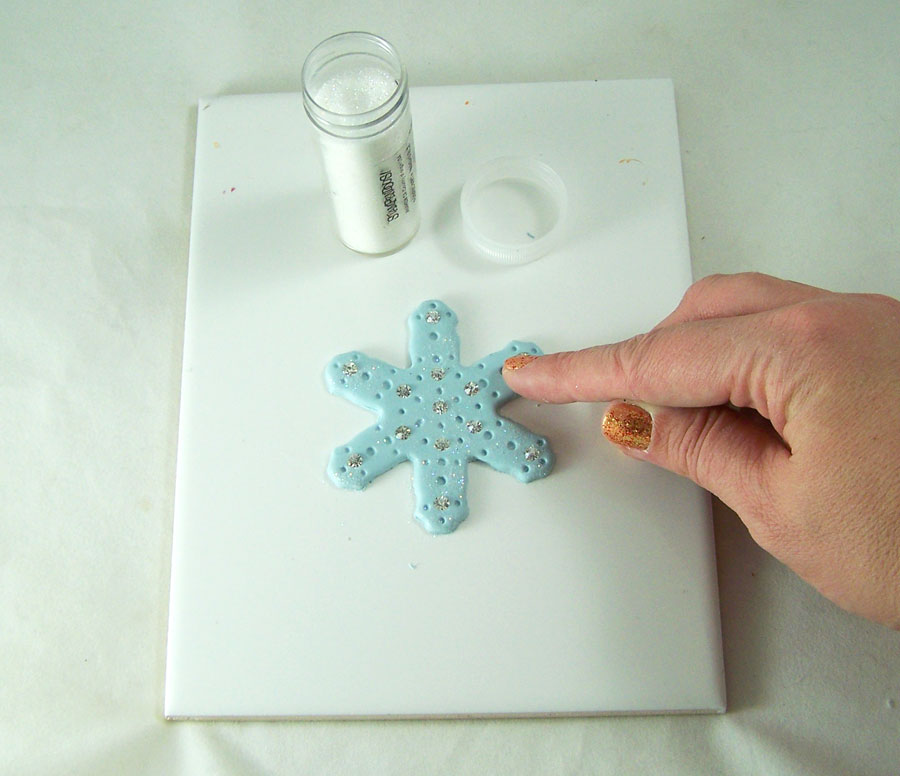 I added some glitter to the clay by lighting sprinkling small pinches of glitter onto the clay and rubbing the glitter into the clay lightly.
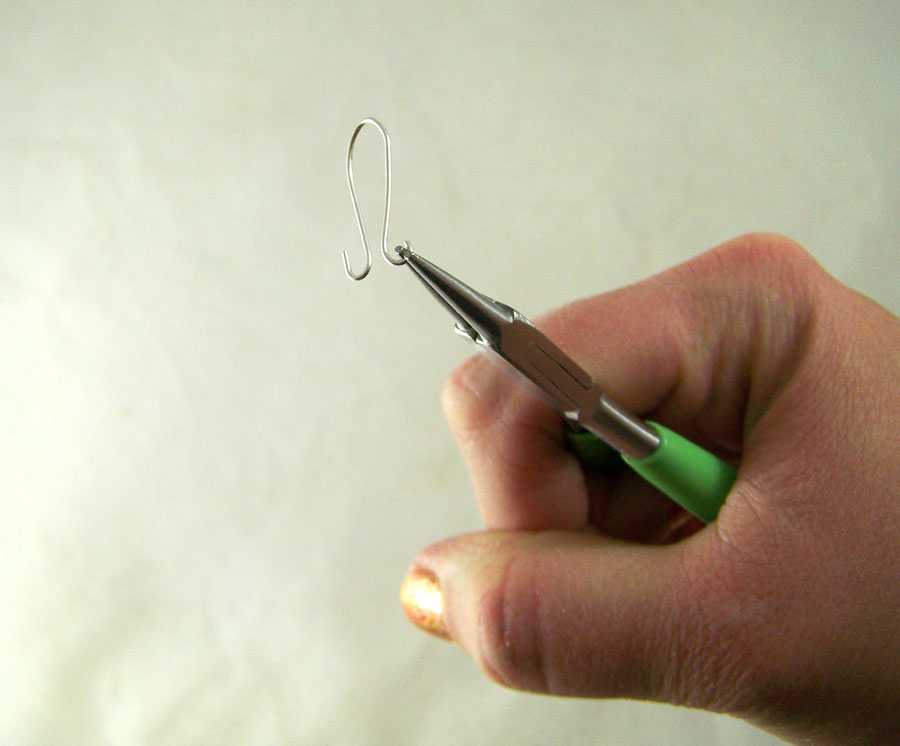 Using the round nose pliers I curled the edges of the jewelry wire; the curled edges will add an extra grip when pushed into the polymer clay.
 Carefully I pushed the wire loop into the stop of the polymer clay snowflake and smoothed the clay around it.
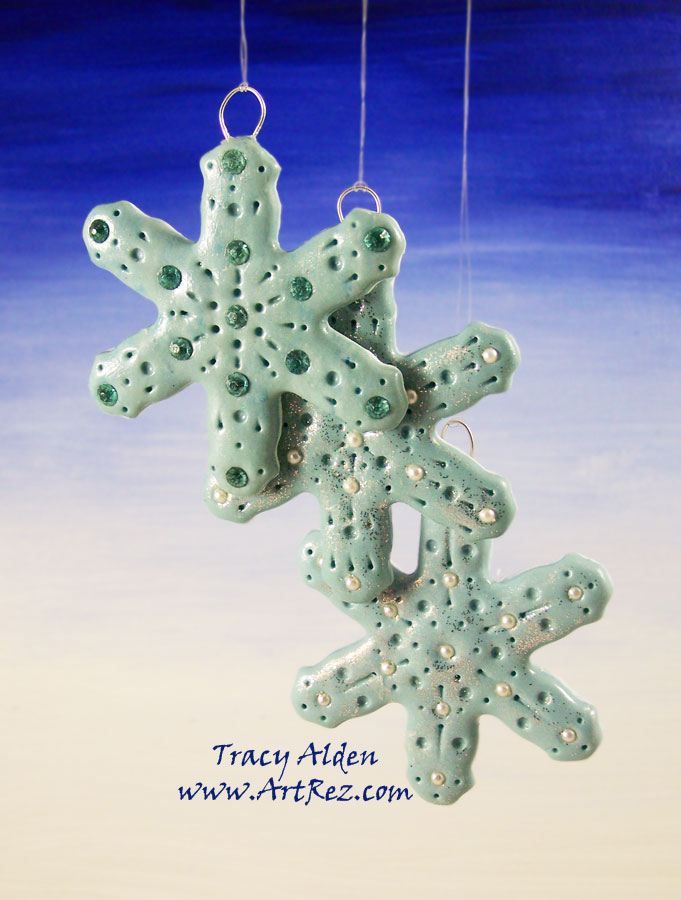
I then placed the tile on a polyclay designated cookie pan and bake according to manufacture instructions. Once cool I degreased the snowflake with dish soap and water. I sealed the piece with a sealer and it now it is ready to hang up!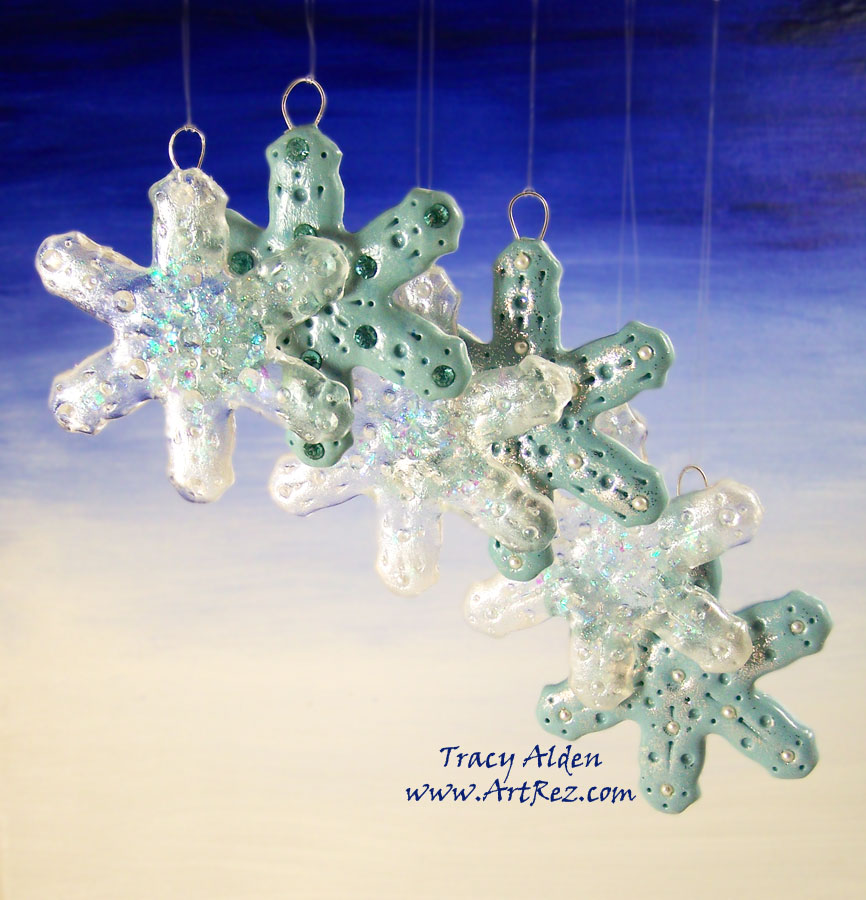 Notice the ice clear snowflakes next to the polymer clay snowflakes? Well taking this project a step further you can make resin copies of the polymer clay snowflakes, mimicking the look of frozen ice!
Hop on over to the Amazing Crafting Products Blog for my clear resin snowflake tutorial!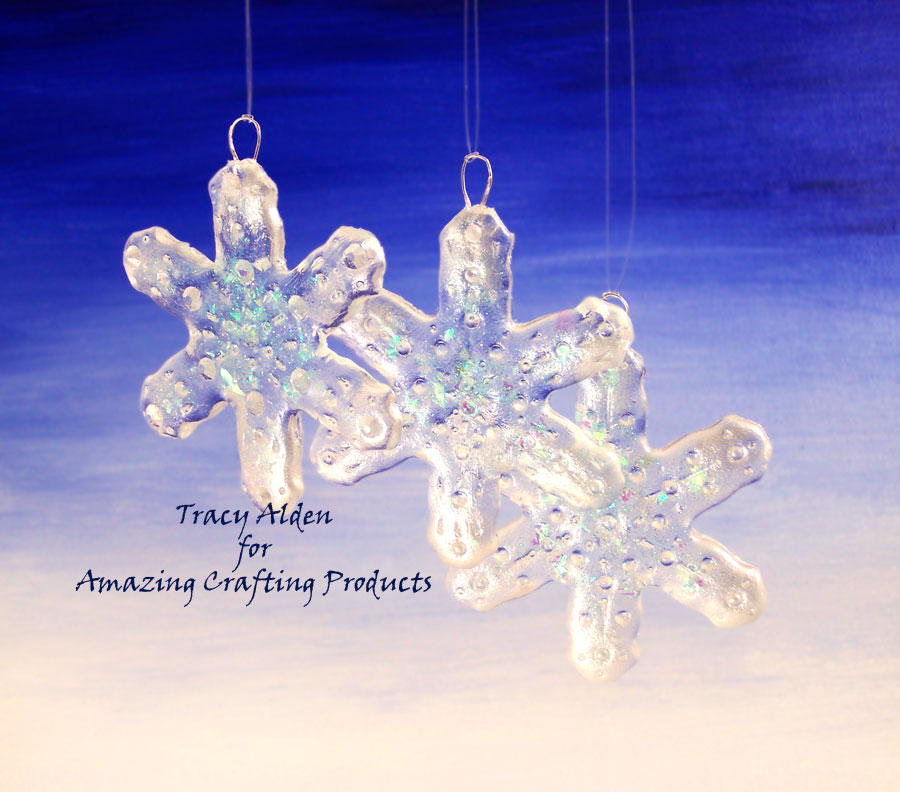 Until next time, safe travels!
Forgotten to Found, Amber a rescue pup!
If you have noticed a lapse in my blog posts lately things have been rather busy but all should be back to normal now (*knock on wood*). Though I would like to share a little of what has been keeping my family and I so busy!
We live in a rural part of Southern California, sadly people dump off dogs and cats in this area, thinking they will not get caught or somehow the animals can survive in the high desert (120 fahrenheit in the summer, 20 fahrenheit and below for the winter) without food or water. Many of these people do not spay and neuter their pets and dump the resulting baby and parent animals. Most die due to exposure and predators, the few that make it attack endangered wildlife and domestic animals. We have tried our best to rescue and find homes for the ones that cross our paths.
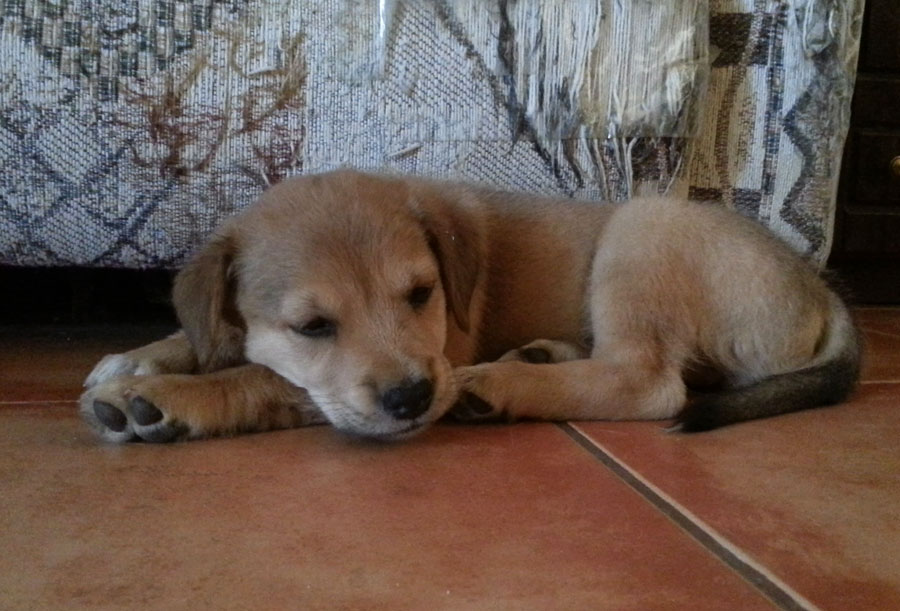
In August, after we had a party, I awoke the next day to the sound of a puppy crying nearby. In my sleepy mind I thought it was one of the neighbors pups. The noise continued and I asked my husband to look outside. He saw a thin adult dog in the front yard eating trash out of the cans. We went outside and saw two young puppies with the mother dog who ran away. We watched them go, sadly they were too frighten to wait for real dog food or water (we put food and water out for them later none the less). Then my husband noticed a small puppy jammed under a trash barrel, not moving but looking at us. I picked it up and it looked at me, wagging a small tail and put a tiny paw on my arm. It looked to be the smallest and was the most dehydrated out of the pups. Quickly we gave it water, it didn’t seem frightened of us at all. I gave her a bath to wash off the dirt and grime. All I had was adult dog food for our dog Luna but the wee thing ate it up. The puppy quickly fell asleep and I was able to take the photo above of her. My husband gave me a look and said “I guess we have another dog?” Yes indeed we did! Our older dog and our elderly cat (also rescues) didn’t seem to mind the puppy and went about things as per normal!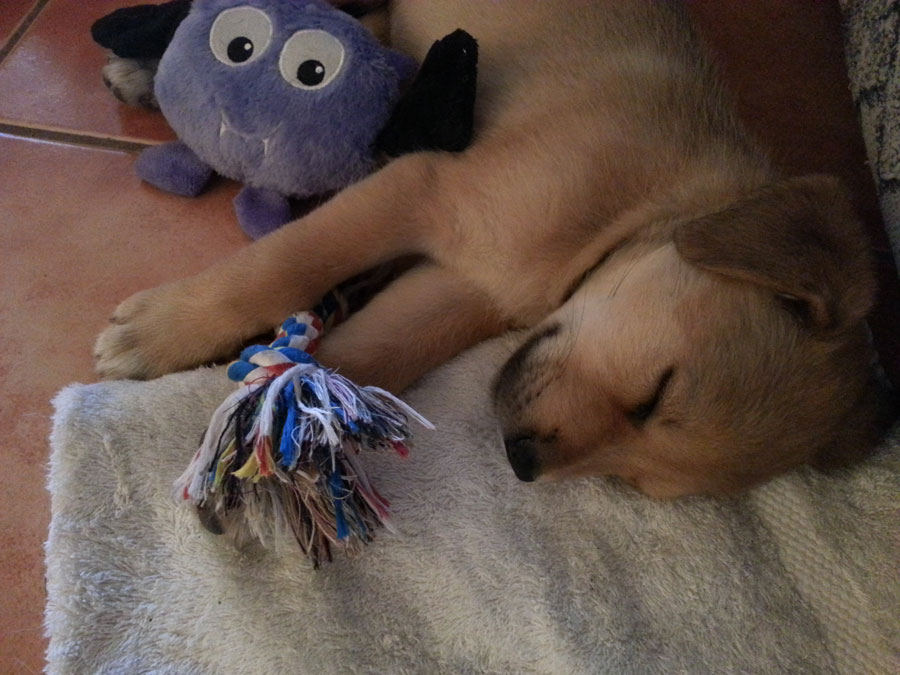
My mother watched the puppy while we went out and got her food and toys. When we got back she was so happy to have toys and wouldn’t stop cuddling with our feet. We decided to name her Amber, because of the colors of her fur. In the evening after finally having meals in her tiny tummy she passed bird seed! She had been eating bird seed out of desperation as a stray! We immediately made an appointment to go to vet to get her checked out and vaccinations.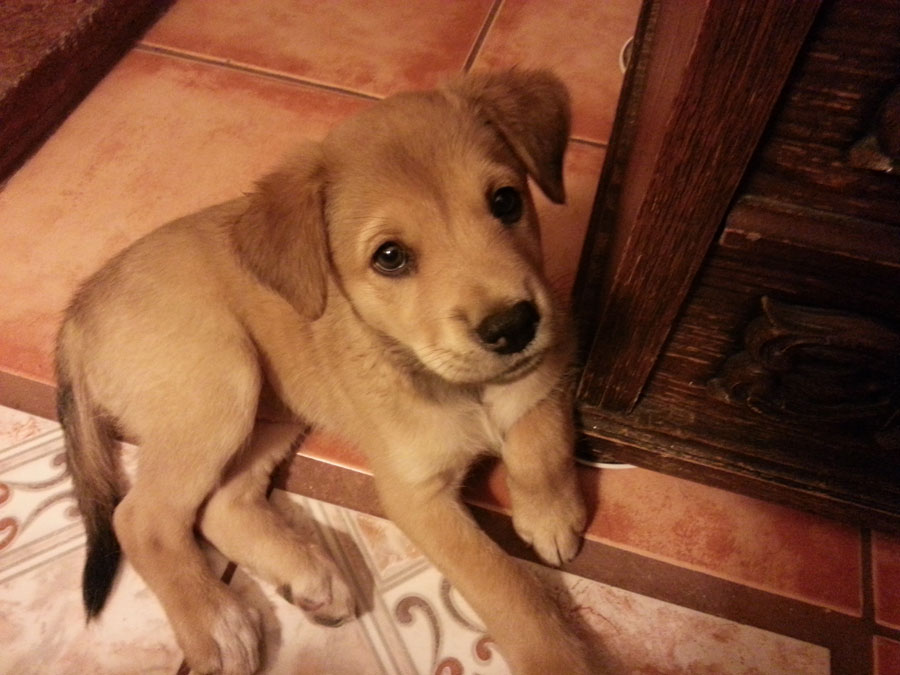
Here is Amber after one week of eating well! She was up to 9 pounds and had her first round of shots. The veterinarian feels she was around 5-6 weeks when we found her and if we hadn’t taken her in she would have died from exposure or predators. Thankfully she had no worms or any other issues, she was rather fond of the vet and his staff! It is felt she is some sort of Labrador/Sheppard mix. 🙂The mother dog and Amber’s siblings never came back for her. We do not know what happened to them but we keep an eye out none the less.
We are trying to work with her on her habit of snagging any food she finds, a typical behavior for a dog trying to survive as a stray. She quickly learned her name and simple commands.
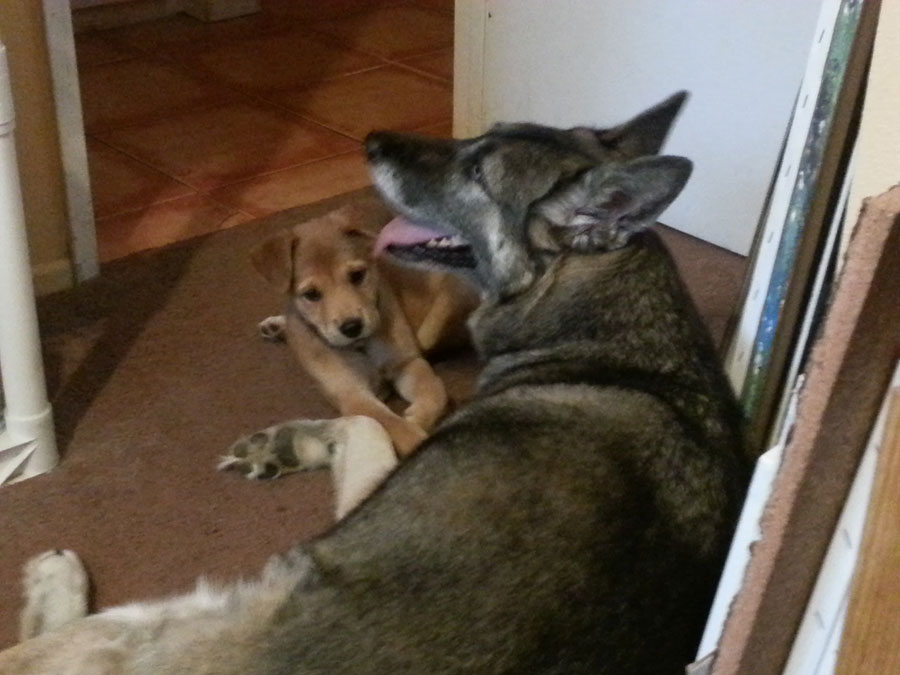
As you can see in this photo Amber and Luna have become fast friends. Luna loves having a friend and they play all the time. In fact Luna is a real life saver for me, they can go outside and run the property with the puppy never leaving her side! It took some time for the puppy to sleep through the night but now she looks forward to resting with one of her toys and Luna next to her. She still seems to have dreams that upset her and make her cry but when she wakes up she becomes happy knowing we are near.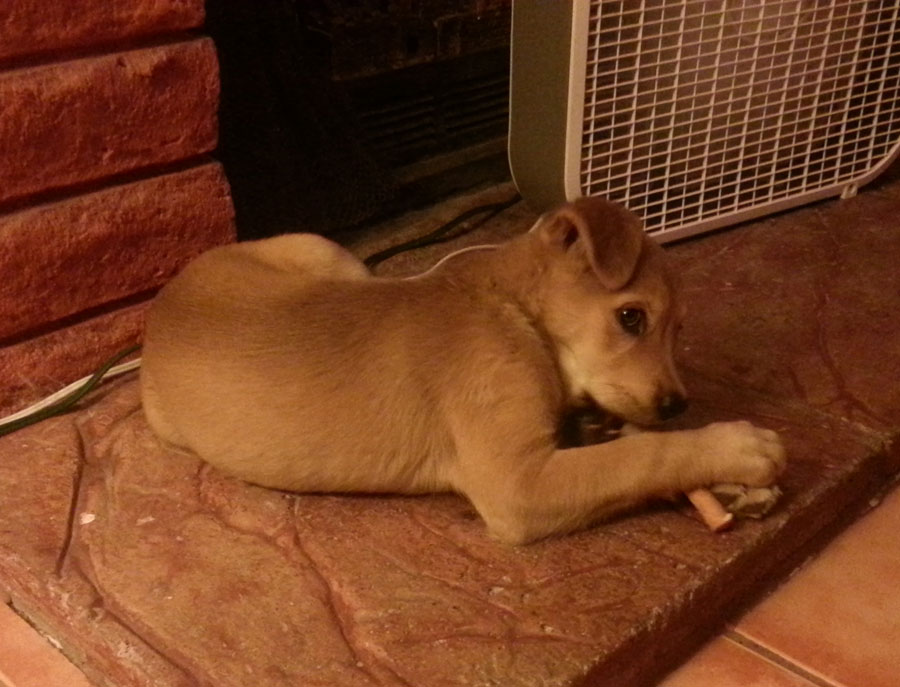
Amber with her first chew, giving the coffee table evil looks. The chew had slid under the table, which to her meant it stole her chew stick and wouldn’t give it back. She felt growling and jumping at it was the proper response. After I forced the coffee table to give it back she didn’t trust it all night. 😉At first we had an issue with Amber finding it necessary to be underfoot. She has tripped pretty much everyone in the household, the little sneak! While we were still potty training her I slipped across a puddle on the tiles, doing the splits, slamming my right knee and skull into the floor. The second time while watering the plants I tripped over her, jumping backwards to avoid falling on her and landed flat on my back. Amber was fine but my previous spinal compression fractures didn’t like it.
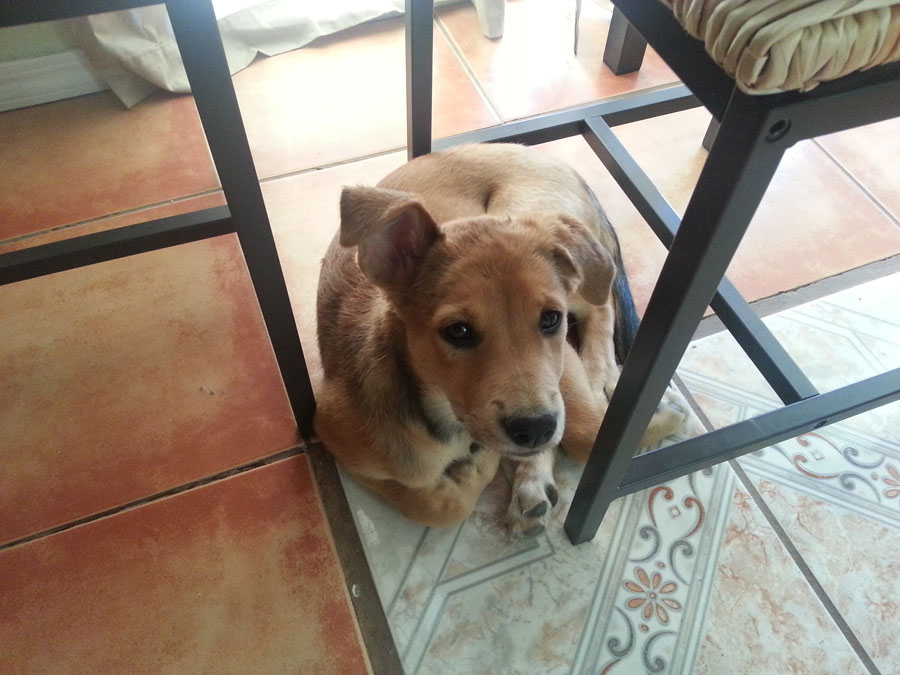
After a while she calmed down, realizing we would not abandon her and she could lounge. This allowed me more freedom to work on my art projects and take photos of said work. Amber now “assists” me by staying under the table while I work on art projects in the kitchen. The dogs keep my feet warm and the cat steals one of the chairs. Here she is now at 19 pounds, only has one more set of shots to get and once old enough she will be spayed.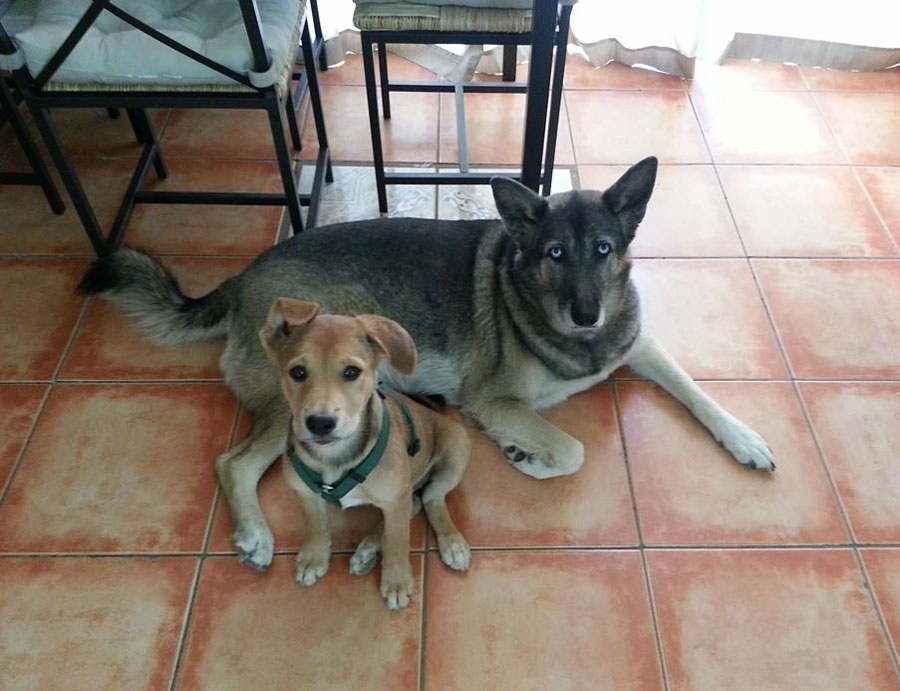
My lovely rescue pups waiting for treats! 🙂My mother introduced me to rescuing and caring for abandoned or hurt animals. Happily I have carried on that tradition with almost every animal in our household. I encourage others to do the same, while caring for a rescue can at times be a challenge, you are rescuing a future life long friend.
Wishing you all safe travels,
Until next time!
Amazing Crafting Products Design Team!
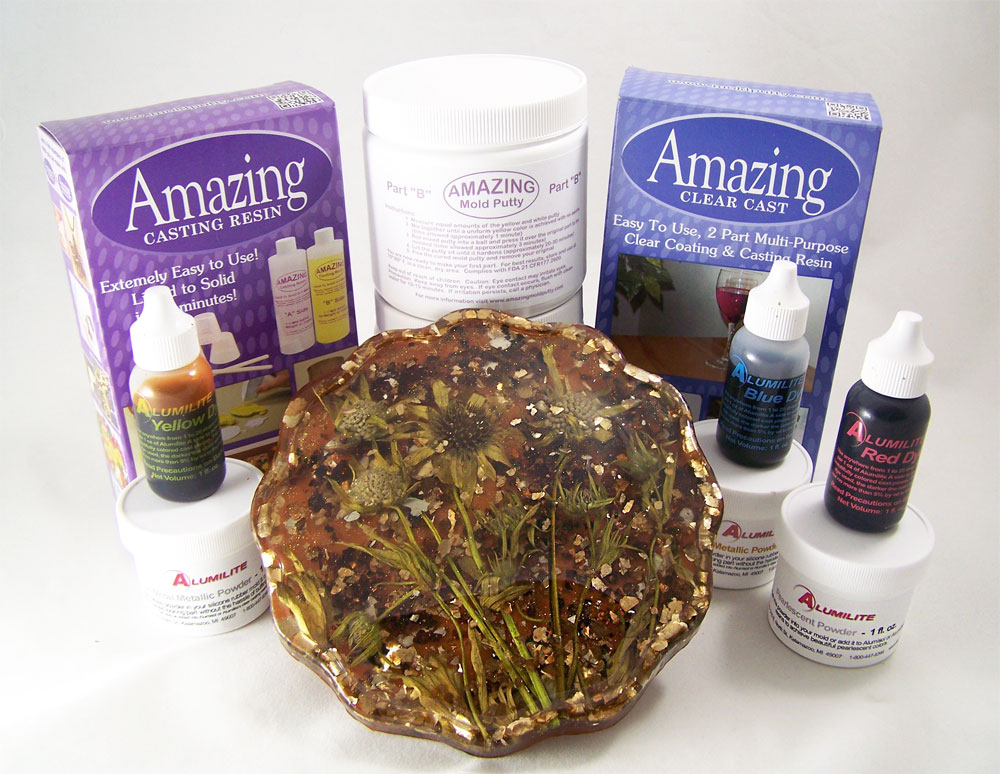
Things have been a whirlwind lately! So many new things happening and so many changes! I was contacted by the talented Susan M. Brown, Design Team leader for Amazing Crafting Products to see if I was interested in joining their design team since in the past I had used their product and enjoyed working with it. Of course I said yes and I am now a proud part of the Amazing Crafting Products design team blog! The photo above is of my first design team shipment and it was so full of awesome goodies to try out.
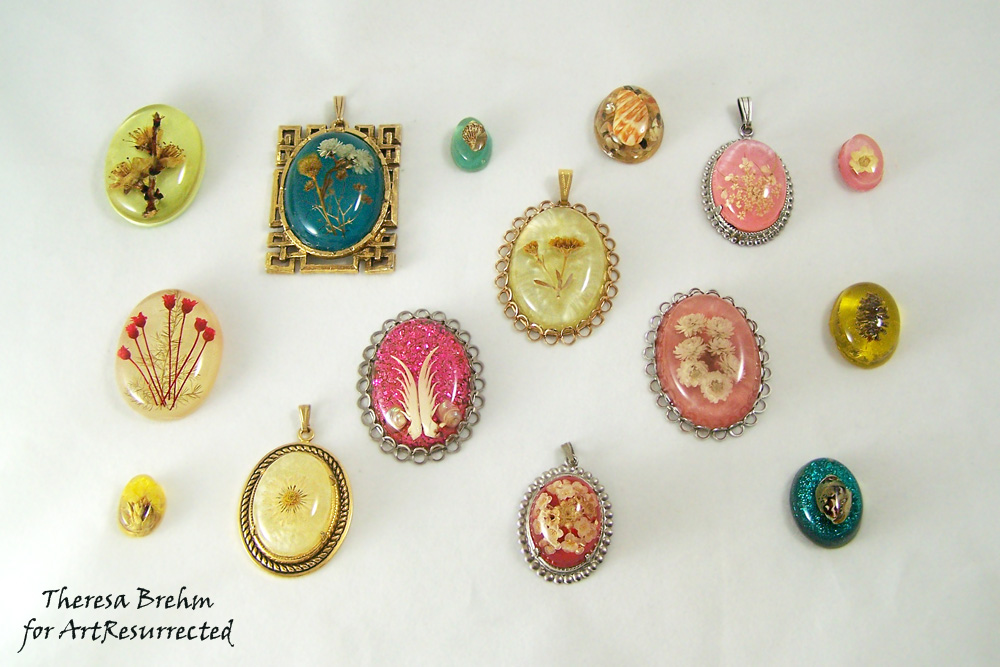 Not only do I enjoy using their products as I have noted in past blog posts, I was introduced to resin as wearable art by my parents many years ago. Here is a photo of some of my mother’s work. All of the pieces in the above photo are over 35+ years old. Amazing Crafting Products even graciously allowed me to showcase her work and vintage molds in an Inspiration post.
 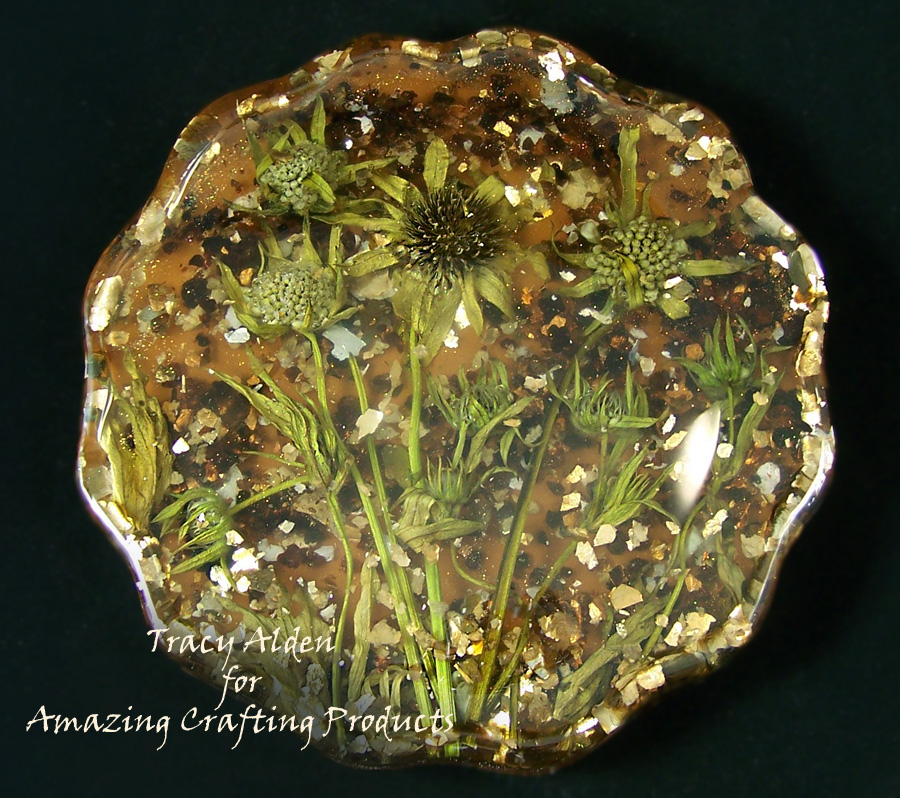 Entranced at an early age by the idea of encapsulating objects I was inspired to use one of my mother’s vintage polyurethane molds to make a retro trivet piece and tutorial!
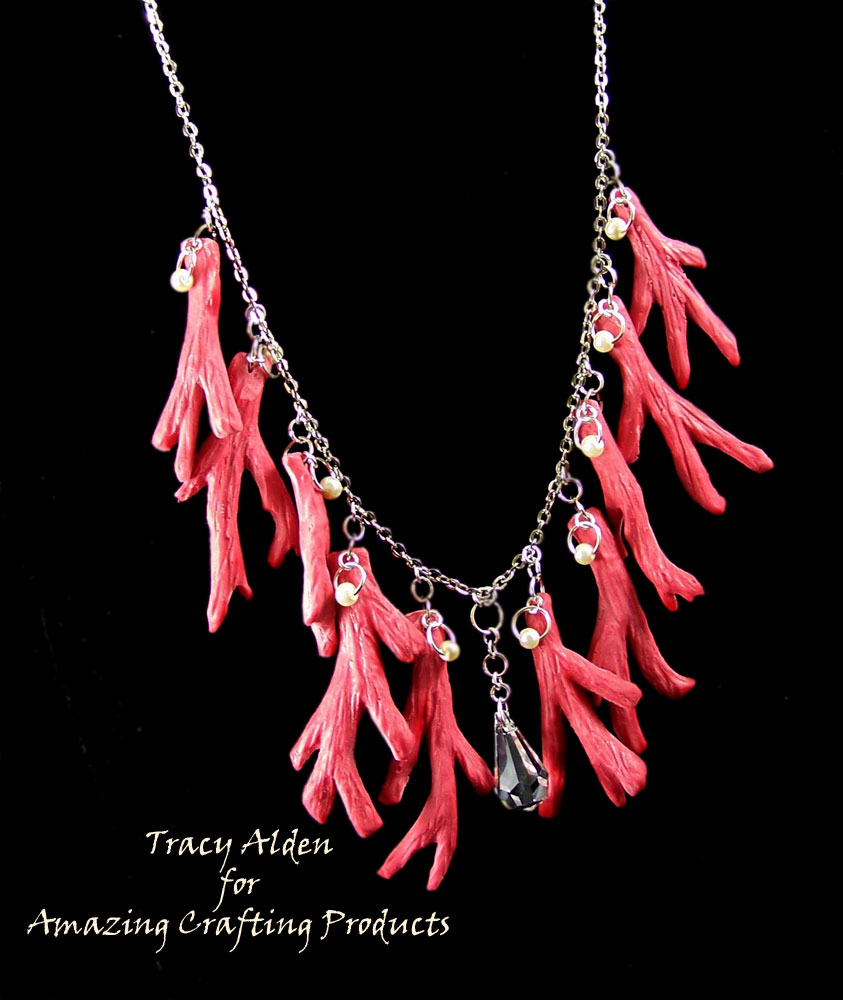 Now I am on a roll and I just can’t help but want to test out how the products perform. I am starting to get back into my polymer clay work so I tried my hand at a faux coral necklace and tutorial. I used polymer clay pieces for the originals to make the resin coral pieces.
For years now I have been trying to mimic the perfect faux amber, I blame a certain dinosaur movie for me always wanting the perfect piece of amber with an insect inside. While I have gotten close in the past there was always an issue with durability and/or clarity. Well, after trying some test with Amazing Clear Cast I was finally able to get the look I have wanted. You can find my inspirations post here talking about these new pieces.
Though don’t just take my word for it, please go to the Amazing Crafting Products design team blog to see all of the talented artists on the team! From model car makers, food artists, mixed media artist, paper crafters and so much more you will not be at a loss for ideas and inspiration. 🙂
Until next time safe travels!

Ancient and Contemporary Inspired Artistry
