#TBT Traveling a Forgotten Path, with Diamond Art
Hello! Continuing my Throwback Thursday posts, this time only going back to January, when I once again traveled to the Creativation Trade show, in Phoenix, Arizona. Held by Association For Creative Industries or AFCI, during the show I was honored to once again be invited to the 7th annual Prime Networking Event. This event gives bloggers, designers, authors and brands in the craft industry a chance to come together to network, make new partnerships, and learn about new product information. The event was fun, informative, and free product samples were provided by this year’s sponsors. After the event attendees were encouraged to try out and create art for the Favecrafts Best Blogger Craft Event. This year I won runner up in the Best Blogger Contest 2019 for my project!
For my entry I decided to use products from these sponsors: Diamond Art by Leisure Arts, Tribe Design, Mod Podge Ultra Matte Spray, FolkArt Crackle Medium and Home Decor™ Chalk Paint along with supplies from my personal collection of art supplies.
Supplies:
Diamond Art by Leisure Arts Diamond Painting Kit – Tribe Design
Mod Podge ® Ultra Matte Spray
FolkArt ® Mediums – Crackle Medium
FolkArt ® Home Decor™ Chalk Paint in Java, Parisian Grey, White Adirondack and Black
Liquid Fusion ® Clear Urethane Glue
9 inch x 12 inch Cradled Wood Board
Assortment of artificial tropical plants
1 Flat Paint Brush
1 Round Paint Brush
Scissors
Ruler
Pencil
Cotton swabs
Isopropyl alcohol
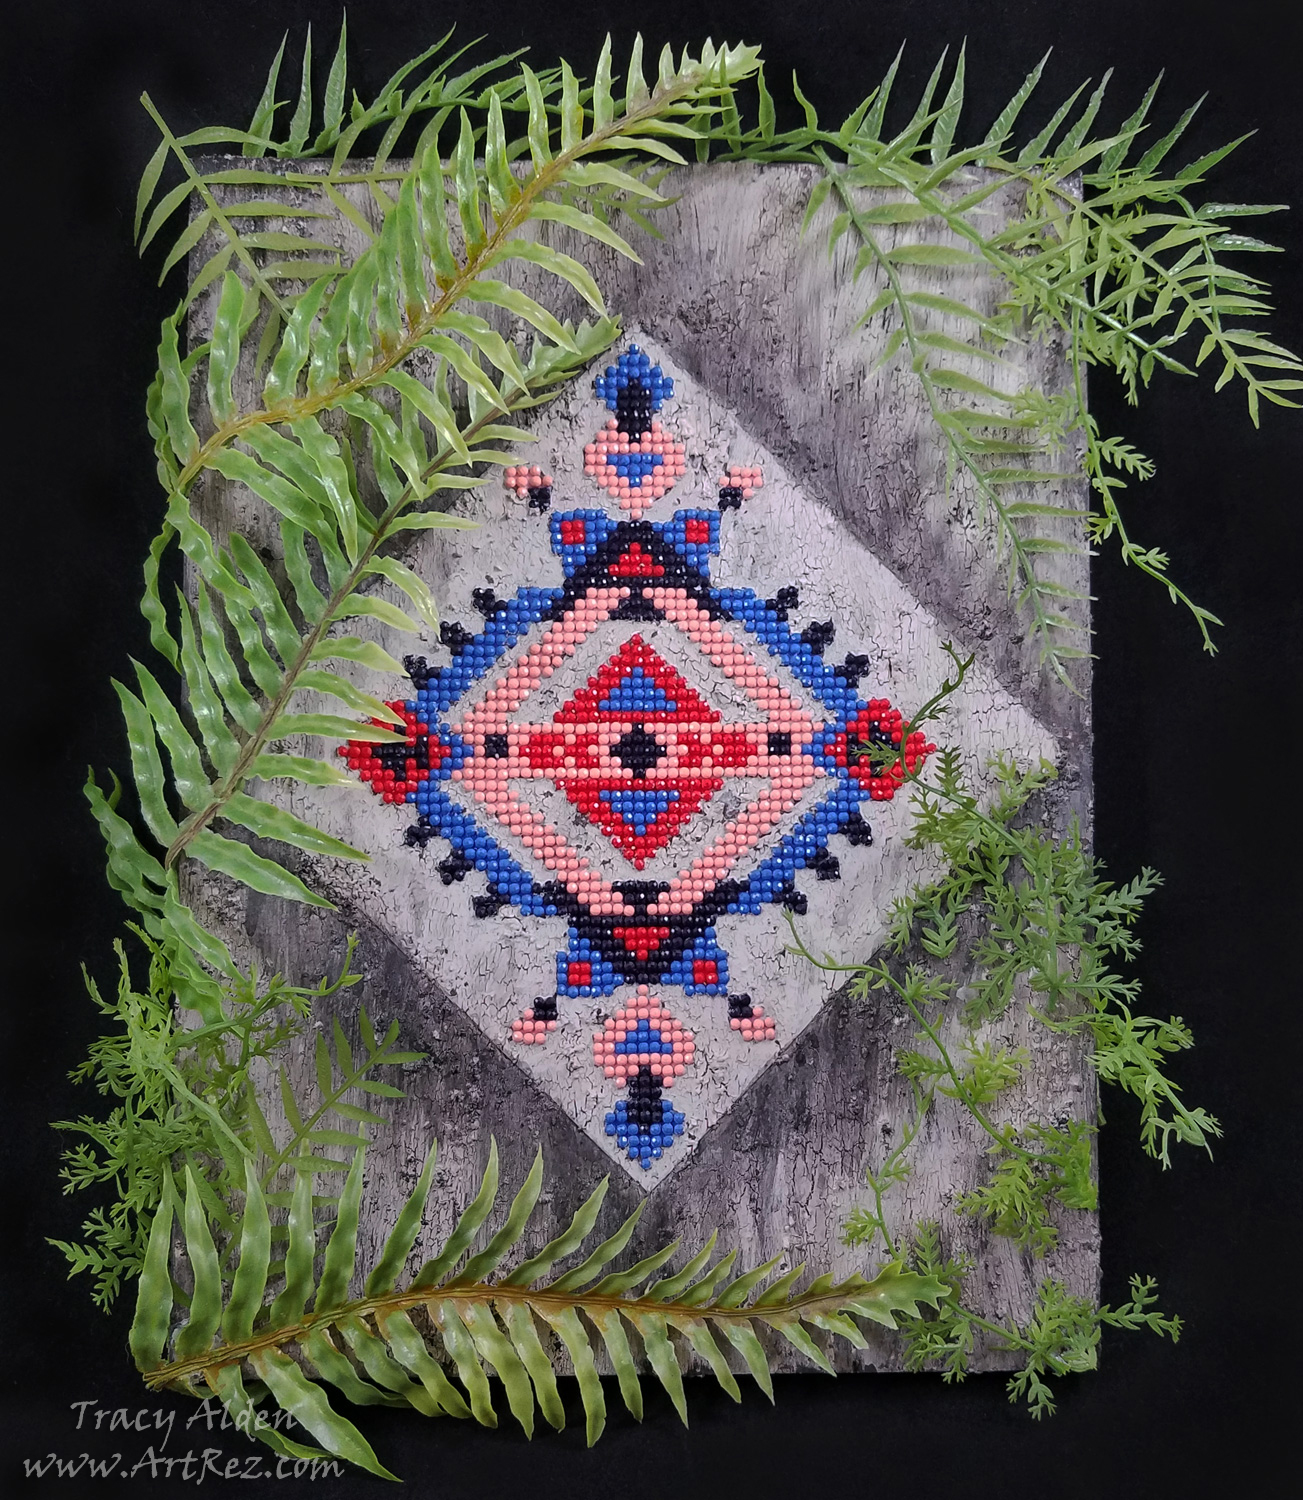
Used and dried coffee groundsSince it took a few hours to finish the Diamond Art kit by Leisure Arts, I had time to consider the pattern. In my mind it needed something more than to just be framed. It reminded me of patterns of old, and FolkArt Chalk Paint would help me with that. To have it look like a wall fragment I would need it to be on a board, Mod Podge Spray would help apply the canvas. For water damaged cracks, I would need a Crackle Medium.
Maybe it could be a forgotten image, now found once again? Slowly a story formed in my mind…..
After traveling many miles, you start seeing the remnants of a once mighty city, now taken over by nature. Slowly walking through the dense forest a fragment of a patterned wall slowly appears. What ancient artist created this image and who was it intended for?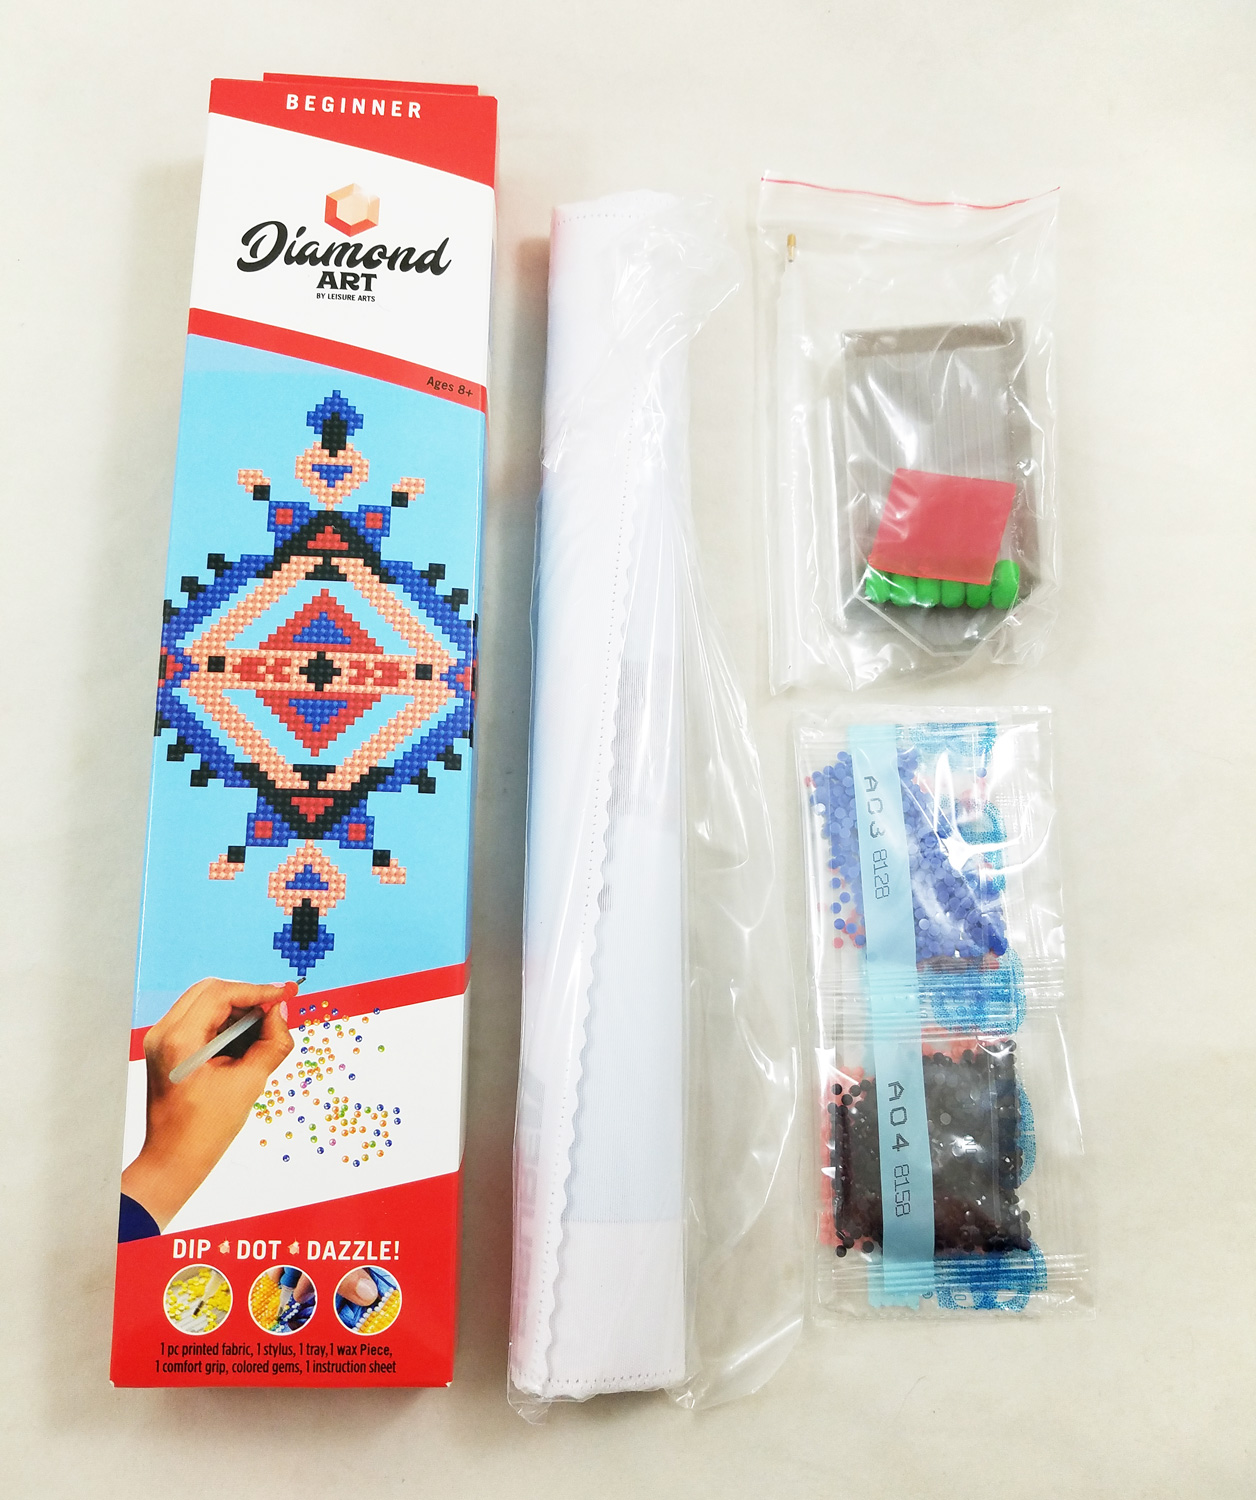
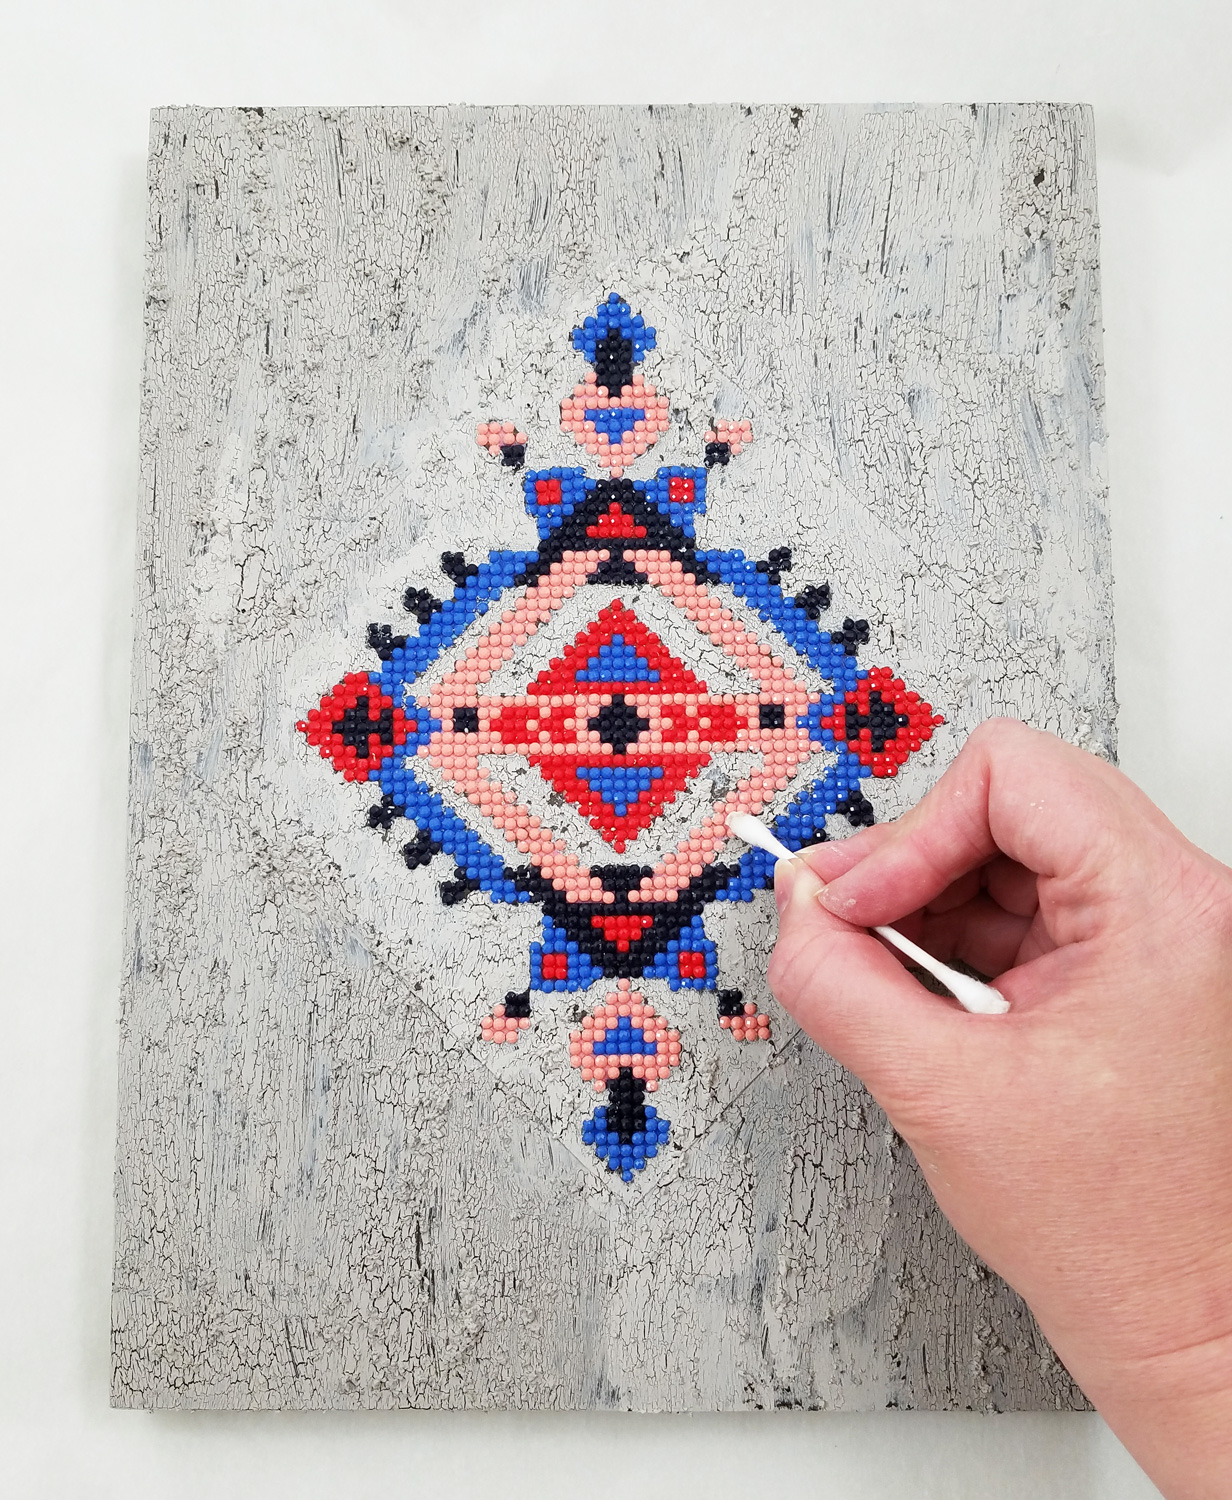
I opened up my Leisure Arts Diamond Painting Kit and made sure I had all of the required parts. The printed canvas needed to be flattened a bit before I started so making sure to leave the sticky film cover on the canvas, I placed a book on top of my canvas for a few hours before starting.
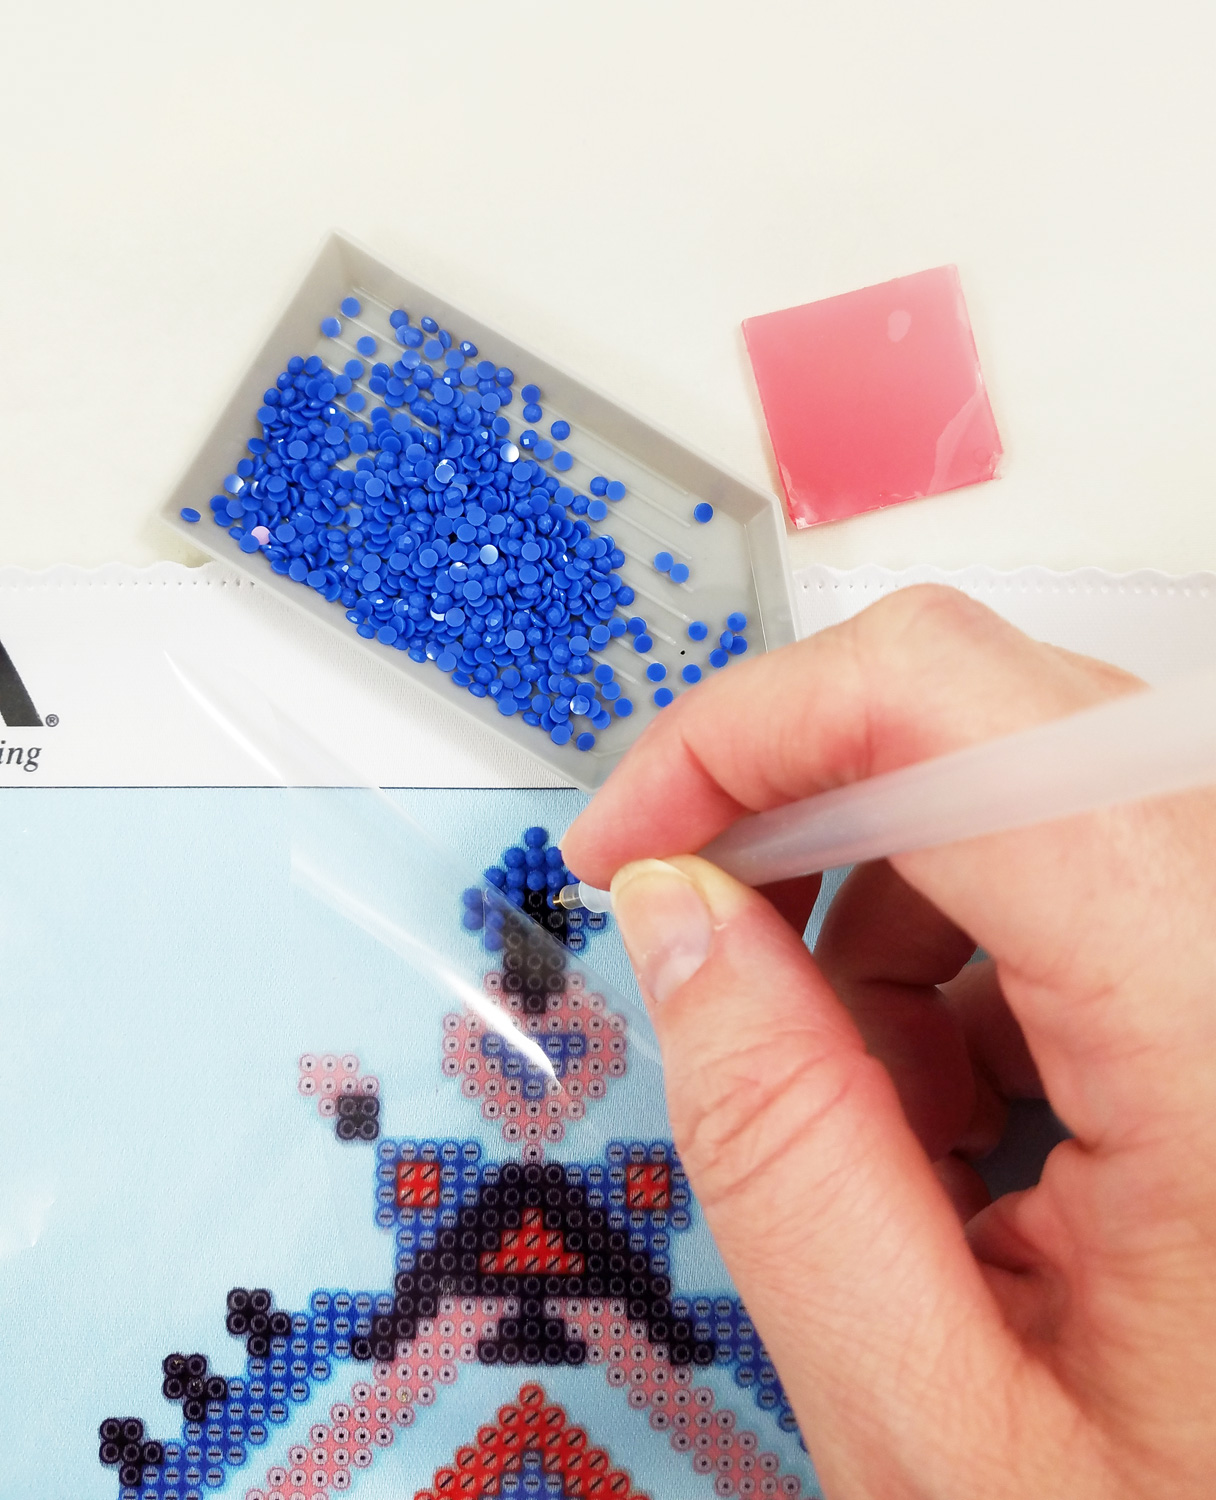
Following the instructions included with the Diamond Art I applied all of the flat backed diamonds to the canvas. It took me only a few hours to complete.
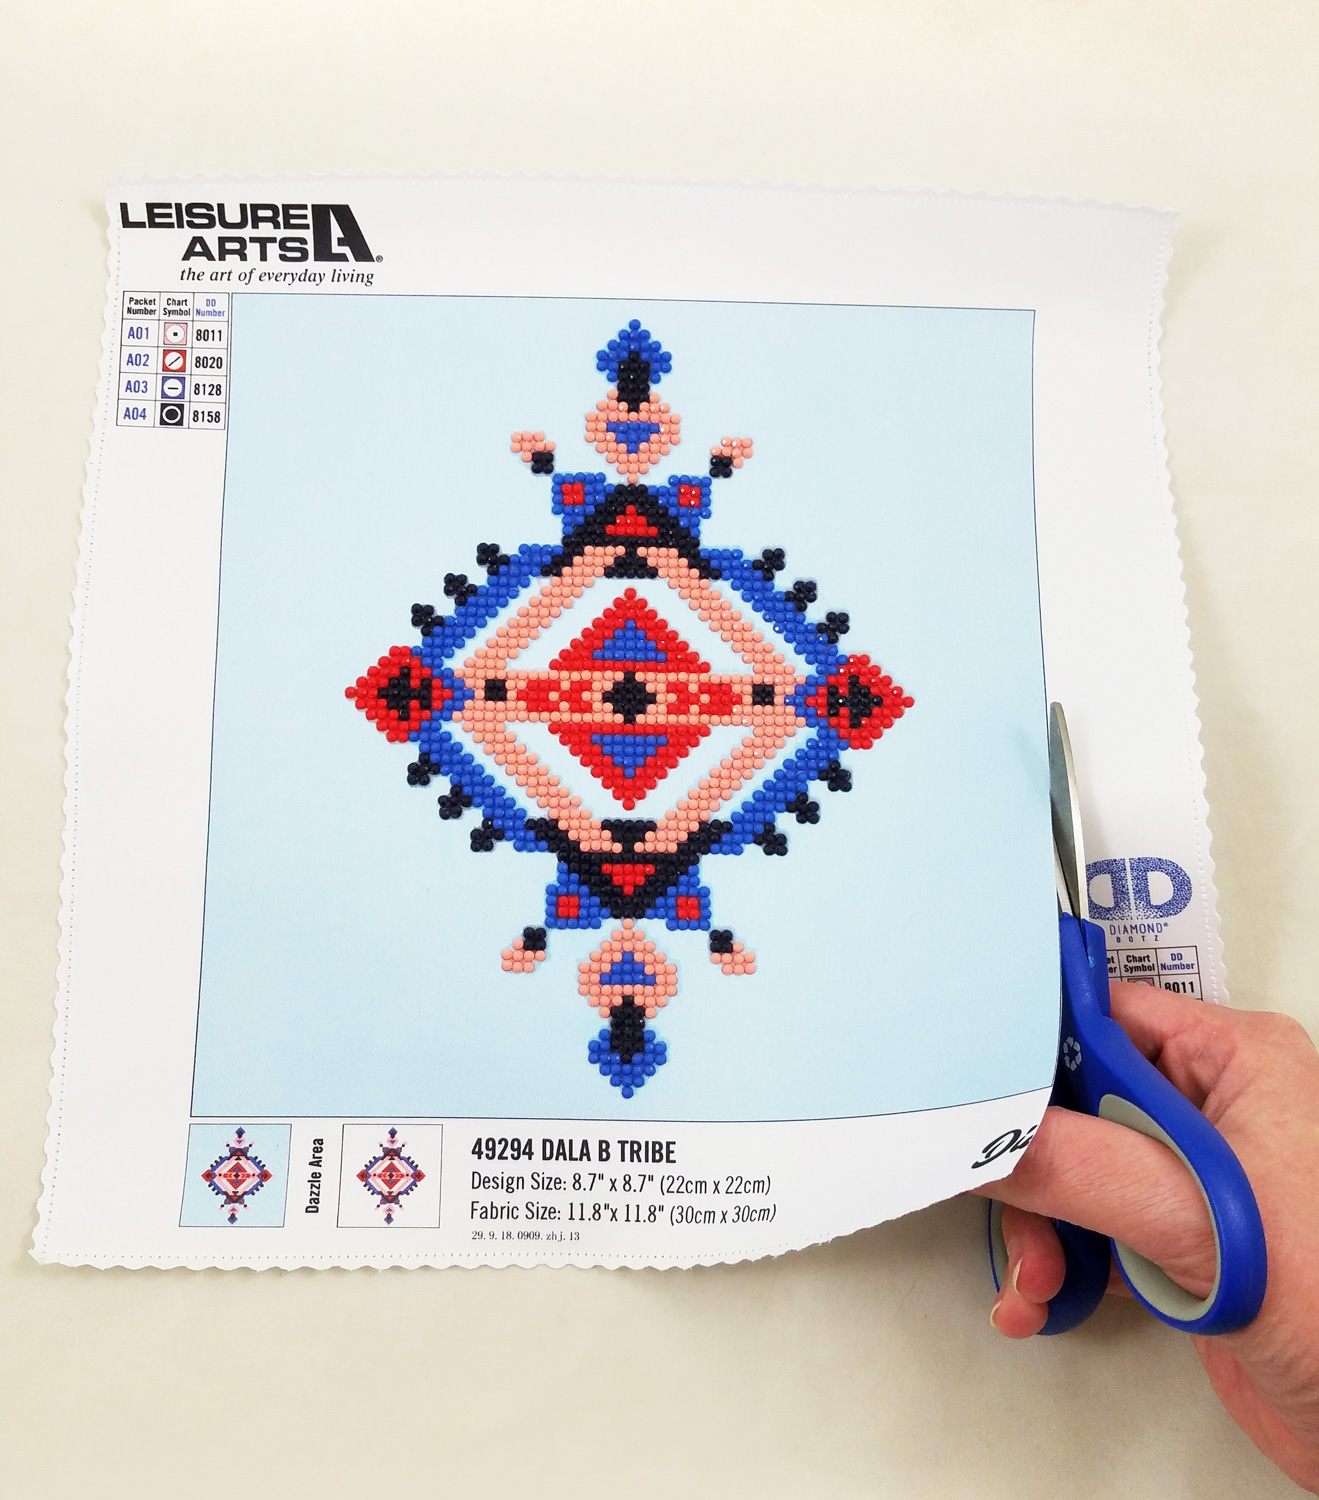
Next I trimmed the Diamond Art canvas to the very edge of the blue background with a pair of sharp scissors.

I carefully used a pencil and ruler to mark as close as possible to the Tribe Design pattern, creating a slightly elongated diamond outline. I then trimmed the canvas further with the scissors, using my pencil lines as my guide.
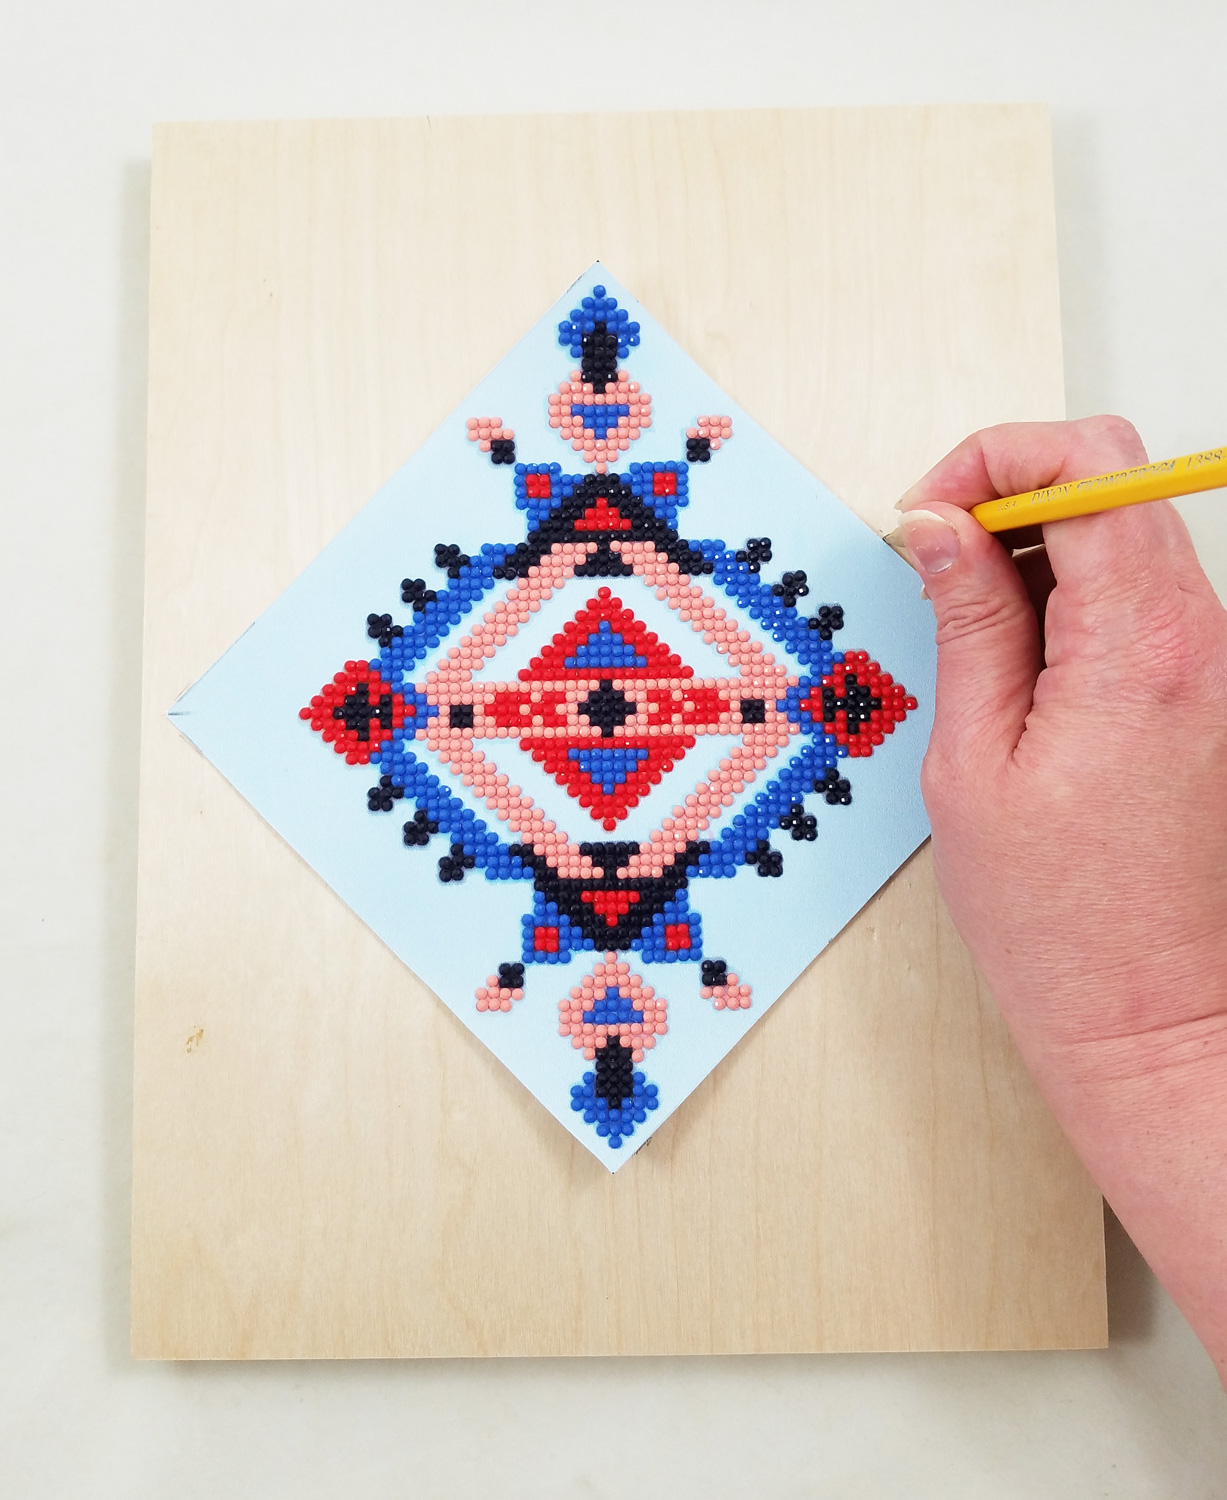
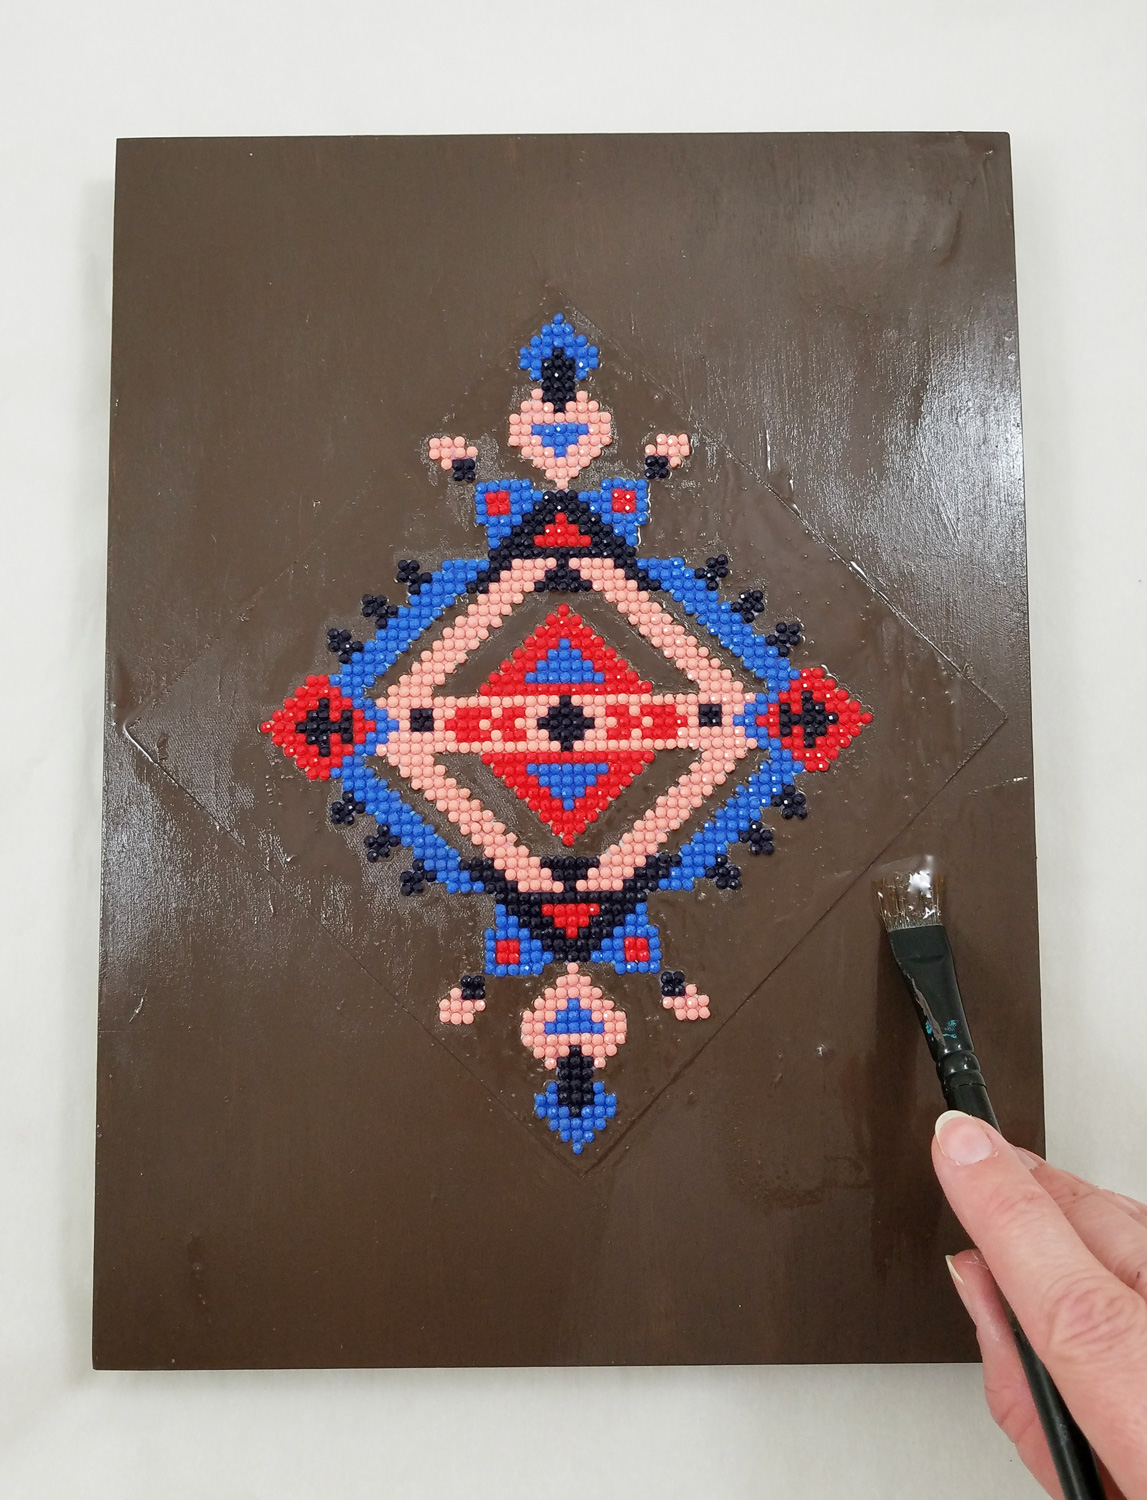
Now that the Diamond Art canvas was cut to size, it fit neatly on the wood board I wanted to attach it to. Once again, I used my pencil to mark out the exact placement of my canvas on the wood board.
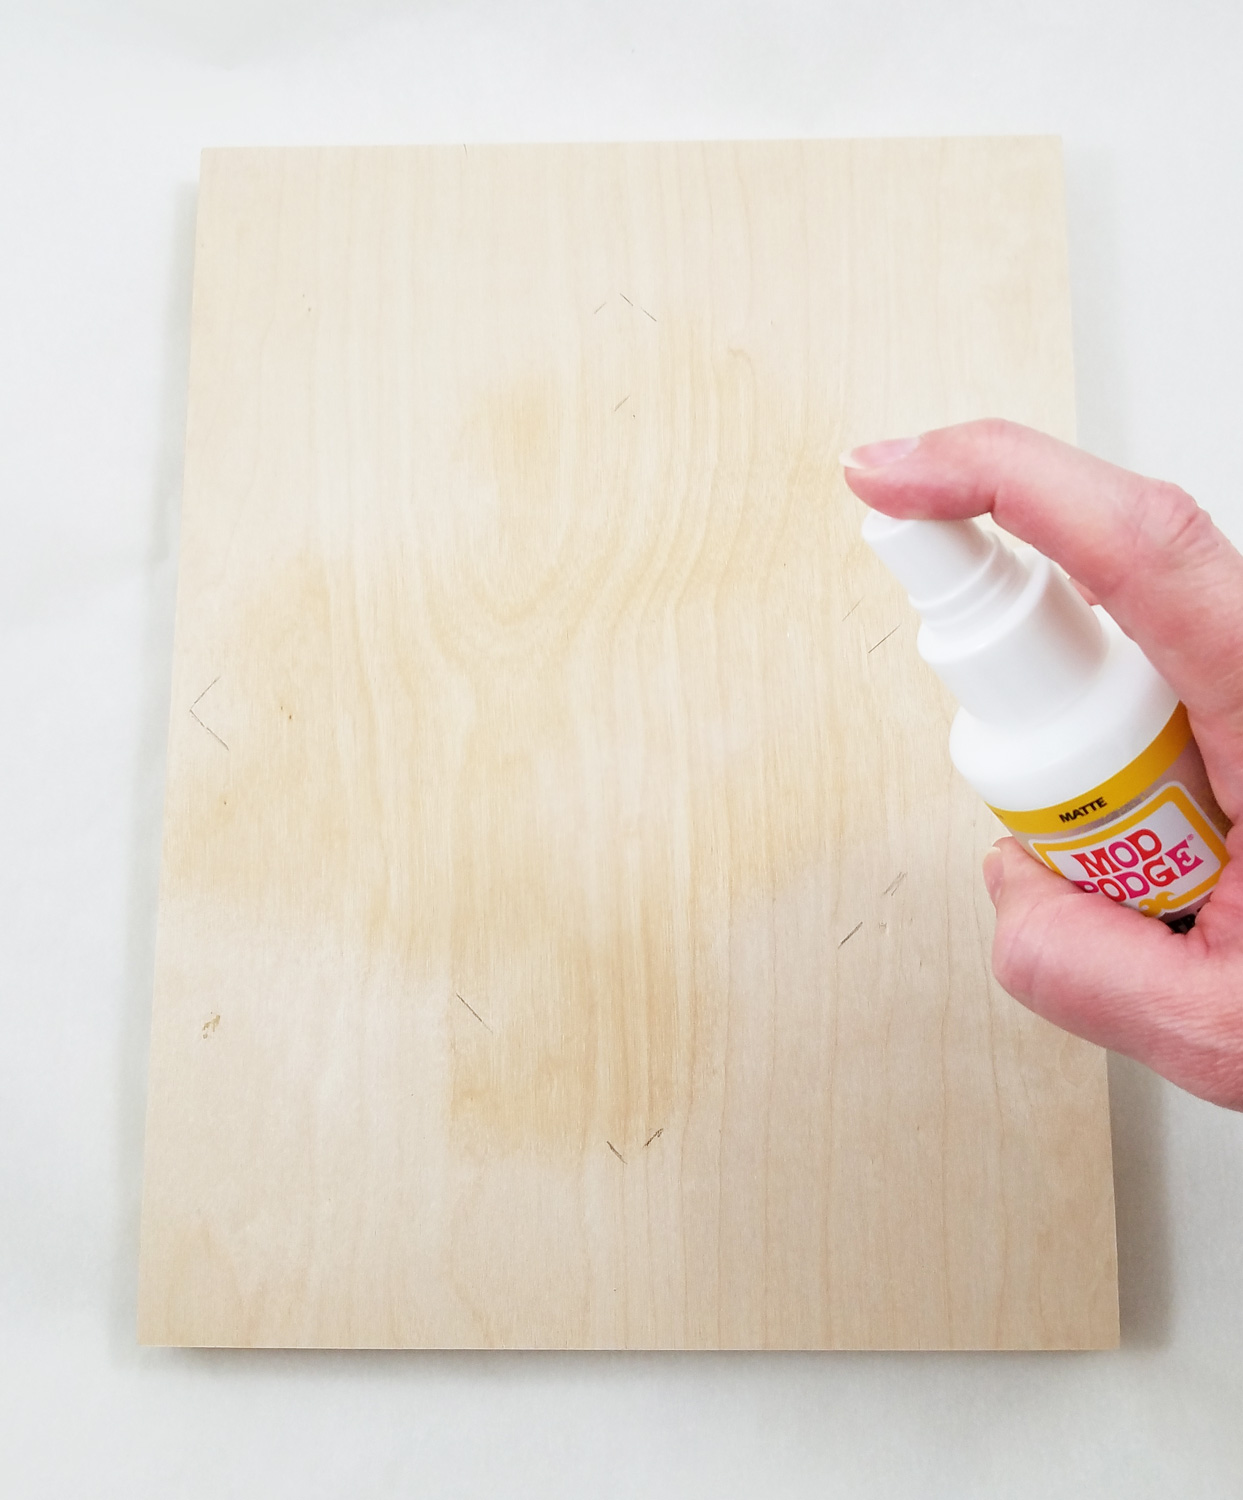
Making sure my wood board was clean of dust or particles I sprayed it with Mod Podge Ultra Matte in the pencil outline of the diamond.
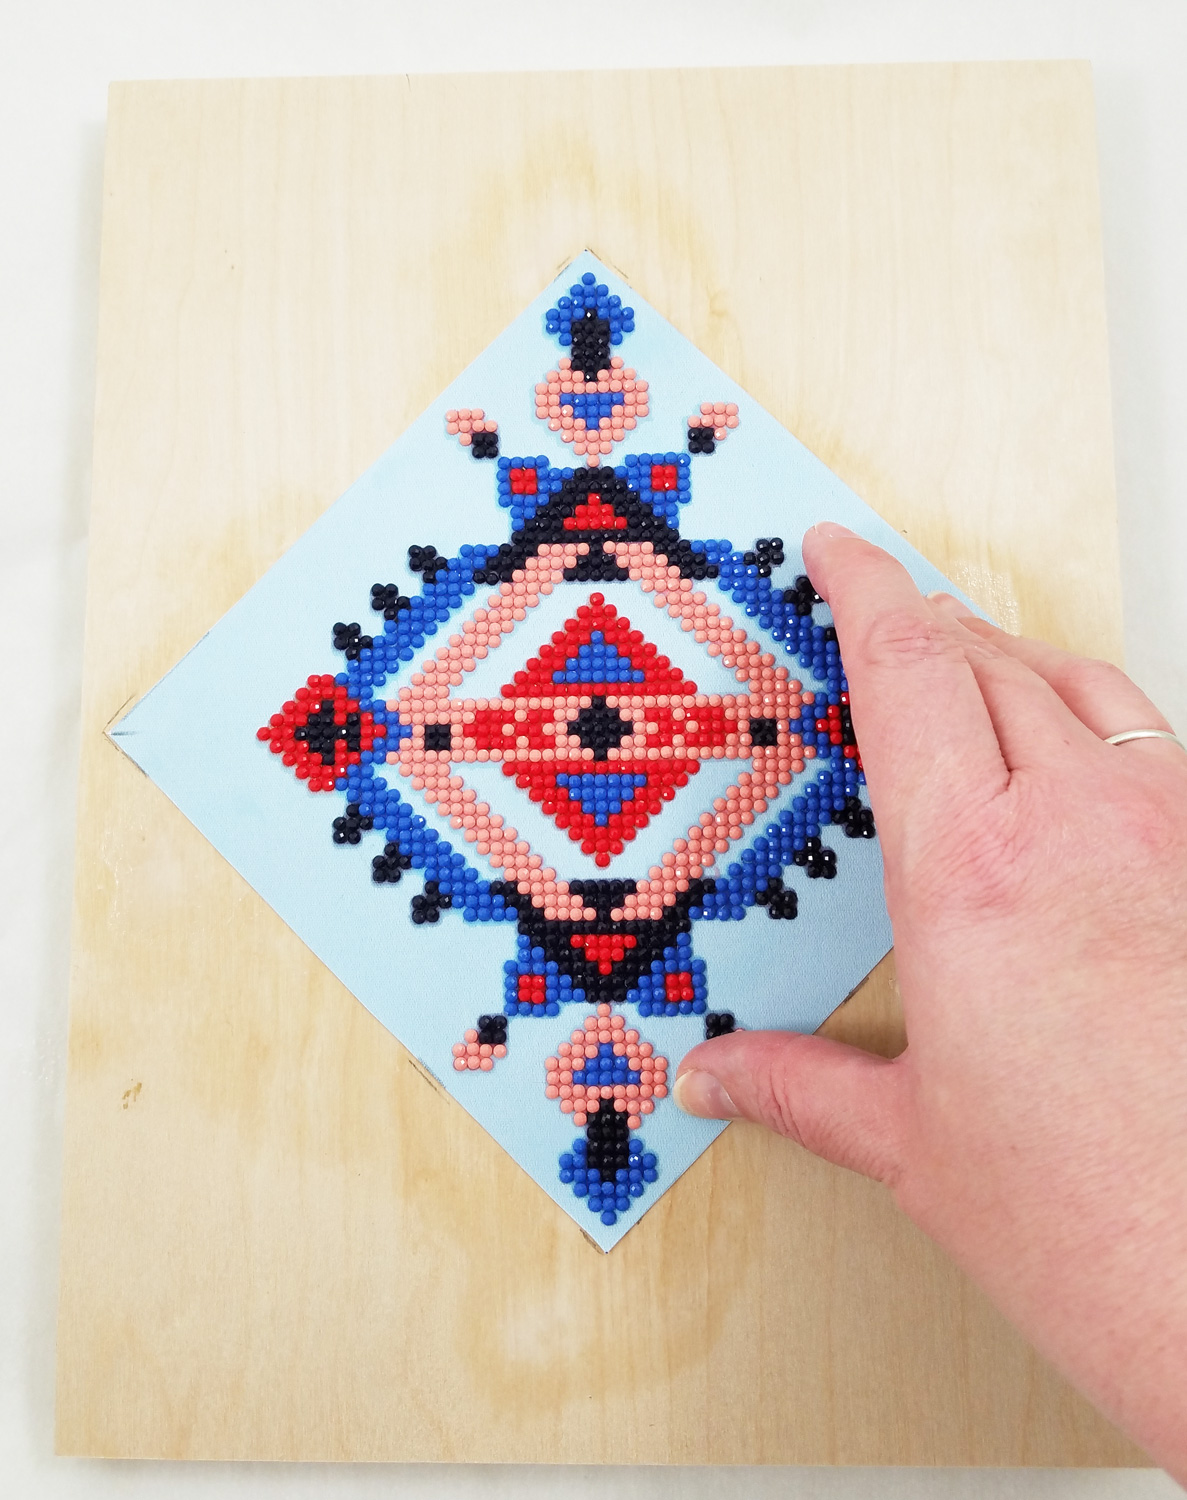
Quickly and carefully I applied the diamond canvas to the coated wood board. I applied firm pressure to the canvas. The spray version of Mod Podge Matte makes it much easier to apply fabric without a worry of oversaturation or bubbles forming. I let the Mod Podge fully dry.
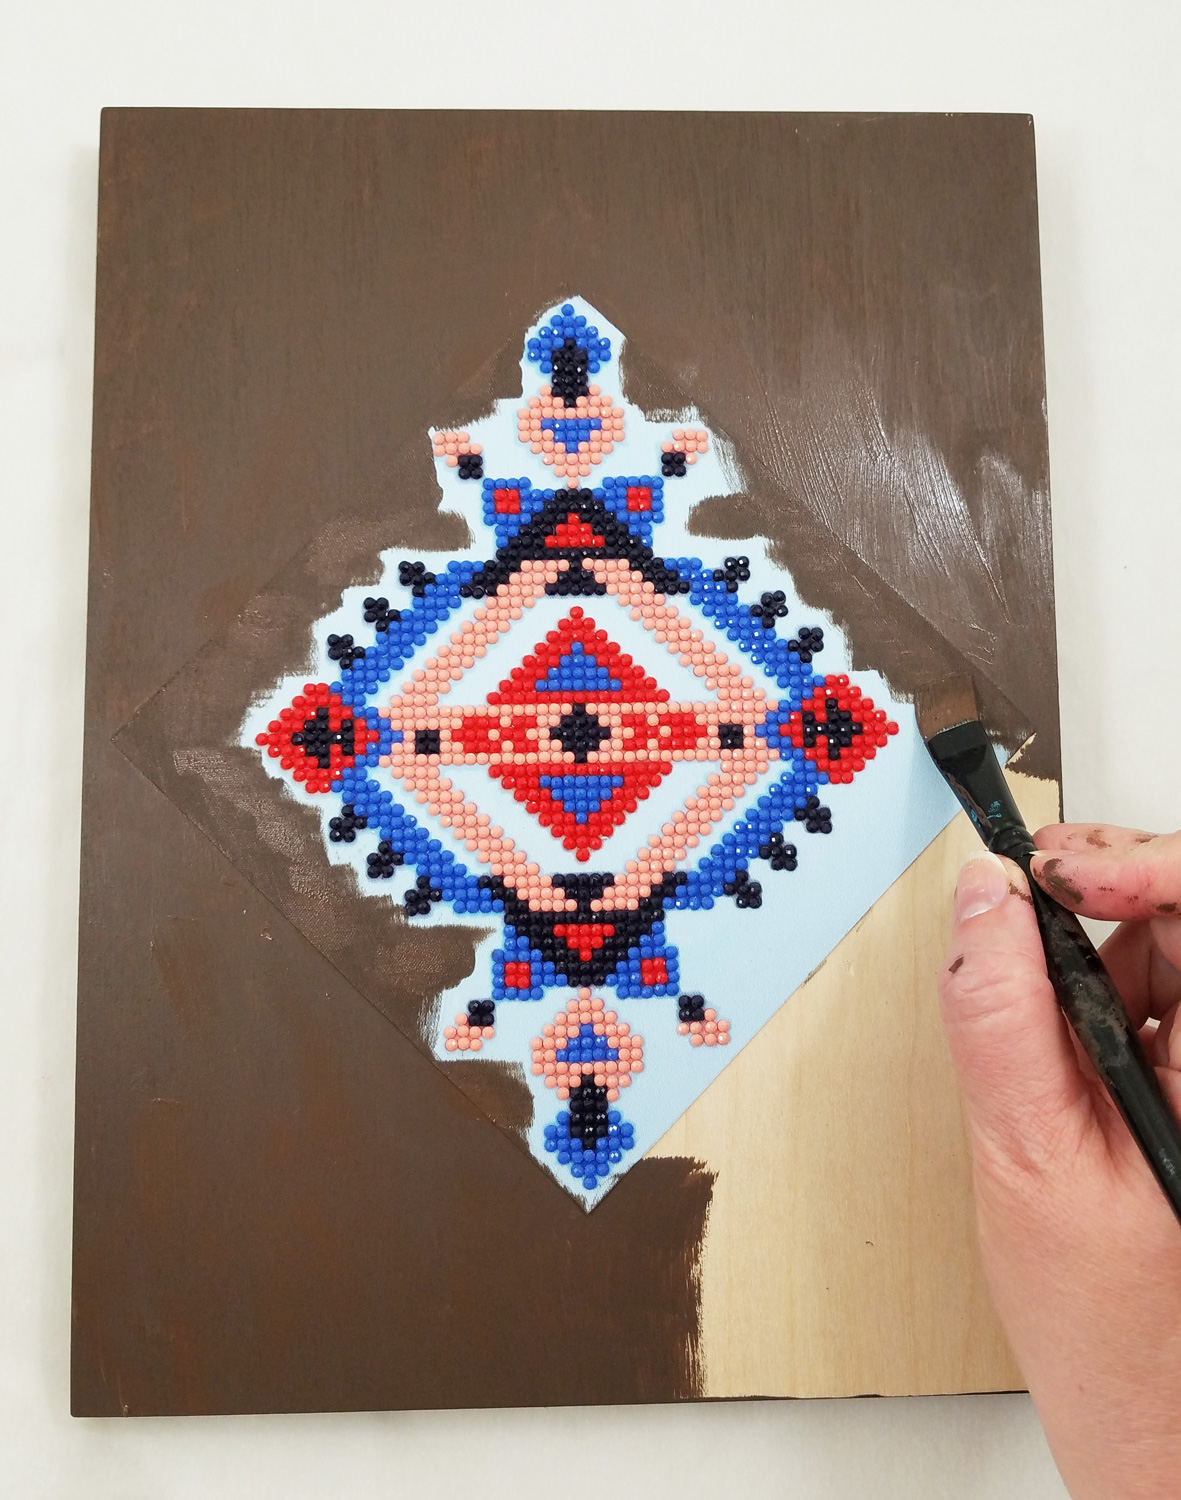
Making sure to cover the sides and front of the wood board I applied on FolkArt Home Deco Chalk Paint in Java. Using the flat paint brush to apply paint to the open sections of the wood board and the round brush for the detailed sections around the diamonds. The Tribe Design canvas had a tendency to soak up more paint, so I applied a bit more paint to make sure there was even coverage.
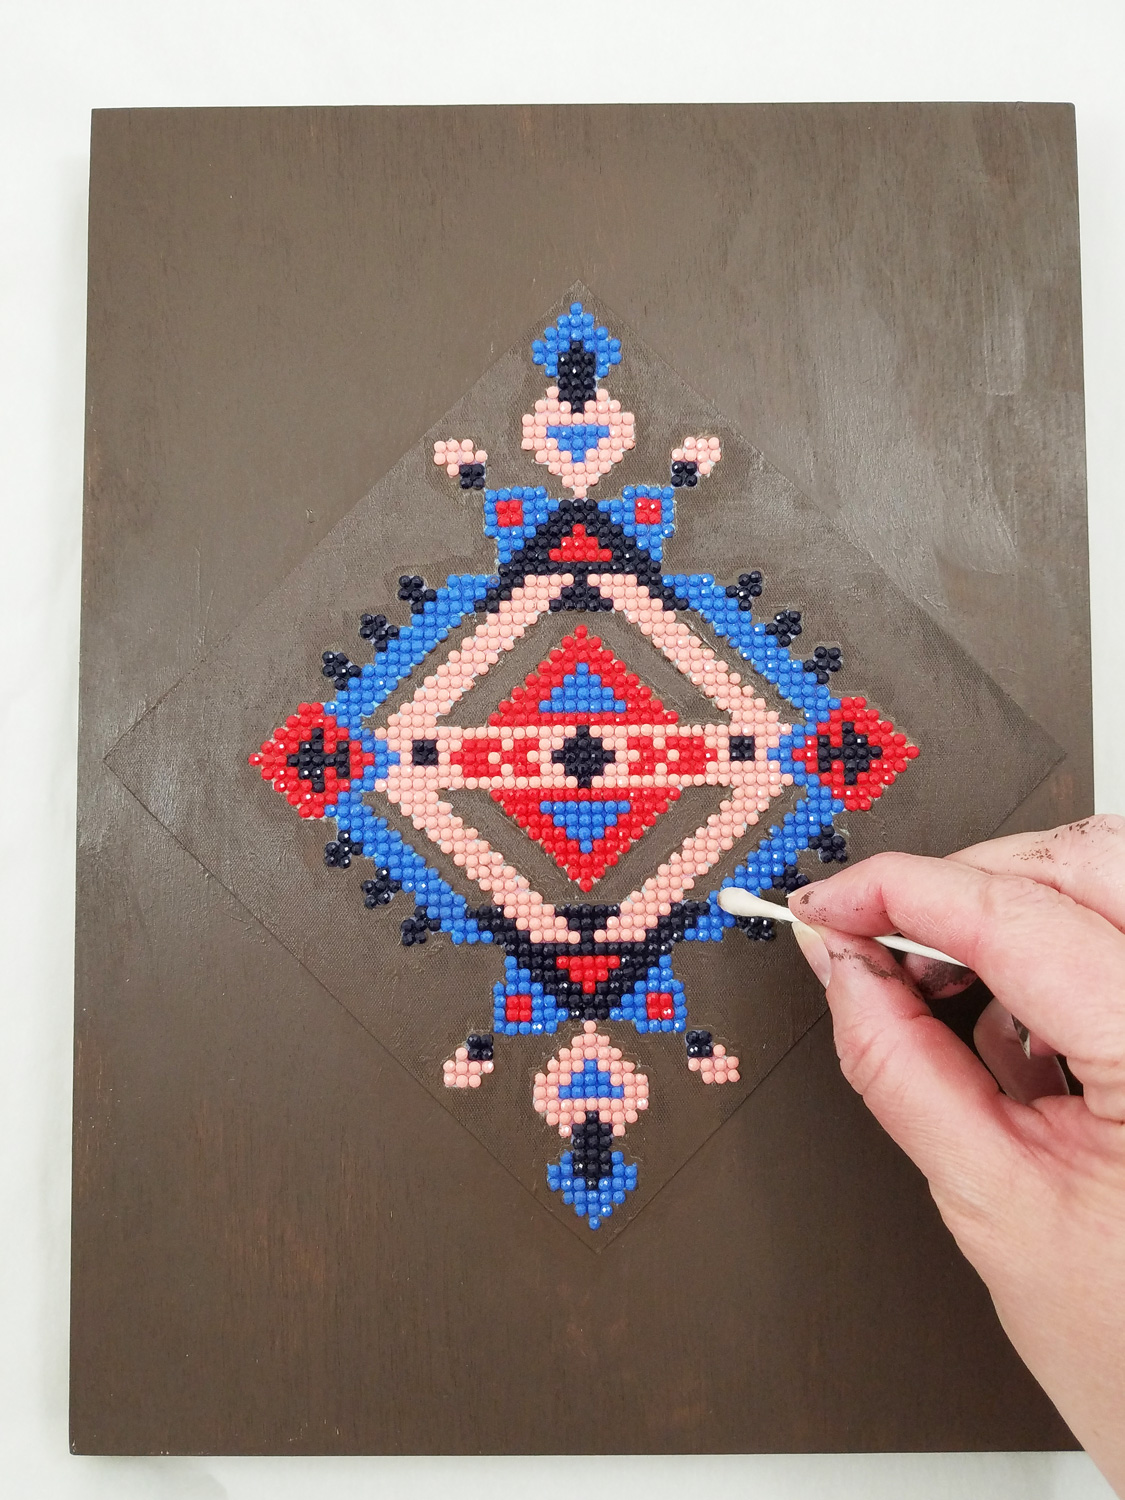
Before the paint fully cured I used cotton swabs dipped in isopropyl alcohol to remove any paint that accidently covered the diamonds. I then let the paint fully cure before the next step.
On the now dry paint I applied FolkArt Crackle Medium, careful to not over brush and to only apply the medium in one direction. This would ensure a better crackle formation later on. I let this layer fully dry.
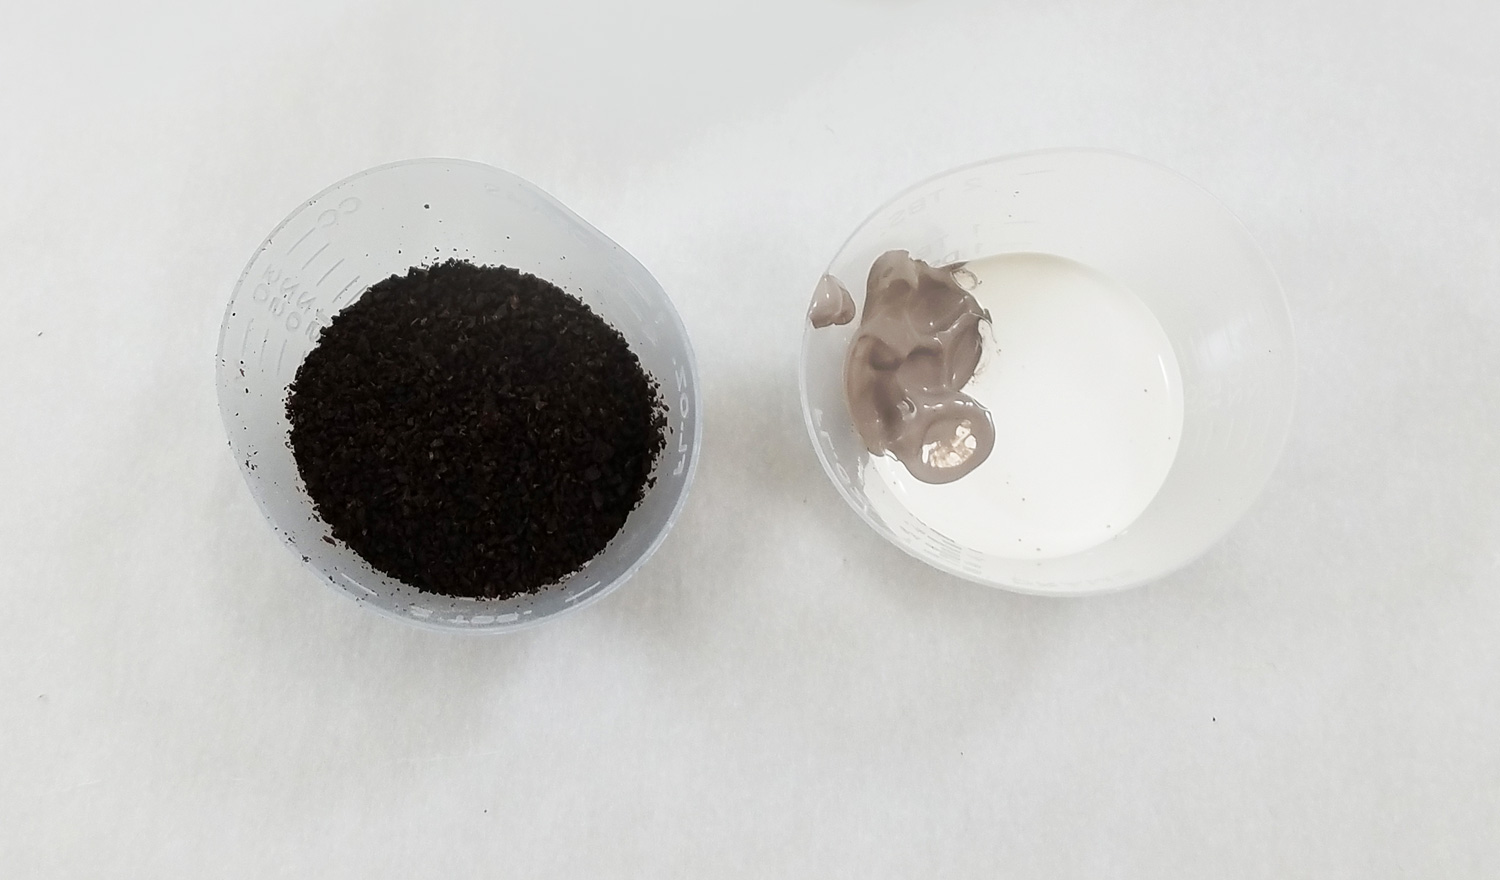
To create a highly textured topcoat I mixed a tablespoon of used and dried coffee grounds in a small cup, with 4 parts FolkArt Home Decor Chalk Paint in White Adirondack, with 1 part Parisian Grey.
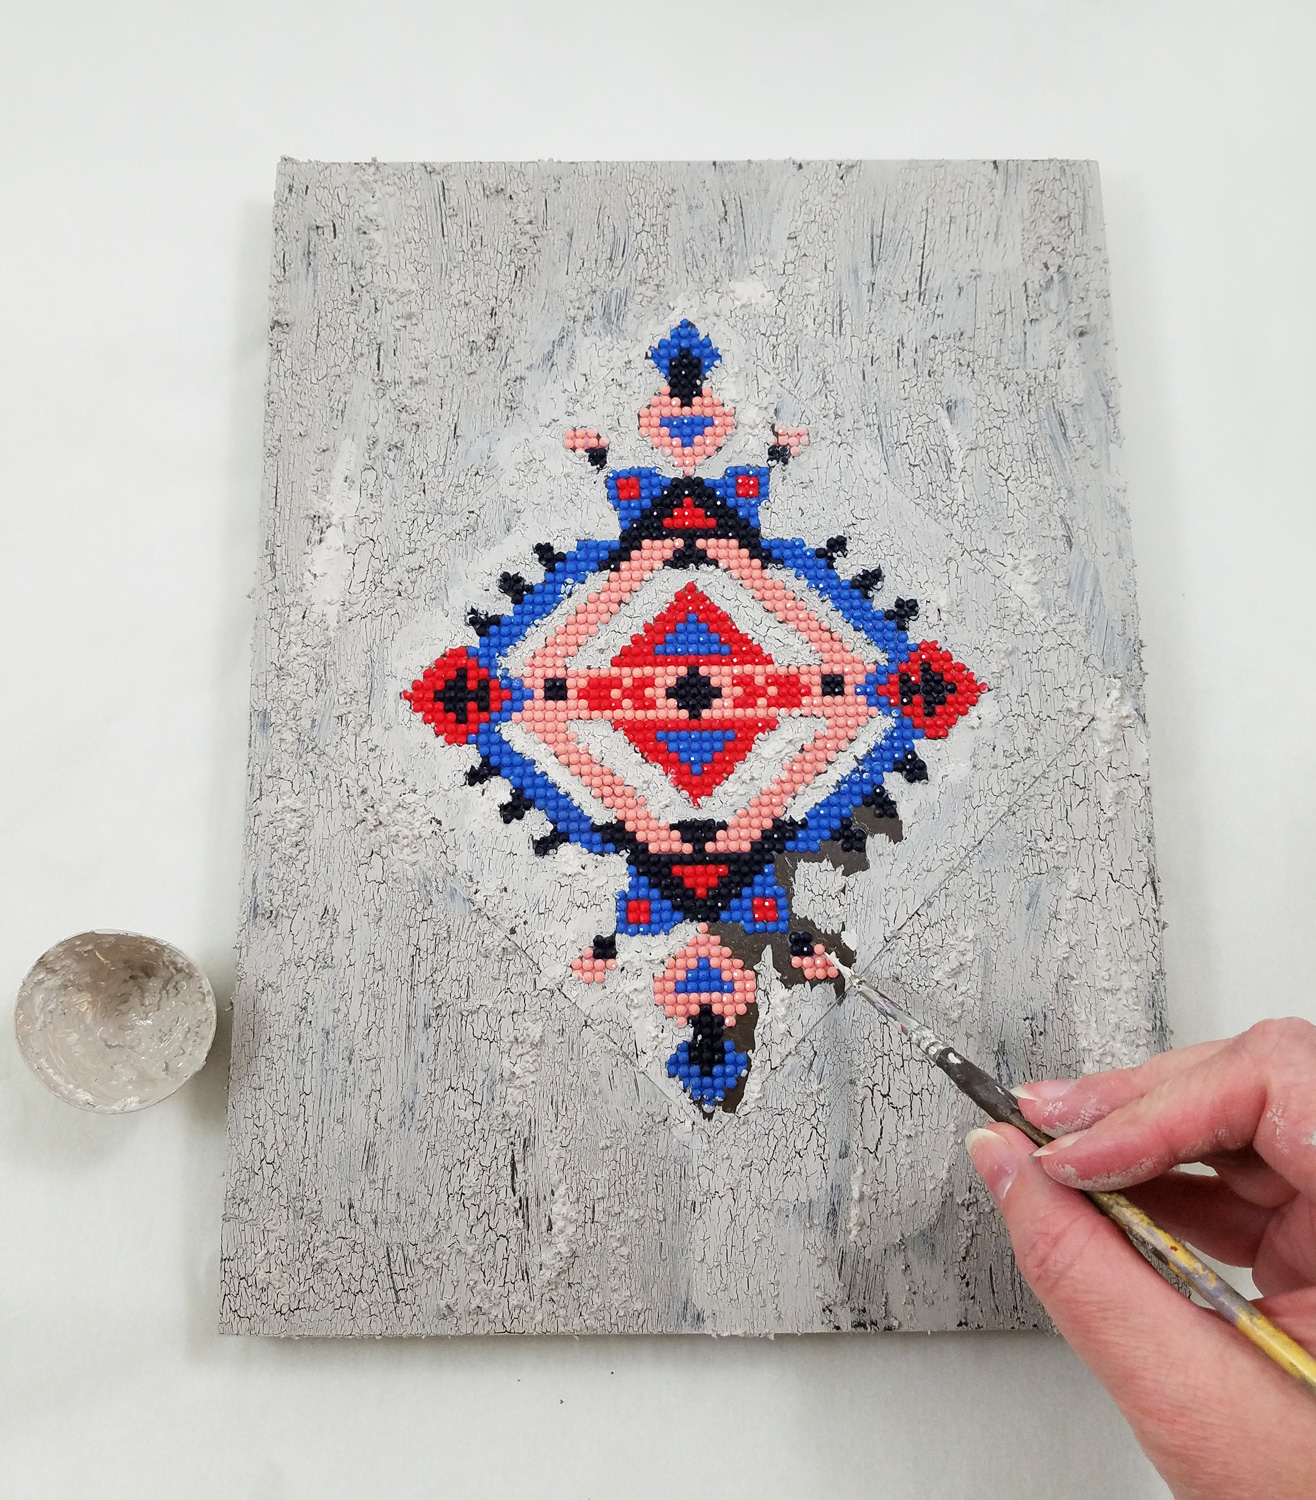
I quickly applied my textured topcoat to the crackle layer, making sure once again to not over paint, and for the most part, go only one direction with the brush strokes. Any time the paint built up too much on the brush I cleaned the paint brush with a paper towel and then reapplied fresh paint mixture to the brush.
Once again before the paint fully cured I used cotton swabs dipped in isopropyl alcohol to remove any paint that accidentally covered the diamonds. I then let the paint fully cure before the next step.
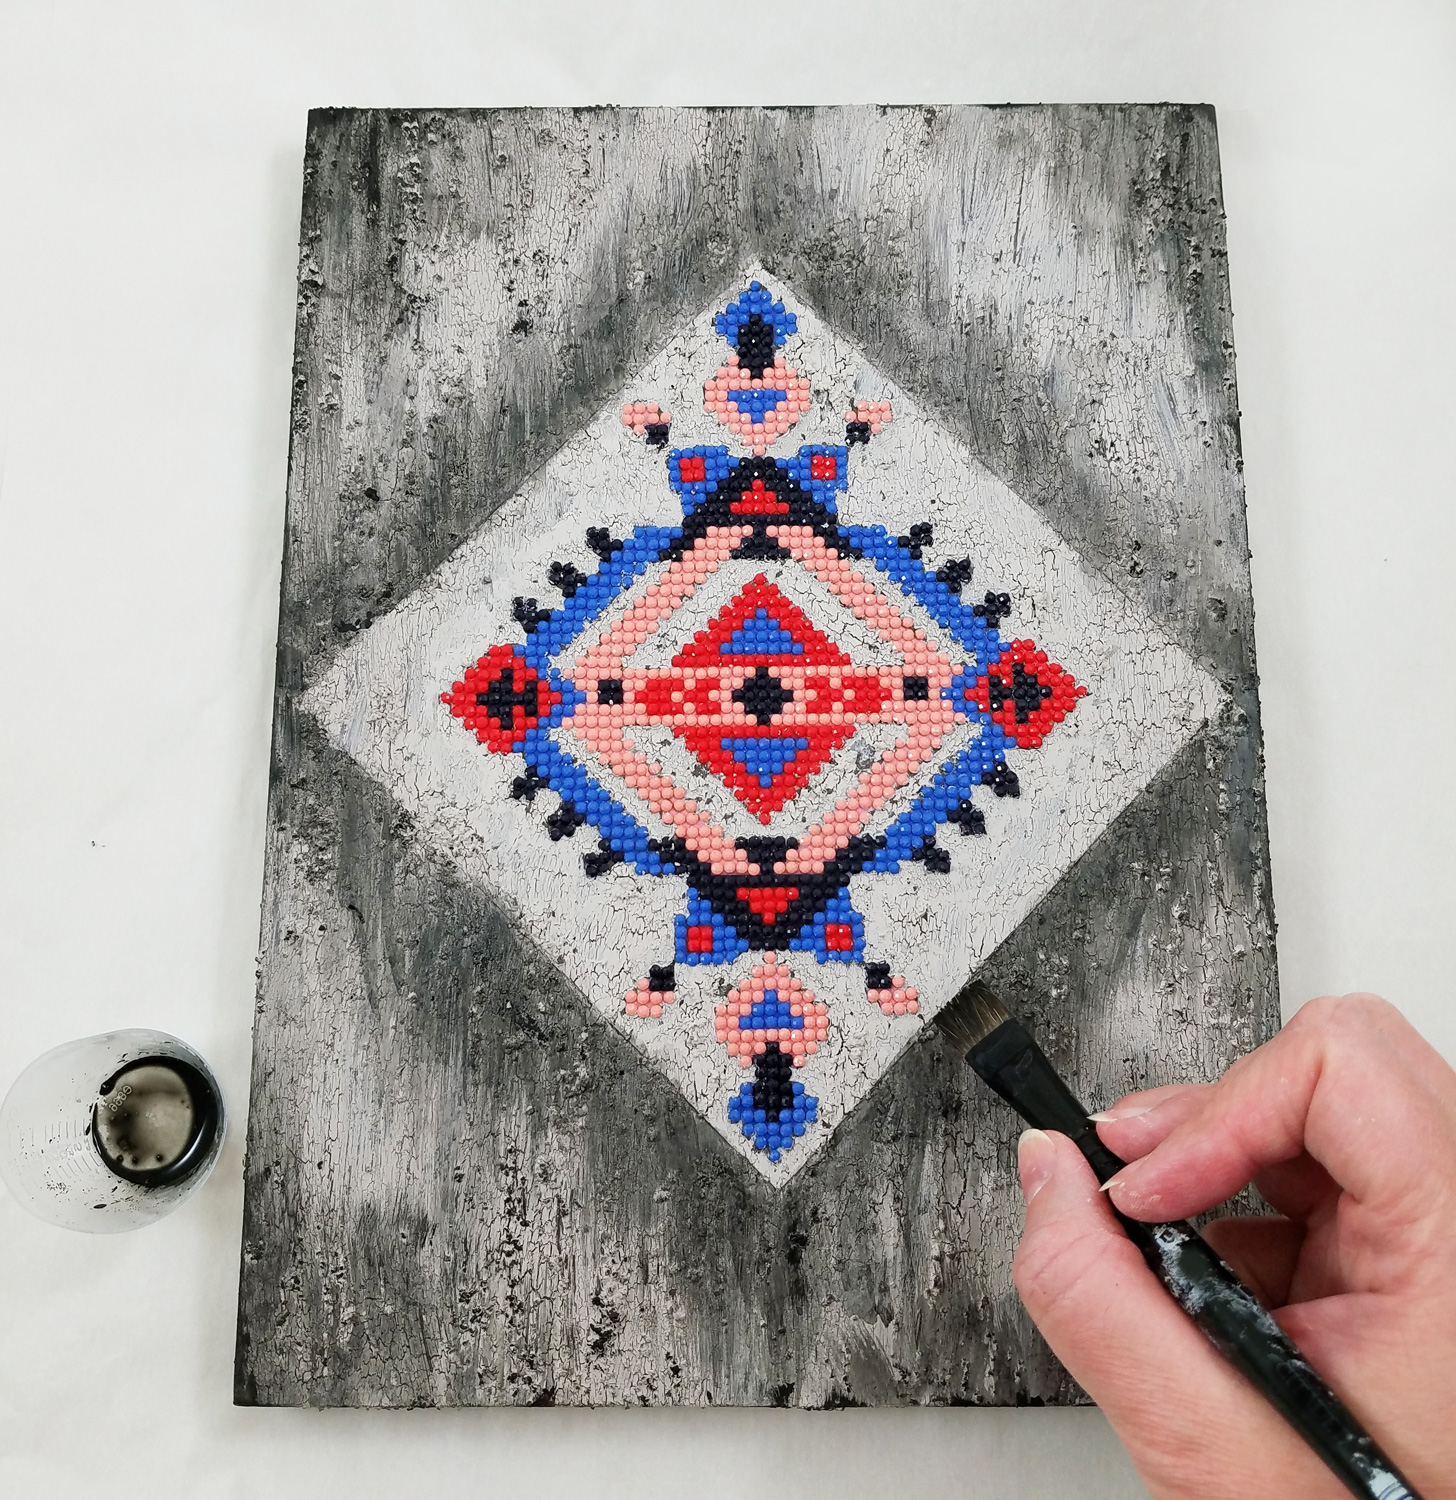
In a small cup I heavily diluted some Black FolkArt Home Decor Chalk Paint with some water and applied it to the cracks, textured elements and raised portions of the wood board, careful to avoid the flat backed diamond pattern. I left the paint to fully dry.
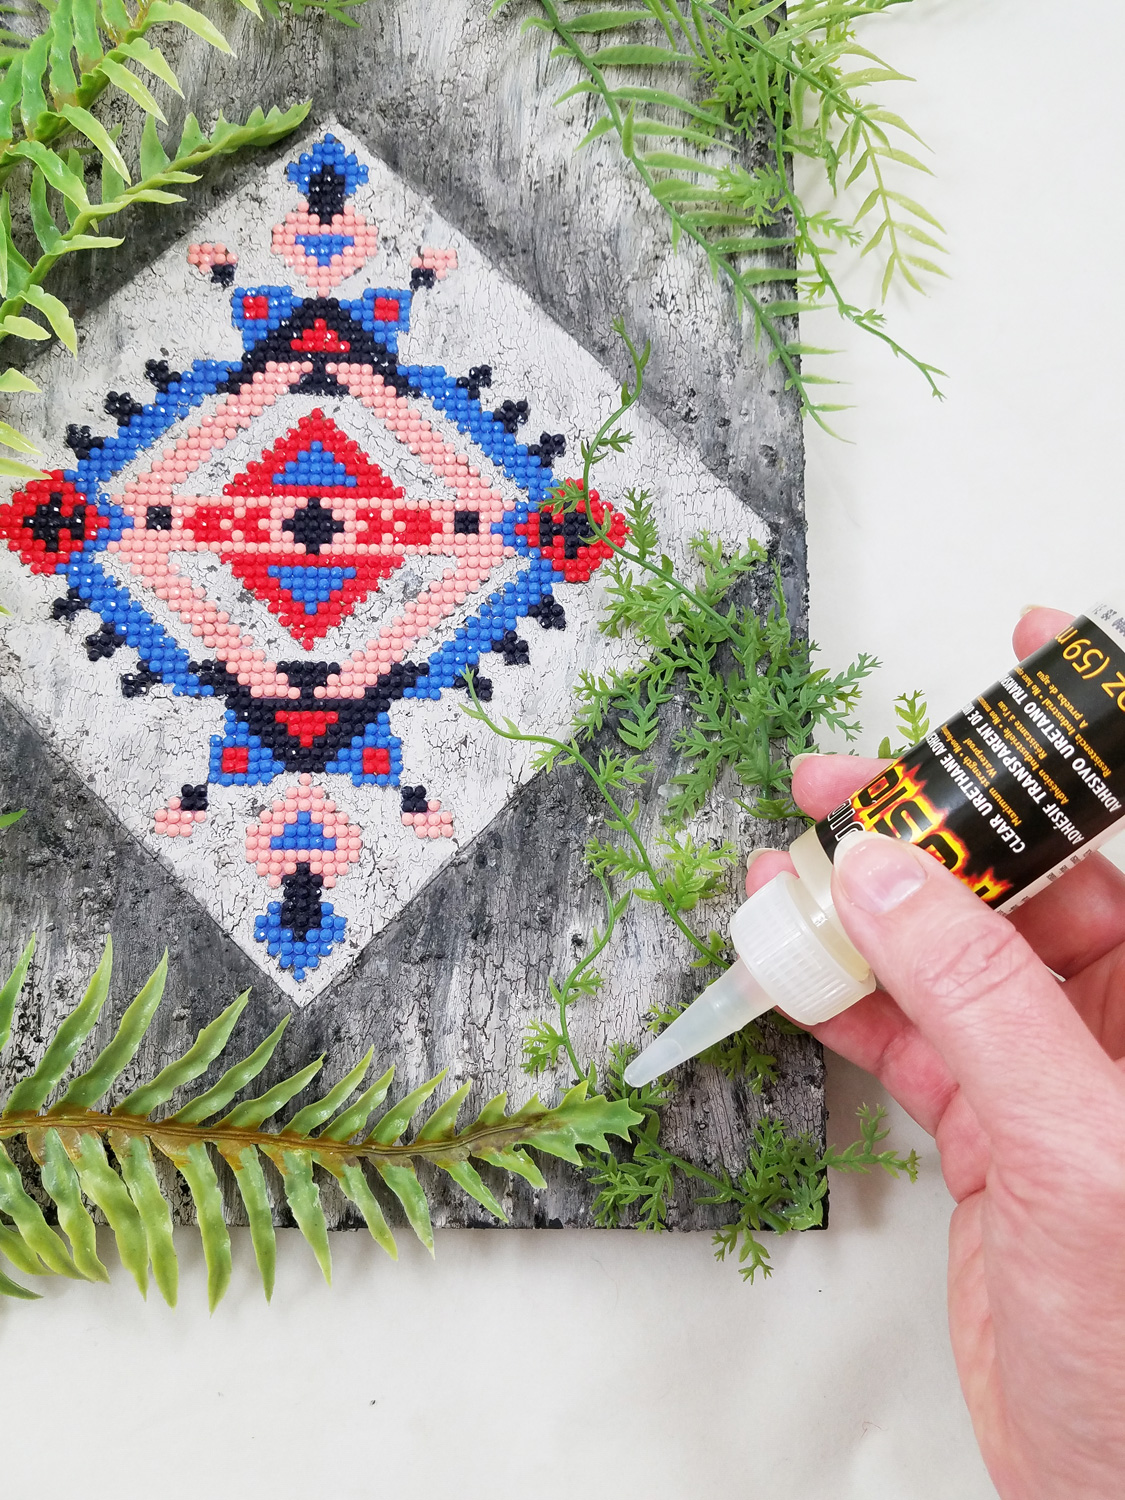
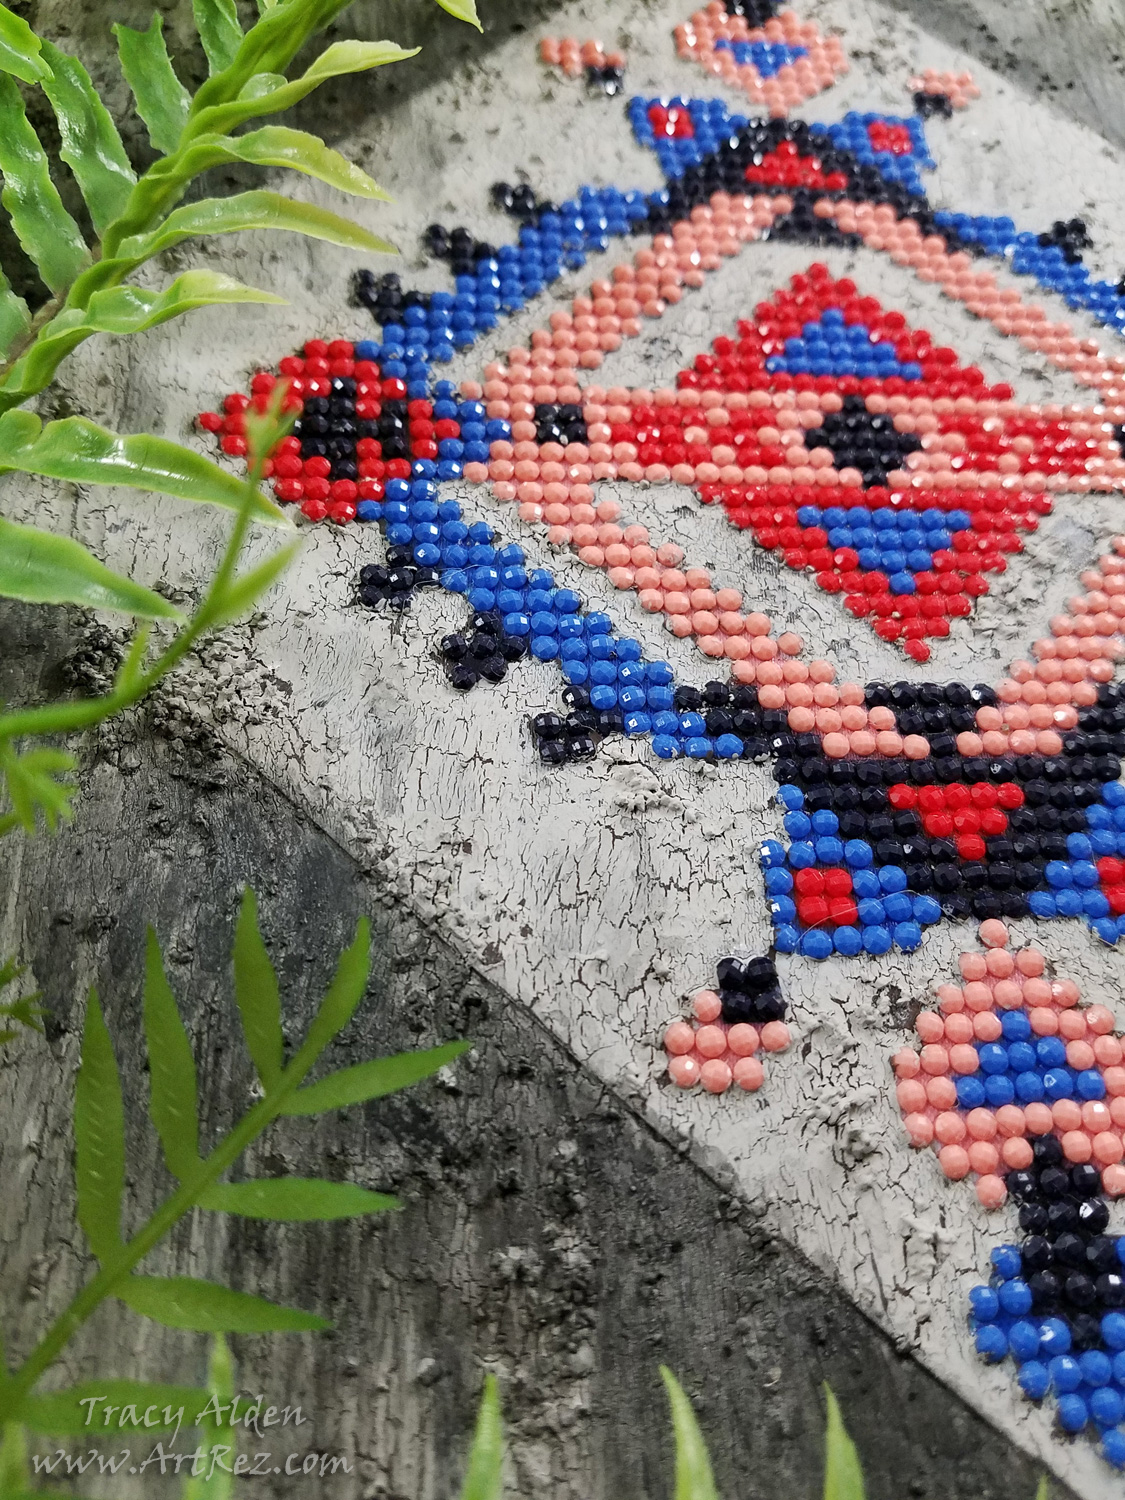
I cut and placed the artificial tropical plants on the board, finding the placement I liked best, gluing the plants in place with Liquid Fusion Clear Urethane Glue. Once the glue was fully cured my pieces was ready to be displayed.
Until next time, safe travels!
*This is an affiliate post, which means I received an assortment of products as a compensation for the creation of art. To read my full disclosure, click here.Mod Podge + Recycling = Home Decor
This time of year many people get gifts wrapped in tissue paper, and most of the time it ends up in the trash. Why not recycle into a beautiful piece of home decor or if you are a crafter that vends, booth decor? In a few short hours you can have a rather nice piece of decor that looks far more valuable that what it once was. 🙂

Mushrooms and Mayhem….
Well lots of artistic mayhem has been afoot lately and I finally got some time to sit down and do a blog post! I have been working with polymer clay and recycled materials as of late, and due to spring coming up I got growing things on the mind. Mushrooms and their appearance in artwork are a favorite of mine (not the use of to create art LOL). I had attempted to make mushrooms out of polymer clay in years past but was never completely happy with the feel or texture of the finished piece. This is where Sculpey’s Ultra Light and Sculpey’s Pluffy polymer clay came into play.

Ultra Light clay is well, ultra light, flexible when rolled thin, and you can use it for armatures and mix it with their other lines of clay. The down side is that when the clay warms up from handling it has a somewhat melted marshmallow feel and sticks to your hands if overworked. Pluffy (A new addition this year to the Sculpey family) has the same qualities, but with the addition of some rather nice colors and marketed towards children. On a whim I made a few mushrooms out the first block I got of the Ultra Light; while trying to mold it quick enough without warming the clay up too much was tricky, the outcome was worth it!

The mushrooms came out velvety soft, very easy to carve, paint and I could put a large amount of them on a diorama without adding unwanted weight. I quickly started to work out more designs and made up “species” of mushrooms for my scenes. What follows is a quick tutorial of how to make the “flat top” mushrooms (great for small polyclay critters and creations to sit on).

Grab a small chunk of Ultra Light or Pluffy and quickly make it into a elongated drumstick.

In a circular motion pinch the top portion of the drumstick until you have a flat top.

Don’t worry if it looks uneven, it looks more natural that way!

Now to add the “gills” of a mushroom (you don’t have to add these but I like to give it that added level of detail). Using a polymer cutting blade or a rigid thin piece of plastic depress into the clay until all the way around to form the gills, you can do that in your hand or on a cutting mat, just be careful if using a blade.

Now do tiny pinches and slight rolling edge to the mushroom, careful not to destroy the “gills”. Your mushroom should look something like this.

Some mushrooms might end up being longer than others, the nature of this clay is to slump a little in baking so put tooth picks in the stem of the larger mushrooms to maintain shape and give it strength. I like to carefully place them on ceramic heat proof tiles, place them in a polyclay designated cookie pan and bake according to manufacture instructions.

Once baked and cooled you can sand or carve any imperfections off. Now you are ready to paint and glitter if you would like. The mushrooms shown are the Pluffy Orange tint that are drying after a black color wash.

Always remember polymer clay that has been painted can have the paint damaged and nicked, so always put a sealant or glaze over the pieces to protect you work. I like to use Mod Podge Matte or Glossy (Sparkle Mod Podge could also be used for a fantasy feel) for the mushrooms, but use other products for other polymer projects.

Here the mushrooms are placed in a scene completely made from the Ultra Light. To get the texture of the “bark” I pressed Ultra Light into the trunk of a tree, baked it separate from the base, painted, sealed and covered the base in used ground tea leaves.
The wonderful part is that you can research more mushroom shapes and designs to try in in polymer clay by looking online, taking field trips into nature to take reference photos and checking your local Natural History Museum for collections!
Until next time safe travels! 🙂
Resin work….
Resin work of any sort has always been an interest of mine. My parents had worked with it over 35 years ago but often complained about the odor and the “cooking” (over heating anything put into the resin) element of resin. With that in mind, I avoided working with resin, concerned about the vapors and heat. That was until I ended up talking with the people at Alumilite Corporation booth, makers of the Amazing Mold Making and Casting Products at CHA‘s 2010 Winter Trade Show. (See this blog post for 2011 CHA Winter Trade Show) They were showcasing their Amazing Mold Putty and Amazing Casting Resin as a way to create replicas of practically anything in a very short period of time. The Molding Putty is non-toxic (in fact you can make food safe molds with it) and the Casting Resin is a opaque, low odor resin and cures within 10-15 minutes. After seeing the demos I went ahead and got several kits.
I started making master pieces in polymer clay to make molds from. I generally use my junk clay, pieces left over from other projects, which for some reason always end up making pink or gray-purple color. LOL
Keep in mind while I use polymer clay as my master you can practically mold any surface or item you like. The more detail in the piece, the finer the mold.

Here are the masters made out of poly clay. Keep in mind I did high detail work. The Amazing Mold Putty does wonderful with anything with high detail, and I get better molds with high detail masters. The Cheshire cat is about the size of a US Silver Dollar.

Note I place the masters on Clear Stamp Acrylic Blocks used for stamping. I use them to keep track if the molding putty is plum to the piece and make sure there is little if no creases forming when placing the molding putty on the piece. You can use small clear glass titles as well.

Make sure you mix the putty according to the manufacture’s instruction, though the Amazing Mold Putty is rather forgiving if there is not exact amounts used. I try to use as little as possible to be able to do more projects. Do not attempt to remove the mold for at least 20 minutes to make sure the mold has set.

As you can see I tried to get the mold putty as plum as possible, using the Clear Stamp Acrylic Blocks as my guide.

While the cure time for the molds is 20 minutes I like to leave the master in the molding putty for longer, making sure the mold is a rigid as possible (but keep in mind it is silicon and very flexible once cured) before trying to make any replicas. The molds can be cleaned with mild soap and water before you make any replicas to remove any loose particles left by the master.

When mixing the Amazing Casting Resin be careful about stirring too fast and for too long. Once the two parts are combined stir carefully until clear, scraping sides, about 15-20 seconds. Then immediately start to pour the resin into your molds; do not pour too quick as you will increase the amount of air bubbles. It will set in 10 minutes, the thicker the piece the faster the cure time. Once the piece is cured I quickly demold, trim any rough edges, sand and either start painting or put some sort of clear protective sealer (I like to use Mod Podge); the resin will bond with the paint or sealer in those few minutes after demolding. I let them dry and sit for about an hour before I do the final sanding or drill any of the replicas.

The finished replicas sanded, drilled, painted and sealed. You can even easily put this resin into clear resin as well, as you can see with the skull that I purposely caught air bubbles in the eye sockets to give it the look of eyeballs.
Until next time, Safe Travels…
Back from CHA

Finally back and unpacked from the Craft & Hobby Association Winter Conference and Trade Show put on by the Craft & Hobby Association (otherwise known as CHA)! It was as per normal an amazing show, full of new products, demos, old favorites and awesome networking. It is always one of the highlights of my year, many of a artistic friend and local art businesses! While I meet so many wonderful people and got to try so many products I must note some really did out shine the rest;
One thing a bit different for me this year was the opportunity to have on display some of my jewelry pieces at the Alumilite Corporation booth, makers of the Amazing Mold Making and Casting Products. They were very pleased with my initial test runs of their product and I am looking forward to using their products in my future artwork.
The amazingly talented Donna Kato was there at her Katopolyclay booth, friendly, funny and as willing as ever to show polyclay tips. Unbeknown to me they now carry some wonderful new colors, products and tools!
The Plaid Creative Group , makers of Mod Podge, Folk Art and Apple Barrel just to name a few, was there in full force with some wonderful make and takes. While I was there I got to meet great crafting personalities such as Mod Podge Amy, and Candie Cooper.
Got to meet the lovely Double Stitch Twins ,Erika and Monika Simmons (they are even more beautiful in person) at the 75th anniversary Red Heart Yarns booth, they had some stunning pieces of their work on display and it was just wonderful to see how many wonderful ways Red Heart Yarn can be used!
The beautiful Lisa Pavelka was there doing a book signing of her new book The Complete Book of Polymer Clay. She was as friendly as ever and even talked about some of her new techniques, designs and new polyclay line coming out.
The fabulous Mark Montano was doing demos and book signings of his new book Pulp Fiction Perfect Paper Projects, you had to do a wonderful paper demo to get a signed book, oh twist my arm. LOL
At the always classy Beadalon booth not only got to see some new products but a dazzling display of Fernando Dasilva‘s work and book signing of his new book Modern Expressions.
Another rather nice opportunity CHA was doing this year was the Annual Business Meeting & Thank-You Breakfast and the Winter Show Event: Moonlight Mixer, both wonderful networking opportunities, alerting members of upcoming trends and great food.
Hats off to CHA for another wonderful Winter Show!

One of my jewelry pieces that was on display at the Alumilite Corporation booth, makers of the Amazing Mold Making and Casting Products. This necklace was made by making molds of Trilobite fossils (extinct marine arthropods) and then making resin replicas.

One of my other pieces that was on display at the Alumilite Corporation booth. This necklace was made by making molds of Trilobite fossils, then making resin replicas and then embedding them into clear resin to replicate fossil beds.

The full set that was on display at the Alumilite Corporation booth.
Safe Travels….

Ancient and Contemporary Inspired Artistry


