DIY Leprechaun Wee Folk Door

I have always loved the idea of the wee Folk or faery, be the good bad or just odd folk that roamed about. One of my favorite faery movies from my childhood was Darby O’Gill and the Little People. The costumes, sets and the illusion of the miniature world of the leprechauns had me entranced Leaving out small gifts or useable objects for them in hopes of getting the favor of the faery was always a magical idea to me. So I got to thinking, why not make a Leprechaun door to add a bit of magic to a home for Spring!Supplies:
G&P Classic Victorian Oval Bookboard Frame
G&P Burnt Umber 3D Enamel Gel
G&P Glastique Matte Finishing Glaze
G&P Medium Flourishes Piccolos
G&P Shamrock Dreams Enamel Powder
G&P Vintage Gold Enamel Powder
G&P Mossy Glen Enamel Powder
G&P Piccolo Embossing Powder Adhesive
Piccolo Easy Grip Tweezers
Green crystal sticker gems
Sizzix Tim Holtz Alterations embossing folder Woodgrain
Dye ink pads in Black and Deep Brown
Small foam squares
Sharp scissors or craft knife
Carefully remove the frame from the package, put aside the globe and easel. Save those pieces for future projects.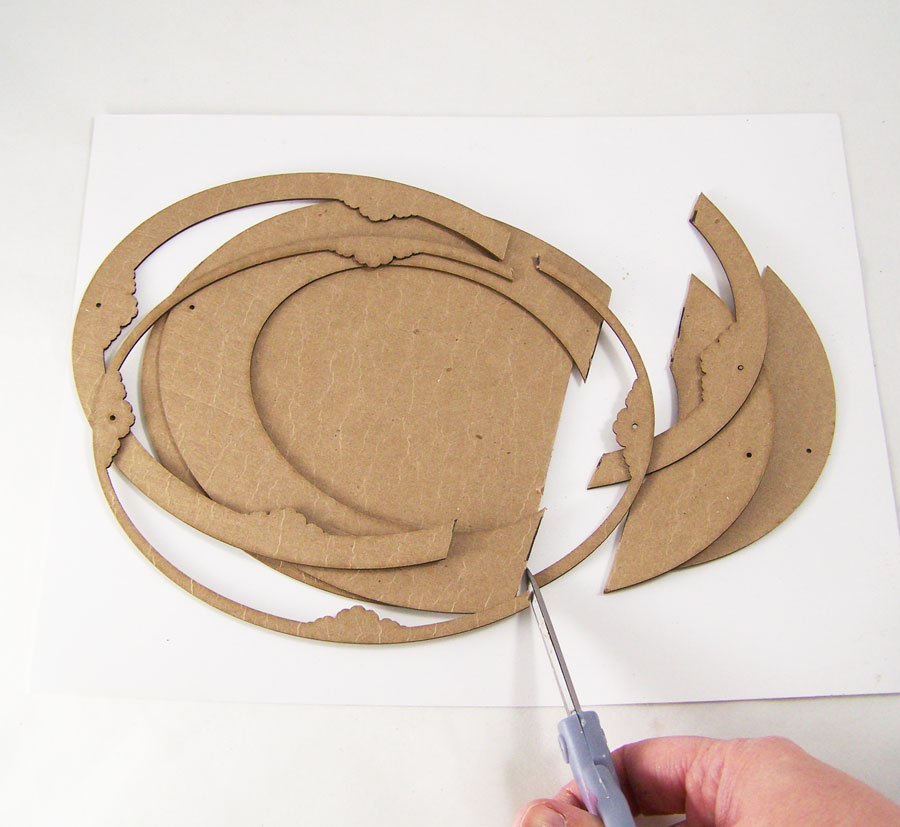
Using a ruler, mark a straight line about 2 inches from the bottom on the frame pieces. Using a sharp scissors or a craft knife, cut the bottom portion off.
Run the back plate and bottom frame sections through an embossing machine using the woodgrain embossing folder. Taking the brown and black dye ink pads, rub them on the embossed sections of the frame.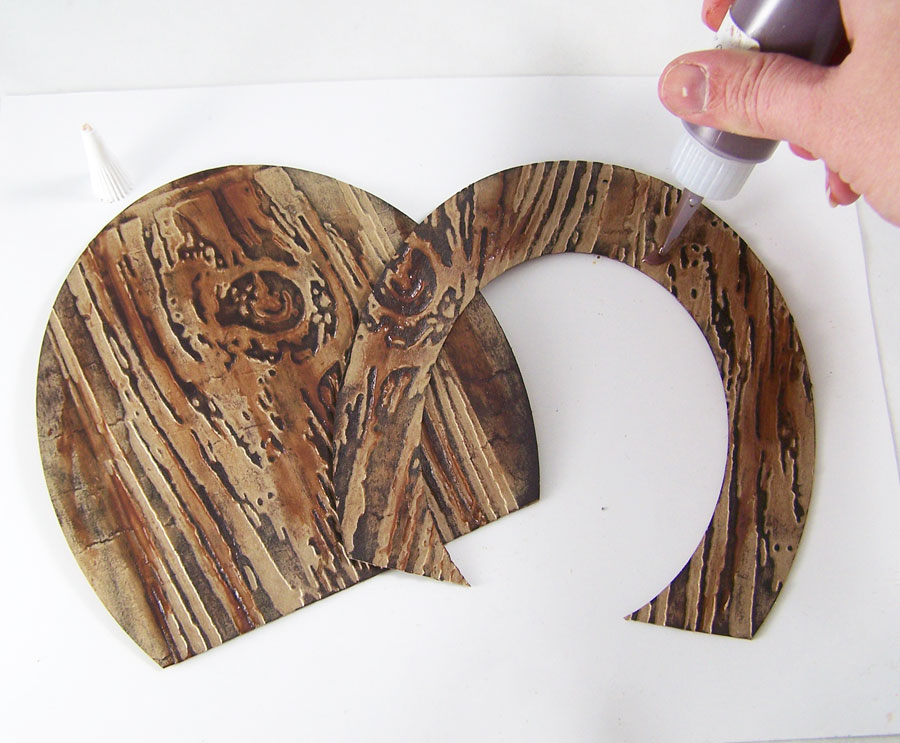
Apply G&P Burnt Umber 3D Enamel Gel to the embossed and now inked sections. Smear the enamel gel in the wood grain pattern with your finger or a cosmetic sponge in a up and down pattern.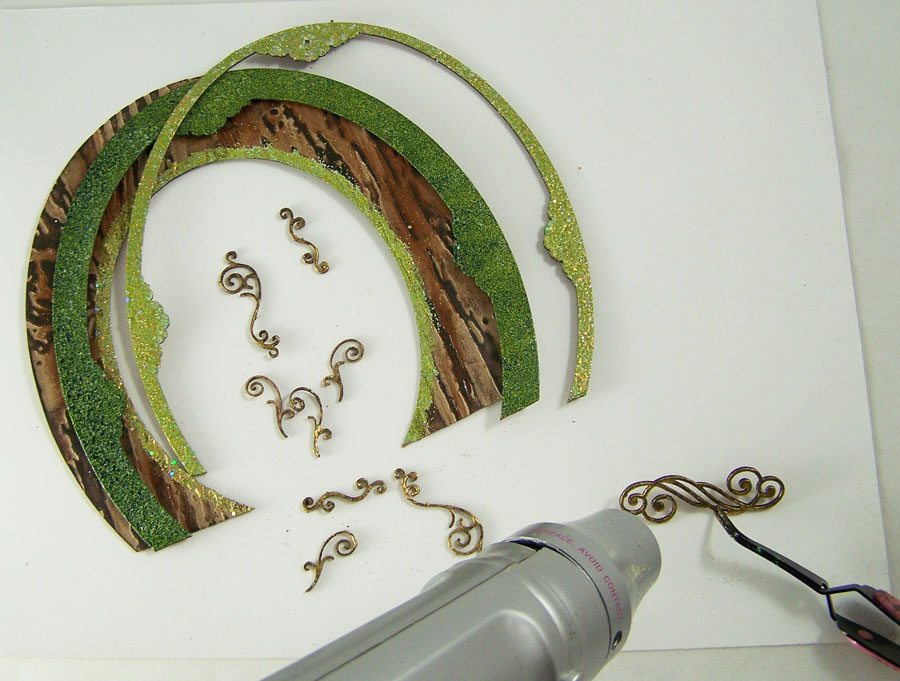
Apply Embossing Powder Adhesive to the top and middle pieces of the frame, the Piccolos and a thin line on the bottom frame. Apply Mossy Glen Enamel Powder to the middle frame, Shamrock Dreams powder to the top frame and thin line on the inner frame, Vintage Gold powder to the Piccolos. Heat to set.
Adhere all three sections of the frame together with Glastique Matte Finishing Glaze, using office clips to keep the frame pieces in place while it dries. Apply Glastique Matte to the back of the Piccolos, place them on the frame and let dry.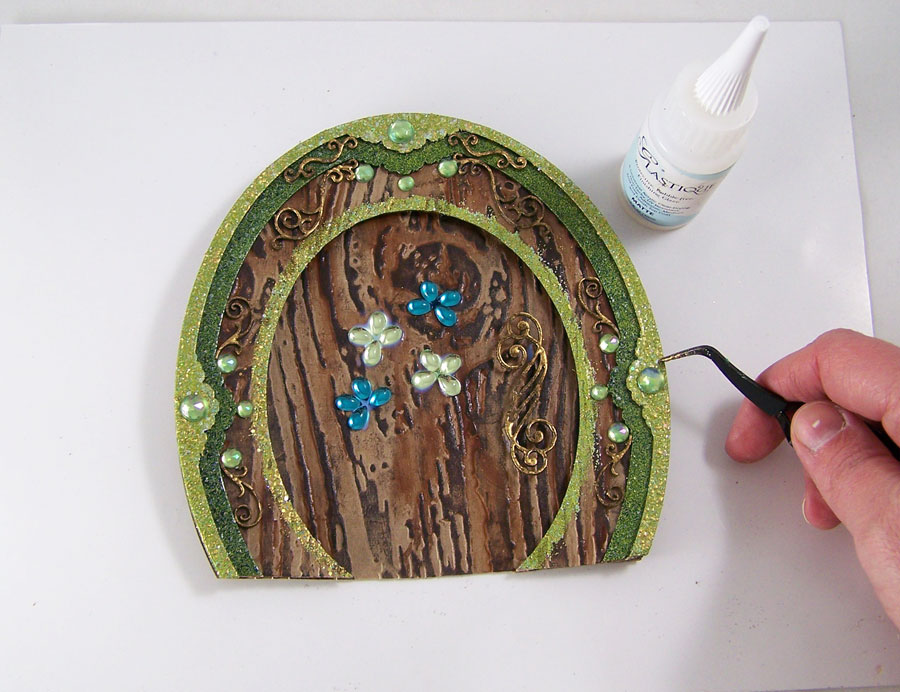
Adhere the back plate to the top frame portion with foam squares. Apply the large swirl Piccolo to the back plate with foam squares to give the illusion of a door handle. Apply the green sticker gems to the faux door with Glastique Matte Finishing Glaze and let dry.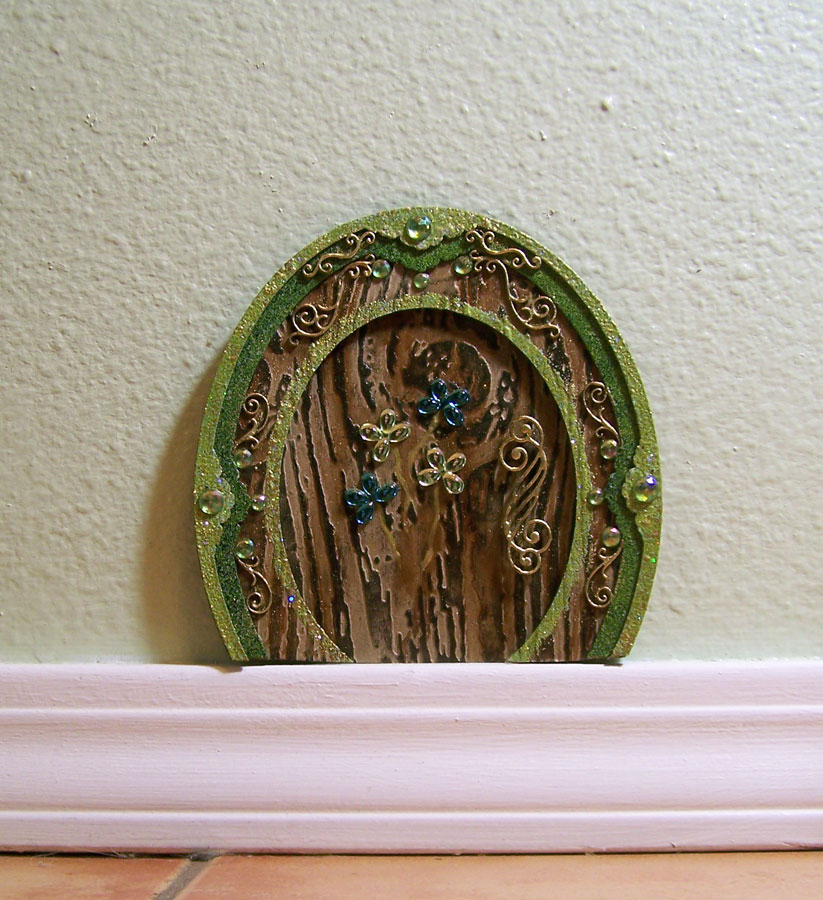
Apply removable poster adhesive to the back of the now completed faux door. Place at the bottom of a wall on the molding, a shelf or anywhere you think a leprechaun might like a magical door! May you have many lucky days ahead!Until next time, safe travels!
Mushrooms and Merriment…

As a young child one of my favorite Christmas decorations was glass mushroom ornaments. They were typically red with white dots and wonderful highlights of pearls, silver, gold and glitter. To me it was like a little frozen bit of fairyland. Traditionally the mushroom ornament was seen as a good luck symbol. In Germany they were seen as a symbol of a person’s love of nature and hope for good tidings in the New Year. Well that got me thinking I just had to make one of my own!Supplies:
Globecraft & Piccolo DIY Portrait Ornament
Globecraft & Piccolo 3D Enamel Gel Satin Honeydew
Globecraft & Piccolo 3D Enamel Gel Napthol Red
Globecraft & Piccolo Piccolo Enamel/Embossing Powder Adhesive
Globecraft & Piccolo Mossy Glen Enamel Powder
Globecraft & Piccolo Pure Sparkle Gold Glitter
Globecraft & Piccolo Glastique Gloss Finishing Glaze
Globecraft & Piccolo Medium FlourishesReindeer Moss
Polymer Clay Mushrooms
Ribbon
Red Sticker Gems
I started with applying the Piccolo Enamel Adhesive to the outer rings of the ornament. I then coated the rings with Mossy Glen Enamel Powder and heat set with heat gun. I then drew a thin bead of Glastique Gloss Finishing Glaze around the inside of the ovals, placed the globes in each half and clipped into place.
Taking the inner ring, I applied Glastique Gloss around the edge and sprinkled on Pure Sparkle Gold Glitter.
The flourishes got a coat of 3D Enamel Gel Satin Honeydew and the polymer clay mushrooms caps had a layer of 3D Enamel Gel Napthol Red applied. Let dry. Then little dots of Glastique Gloss on the mushroom caps and a sprinkle of Pure Sparkle Gold Glitter on top.
Once the mushroom are completely dry I bundled them together and wrapped Reindeer Moss around them tightly. I glued all the pieces of the ornament together with Glastique, carefully sandwiching the mushrooms and moss. I left them clipped in place until dry.
Using Glastique as glue once again, I added the flourishes and sticker gems to the ornament. Once dry I added the ribbon to the top!
Hop on over to the Globecraft & Piccolo blog today to see my Christmas Airship Express tutorial!

Until Next Time, Safe Travels!Halloween crafts and Pumpkin Harvest!
It has been a very long month and seemed to have gone by so quickly. I never seem to have enough time to get all of the arts and crafts I want to get done for Halloween. There are so many directions you can go to be creative for Halloween: home decor, themes, costumes and accessories. Jewelry is thankfully one of those crafts that is easy to make, even with time constraints. I ended up finding this perfect twisted tree pendant from Blue Moon Beads. It had a silver bird dangle attached to the tree; while cute it did not lend well to a Halloween theme, so I removed it and started to brain storm. I wanted to make a more classy addition to a witch costume. Going with the classic idea of poison apples, I started to rummage through my glass and crystal beads.

“The wicked tree” ended up being simple to make but classical in design. I thought blood red crystals would add the needed flash of color with a touch of sparkle to remind of the ruby red but deadly apples.Now still going with the Halloween theme, I bring you to my garden. As I noted in my last post pumpkins have been a big theme for me this season. For me Halloween is one of the best times to showcase this lovely squash. This year I attempted my first try at a completely organic pumpkin patch. Starting with only homemade organic compost and organic seeds I ended up planting 12 seedlings. Traditionally you want to plant pumpkins no later than June, I ended up planting them in the beginning of July but they still came out wonderful. I picked a small variety called New England Pie. This is a classic traditional heirloom pie pumpkin on the East Coast. They are small and usually only weigh a few pounds.

Quickly they took over my little raised garden patch and started to bloom! The bees did the rest and little pumpkins started to form!

I was so happy to harvest the first pumpkin of the season. But many more started to turn orange….
I have many more still turning orange on the vine but I was able to harvest these. They have to cure for 10 days but they look wonderful as Halloween decor until I can cook them up. 🙂My family can’t wait for them to be ready to eat and they are already planning on what to make. One of my favorite recipes to use for pumpkins besides stuffed pumpkin is Olive Oil Pumpkin Bread. At first it might sound a bit odd but it is a wonderful recipe to use. The flavor is light but the bread is rich in nature, perfect to give as a gift.
Wishing everyone a Happy and Safe Halloween! Until next time, Safe Travels!
Family of Pumpkins
I have pumpkins on the brain lately (sounds like a condition doesn’t it? LOL). I am trying to grow a pumpkin patch, wanting to make pumpkin pie, finding vintage ads of pumpkins and creating pumpkins out of polymer clay. I have always had fond memories of carving pumpkins, making pumpkin cakes and cookies with my family. To me they are what Fall, Halloween and harvest festivals are about.
This year I am making all kinds of Fall crafts but I wanted to make something showcasing pumpkins and the happy feeling of family together for the seasons. I started with making a cute little family of pumpkins out of polymer clay. I really liked how they came out but felt I could use them on so many projects such as cards, magnets, jewelry and wall decor. So I decided to make a mold of them so I could do all the projects I thought of and more.
For the pumpkin family mold I used:
Polymer clay (any brand or color will do since I made a mold from the original polymer piece)
Amazing Mold Putty
Amazing Casting Resin
Martha Stewart Crafts 2oz Multi-Surface Satin Acrylic Craft Paint Carrot, Jonquil and Beetle Black
Here is the original pumpkin family made out of poly clay. I gave them deep smiles and happy faces, I don’t have to worry about any detail being lost since the Amazing Mold Putty does wonderful with anything with high detail.
I mixed the putty according to the manufacture’s instructions, though the Amazing Mold Putty is rather forgiving if there is not exact amounts used. I do not attempt to remove the mold for at least 20 minutes to make sure the mold has set. While the cure time for the molds is 20 minutes I like to leave the orignal in the molding putty for longer, making sure the mold is a rigid as possible (but keep in mind it is silicon and very flexible once cured) before trying to make any replicas. The mold can be cleaned with mild soap and water before you make any replicas to remove any loose particles left by the original.
 When mixing the Amazing Casting Resin I have to be careful about stirring too fast and for too long. Once the two parts are combined stir carefully until clear, scraping sides, about 15-20 seconds. I then immediately start to pour the resin into the mold; be careful not to pour too quick as you will increase the amount of air bubbles. It will set in 10 minutes, but keep in mind that the thicker the piece the faster the cure time. In this case the pumpkin family is a thick piece and set in about 8 minutes.
 Here the resin copy is next to the original and the mold. Once the piece is cured I demold, trim any rough edges, sand and started painting.
Here I show the 3 stages of painting. I have found that the Martha Stewart Crafts Multi-Surface acrylic paint bonds well with the resin replicas. I start with the Carrot, then a color wash of Beetle Black and then paint the Jonquil paint only in the eyes, noses and mouths of the pumpkin family.The first project I wanted to make with a pumpkin family was a home decor piece for my mother. She loves the holidays and always likes to have the family home to celebrate.
For the home decor piece I used:
Globecraft Memories Classic Fancy Rectangle
Globecraft Memories Glastique Gloss Finishing Glaze
Globecraft Memories Enamel powders 24K Gold and Mossy Glen
Globecraft Memories Piccolo Accents
Cardstock (any color or brand will work, I used orange, metallic white and black)
Mini Fall Leaves (most local craft stores carry small bags of fabric or paper leaves in the scrapbooking or floral sections) Using one of the finished pumpkin resin pieces, I placed it in the middle of the Classic Fancy Rectangle and traced along the inside of the oval to make sure the background paper, pumpkins and a leaf embellishments fit inside the globe.
 Once I decorated the outer layers of the frame with the paper, enamel and Piccolos, I coated the outside layers with two coats Glastique Gloss glaze. Once completely dry I glued the layers and globe with Glastique together. I then glued the pumpkin resin piece to the backplate of the frame with a thick layer of Glastique. I carefully added the mini leaves around the bottom of the pumpkin family to give them a “bed” of leaves to be on.

Glue the top layers of the the frame to the backplate with Glastique and once dry it is now ready to hang on the wall! 🙂Until next time, Safe Travels!
CHA Winter show 2012 part 1
This year’s winter Craft and Hobby Association show was awesome! While this show was a touch smaller than past Winter CHA shows I can honestly say it was still a great and positive show to attend. There were so many new products, designs, workshops and wonderful contacts; this show sure was a busy one! It was a bit different for me because this was my first time doing demos at the CHA Globecraft Memories booth.
At the last winter CHA in 2011 I had gotten some information about a new company called Globecraft Memories. They had wonderful chipboard frame and globe sets that people could decorate with paper, fabric, paints, stamps or clay and place photos or family treasures inside. I saw one of their globes with a miniature polymer clay baby in it and I felt these would be prefect for my miniature work. I ended up finding out the baby sculpture was from their other company Secrist Dolls, which carries only the best vinyl doll kits, polymer clay doll sculpting tools and doll paints on the market. I left my business card and eagerly awaited the catalog to be sent to me. I ended up being contacted by the owner Mr. Pat Secrist because he had noticed I listed myself as a designer on my business card. They had some openings in their design team and they were looking for some new ideas. We got to talking and I ended up making a few samples for the website. Mr. Secrist then started to get in some new products to expand the line, they sent me and their other designers some to test. I was sent frames to start making samples for the CHA winter show. I was excited to be then asked to demonstrate products at CHA in their booth! Mr. Secrist wanted to show people that the globe kits and frames could be so much more. The idea was to make these frames more than just a card making or a scrapbooking element but something that could appeal to paper crafters, home decor artists and even mixed media artists like myself. The end result was a wonderful line of products designed to make chipboard look like expensive metal wall decor, enameled art and stonework but for fraction of the cost.
I can honestly say I love their new line of products:
New Frame Chipboard Kits: A new line of frames and elements for all interests. Be it for scrapbooking, papercrafting, home decor or mixed media they have styles and elements you will love. They also have a line of Steampunk Airships that are just too cute, which come in Large, Medium and Mini. The chipboard elements before assembling can be put through an embossing machine like Sizzix or Cuttlebug for more texture and detail.
Piccolo Chipboard Elements: Both as mini chipboard elements to be used on frames, paper or card these wonderful little patterns and shapes come in so many styles. From Steampunk gears, birds, cats, swirls, butterflies to delicate corner elements. They also have Toppers that are small tags and elements that would be wonderful for cards, scrapbooks and mixed media art.
Glastique – Flexible Finishing Glaze: comes in Gloss and Matte. This is water based and non-toxic. It can be applied to chipboard, fabric, paper, glitter, paint, it can act as a glue and a clear glaze. In fact, when coated on pieces of chipboard that has been coated in embossing powder it makes the chipboard flexible! I have even put thick layers of the Glastique on rubbers stamps; once dried and peeled off the stamp, I have a clear flexible piece to be added to mixed media work or paper crafting.
Halo Glitter: comes in Gold and Silver. A wonderful fine glitter with several different sized particles for a more reflective effect. Layer it with Glastique and you have gorgeous color reflection.
Mica Powders: They carry so many colors I can’t list them all! Super fine mica powder for all you craft needs, from paper crafting, resin work to even polymer clay. They add no binders to the mica so there is no worries about odd chemical reactions like other products on the market. Layer it with Glastique to get a dichroic glass effect.
Mica Powders with Glitter: Super fine powder and glitter in vibrant colors. Stunning selection of colors for so many uses.
Super pigment rich acrylic paint and glazes: While this is a slightly more expensive paint than your standard craft store bottle paint it is well worth the cost. Their colors are luscious, they dry the same color they are when wet, their metallic paints only need one coat for full coverage and the glazes are just stunning on paper or wood.
Globecraft Memories Enamel powders: These powders are specially designed to cover larger areas such as the chipboard frames Globecraft Memories is known for. The nice thing is the powders still look wonderful on detail elements such as their Piccolos. I love these powders but then again I am a bit partial to them. I ended up making a portion of the new recipes of enamel powders for Globecraft Memories and one of my colors, Girls Night Out ended up being their 3rd best seller at the Winter CHA! These wonderful colors can mimic stone, metal, natural elements and aged surfaces. In fact these powders worked did it so well for the first two days of CHA people walked past the Globecraft Memories booth thinking they were selling real metal and wood frames, not coated chipboard! A sign had to be placed in front to tell everyone everything in the booth was chipboard. 😛
The following is the few photos I was able to take while doing demos at CHA.

Mr. Pat Secrist the owner of Globecraft Memories.

Some of the wall displays in the Globecraft Memories booth, the music sheet, solar, ambers and 4 globe sayings frames are my work.

The flower bouquet and apple basket sets are based on my illustrations and the samples shown are my completed work.

Part of the Globecraft Memories booth at the CHA winter show.

A close up of the sea frame set made into a mirror wall hanging.

Some of my completed airships hanging from the booth. Some of the Piccolo chipboard element packs are on the right.

Close up of one of the completed airships.
The following photos are some the prototype photos I took while making the samples for the show. You will notice in some of the photos the globes are not attached because it is easier to ship without the globes in place. If you would like to see more prototype photos check out my Facebook fan page. All of the frames are from Globecraft Memories.

My music frame that was picked as a booth sample. Classic Grand Rectangle backplate with other chipboard elements and Glastique Flexible Finishing Glaze Matte.

Prototype photo of my version of the seascape frame that was picked as a booth sample. This was before the mirrors replaced the globes for the final sample. Frame is covered in my enamel powder recipes. Seascape Wall Decor Kit.

A saying frame set that was picked as a booth sample. Inner frames are covered in my enamel powder recipes “Mardi Gras” and “24 K gold”. Little Fancy Rectangle, chipboard elements and Glastique Flexible Finishing Glaze.

Vintage airship that was picked as a booth sample. I used the Large Airship and chipboard elements.

Mini airship that was picked as a booth sample. This is a finished piece I used the Mini Airship, the pigment rich paints and Glastique Flexible Finishing Glaze.

Vintage airship that was picked as a booth sample. This is a finished piece. Mini Airship kit, enameling powder and paint.

Apple frame set that is based on my illustration. This version was picked as a booth sample. This is the Apples of My Eye Wall Decor Kit.

Birdcage piccolo that was picked as a booth sample. The globe is not attached in this photo because it is easier to ship without the globe in place. Classic Fancy Oval and Piccolo chipboard elements.

Dino amber frame that was picked as a booth sample. Frame is covered in my enamel powder recipe “Brown Stone”. I used the Classic Grand Rectangle backplate.

Museum frame, this is the first version. I put the label inside the frame and that version was picked as a booth sample. Frame is covered in my enamel powder recipe “Vintage Copper”. I used the Classic Grand Rectangle backplate with Piccolo chipboard elements and Glastique Flexible Finishing Glaze.

Flower frame set loosely based on a illustration of mine. This version was picked as a booth sample. Frame is covered in my enamel powder recipes. Big Bouquet Wall Decor Kit.
Until next time safe travels!

Ancient and Contemporary Inspired Artistry
