2017 Creativation Show with Amazing Casting Products
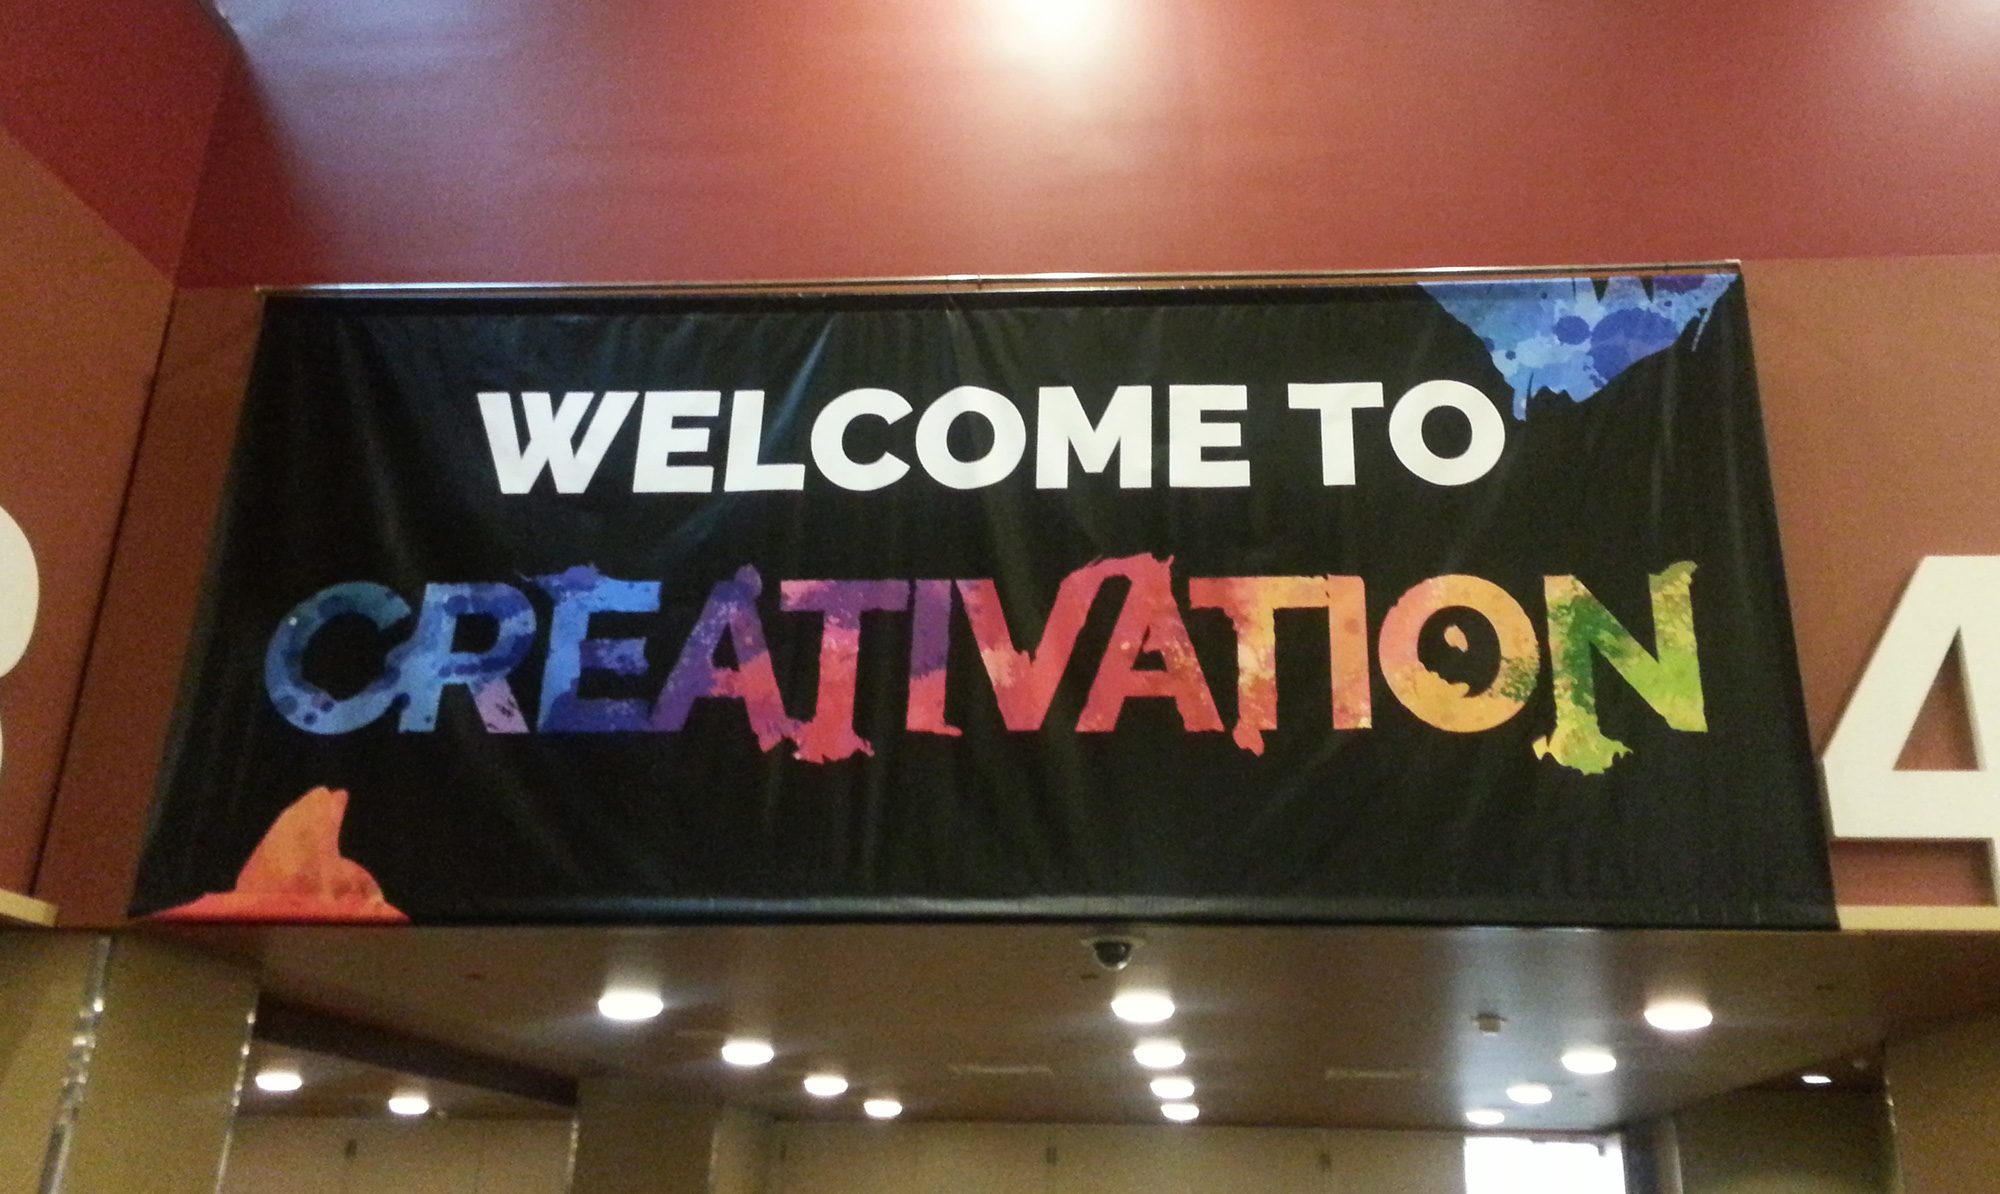
This year’s Craft & Hobby Association 2017 show was a whirlwind of changes, arts and crafts manufacturers, new products, demos, classes, and networking opportunities. Formerly known as the CHA Mega Show, it is now called the Creativation Trade show, held in Phoenix, Arizona. CHA also went under a new rebranding, now Association For Creative Industries or AFCI to reflect their more broad ranging inclusion of creative industries.
Here is their lovely new logo that was introduced to attendees and exhibitors on the second day of the show!
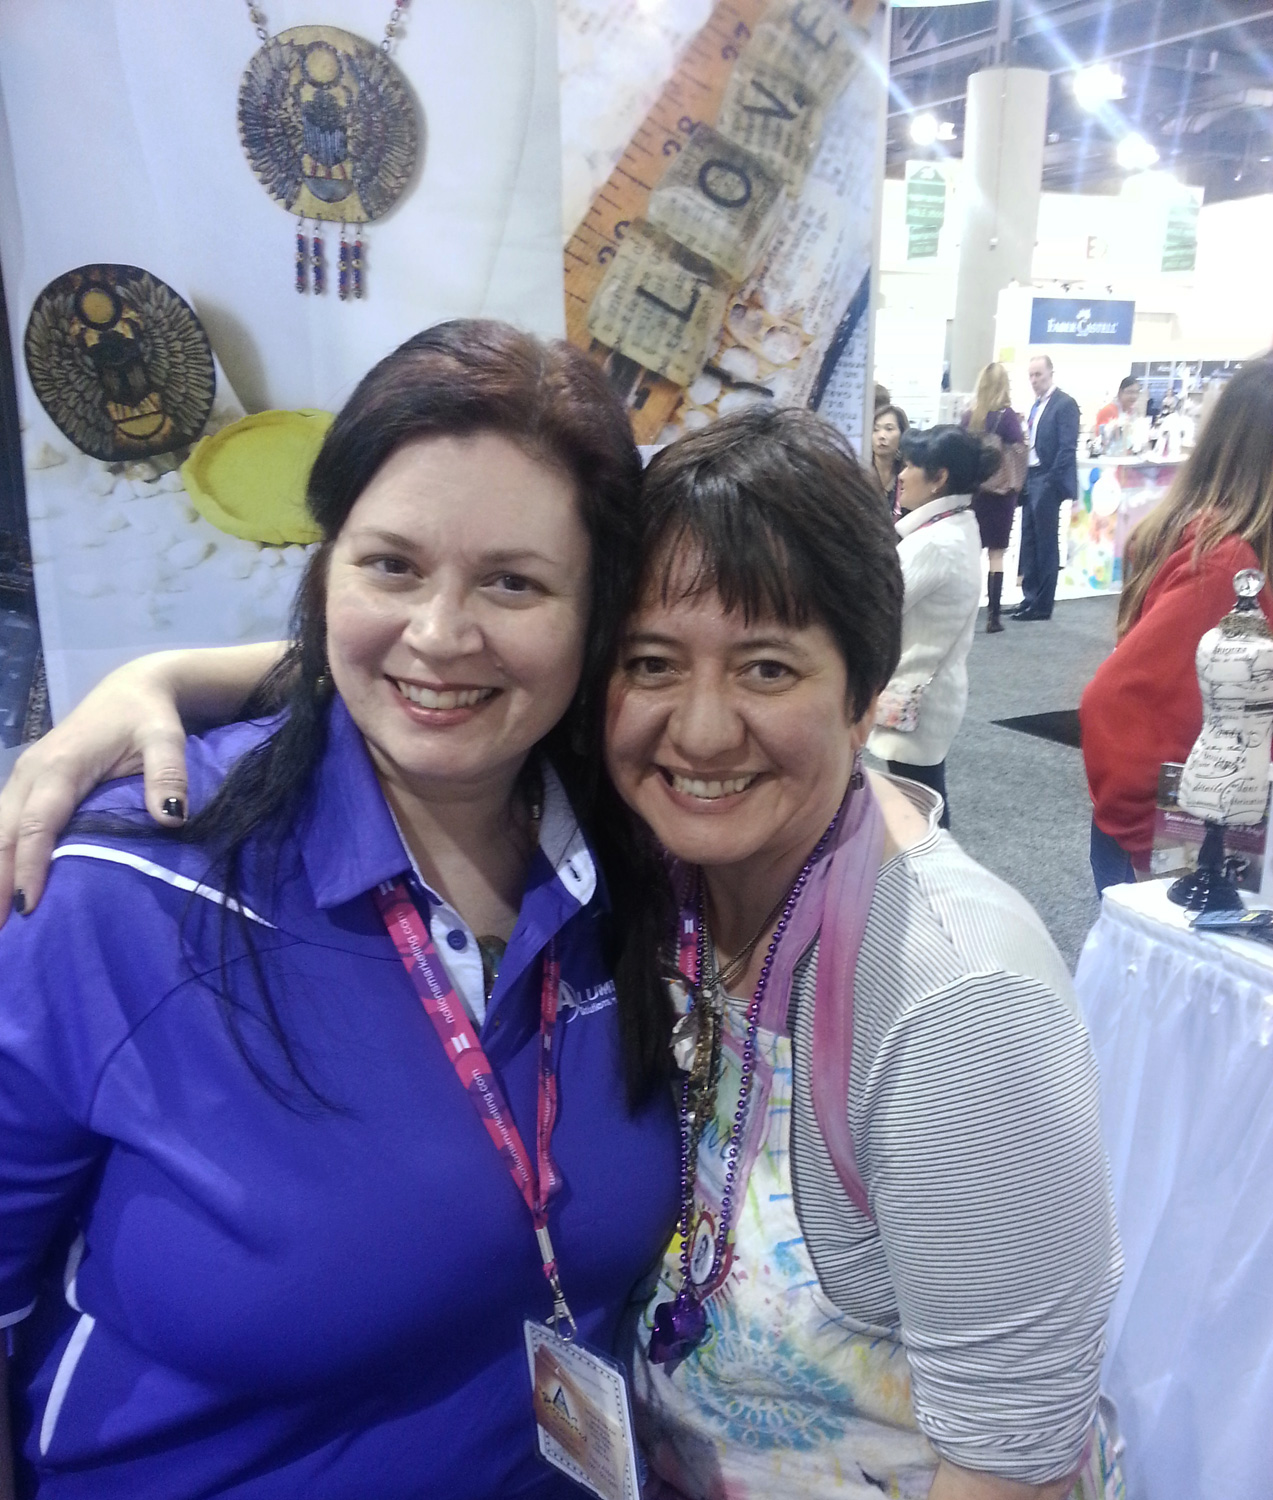
I was once again a demonstrator at the Amazing Casting Products/Alumilite Corp booth at CHA, this time for all three days! With the show being shorter but with longer show hours everything was a whirlwind.
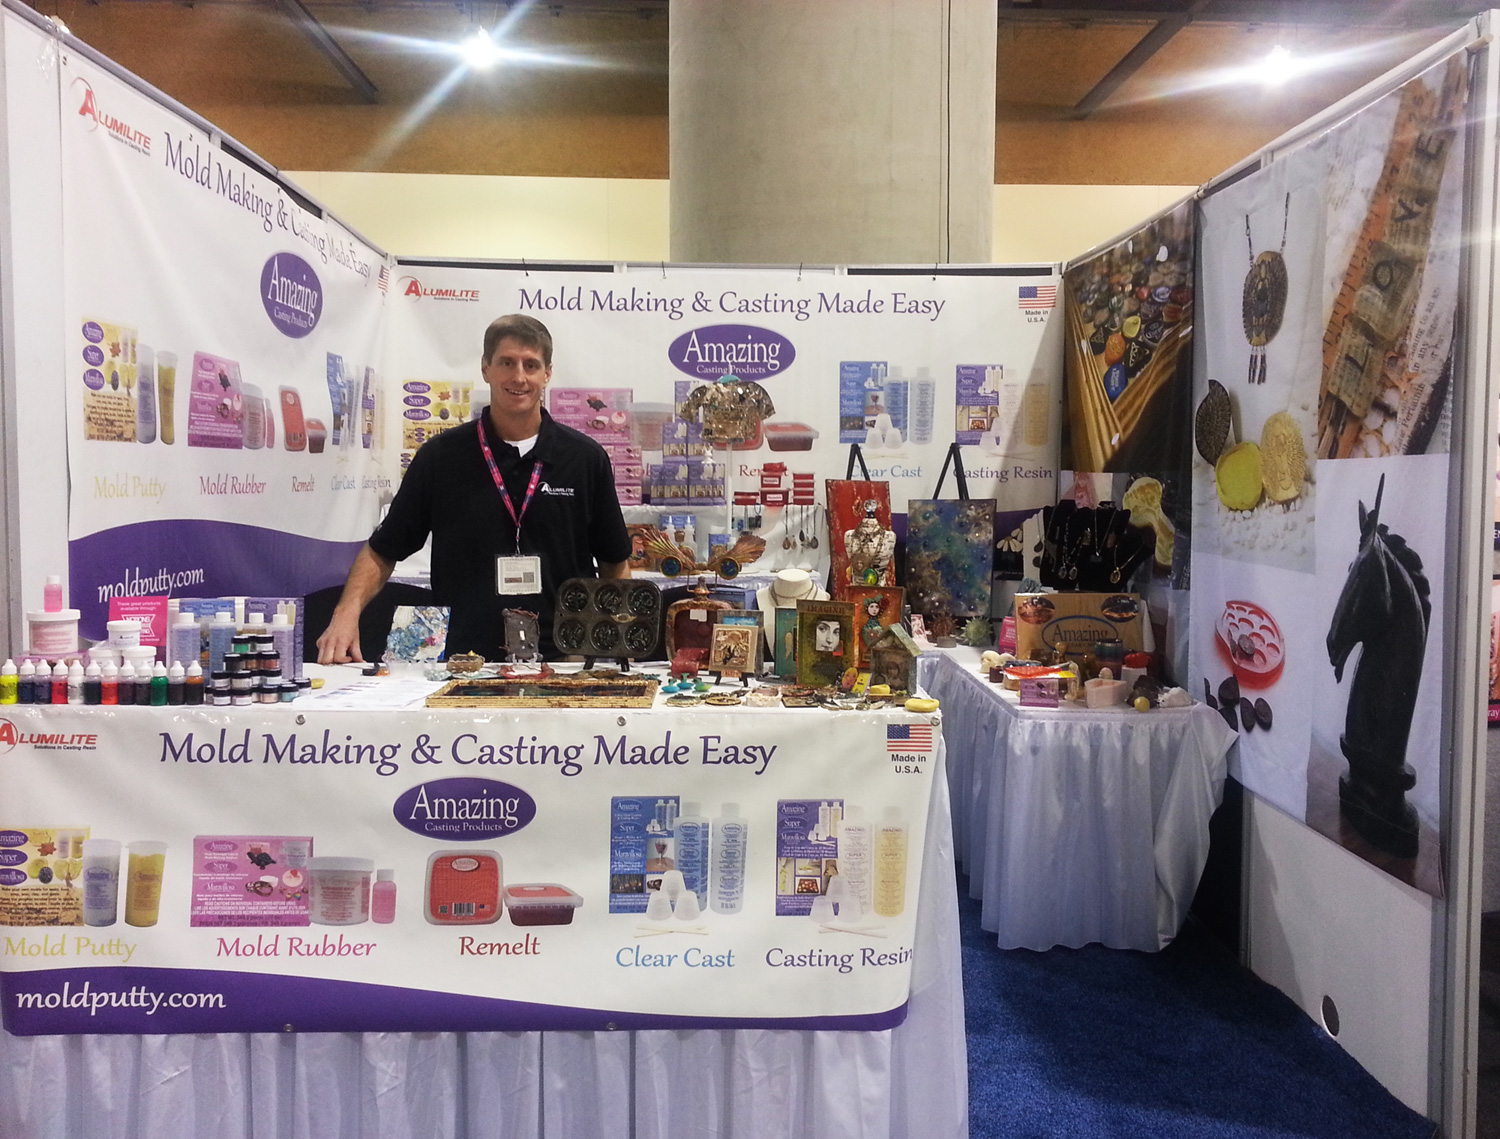
In the above photo the President of Alumilite, Mike Faupel is proudly showing off the products of the Amazing Casting Products line and all the artwork samples.

On the front table there was a wonderful array of artwork by Cat Kerr, Tina Walker, Kristie Taylor and yours truly.
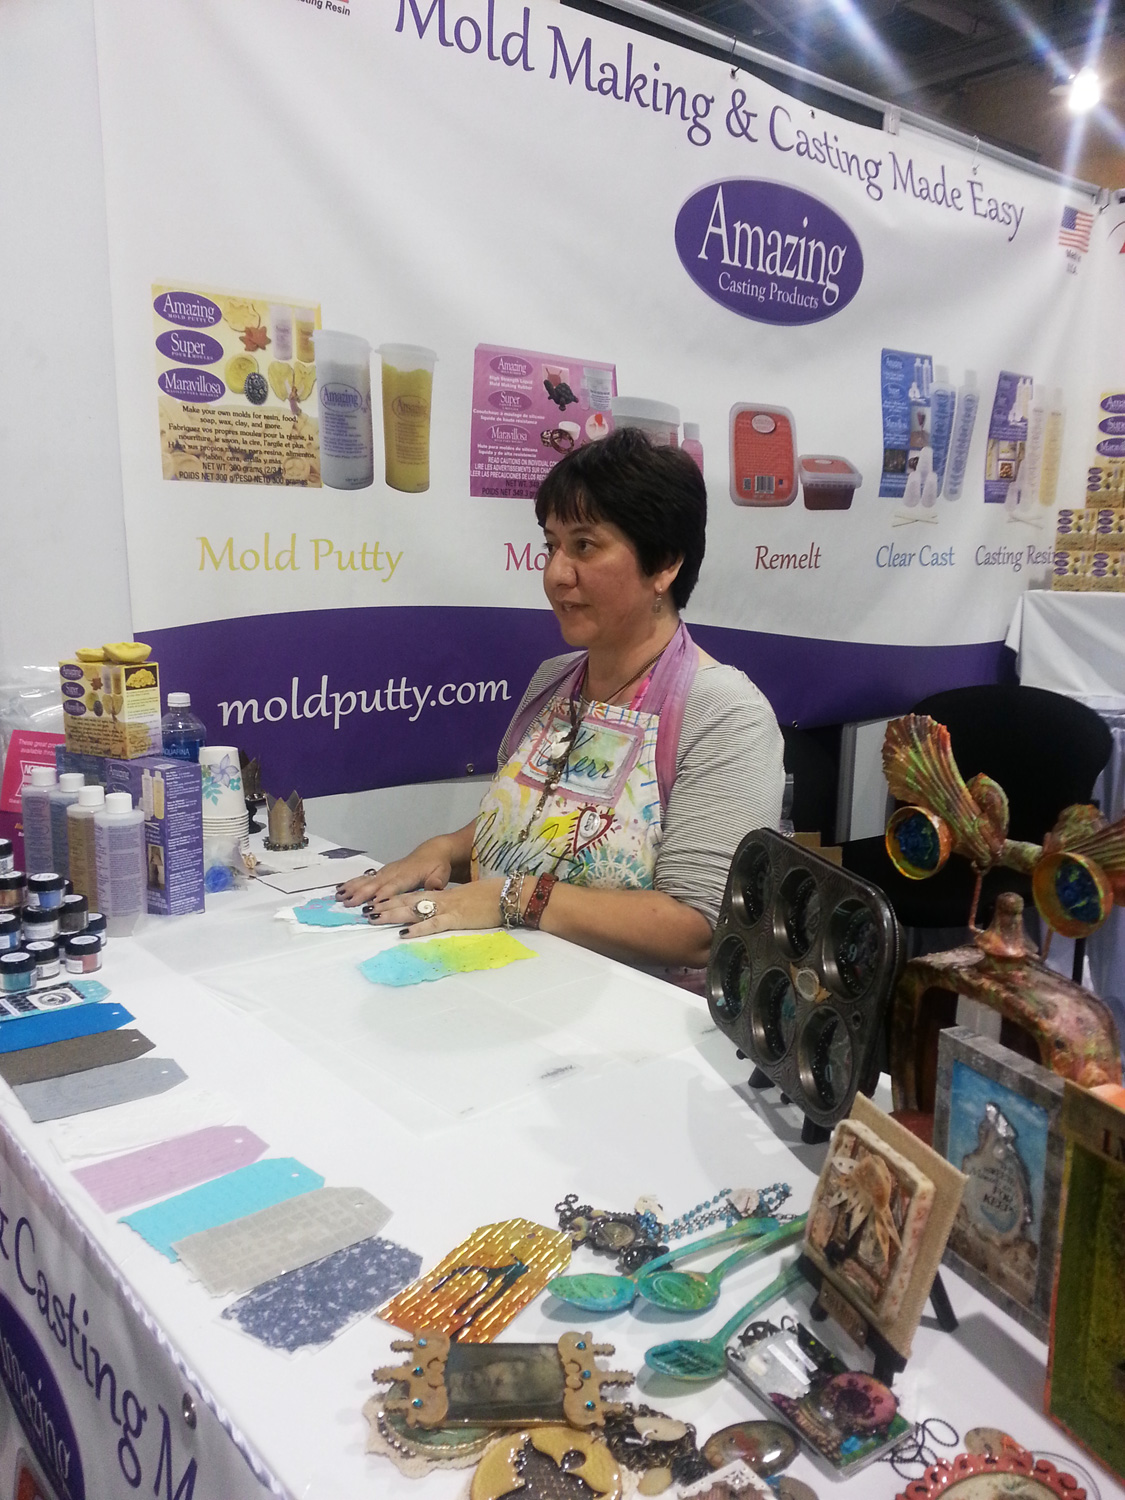
The talented and lovely Cat Kerr did afternoon demonstrations at the booth on Saturday. A tutorial of one of the projects she was demoing can be found Here.
While sadly Cat couldn’t stay for all of the show, everyone at the Amazing Casting Products booth made sure she had a great time!
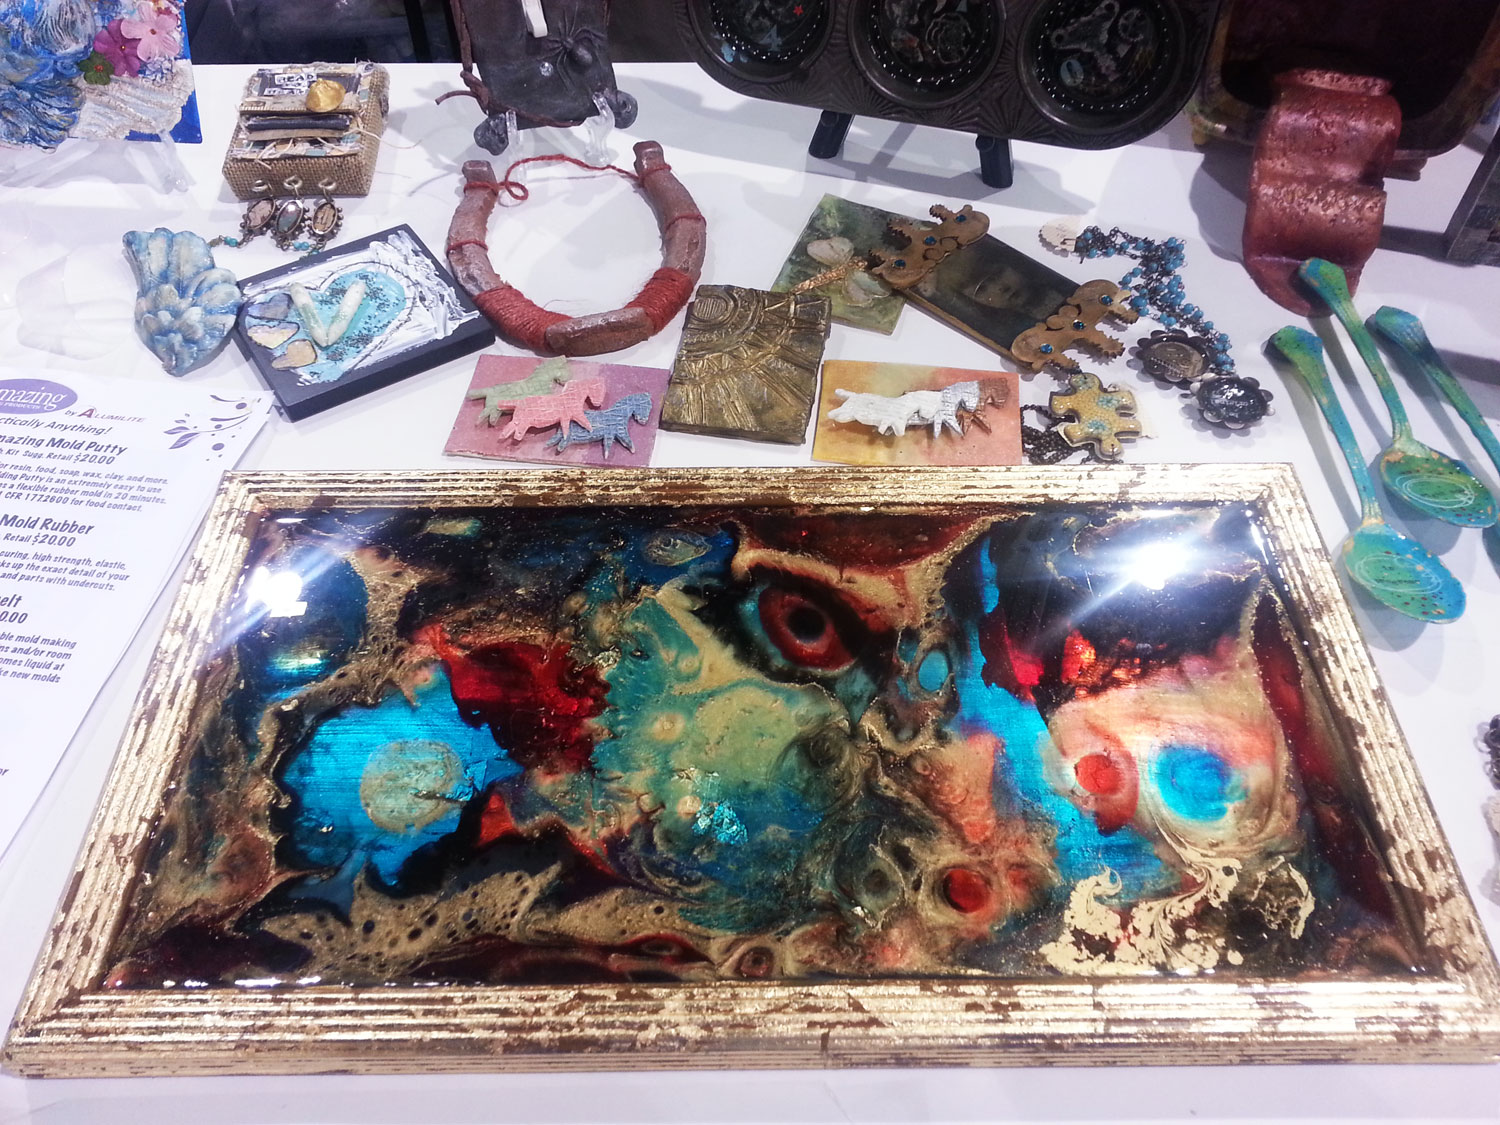
One of my new pieces on display was resin frame piece I created and brought just for this show.
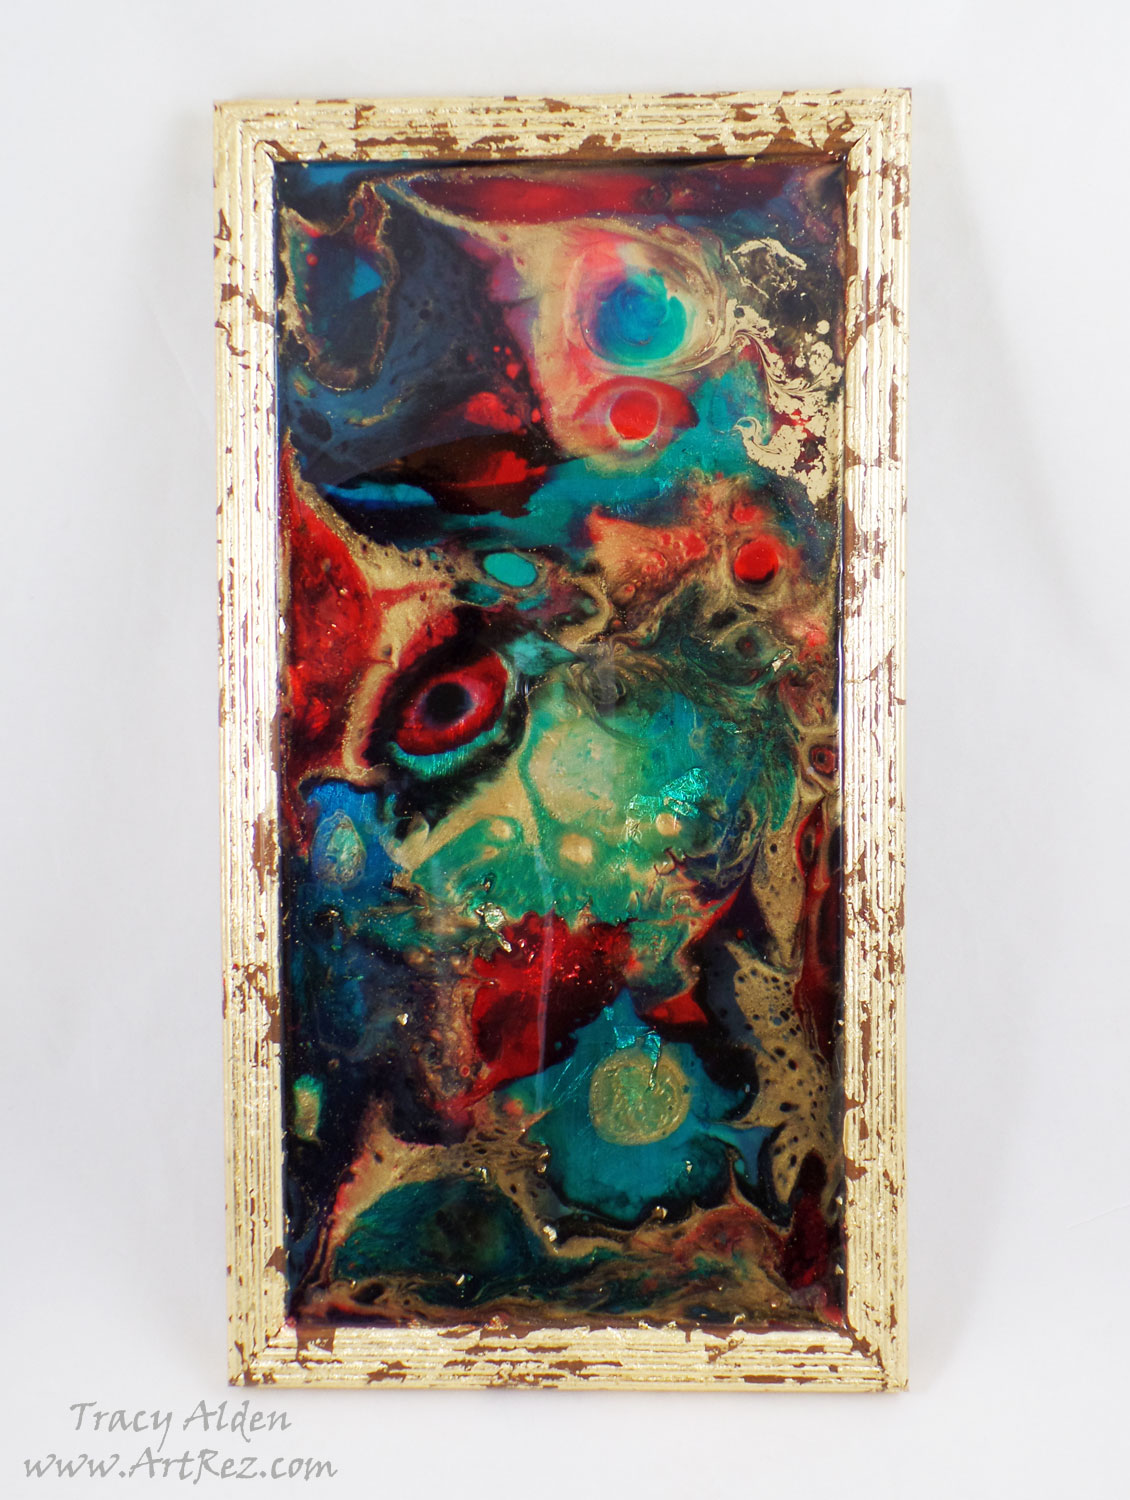
Using an old frame, gold leaf, Amazing Clear Cast resin tinted with Alumilite’s Dyes and mixed with Alumidust powders I was able to create a vibrant one of a kind abstract piece.
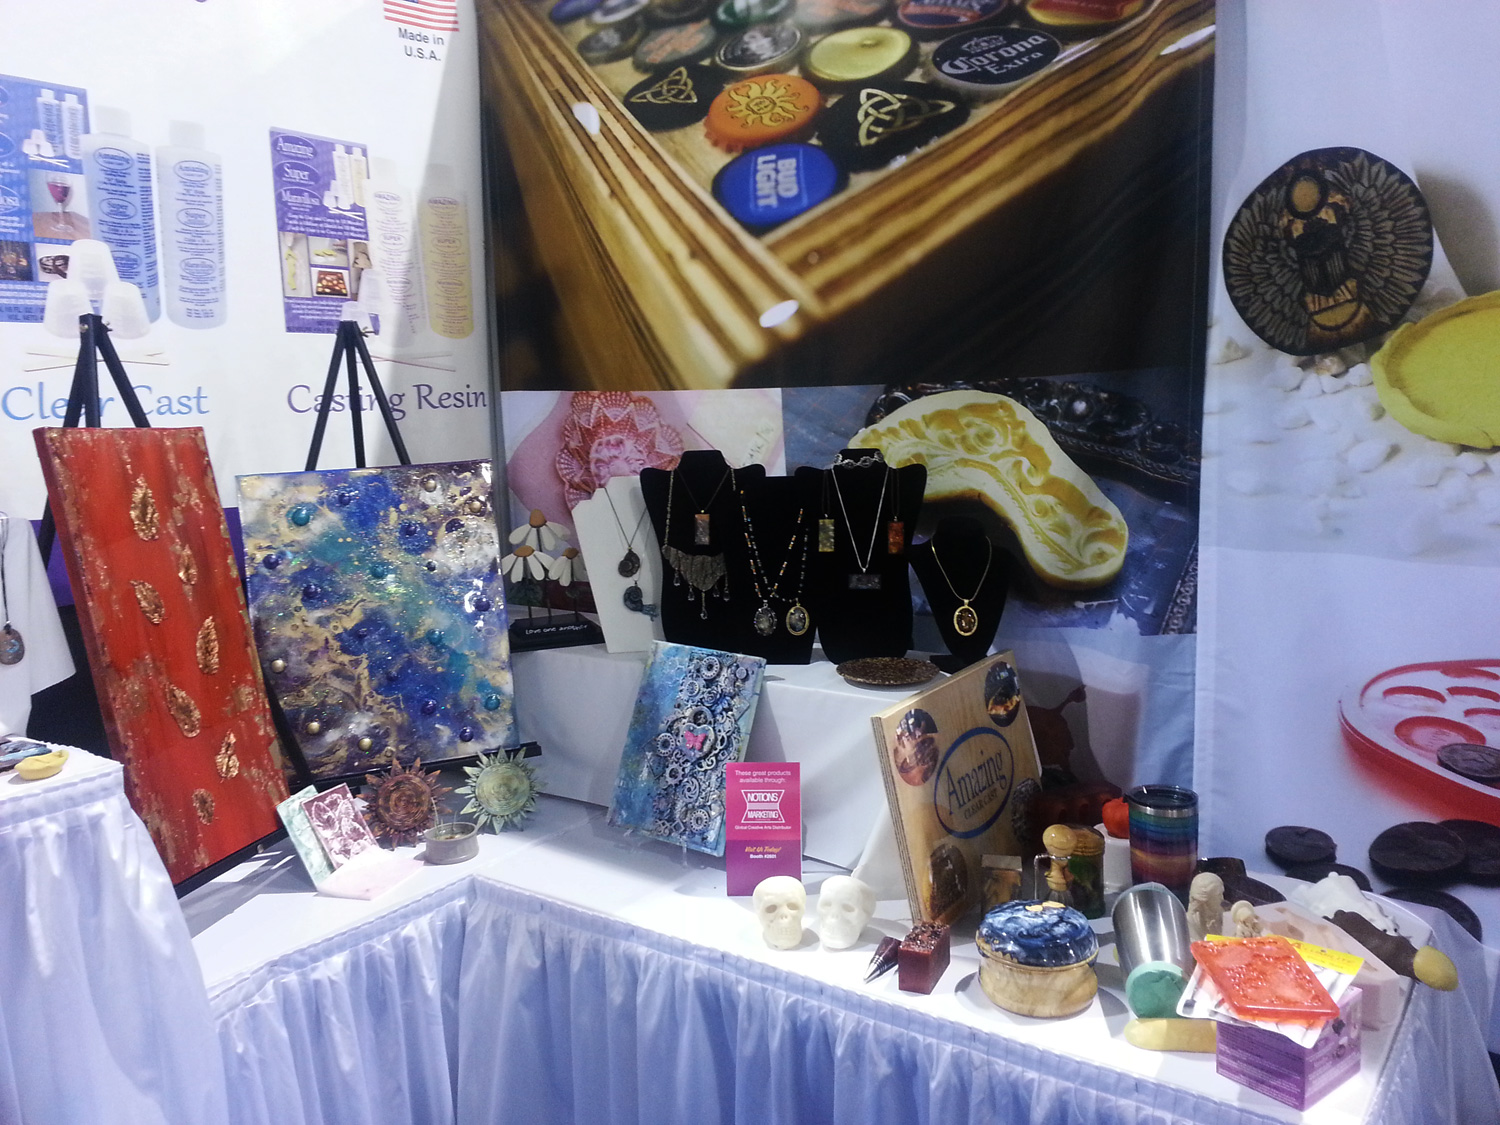
There was so many samples showcased in almost ever corner of the booth! From home decor, mixed media, jewelry, garden decor, fine art and more!
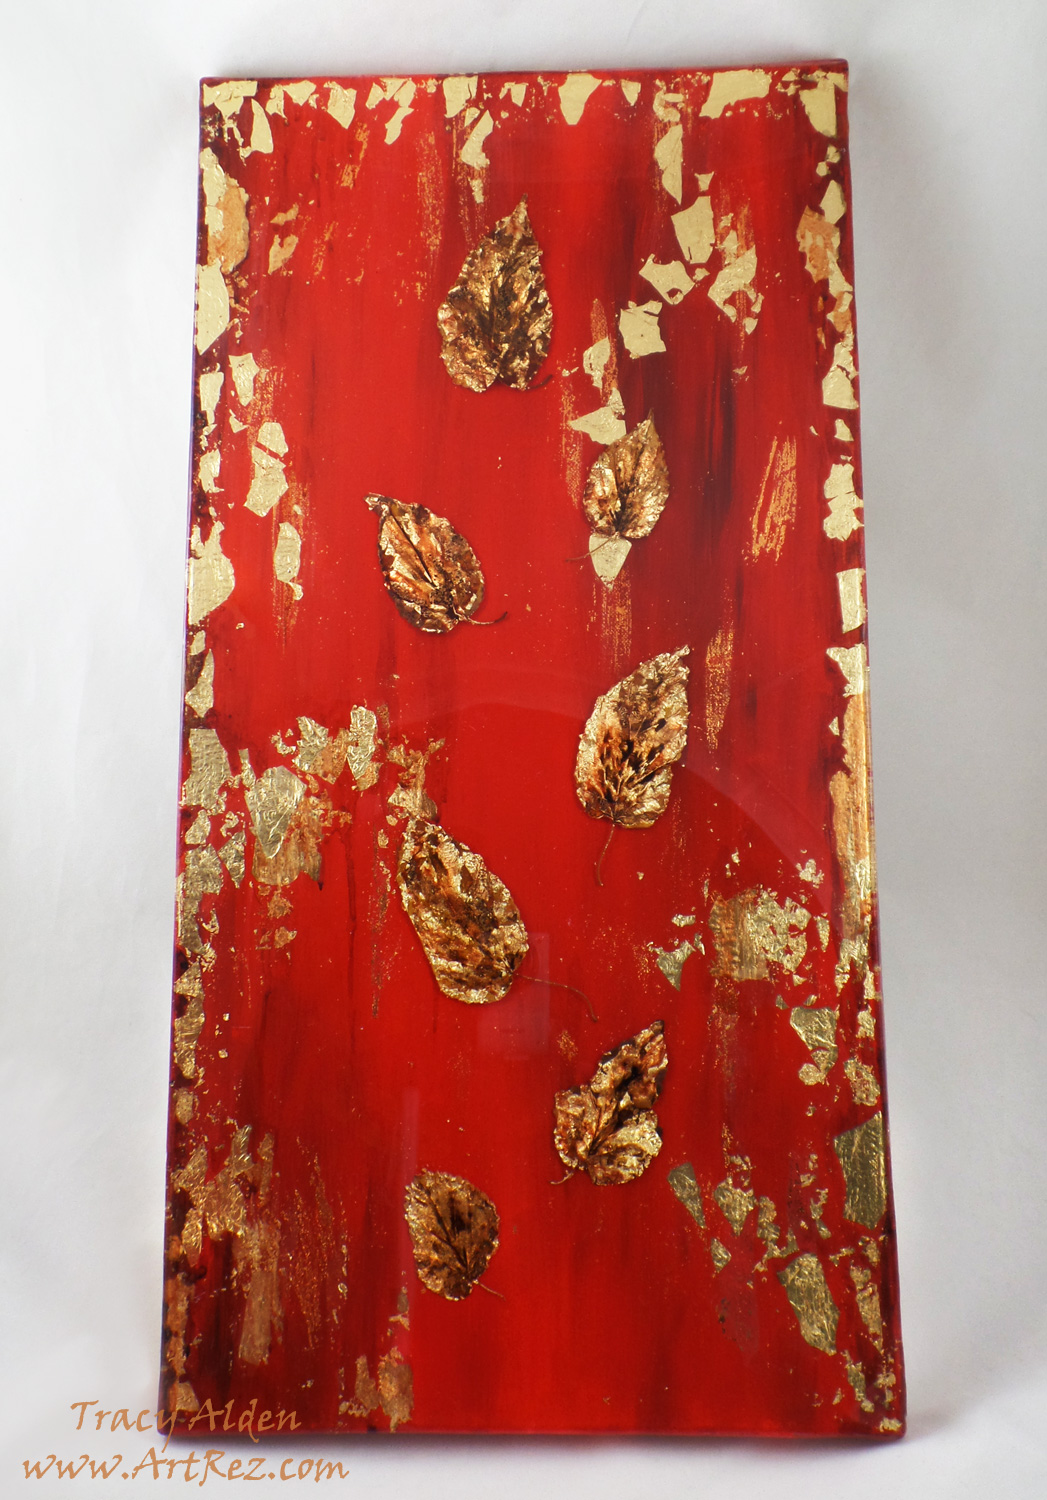
Trying a new spin on my resin canvas application (such as I did for last year’s show) I painted, applied gold leaf, Amazing Clear Cast resin, real leaves on a 12″x 24″ canvas. The depth and dimension I was able to achieve was lovely.

At the end of three days of demos from 9am-6pm I was looking a little frazzled but I had a wonderful time sharing techniques, new resin applications and showcasing my skills as a designer.
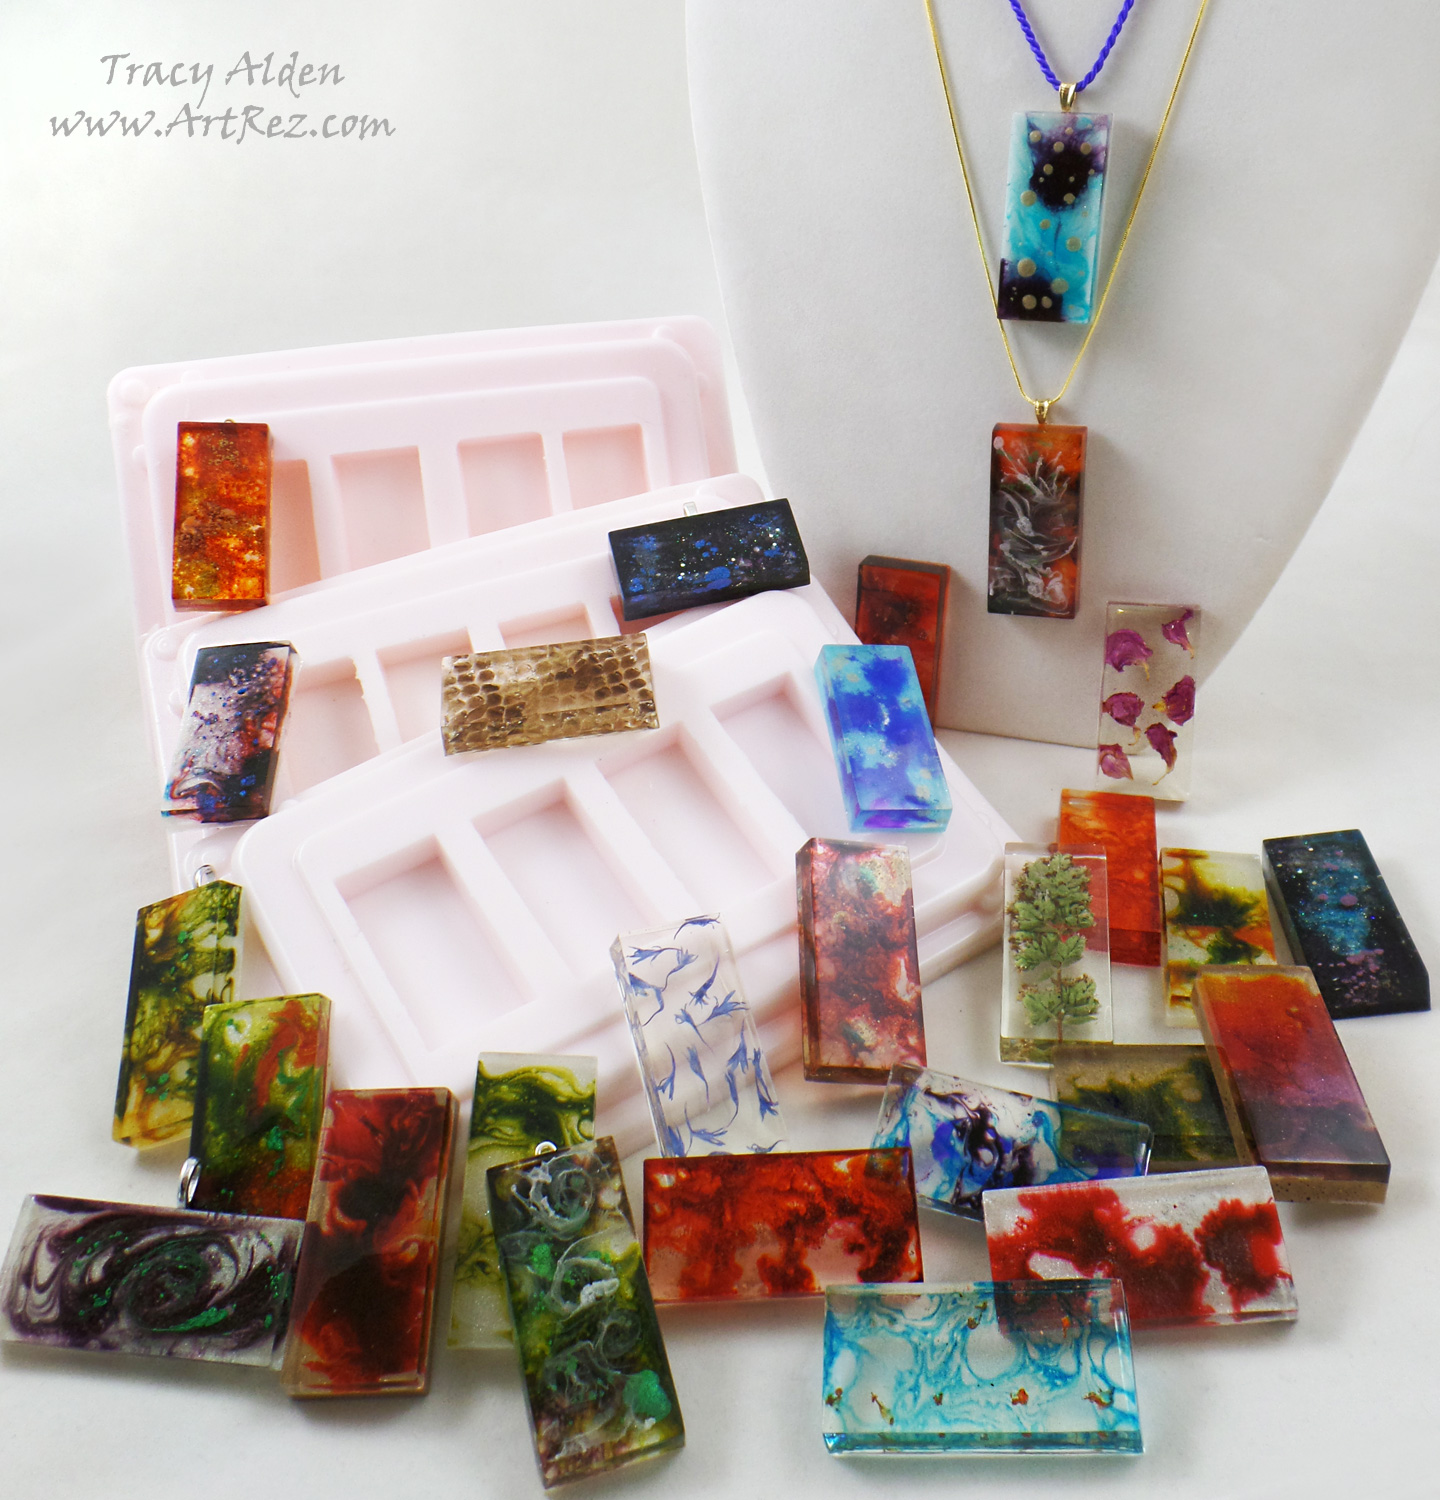
One of my favorite demonstrations was using the tile molds you can see in the photo. If you would like to find out how to create your own a tutorial can be found Here.
While I didn’t get to walk the show floor like I normally would because everything was so busy this show turned out to be a wonderful and new adventure into the creative industries.
Until Next Time, Safe Travels!
2016 DesignerCon Recap
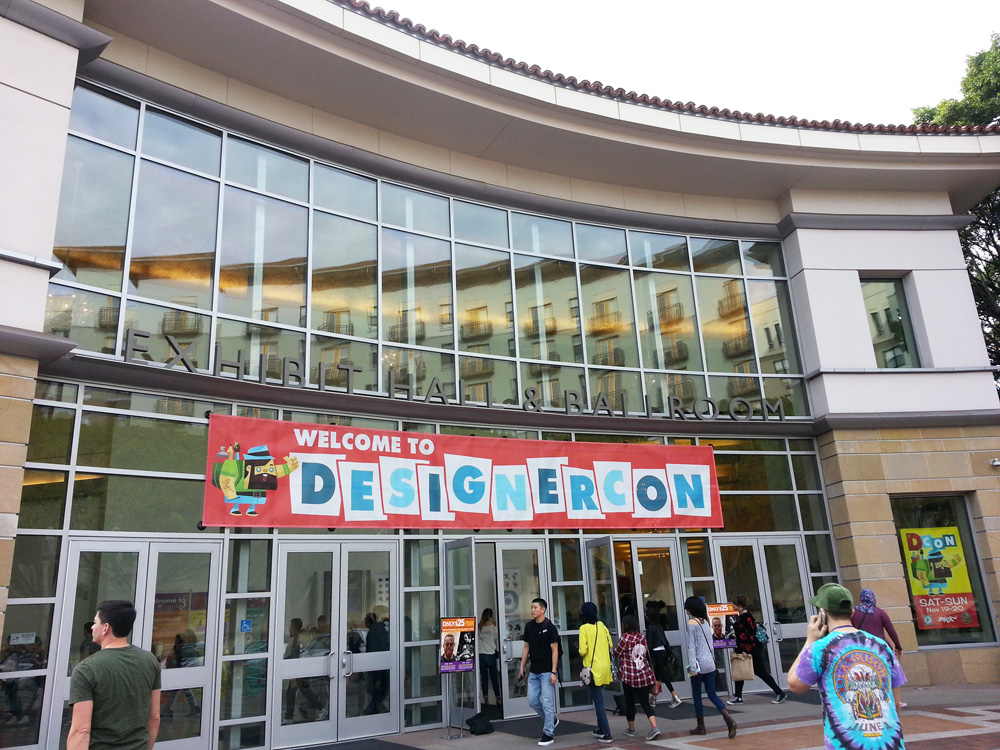
This year I was finally about to attend DesignerCon or otherwise known as DCon. While my recap is somewhat belated I still wanted to share some info on a few of the seriously talented artists I met at this show.
So what is DesignerCon? As per their website:
“Designer Con is an annual art and design convention that smashes together collectible toys and designer goods with urban, underground and pop art! DCon is over 90,000 sq. ft. and features over 350 vendors, art & custom shows, live demonstrations, and much more! he show coordinators strive to provide a fun, safe, comfortable environment for fans, artists, and vendors to meet. Join us every November at the Pasadena Convention Center for a weekend of fun, toys, and art!”
While I was only able to attend one day due to scheduling conflicts, making it a mad dash to be able to see all the vendors and wonderful artists, it was an awesome show to attend. With so many talented people selling their art is was honestly hard to pick who to buy from and what. It is not a show to miss and next time I hope to go both days to not just walk the floors but attend some of the special events and panels.
I wanted to show some of the artists I bought from, their links on social networks and where others might buy more of their work outside of DesignerCon!
*Some shops might be down for the holidays or have specials going only for the holidays, make sure to check out their different social networks for updates.
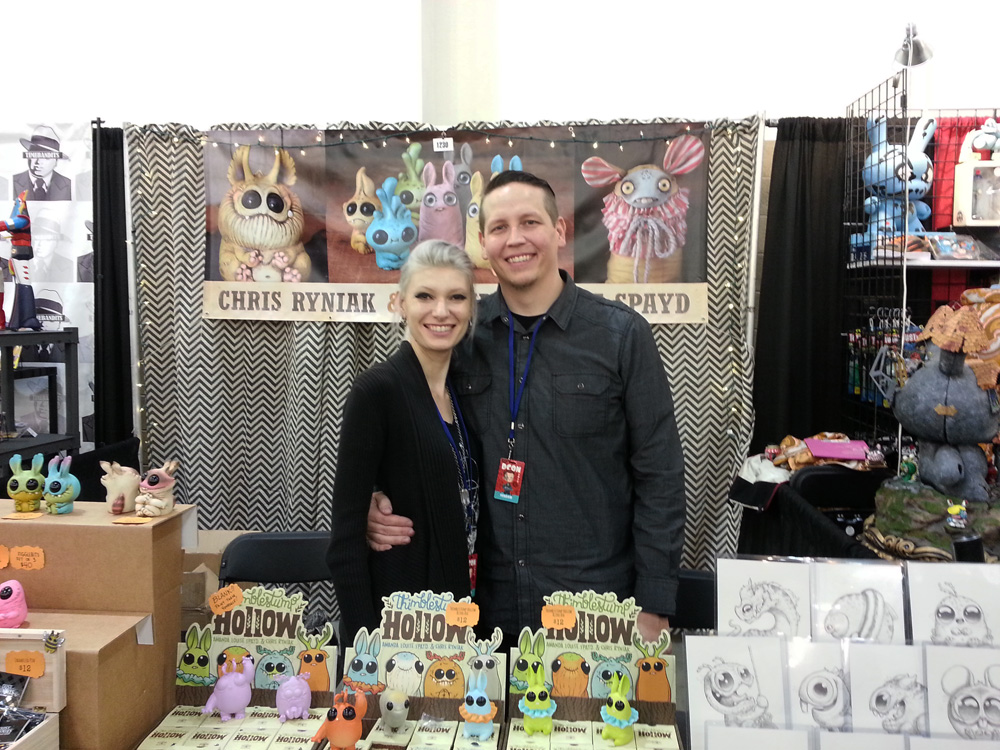
Artists Amanda Louise Spayd and Chris Ryniak had a combined booth showcasing their sculptures, vinyl figures, illustrations, prints and buttons. Their unique spin on monsters and wee creatures has been a favorite of mine for years and it was a pleasure to finally meet them in person and buy some of their art.
Their combined shop: https://www.bindlewood.com/
Amanda Louise Spayd
Created the puppets in the short film The Maker: http://www.themakerfilm.com/
Website: http://amandalouise.com/
Instagram: https://www.instagram.com/amandalouisespaydChris Ryniak
Making Monsters by Chris Ryniak lecture at Patreon’s first ever creator conference: https://www.youtube.com/watch?v=81nzmR3jbe4
Instagram: https://www.instagram.com/chrisryniak
Facebook: https://www.facebook.com/ChrisRyniakArt/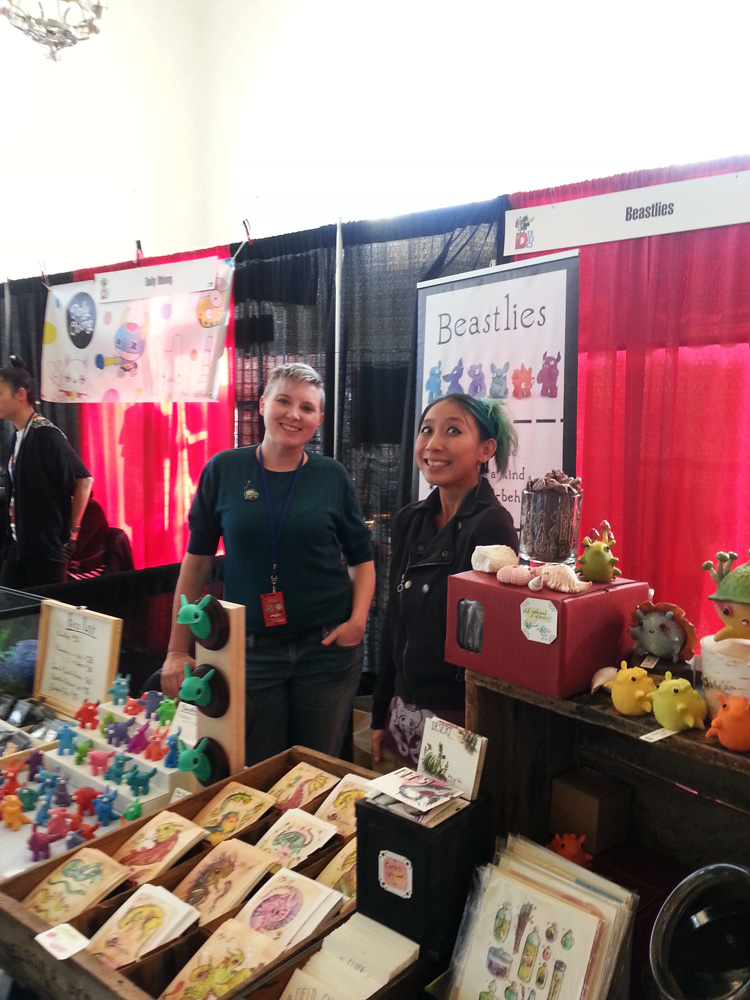
Artists Shing Yin Khor, otherwise known as Sawdust Bear and Leslie Levings creator of the Beastlies had a combined booth as well. Each of these artists had sculptures, resin castings, illustrations, prints, cards and buttons of their lovely and playful work. Seemingly lost specimens and denizens of hidden worlds each one of their pieces of artwork is full of personality.
Sawdust Bear
Website: http://www.sawdustbear.com/
Instagram: https://www.instagram.com/sawdustbear/
Facebook: https://www.facebook.com/sawdustbearBeastlies
Website: http://www.beastlies.com/
Instagram: https://www.instagram.com/beastlies/
Facebook: https://www.facebook.com/Beastlies/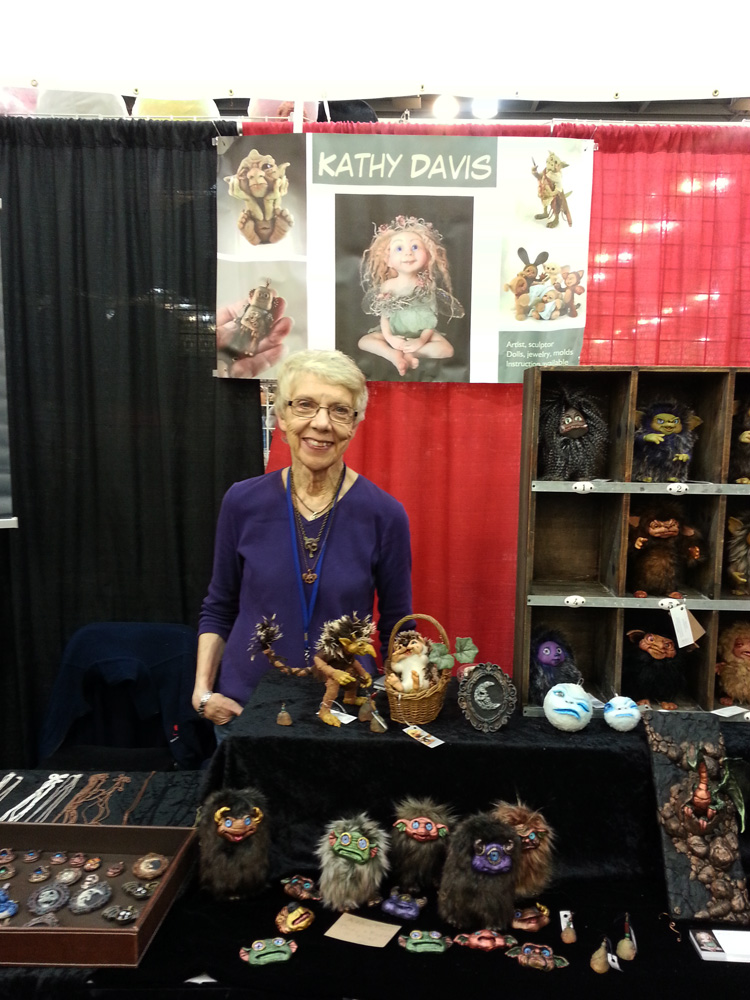
I had the opportunity of seeing artist Kathy Davis at the 2016 Craft and Hobby Association Trade Show, before meeting her again at her DesignerCon booth. A truly talented doll artist and jewelry designer, her one of kind pieces were not to be missed! Her sculptures and dolls seem to have stepped right out of a fairy tale.
Website: http://www.kathndolls.com/
Etsy: https://www.etsy.com/shop/Kathndolls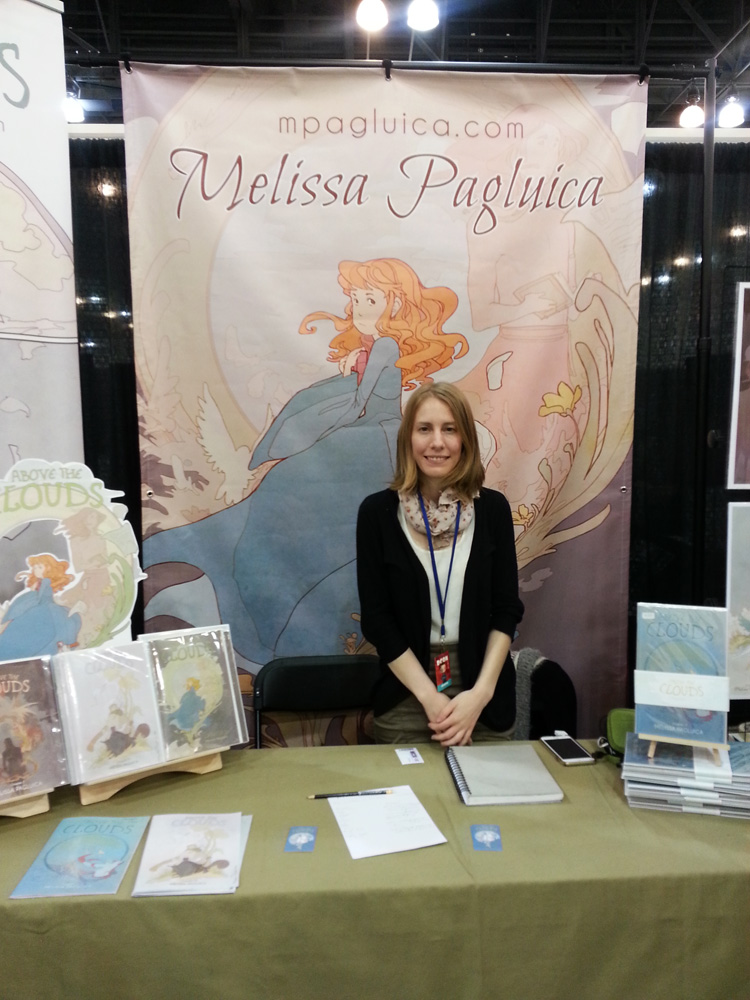
Artist Melissa Pagluica, creator of Above the Clouds, a comic that tells two intertwining stories, the adventures of a hero who must save a dying world, and a girl who must convince an author to finish what he has started. Her lovely dreamlike illustrations caught my eye from the aisle, even without knowing they came from her comic series, and I couldn’t leave her booth without buying a few.
Website: http://www.mpagluica.com/
Etsy: https://www.etsy.com/shop/TeacupBee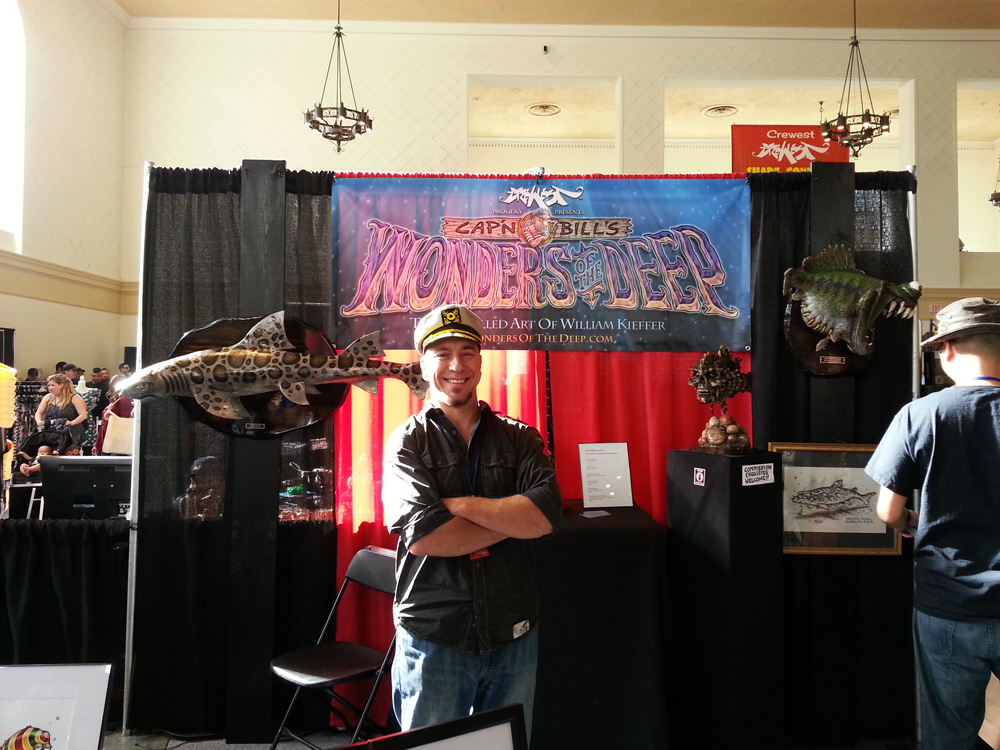
Artist William Kieffer, otherwise known as Cap’n Bill, had an amazing display of deep sea creature sculptures, cards and prints. His highly detailed and wildly imaginative art harked back to deep sea creature myths and tall tails, while his greeting cards tapped into pop culture humor.
Website: http://www.wondersofthedeep.com/
Facebook: facebook.com/CapnBillKieffer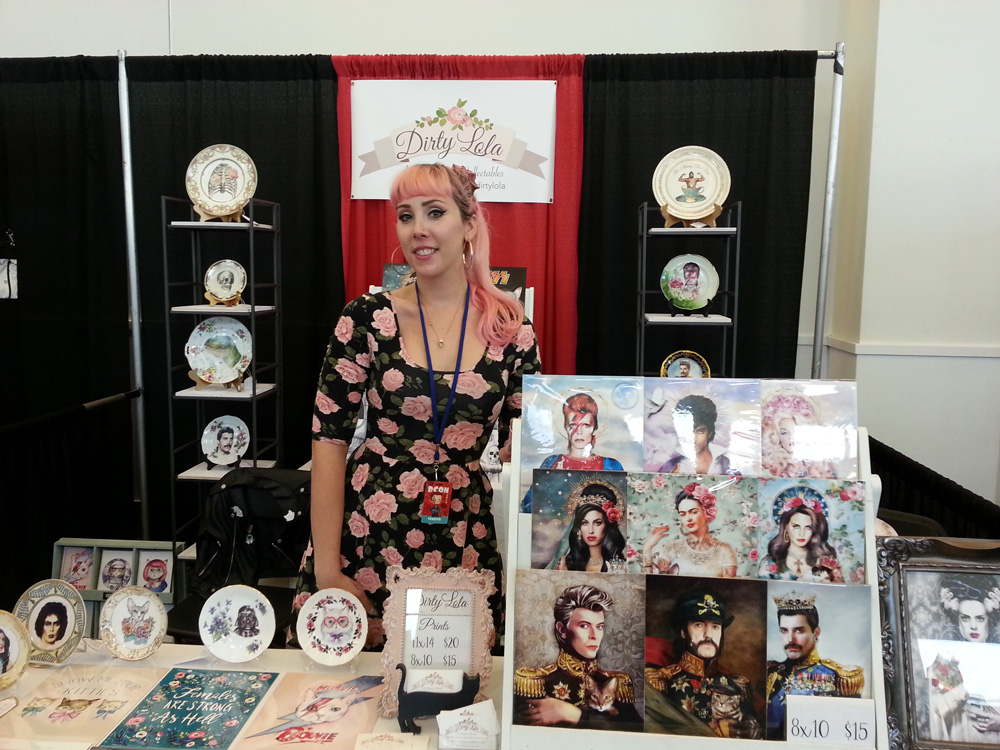
Artist Dirty Lola, otherwise known as Scarlett River, had a lovely assortment of prints, cards and antique altered decorative plates of her pop culture art. Celebrities are portrayed as saints, dignitaries or one of kind focals in her lovely retro art.
Etsy: https://www.etsy.com/shop/DirtyLola
Facebook: https://www.facebook.com/scarlettriverofficial/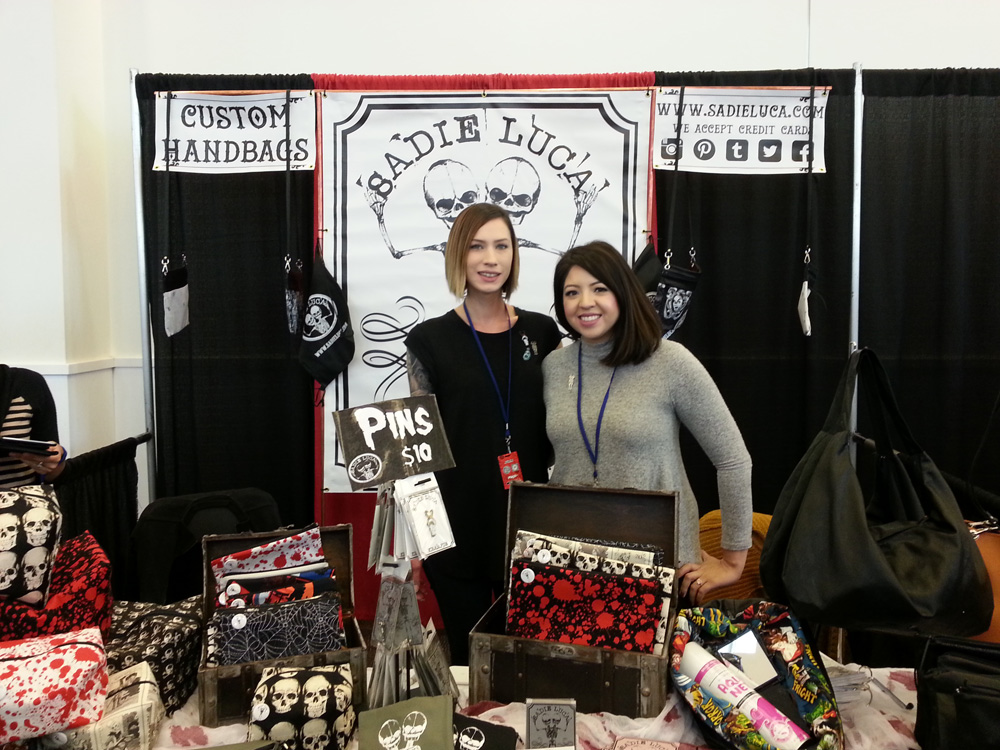
Artist shop Sadie Luca had a wonderful assortment purses, bags, pins, prints and aprons with retro horror camp prints with a modern fashion spin.
Etsy: https://www.etsy.com/shop/SadieLuca
Instagram: https://www.instagram.com/sadieluca/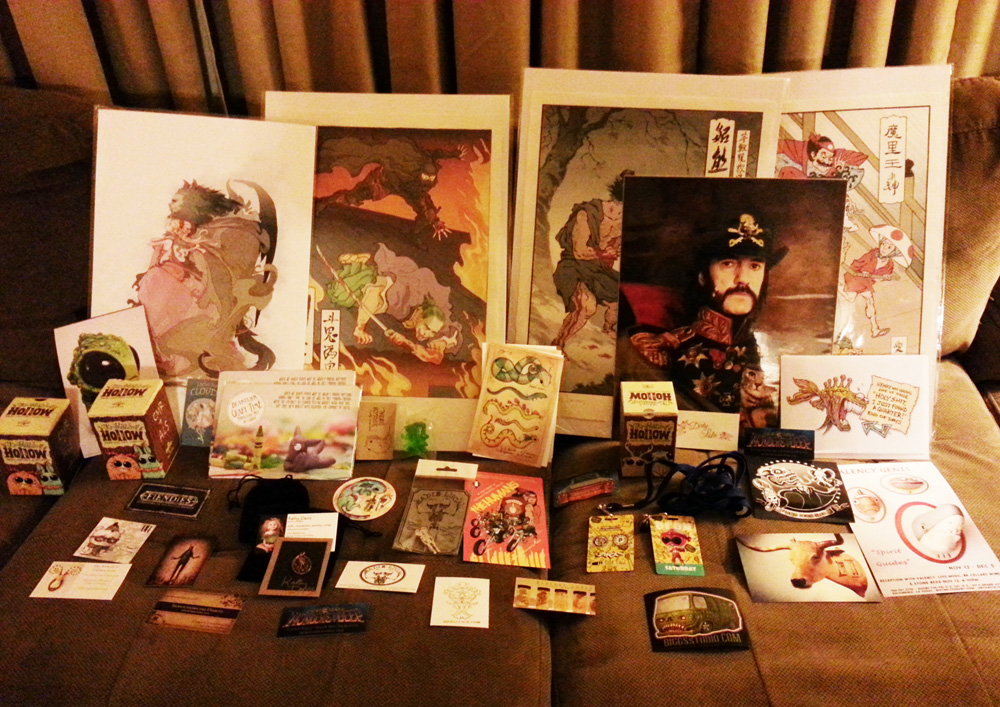
After just one day at DesignerCon I came back home with all of these wonderful items to display, share with others and give as holiday gifts!
We need and want beautiful art in our lives, but to have this we need to support artists who’s work we appreciate. Buy their art art, their images, sculptures, clothing, music and more, I can’t stress this enough. We lost a lot of amazing artists in 2016, support artists in their lifetime.
Wishing you all a Happy New Year, Until Next Time, Safe Travels!
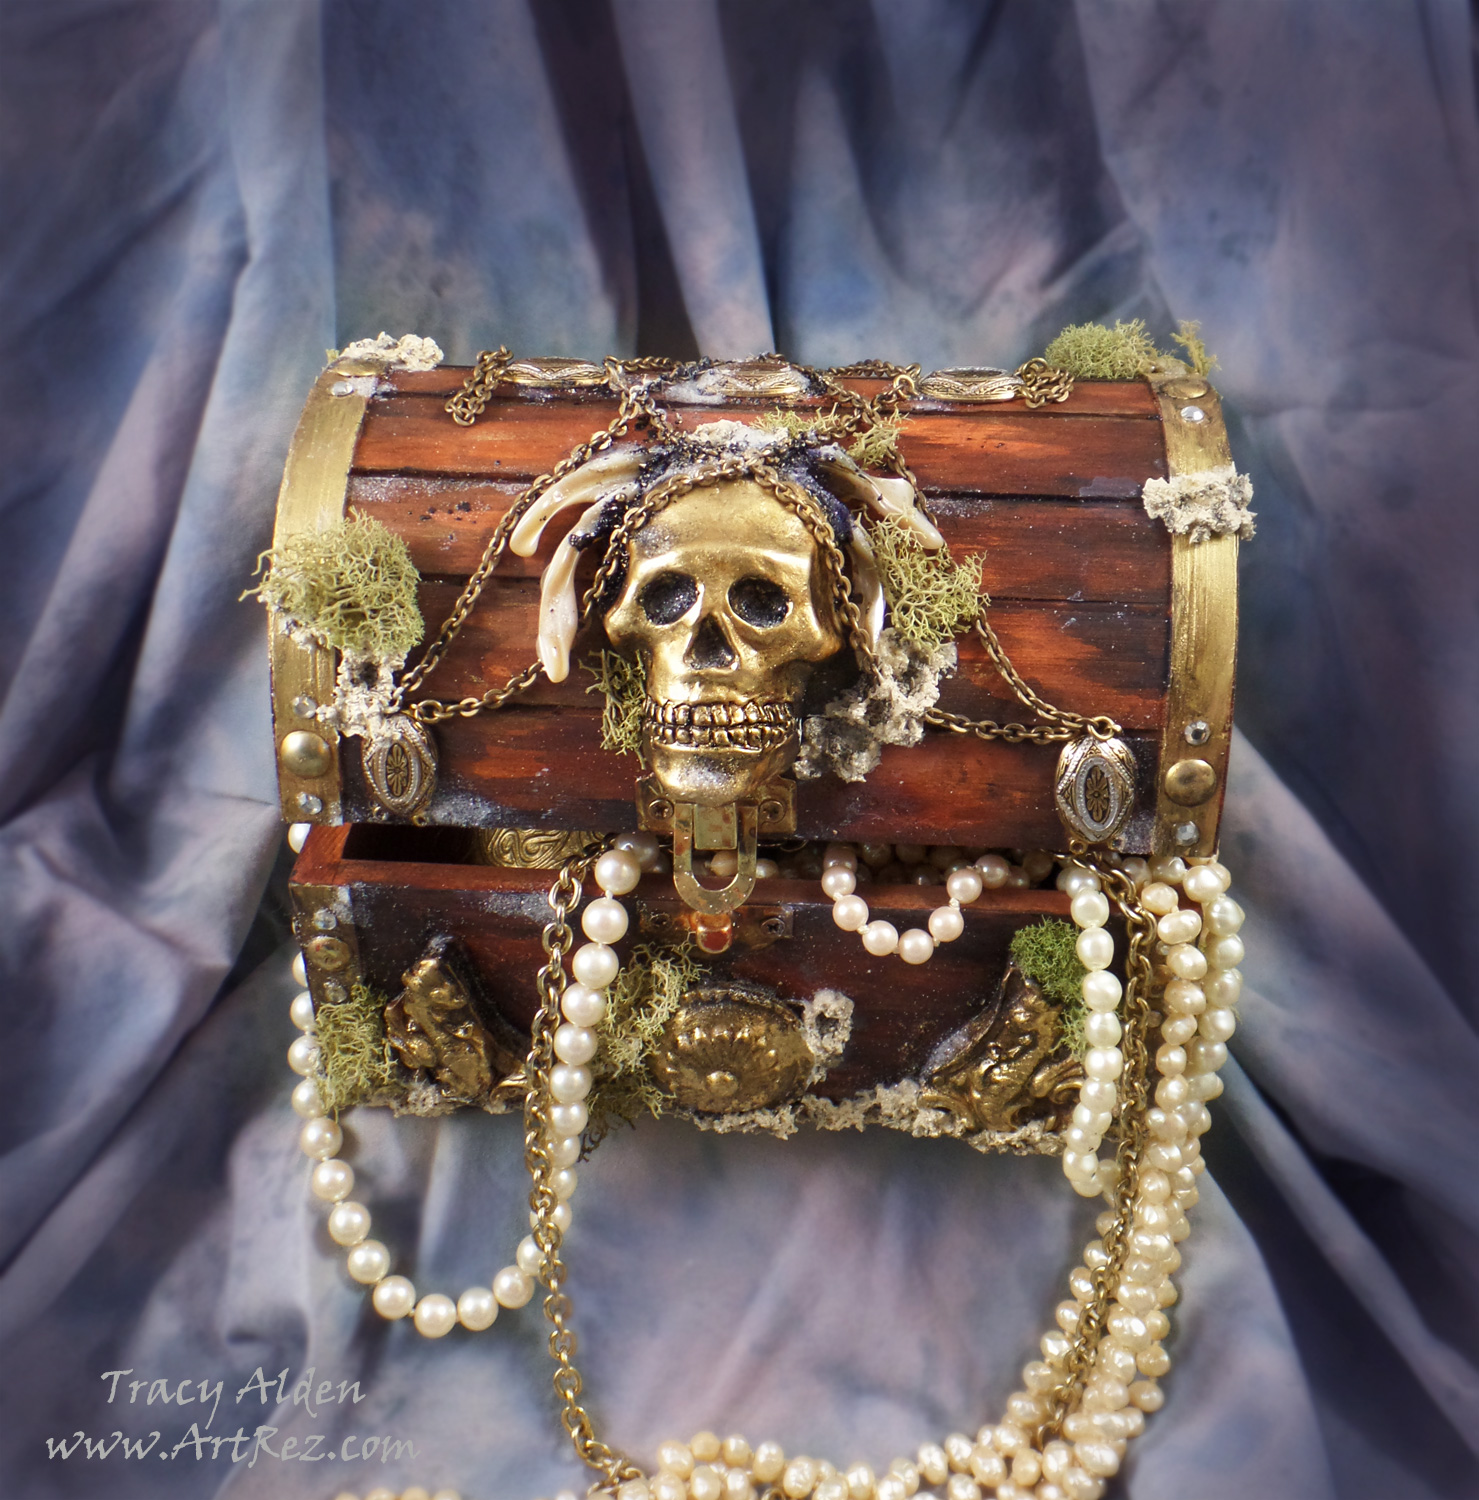
A #Cre8time voyage to find Pirate Treasure!
With Fall fast approaching, I am once again looking at new ways to jump start my creativity. I finally decided to order pieces from Relics & Artifacts® by Sandra Evertson to try out. The line has been catching my interest for a few years every time I see them at craft and hobby trade shows and on social media. Locally no stores currently carry their product line however it is rather easy to order the Matte Resin Craft Blanks from their website (they ship VERY quickly and package the art supplies wonderfully!). The resin blanks were larger than I expected, had a nice weight, tooth to the surface (great for paint application) and fine detail.
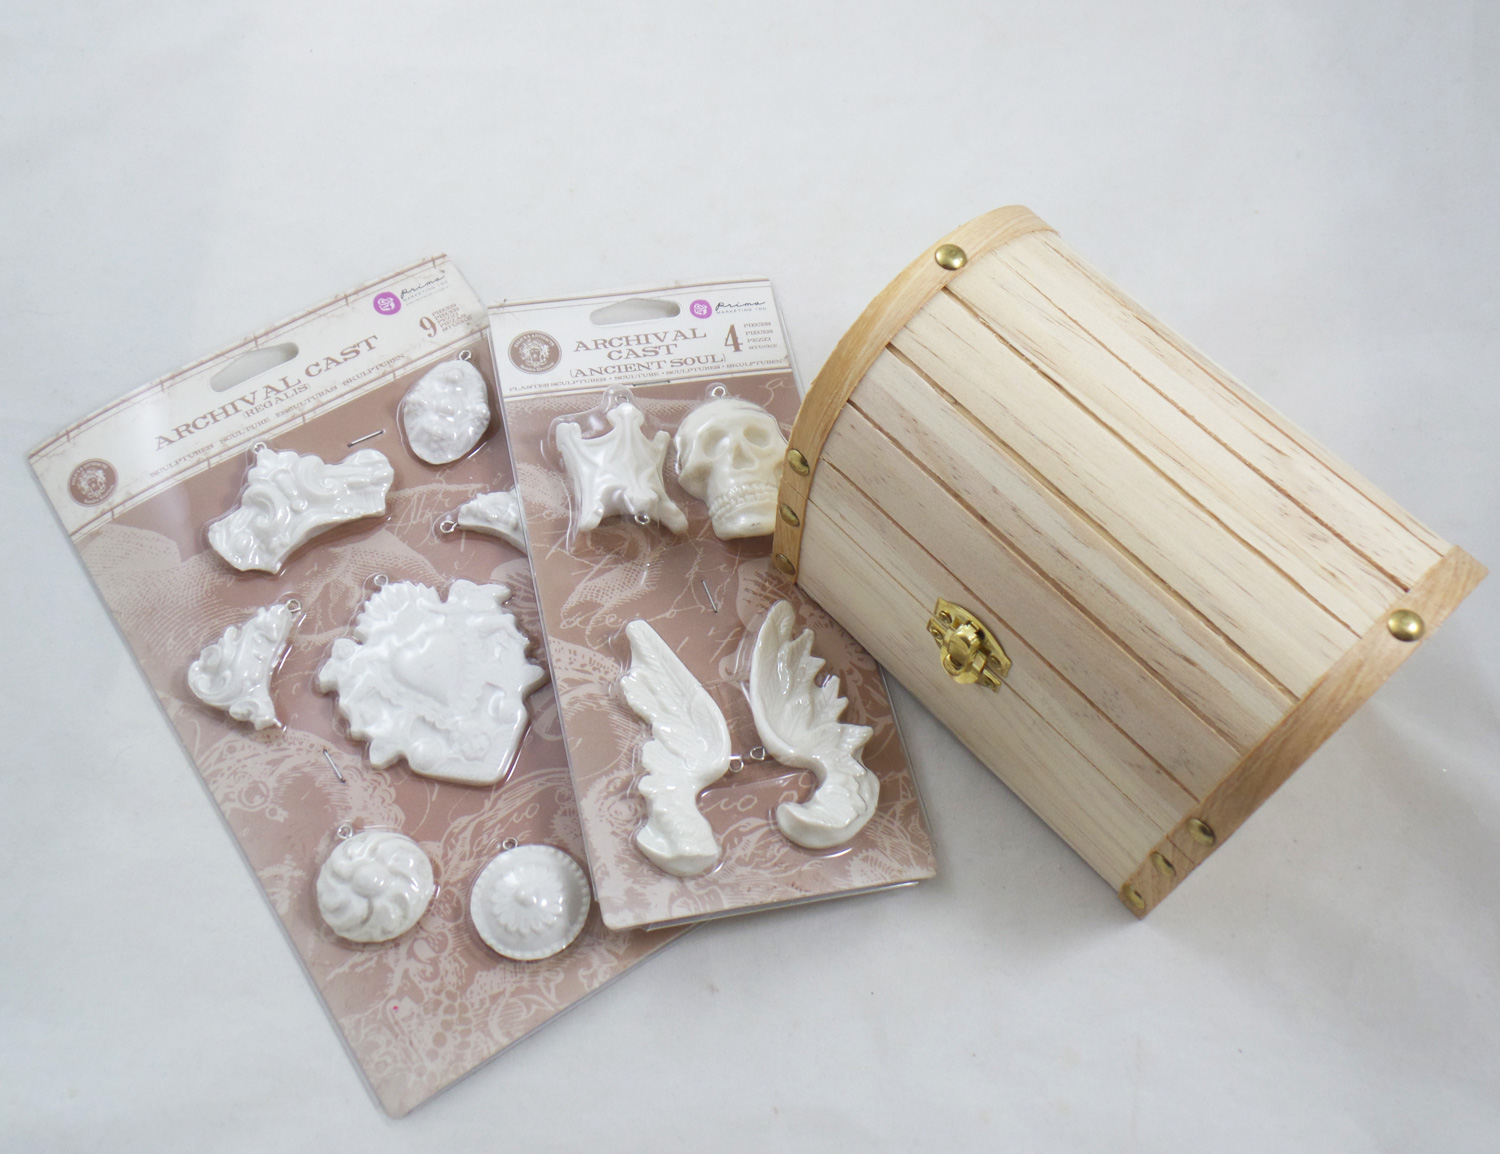
I bought 4 sets but the pieces in the Ancient Soul and Regalis sets got my mind whirling immediately. The skull focal in the Ancient Soul set had me thinking of a Jolly Roger and a sunken treasure chest. I collected some vintage jewelry supplies and started my craft voyage into uncharted seas….
Supplies:
Unfinished Wood Trinket Box (I found one at Jo-Ann)
Relics & Artifacts® Ancient Soul and Regalis Matte Resin Craft Blanks
Alumilite Metallic Powder Gold
Liquitex Gloss Varnish
Beacon Gem-Tac Adhesive
Stampendous Crystal Snow White Glitter, Ultra Fine
Paint Brushes
Acrylic Paint in Metallic Light Gold, Black, Burnt Umber, Terra Cotta, White and Yellow Ocher
Baking Parchment Paper (as a work surface)
2 Flat head jewelry pliers
1 Broken bracelet, chain necklace, shell beads and flat backed rhinestones 4mm, jumprings
4 used and dried tea bags
Dried Green Moss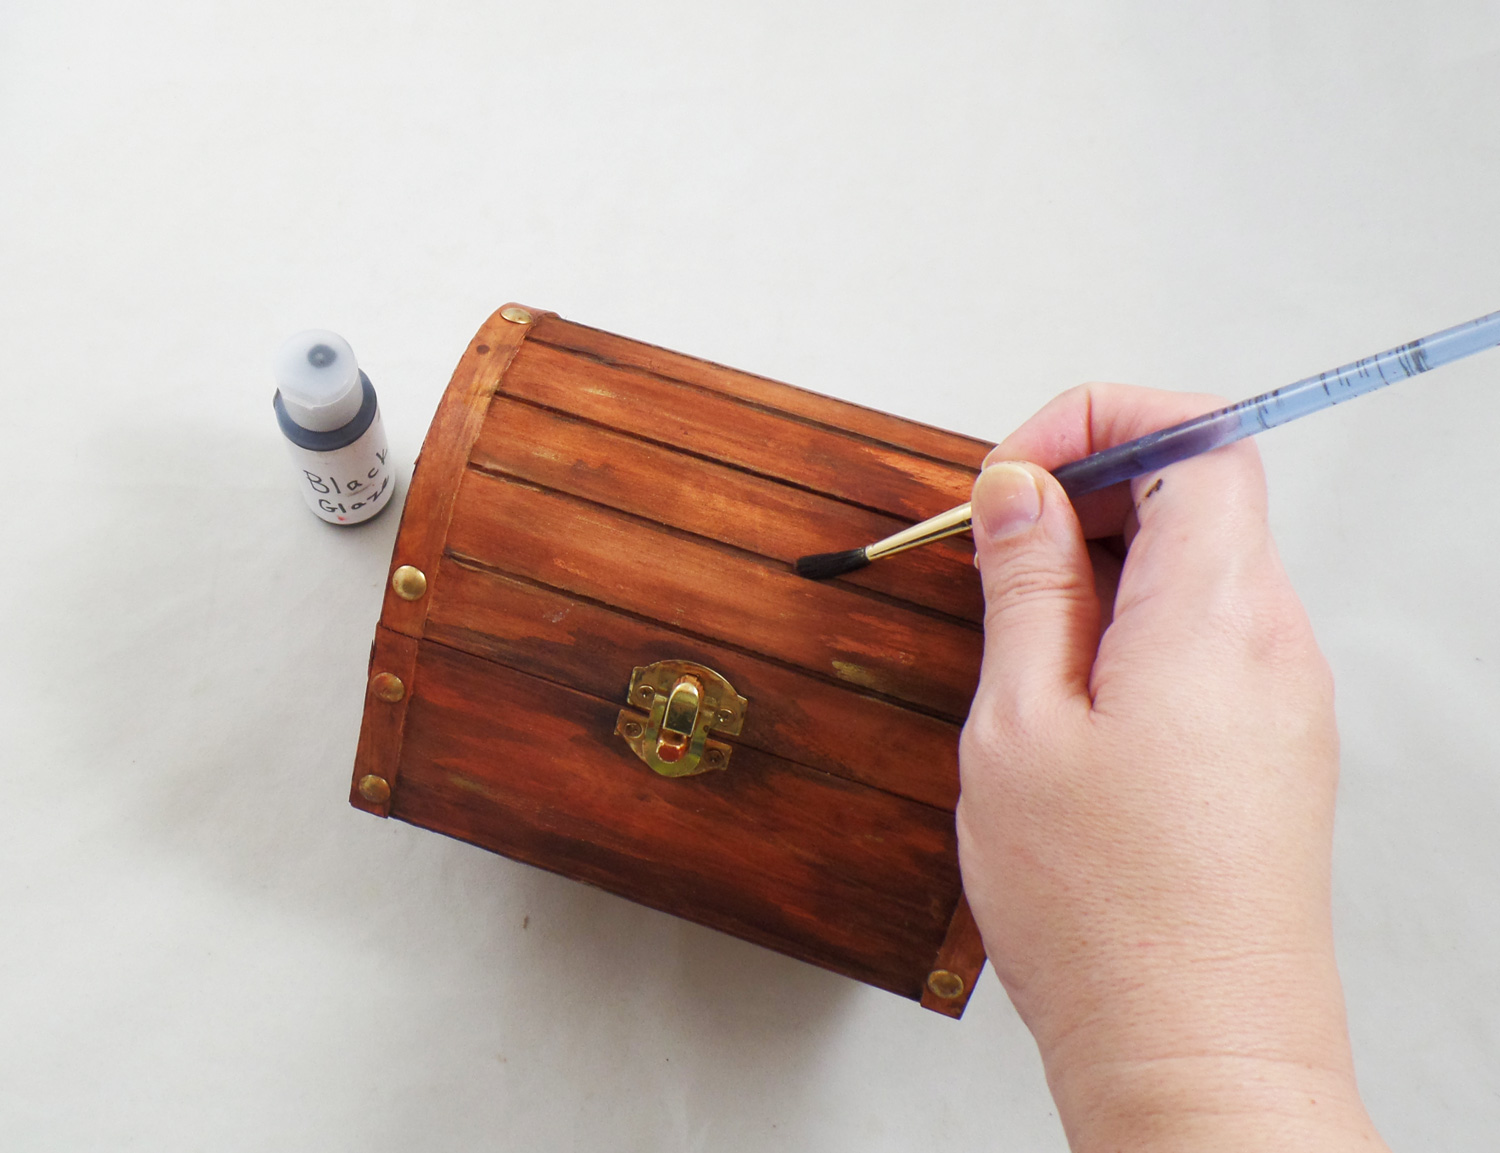
I started by painting the inside and outside of the unfinished wood box. I diluted the paint with water to create a color wash that would stain the wood but still leave the wood grain visible. First coat of diluted paints was the Terra Cotta, then the Burnt Umber and finally the Black in the nooks and crannies.
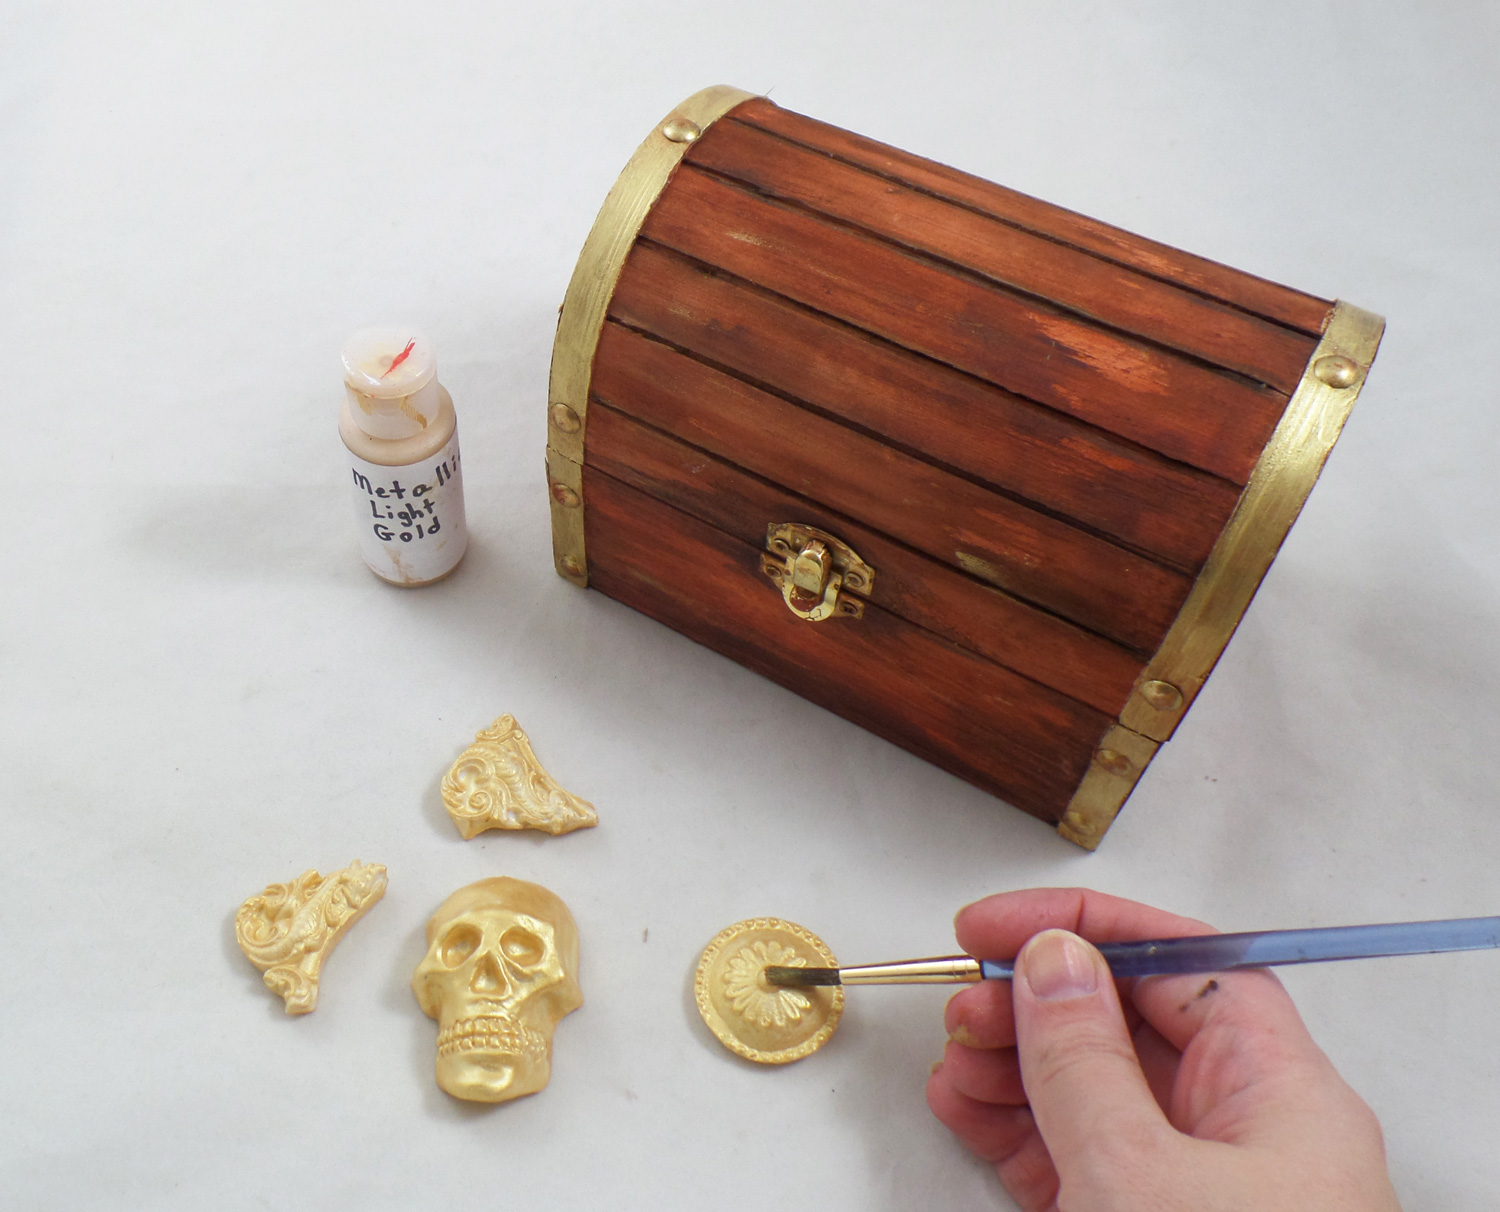
While I let the wooden box dry I removed the eye pins carefully with pliers that are put into Relics & Artifacts® pieces by the manufacturer, since I wasn’t going to make them into jewelry. I painted the pieces and the trim on the box with Metallic Light Gold paint. They needed two coats because most metallic paints need several coats for full coverage. The resin pieces were easy to paint and I didn’t have a single issues with the paint beading up or sliding off like with other resin blanks on the market!
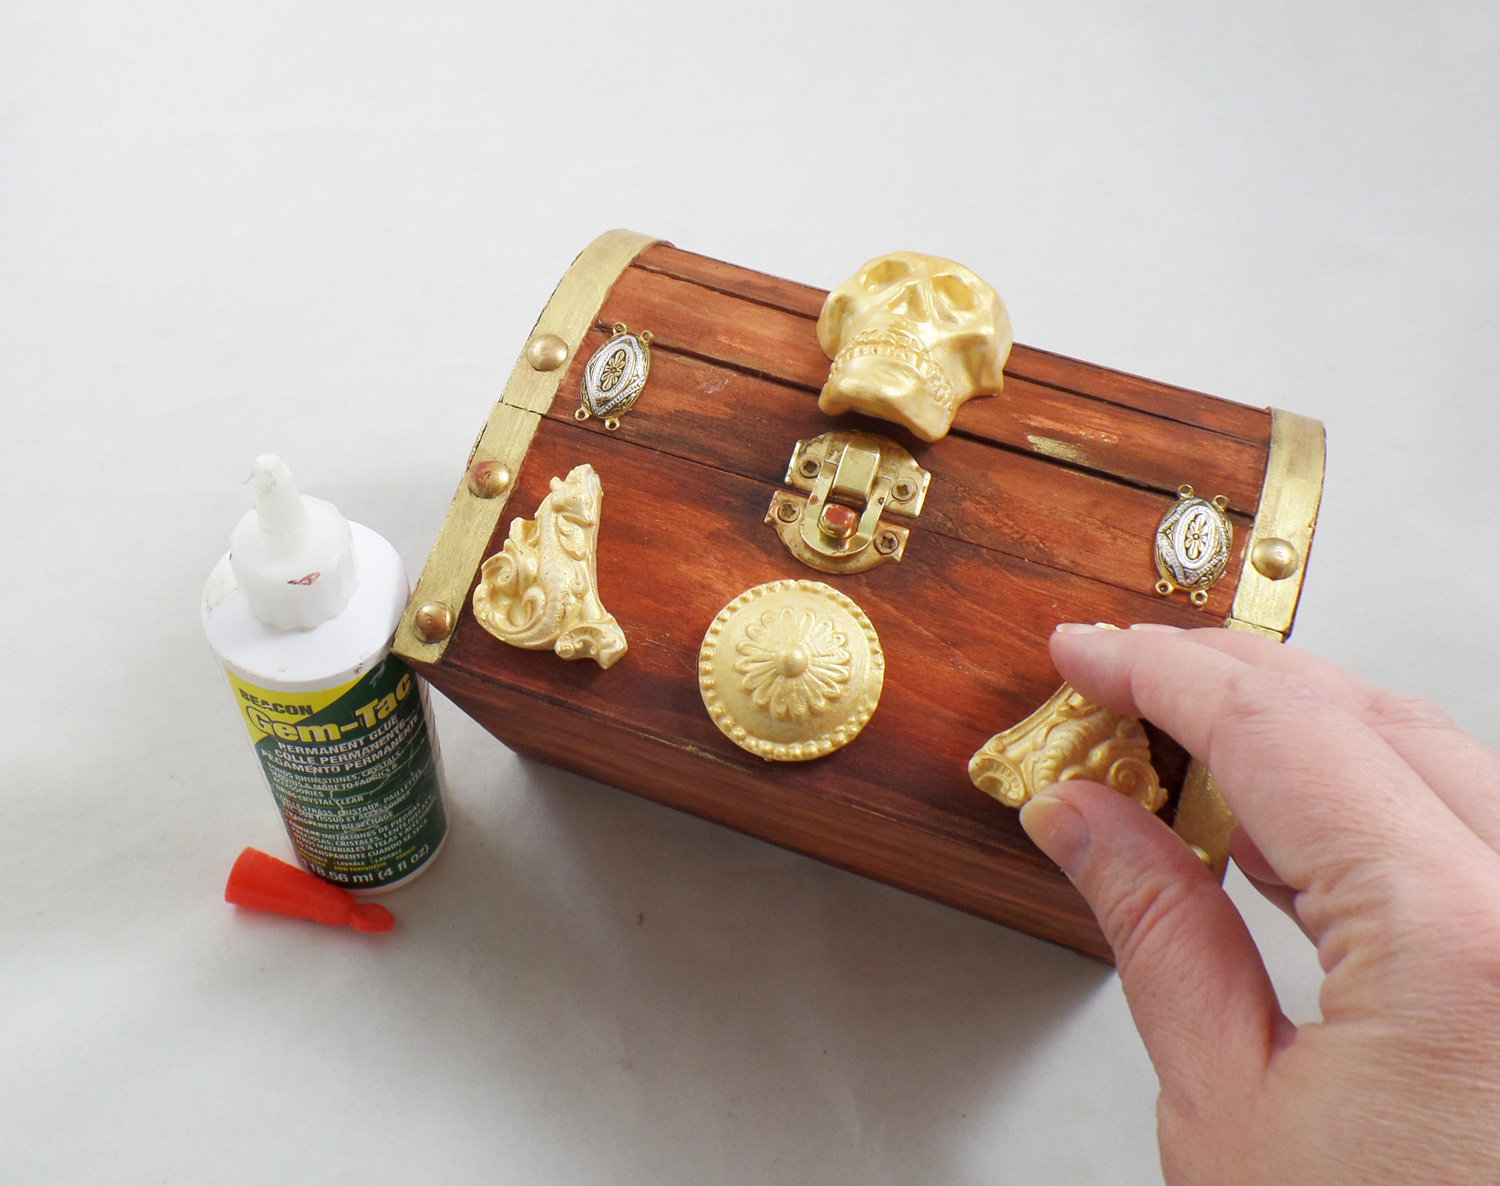
Once all the pieces were dry I applied them to the wood box with Beacon Gem-Tac Adhesive. A broken bracelet with beautiful metal spacers I took apart and glued the spacers to the box to give the illusion of metal brackets bolted to the box. Once the glue was dry I did another color wash of the Burnt Umber and Black acrylic paints all over the box and glued on embellishments to give them an aged appearance. I attached broken chain from an old necklace to the bracelet spacers, glued onto the box, with jumprings.
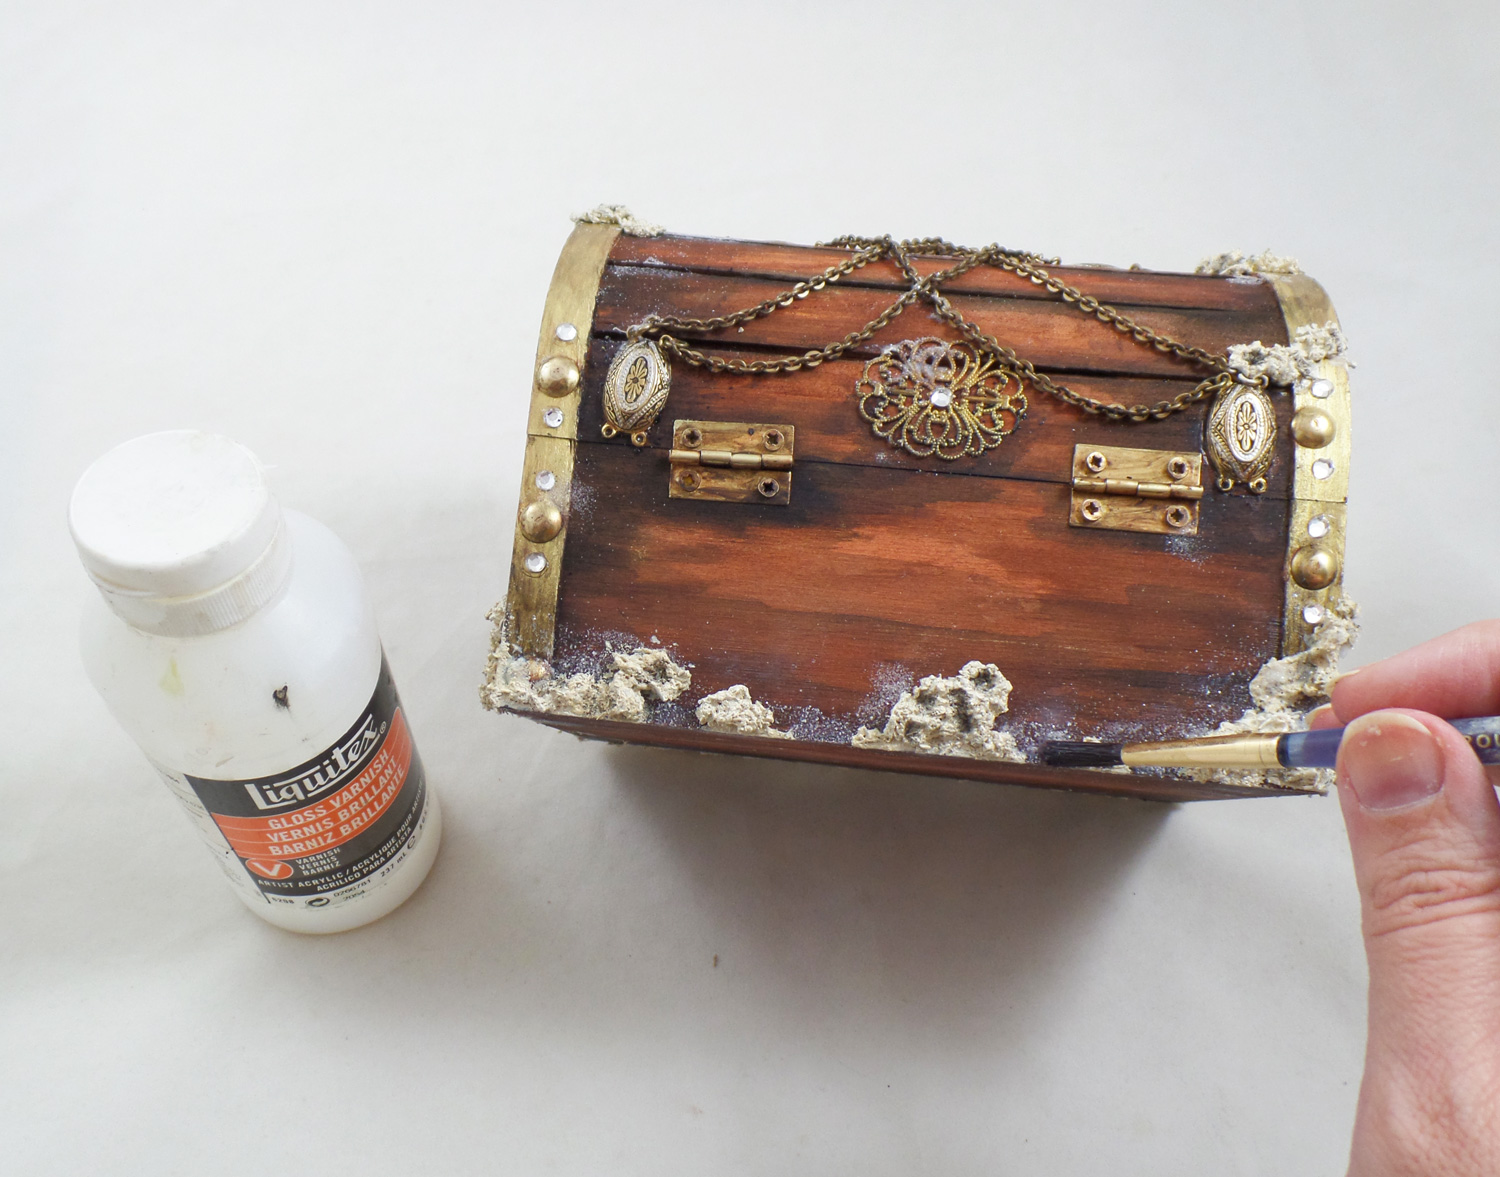
In a small cup I mixed up some White and Yellow Ocher acrylic paint with dried tea leaves and a little Beacon Gem-Tac Adhesive. I applied it around the bottom and sides of the box in small clumps to give the illusion that barnacles had started to grow around this long forgotten treasure. Once the faux barnacles were dry I did a Black acrylic paint wash to give them detail. I added some Liquitex Gloss Varnish over and around the edges of the barnacles and sprinkled on Stampendous Crystal Snow White Glitter. Once dry it looked like salt deposits from sea water.
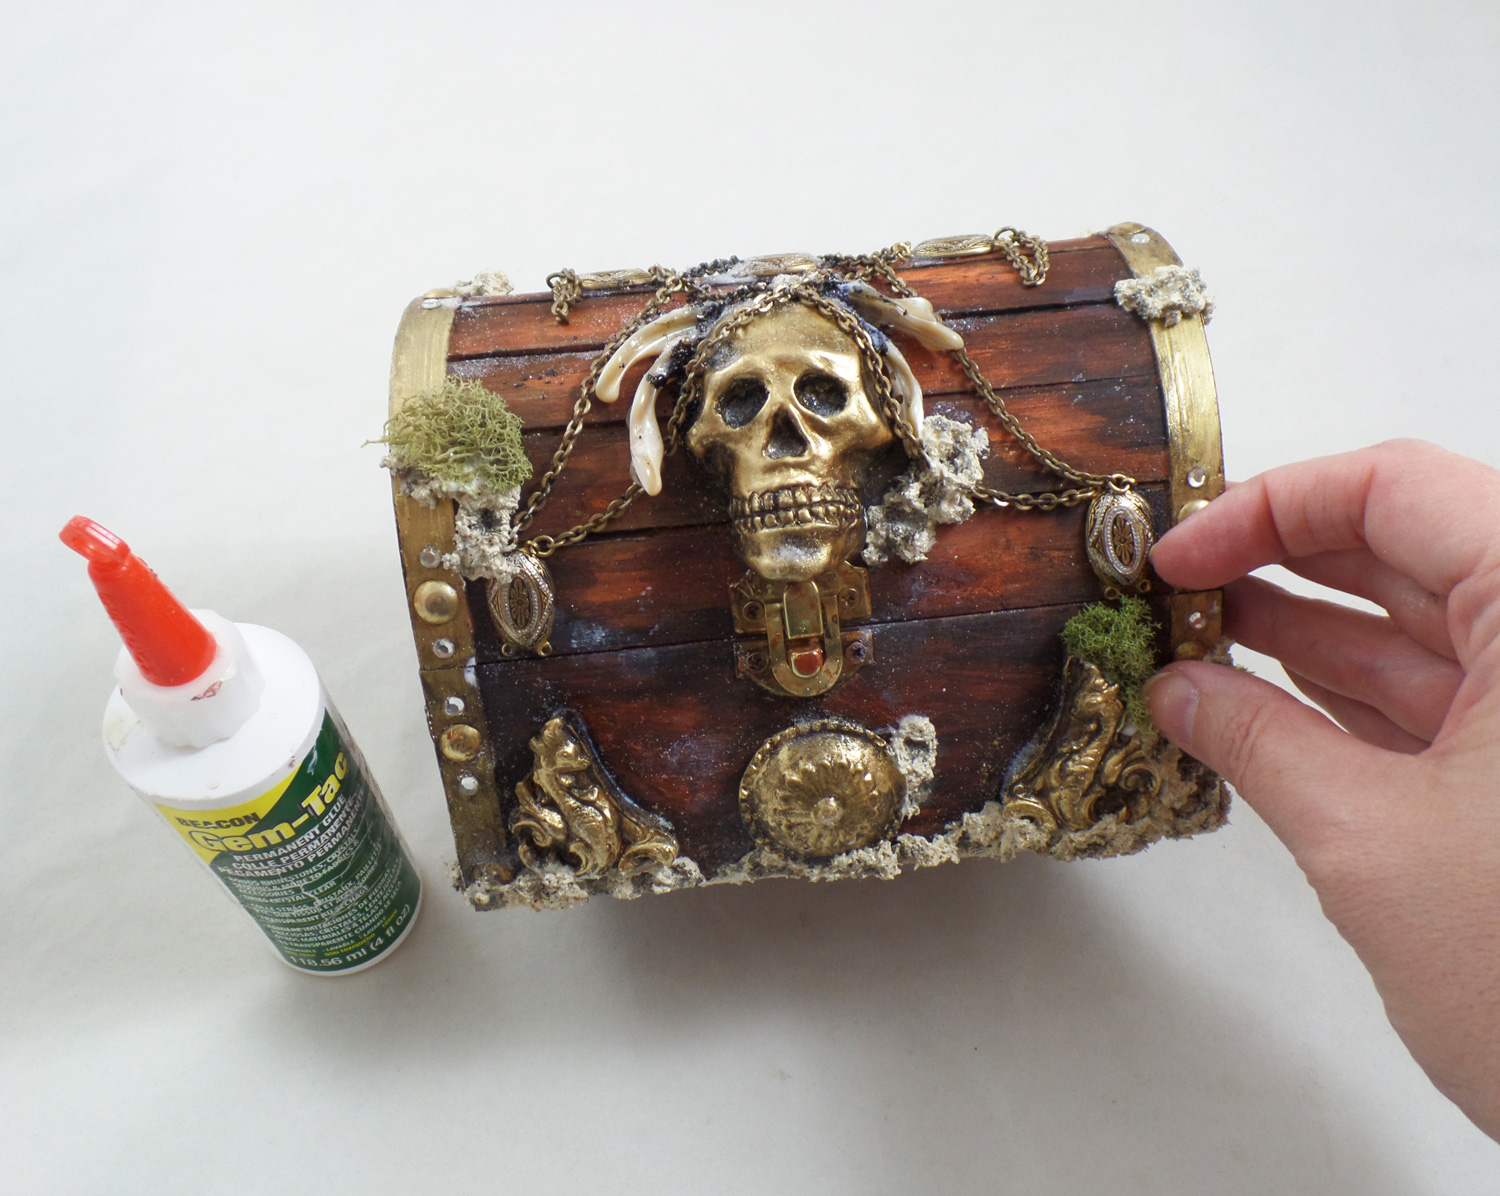
I randomly applied more spots of varnish and glitter to give a grungy, salty appearance to the treasure chest. I glued on tiny bits of moss on the box along the edges and embellishments.
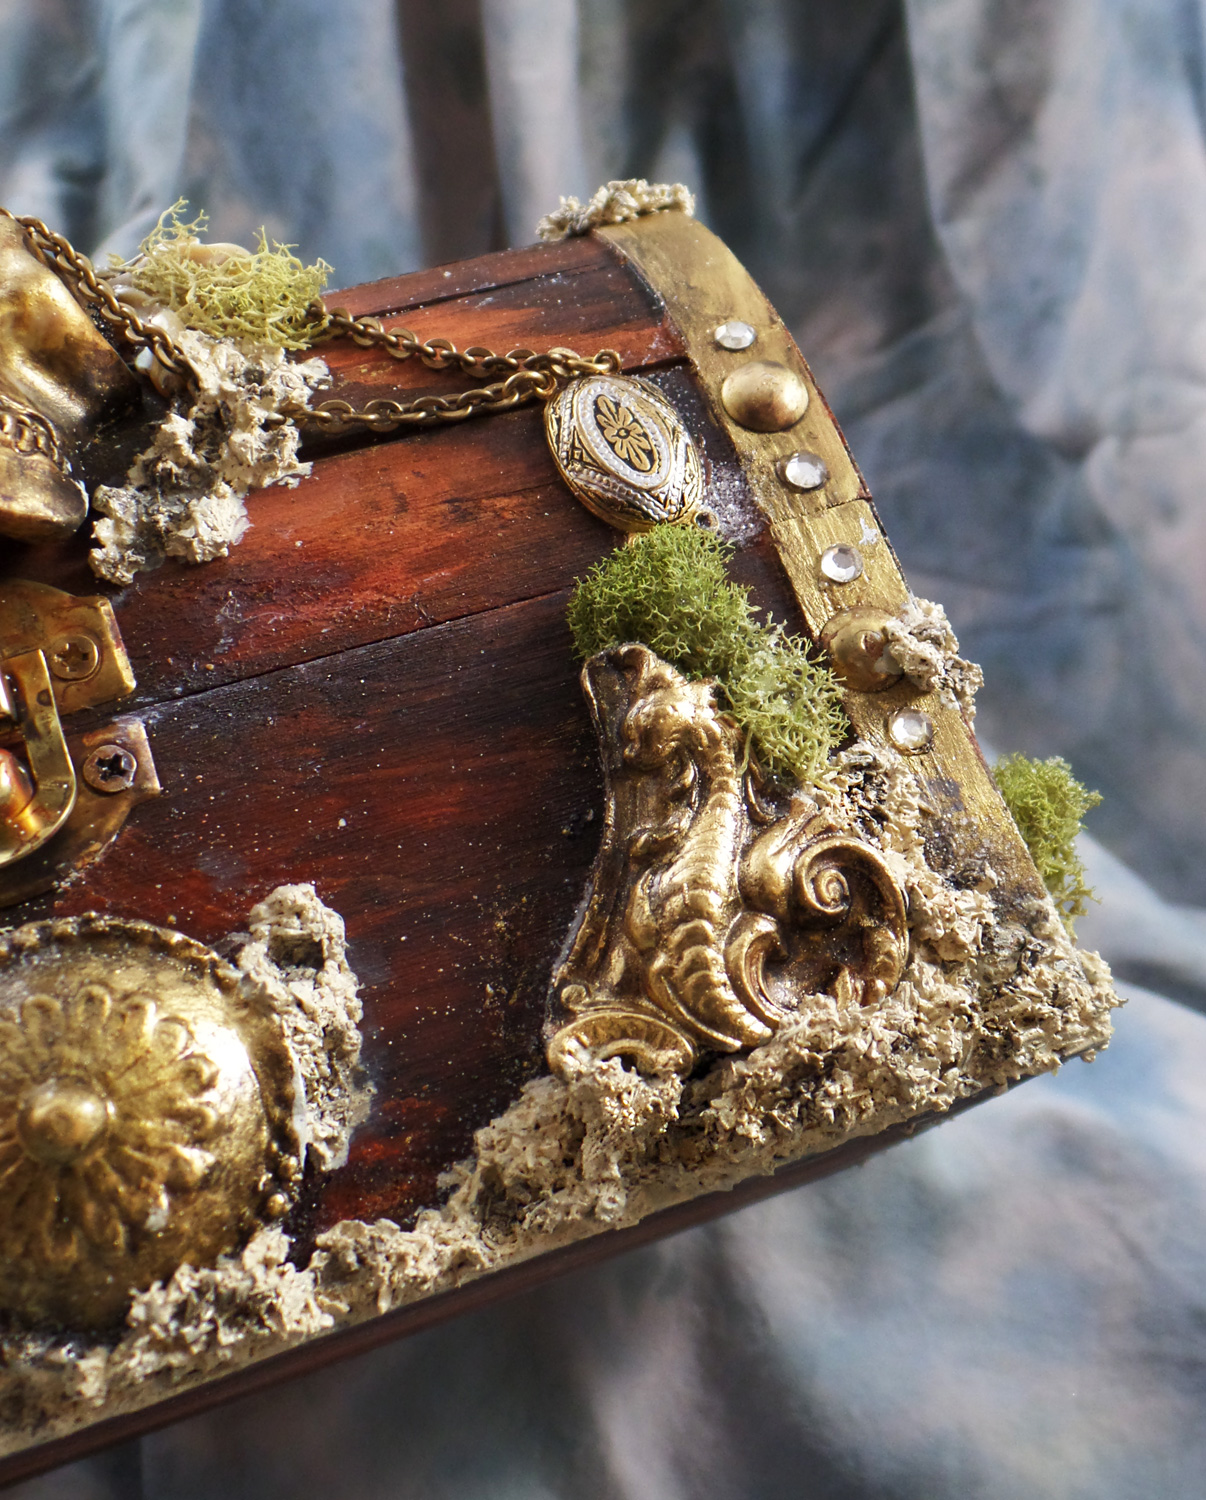
When applying the faux barnacle mixture to the box I was sure to press it against the resin pieces and edges of the box for a good bond. To make it look like the barnacles had grown haphazardly I pushed the back end of a paint brush here and there into the tea leaves and paint mixture.
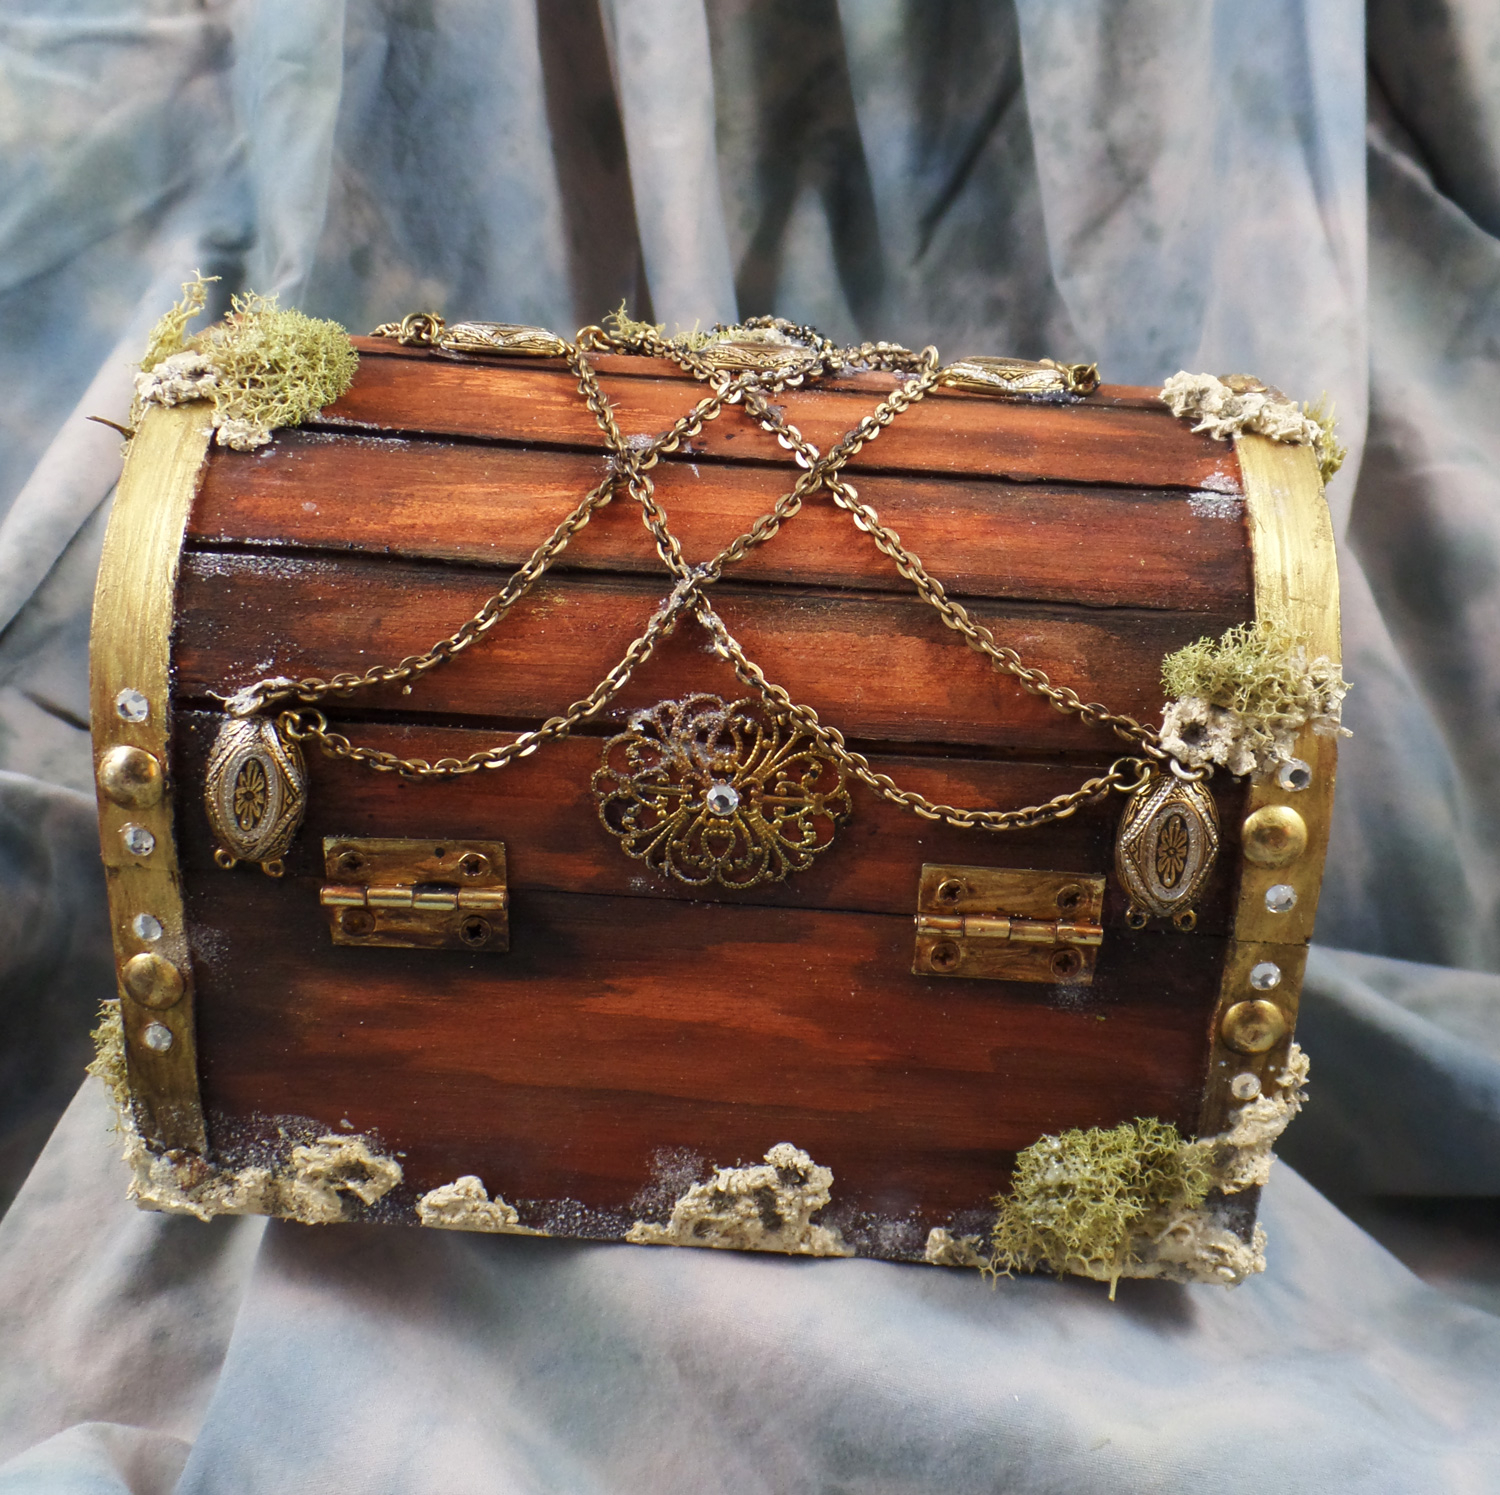
Not forgetting the back of the treasure chest, I had glued on more bracelet pieces, metal embellishments and tiny vintage glass rhinestones. With the chain linked into the bracelet spacers, draped back to front on the chest, my Pirate Treasure Chest was complete!
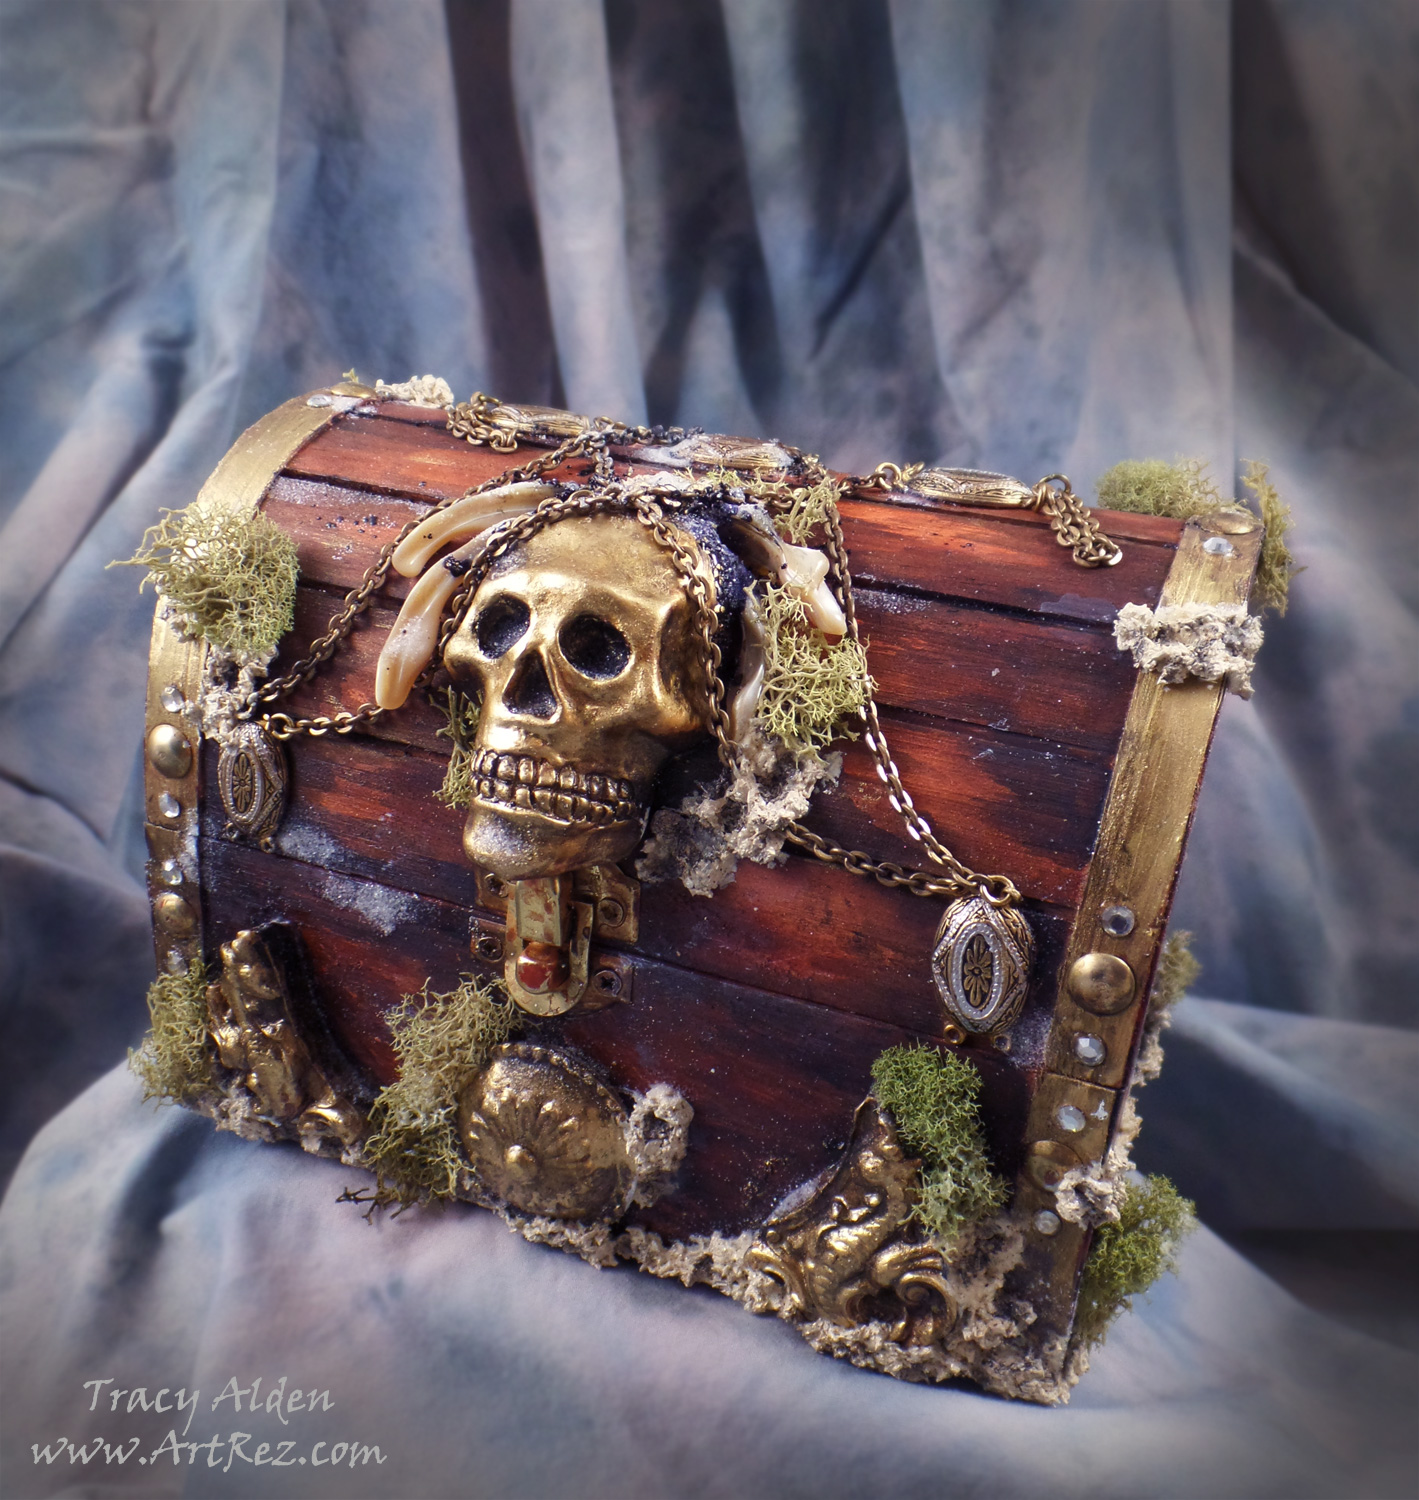
I really love how this piece came out and can’t wait to try out more of the Relics & Artifacts® line with future art projects.
What lovely mixed media treasures will you create?
Until Next Time, Safe Travels!
Crafty Recuperating Recap!

Hello! I am finally back after having to take a unwanted break thanks to getting the flu, then pneumonia which caused a partial lung collapse. Now that I am in better health it’s time to share all the projects I have been making for Amazing Casting Products while I have been recuperating and getting back on track with arts and crafting goodness!
Starting with the photo above I tried my hand at Resin Paper Jewelry, using imported papers from India. They were simple to make, highlighted the beautifully textured paper and became rather sturdy with the coating of resin.
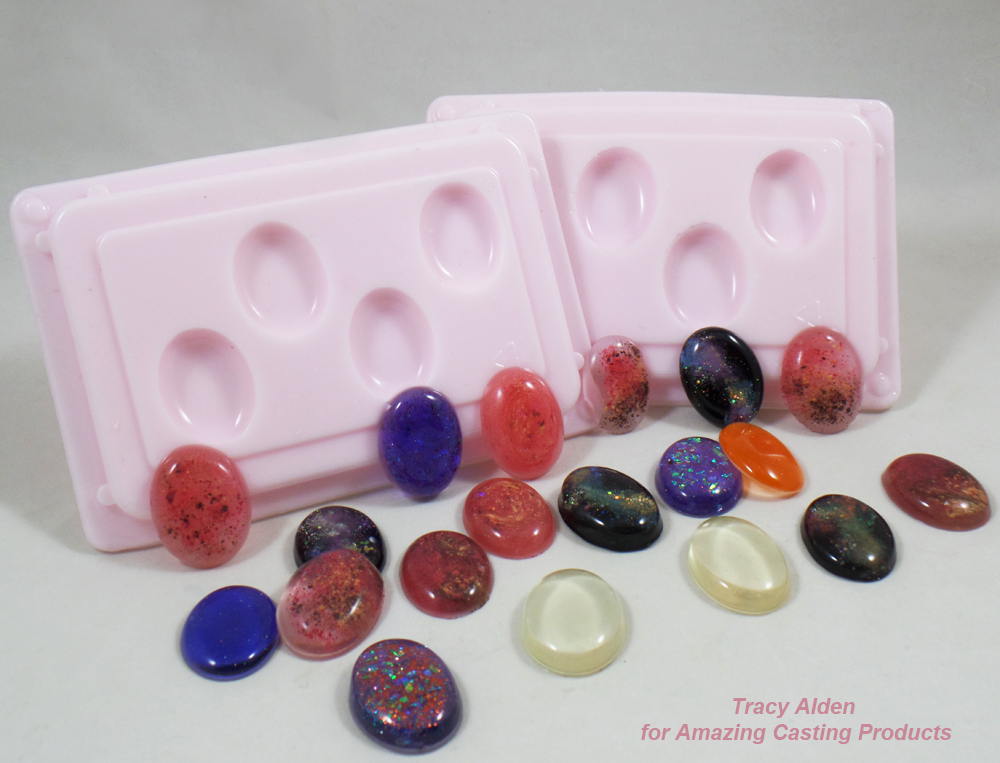
My next project was born out of necessity. I have a collection of polyurethane Cabochon molds my mother had bought and used 45+ years ago. I now use them regularly to create many of my cabochon pieces. However when the molds get old and used a lot they can slowly become brittle. Well, brittle molds don’t take too well to being flexed and I shattered two of my best cabochon molds. See how I created new Cabochon Molds!
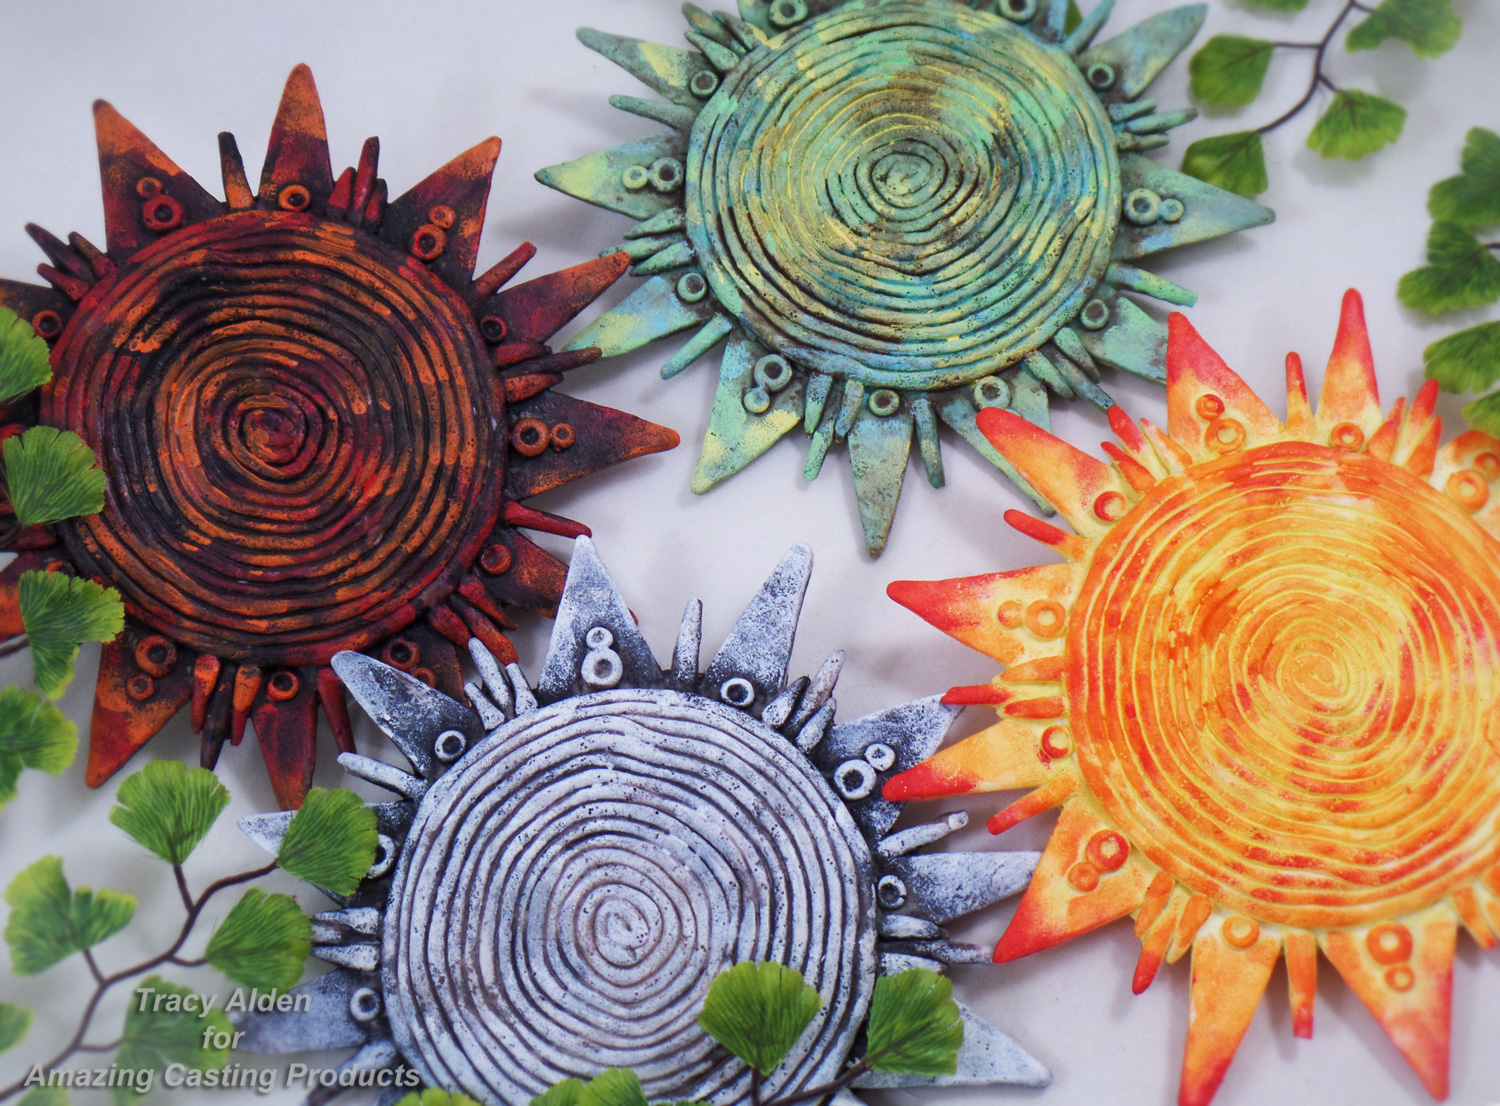
Since I have a fondness for Southwestern art and Celestial patterns, I wanted to try making my own Sun Disk Wall Plaques for my garden.
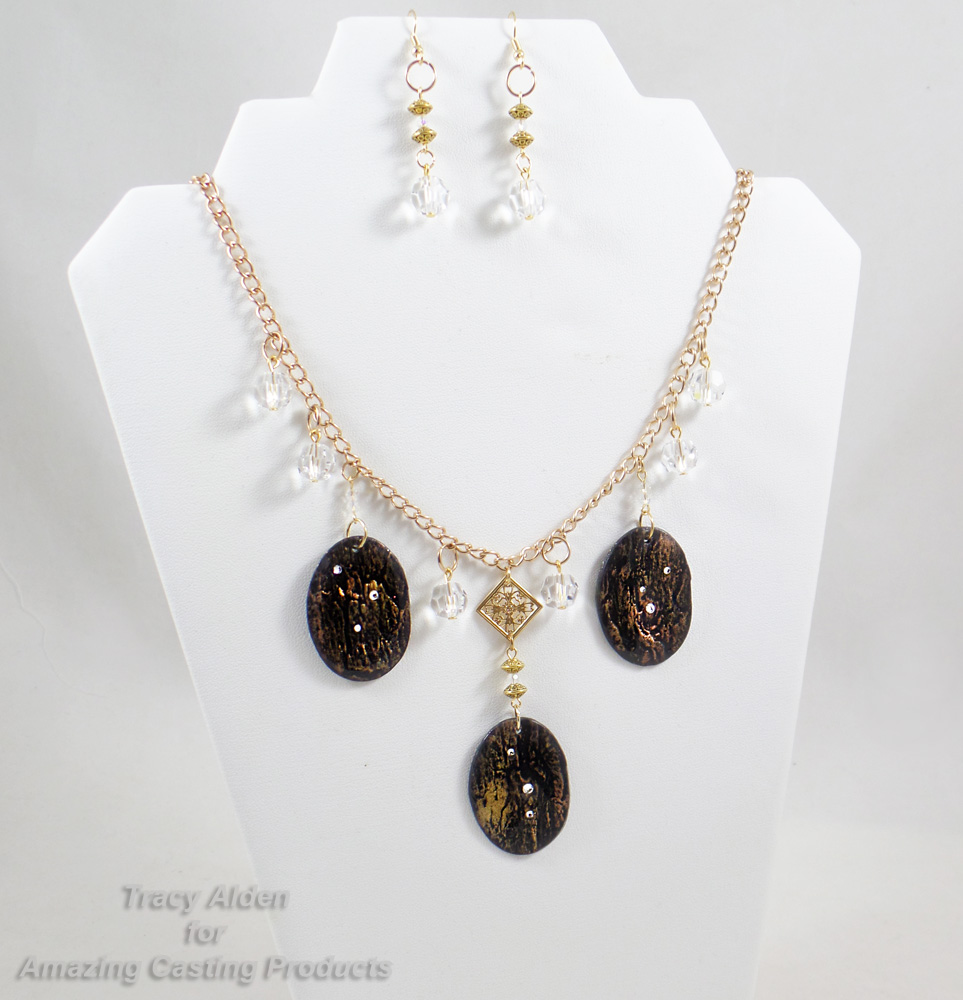
I had fun with a Tree Bark Texture Plate I made years ago but this time I created polymer clay pendants coated in resin and embellished with crystals in this Tree Bark Jewels Necklace.

Seeing the new home decor trend of blue and white country tiles and pottery, I wondered if I could attempt my own version with everyday craft supplies and without the need of a kiln! My Faux Delft Tile Decor ended up being a fun and new way to use acrylic paint, polymer clay and resin.

I spend a lot of time working out ideas and testing out craft supplies to see what might be possible with future projects. Some don’t work out, some are happy accidents and others a success. Here is a few of my Resin Tips and Tricks.
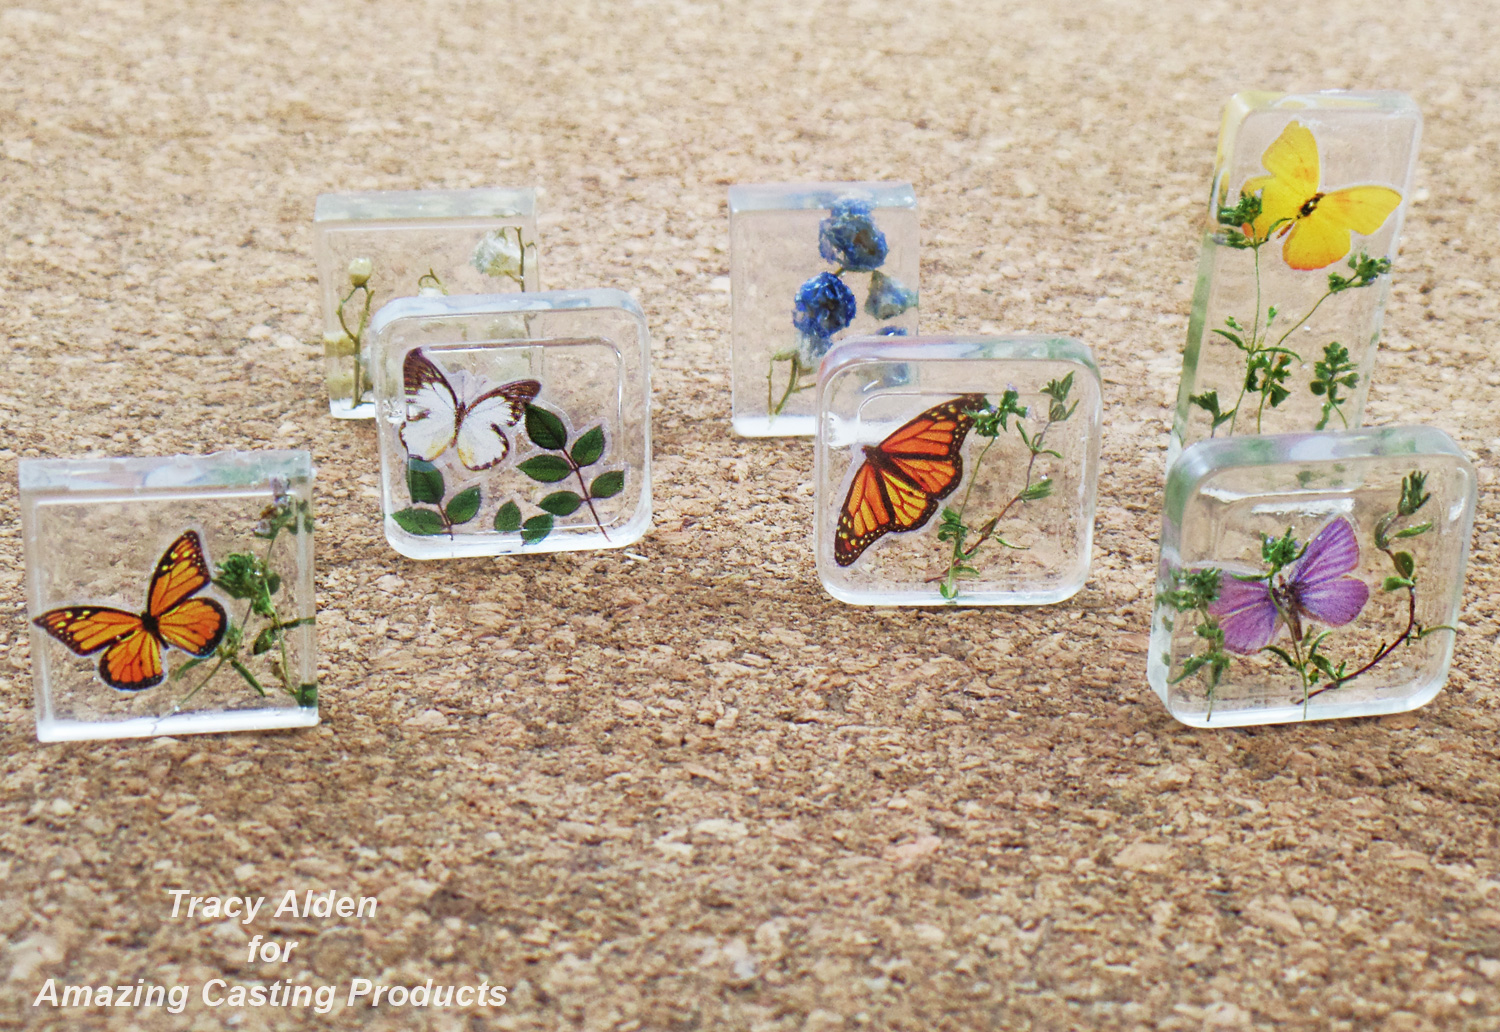
In the process of sorting my beads recently I noticed the hard plastic containers many small beads come in have perfectly smooth and glossy lids. I was able to make new resin pendant molds and create a selection of Springtime Pendants with dried plants, stickers and resin!
I hope these projects keep you inspired and Until Next Time, Safe Travels!
An Artistic Halloween Haunting Recap!
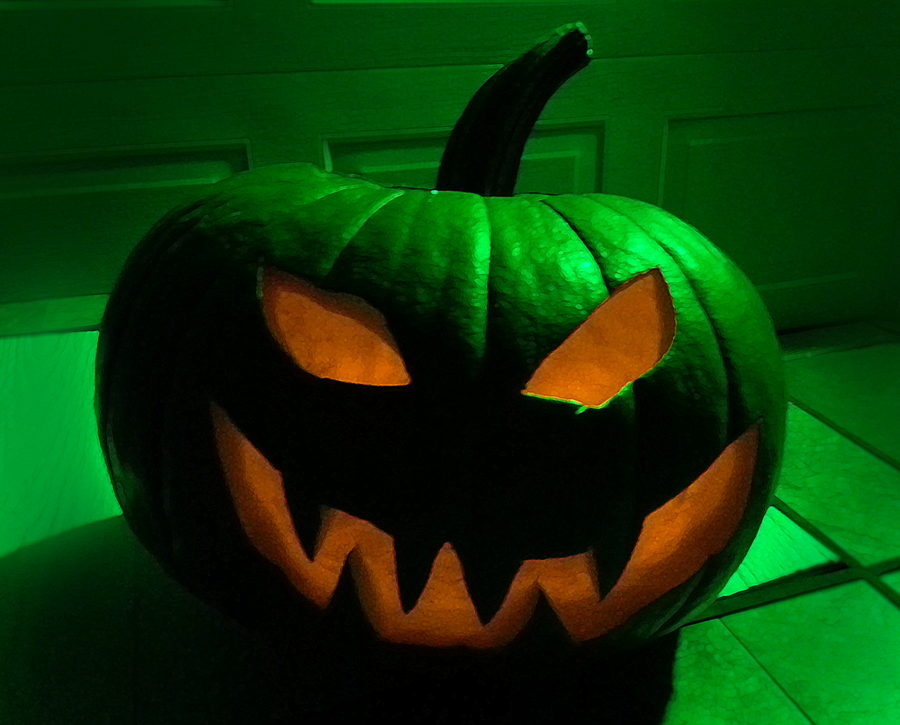
Welcome to my Artistic Halloween Haunting Recap! The month of October and all of the Halloween goodness flew by so fast, but I wanted to share some of my ghoulish crafting fun before Halloween is just a faint promise of next year.

Using some wonderful chains, crystals and beads from Fiona Accessories I created this jewelry assemble for my spellbinding costume of a Gothic witch. The sterling silver snake pendant was hand crafted in Nepal and really played well with the raven skull I had bought recently.
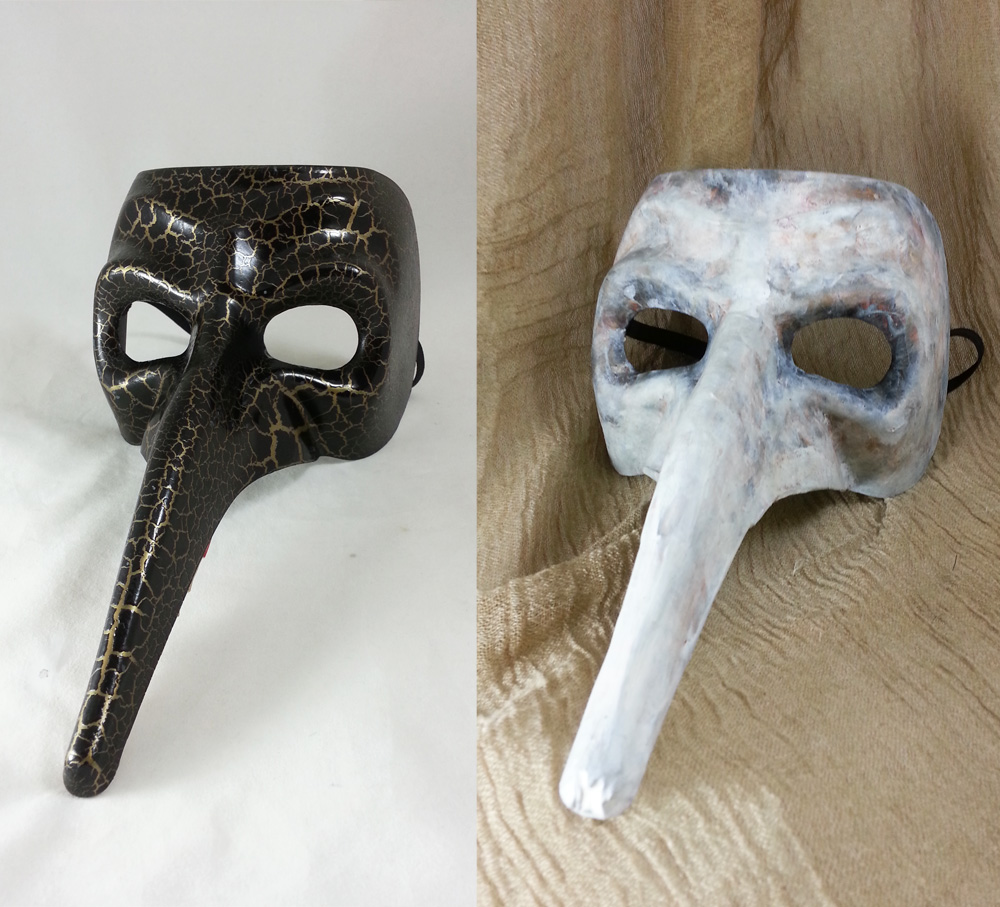
I transformed this plastic Italian Carnival mask into a Plague Doctor mask using paper mache, paint and Liquitex Matte Varnish. However I wasn’t finished there and created the rest of the look:
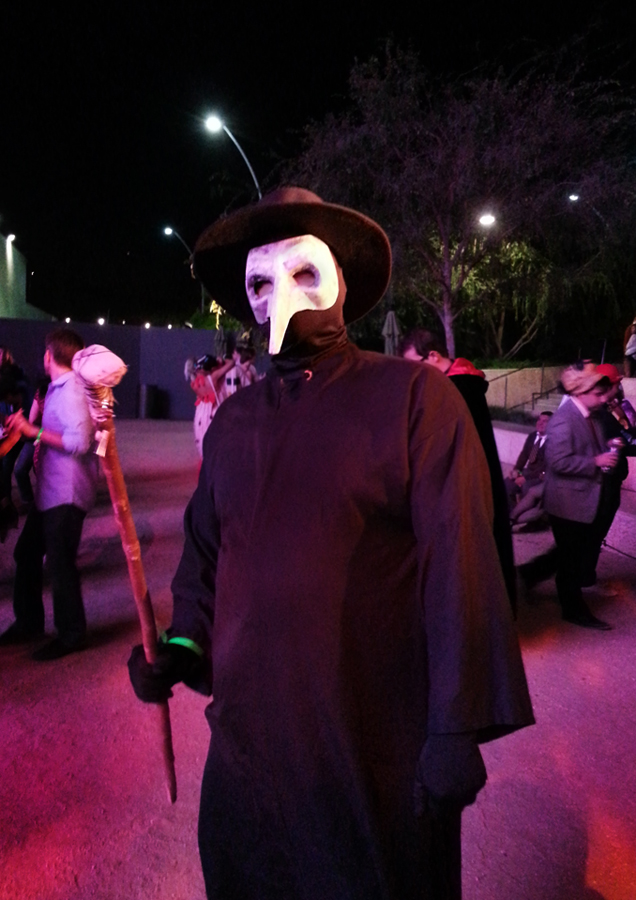
With the addition of a black heavy weight line robe, hood, gloves, hat and walking stick it made a perfectly frightening Plague Doctor costume for my husband.
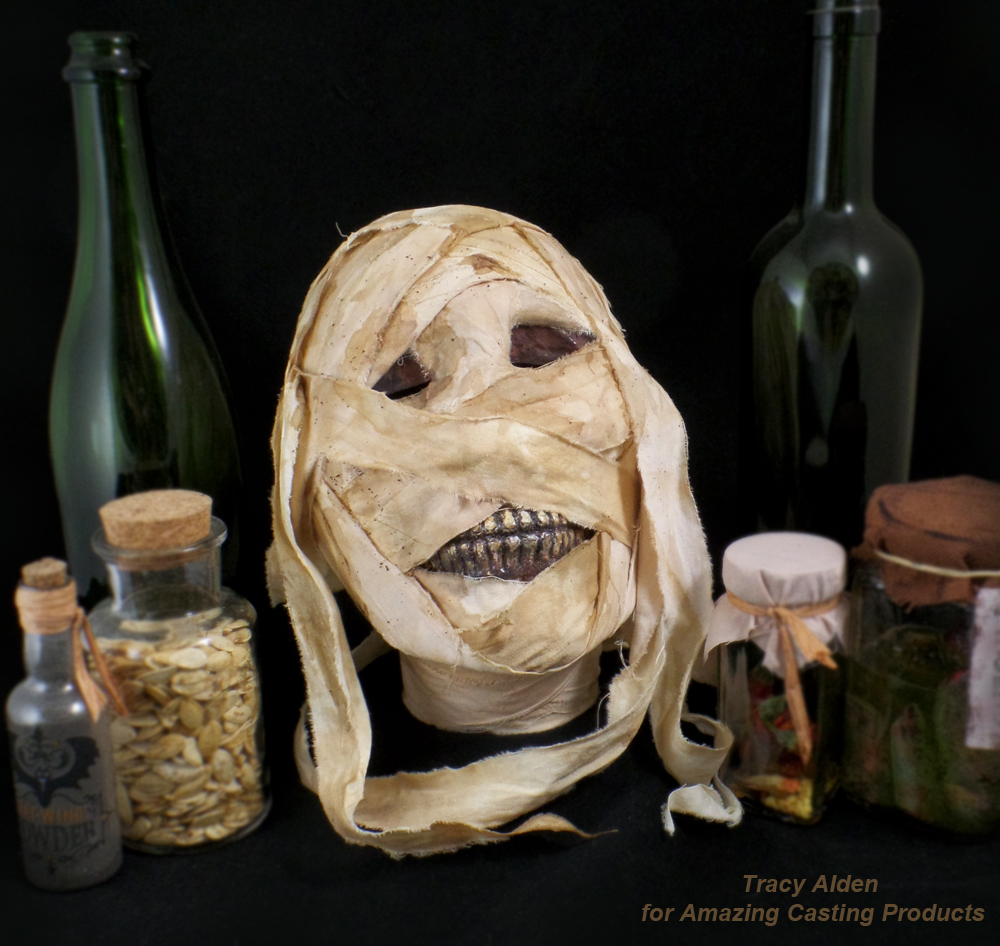
I created a replica mummy head using a plastic Halloween skull and the help of Amazing Casting Products. Clicj HERE for this Upcycled Mummy’s Curse!
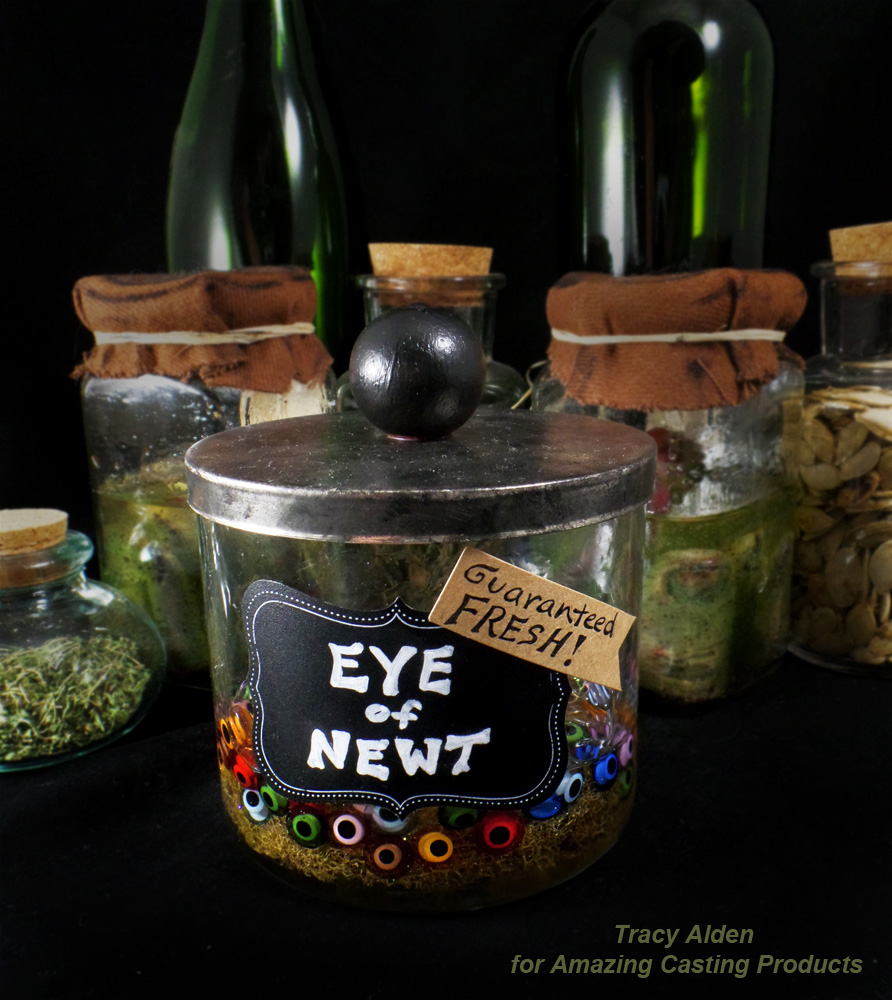
Taking inspiration from one of William Shakespeare’s most famous plays, Macbeth, I created a Eye of Newt Apothecary Jar, spooky enough to keep any monster happy!
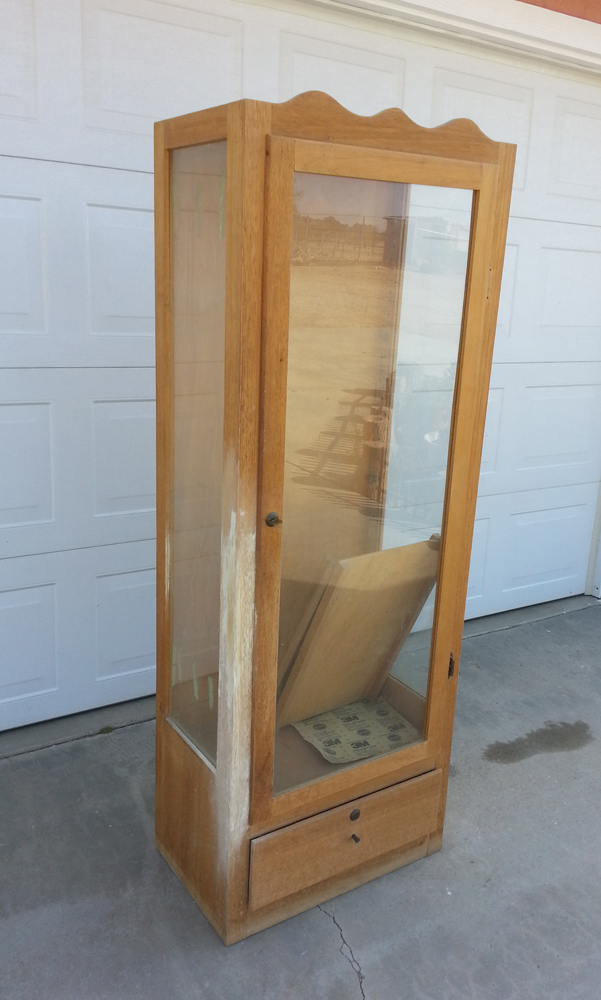
Last but not least my husband and I finally took the time to refinish a old cabinet that had been in the family longer than me. After patching, sanding, staining and varnish it was ready to become a Halloween curio cabinet!
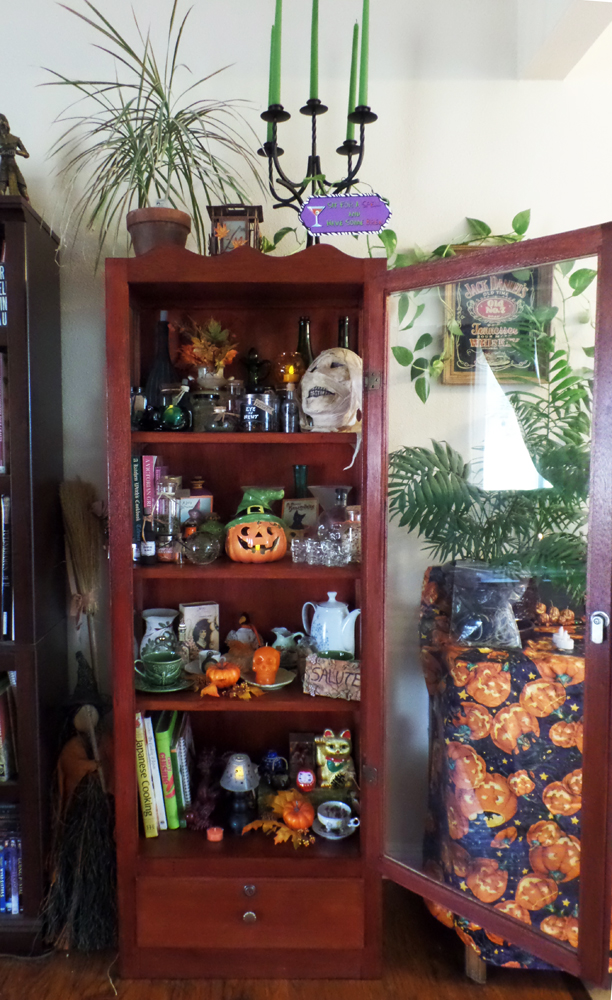
Not bad for our first attempt at giving new life to an old piece. Once filled with fun holiday decor it made a perfectly frightening Halloween decoration. With Halloween gone and past now I can fill it with with antiques and little curios befitting of Fall.Now to start on art projects for Fall and the coming Winter!
Until Next Time, Safe Travels!

Ancient and Contemporary Inspired Artistry