DIY Leprechaun Wee Folk Door

I have always loved the idea of the wee Folk or faery, be the good bad or just odd folk that roamed about. One of my favorite faery movies from my childhood was Darby O’Gill and the Little People. The costumes, sets and the illusion of the miniature world of the leprechauns had me entranced Leaving out small gifts or useable objects for them in hopes of getting the favor of the faery was always a magical idea to me. So I got to thinking, why not make a Leprechaun door to add a bit of magic to a home for Spring!Supplies:
G&P Classic Victorian Oval Bookboard Frame
G&P Burnt Umber 3D Enamel Gel
G&P Glastique Matte Finishing Glaze
G&P Medium Flourishes Piccolos
G&P Shamrock Dreams Enamel Powder
G&P Vintage Gold Enamel Powder
G&P Mossy Glen Enamel Powder
G&P Piccolo Embossing Powder Adhesive
Piccolo Easy Grip Tweezers
Green crystal sticker gems
Sizzix Tim Holtz Alterations embossing folder Woodgrain
Dye ink pads in Black and Deep Brown
Small foam squares
Sharp scissors or craft knife
Carefully remove the frame from the package, put aside the globe and easel. Save those pieces for future projects.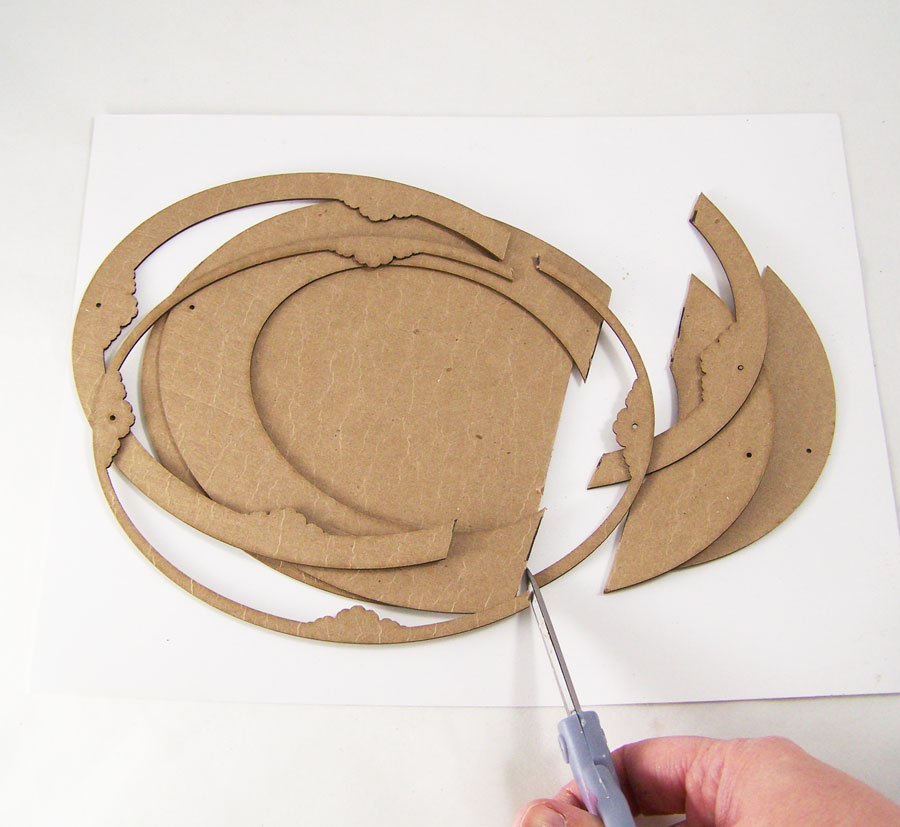
Using a ruler, mark a straight line about 2 inches from the bottom on the frame pieces. Using a sharp scissors or a craft knife, cut the bottom portion off.
Run the back plate and bottom frame sections through an embossing machine using the woodgrain embossing folder. Taking the brown and black dye ink pads, rub them on the embossed sections of the frame.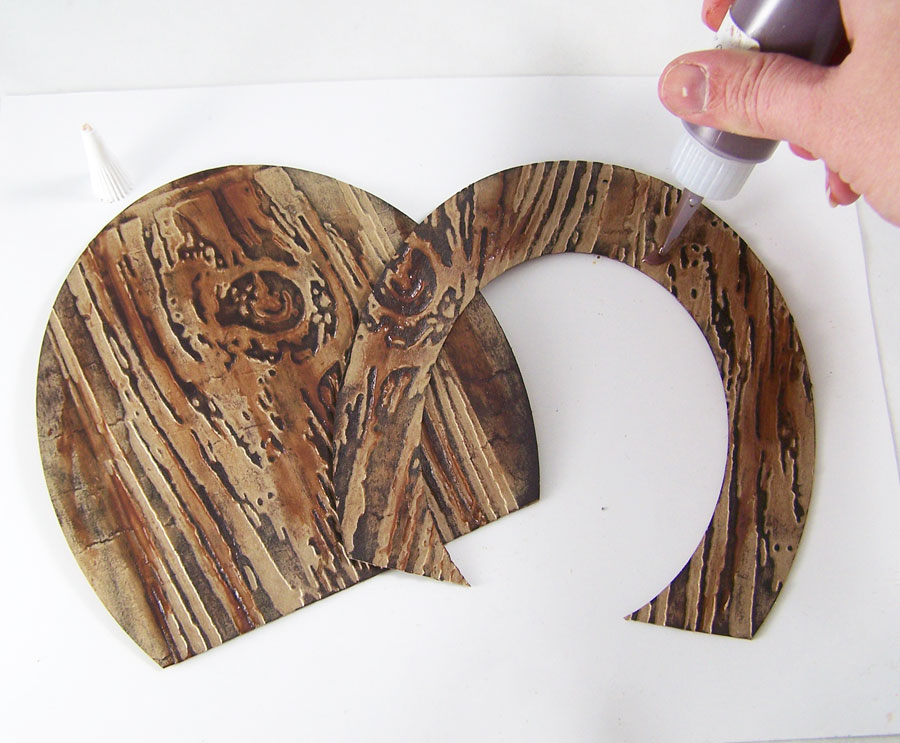
Apply G&P Burnt Umber 3D Enamel Gel to the embossed and now inked sections. Smear the enamel gel in the wood grain pattern with your finger or a cosmetic sponge in a up and down pattern.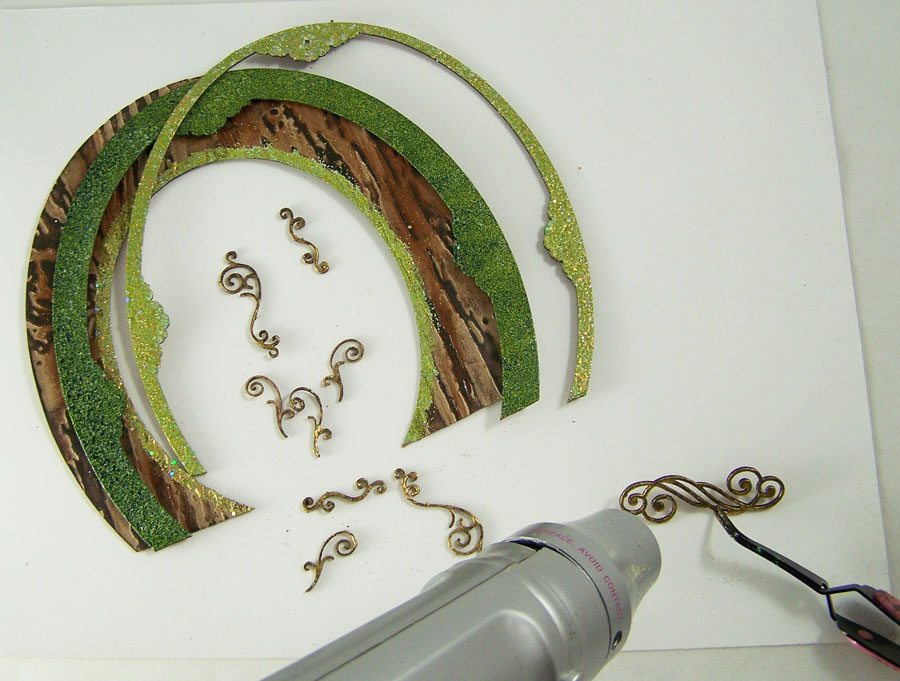
Apply Embossing Powder Adhesive to the top and middle pieces of the frame, the Piccolos and a thin line on the bottom frame. Apply Mossy Glen Enamel Powder to the middle frame, Shamrock Dreams powder to the top frame and thin line on the inner frame, Vintage Gold powder to the Piccolos. Heat to set.
Adhere all three sections of the frame together with Glastique Matte Finishing Glaze, using office clips to keep the frame pieces in place while it dries. Apply Glastique Matte to the back of the Piccolos, place them on the frame and let dry.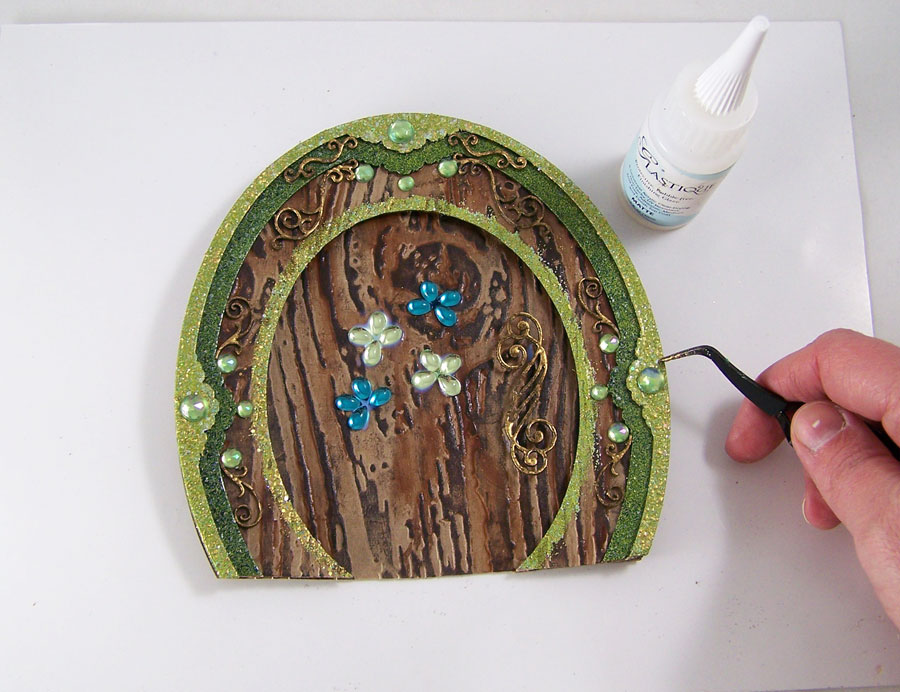
Adhere the back plate to the top frame portion with foam squares. Apply the large swirl Piccolo to the back plate with foam squares to give the illusion of a door handle. Apply the green sticker gems to the faux door with Glastique Matte Finishing Glaze and let dry.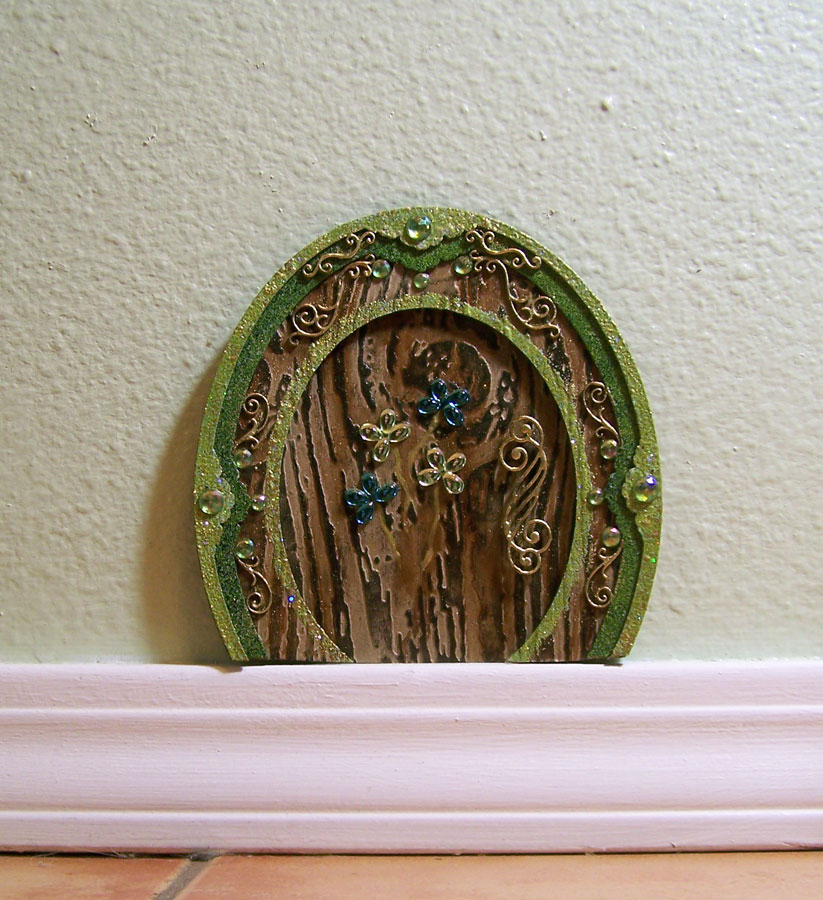
Apply removable poster adhesive to the back of the now completed faux door. Place at the bottom of a wall on the molding, a shelf or anywhere you think a leprechaun might like a magical door! May you have many lucky days ahead!Until next time, safe travels!
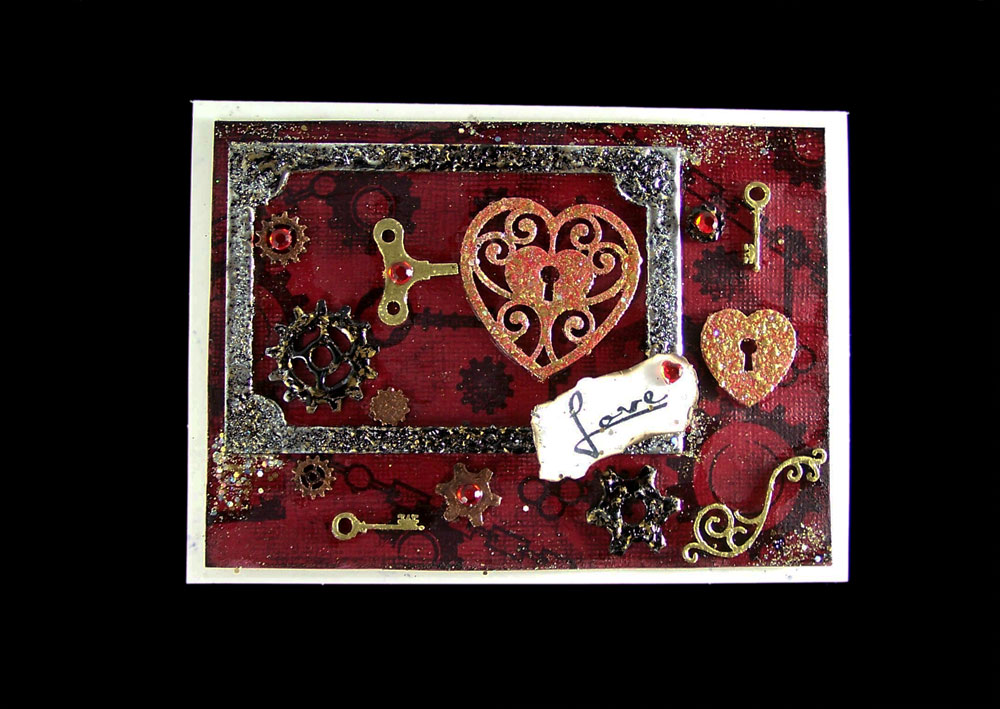
A Steampunk Valentine
I seriously can’t get enough of Steampunk art these days. The diversity, detail and amazing styles that are being created are a wonder to behold. Continuing with this theme, I wanted to create a different form of the traditional Valentines. My feeling was, why not let a Steampunk fan know they are loved with a card? 🙂Supplies:
G&P Key to My Heart Charm Set H006
G&P Keys to My Heart Accents H009
Vintage Gears Embellishment Set ST002
G&P Glastique Gloss Finishing Glaze
G&P Glastique Matte Finishing Glaze
G&P Ruby Red Slippers Embossing Powder
G&P 24K Gold Embossing Powder
G&P Copper Kettle Enamel Powder
G&P Vintage Black Enamel Powder
G&P Piccolo Embossing Powder Adhesive
Globecraft & Piccolo Pure Sparkle Gold Glitter
Piccolo Easy Grip Tweezers
Red crystal sticker gems
Blank card
Red card stock
Gear and key Stamps
Stamp ink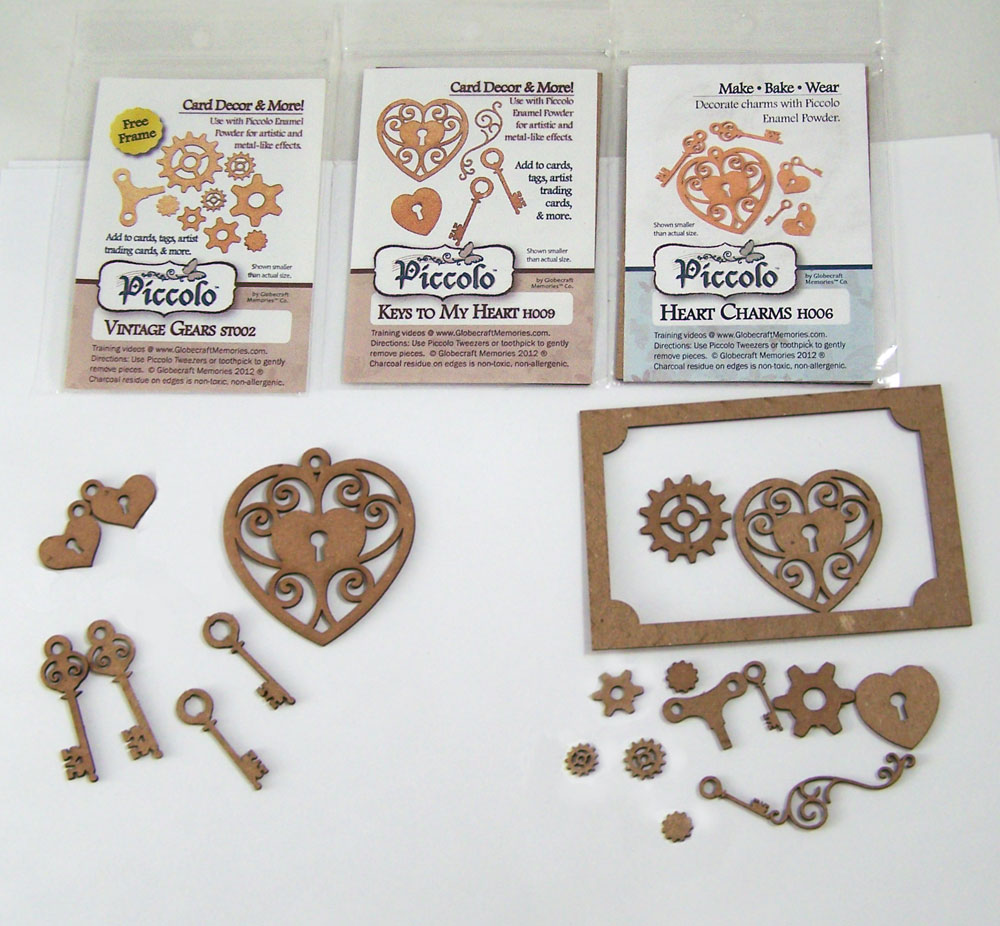
Carefully remove all of the Piccolos from the chipboard frames. Separate the frame, gears, small keys, two lock hearts without loops and the swirl. Place the remaining pieces to the side for a wearable Valentine’s Day Bling project; check out the Globecraft & Piccolo blog for that tutorial. 🙂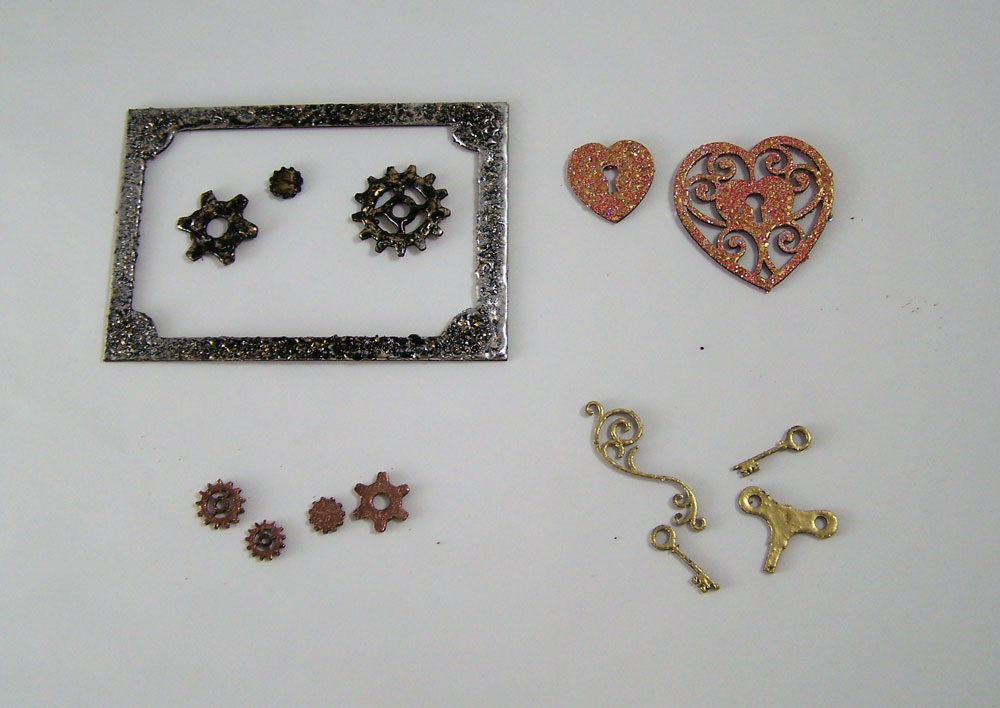
Apply Piccolo Enamel Adhesive to all of the remaining pieces. The two heart locks I coated with G&P Ruby Red Slippers Embossing Powder. The two keys, windup key and swirl with G&P 24K Gold Embossing Powder. The four tiny gears with G&P Copper Kettle Enamel Powder. The frame and remaining gears I coated with G&P Vintage Black Enamel Powder. Heat set.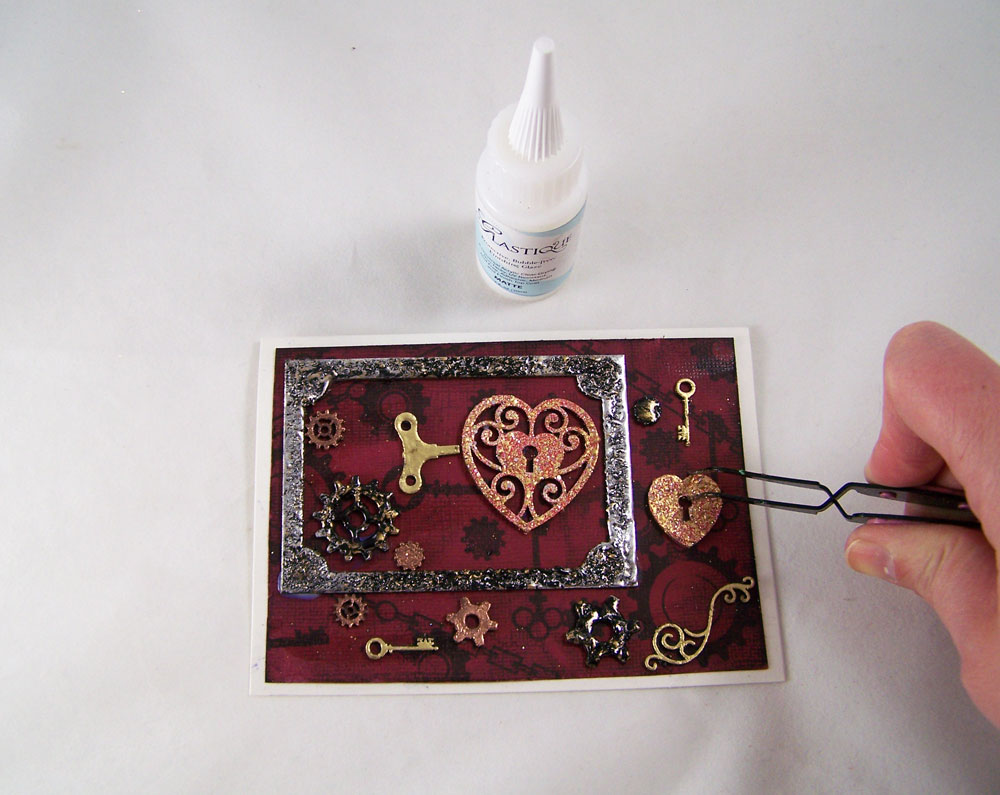
Stamp the card stock with the gears and key stamps. Adhere to the front of the blank card. Carefully glue the embossed Piccolos to the front of the card using the G&P Glastique Matte Finishing Glaze.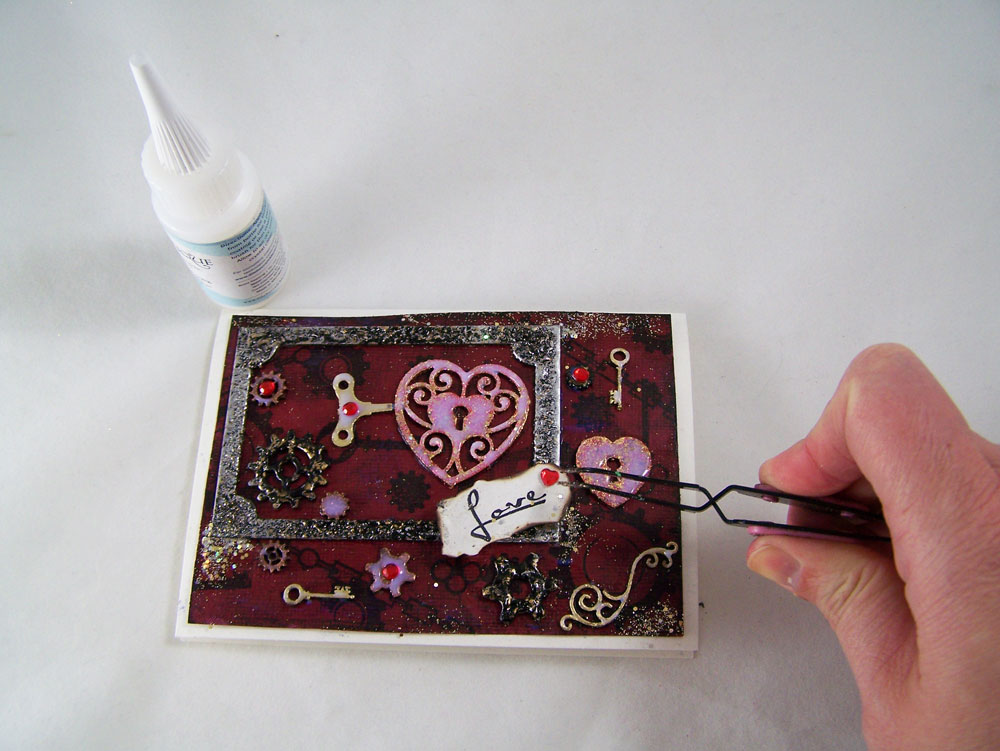
Coat all of the Piccolos with G&P Glastique Gloss Finishing Glaze and add the red sticker gems to a few of the gears. Put a few drops of Glastique Gloss on the card, smear the drops with your finger and sprinkle Globecraft & Piccolo Pure Sparkle Gold Glitter on top.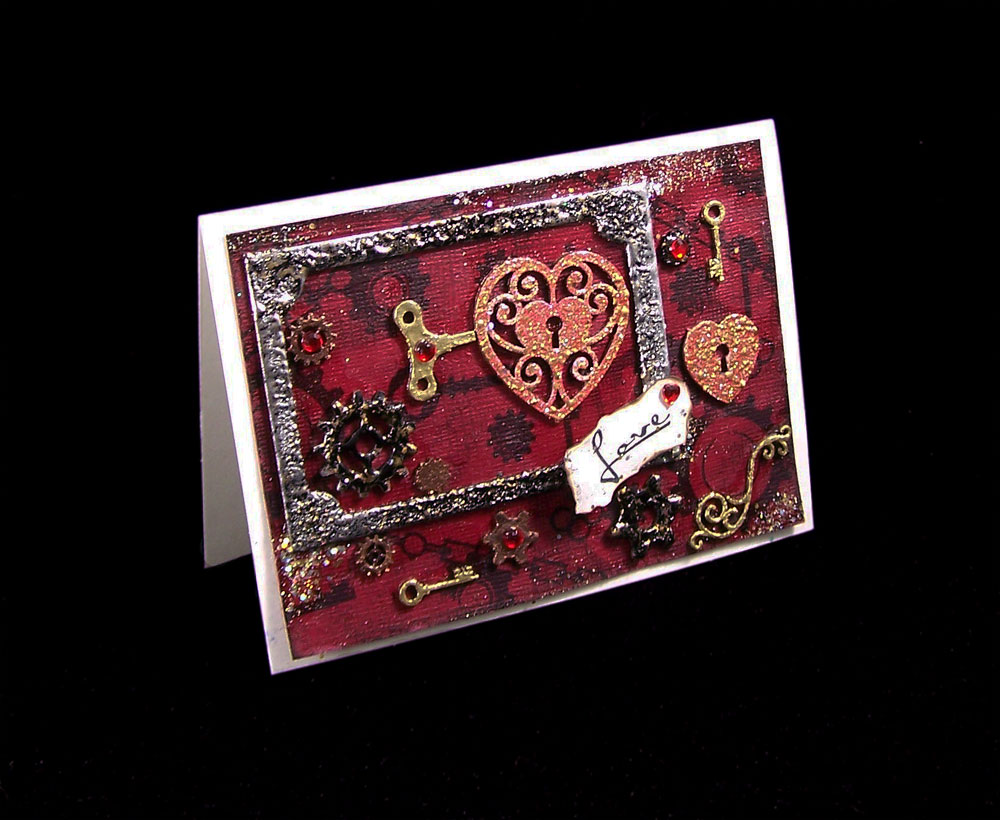
Stamp or write your favorite Valentine’s sentiment inside. 🙂Until next time, safe travels!
CHA Winter Show 2013
Another Craft and Hobby Association Winter show has come and gone. While there were less vendors this year, I honestly feel this was one of the best I attended. This show was amazing! The classes, networking and show floor events were wonderful. I was able to make new accounts with several vendors and got to meet up with some seriously talented artists.
The wonderful Globecraft & Piccolo had a booth again at CHA. I am proud to be part of their Design Team and a part of product design & development! Members of the G&P design team, Jami Bostjancic (of Accent Allusions) and I were honored to be asked to do demos at the booth for three of the four days of CHA.
Here is some of the cool G&P products we got to demo at the show:
NEW Globecraft & Piccolo UV Resin: It cures in 3 minutes in UV light, scratch resistant, self leveling and not affected by humidity (in fact it can set up underwater). It works wonderful on top of chipboard, acrylic, paper, polymer clay, fabric, vellum and so much more!
NEW Globecraft & Piccolo Acrylic Bezels and Tags: Clear acrylic bezels and tags come in so many shapes and sizes. Perfect for making jewelry, mixed media and card decor! Looks lovely stamped and with paper backings.
NEW additions to the Globecraft & Piccolo Embossing powder line: These powders are specially designed to look awesome on large and small projects. G&P Embossing Powders are made of varying-sized particles that create a unique depth and dimension not available with traditional embossing powders. These wonderful colors can mimic stone, metal, natural elements and aged surfaces. The new colors are Real Rust, Ruby Red Slippers, Shamrock Dreams, Turquoise Lagoon, and Platinum!
New Piccolo Chipboard Elements: Now in many different sizes, great for home decor, card making, mixed media, jewelry and more! From holiday, seasonal, steampunk, animals, swirls, and elaborate corner and edge elements.

The Globecraft & Piccolo booth at CHA.
G&P display showcasing all of their embossing powders and chipboard charm sets. All of the charm sets on the velvet boards are my work. 🙂

G&P acrylic and chipboard bezels samples by the talented design team, the Secrist family (G&P) and I.
Just beautiful card decor work with Piccolos by the design team!
G&P Ornament sets. The lovely mixed media piece on the left is made by the talented Linda Neff (part of the G&P design team) from ornaments and a lampshade.
An overview of the booth.
Some samples of the demo work showing the new UV Resin and acrylic bezels! Pieces by Pat Secrist (Of G&P), Jami Bostjancic and I.The following photos are close up of booth display samples to show you how many new styles and techniques you can use with the new G&P products.

G&P acrylic bezel, G&P UV Resin, mica powder, permanent ink, paper and sticker gems.
Mini oval acrylic bezels with Pure Sparkle Glitter in Gold, mica powder, 3D Enamel Gel and sticker gems. Faux glass technique.
Top left and bottom bezels are acrylic and top right bezel is bookboard. 3D Enamel Gels, Pure Sparkle Glitter in Gold and Silver, mica powder and sticker gems. Glastique Gloss is used to seal each layer. Topped with the new UV resin. Nebula/night sky technique.
G&P acrylic bezel, G&P UV Resin, G&P Piccolo Gears, mica powder, permanent ink, paper and sticker gems. Piccolo layer technique.
G&P acrylic bezel, G&P UV Resin, mica powder, 3D Enamel Gels, Origami foil paper and sticker gems. Faux glass technique.Until next time safe travels!
Mushrooms and Merriment…

As a young child one of my favorite Christmas decorations was glass mushroom ornaments. They were typically red with white dots and wonderful highlights of pearls, silver, gold and glitter. To me it was like a little frozen bit of fairyland. Traditionally the mushroom ornament was seen as a good luck symbol. In Germany they were seen as a symbol of a person’s love of nature and hope for good tidings in the New Year. Well that got me thinking I just had to make one of my own!Supplies:
Globecraft & Piccolo DIY Portrait Ornament
Globecraft & Piccolo 3D Enamel Gel Satin Honeydew
Globecraft & Piccolo 3D Enamel Gel Napthol Red
Globecraft & Piccolo Piccolo Enamel/Embossing Powder Adhesive
Globecraft & Piccolo Mossy Glen Enamel Powder
Globecraft & Piccolo Pure Sparkle Gold Glitter
Globecraft & Piccolo Glastique Gloss Finishing Glaze
Globecraft & Piccolo Medium FlourishesReindeer Moss
Polymer Clay Mushrooms
Ribbon
Red Sticker Gems
I started with applying the Piccolo Enamel Adhesive to the outer rings of the ornament. I then coated the rings with Mossy Glen Enamel Powder and heat set with heat gun. I then drew a thin bead of Glastique Gloss Finishing Glaze around the inside of the ovals, placed the globes in each half and clipped into place.
Taking the inner ring, I applied Glastique Gloss around the edge and sprinkled on Pure Sparkle Gold Glitter.
The flourishes got a coat of 3D Enamel Gel Satin Honeydew and the polymer clay mushrooms caps had a layer of 3D Enamel Gel Napthol Red applied. Let dry. Then little dots of Glastique Gloss on the mushroom caps and a sprinkle of Pure Sparkle Gold Glitter on top.
Once the mushroom are completely dry I bundled them together and wrapped Reindeer Moss around them tightly. I glued all the pieces of the ornament together with Glastique, carefully sandwiching the mushrooms and moss. I left them clipped in place until dry.
Using Glastique as glue once again, I added the flourishes and sticker gems to the ornament. Once dry I added the ribbon to the top!
Hop on over to the Globecraft & Piccolo blog today to see my Christmas Airship Express tutorial!

Until Next Time, Safe Travels!Let it snow…..

Even though it is not Winter yet, it sure feels like it. We have a cold weather front moving in and there is some talk of snow! It is the perfect weather to stay inside, decorate for the holidays and make gifts. Today I am going to show you how to make a snowflake jewelry set that can be put in a card set using Globecraft &Piccolo products.Supplies for earrings and necklace:
2 packages of Globecraft & Piccolo Snowflake Accents
Globecraft & Piccolo Pure Sparkle Silver Glitter
Globecraft & Piccolo Glastique Gloss Finishing Glaze
Globecraft & Piccolo Titanium White 3D Enamel Gel
Piccolo Easy Grip Tweezers
Pale Blue Sticker gems
Silver jumprings
Silver chain
2 Earring wires
Jewelry clasp
Flat nose pliers
Wire cutter

Carefully remove all of the snowflake Piccolos from the chipboard frame. Coat one side of all of the snowflake Piccolos with Titanium White 3D Enamel Gel. Let dry. Now coat the other side of only 1 large snowflake, 2 mediums, 2 smalls and 2 minis. The pieces with both sides coated will be for the jewelry and the snowflakes with only one side with enamel will be used for the card (or other projects if you like).
Carefully apply Glastique Gloss Finishing Glaze to all of the snowflakes and sprinkle Pure Sparkle Silver Glitter on top. Let dry.
Now apply two more coats of Glastique Gloss Glaze to the snowflakes. Let dry. The layers of glaze will give the snowflakes a glass like finish and help the glitter “pop”.

Now apply Glastique Gloss Glaze to two of the small snowflakes. Carefully position the mini snowflakes in a manner to create a enclosed space to put a silver jump ring through. Let dry. Go back and seal the areas where the snowflakes touch with Glastique. Let dry.
Use Glastique Gloss Finishing Glaze to glue on the pale blue sticker gems to the large, medium and small snowflakes. Let dry.
Open up oval jump rings and put through the small triangles in 2 of the medium, the space in small and mini glued pieces and 1 large snowflakes; close jump rings.

Cut 2 separate lengths (two inches long) of silver chain and attach each length to a medium snowflake with a small jump ring. Add another jump ring on top and attach the earring wire.
Cut two lengths of silver chain (1/2 inch long) and attach to the small and mini snowflakes glued together with a small jump ring. Add another jump ring on top and attach to the earring wire with the medium snowflake. Cut 16 inches of silver chain and string the large snowflake on it. Attach jewelry clasp to chain with small jump rings.
You can give the jewelry set as is or you can make a matching card to place the jewelry in. Use the left over snowflakes for embellishments on the card. 🙂Supplies for card:
White card stock
Pale Blue card stock
Globecraft &Piccolo Blue Pearl 3D Enamel Gel
Globecraft &Piccolo Glastique Gloss Finishing GlazeUntil Next Time, Safe Travels!

Ancient and Contemporary Inspired Artistry
