DIY Leprechaun Wee Folk Door

I have always loved the idea of the wee Folk or faery, be the good bad or just odd folk that roamed about. One of my favorite faery movies from my childhood was Darby O’Gill and the Little People. The costumes, sets and the illusion of the miniature world of the leprechauns had me entranced Leaving out small gifts or useable objects for them in hopes of getting the favor of the faery was always a magical idea to me. So I got to thinking, why not make a Leprechaun door to add a bit of magic to a home for Spring!Supplies:
G&P Classic Victorian Oval Bookboard Frame
G&P Burnt Umber 3D Enamel Gel
G&P Glastique Matte Finishing Glaze
G&P Medium Flourishes Piccolos
G&P Shamrock Dreams Enamel Powder
G&P Vintage Gold Enamel Powder
G&P Mossy Glen Enamel Powder
G&P Piccolo Embossing Powder Adhesive
Piccolo Easy Grip Tweezers
Green crystal sticker gems
Sizzix Tim Holtz Alterations embossing folder Woodgrain
Dye ink pads in Black and Deep Brown
Small foam squares
Sharp scissors or craft knife
Carefully remove the frame from the package, put aside the globe and easel. Save those pieces for future projects.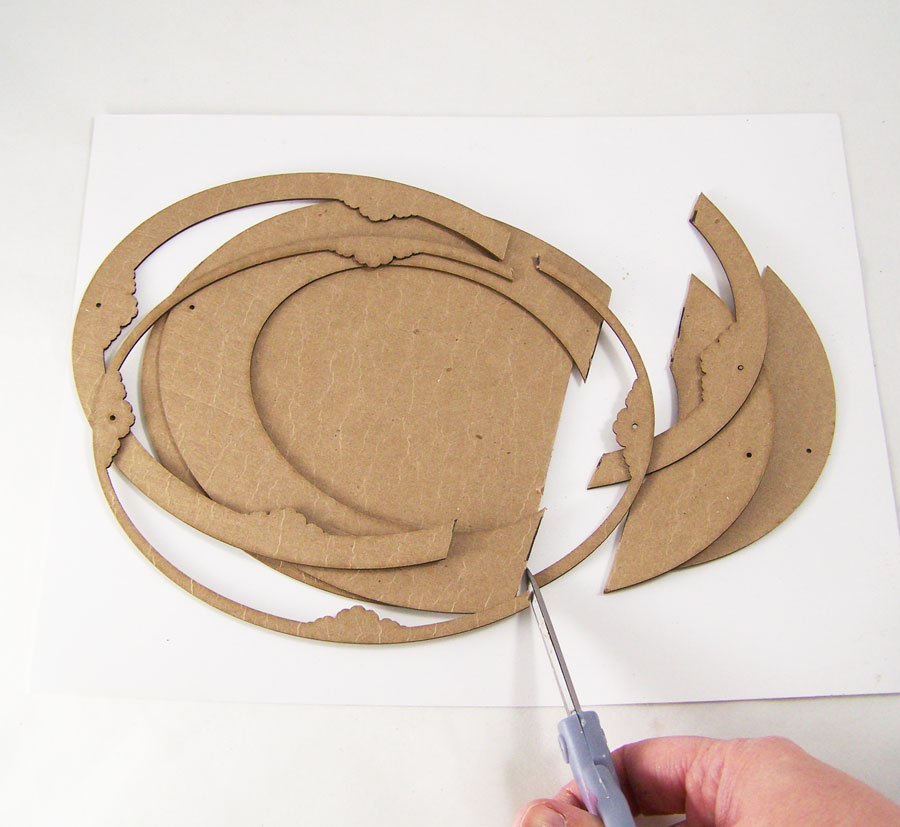
Using a ruler, mark a straight line about 2 inches from the bottom on the frame pieces. Using a sharp scissors or a craft knife, cut the bottom portion off.
Run the back plate and bottom frame sections through an embossing machine using the woodgrain embossing folder. Taking the brown and black dye ink pads, rub them on the embossed sections of the frame.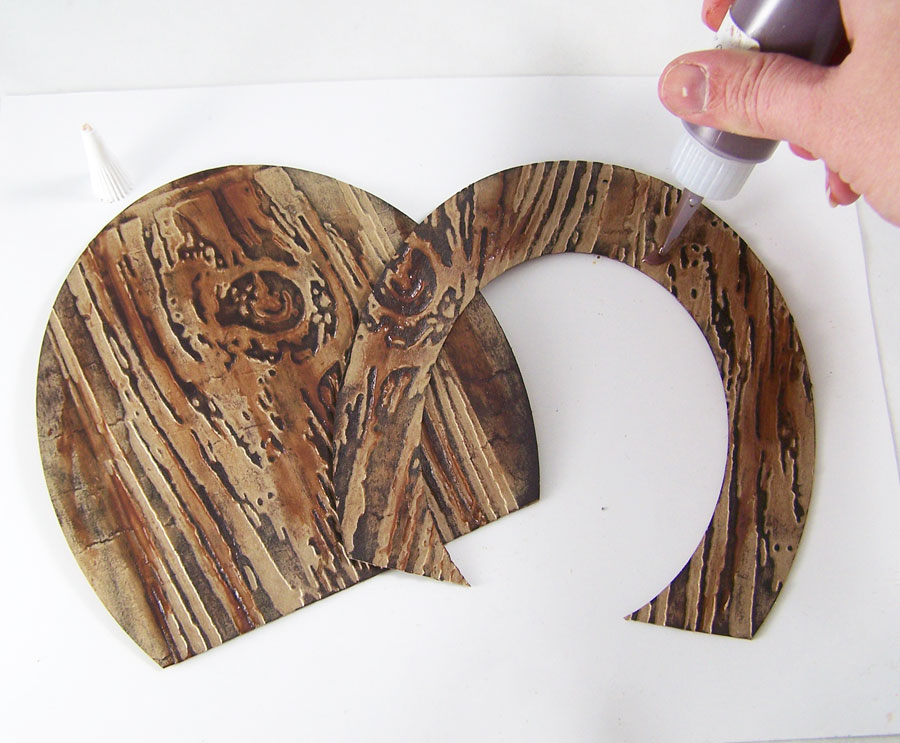
Apply G&P Burnt Umber 3D Enamel Gel to the embossed and now inked sections. Smear the enamel gel in the wood grain pattern with your finger or a cosmetic sponge in a up and down pattern.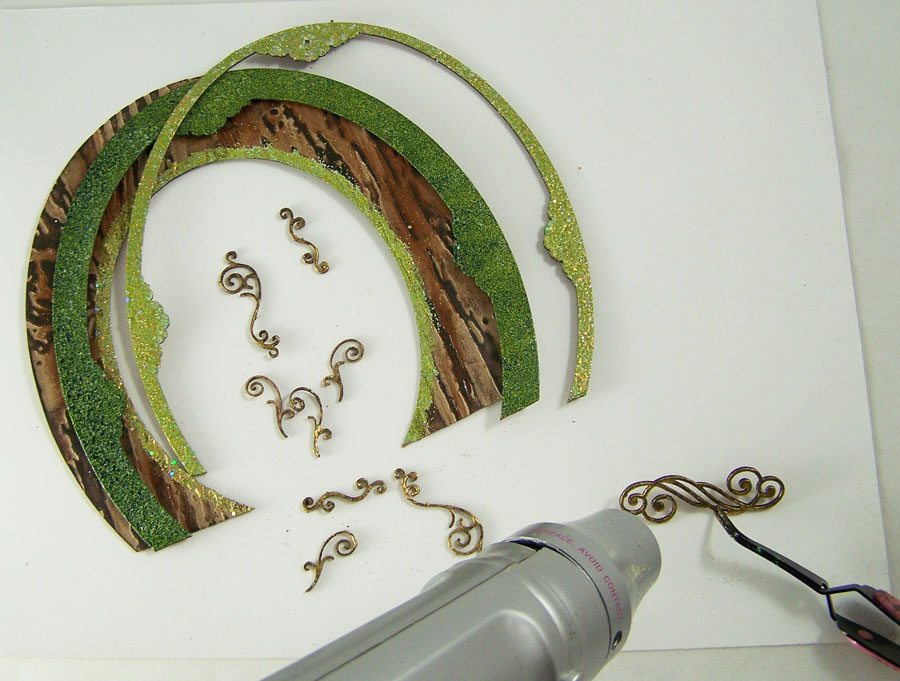
Apply Embossing Powder Adhesive to the top and middle pieces of the frame, the Piccolos and a thin line on the bottom frame. Apply Mossy Glen Enamel Powder to the middle frame, Shamrock Dreams powder to the top frame and thin line on the inner frame, Vintage Gold powder to the Piccolos. Heat to set.
Adhere all three sections of the frame together with Glastique Matte Finishing Glaze, using office clips to keep the frame pieces in place while it dries. Apply Glastique Matte to the back of the Piccolos, place them on the frame and let dry.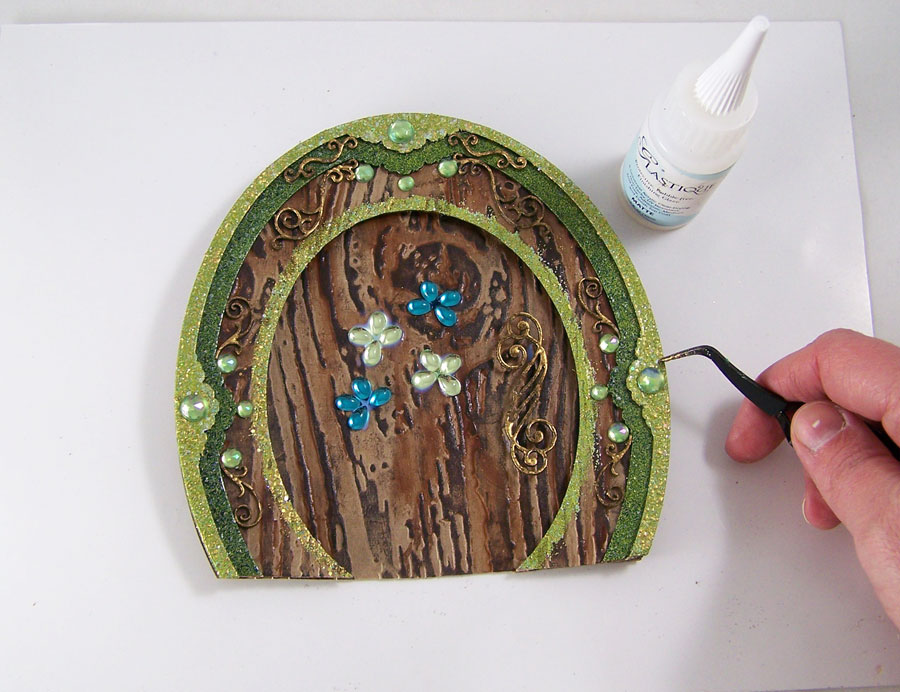
Adhere the back plate to the top frame portion with foam squares. Apply the large swirl Piccolo to the back plate with foam squares to give the illusion of a door handle. Apply the green sticker gems to the faux door with Glastique Matte Finishing Glaze and let dry.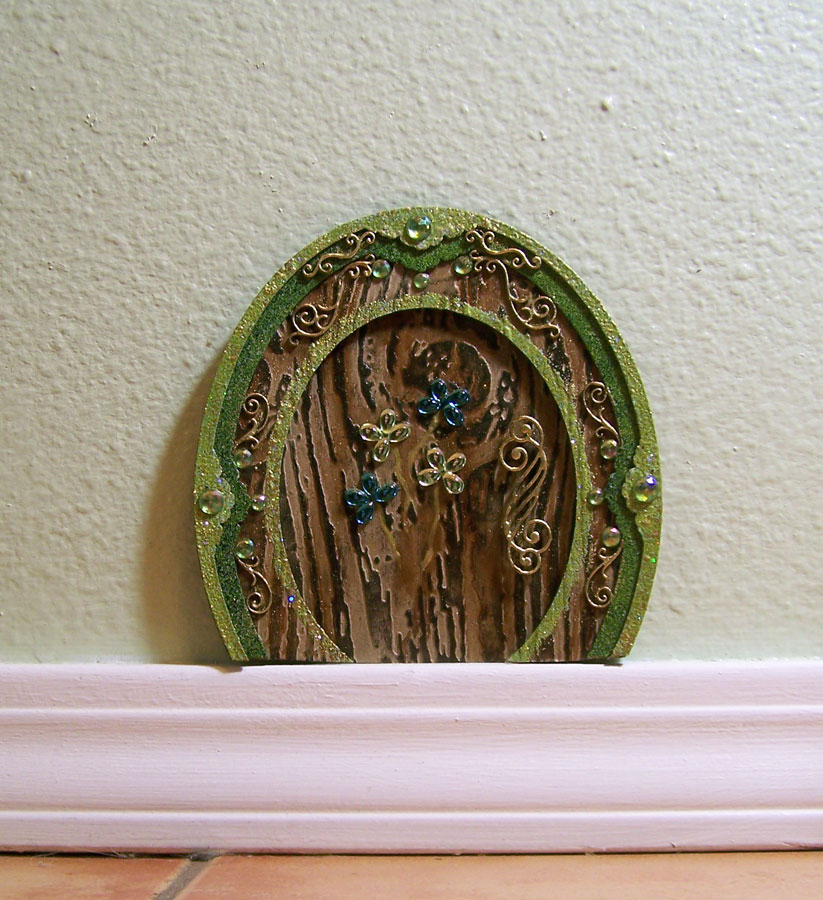
Apply removable poster adhesive to the back of the now completed faux door. Place at the bottom of a wall on the molding, a shelf or anywhere you think a leprechaun might like a magical door! May you have many lucky days ahead!Until next time, safe travels!
A Steampunk Valentine
I seriously can’t get enough of Steampunk art these days. The diversity, detail and amazing styles that are being created are a wonder to behold. Continuing with this theme, I wanted to create a different form of the traditional Valentines. My feeling was, why not let a Steampunk fan know they are loved with a card? 🙂Supplies:
G&P Key to My Heart Charm Set H006
G&P Keys to My Heart Accents H009
Vintage Gears Embellishment Set ST002
G&P Glastique Gloss Finishing Glaze
G&P Glastique Matte Finishing Glaze
G&P Ruby Red Slippers Embossing Powder
G&P 24K Gold Embossing Powder
G&P Copper Kettle Enamel Powder
G&P Vintage Black Enamel Powder
G&P Piccolo Embossing Powder Adhesive
Globecraft & Piccolo Pure Sparkle Gold Glitter
Piccolo Easy Grip Tweezers
Red crystal sticker gems
Blank card
Red card stock
Gear and key Stamps
Stamp ink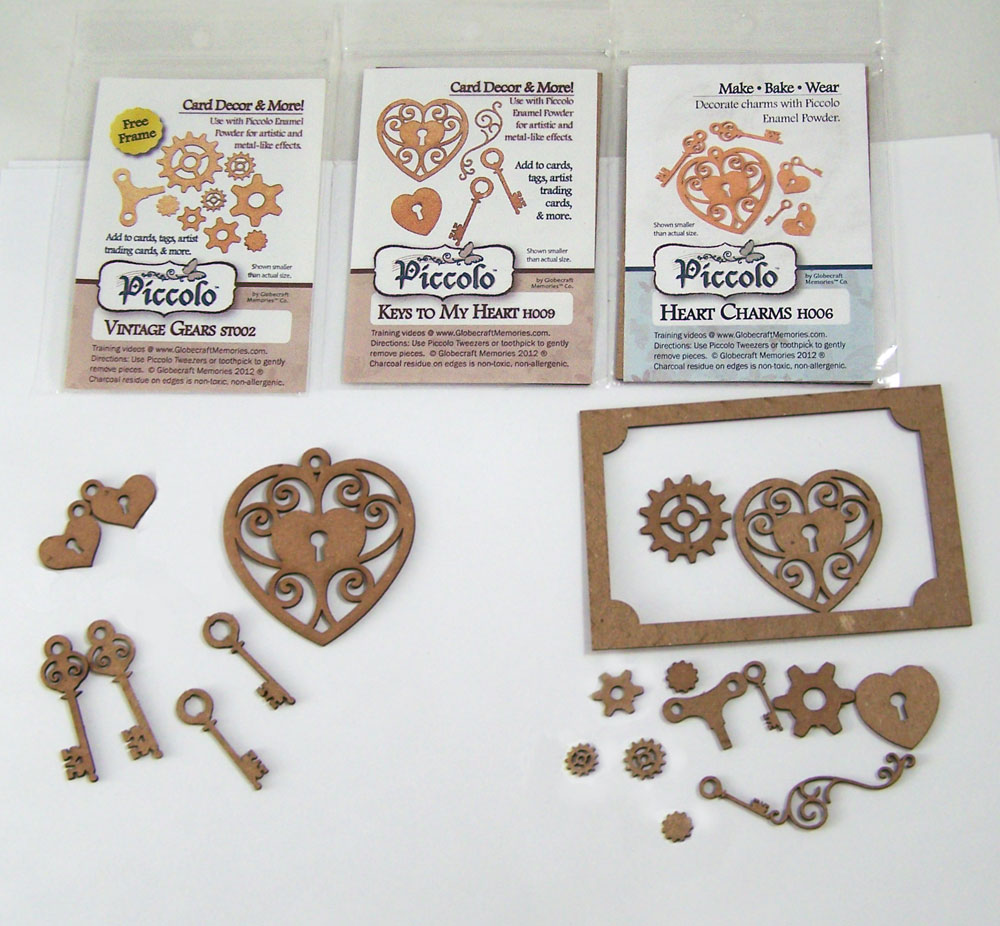
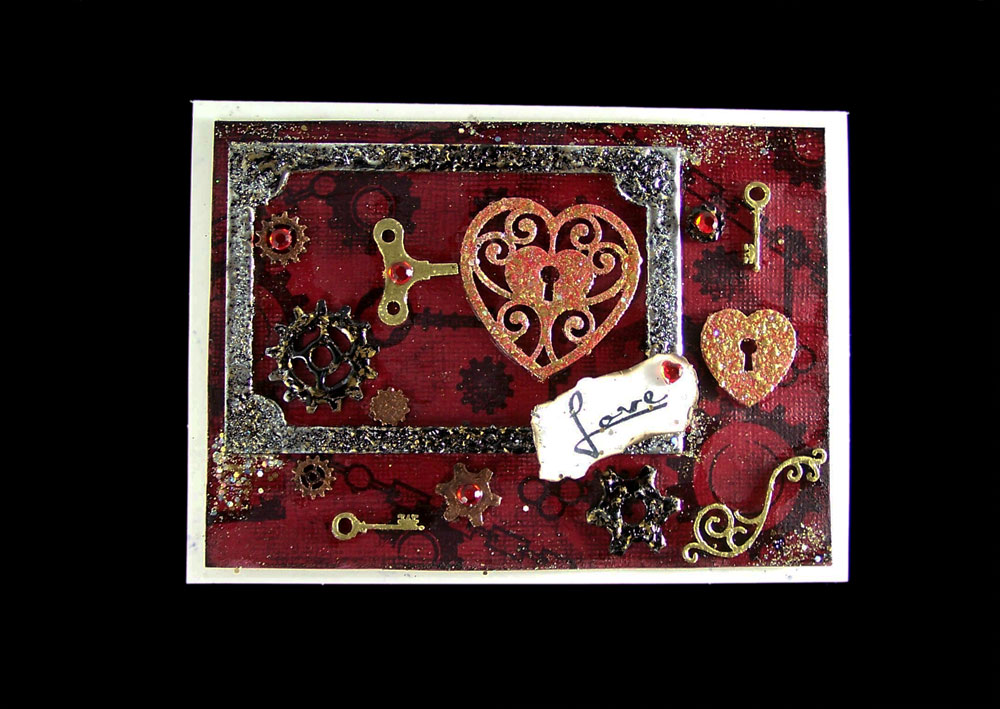
Carefully remove all of the Piccolos from the chipboard frames. Separate the frame, gears, small keys, two lock hearts without loops and the swirl. Place the remaining pieces to the side for a wearable Valentine’s Day Bling project; check out the Globecraft & Piccolo blog for that tutorial. 🙂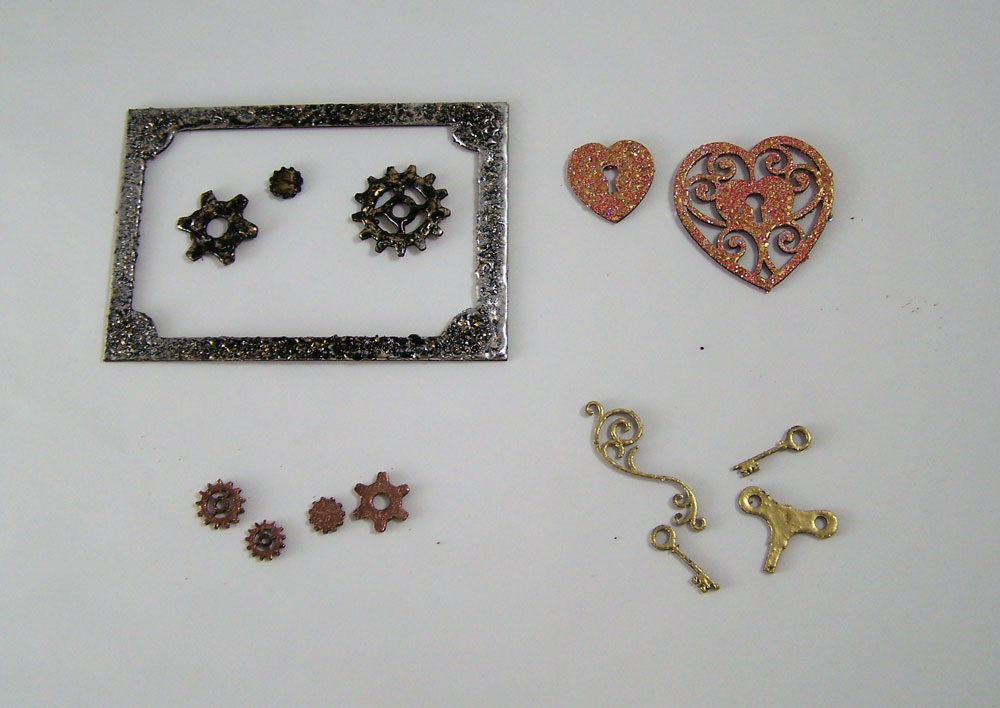
Apply Piccolo Enamel Adhesive to all of the remaining pieces. The two heart locks I coated with G&P Ruby Red Slippers Embossing Powder. The two keys, windup key and swirl with G&P 24K Gold Embossing Powder. The four tiny gears with G&P Copper Kettle Enamel Powder. The frame and remaining gears I coated with G&P Vintage Black Enamel Powder. Heat set.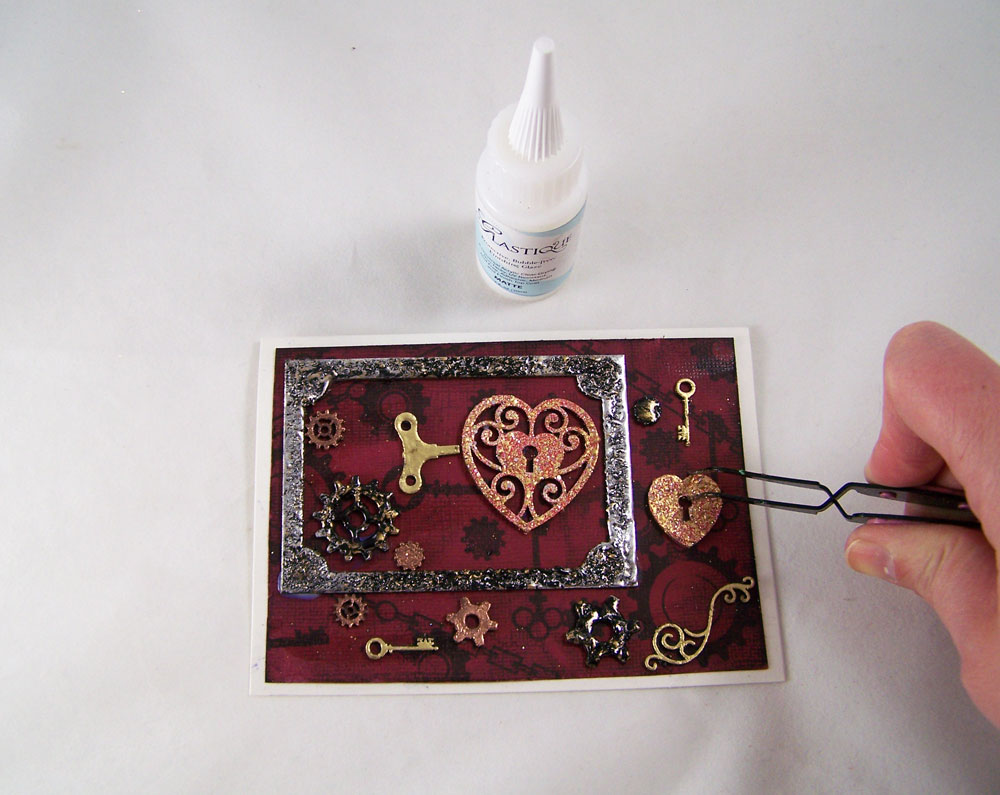
Stamp the card stock with the gears and key stamps. Adhere to the front of the blank card. Carefully glue the embossed Piccolos to the front of the card using the G&P Glastique Matte Finishing Glaze.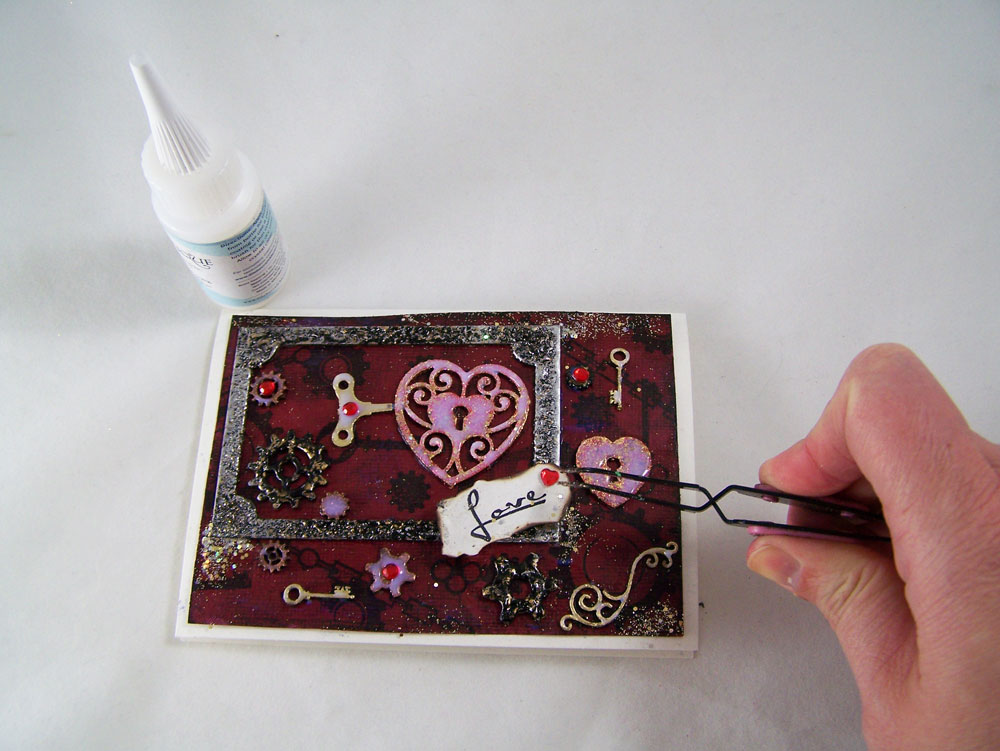
Coat all of the Piccolos with G&P Glastique Gloss Finishing Glaze and add the red sticker gems to a few of the gears. Put a few drops of Glastique Gloss on the card, smear the drops with your finger and sprinkle Globecraft & Piccolo Pure Sparkle Gold Glitter on top.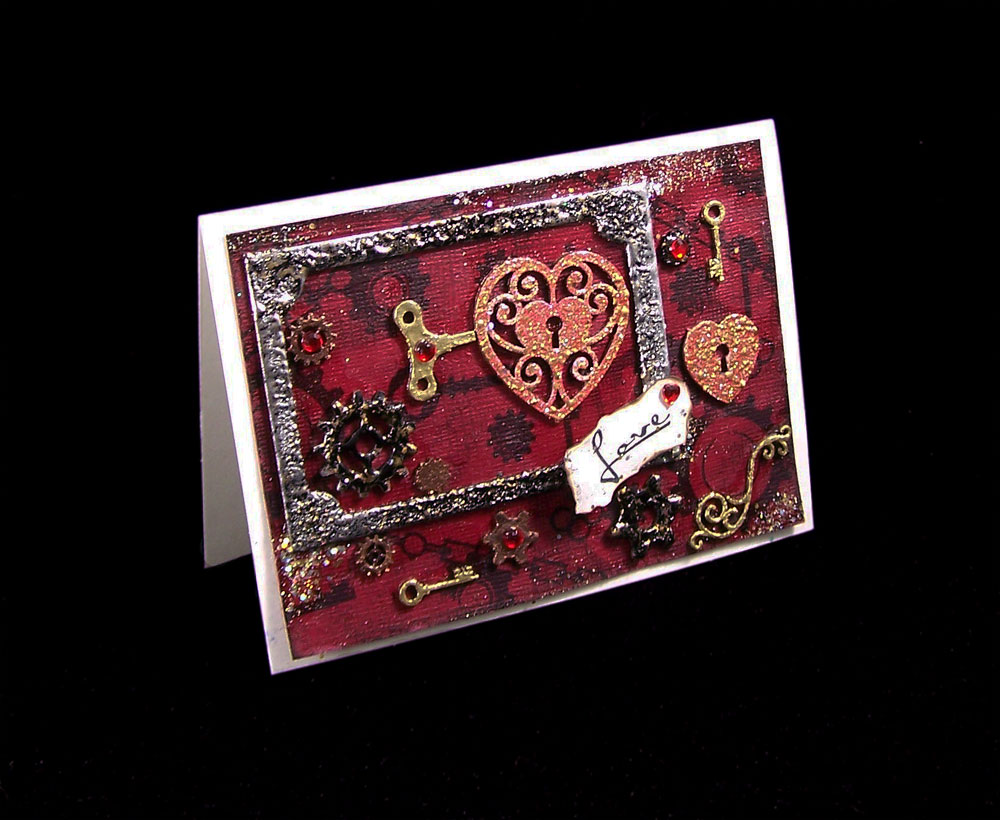
Stamp or write your favorite Valentine’s sentiment inside. 🙂Until next time, safe travels!
Mushrooms and Merriment…

As a young child one of my favorite Christmas decorations was glass mushroom ornaments. They were typically red with white dots and wonderful highlights of pearls, silver, gold and glitter. To me it was like a little frozen bit of fairyland. Traditionally the mushroom ornament was seen as a good luck symbol. In Germany they were seen as a symbol of a person’s love of nature and hope for good tidings in the New Year. Well that got me thinking I just had to make one of my own!Supplies:
Globecraft & Piccolo DIY Portrait Ornament
Globecraft & Piccolo 3D Enamel Gel Satin Honeydew
Globecraft & Piccolo 3D Enamel Gel Napthol Red
Globecraft & Piccolo Piccolo Enamel/Embossing Powder Adhesive
Globecraft & Piccolo Mossy Glen Enamel Powder
Globecraft & Piccolo Pure Sparkle Gold Glitter
Globecraft & Piccolo Glastique Gloss Finishing Glaze
Globecraft & Piccolo Medium FlourishesReindeer Moss
Polymer Clay Mushrooms
Ribbon
Red Sticker Gems
I started with applying the Piccolo Enamel Adhesive to the outer rings of the ornament. I then coated the rings with Mossy Glen Enamel Powder and heat set with heat gun. I then drew a thin bead of Glastique Gloss Finishing Glaze around the inside of the ovals, placed the globes in each half and clipped into place.
Taking the inner ring, I applied Glastique Gloss around the edge and sprinkled on Pure Sparkle Gold Glitter.
The flourishes got a coat of 3D Enamel Gel Satin Honeydew and the polymer clay mushrooms caps had a layer of 3D Enamel Gel Napthol Red applied. Let dry. Then little dots of Glastique Gloss on the mushroom caps and a sprinkle of Pure Sparkle Gold Glitter on top.
Once the mushroom are completely dry I bundled them together and wrapped Reindeer Moss around them tightly. I glued all the pieces of the ornament together with Glastique, carefully sandwiching the mushrooms and moss. I left them clipped in place until dry.
Using Glastique as glue once again, I added the flourishes and sticker gems to the ornament. Once dry I added the ribbon to the top!
Hop on over to the Globecraft & Piccolo blog today to see my Christmas Airship Express tutorial!

Until Next Time, Safe Travels!Globecraft & Piccolo Design Team and 3D Enamel Gels!

As you all know I have been a proud member of product design and development for Globecraft Memories for over a year now. I love the work and always look forward to testing new products. So I was pleasantly surprised when they graciously invited me to join their Globecraft & Piccolo online design team! There’s an amazing amount of talented ladies in this team and many diverse styles. I can’t wait to see what everyone makes! Please make sure to check out their blog often!
One of the new products we are getting to showcase and use in the design team is Piccolo 3D Enamel Gels. They are non-toxic, have no odor, are easy to clean up and have wonderful pigment-rich colors. They can be applied to chipboard, paper, plastic and fabrics with ease (I’m willing to bet there are even more applications that I have yet to try).
A new product they carry, blank Bookboard Bezels, are just perfect to coat with the 3D Enamel and turn into jewelry. A single coat on a bezel gives you a lovely transparency, two coats give a opaque glass like finish. When you apply a single coat on top of Globecraft’s Enamel Powders it has a wonderful stained glass effect, but you can also put a layer of 3D Enamel down first, let dry and then sprinkle a layer of Enamel Powders on top.

The 3D Enameling Gel does not boil when you pass the heat gun over to set the Enameling powders if the gel is fully cured. On this Skinny Tag bezel I used Mars Black 3D Enamel Gel and a overlay of Girls Night Out Enamel Powder.
If you layer the Enamel Gel between layers of Glastique Gloss Finishing Glaze you can get an amazing level of depth. Mars Black, Ultramarine Blue, Purple Mist 3D Enamel Gels, Pure Sparkle Silver Glitter and Mica for this celestial sky set.
You can get the illusion of glass when you add Glastique Gloss Finishing Glaze and Art Glitter Ultrafine Angel Dust glitter on top of the 3D Enamel. I used a Flower drop bezel , Dark Green, Metallic Gold, Purple Mist 3D Enameling Gels, and sticker gems for this piece.
The 3D Enamel Gel has a natural gloss finished if applied straight from the bottle but if you use a cosmetic sponge to stipple it on you can get a satin finish. For this Graffiti Art necklace I used a Square Tag bezel, Glastique Gloss Finishing Glaze and 3D Enameling Gel (Titanium White, Orange, Cobalt Turquoise, Bright Yellow, Napthol Red, Metallic Silver, Metallic Copper, Mars Black).
The new Enamel Gel is perfect for when you want just a touch of color. The tiny applicator tip on all of the Gel bottles makes it easy to apply it to any Piccolo element. With this Steampunk Gear Bezel, the Bright Yellow, Metallic Silver and Metallic Copper 3D Enameling Gels give it that perfect touch of color.Until Next Time, Safe Travels!
Globecraft Memories New Piccolo Charm line!
I have been working on so many art projects that I am lucky I had the time to take photos of them before they were sent off! I once again had the wonderful opportunity to work with Globecraft Memories as a designer/product design and development on of their new line of Piccolo charms. By now you know about the Piccolo Card Toppers and the Piccolo embellishments. They have added a new Piccolo Charm line! Steampunk gears, hearts, kitties, sea life, angels, butterflies, horses, keys and silhouettes are just a few of the new kit themes in the charm line. With each kit you can make anything from a necklaces, earrings, lapel pins, wineglass charms, curtain tiebacks, rear view mirror dangles and much more!
Like all of the Piccolo Card Toppers and the Piccolo embellishments, the Piccolo Charm line is made from a high quality chipboard. To make the charms more durable and able to handle daily wear and tear I use Glastique Flexible Finishing Glaze (Gloss) on all of the pieces to give it flexibility, strength and a enamel-like finish. The Piccolo Charm sets will be available soon at Globecraft Memories, so watch their website for product updates. I have been merrily making up product samples of this new line to be displayed at upcoming shows for Globecraft Memories, and here is a few:

This set I turned into Butterfly shoulder duster earrings. Sticker gems, stamp-pad ink and Globecraft Memories’s Piccolo Enamel Powders.

This lovely Heart lock and key set I felt would be perfect for a faux vintage necklace. Sticker gems and Globecraft Memories’s Piccolo Enamel Powders.

I love Steampunk gears and I wanted to something different with a Emerald City themed necklace and earring set. Sticker gems and Globecraft Memories’s Piccolo Enamel Powders.

The Sea-life set is perfect for Summer and I put a textured heavy coat of Glastique on this piece to mimic the look of water. Acrylic paint and Globecraft Memories’s Piccolo Enamel Powders.

Another lovely Steampunk gears kit that I turned into a lapel pin. Acrylic paint, sticker gems, stamp-pad ink and Globecraft Memories’s Piccolo Enamel Powders.

The Silhouette set I made into a hostess gift set, with a wine bottle tag, matching hostess necklace and wine glass charms. Barbie meets Girls Night! Sticker gems and Globecraft Memories’s Piccolo Enamel Powders.

One of the many lovely Flourish sets, I wanted to try a faux vintage look with copper highlighting the amazing detail in the flourishes. Acrylic paint and Globecraft Memories’s Piccolo Enamel Powders.

They have so many butterfly sets, though this set is one of my favorites since it lends so well to faux enamel. Sticker gems and Globecraft Memories’s Piccolo Enamel Powders.
Untill next time, Safe Travels!

Ancient and Contemporary Inspired Artistry
