A December Crafting Recap!
December has come and gone so quickly! The holidays have been a whirlwind of making gifts, food, festive events and cold windy weather. With many shows and special events not only in December, but upcoming in 2016 it has been an ongoing artistic adventure. While some of the art projects I have been working on have yet to be displayed, I wanted to share some of my projects already showcased before the New Year started.
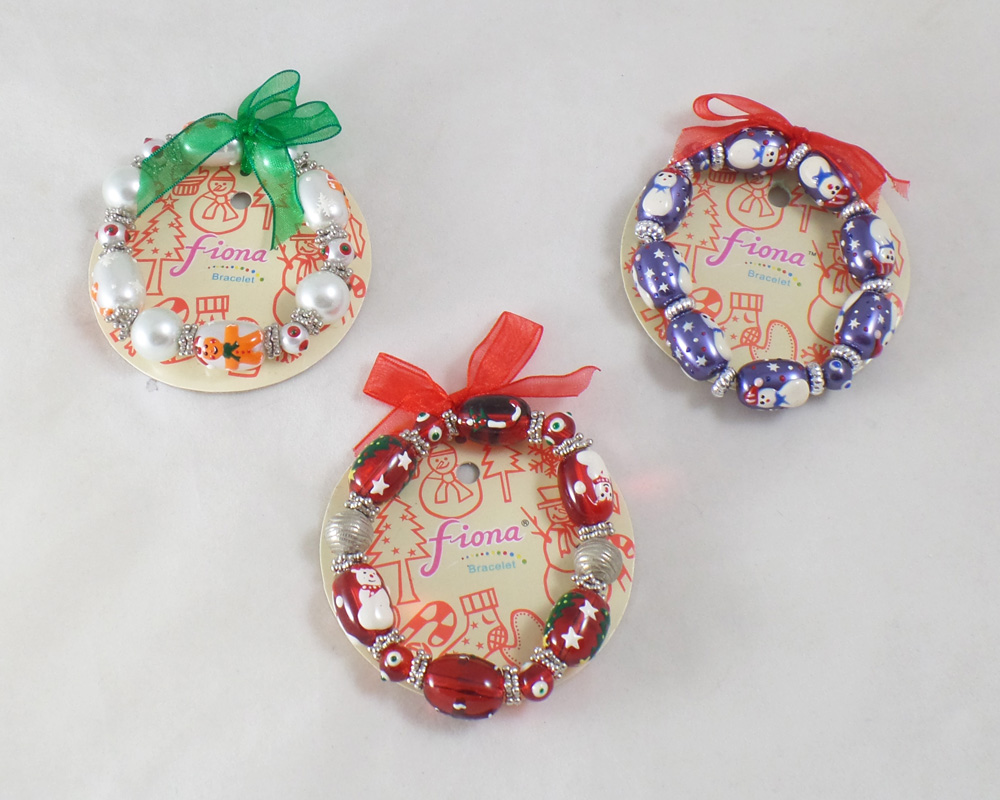
As I have noted in the past I have a serious love for Fiona Accessories beads. Along with their jewelry supplies they also make hand painted beaded bracelets for many holidays and seasons. I had gotten a few of their cute Winter holiday themed bracelets just for fun. While the bracelets are beautiful as is, I got the idea to turn them into earrings.
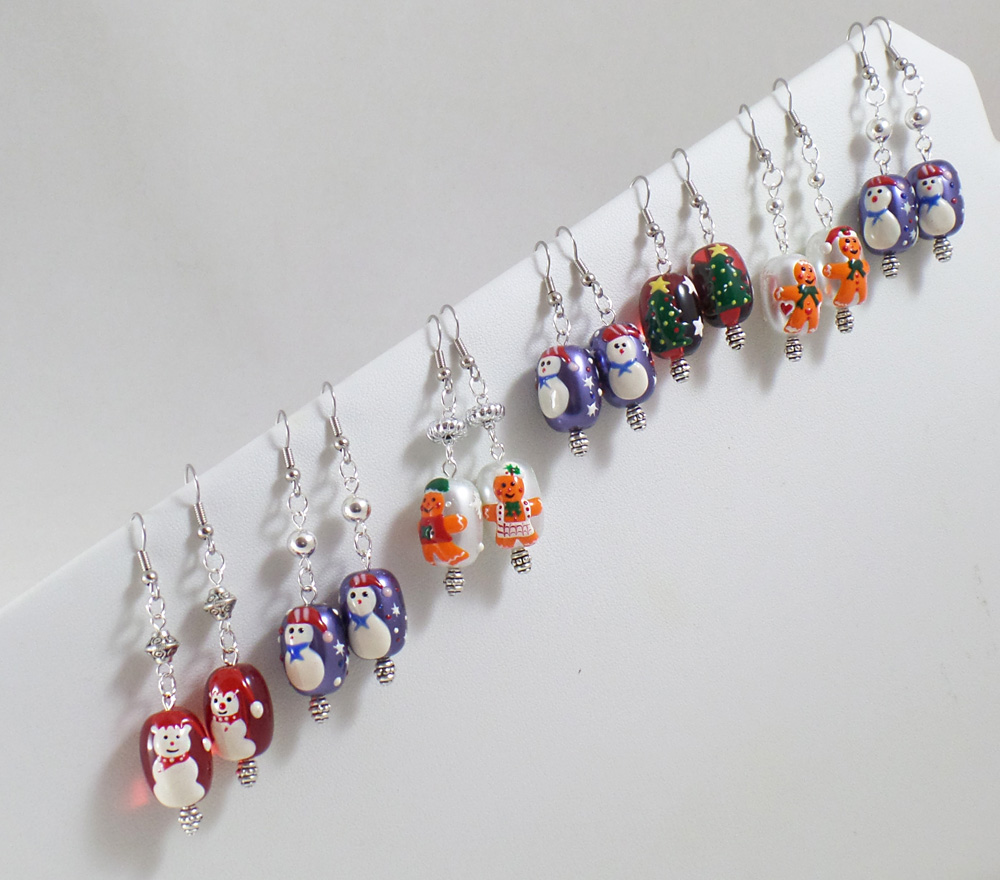
With the addition of silver spacer beads, earring wires and decorative head pins I was able to create festive earring sets and still have many beads left over for other projects.
With the help of using Amazing Casting Products Clear Cast Resin, Fiona Accessories beads and papercrafting supplies I created a series of handmade jewelry. You can check out the tutorial to make your own HERE.

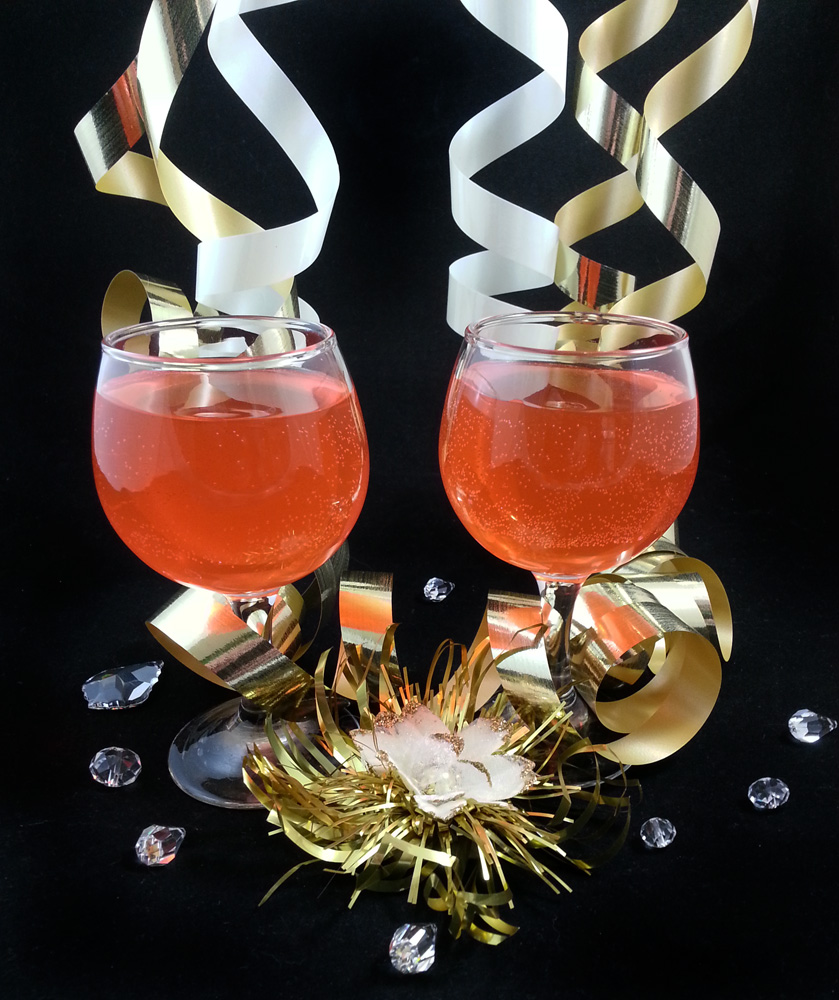
A local SoCal High Desert historic site, The Antelope Valley Indian Museum, held a Holidays on the Homestead event in December. The historic grounds were decorated in vintage holiday style with live acoustic music around a campfire, a chili cook-off, tours of the grounds, and a handcrafted country craft boutique! With all the jewelry I had been making it made perfect sense to get a booth in the craft boutique. Even though it was a chilly night, I sold many pieces of jewelry and loved being in a hall surrounded by art.

Hope you take Amber’s suggestion of staying warm and happy this Winter. Wishing you all a Happy and Healthy New Year!
Until Next Time, Safe Travels!
An Artistic Halloween Haunting Recap!
Welcome to my Artistic Halloween Haunting Recap! The month of October and all of the Halloween goodness flew by so fast, but I wanted to share some of my ghoulish crafting fun before Halloween is just a faint promise of next year.

Using some wonderful chains, crystals and beads from Fiona Accessories I created this jewelry assemble for my spellbinding costume of a Gothic witch. The sterling silver snake pendant was hand crafted in Nepal and really played well with the raven skull I had bought recently.
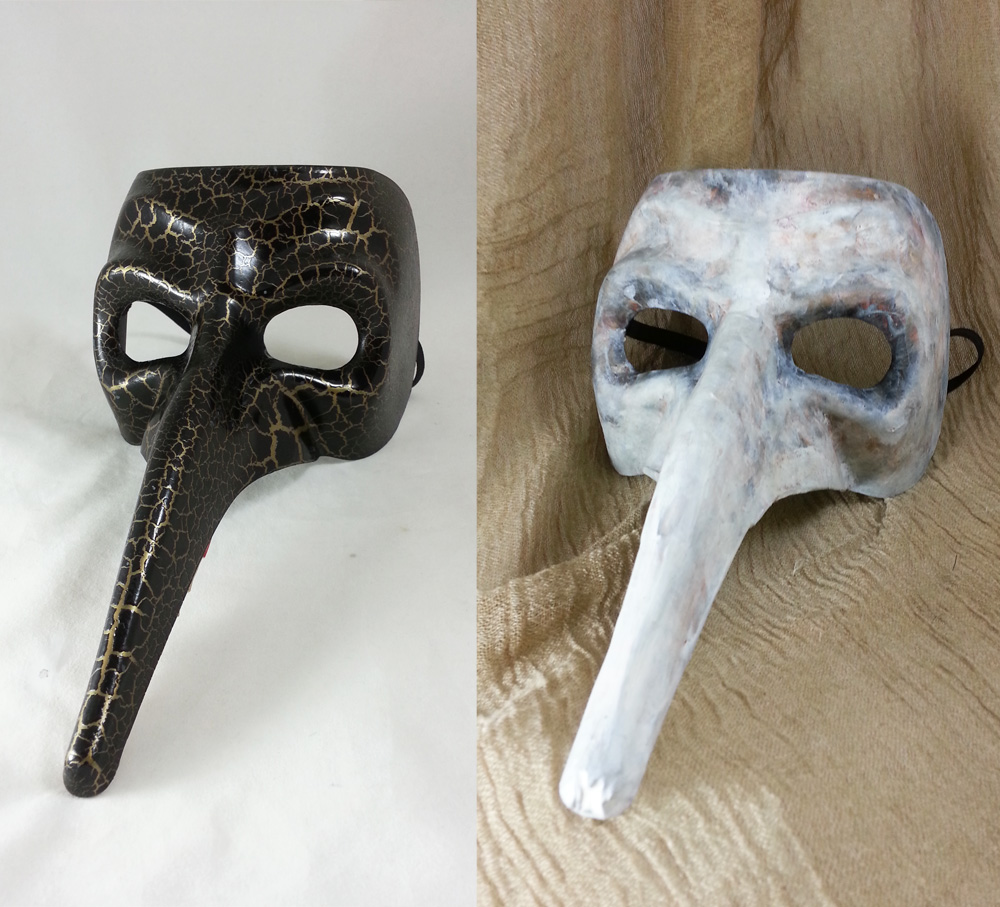
I transformed this plastic Italian Carnival mask into a Plague Doctor mask using paper mache, paint and Liquitex Matte Varnish. However I wasn’t finished there and created the rest of the look:

With the addition of a black heavy weight line robe, hood, gloves, hat and walking stick it made a perfectly frightening Plague Doctor costume for my husband.
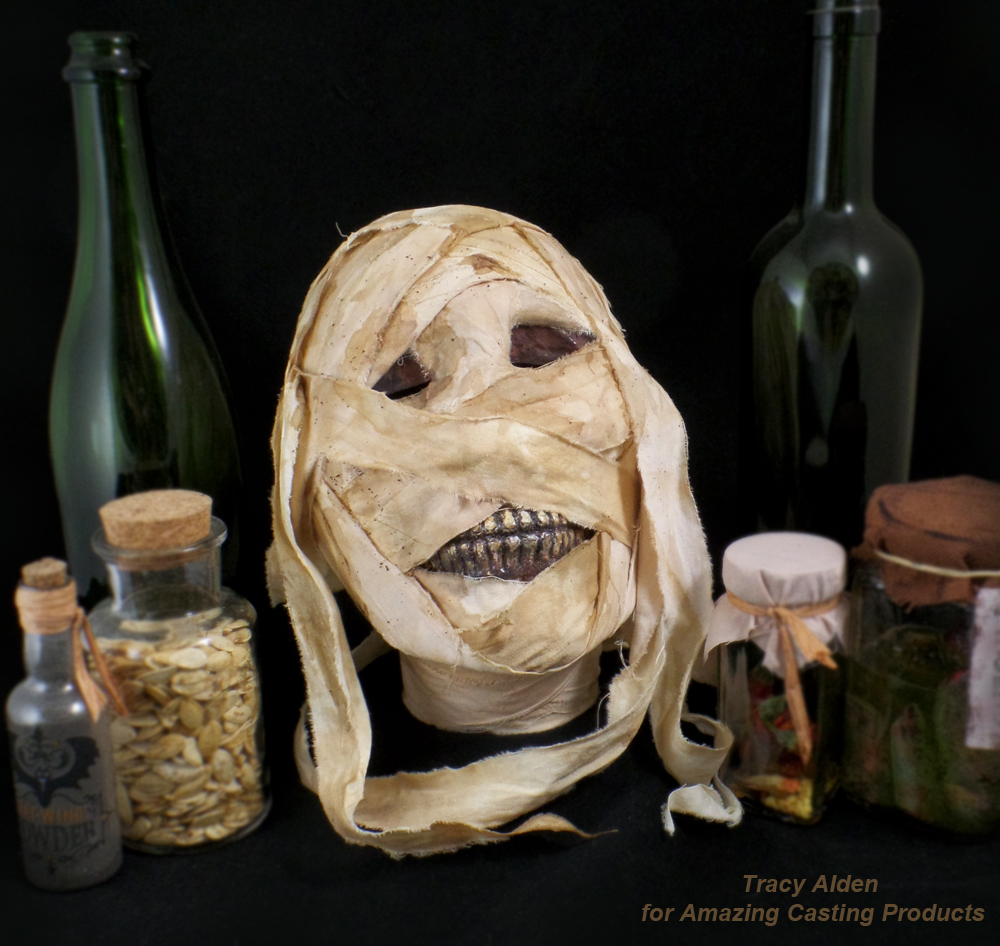
I created a replica mummy head using a plastic Halloween skull and the help of Amazing Casting Products. Clicj HERE for this Upcycled Mummy’s Curse!
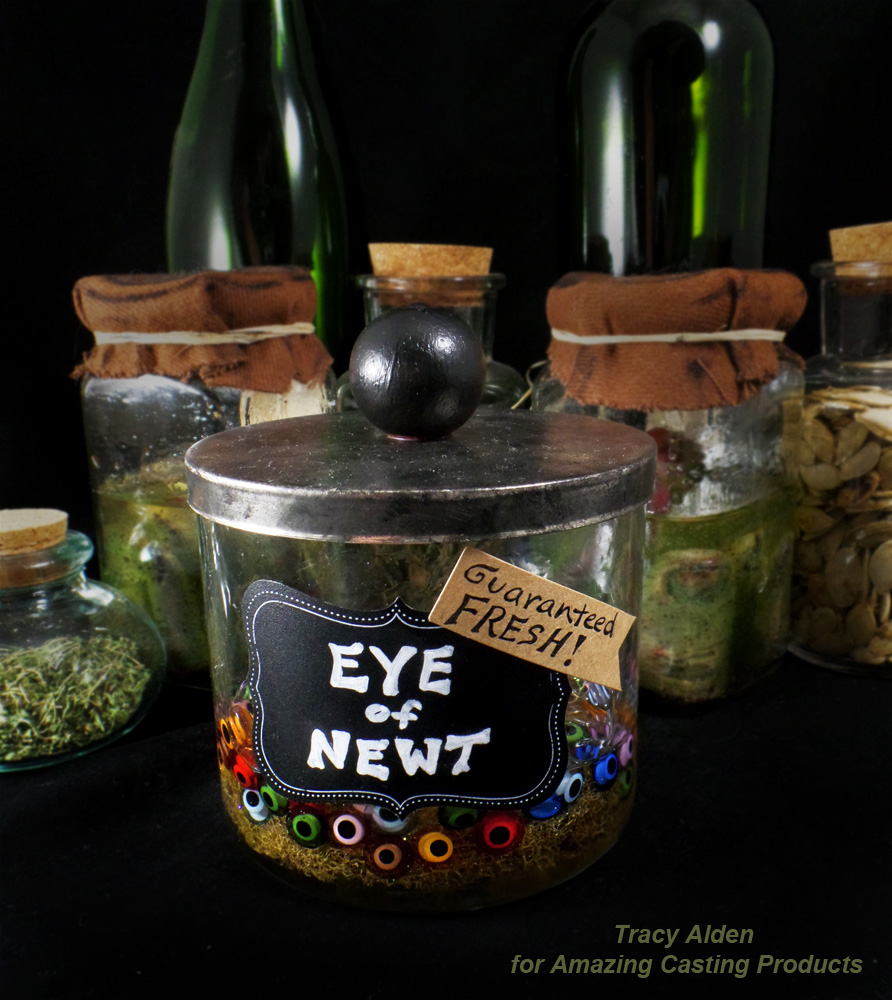
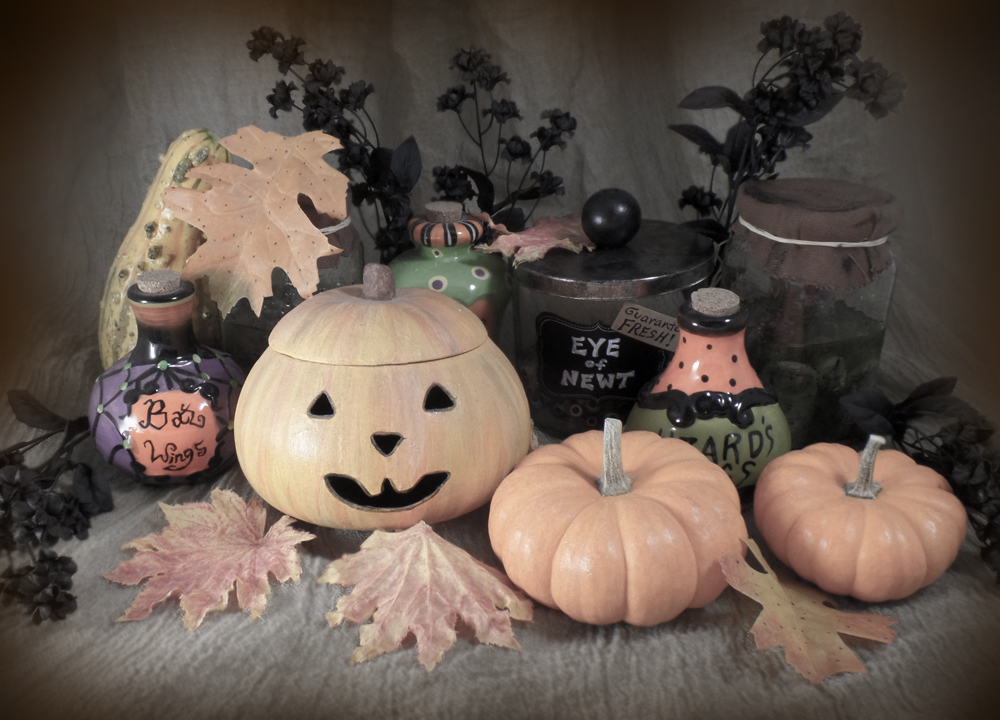
Taking inspiration from one of William Shakespeare’s most famous plays, Macbeth, I created a Eye of Newt Apothecary Jar, spooky enough to keep any monster happy!
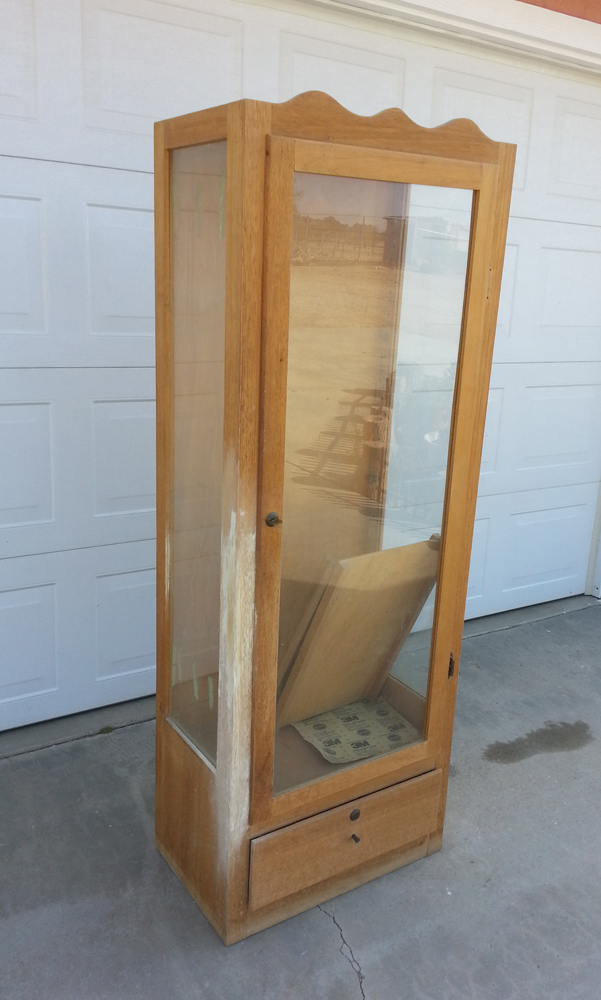
Last but not least my husband and I finally took the time to refinish a old cabinet that had been in the family longer than me. After patching, sanding, staining and varnish it was ready to become a Halloween curio cabinet!
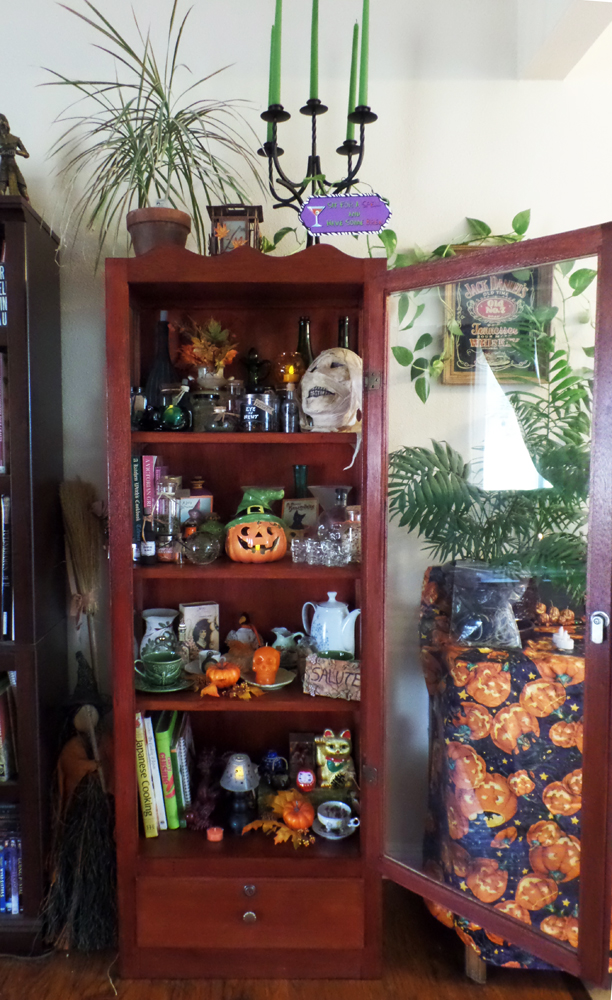
Not bad for our first attempt at giving new life to an old piece. Once filled with fun holiday decor it made a perfectly frightening Halloween decoration. With Halloween gone and past now I can fill it with with antiques and little curios befitting of Fall.Now to start on art projects for Fall and the coming Winter!
Until Next Time, Safe Travels!
A Crafty Halloween Throwback Thursday
Welcome to my Halloween Throwback Thursday! Halloween as I have often noted is one of my favorite holidays, I just love making all kinds of spooky and fun art. This week I was able to start unpacking all of my plastic tote bins filled to brim with ghoulish decor. I was reminded of my Halloween projects I have created for Amazing Casting Products and I wanted to share a few of my favorites!

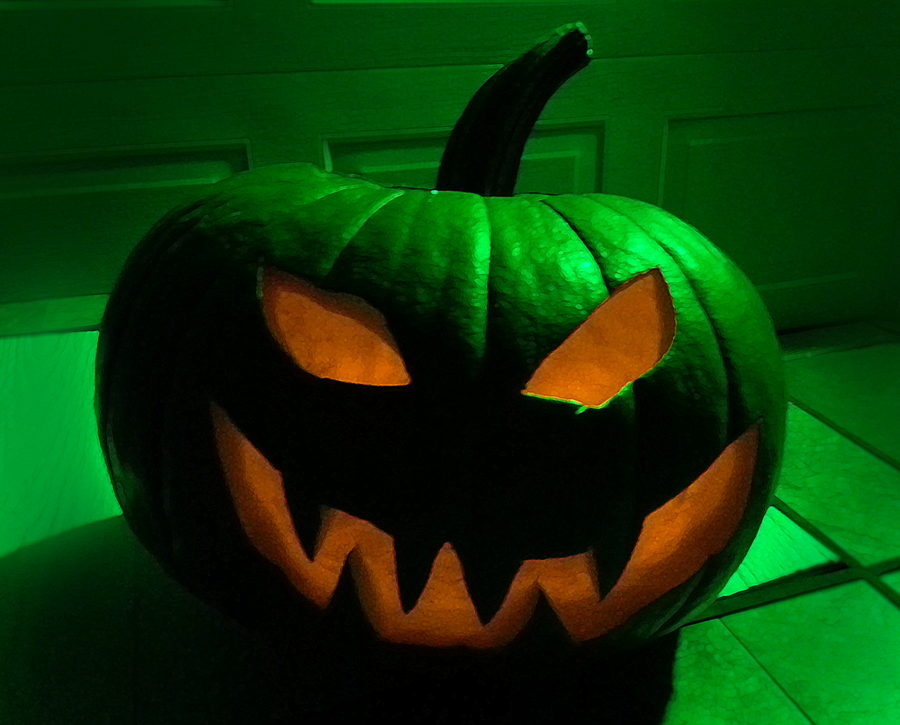
How to enhance a Pumpkin’s Smile with resin teeth using Amazing Casting Resin and Mold Putty.
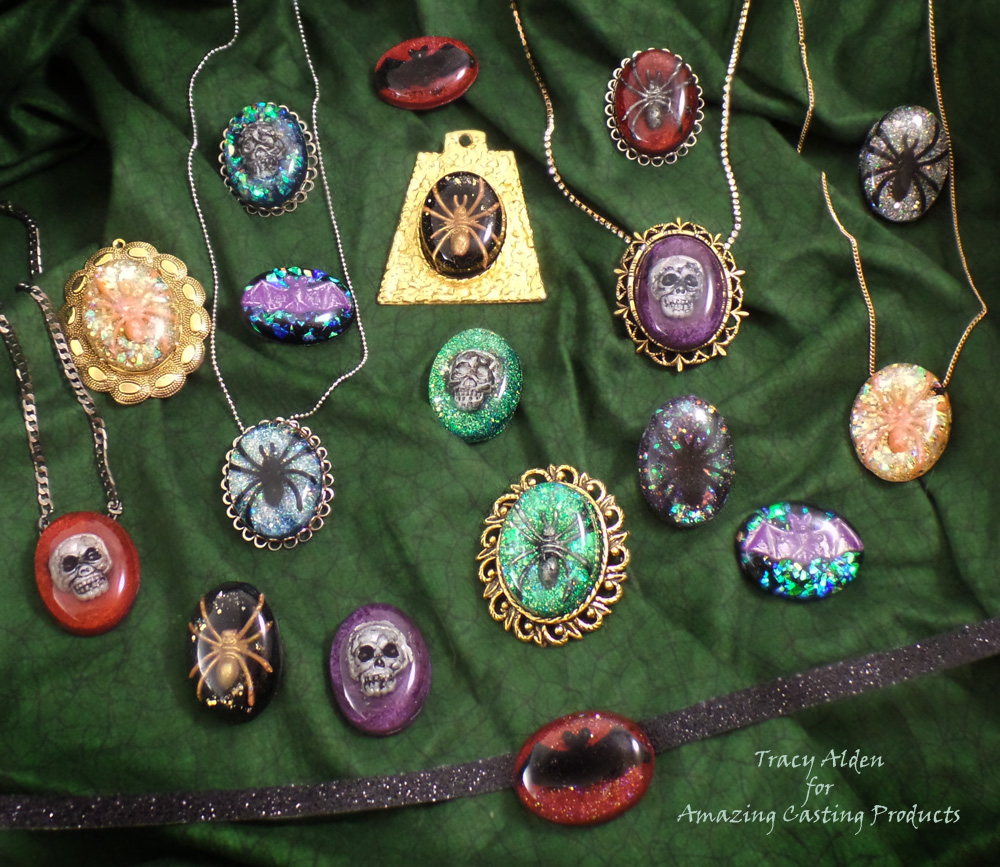
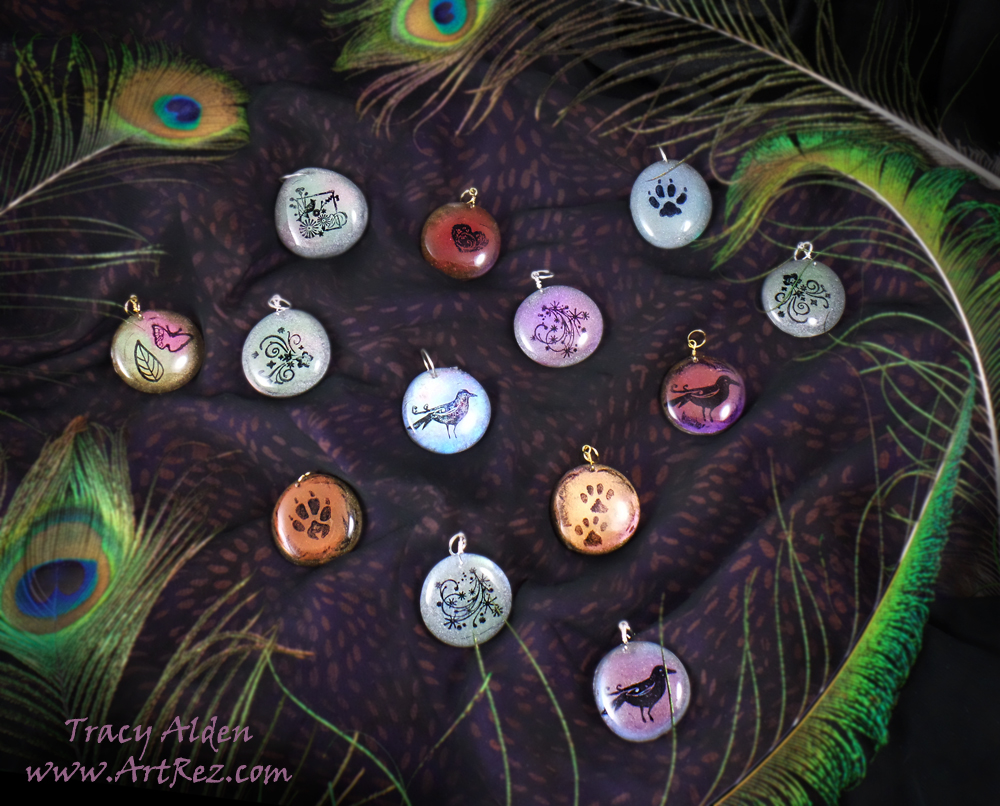
How to make Halloween party favors go from groan to glam with Resin Cabochons made with Amazing Clear Cast.
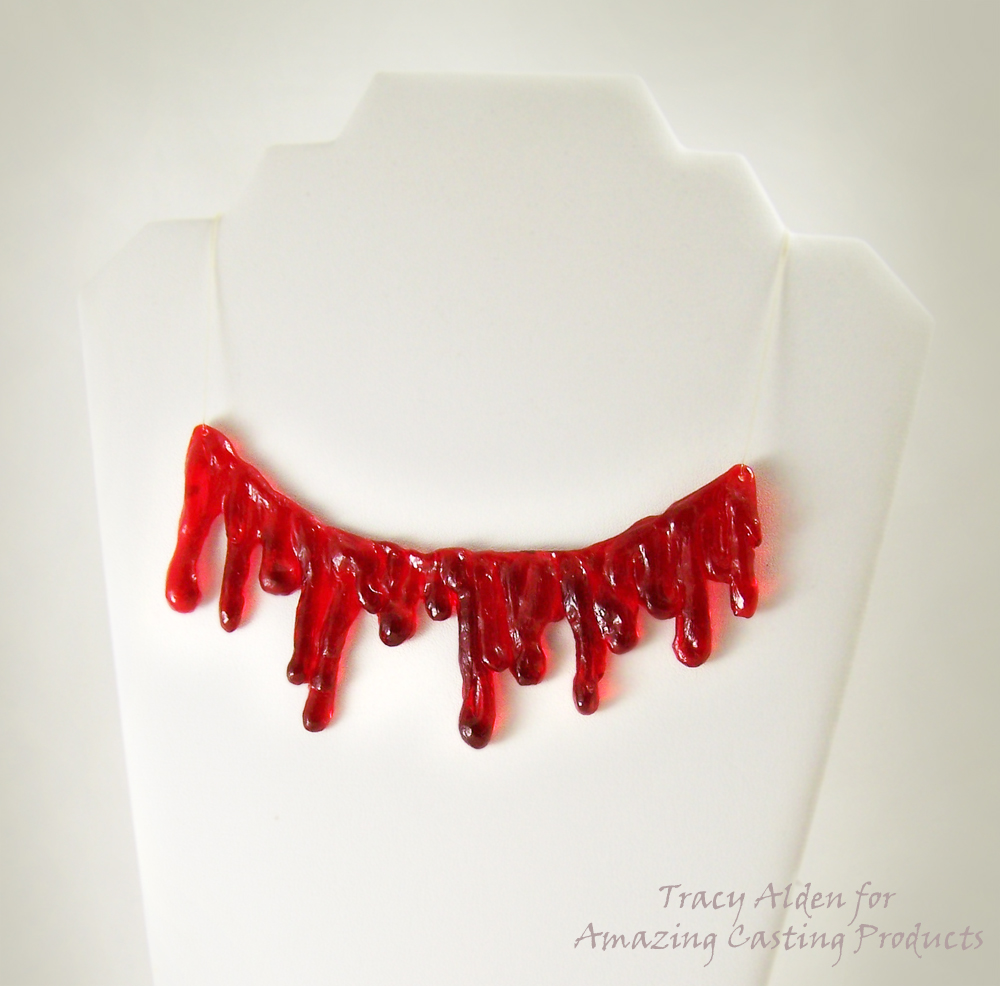
Running out of time on what Halloween costume to wear…. take a look at a Resin Blood Drip Necklace using Amazing Mold Rubber.
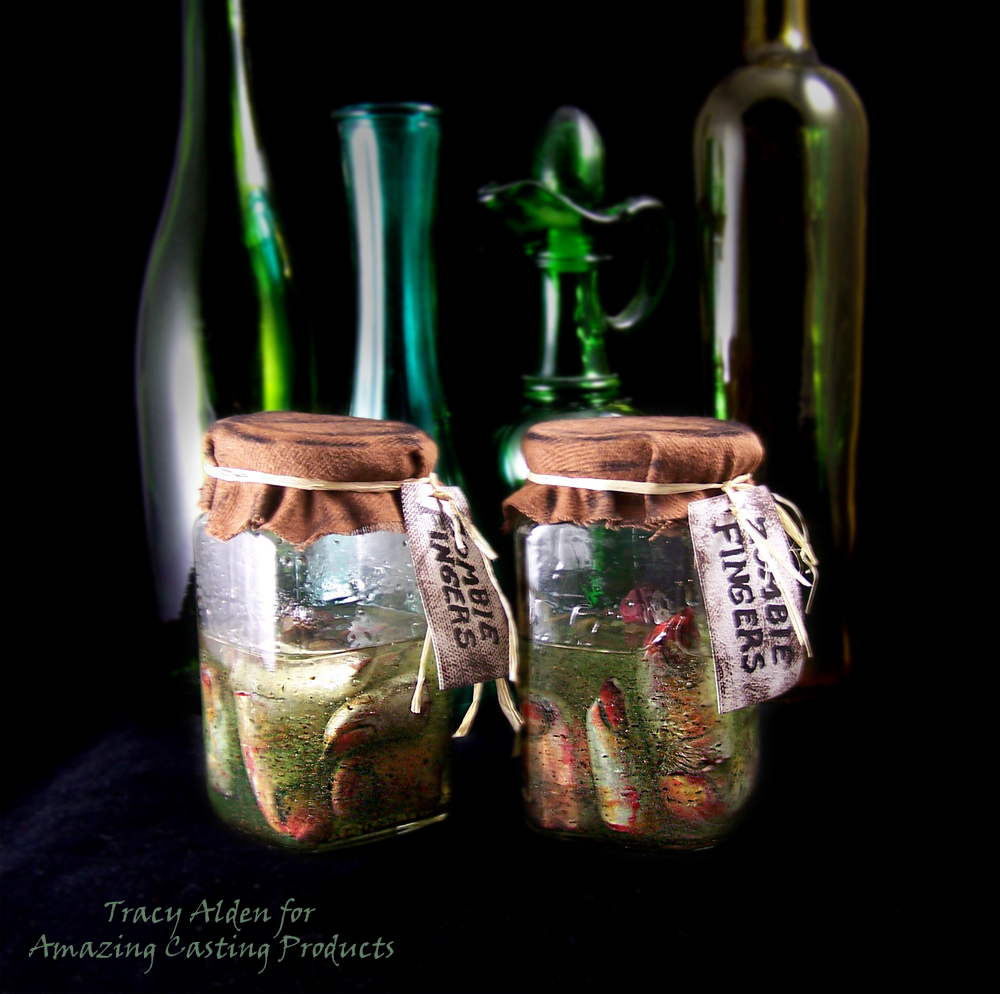
Need that perfect addition to a spooky apothecary? Try you hand at a upcycled Zombie Finger Apothecary Jar using Amazing Casting Products.
I hope sharing some of these projects has you mind a whirl with some Halloween craft project inspiration!
Until Next Time, Safe Travels!
Metallic Resin Charm Necklaces
Sometimes inspiration for my craft projects is right in front of me, and surely this was one of those cases. I collect all kinds of little stones, trinkets and pieces of glass and often put them on display around the house in eclectic little assortments. I noticed the larger decorative glass pebbles I have, that can be found at most craft stores, have wonderful little round shapes that make me think of shapes of charms and pendants. I knew Amazing Remelt would make not only quick but glass-smooth molds and Amazing Clear Cast would be perfect to pour into the molds to create the charms, so off I went looking for my supplies!Supplies:
Amazing Remelt
Amazing Clear Cast
Alumidust
Alumilite Metallic Powder
StazOn Ink
Stir Sticks
Mini Stamps
Decorative Glass Pieces
Small Hand Drill
Ribbons, Cording and Metal Wire
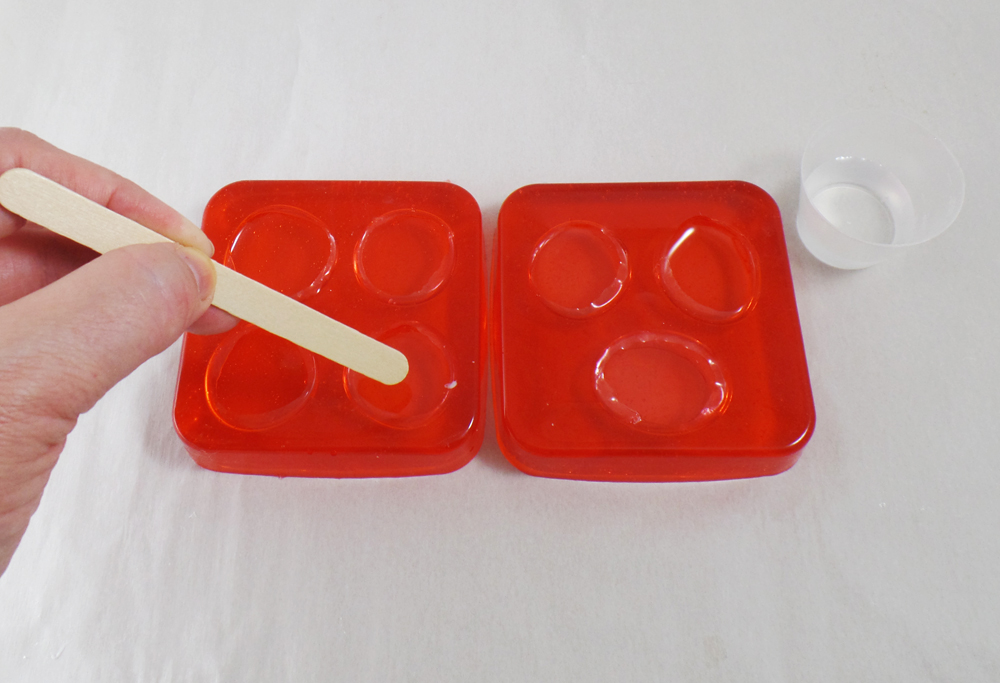
I started off with removing several blocks of Amazing Remelt from their containers. They are easy to remove by running a stir stick around the edges and gently lifting the Amazing Remelt from the container.
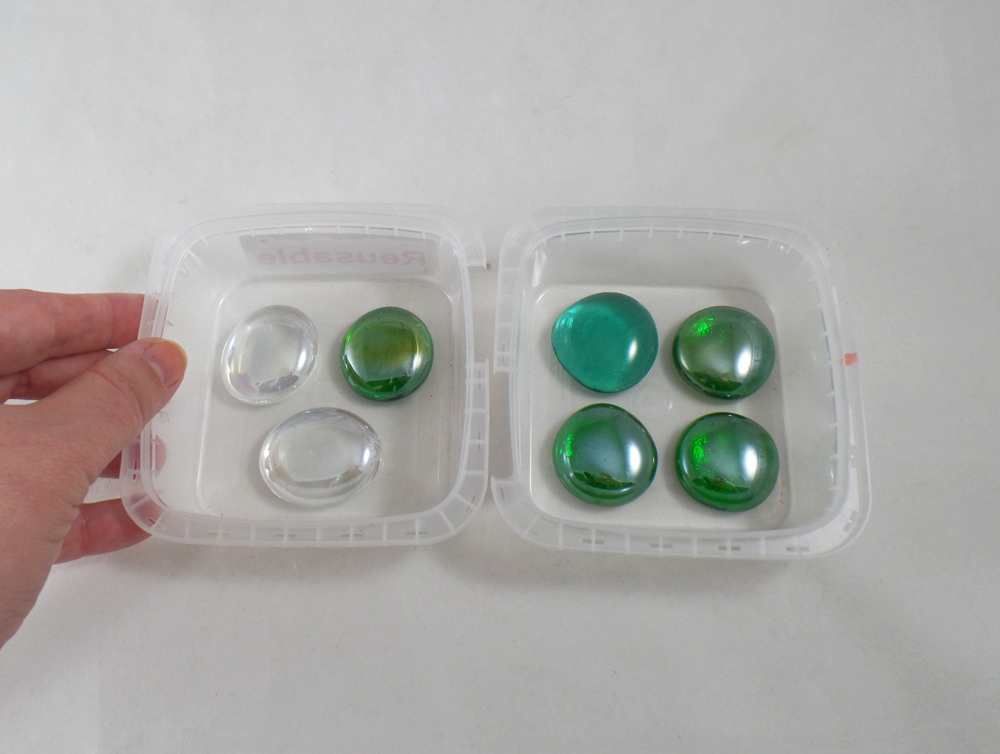
The Amazing Remelt containers acted as my mold boxes and I placed the glass pieces in the containers, making sure to leave some space between each piece so the mold will have separate spaces for each piece. You do not need to use an mold release on these pieces as they are smooth and non-porous.
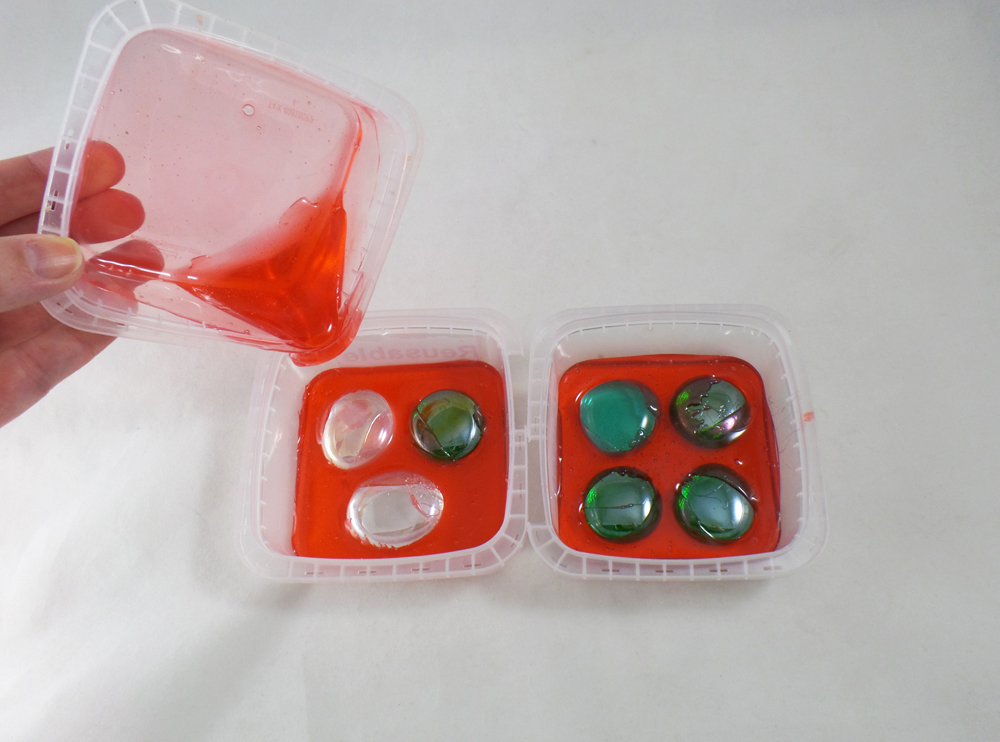
I heated one half of a Amazing Remelt brick in the microwave until liquid, in one of the containers it came in. I poured the heated Remelt in the two containers holding the glass pieces, but only a thin enough layer to cover the bottom and a bit of the sides of the glass. This layer acts as an anchor for the pieces without having to glue the glass in place, I let this layer cool completely.
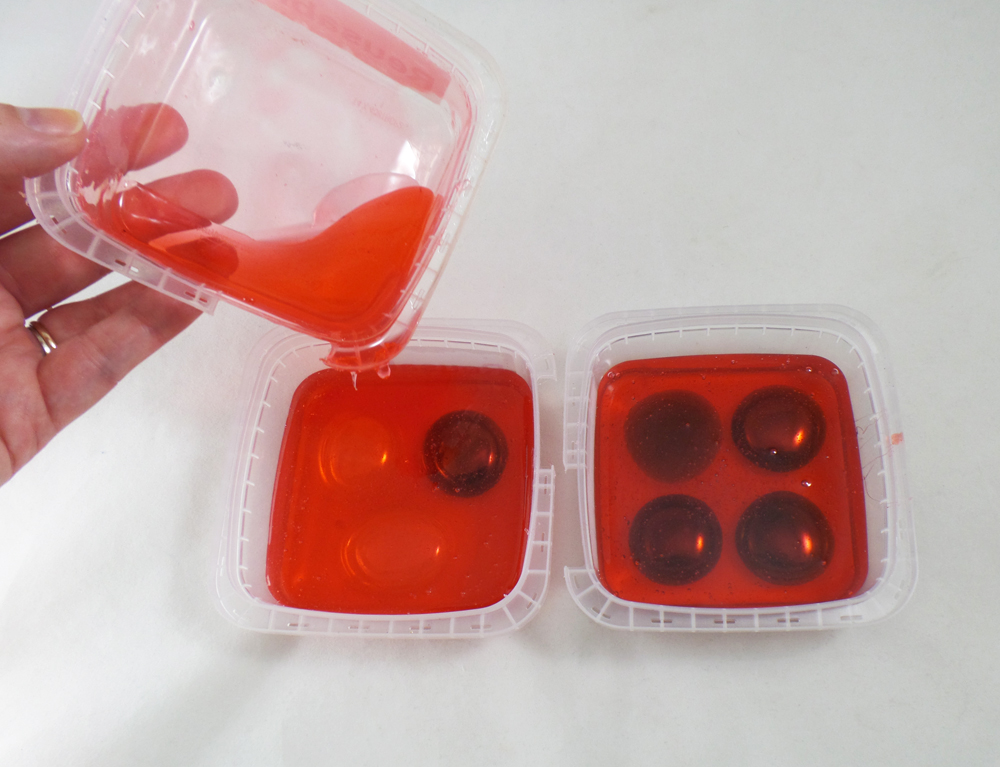
The second pour of Amazing Remelt I covered the glass pieces completely and let them cool to finish the molds.
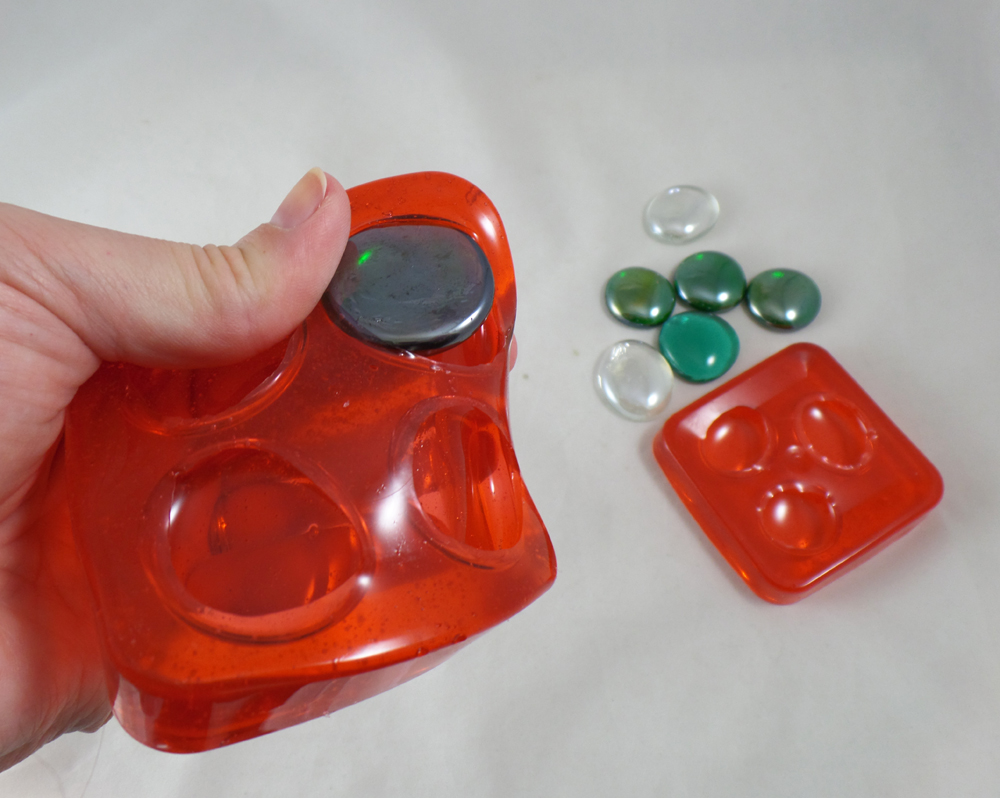
Once the molds were cool and no longer tacky I carefully removed them from the containers and flexed the molds until the glass pieces popped out.
I mixed up a small batch of Amazing Clear Cast and filled each round in the mold halfway and let it cure to a hard yet somewhat tacky state.
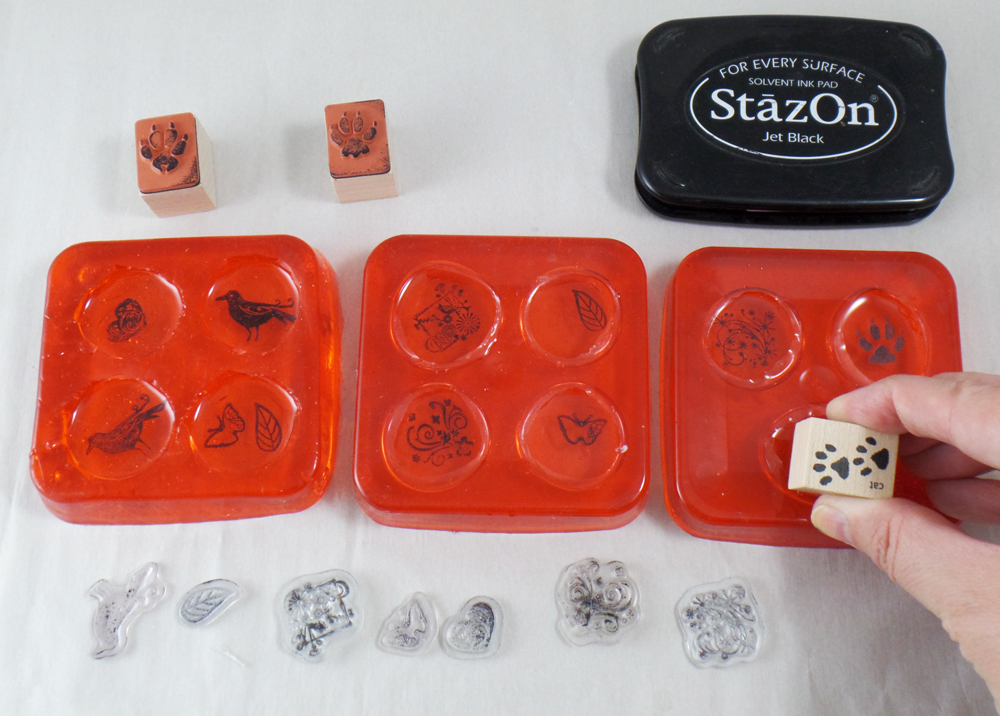
I then carefully inked and stamped little stamps with StazOn Ink into the tacky resin. The tacky state of the resin prevents the stamp from sliding and “grabs” onto the stamp, making sure I got a good stamped image.
*Pick your favorite stamps! As long as the stamp can fit the mold opening you can use any number of stamp images.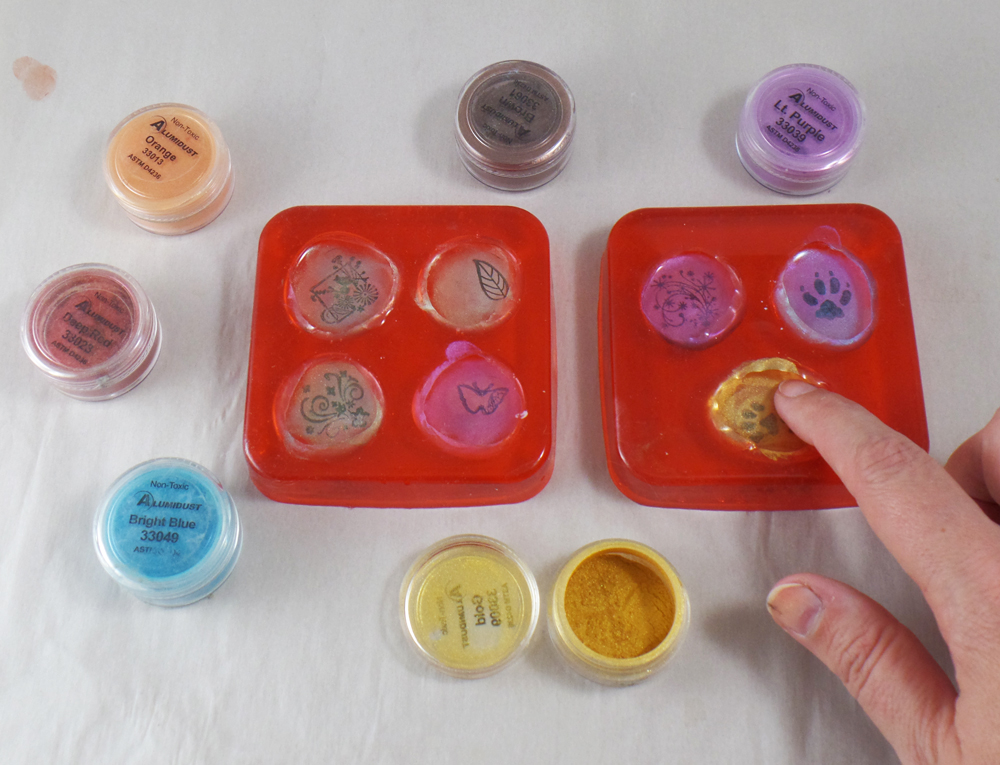
I rubbed Alumidust, in several different colors on the first layer of resin that was now stamped. Just like with the stamps there is no rhyme or reason to the color choices, just have fun with all the Alumidust colors!
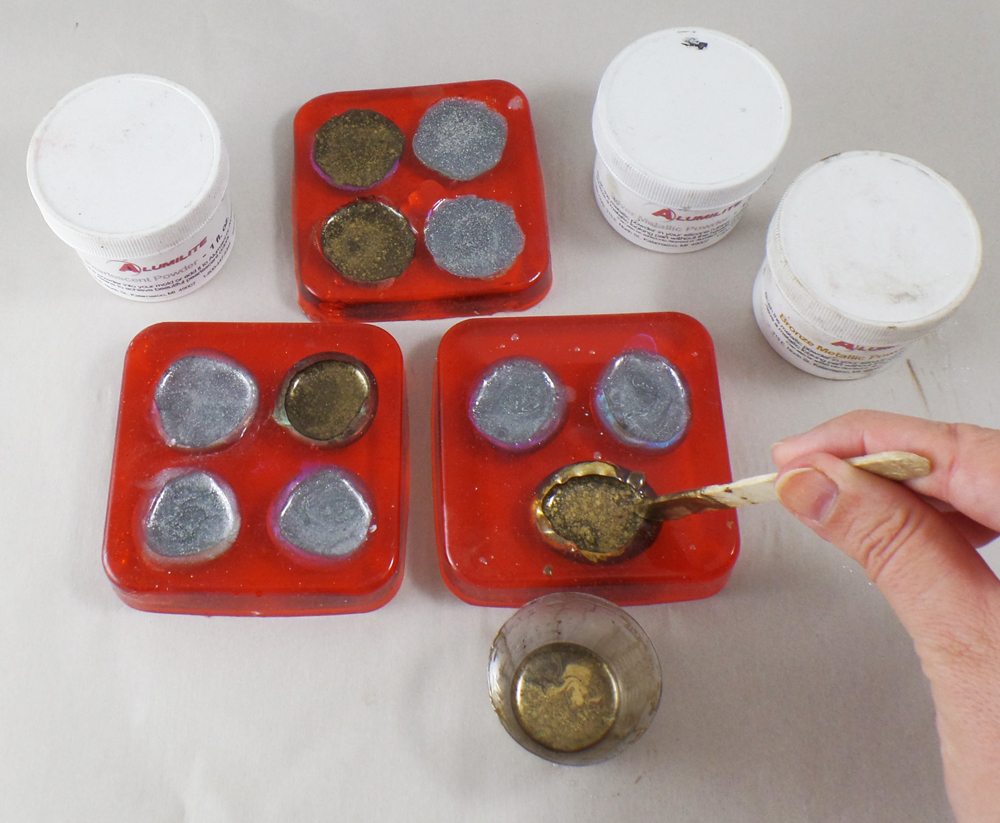
I mixed up two batches of Amazing Clear Cast mixed with Alumilite Metallic Powder, one silver and one bronze, and poured it in the molds as a second layer. I let it cure overnight.
* If you live in an high humidity area you might notice the when you pop out the resin pieces the next day they will be hard but slightly tacky. Just remove them from the molds and place them on parchment paper and wait for the resin to completely harden outside of the molds.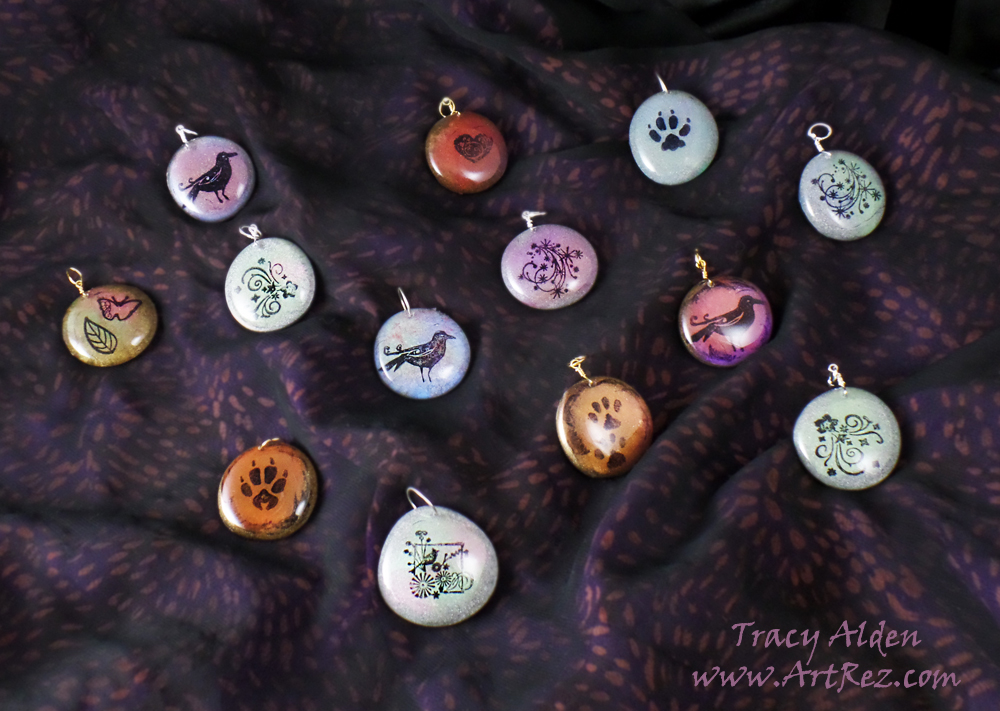
Once all of the pieces were fully cured, I carefully sanded any uneven edges and drilled holes with a hand drill. I scrubbed them clean and threaded jewelry wire and jump rings through the drilled holes. Now they are ready for ribbons, thread or chain!
Want to see more of Amazing Casting Products tutorials and inspiration? Hop on over to their Blog to see all kinds of Amazing Artists’ Designs!Until Next Time, Safe Travels!Faux Ancient Egyptian Pendants

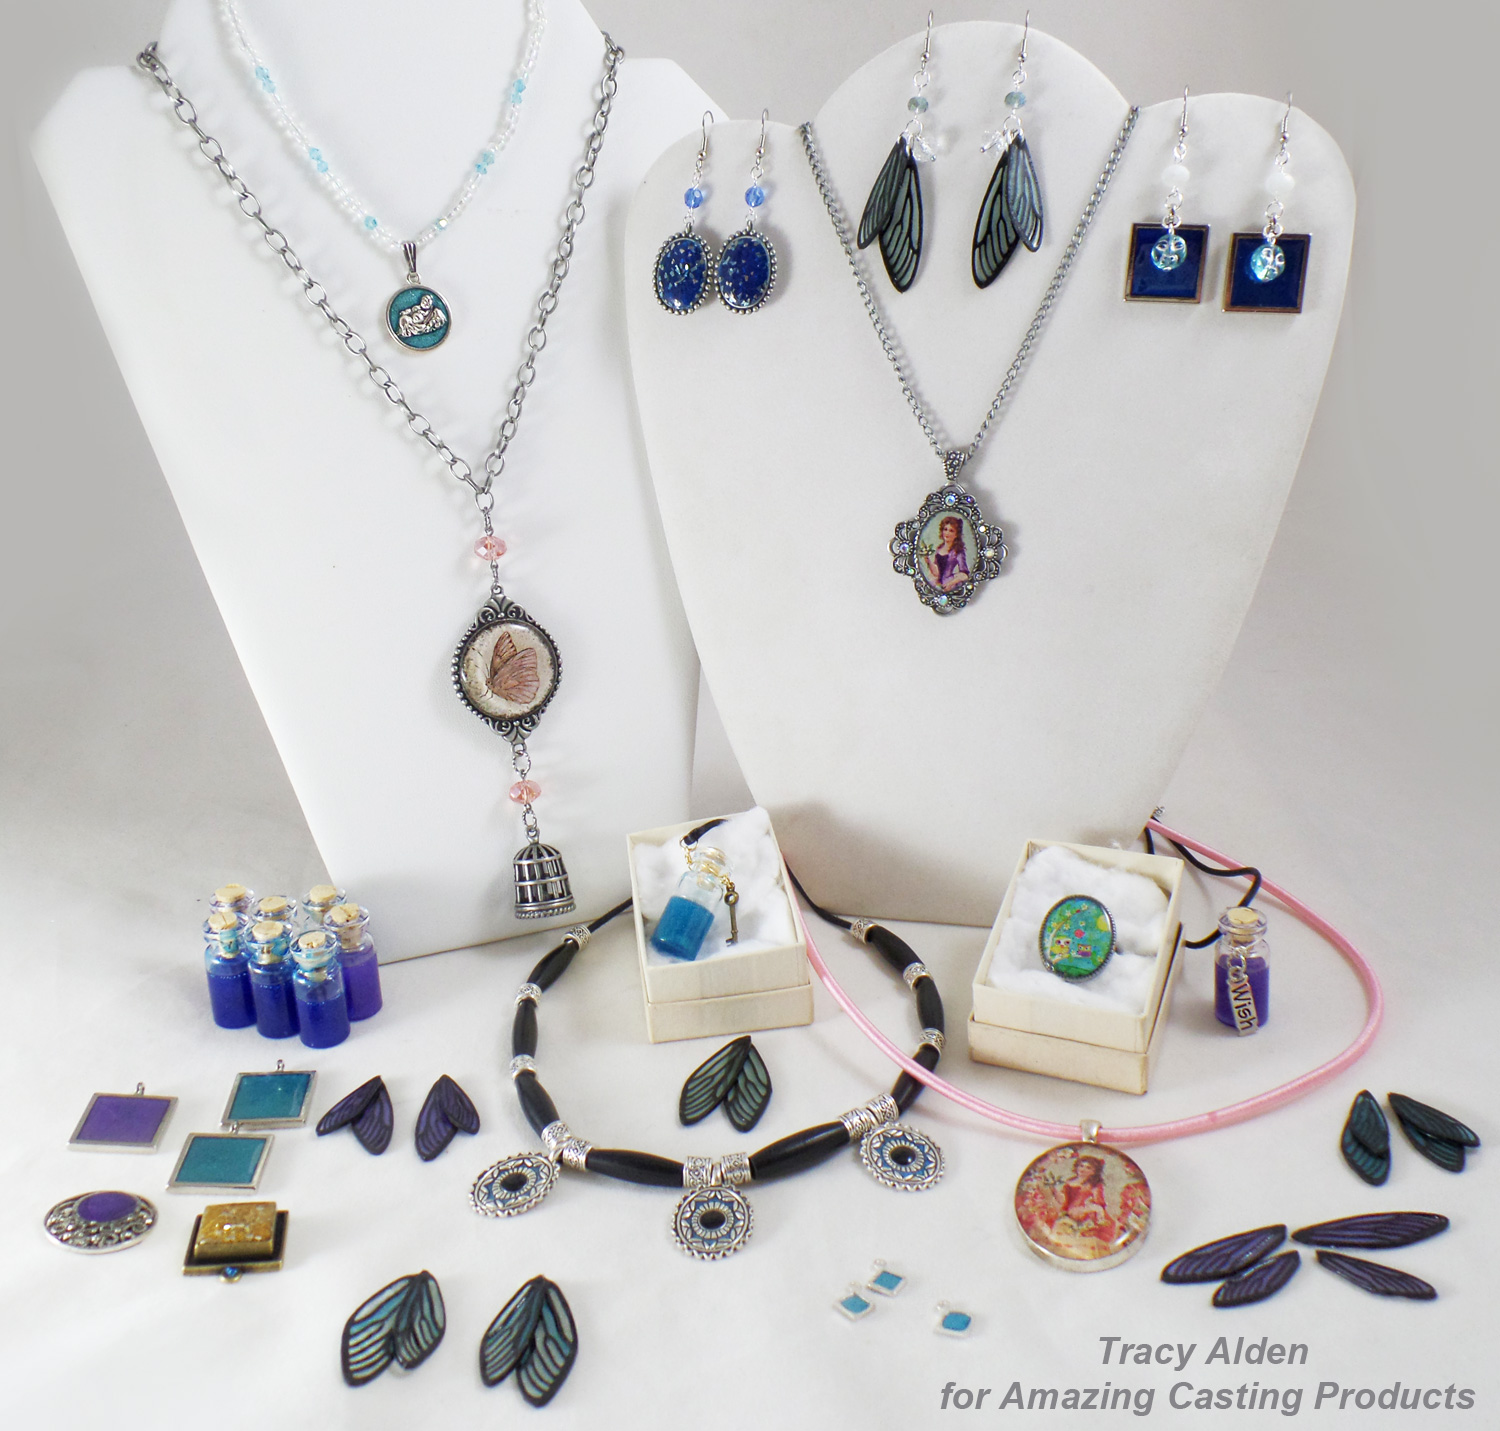
One of my favorite pastimes is to go visit museums and flip through books with ancient jewelry collections. The ingenuity, craftsmanship and raw talent in ancient work is a true inspiration.
One of those ancient testaments to ingenuity is Ancient Egyptian Faience, known as the world’s oldest known form of glazed ceramic and a precursor to the earliest forms of glass making. While it shares the name faience with the tin-glazed pottery associated with Faenza in northern Italy, it is not true faience. Ancient Egyptian Faience is not made of clay at all but type of frit, a mixture of sand, quartz, silica, calcite lime and a mixture of alkalis. To the ancient Egyptians, it was known was known as “tjehnet” which means brilliant or dazzling. Often crafted into beads, pendants, figures, tiles and other small objects, using push molds or sculpted by hand, then heated to create lovely glazed pieces of art. It was used as a imitation of semi precious stones, such as lapis lazuli and turquoise, though many colors could be achieved by changing some of the ingredients of the frit mixture.
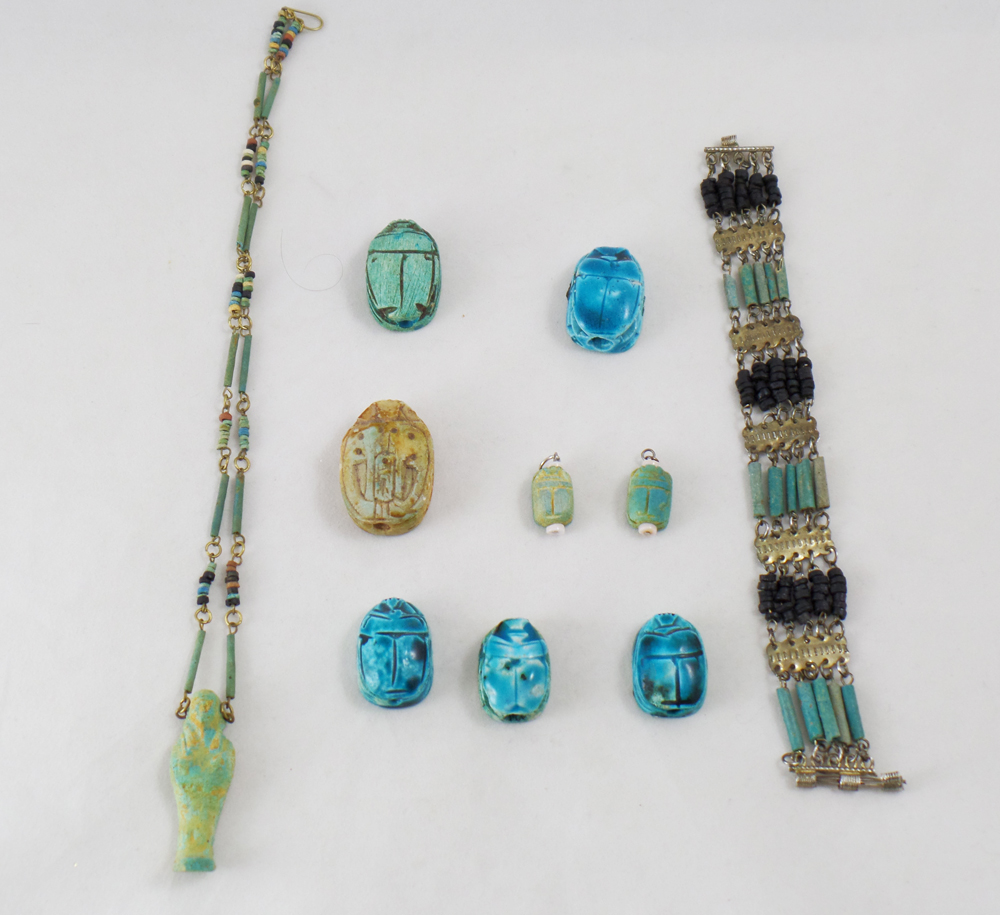
I wondered, how I could make something that looked like Ancient Egyptian Faience but without the need of a kiln? Using real Egyptian Faience as my model, such as those in the above photo, gave me a good idea of what colors and textures I wanted to match. While it is very easy to create the shapes out of any number of air dry and oven bake clays, the glazed appearance of much of the Ancient Egyptian Faience was going to be tricky. I got to thinking how Amazing Casting Products’s Amazing Clear Cast Resin on top of polymer clay could appear like a glaze and more akin to the lovely ancient work.
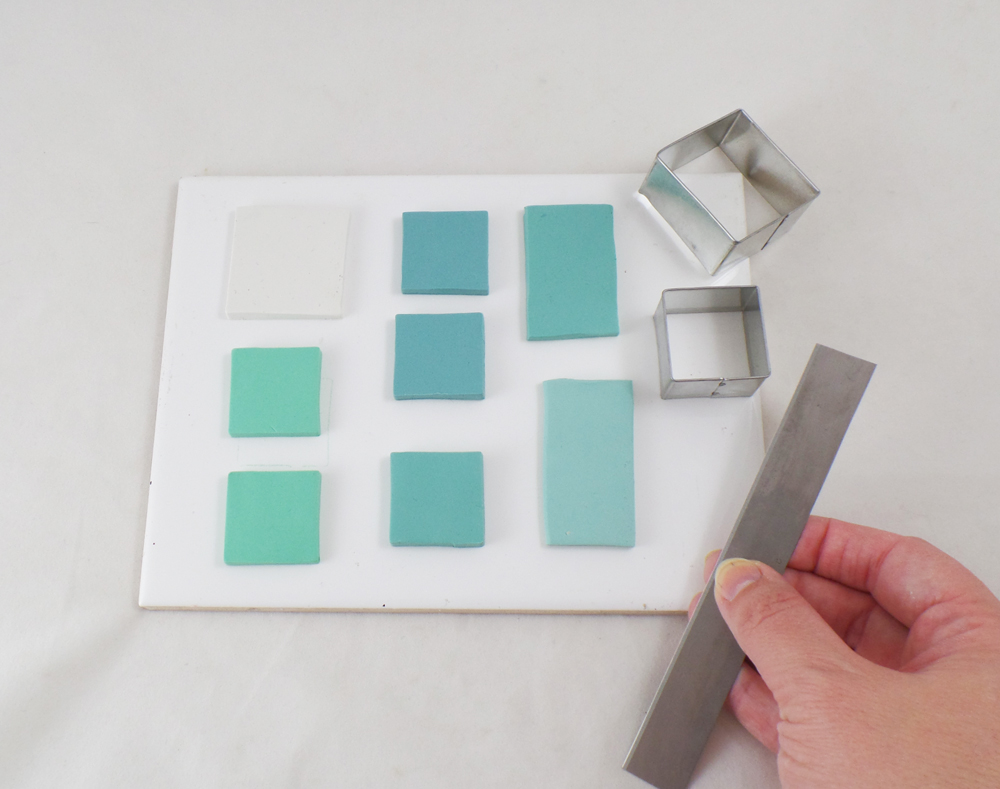
I started with conditioned polymer clay, in the color tones of blues and greens, betting that a base color of those hues would give me the best results. I also conditioned a piece of white polymer clay as a color test. I then cut all pieces into sizes and shapes good for pendents.
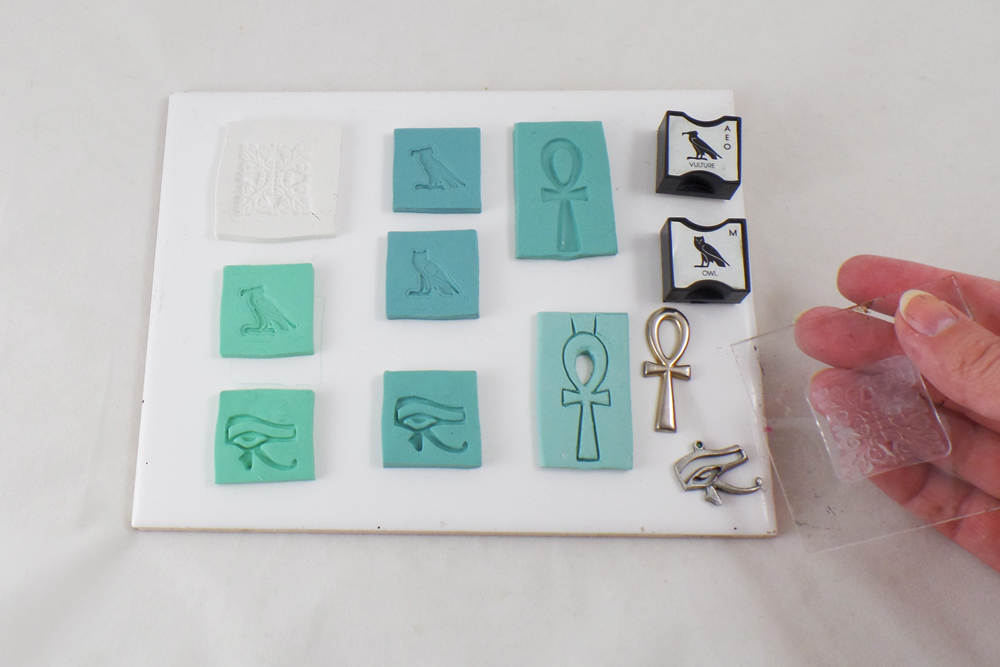
I went through my collection of stamps and charms, picking ones that were Egyptian themed. I sprayed the object to be pressed in the clay with water to act as a stamp release from the clay and pressed firmly into the clay.
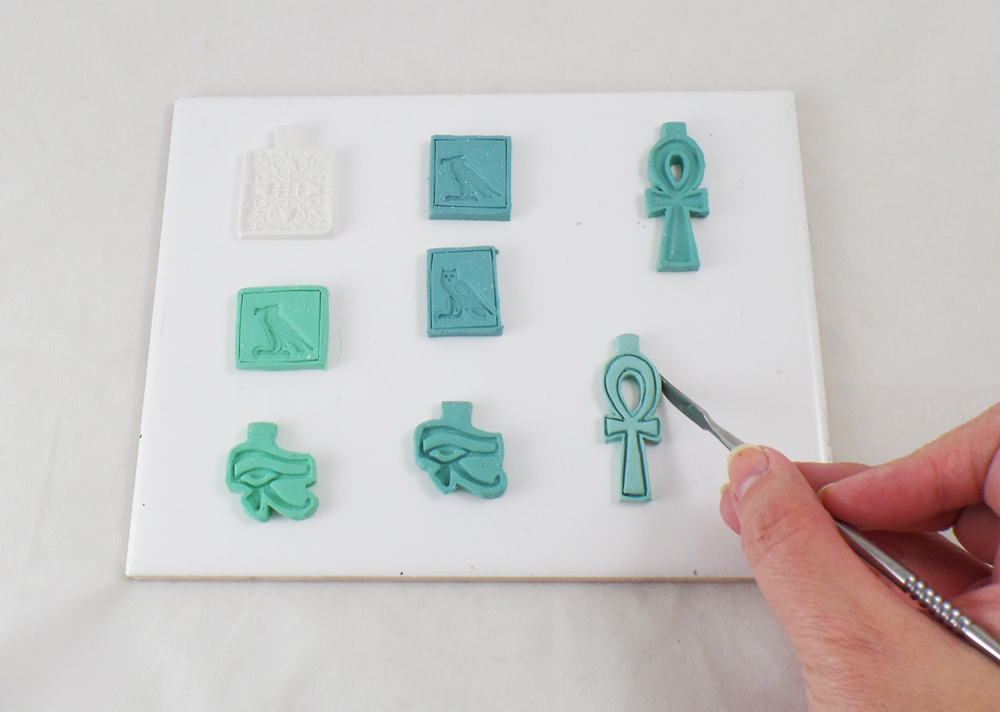
I trimmed the pieces of clay close to the stamped images, smoothing edges and defining details of the stamped images.
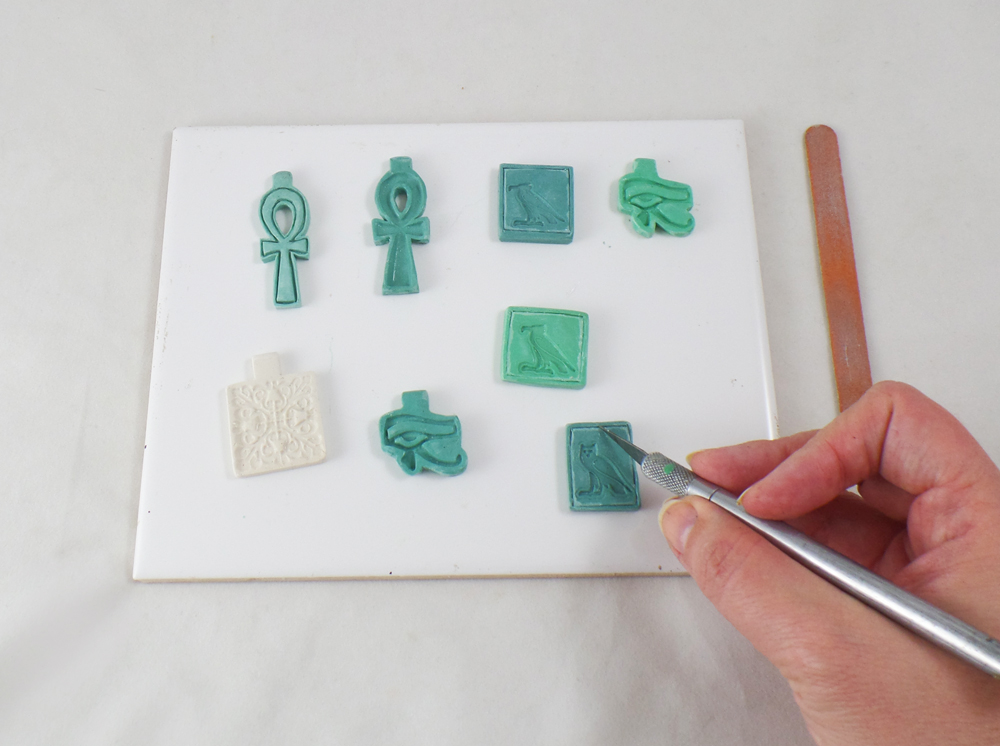
After curing the polymer clay by manufacturer’s instructions, and once the pieces were cool, I trimmed off any rough edges on the clay pieces with a craft knife.
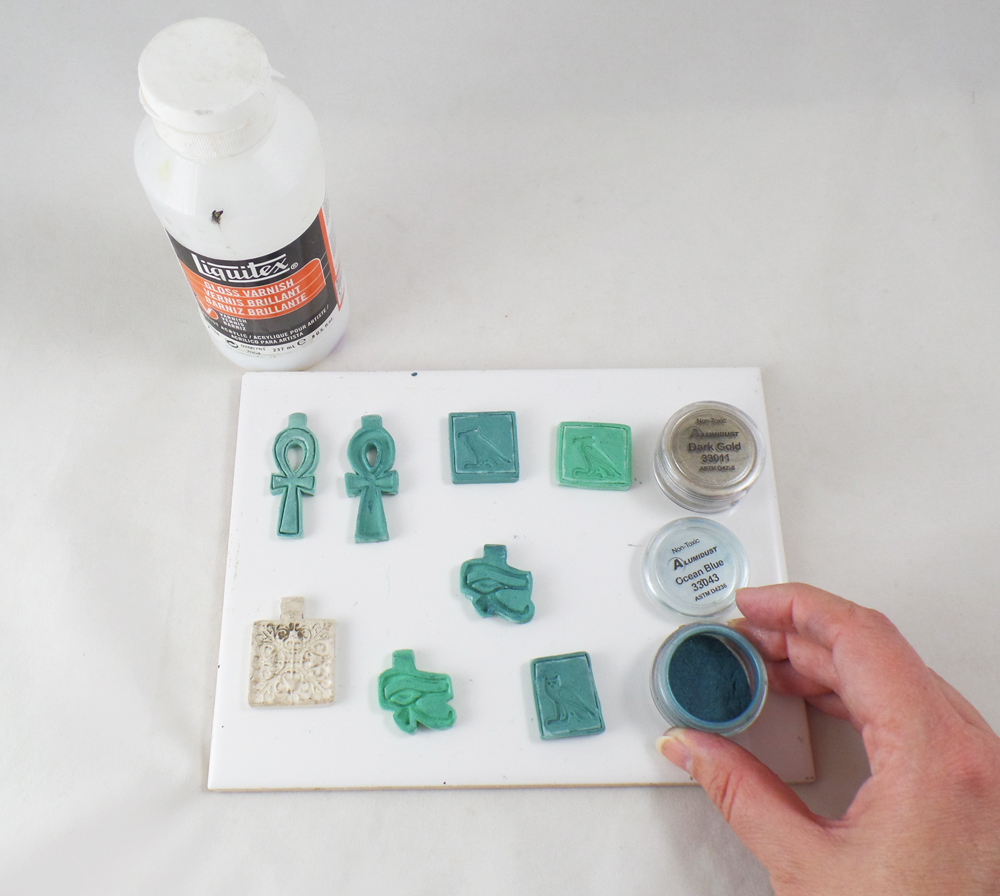
I applied a thin layer of Liquitex Gloss Varnish to all of the pieces and before they dried rubbed on a light layer of Alumidust.
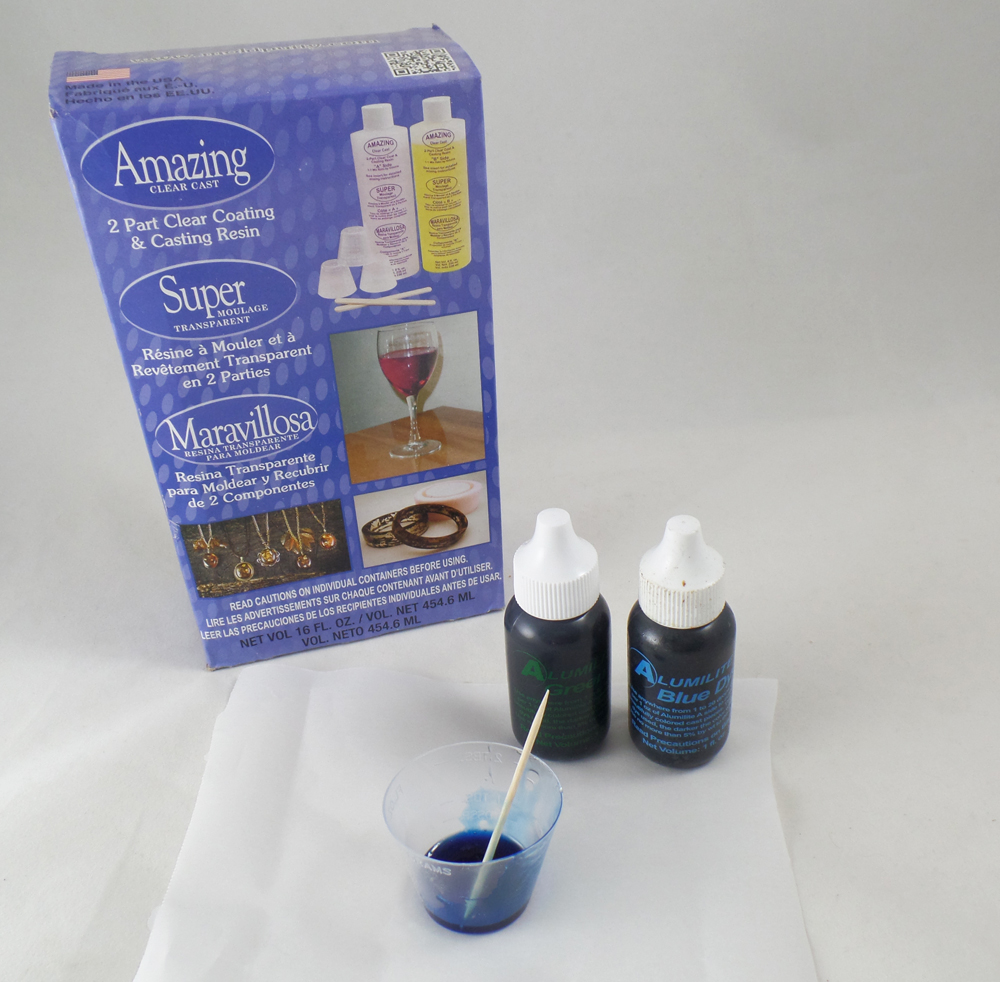
I mixed a very small amount of blue and green Alumilite Dyes with Amazing Clear Cast Resin, making sure to fully stir the dyes into the resin and let it sit for 10 minutes.
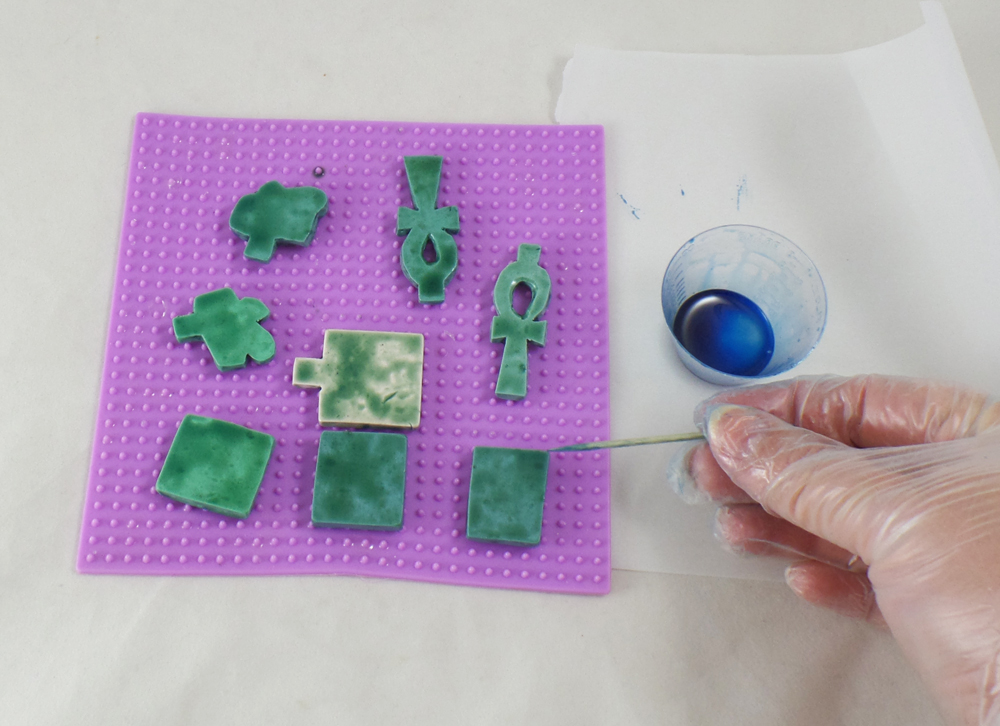
By letting the resin sit for 10 minutes, the resin will be thicker and stick more to the polymer clay pieces. I carefully applied the resin to the back and sides of the pendants with a toothpick first and let them cure completely, as per manufacture instructions, before moving onto the next step.
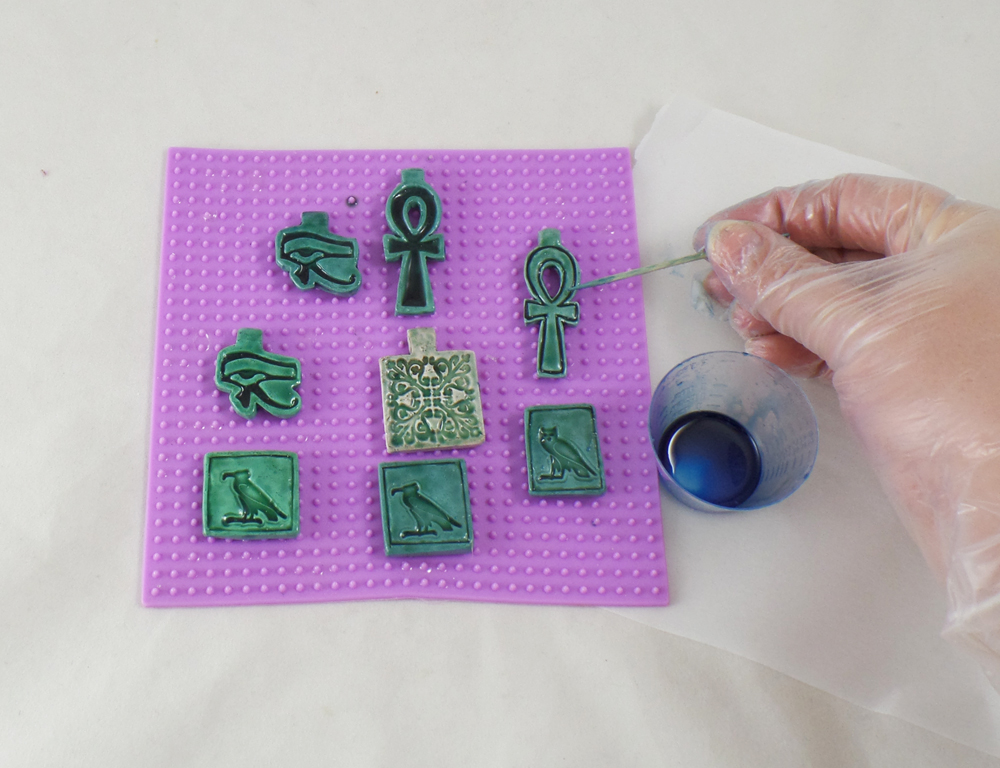
After the back of the polymer clay pieces were dry I applied resin to the front of the pieces with a toothpick, making sure to get all the groves and indents of the stamped images. I let this layer of resin cure completely.
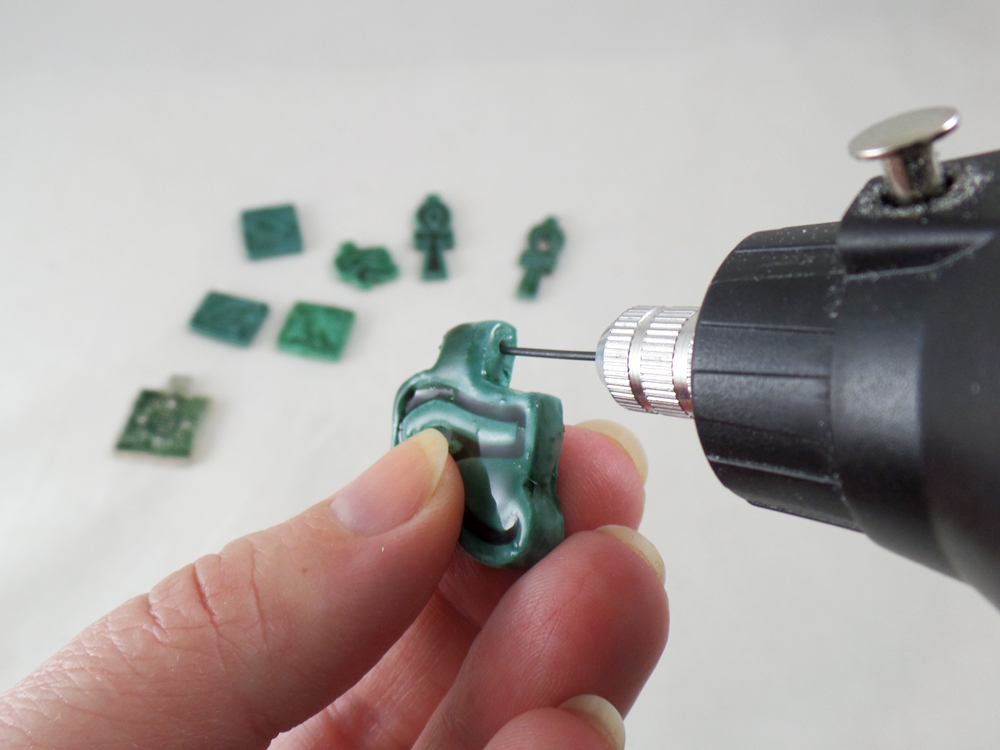
Once all of the pieces were fully cured I carefully drilled holes to put beading wire and thread through each piece.
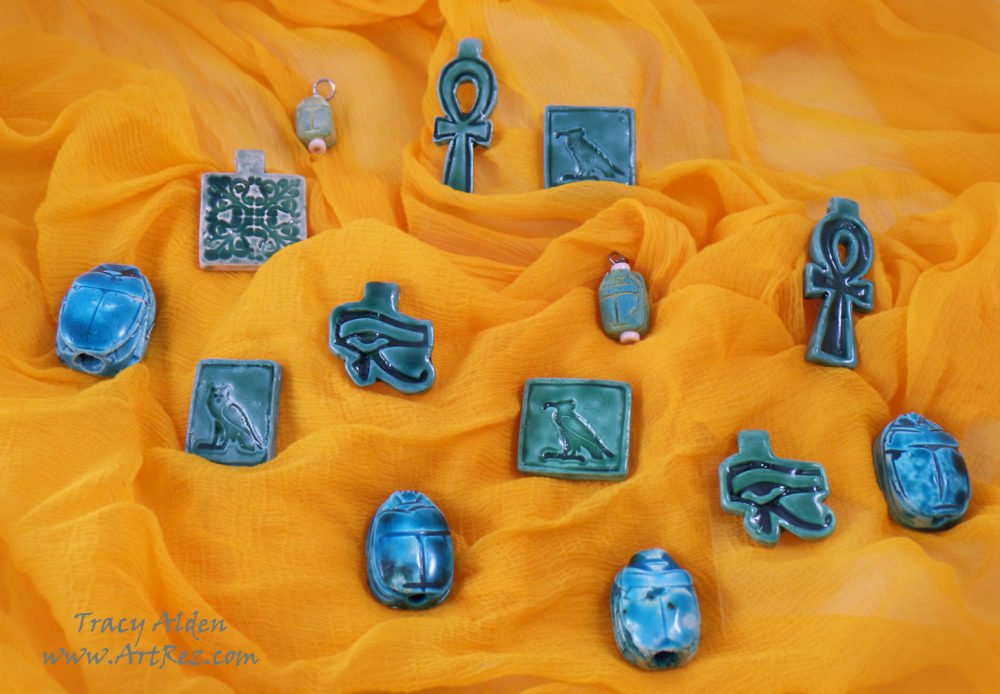 Here are the finished Faux pieces with the real Egyptian Faience, a pretty close match if I do say so!
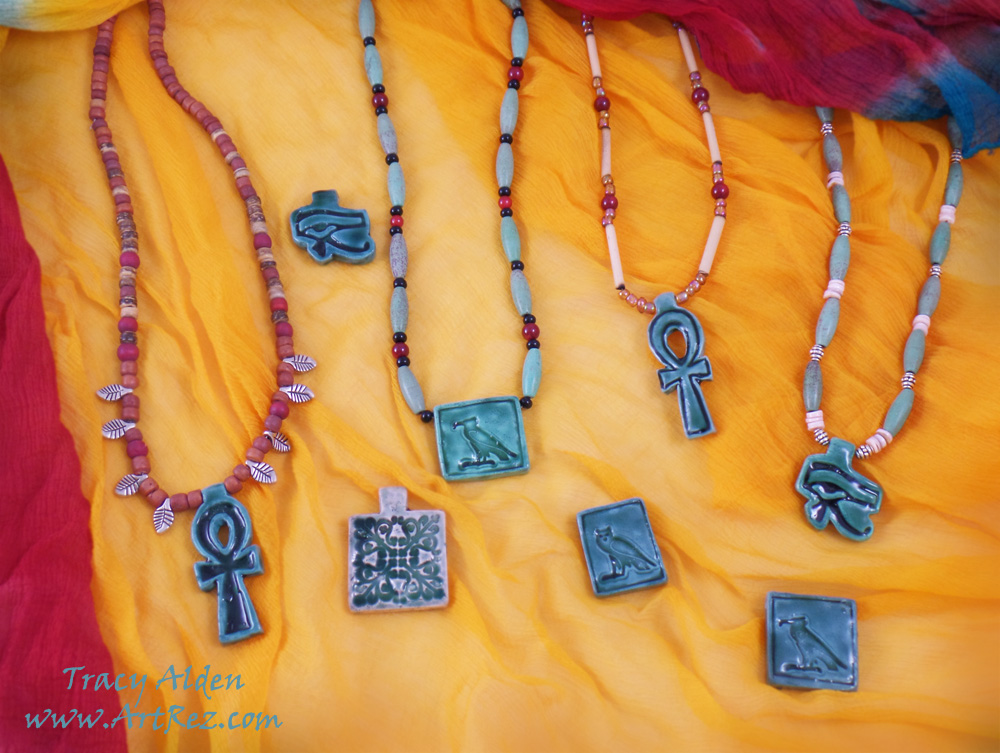 The addition of wood, glass, semi precious stones and shell makes these pieces look straight out of ancient jeweler’s marketplace!Want to see more of Amazing Casting Products tutorials and inspiration? Hop on over to their Blog to see all kinds of Amazing Artists’ Designs!Until Next Time, Safe Travels!

Ancient and Contemporary Inspired Artistry