The Gift of Sparking Winter Jewelry, Handmade of Course!
With the past few months speeding past, with projects, orders, shows and daily life, I still make time to create handmade gifts for friends and family. No matter how much planning involved I always seem to end up making a few things last minute, but now that most of these pieces are on their merry little way I can share a few of my favorites.
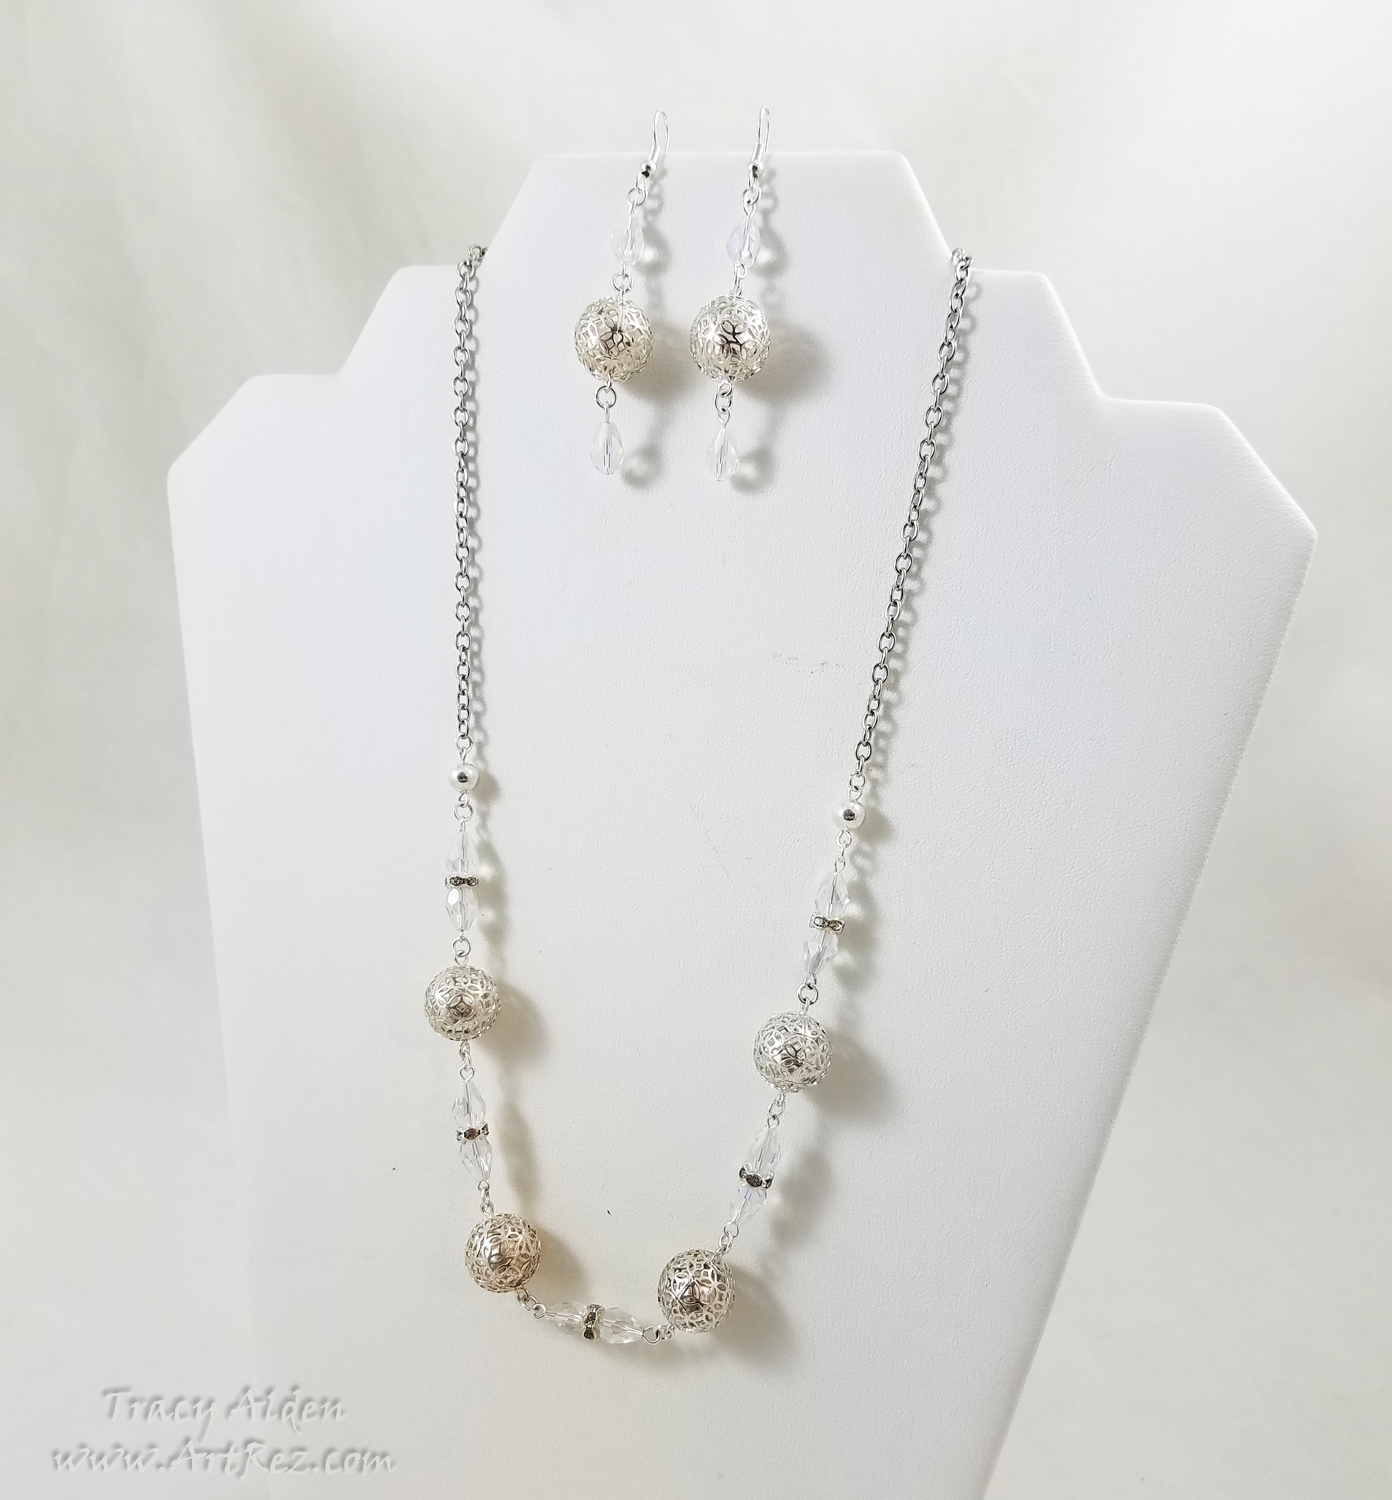
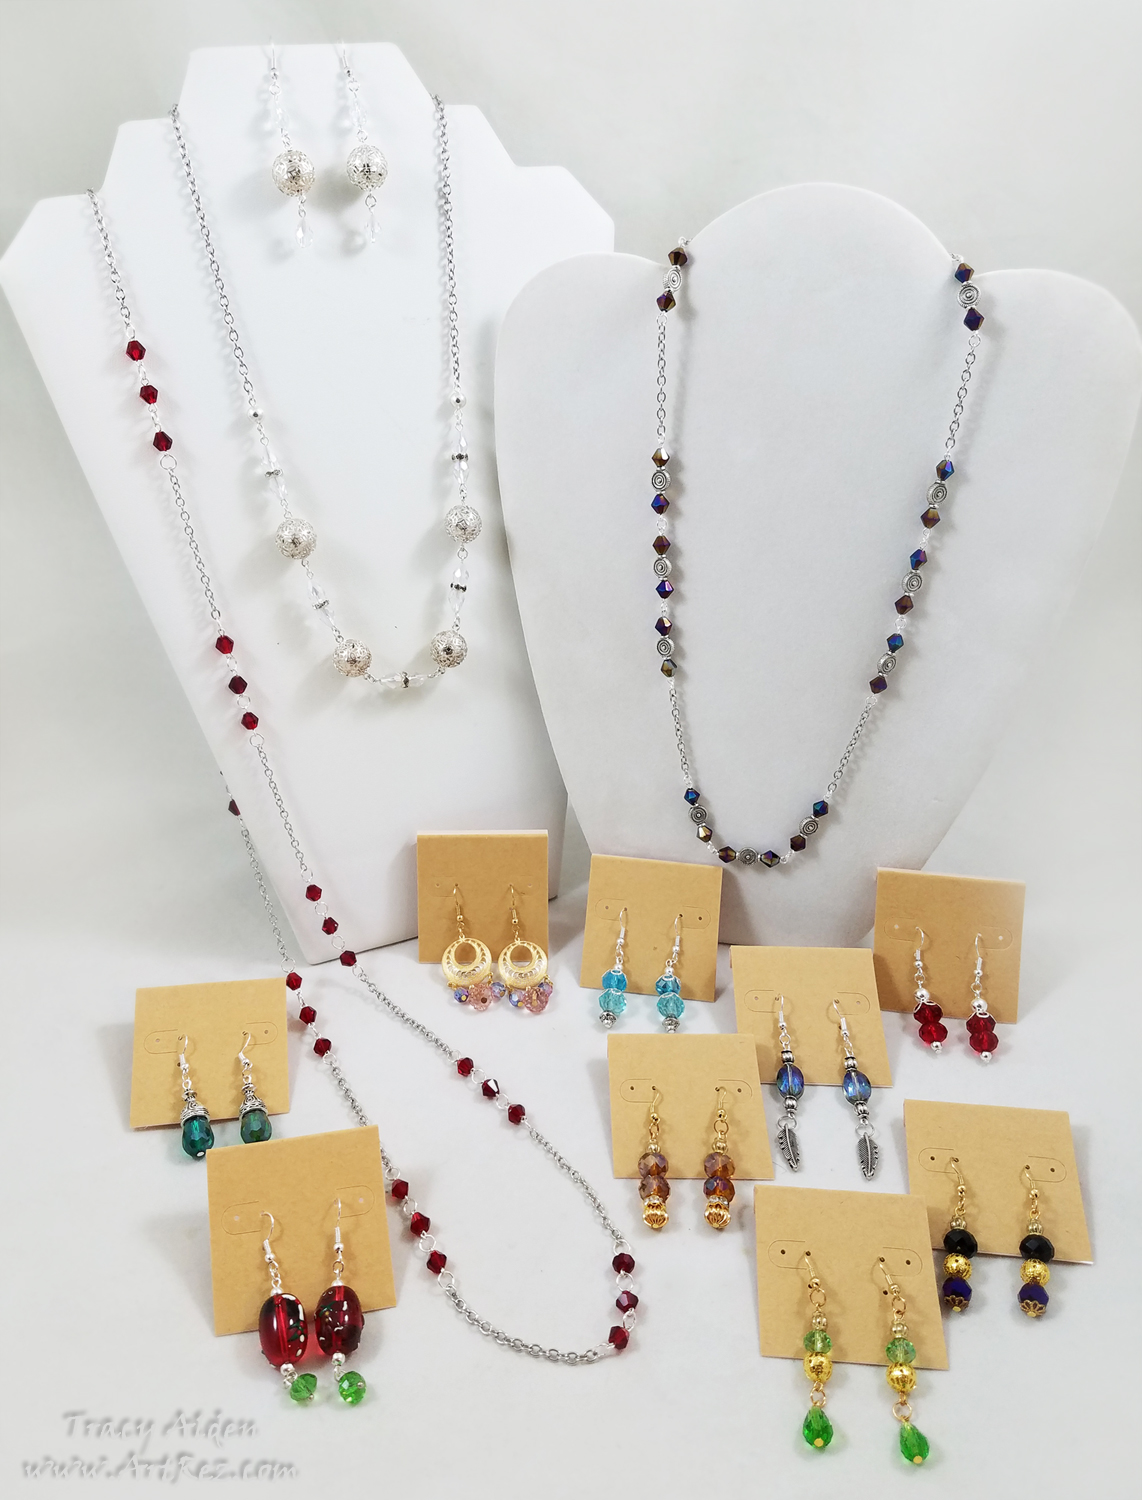
I love getting random bead assortments from Fire Mountain Gems. In one of my last orders I received some sterling silver filigree bell beads. Hoping to create some form of jewelry set, I was not sure what to put with them. Pulling out of my bead stash I found clear crystals and chain from Fiona Accessories. They were the perfect addition to the bells, creating a delicate but beautiful mix of sparkle and sound in a Princess length necklace.
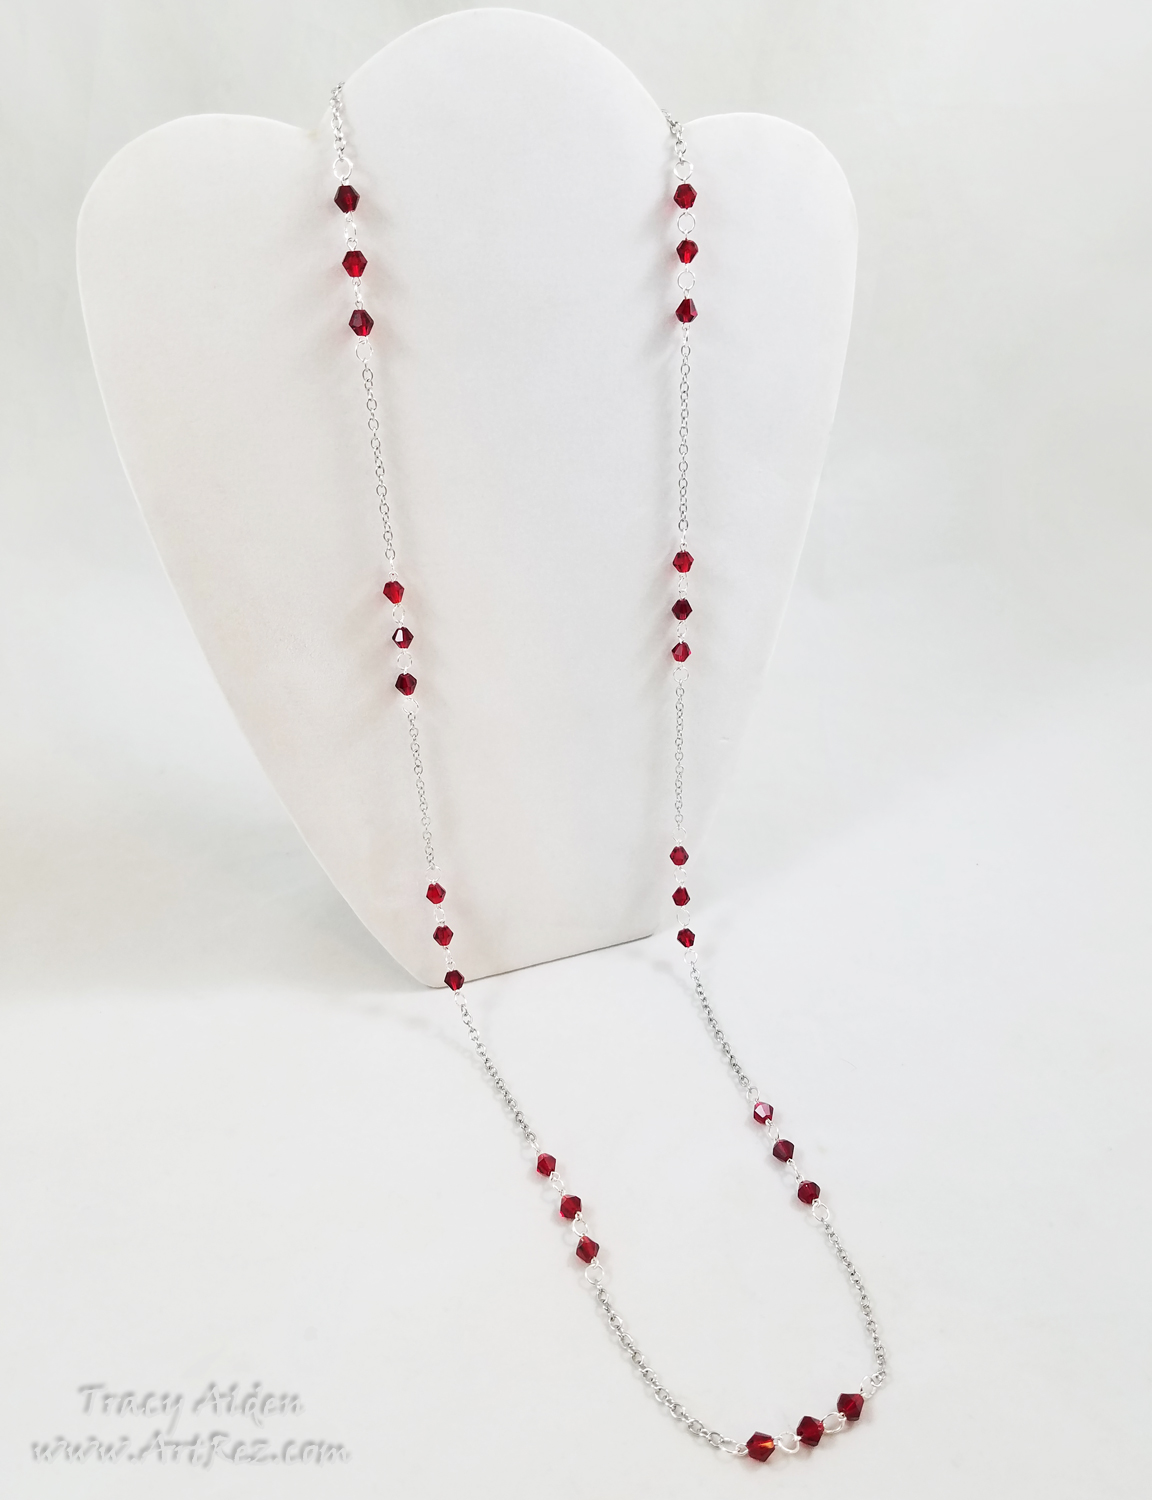
Taking inspiration from the 1920s jewelry styles I wanted to create a simple Opera length necklace. Once again using chain from Fiona Accessories and red crystals from Michael’s Bead Landing™ a graceful and lightweight necklace was created. While the red color is fitting for the holidays it also works well as a nice addition to dressy causal attire.
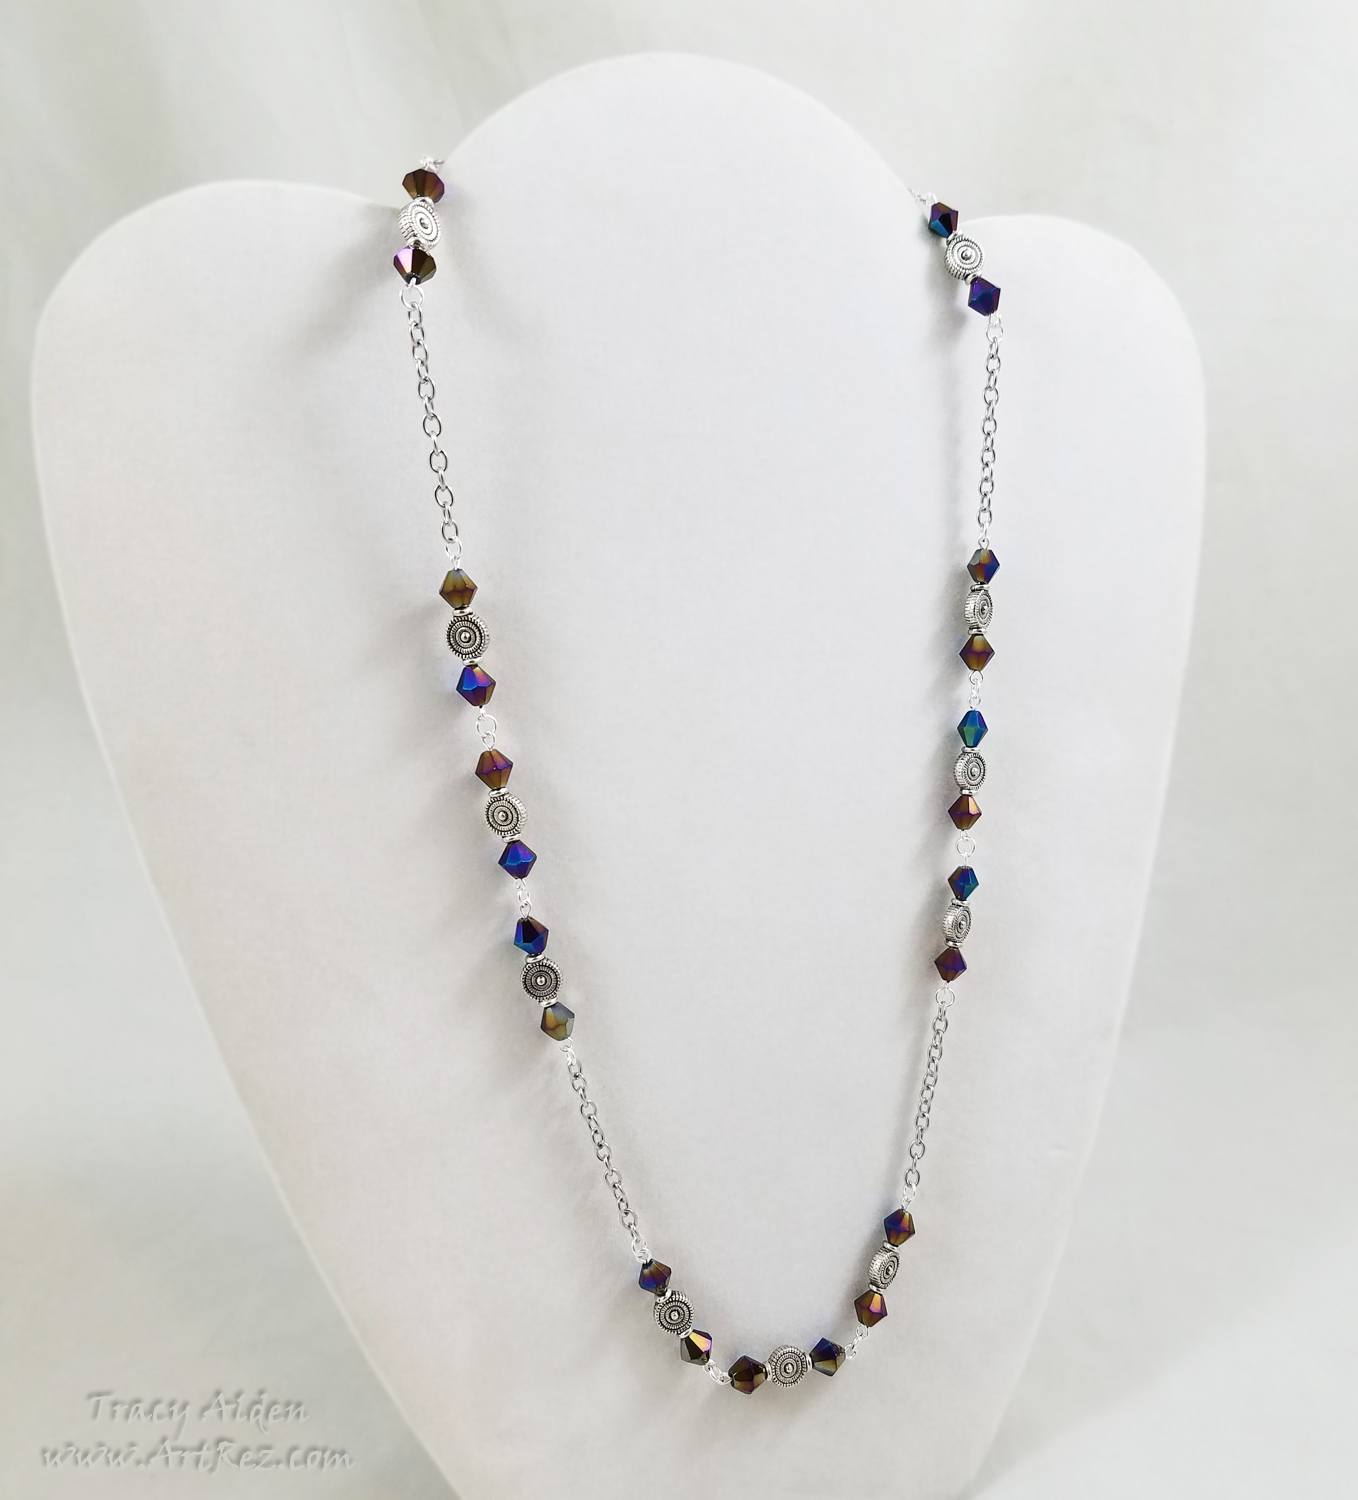
For this Matinee length necklace I used a mixture of miscellaneous findings left over from previous projects. The Aurora Borealis blue crystal beads went perfect with the patterned spacer beads. While the chain adds a more modern feel, the colors and spacers hark back to more ancient times.
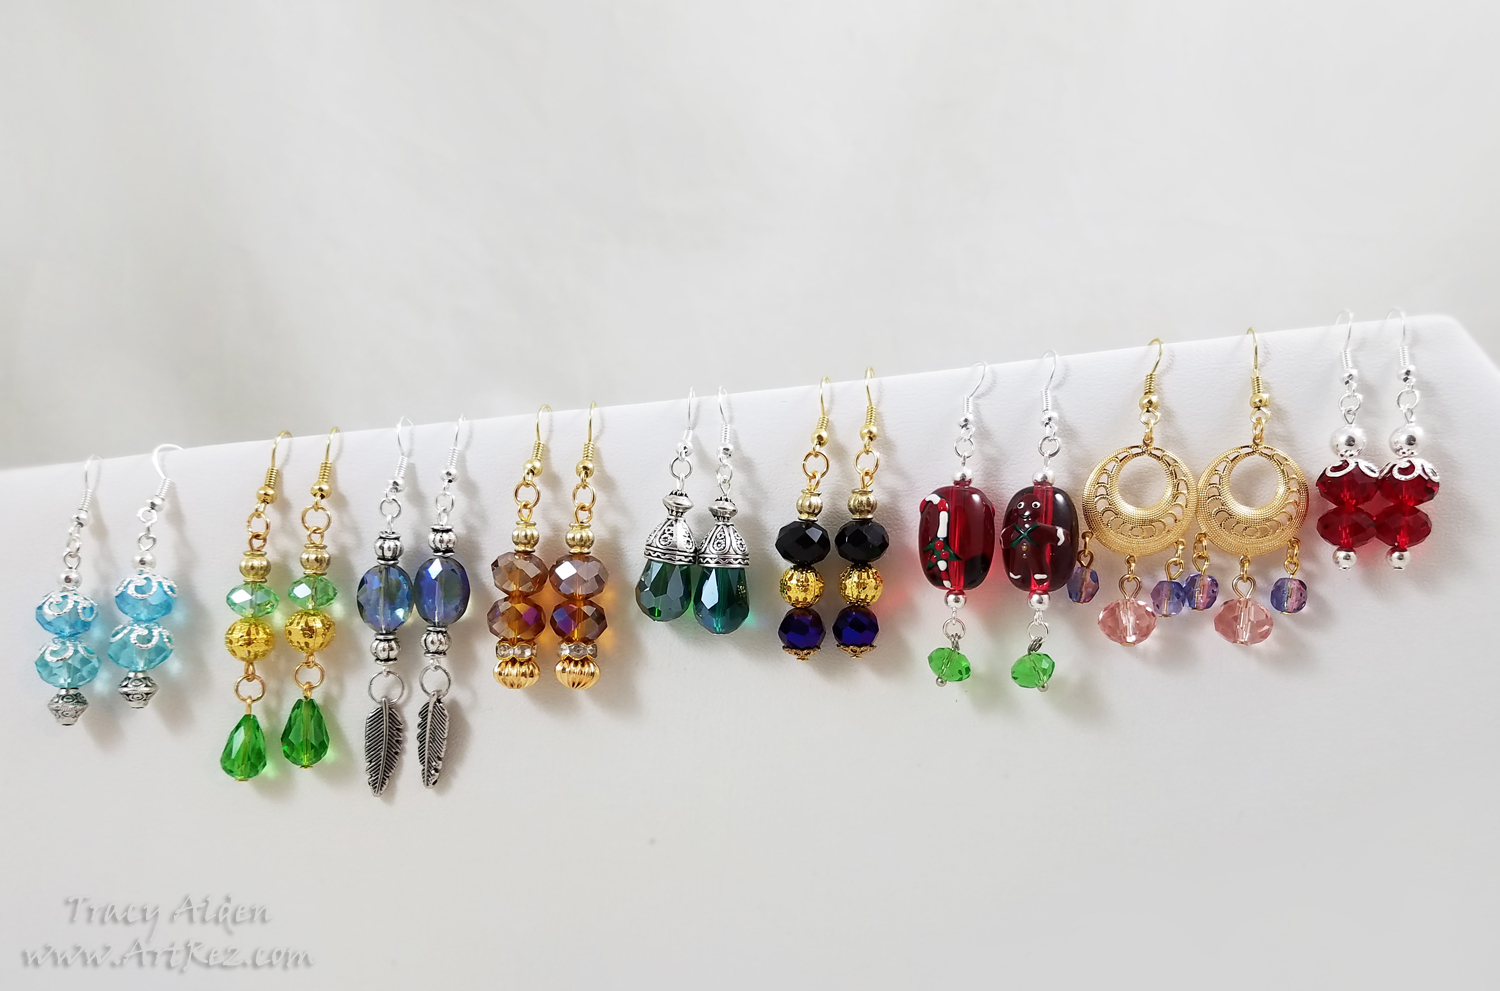
When making jewelry gifts I just have to make earrings. Some beads just lend themselves to something delicate or have just the perfect flash of color to be made into earrings. Using beads and findings from Fire Mountain Gems, Fiona Accessories, Michael’s and many more jewelry suppliers these earrings were quick to make. A few almost could pass for tree ornaments, others found treasures and old heirlooms, making them perfect gifts for young or old.
What handmade gifts have you made or are making this Holiday Season?
Wishing you all a Happy and Healthy New Year!
Until Next Time, Safe Travels!
Crafty Adventures with Resin and Orchids
Many of my art projects are tests of both art products and my ability to create. I can collect supplies, start working on something, even get a basic idea of what I would like to do, and end up making something completely different. Being able to adapt and still make a complete project that I can be happy with is my ideal goal, and thankfully this one ended up that way.
Starting with a small collection of orchid blooms that I had dried, I wanted to try to preserve in resin. Dried orchid blooms are very delicate, easily crumbling if mishandled. I decided a frame was the best choice to display the dried orchids and be able to hold the resin in place.
Supplies:
Amazing Clear Cast Resin
Black Alumilite Dye
Alumidust powders Light Pink, Interference Red, Yellow Gold and Brown
Liquitex Gloss Varnish
Dried Flowers
Toothpicks
Stir Sticks
Paint Brush
Acrylic Paint
Picture Frame
Micro Hole-less Glass Beads in Gold and Purple
Measuring Cups
Parchment Paper (Found in the Baking section of most stores) to protect work surfaces
Glue
Baby Wipes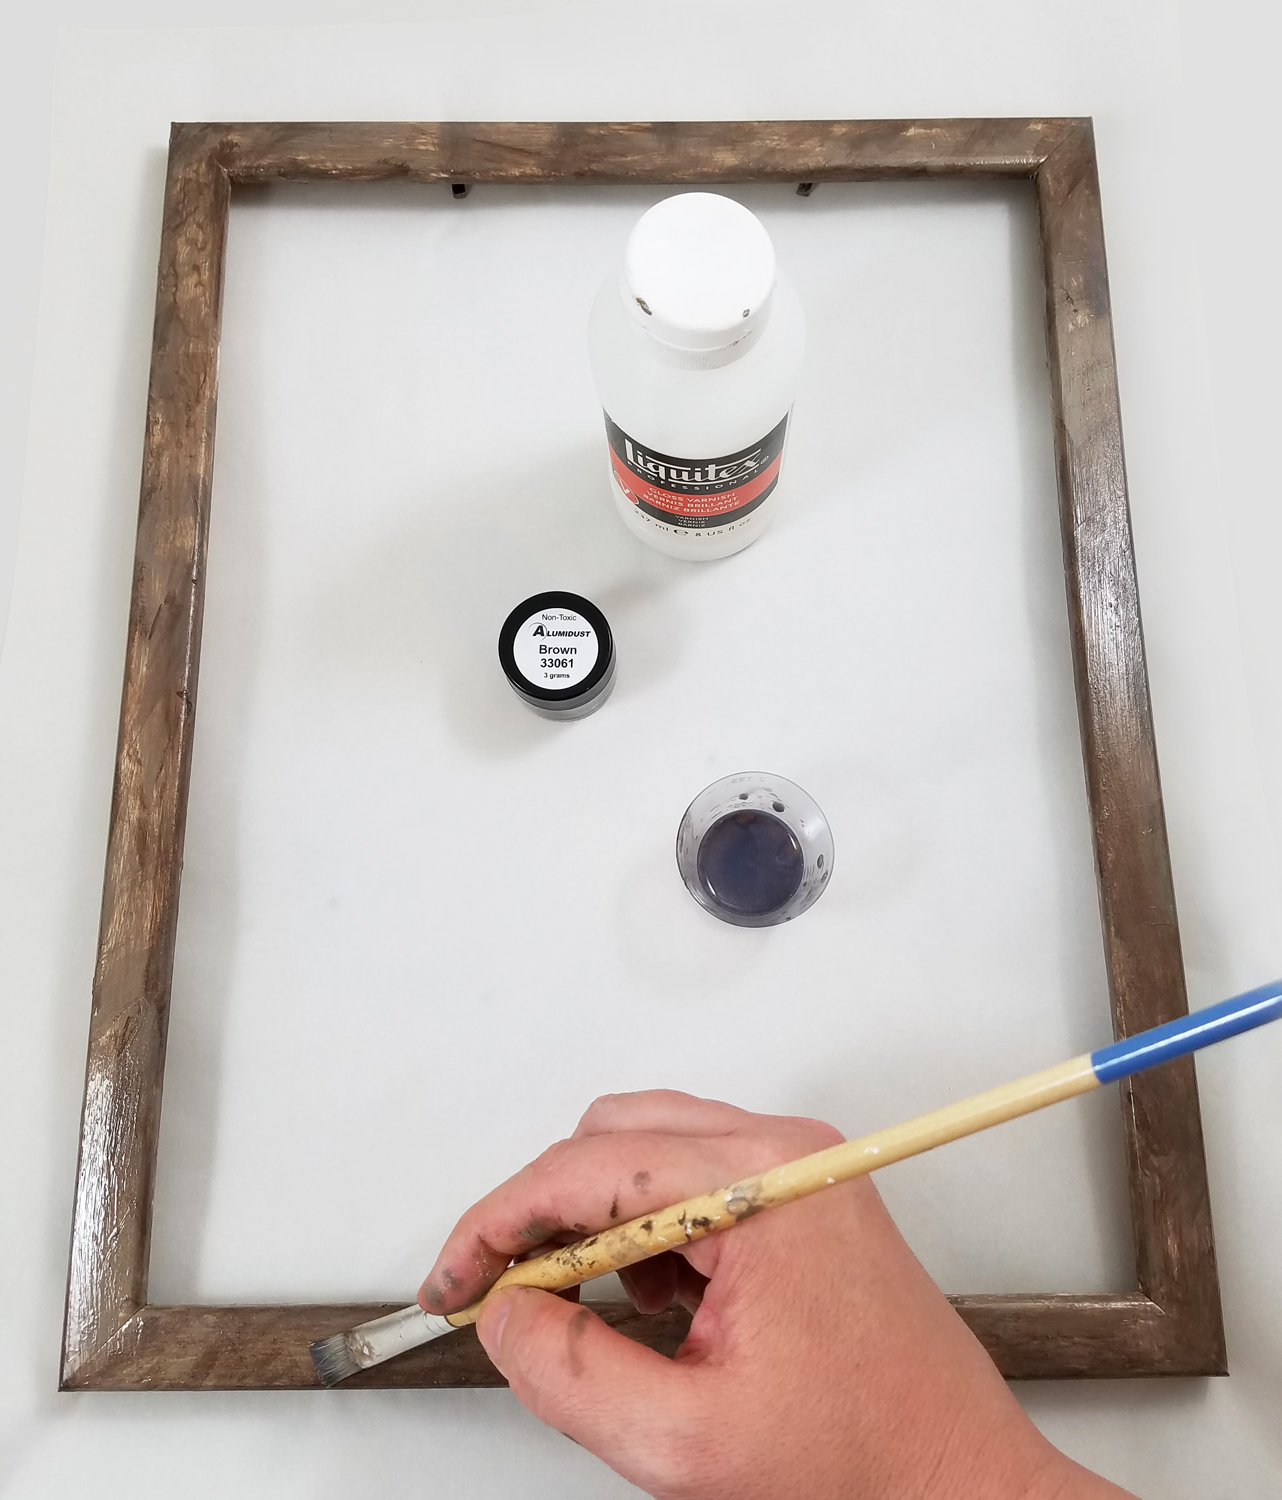
I started with removing the glass and back panel of an old frame. I scrubbed the frame clean and painted the back and front of the frame with 2 coats of paint. I mixed some Brown Alumidust powder with Liquitex Gloss Varnish, as a protective varnish layer over the paint. I let the varnish dry overnight.
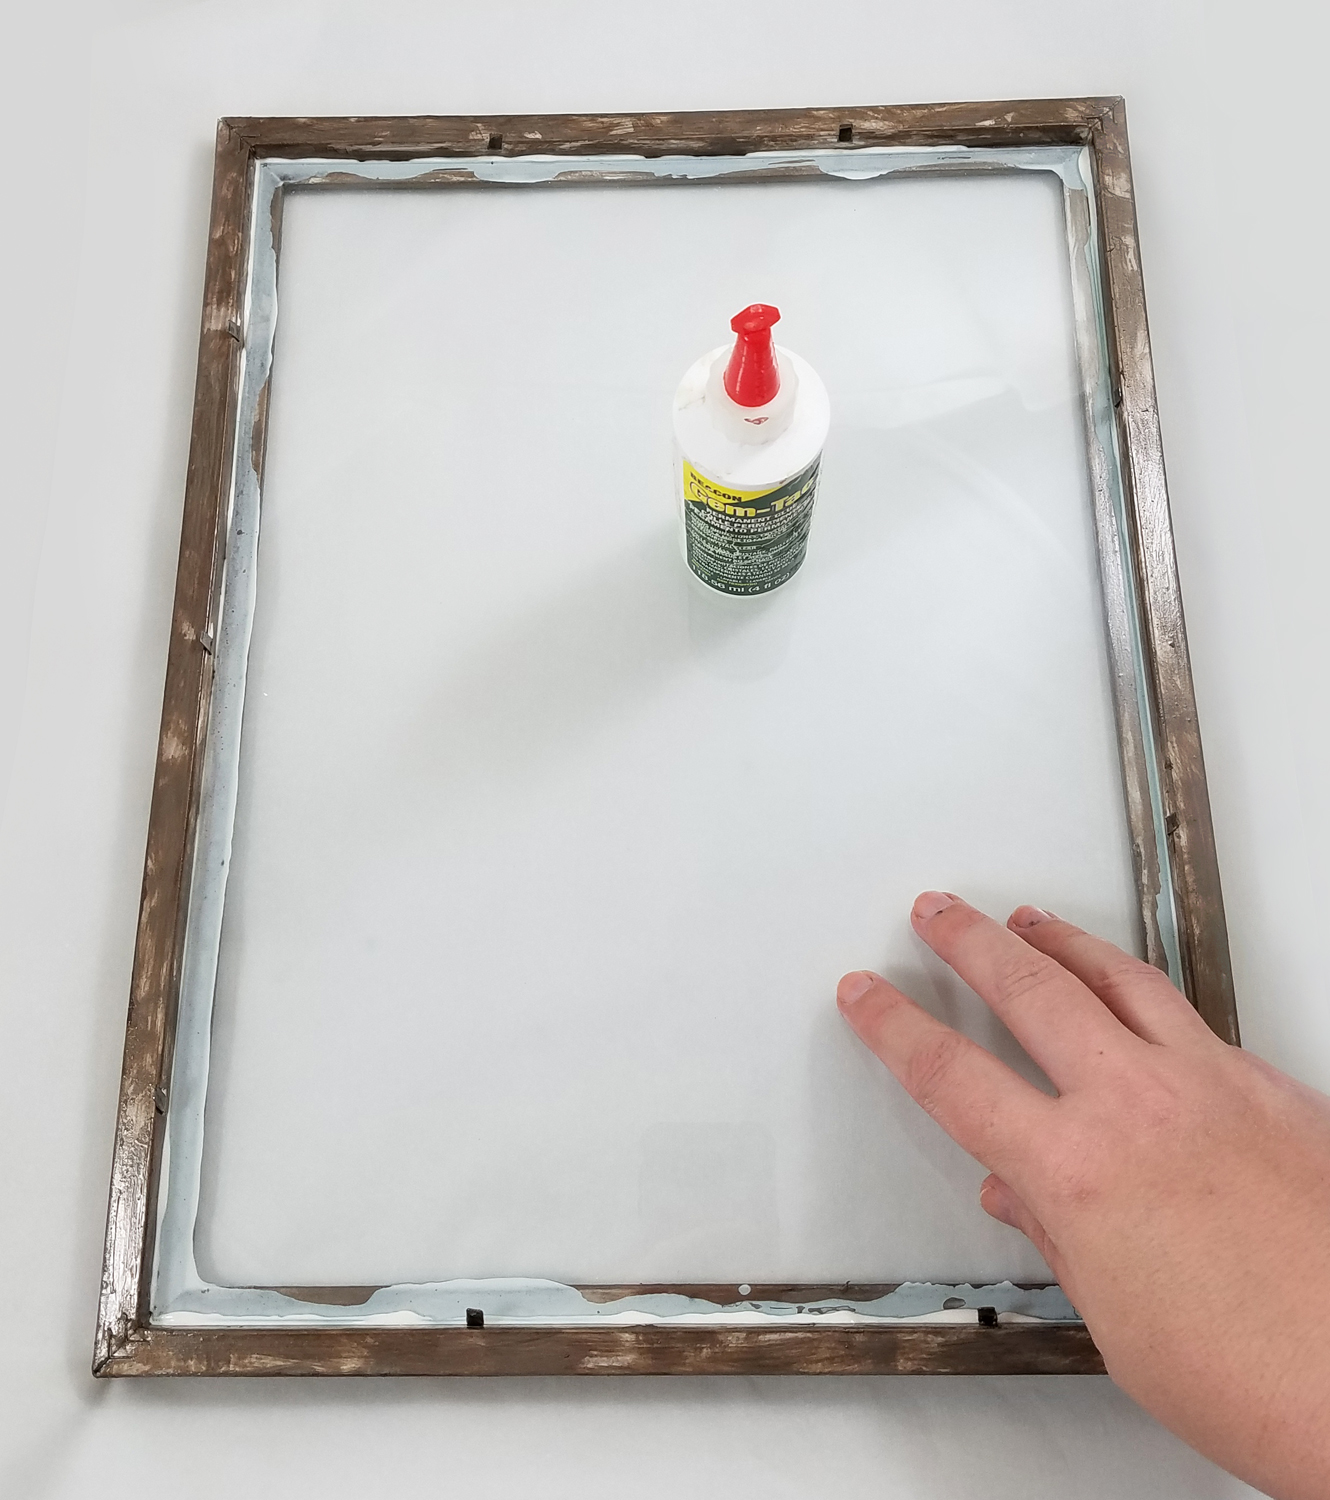
I cleaned the glass panel and put it back into the frame. I glued the glass in place to make sure it wouldn’t shift while I worked on it and so resin wouldn’t leak around the edges later. I was careful to have a solid line of glue all the way around the frame and let it dry completely.
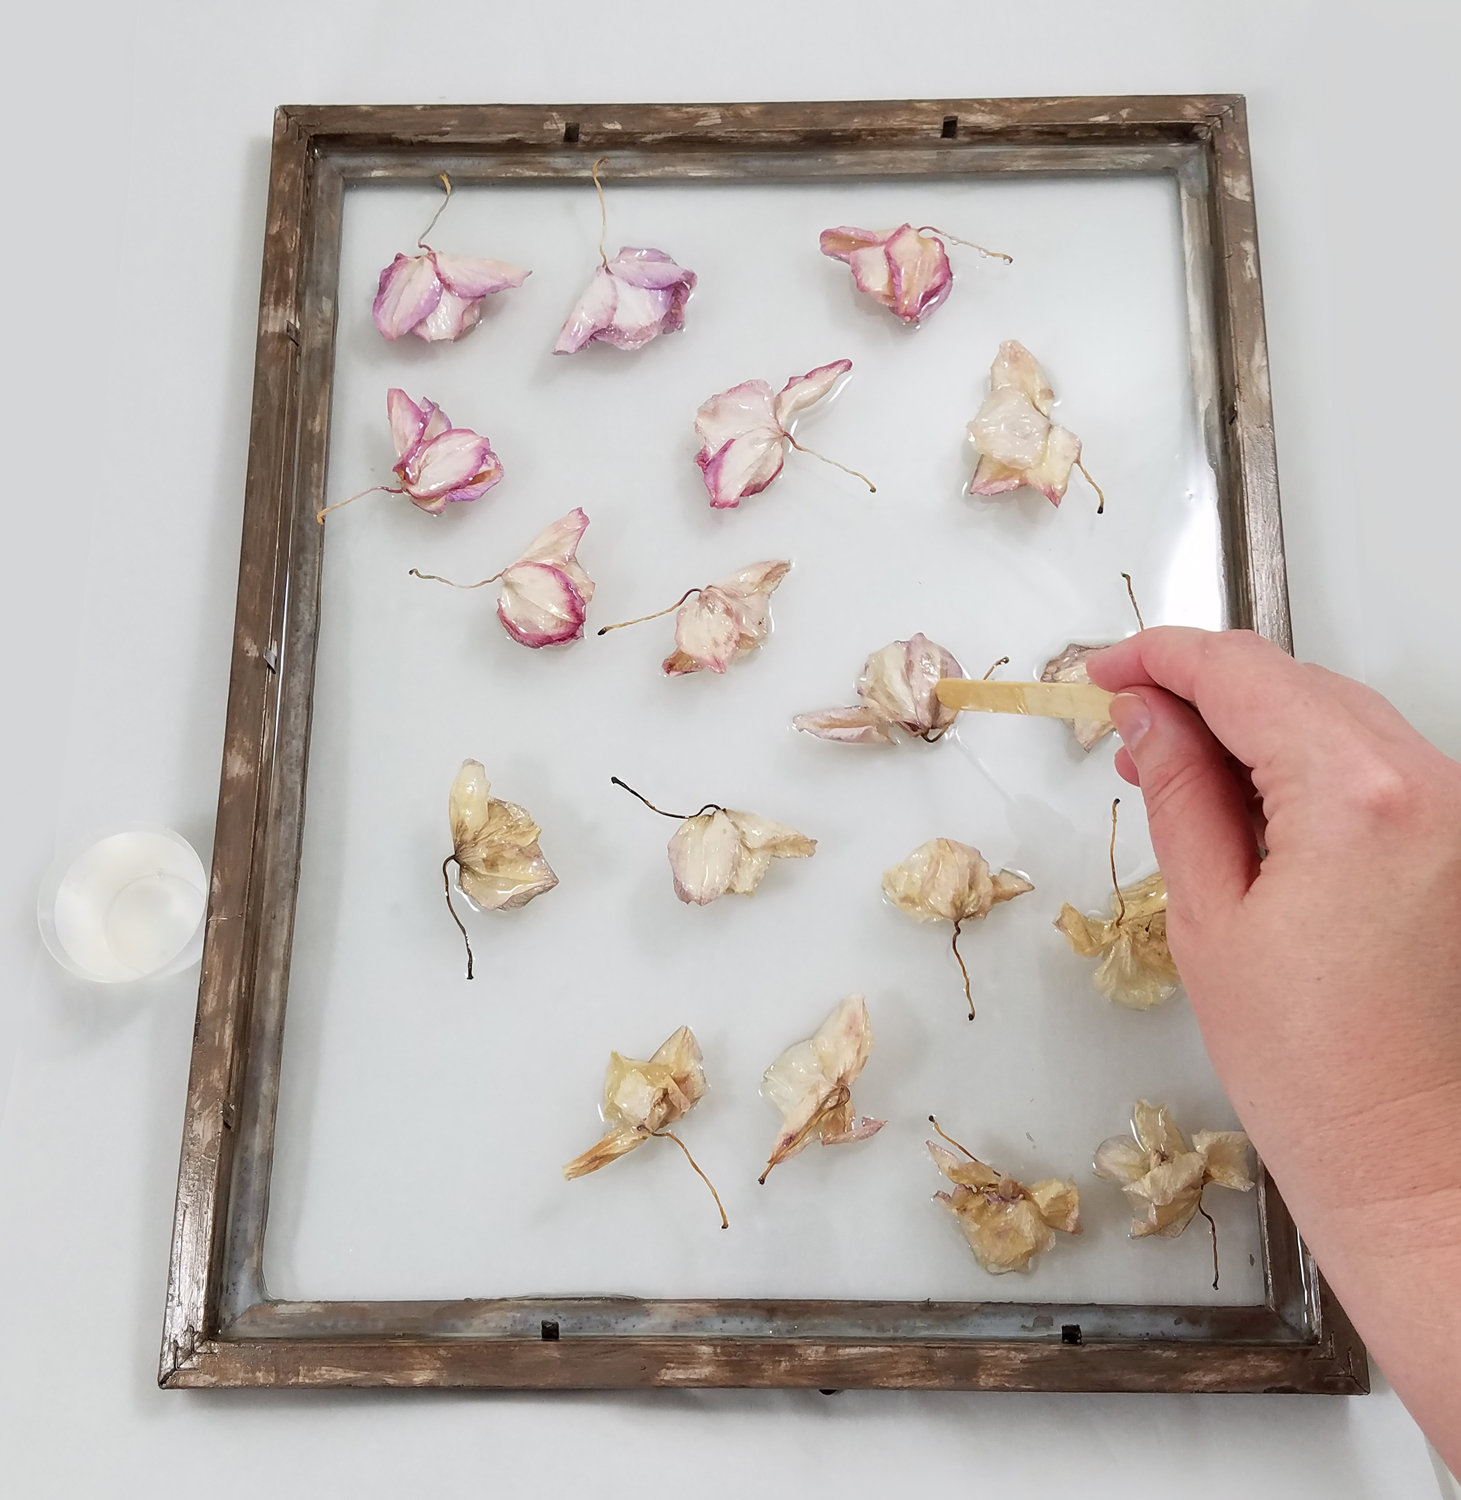
I mixed up some Amazing Clear Cast Resin, making sure to slowly stir to reduce air bubbles and let it sit for 5 minutes. I poured the resin into the frame and carefully placed the dried orchid blooms into the uncured resin. I found that with the first layer of Amazing Clear Cast Resin the orchid blooms had a tendency to shift in the resin. So the first layer of resin had to be a thin pour and I let that cure to a tacky set.
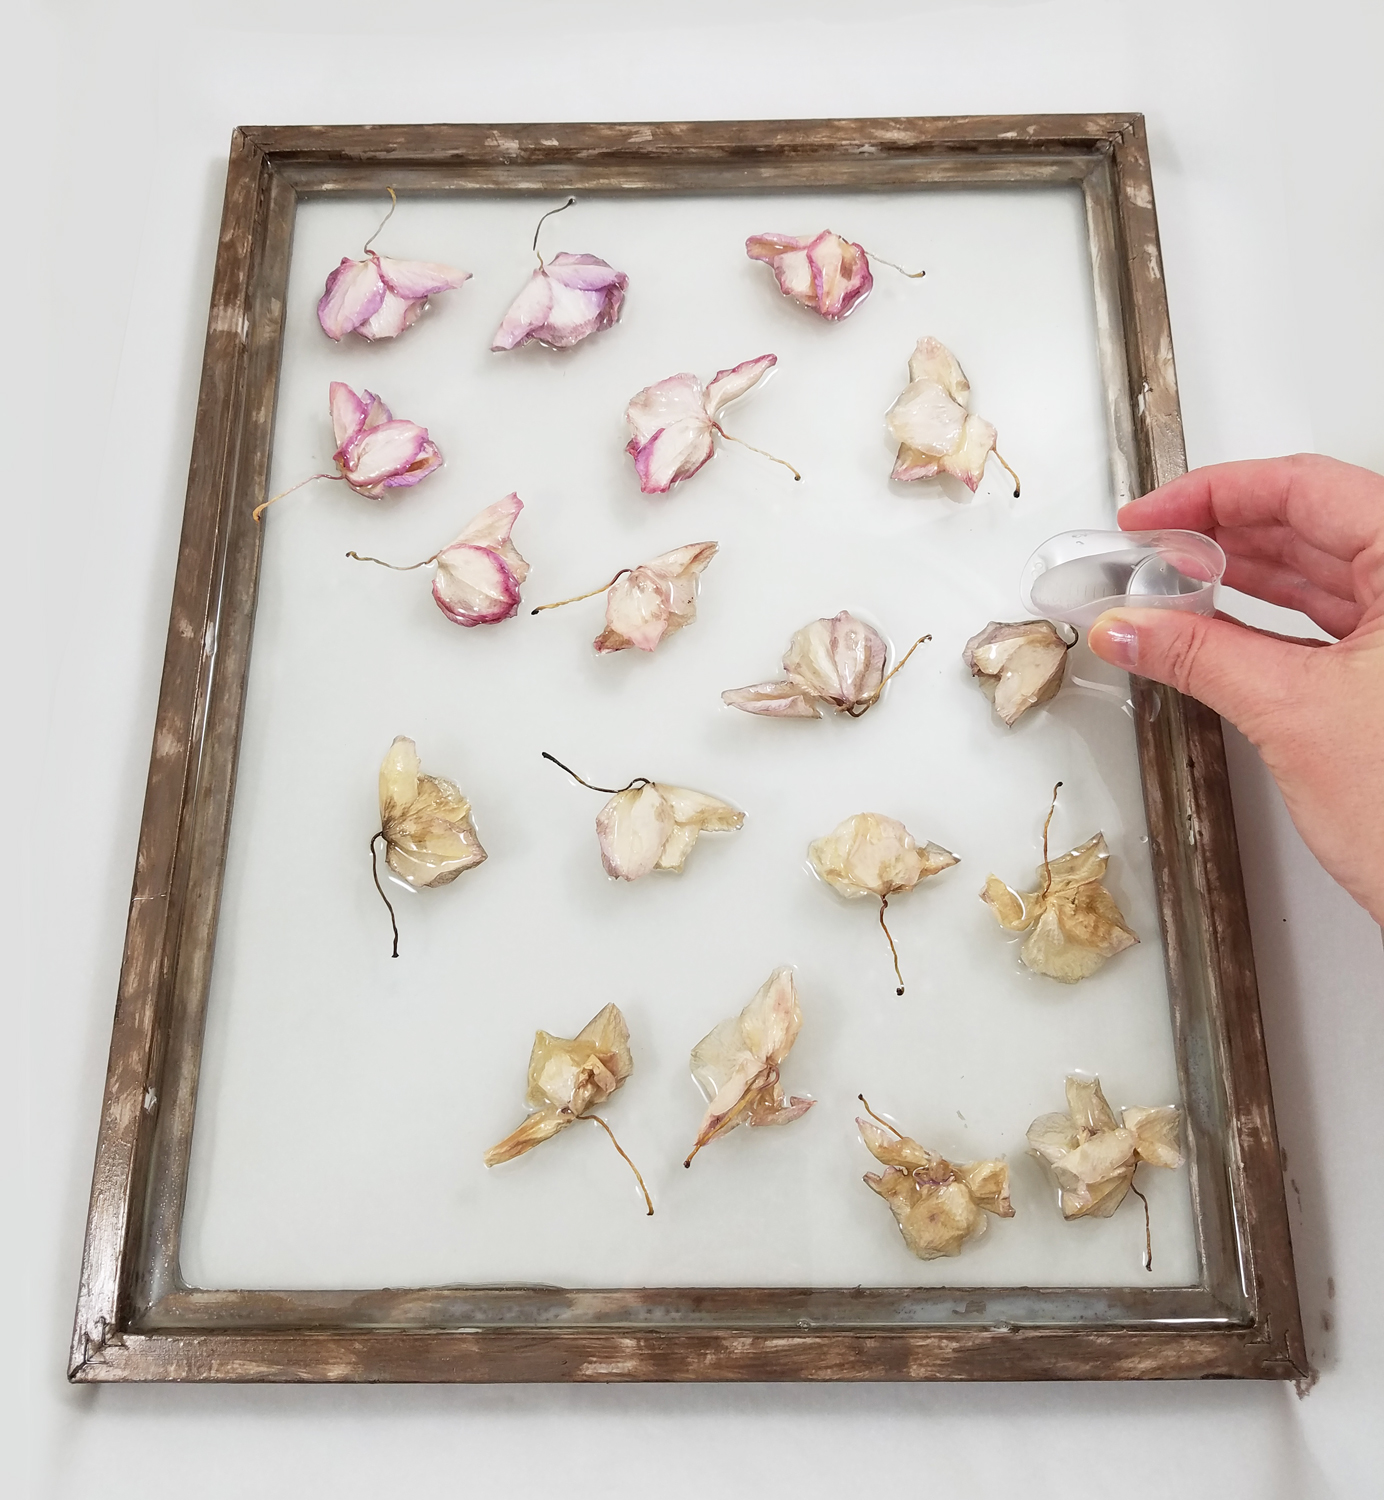
I added a second clear layer of Amazing Clear Cast Resin, to cover and protect the orchids. To make sure the resin completely encapsulated the orchids I would push some of the uncured resin around with a stir stick, moving the resin in and around the blooms. I let this layer of resin cure completely.
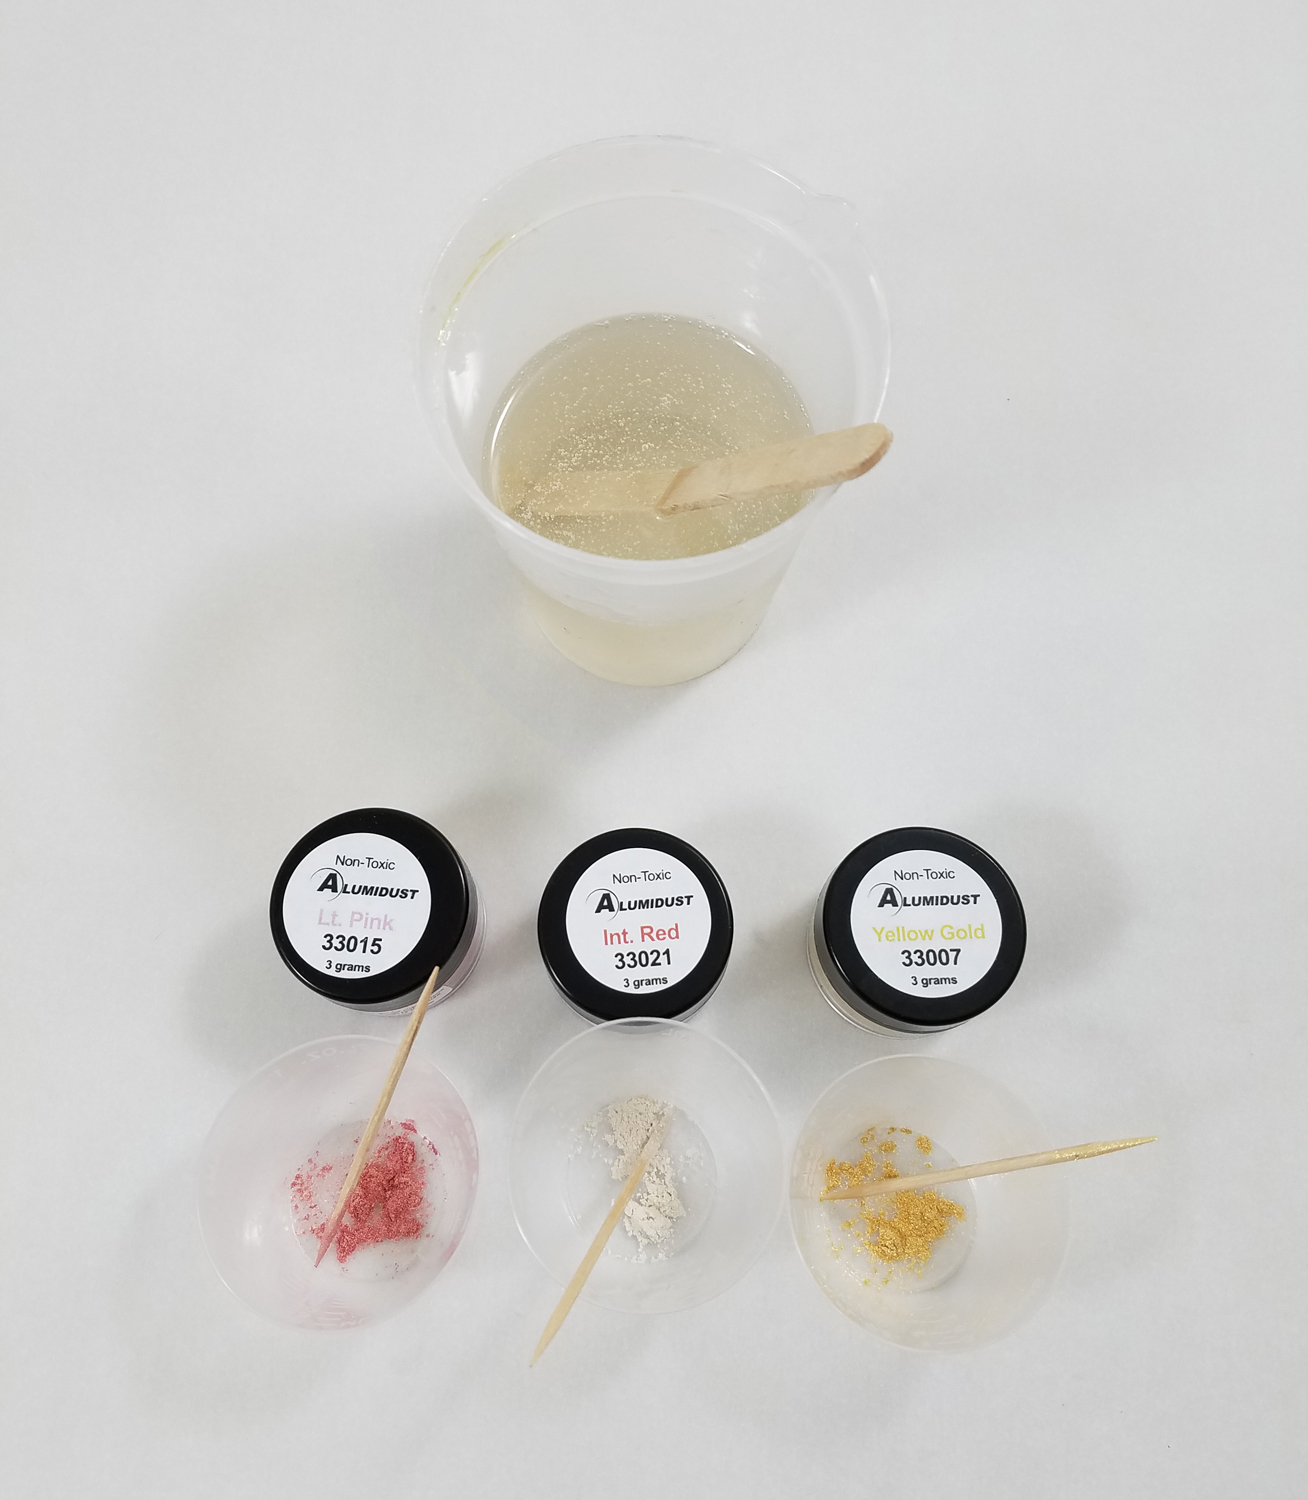
Mixing up a new batch of Amazing Clear Cast Resin, I put a pinch of Light Pink, Interference Red and Yellow Gold Alumidust in separate small measuring cups. I then carefully added the liquid resin into each cup carefully stirring with toothpicks to fully mix in the powders.
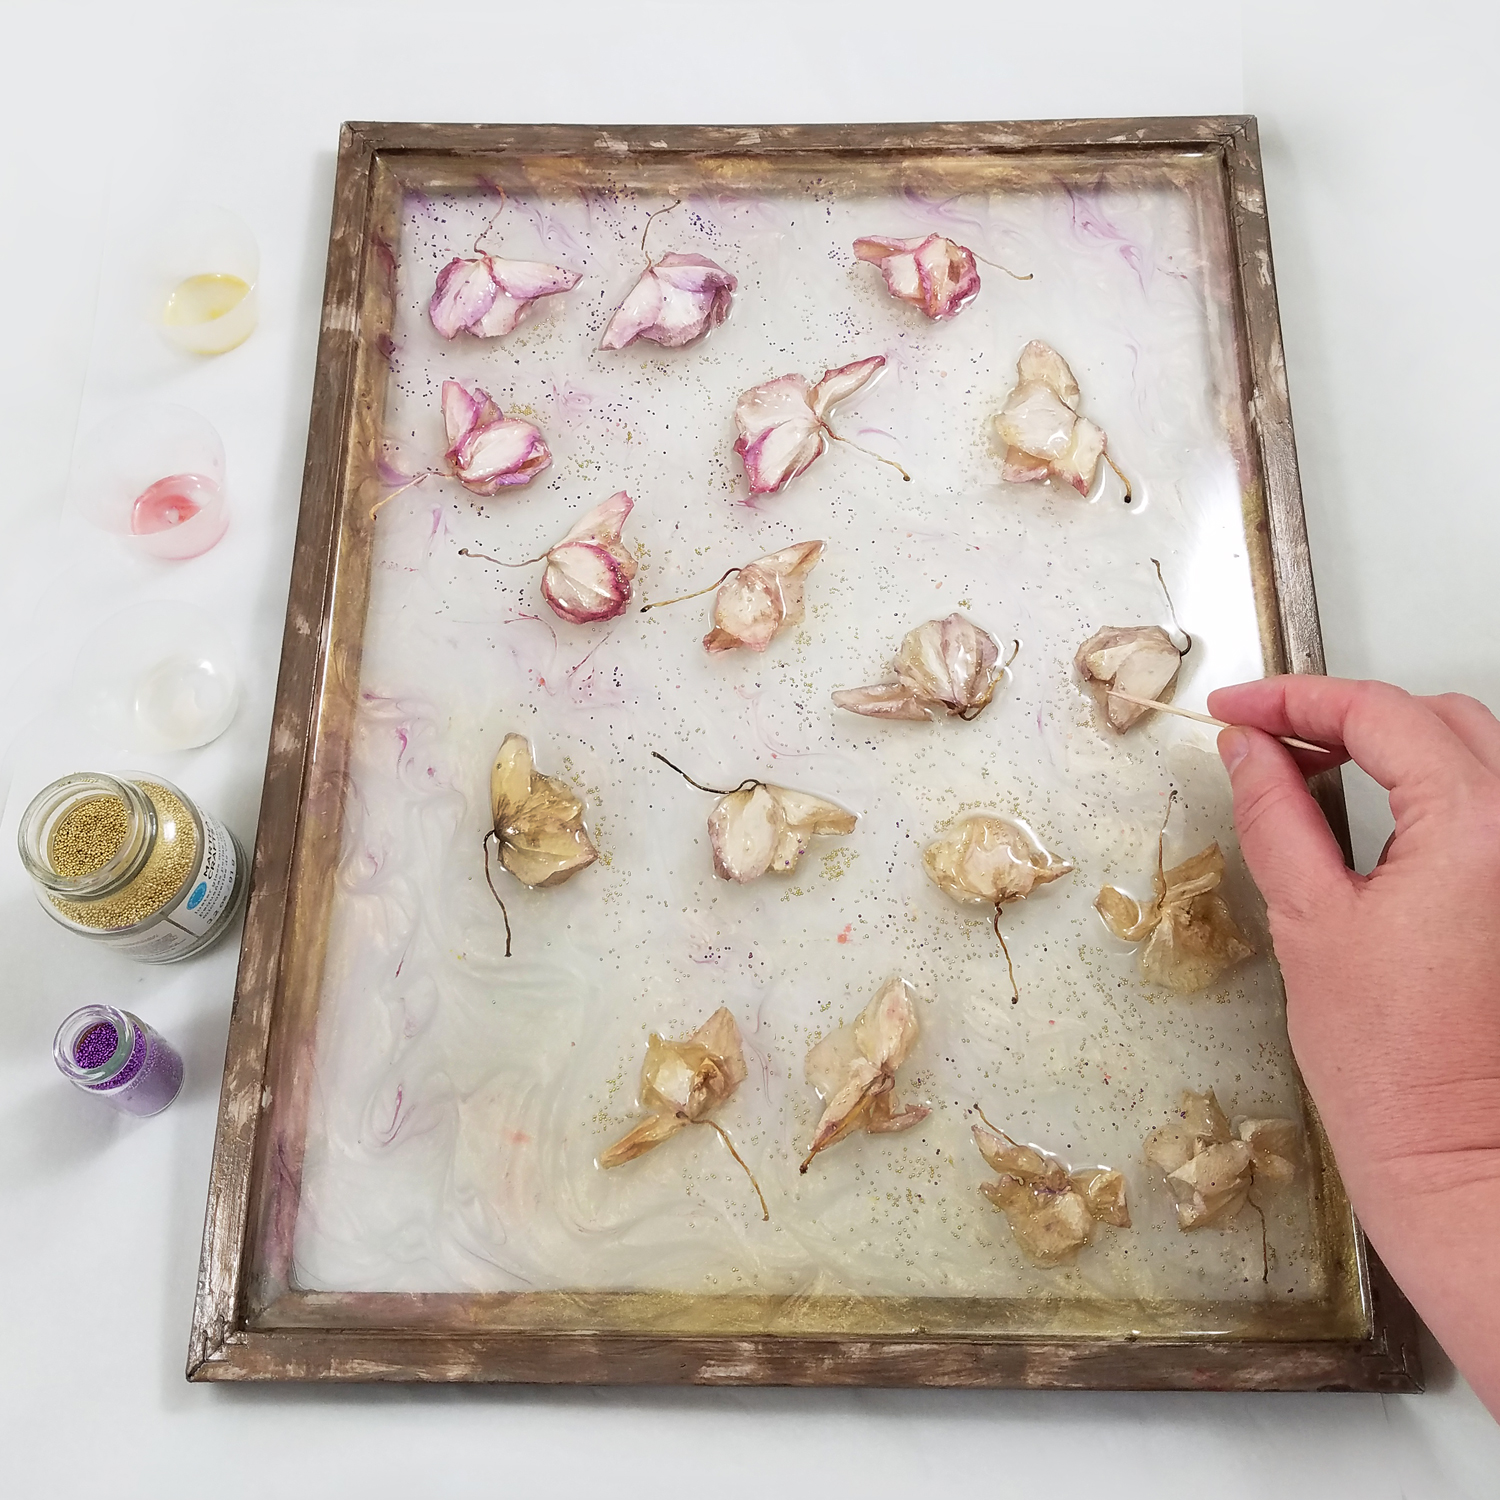
I poured the resin mixed with Alumidust in different spots all over the frame and used a toothpick to drag the colors through each other. This created a lovely ebb and flow of color to the resin, and I honestly lost track of time doing this and found it rather relaxing and meditative in nature. I sprinkled in some Micro Hole-less Glass Beads in Gold and Purple around the blooms in this layer of tinted resin before the resin cured.
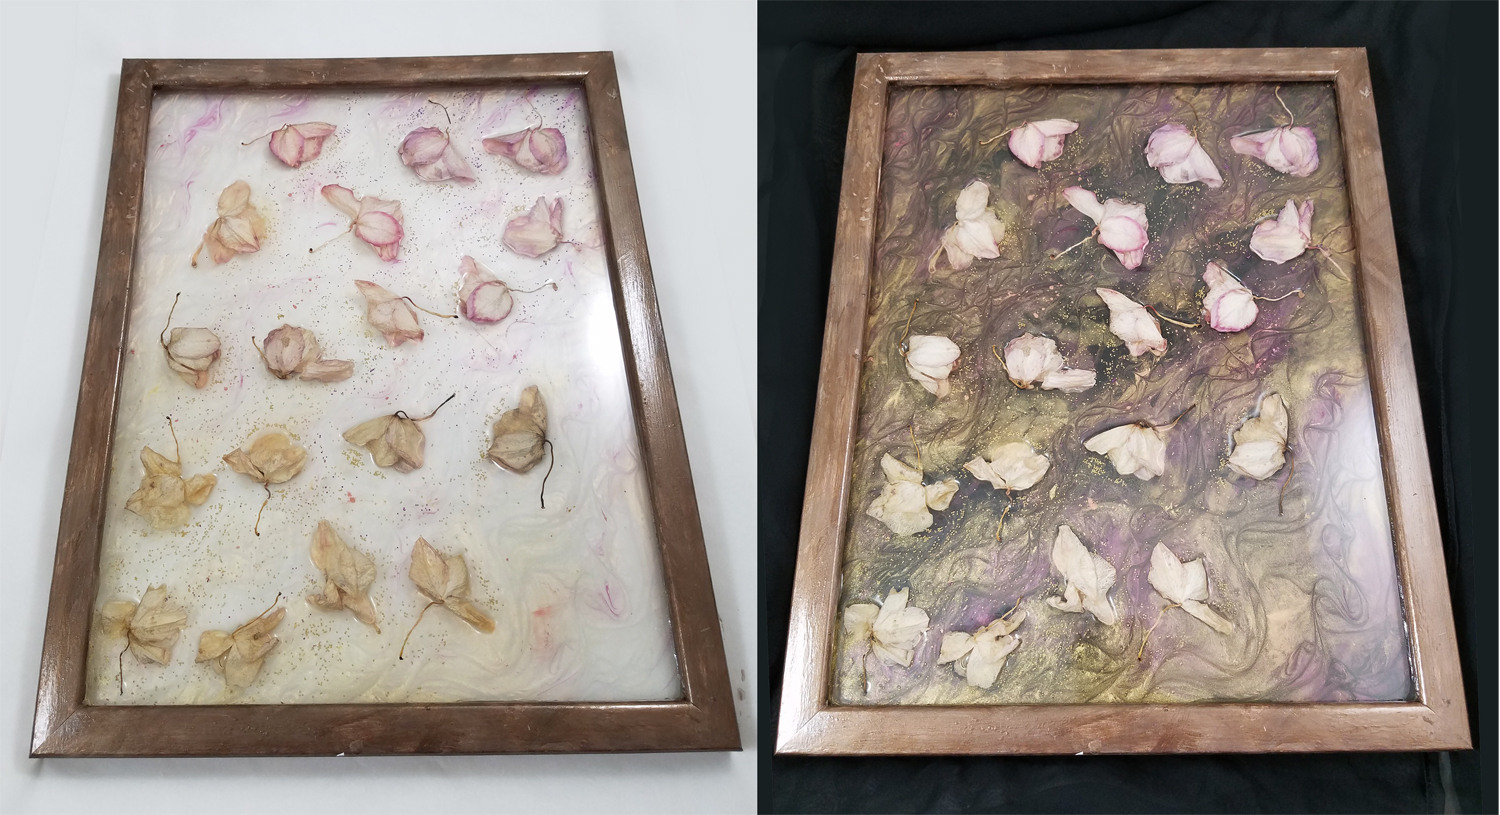
I had planned on doing a final cream color tinted layer for the background, but the lovely powder layer got lost when I tried a test sheet of white paper behind it. I needed more of a color contrast, so I thought about a black tinted layer or resin, using a black cloth to mimic the look, allowing the Alumidust tinted resin layer to visually pop more.
*In the future if I want to use a cream or light colored background I just need to make sure I use more Alumidust or a few drops of Alumilite Dyes to increase the color intensity without the need of a contrasting background.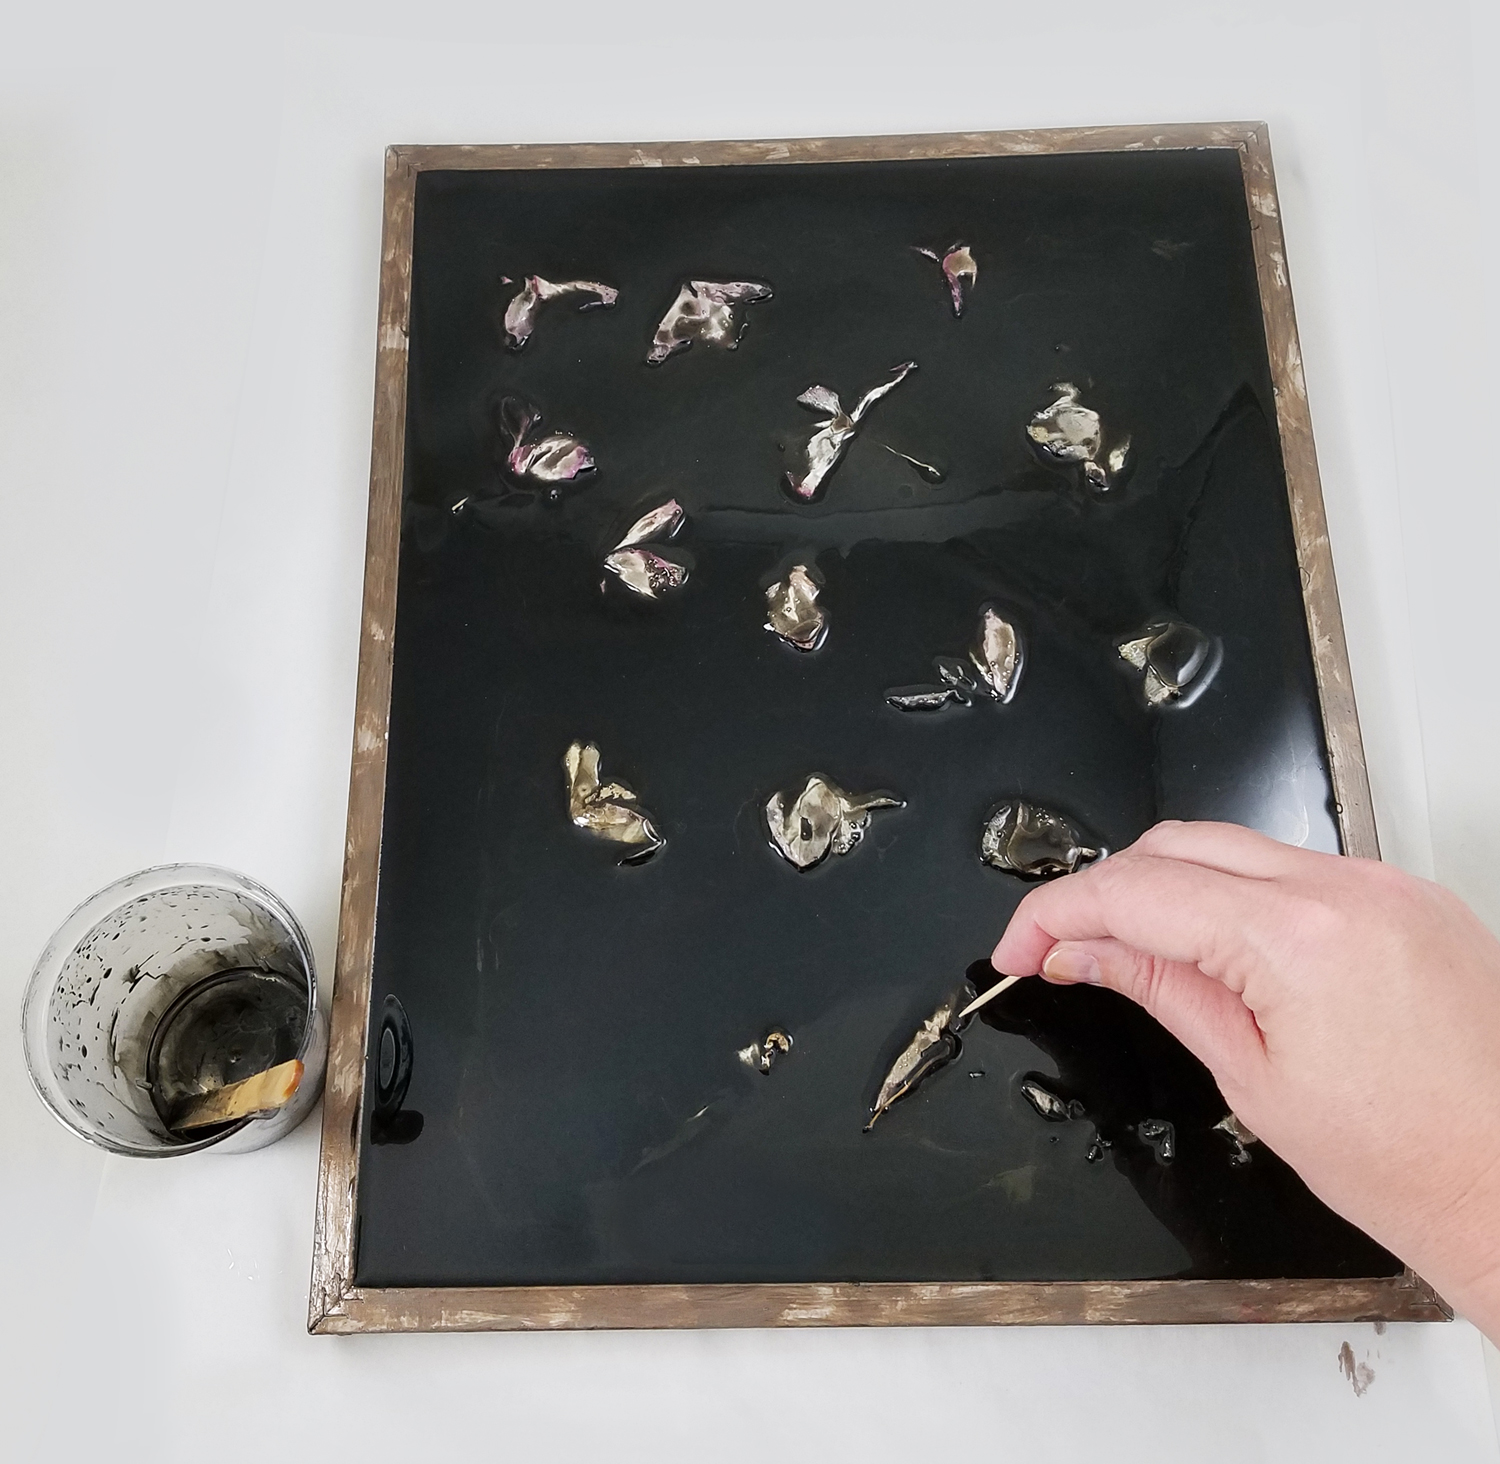
Mixing up a final batch of Amazing Clear Cast Resin I added Black Alumilite Dye Black to the resin, making sure to fully stir in all the dye. I poured the resin over the orchids and previous resin layer, carefully popping bubbles and making sure the tinted resin went into all the nooks and crannies.
*The dried orchids in this photo are slightly raised as they were not dried flat but collected already dried from a live plant. If the look of filter light going through the resin coated flowers is not the desired appearance just used pressed flowers instead.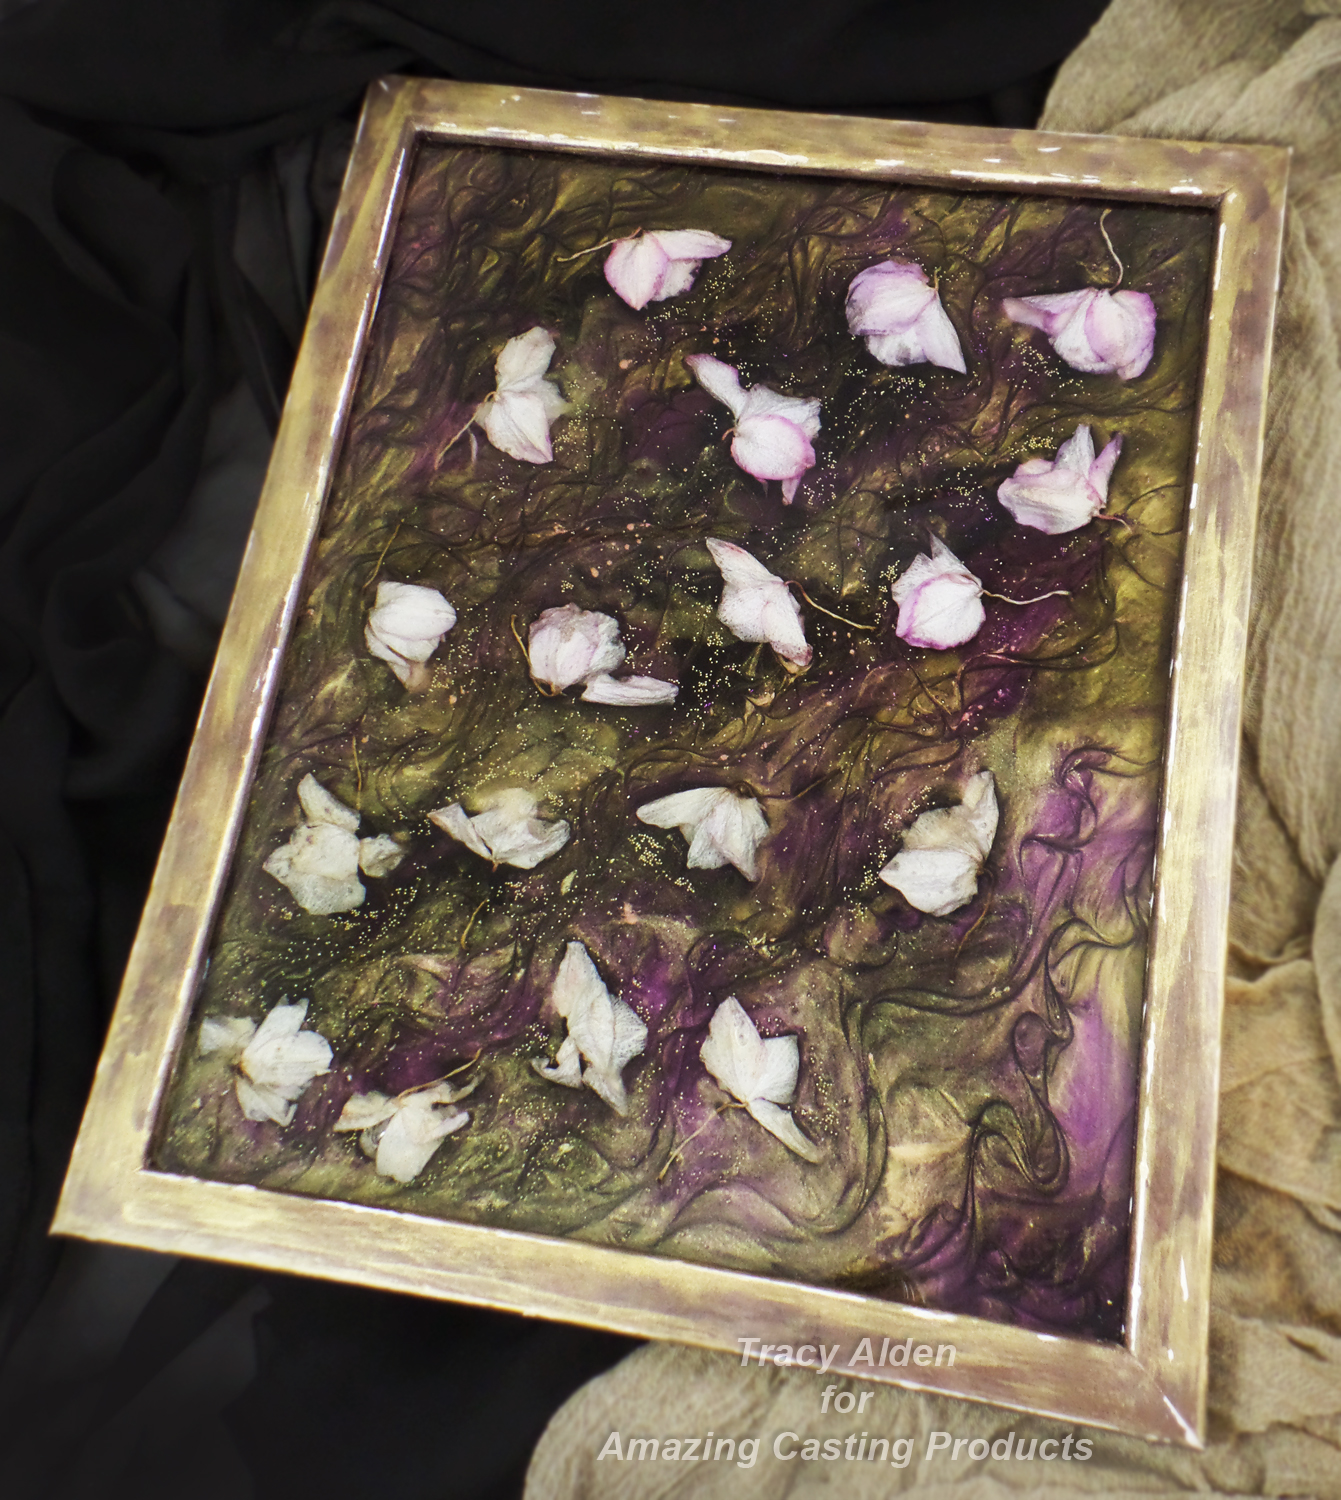
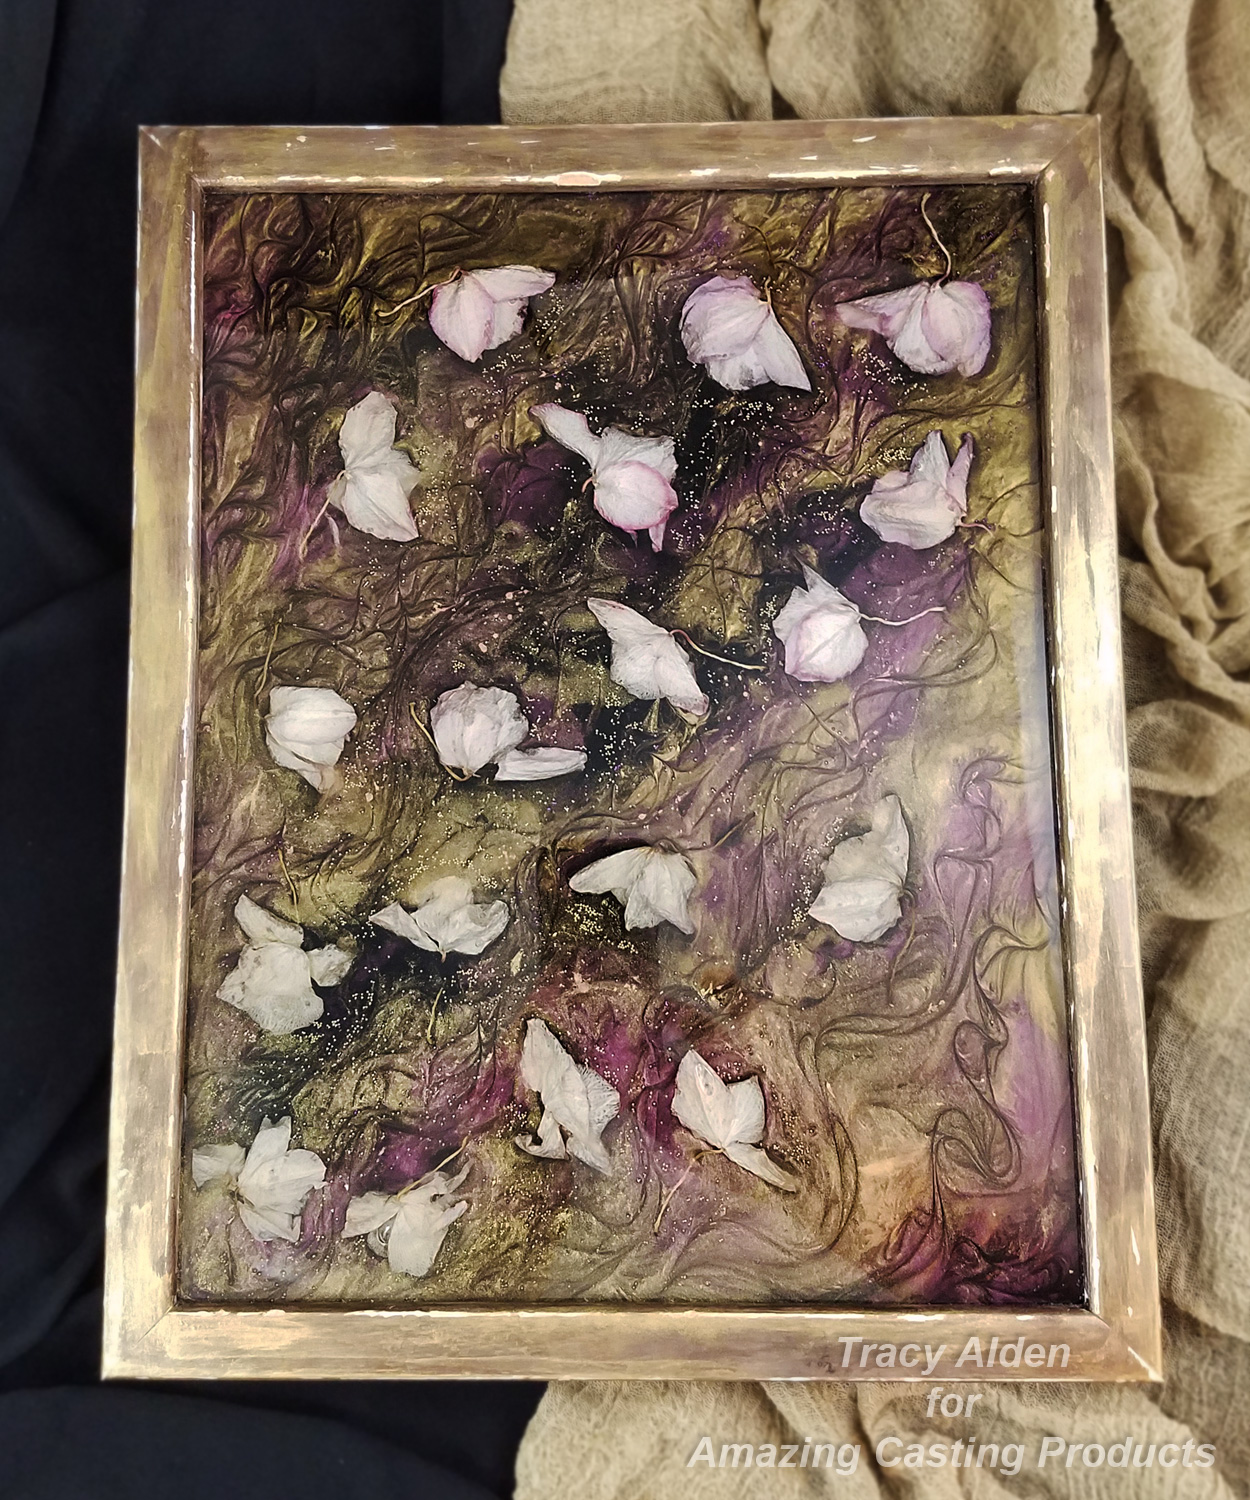
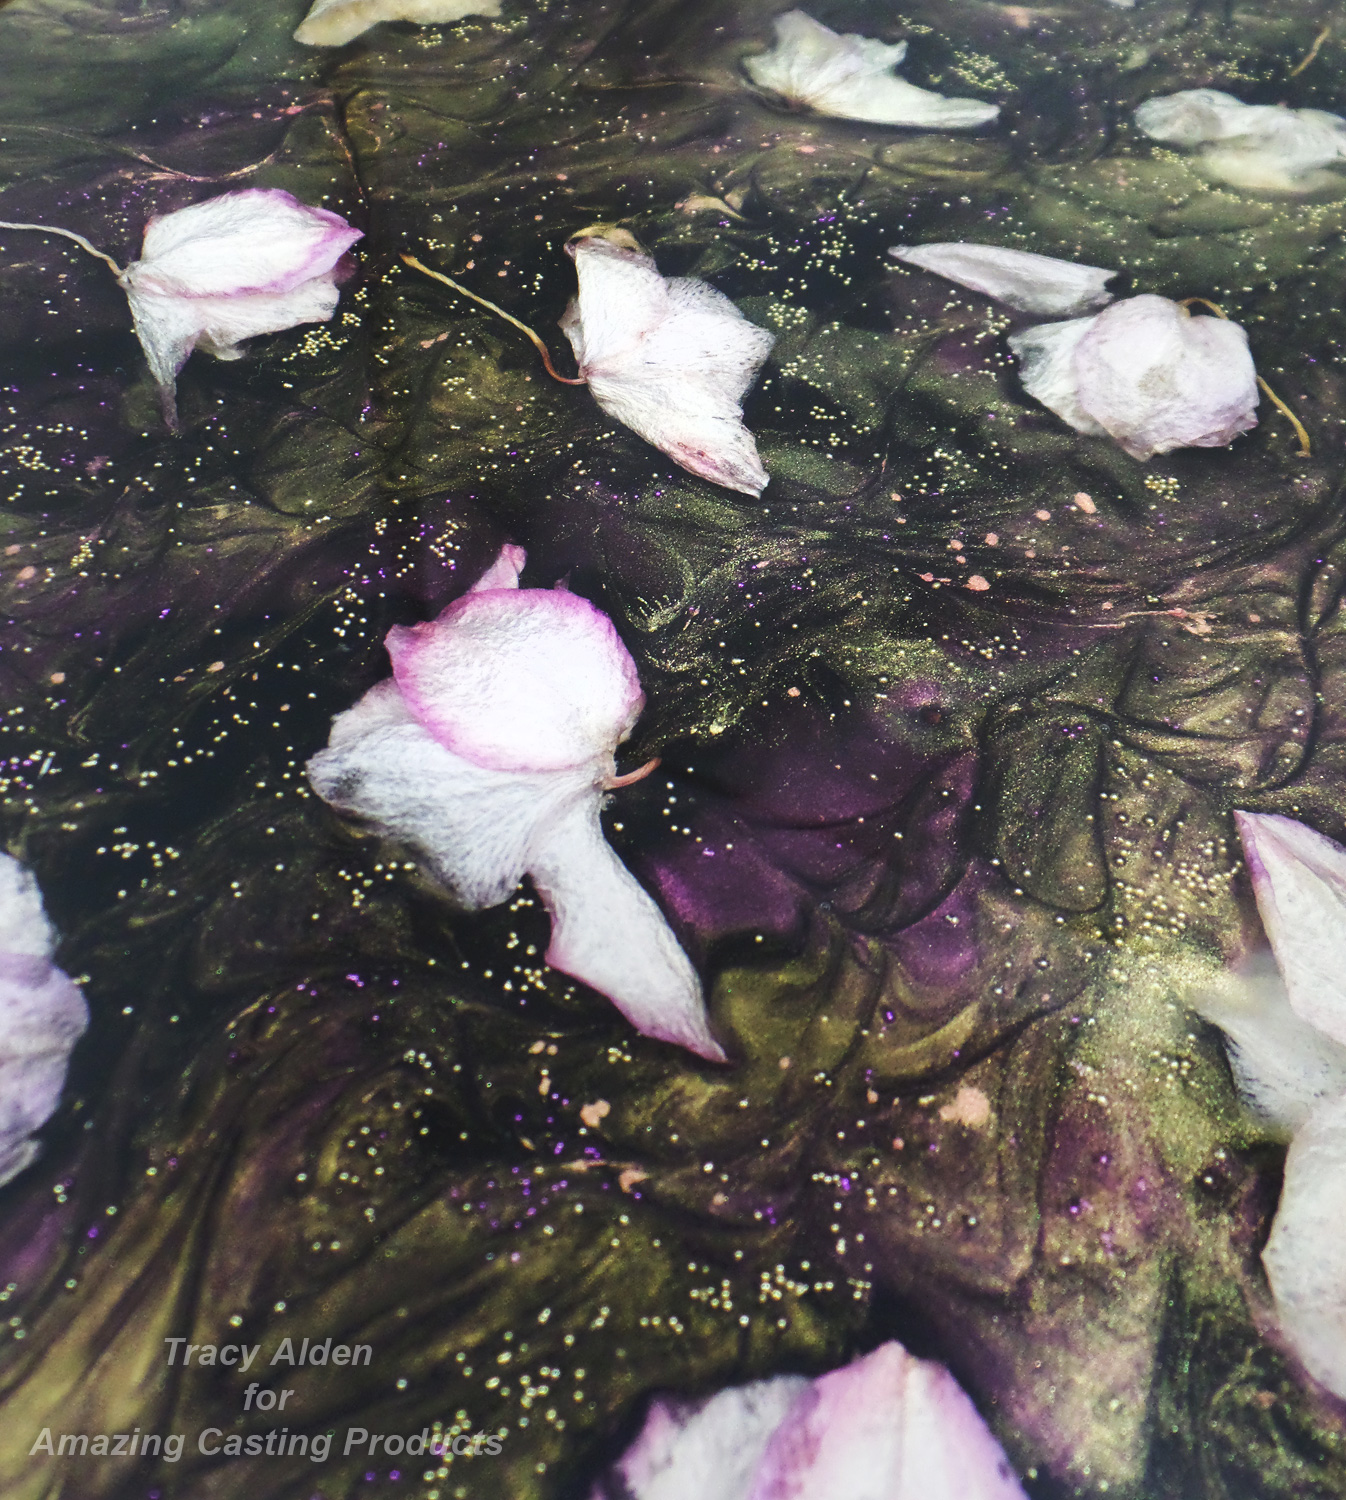
Here it is with the final layer of black tinted resin. The Alumidust not only creates a wonderful metallic shimmer but changes color and tone depending on how the frame is tilted or what type of light source is used!
This test of both dried materials and the ability to quickly change the direction of the project worked out well. The frame looks complicated but it is just four layers of resin poured. No waste of resin just a few popsicle sticks, toothpicks and clean up with baby wipes.
With a simple change of dyes, powders and their concentration any number of lovely art can be created with few supplies!Until Next Time, Safe Travels!Enchanting Halloween Jewelry Charms

My favorite time of year, Fall is finally here! Cooler weather, plant-life changing colors and the promise of my favorite holiday of the year, Halloween just right around the corner. Now that I have a little more free time I am trying to find ways to use up a lot of my older art supplies mixed with new and interesting items. Scouring stores for Halloween decos, supplies, fabrics and ideas is favorite and seemingly a family tradition in our household.
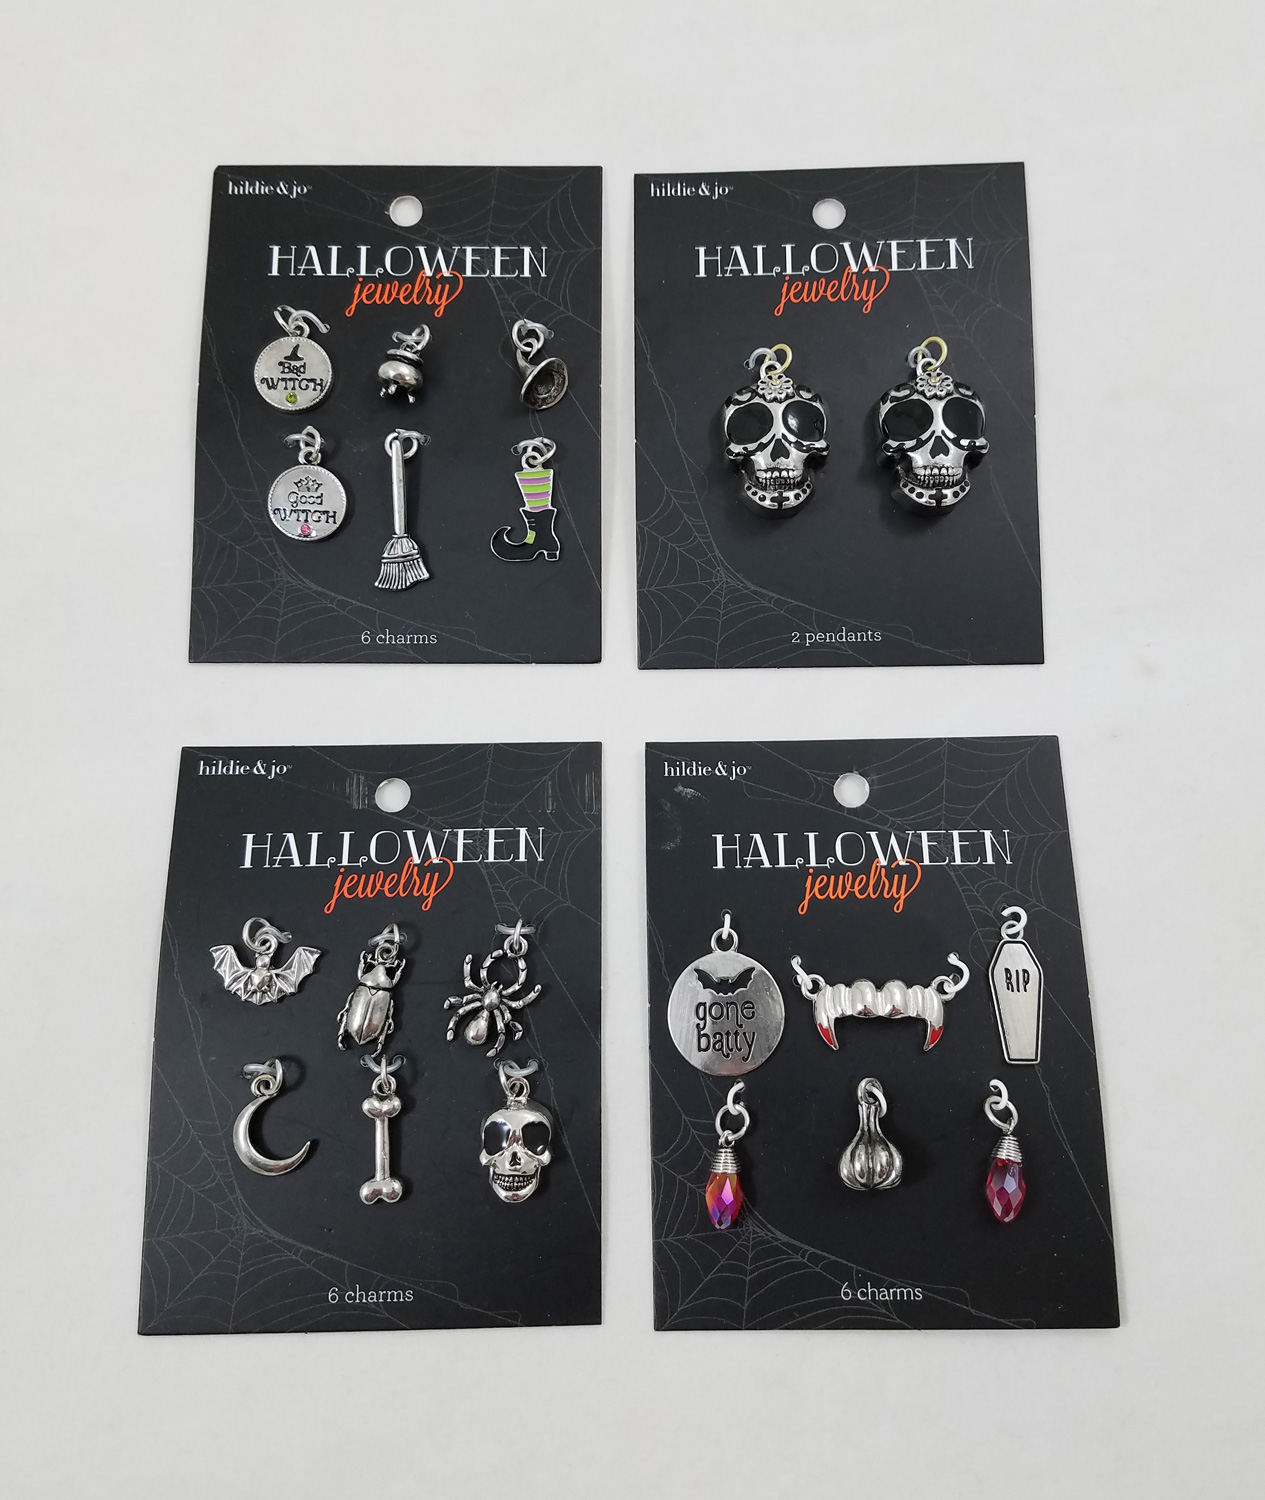
I found at JoAnn Fabric Stores a wonderful line of Halloween charms by hildie & jo. The charms are sturdy, have a great finish and there is a great variety of carded charms. My only problem was most JoAnn Fabric Stores were selling out of the charms quickly and these were the only sets I could find. Each set had different themes and assortment of styles. I didn’t use all the charms yet but several I immediately knew what I wanted to create using up some of my older jewelry supplies.

The large two skull pendant set while advertised as Halloween charms I felt fit a Día de los Muertos (Day of the Dead) theme better. Noticing the skulls had a warm golden honey color rhinestone set in them along with a black enamel antiquing, I picked black and honey tone crystals from Fiona Accessories, silver flower and leaf beads to accompany the skull.
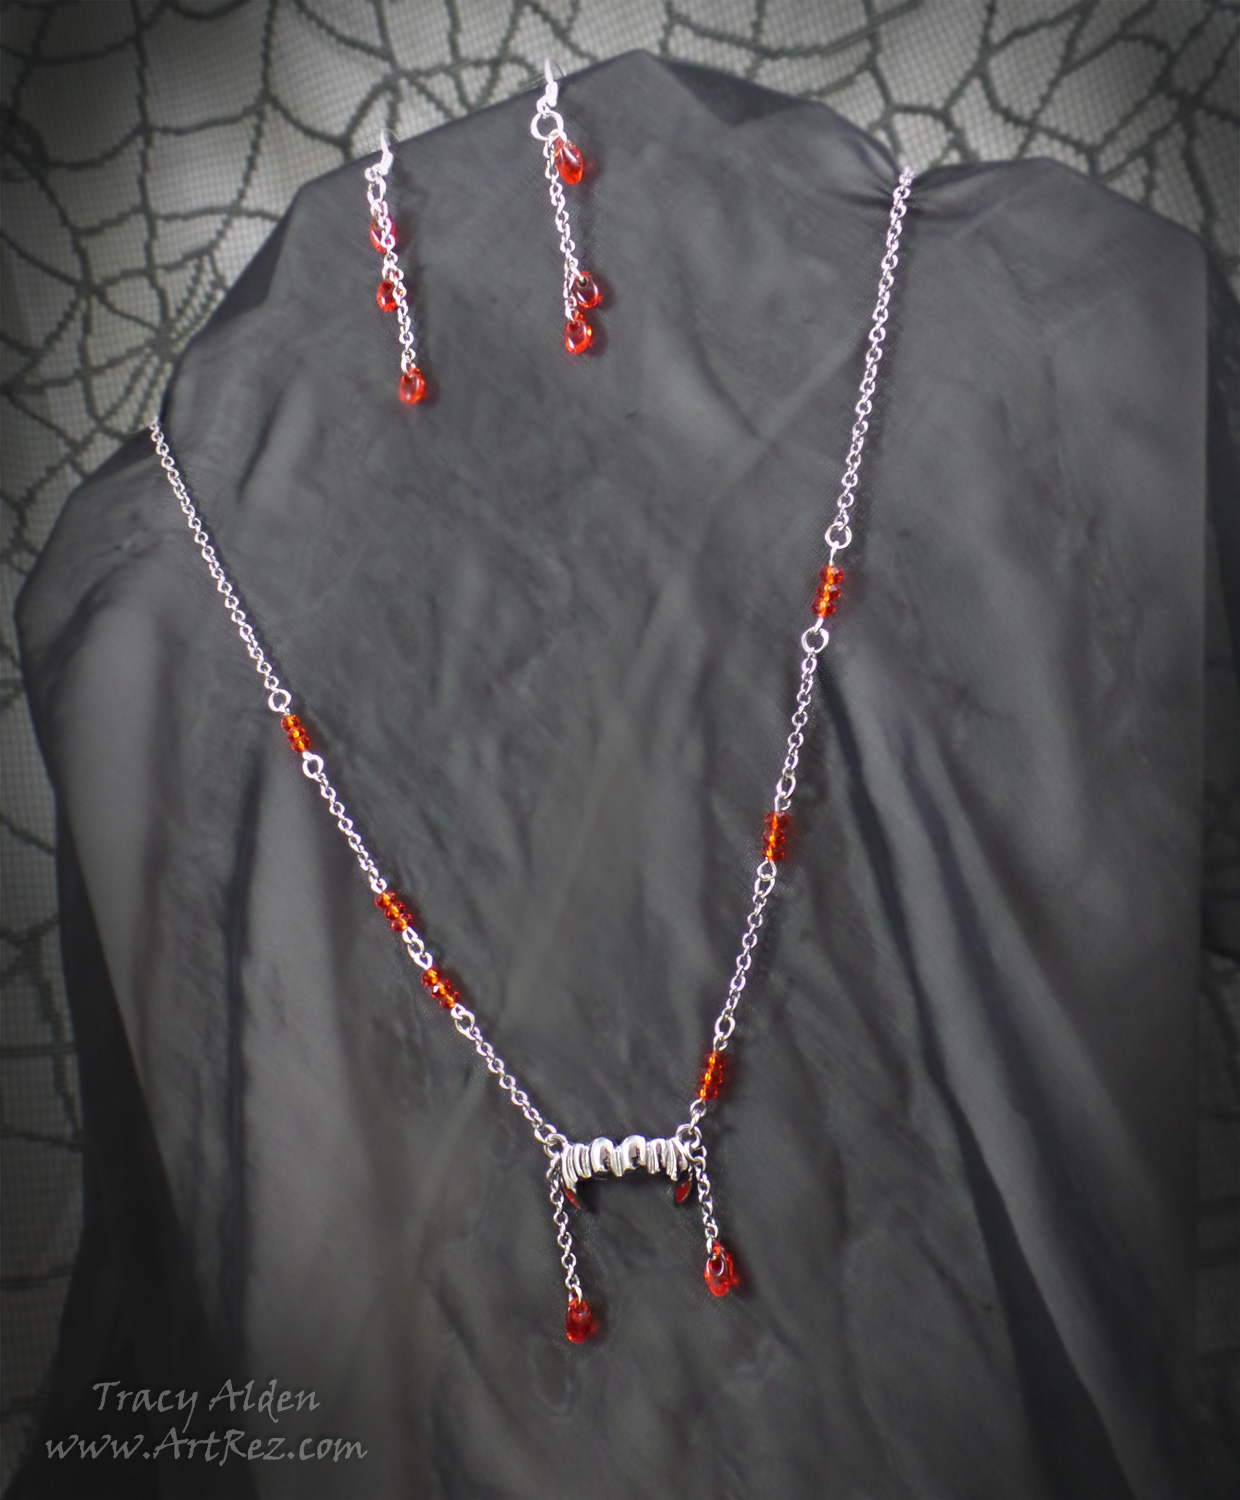
The rather adorable silver fang charm was just perfect as is, and I felt if I added any of the other charms to it, the piece would get lost. I matched the red enamel on the fangs to small red Swarovski crystal beads and silver-lined translucent red Miyuki magatama (oval) beads. By spacing the beads on the chain in irregular intervals, it created the look of crystallized blood flowing down the chain and past the fangs.
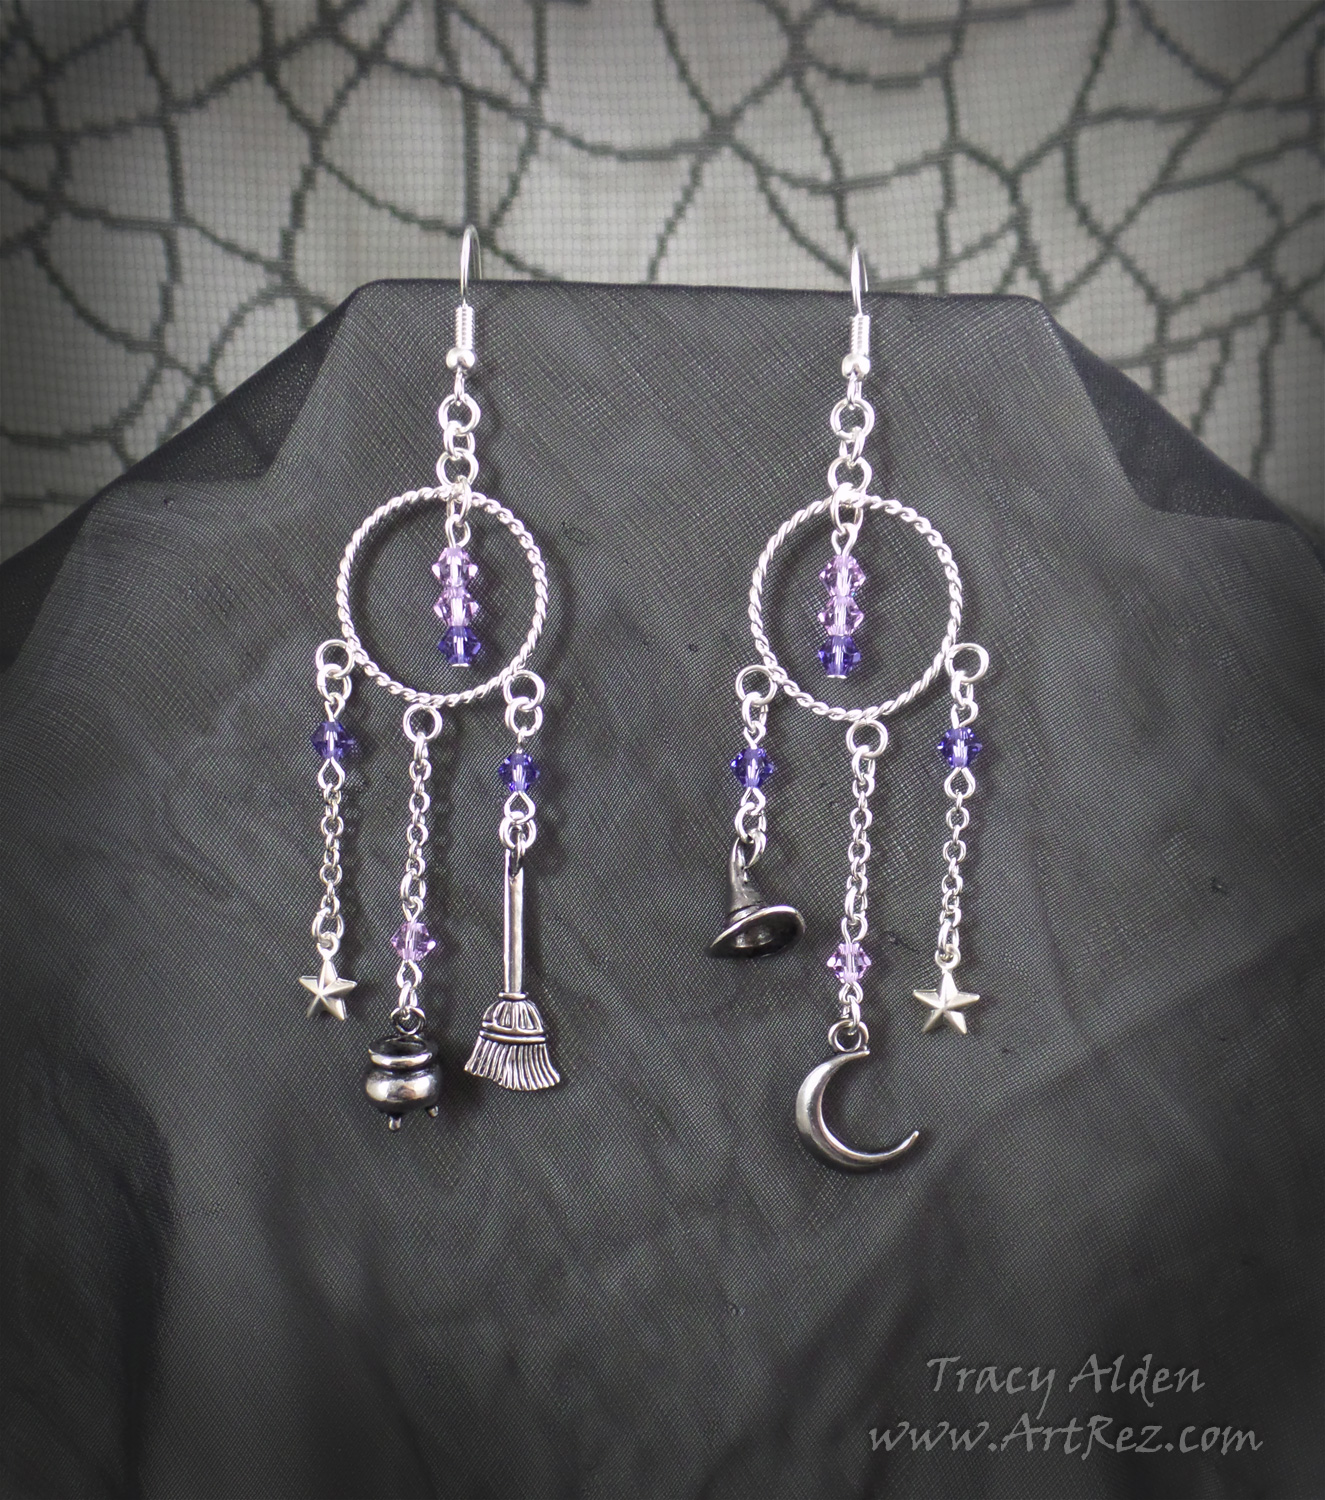
The tiny witch craft charms were so sweet and well crafted I felt adding them to silver earring hoops with purple Swarovski crystals was the best way to create a delicate but magical cascade.
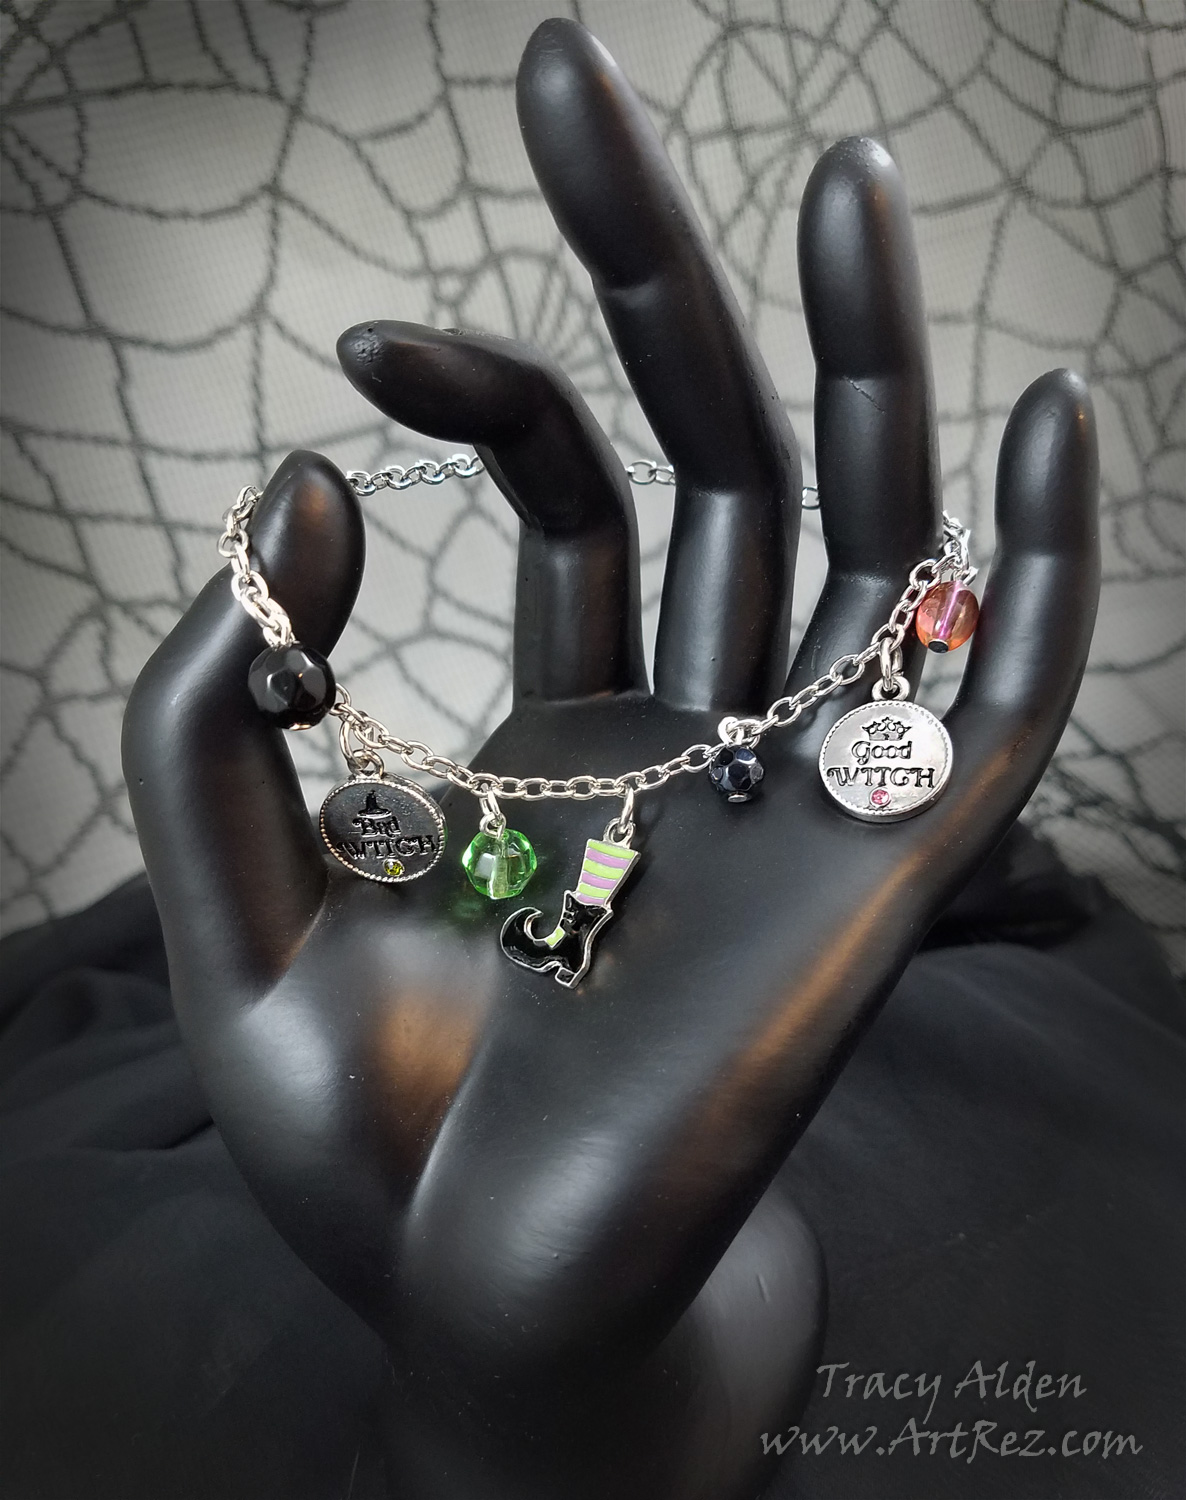
The more tongue-in-cheek witch charms I turned into a bracelet, using black, green and pink Czech fire polished beads. The playful movement of the charms and drops added to the fun everyday style.
After having such a fun time creating these pieces I can’t help but want to haunt the stores for more!
What might inspire you to make some fashionably ghoulish accessories this season?
Until Next Time, Safe Travels!
A #Cre8time trip to Ancient Greece with Amazing Casting Products and Stencil Girl Products
Hello! Tracy here with something special this month, a wonderful collaboration between Amazing Casting Products and Stencil Girl Products! Showcasing projects by incorporating Stencil Girl stencils along with Amazing Mold Putty and Amazing Clear Cast.

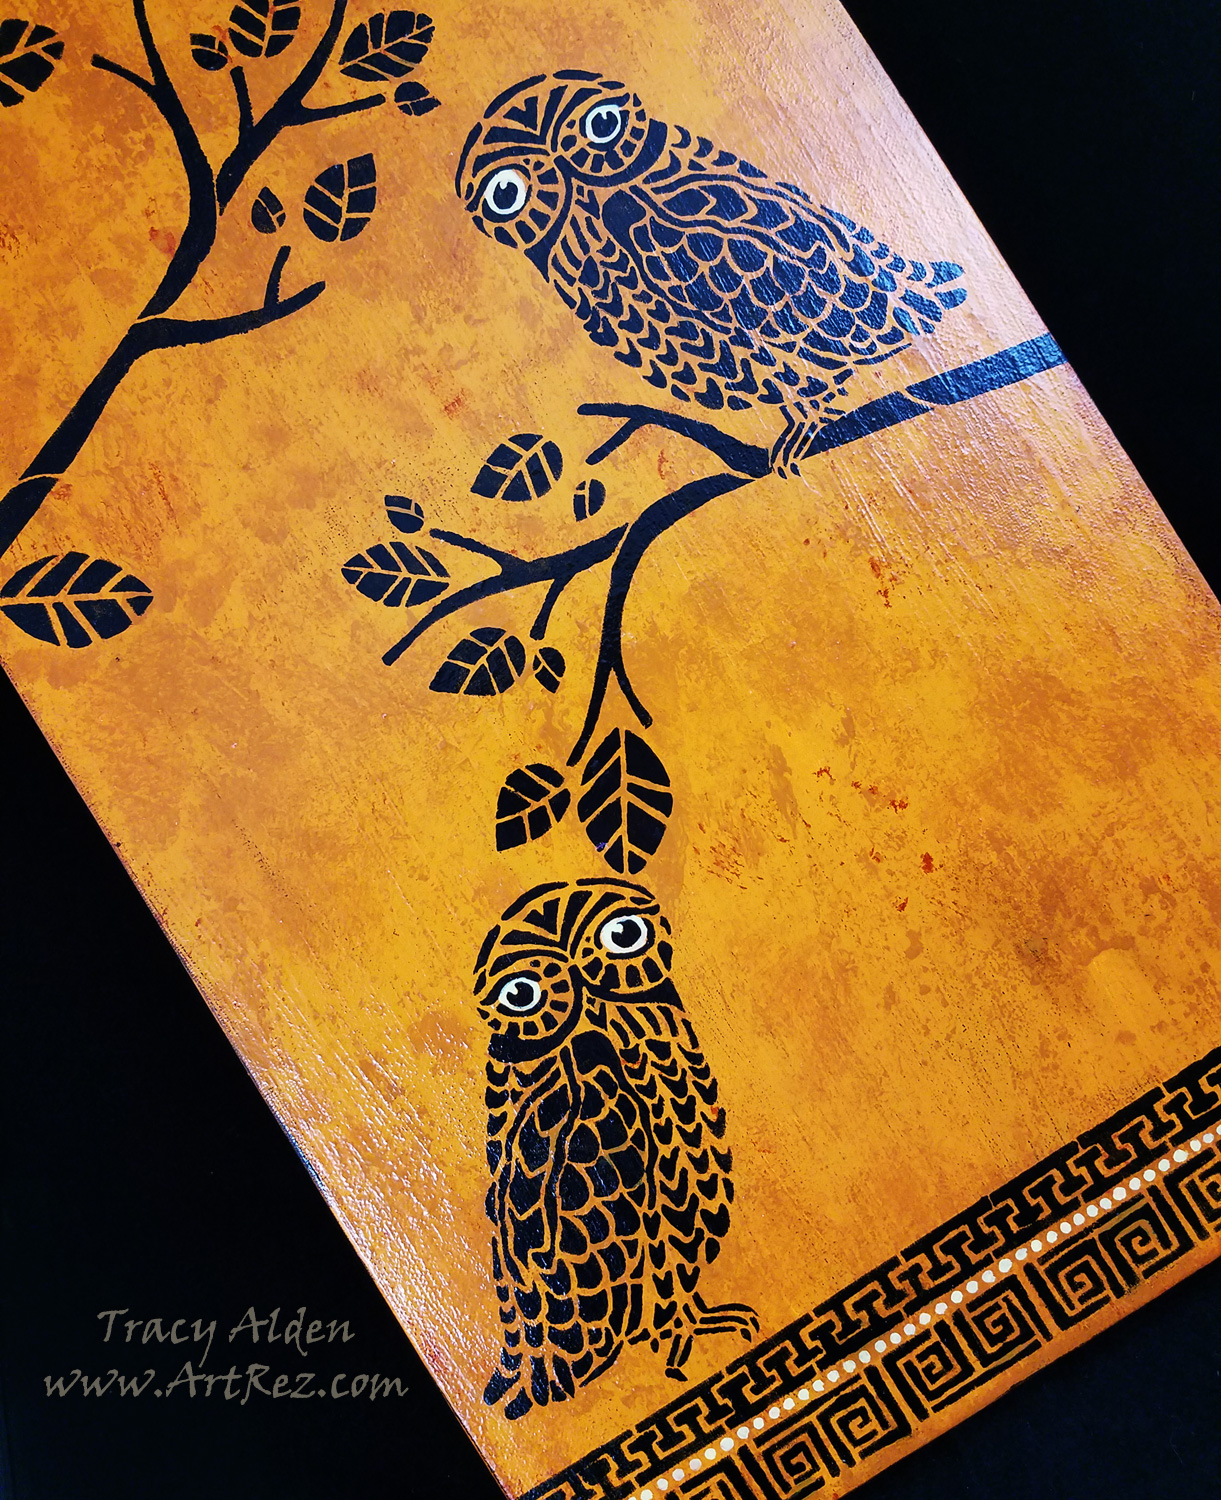
When I was given the chance to look through the Stencil Girl Products online catalog of stencils, there was so many to choose from! After seeing their Three Owls and a Branch stencil I immediately got an idea for a canvas piece. One of the owls in particular reminded me of Athena’s owl from the original Clash of the Titans movie, and once I saw the Stitch a Greek Border stencil I just knew I had to do a Grecian inspired piece!
Supplies:
Amazing Mold Putty
Amazing Clear Cast Resin
Stencil Girl Products Three Owls and a Branch 9″ X 12″ stencil
Stencil Girl Products Stitch a Greek Border 9″ X 12″ stencil
12″ X 24″ Canvas
Painter’s Tape
Paint Brush
Cosmetic Sponges
Acrylic Paint (Black, Yellow, Pale Yellow, Brown and Orange)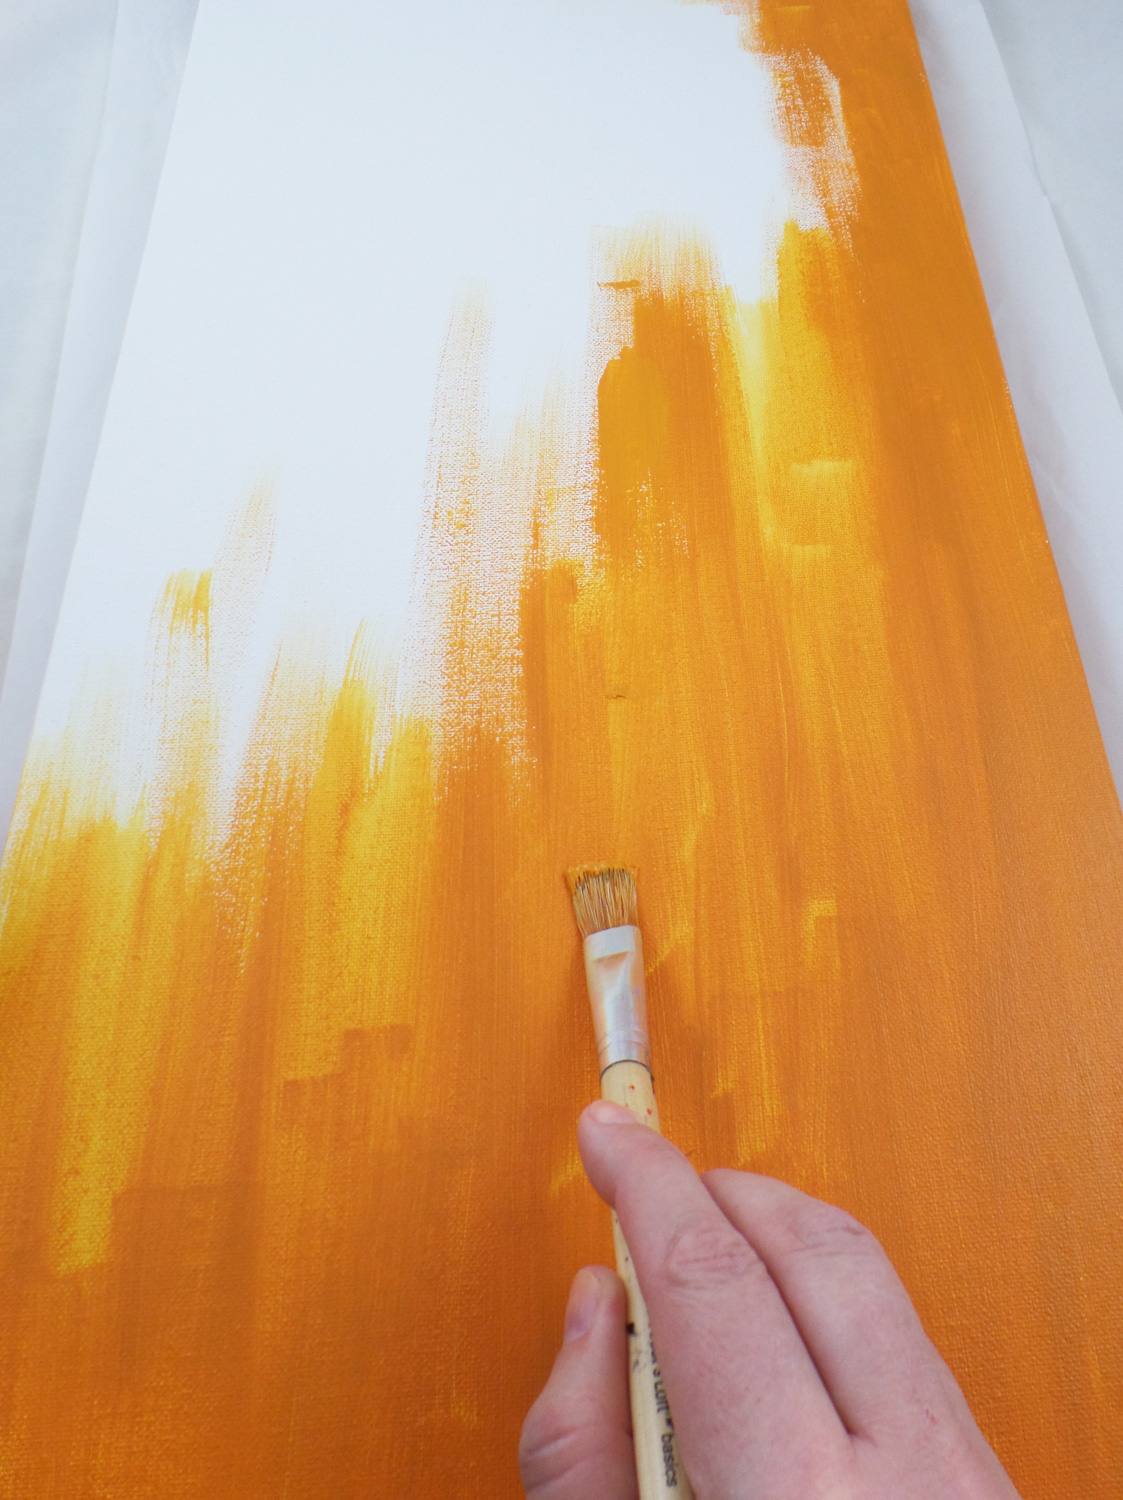
I mixed together the Yellow, Brown and Orange acrylic paints and applied it to the surface of the canvas. I did about two coats of paint to get a mostly even color tone.
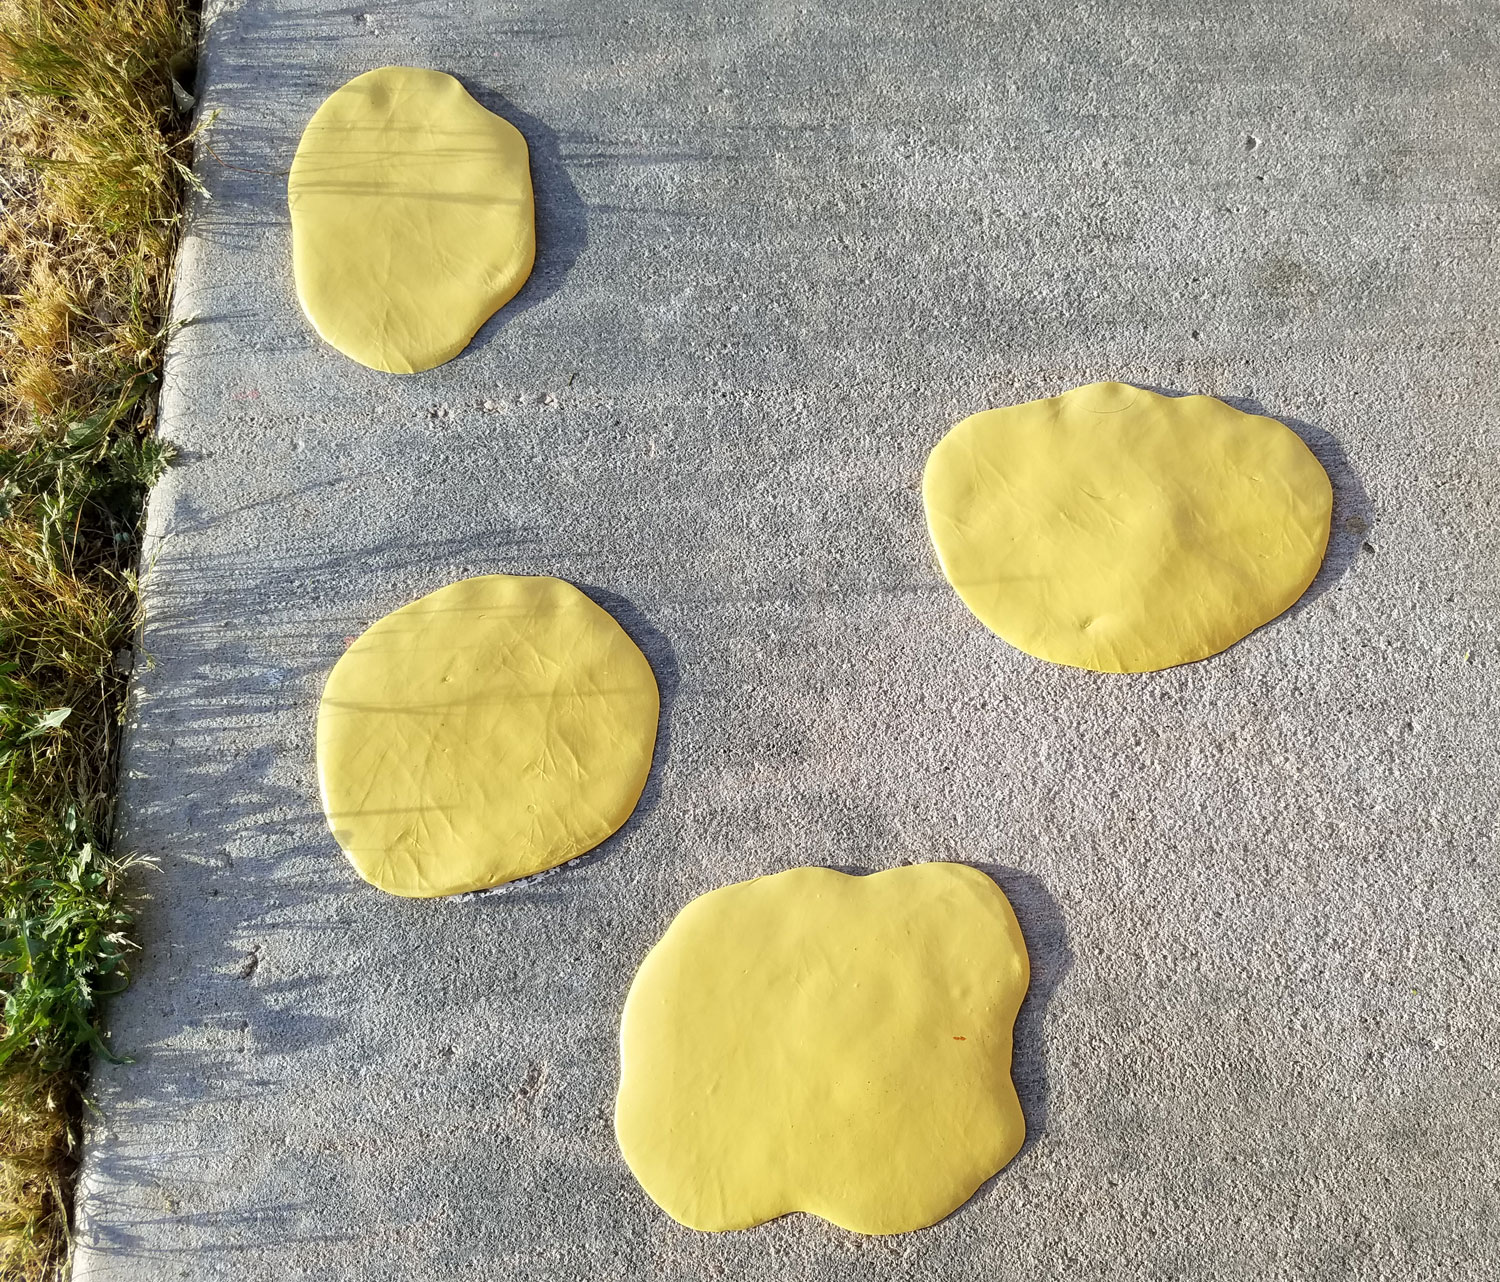
While the paint on the canvas was drying I scrubbed and cleaned a rough patch of sidewalk in my front yard. Once the cement was dry I mixed up some Amazing Mold Putty{CLICK HERE to view mixing/preparation}, and pressed the putty into the most textured spots of the sidewalk. I let the mold putty cure and carefully peeled the putty off the sidewalk.
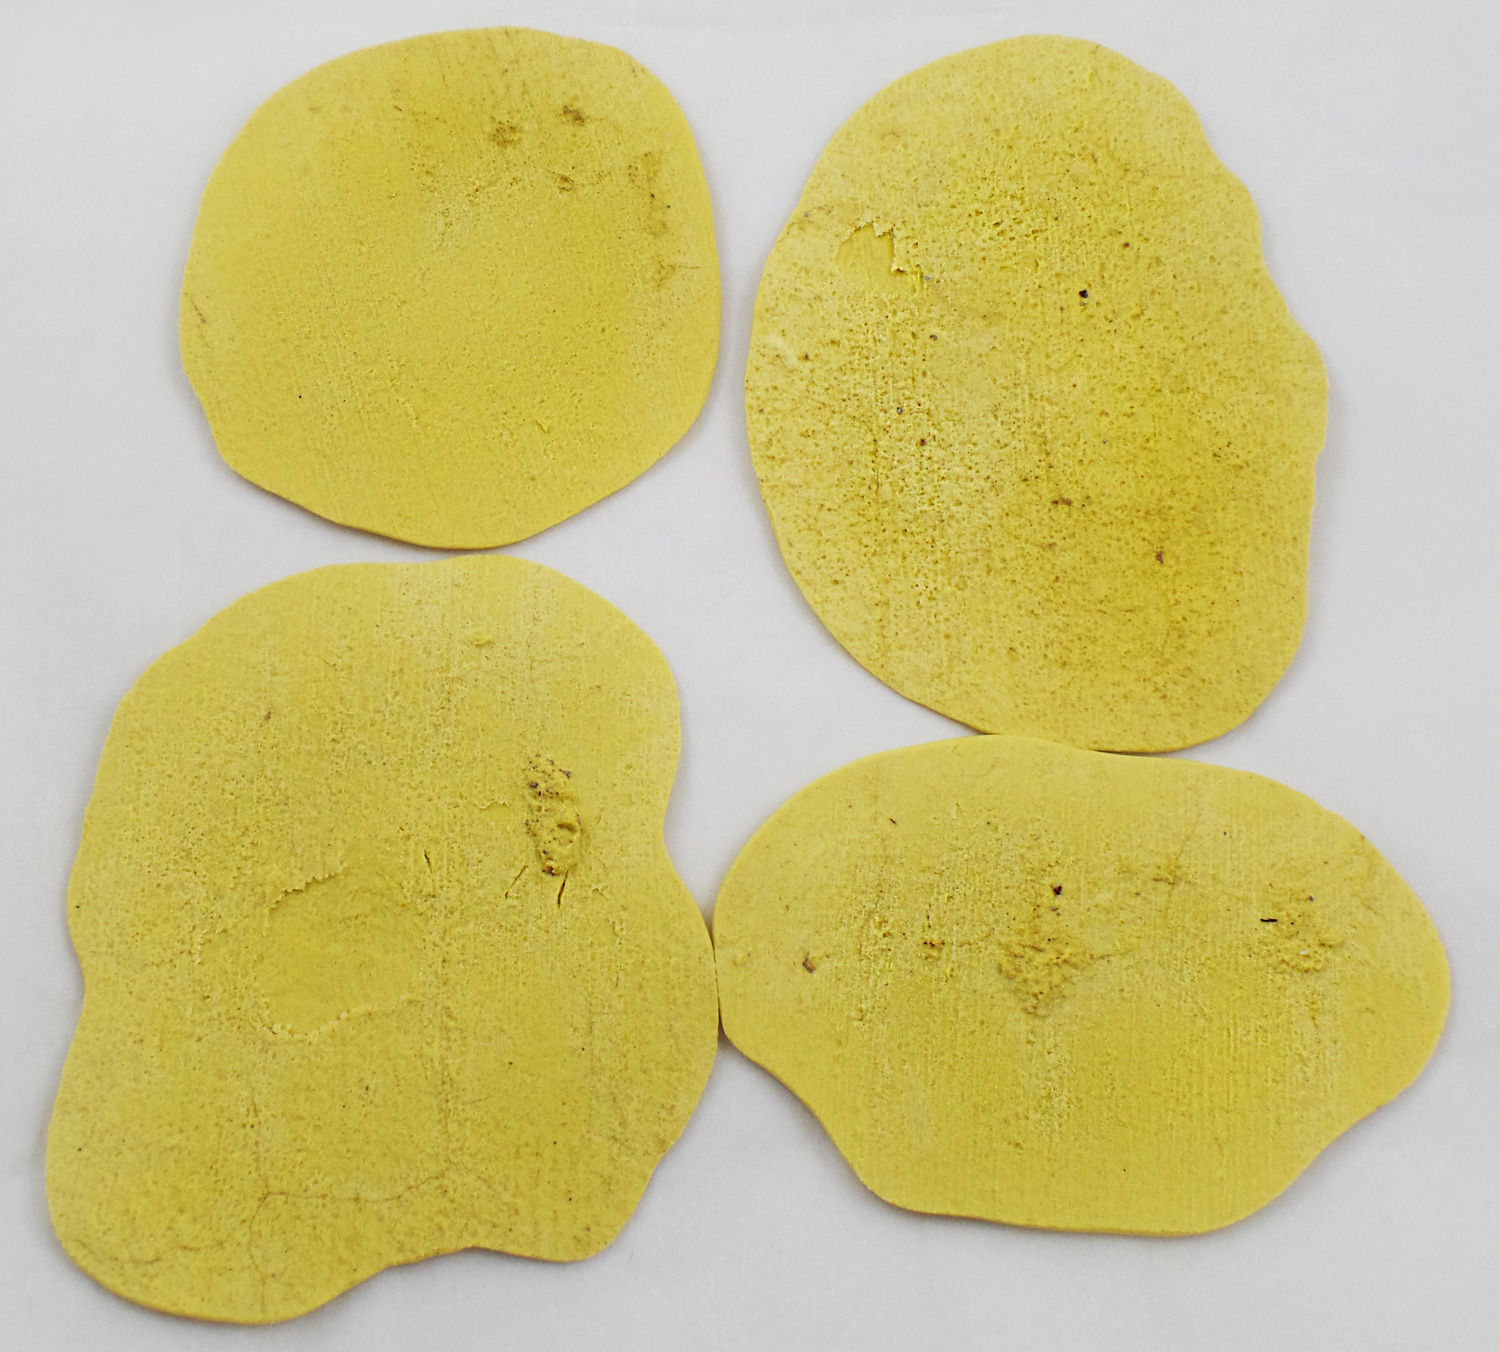
Once removed from the sidewalk I now had wonderful one of kind texture plates to use as stamps!
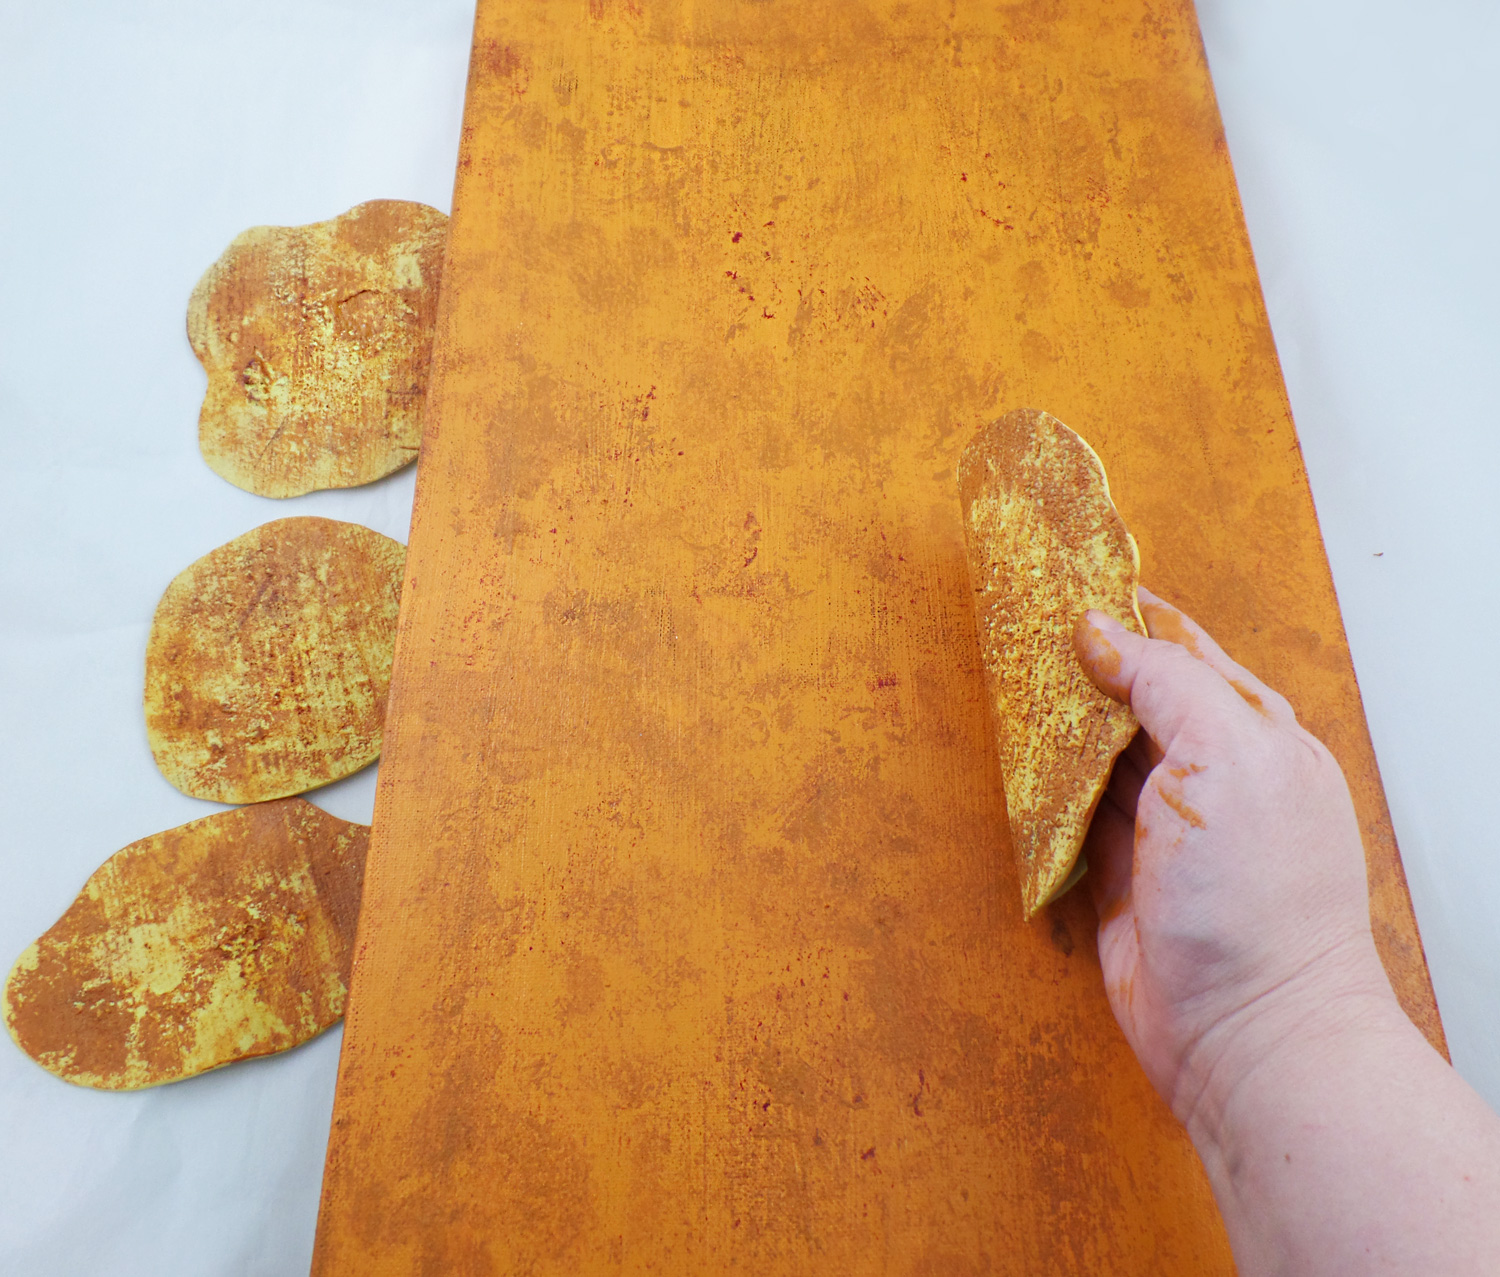
To each Amazing Mold Putty stamp I applied a light coat of acrylic pant and stamped it all over the surface of the canvas. There was no rhyme or reason to the placement, just anywhere I wanted to create a controlled splatter of color. By using several colors of paint the surface started to mimic aged Grecian frescoes and pottery. I let the paint dry fully.
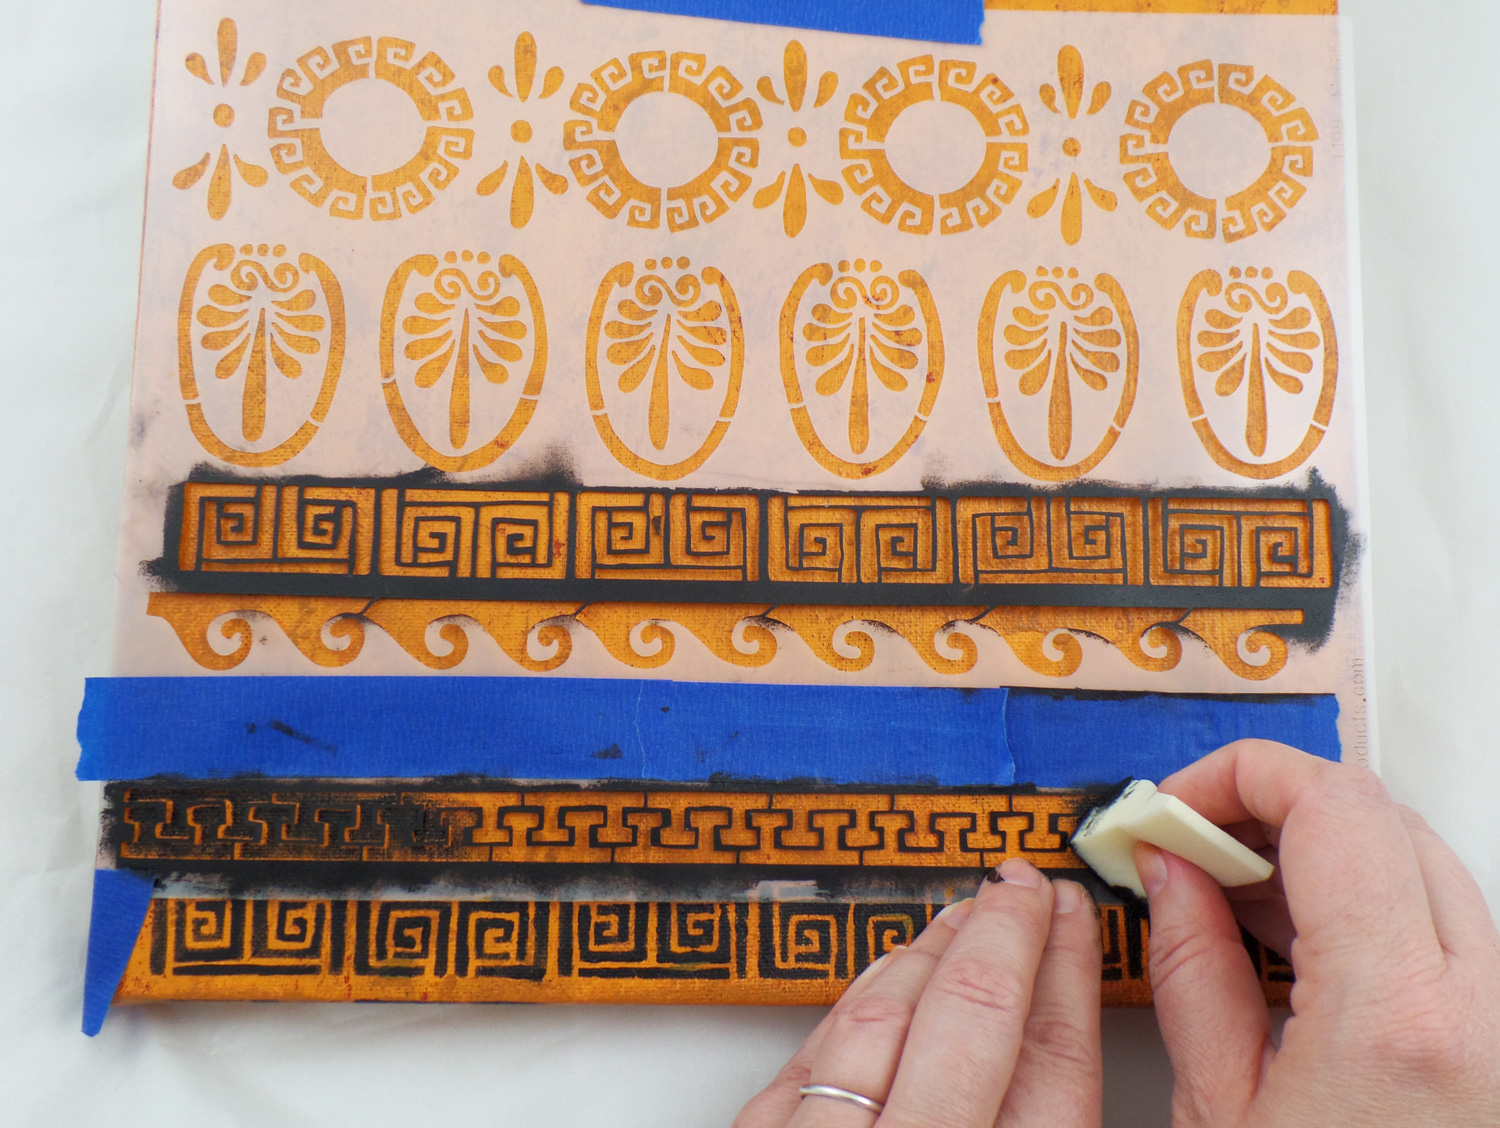
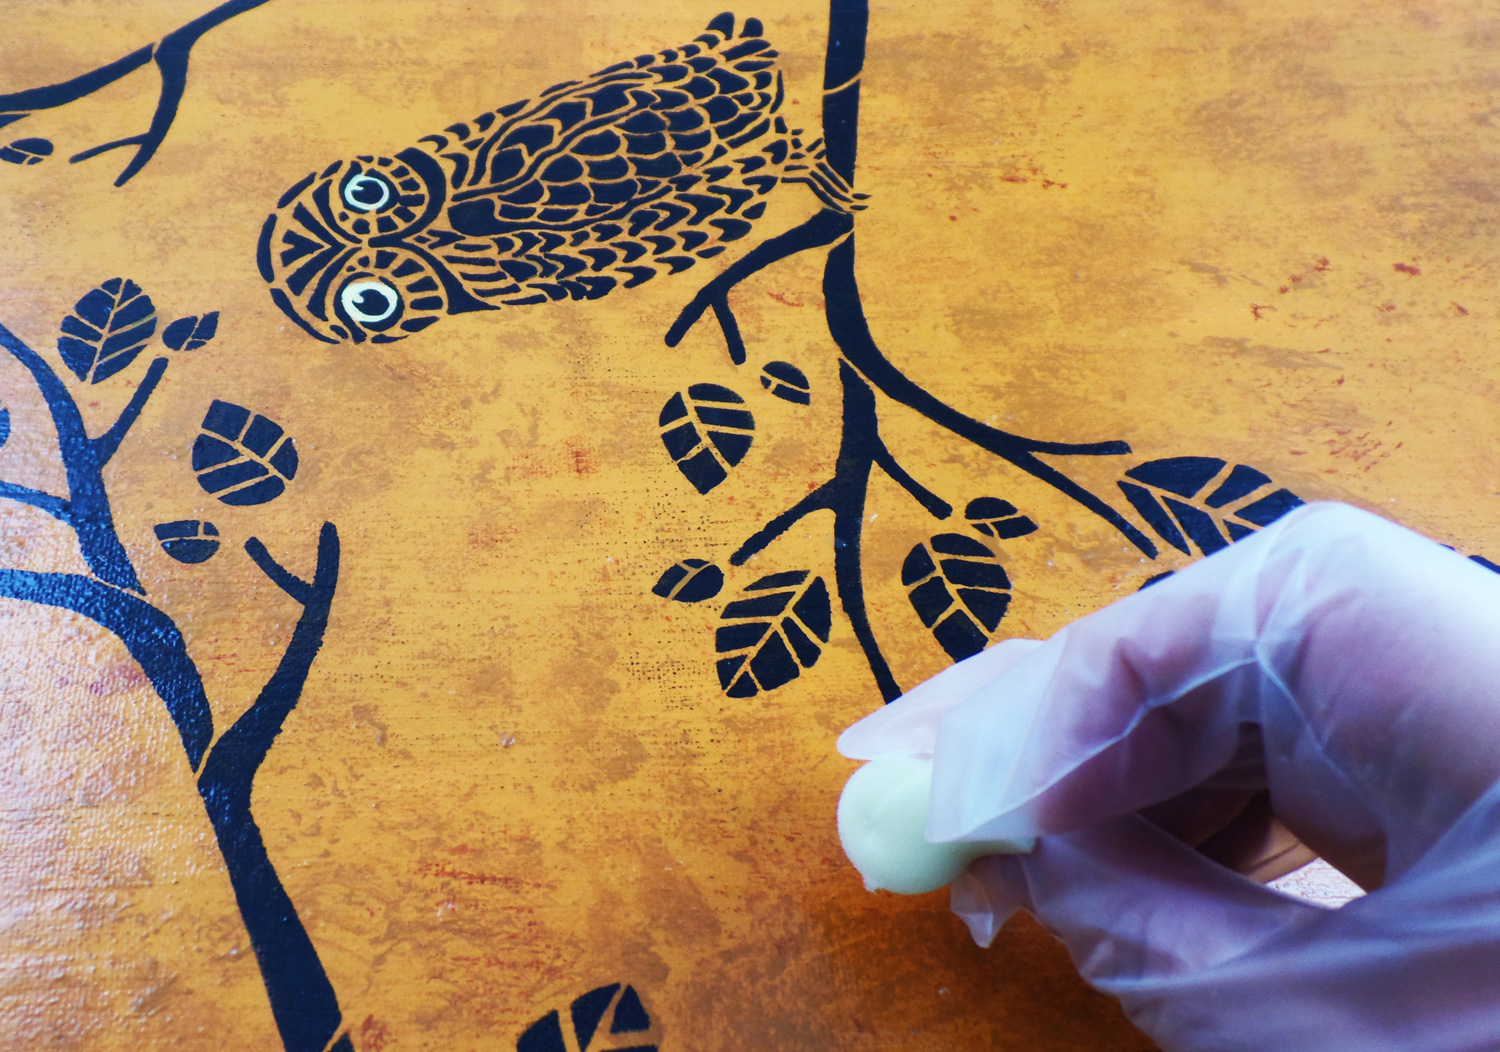
Using painters tape I taped in place the Stencil Girl Products Stitch a Greek Border on the bottom of the canvas and picked two different trim patterns to stencil. By using painter’s tape, it will hold the stencil in place but not damage the painted surface (nor the stencil), allowing for easy repositioning. I then poured a small amount of Black acrylic paint on a palette and dabbed a cosmetic sponge lightly into the paint. I carefully applied the paint while holding the stencil in place to prevent any slight slippage of the stencil. If an area needed a second coat of paint it was easy to go back and reapply paint without any worries of paint overloading. I repeated this for the top of the canvas as well.
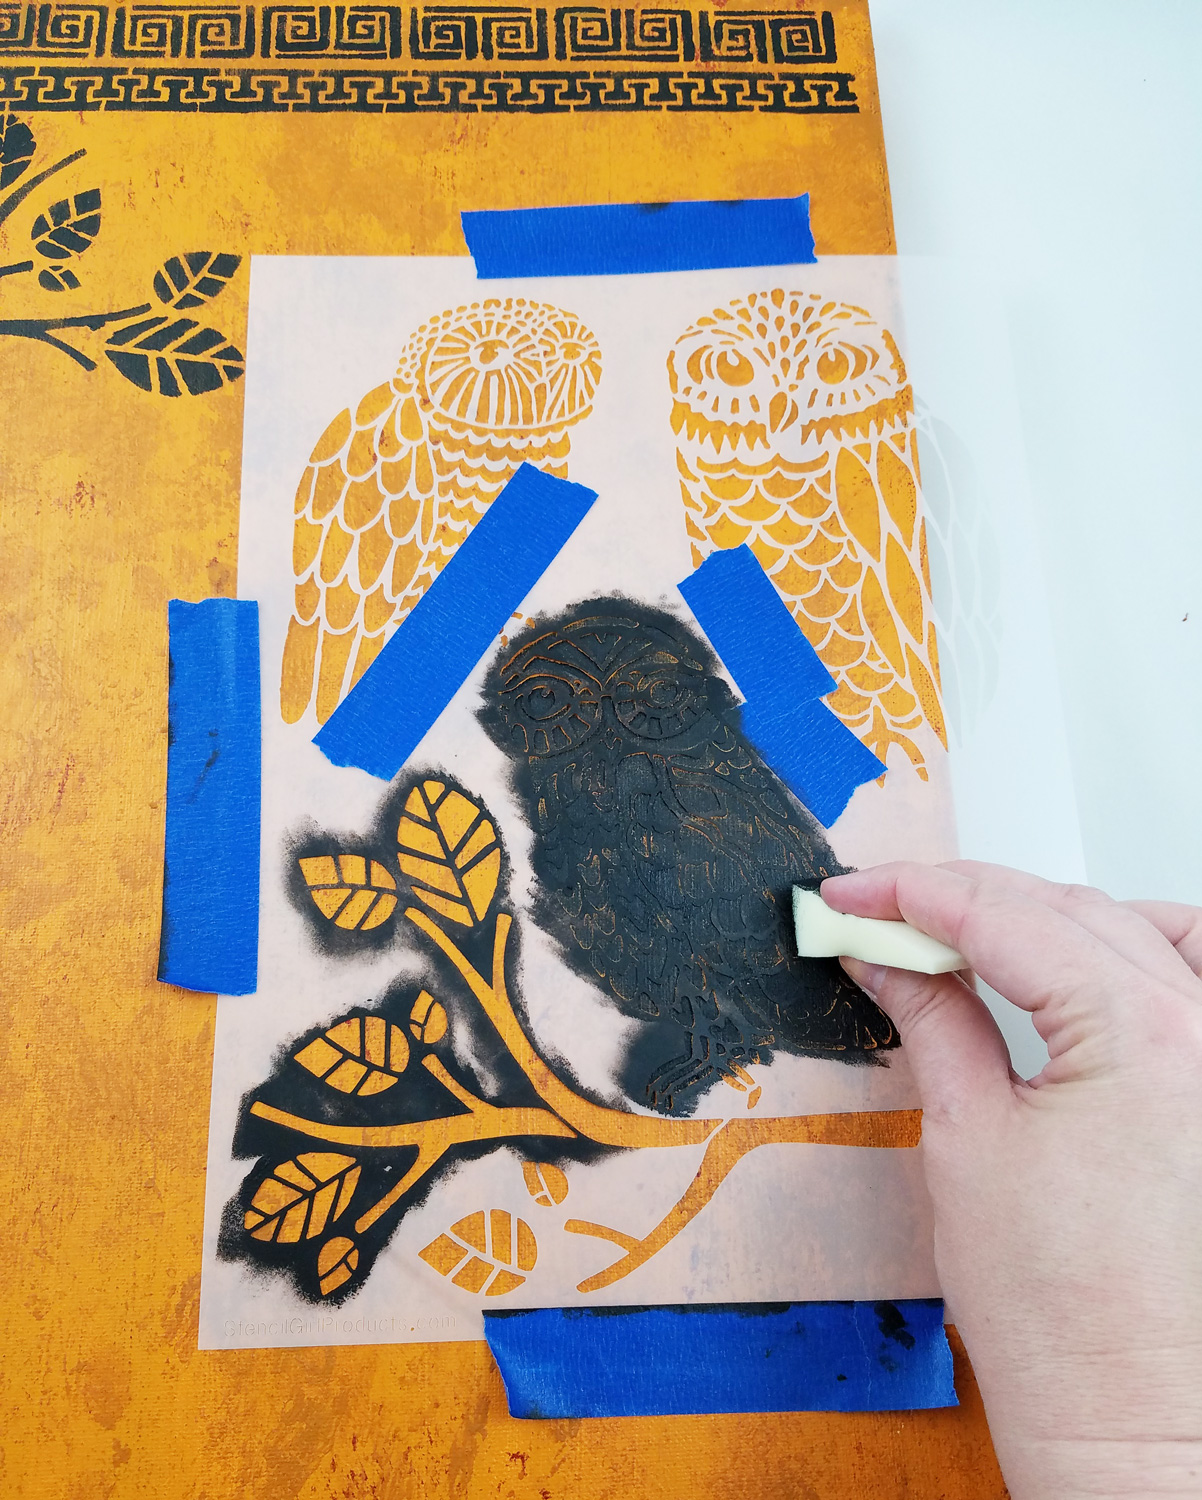
The Stencil Girl Products Three Owls and a Branch stencil allowed for a lot of artistic freedom by simply blocking off sections I did not want paint to go through with painter’s tape. By flipping over the stencil or moving it around at different angles I was able to create many tree branches with ease.
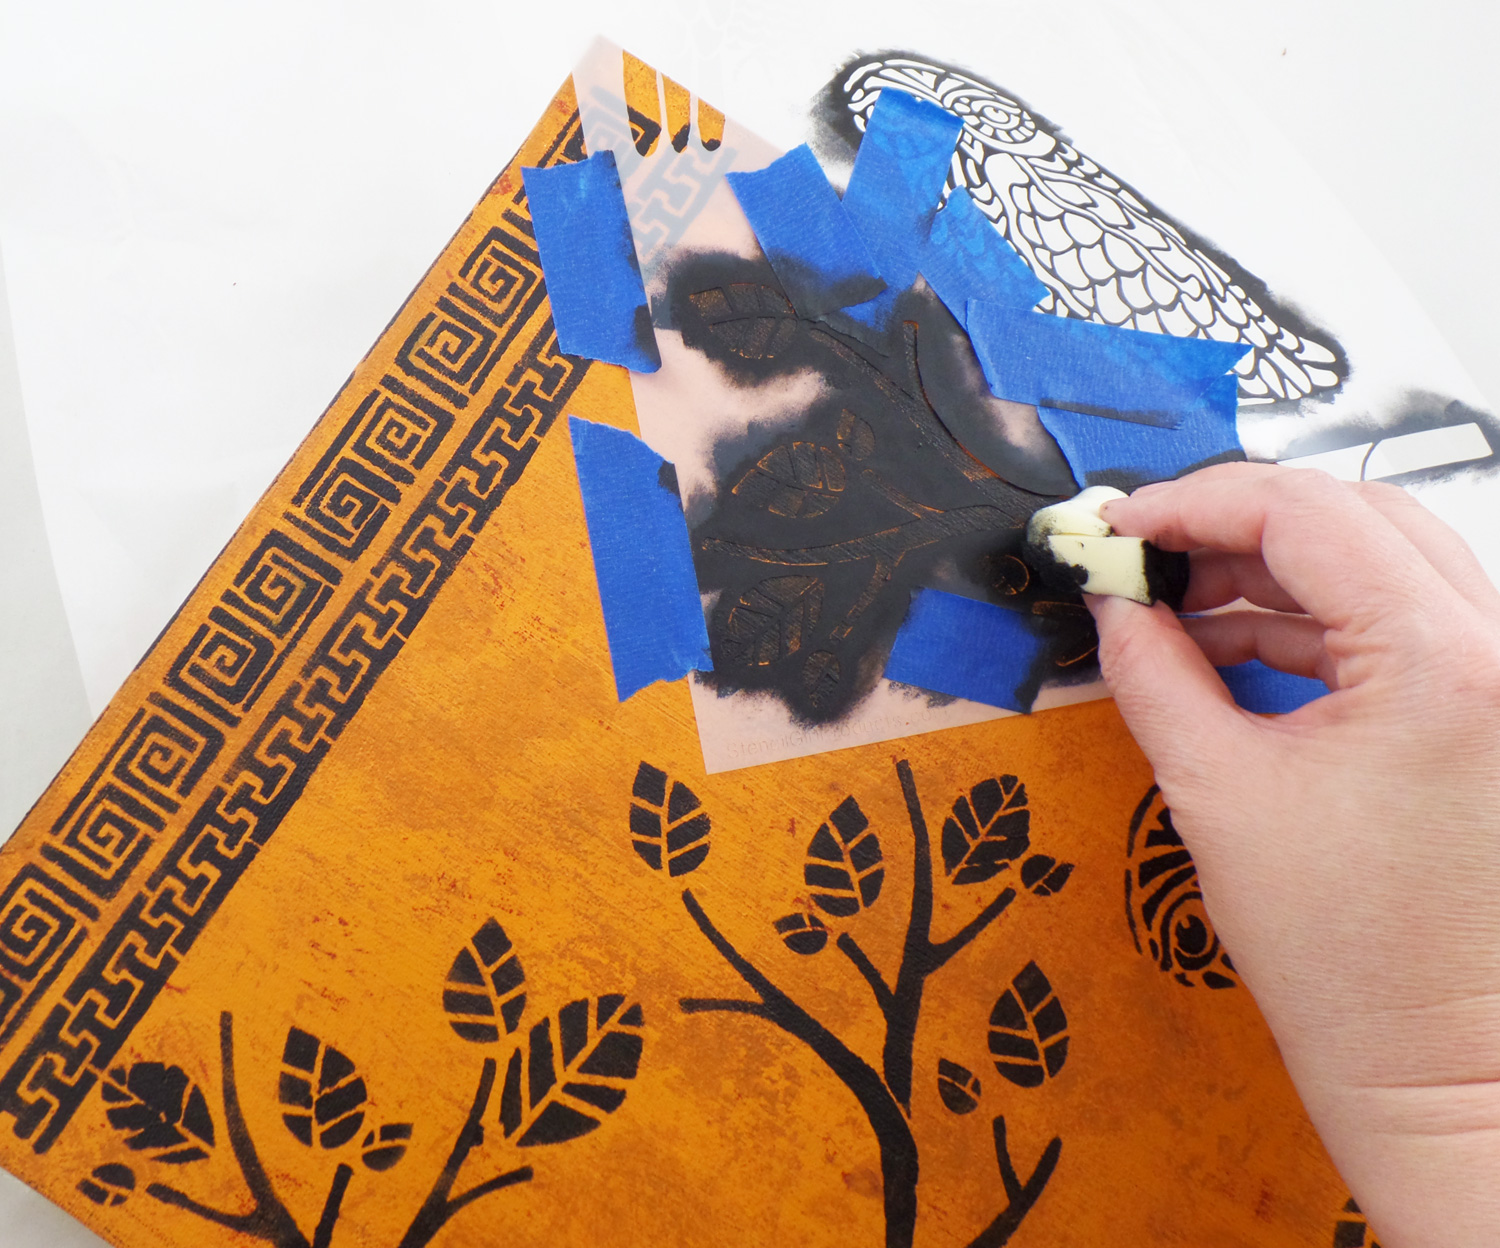
With a few branches I even taped off some of the leaves to create the look of tree just starting to sprout leaves in Spring. Once I was done stenciling it was easy to clean the stencils by placing them in a small tub with soap water and gently rubbing the paint off.

Once all of the paint was dry I went back to fix any stenciling mistakes I had made with a small paint brush. I then added some Light Yellow acrylic paint to the eyes of the owls and trim to further replicate the look of ancient Greek art.
I mixed up some Amazing Clear Cast Resin, let it sit for 10 minutes, and applied a thin layer to the front of the canvas with a cosmetic sponge. I applied the resin slowly, a downward motion, top to bottom of the canvas. I didn’t mind if I had little bumps and canvas texture showing through, as the resin was acting as a color intensifier and a thin protective coating. I let the resin fully cure for 24 hours before handling.
*If I wanted a more of a glassy smooth surface I would apply a second or even third layer of resin without a cosmetic sponge.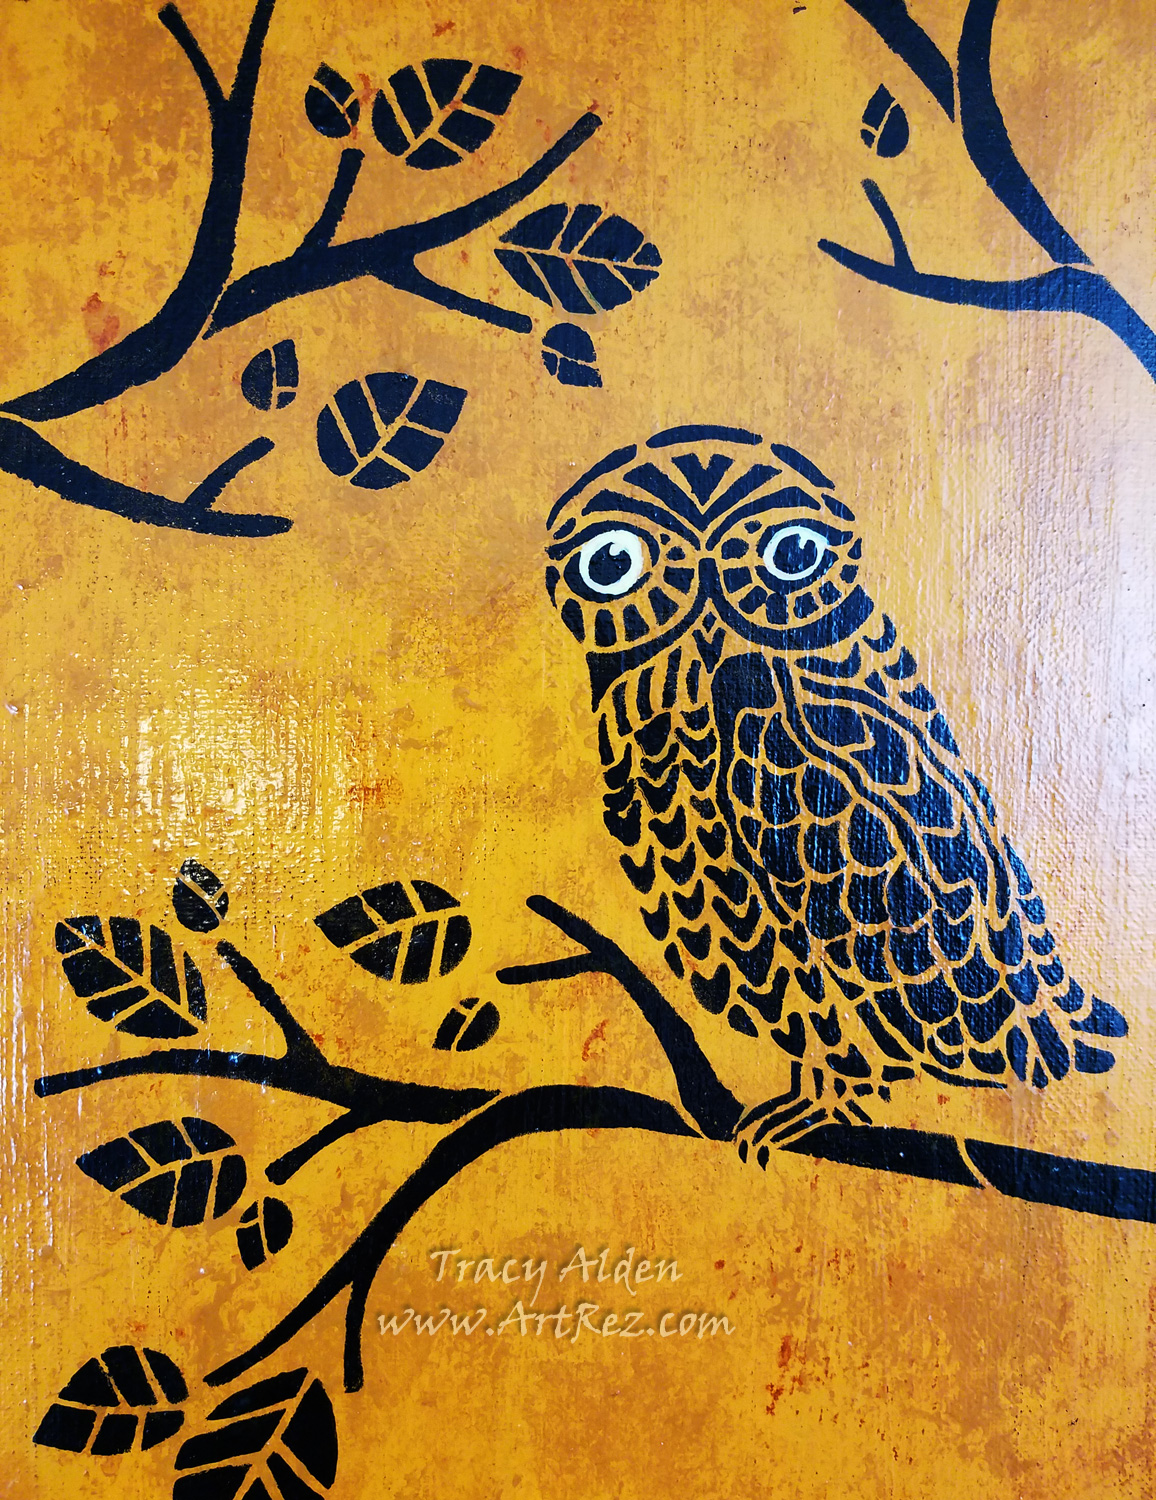
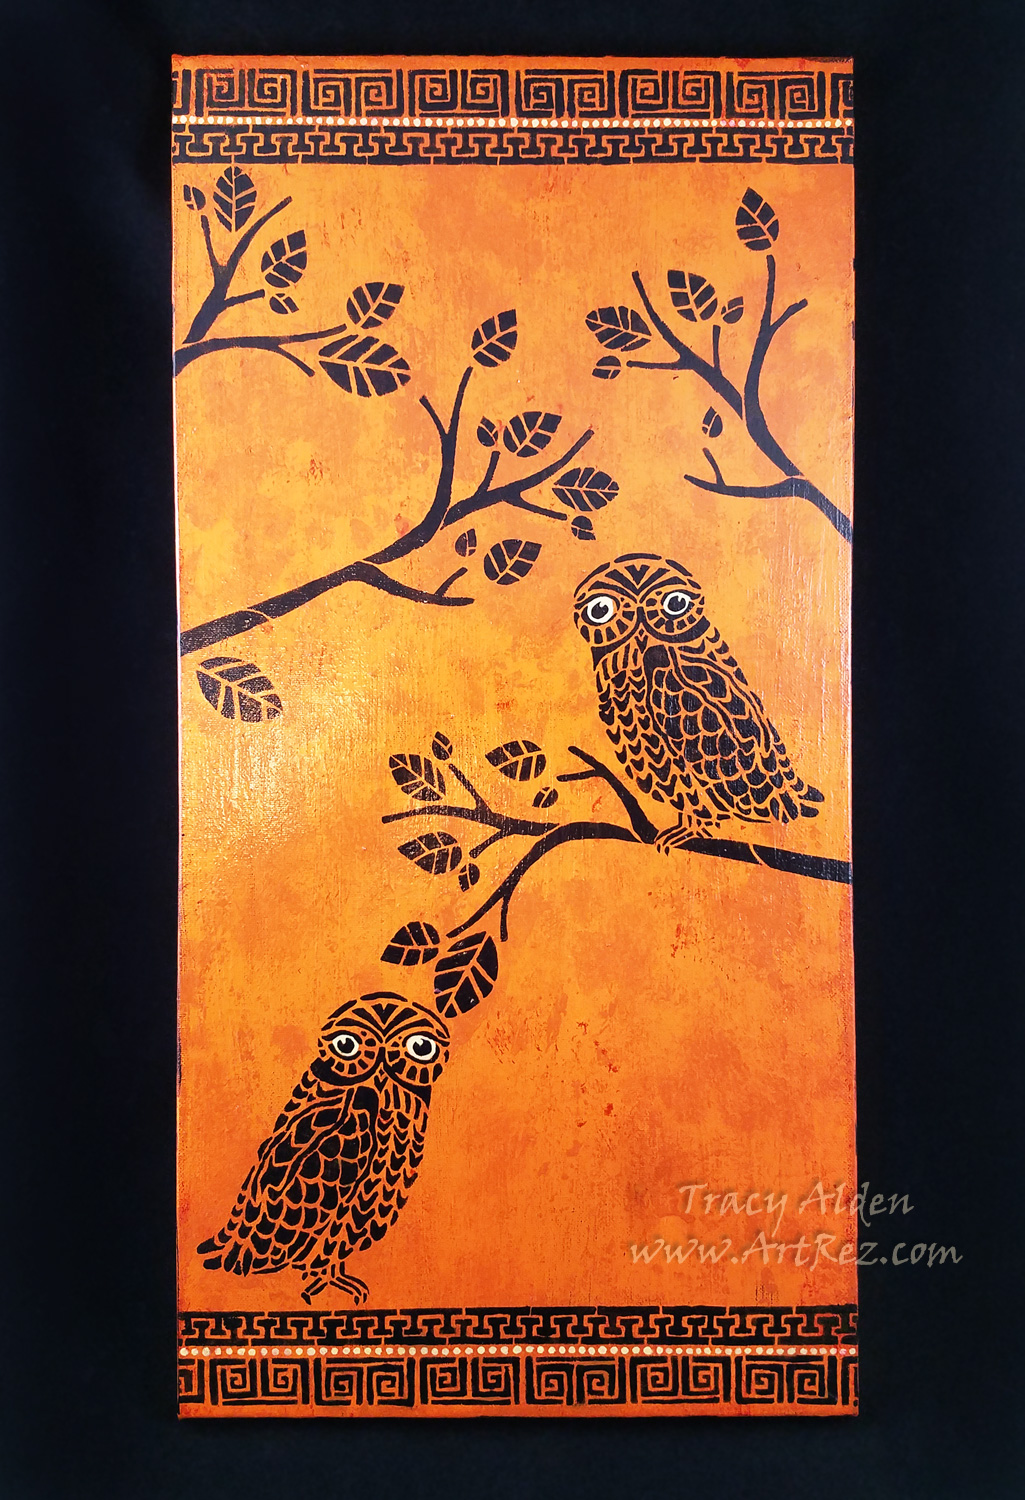
Now completed, Athena’s ever watchful owls seem to be right off an ancient fresco!
Until Next Time, Safe Travels!
#Cre8time Jewelry Creations Inspired by Art History

Hello! With Spring in full swing I have been cleaning the plethora of crafting supplies I seem to always have. While I destash I can’t help but notice I seem to add to the collection without noticing! So this time I set myself the goal of using my more coveted supplies to create jewelry on a more regular basis. Today I wanted to show with you some of those jewelry creations inspired by Art History.

“Imhotep’s Gift”, vintage gold plated beads, Lapis Lazuli beads and vintage gold plated findings.
I have a serious love of Lapis Lazuli; the tiny highlights of naturally occurring Iron Pyrite always gives it a wonderful sparkle. Taking my inspiration from ancient Egypt, a matching set of chandler earrings and necklace was born.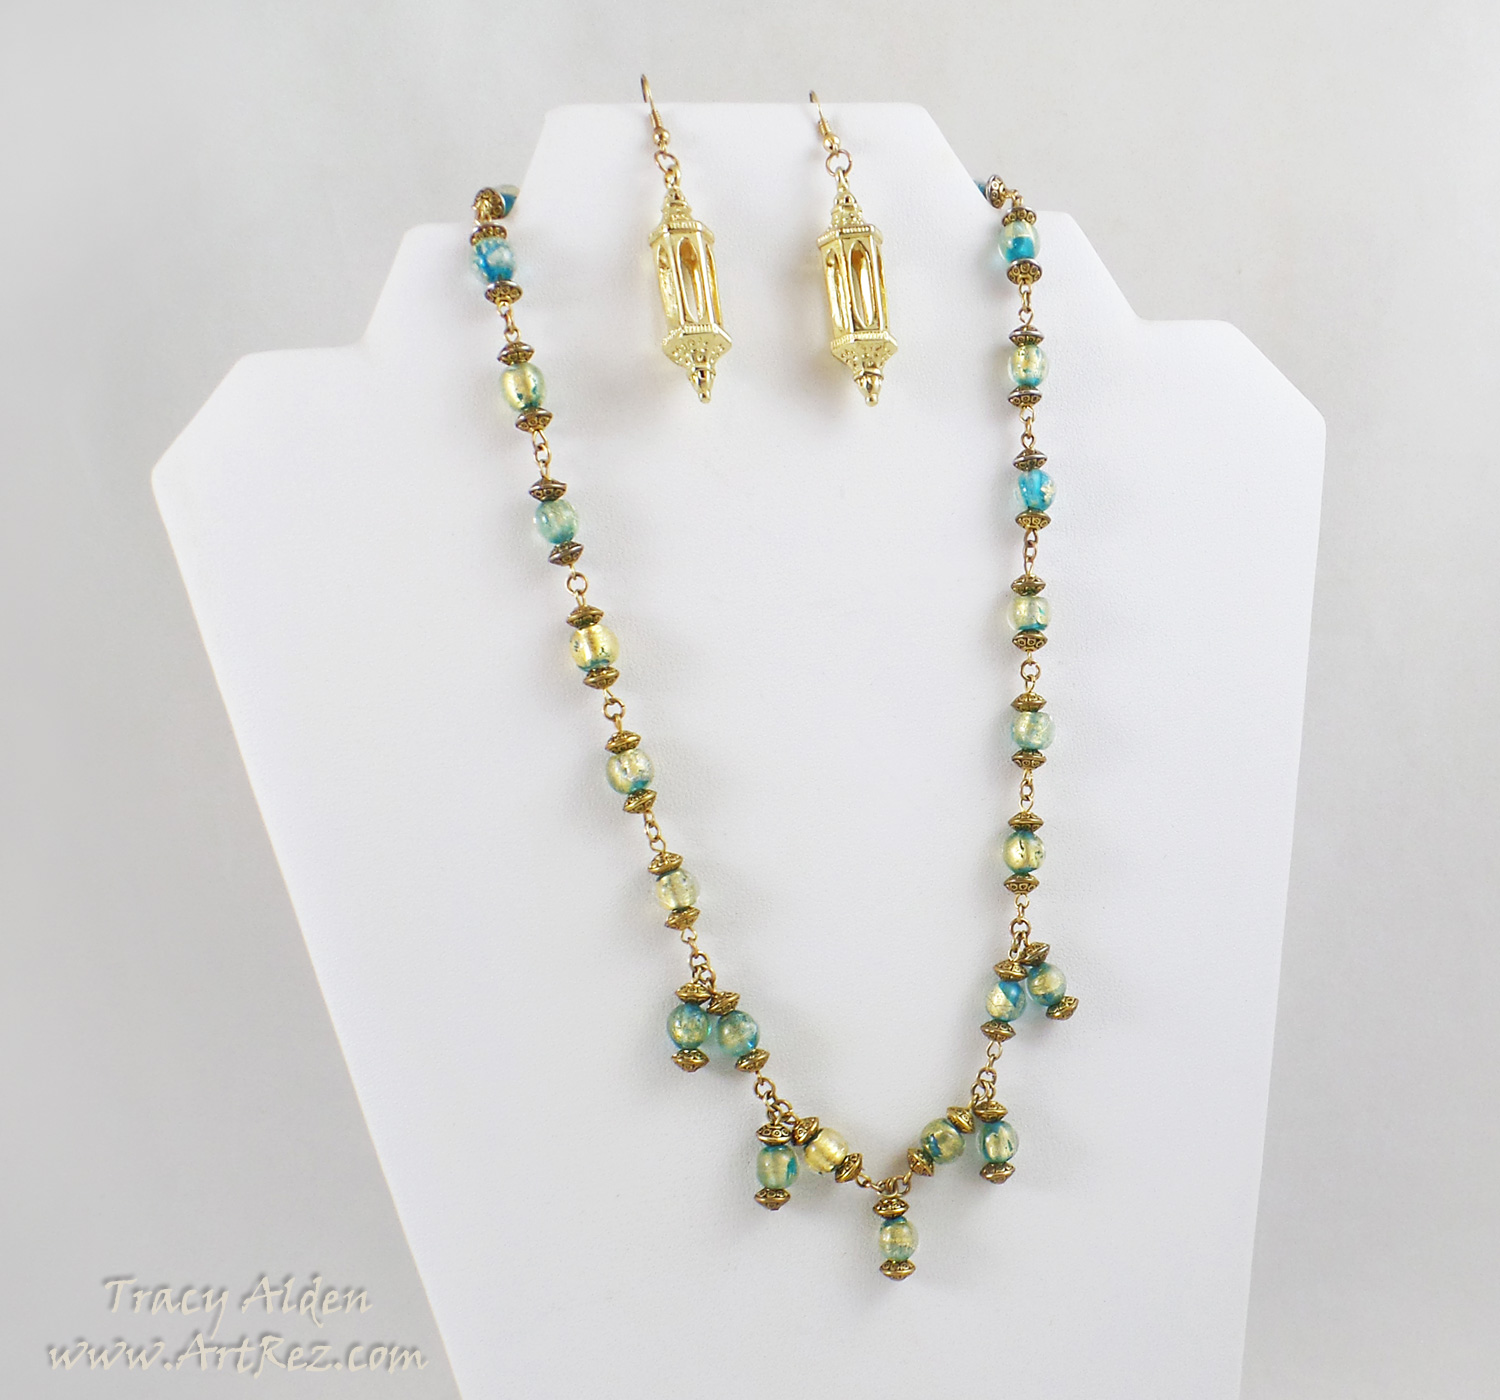
“Roman villa”, gold foil and turquoise colored lamp-worked beads, Bead Gallery® gold rondelle beads, vintage gold plated findings and Blue Moon Beads® gold lantern focals from JoAnns.
The gold foil lamp-worked beads immediately reminded me of how ancient Roman glass looks when unearthed at archaeology digs. Using surviving Roman necklaces as a guide I used a link and drop design to create this necklace. I felt using the same beads would look a bit much for earrings so I went with lantern focal drops instead.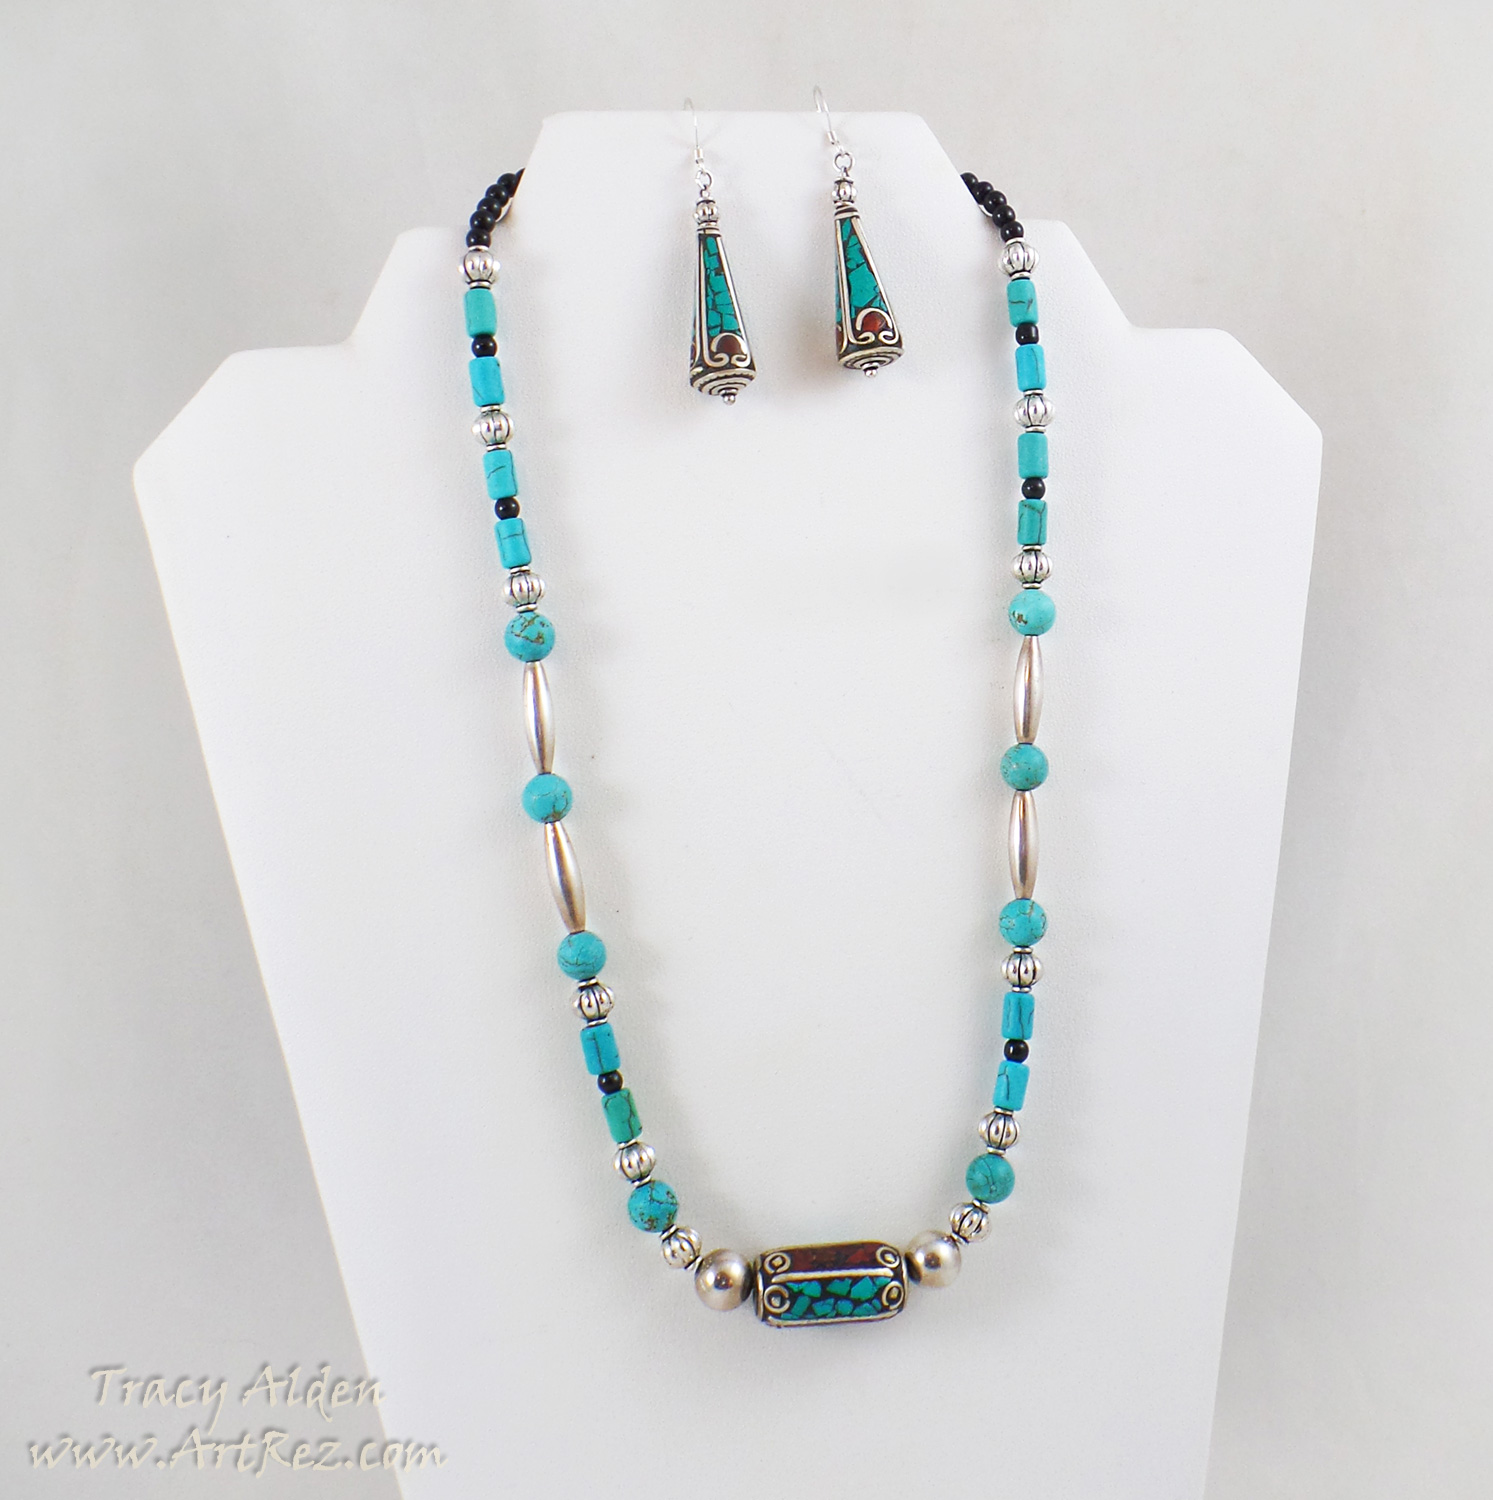
“Nepal Spring”, Sterling Silver Fair Trade beads from Nepal, vintage Sterling Silver spacer beads, Fiona Accessories black glass beads, Bead Gallery® turquoise tone Magnesite beads and vintage Sterling Silver findings.
I had bought the Nepal Fair Trade beads some years ago but could never think of what to do with them. I realized putting all the beads on one strand would be too heavy, so using only one bead as my focal I created a simple but stylish layout. The two additional beads from Nepal had their intricate details highlighted as earrings.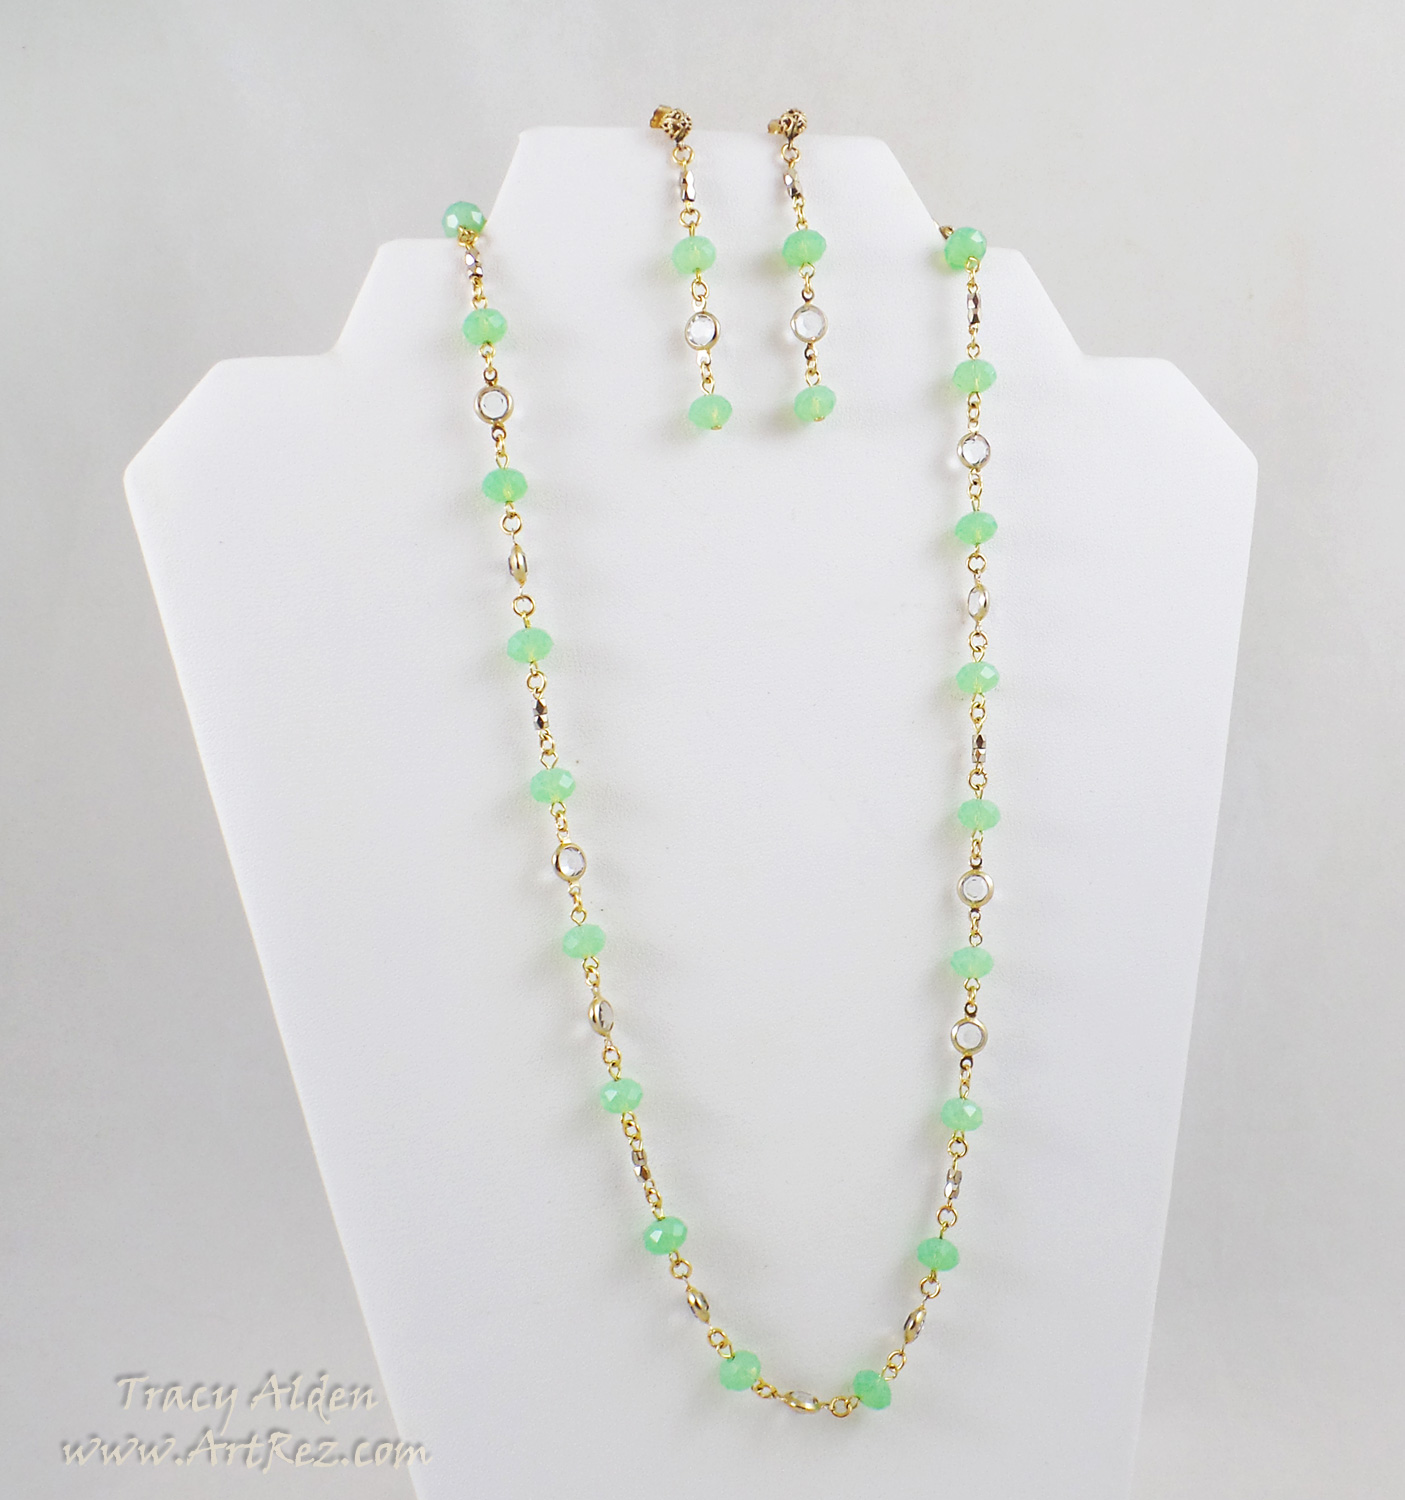
“Uranium Ball”, Neon green crystal beads (a discontinued line of crystals from Bead Gallery®?), vintage crystal and gold plated links, vintage gold plated spacer beads and vintage gold plated findings.
Once again the beads were my starting point of the design, the odd, almost glowing hue of the crystal beads made me think of Uranium glass. Uranium glass (also known as Vaseline glass), was glass tinted with Uranium to striking tones of green, was made into tableware and household items in the 1800 and early 1900s. Taking inspiration from the jewelry styles of the 1910-20s I created this set using mostly broken vintage jewelry pieces I have collected over the years.What type of wearable art could you create with a Spring destash of supplies?
Until Next Time, Safe Travels!

Ancient and Contemporary Inspired Artistry