Fall Miniature Art Supply Finds
With the first day of Fall fast approaching I swear I can almost smell the cool air, soon to be falling leaves, pumpkin pie and Halloween candy to come! It also has me haunting stores in search of new art supplies, in particular items perfect for Halloween and my eternal addiction, miniatures. Sit down for a spell, pour yourself a cup of tea and let me speak of some of the crafting bounty.
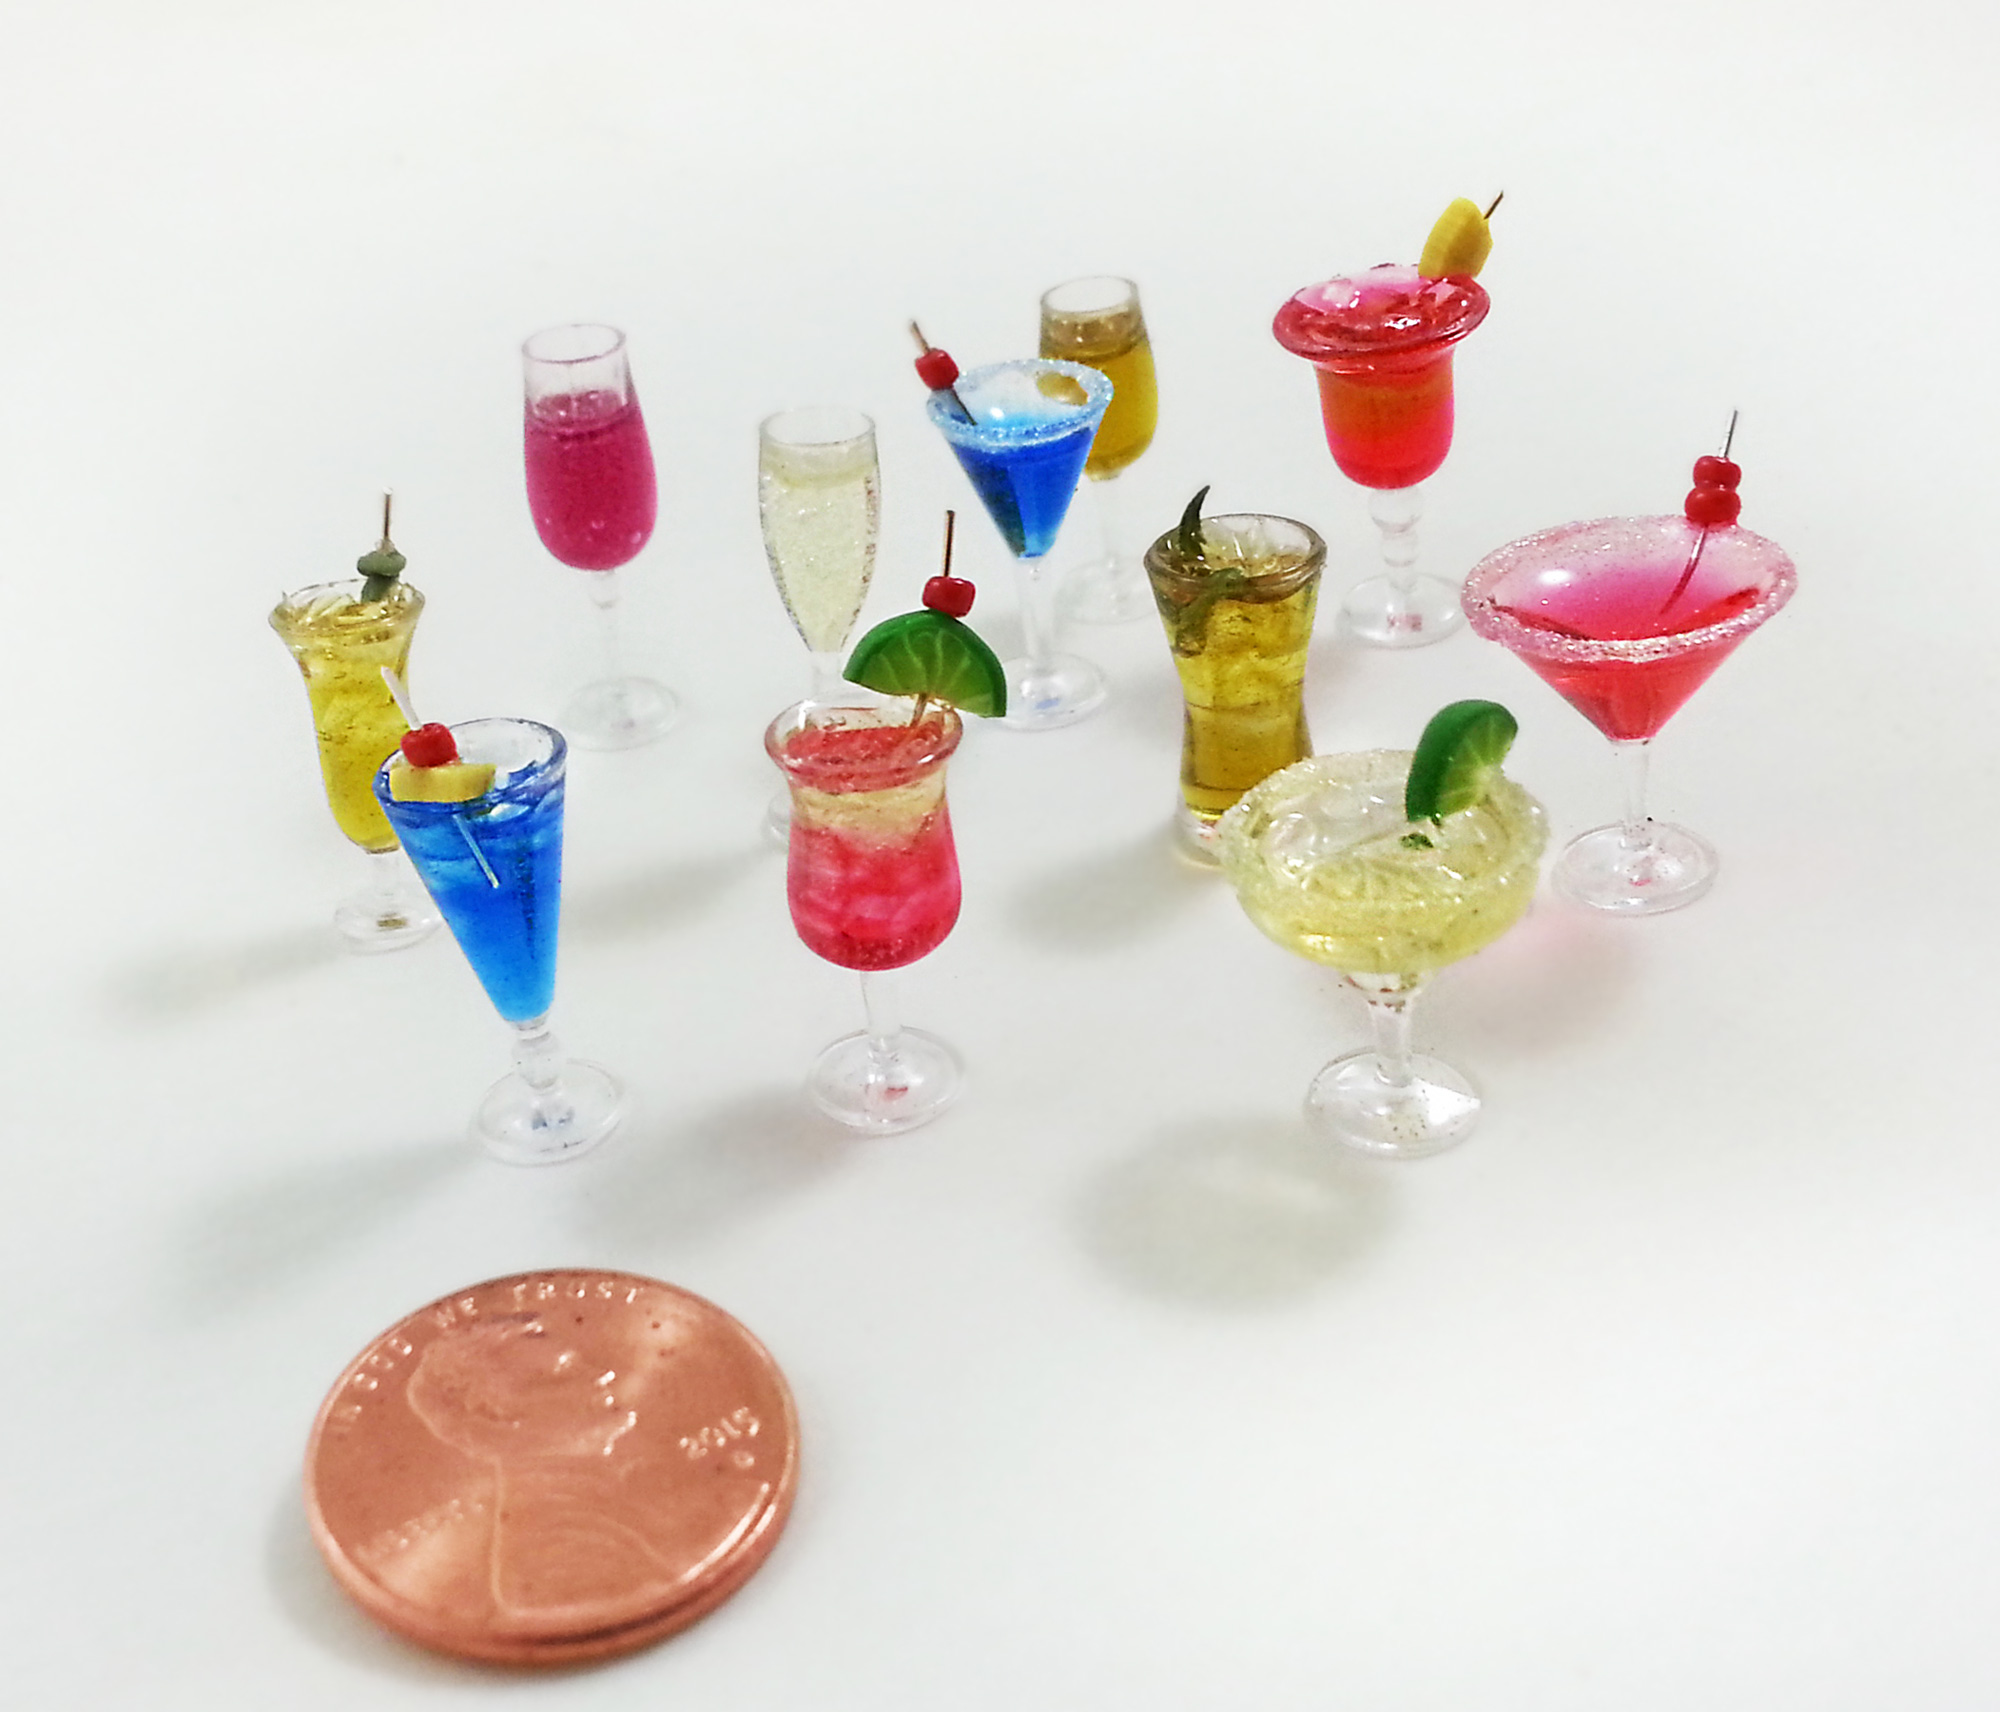
These 1/12th Scale Miniature Cocktail Glasses I found on Amazon. They are clear plastic and rather lightweight so gluing them down or filling them with resin, such as I did to create a miniature Happy Hour with the help of Amazing Clear Cast, is highly suggested. My tutorial on how to fill these darling cups can be found HERE. No two cups are alike in the set so if you would like to have doubles or to create a table setting you will need to buy several sets.
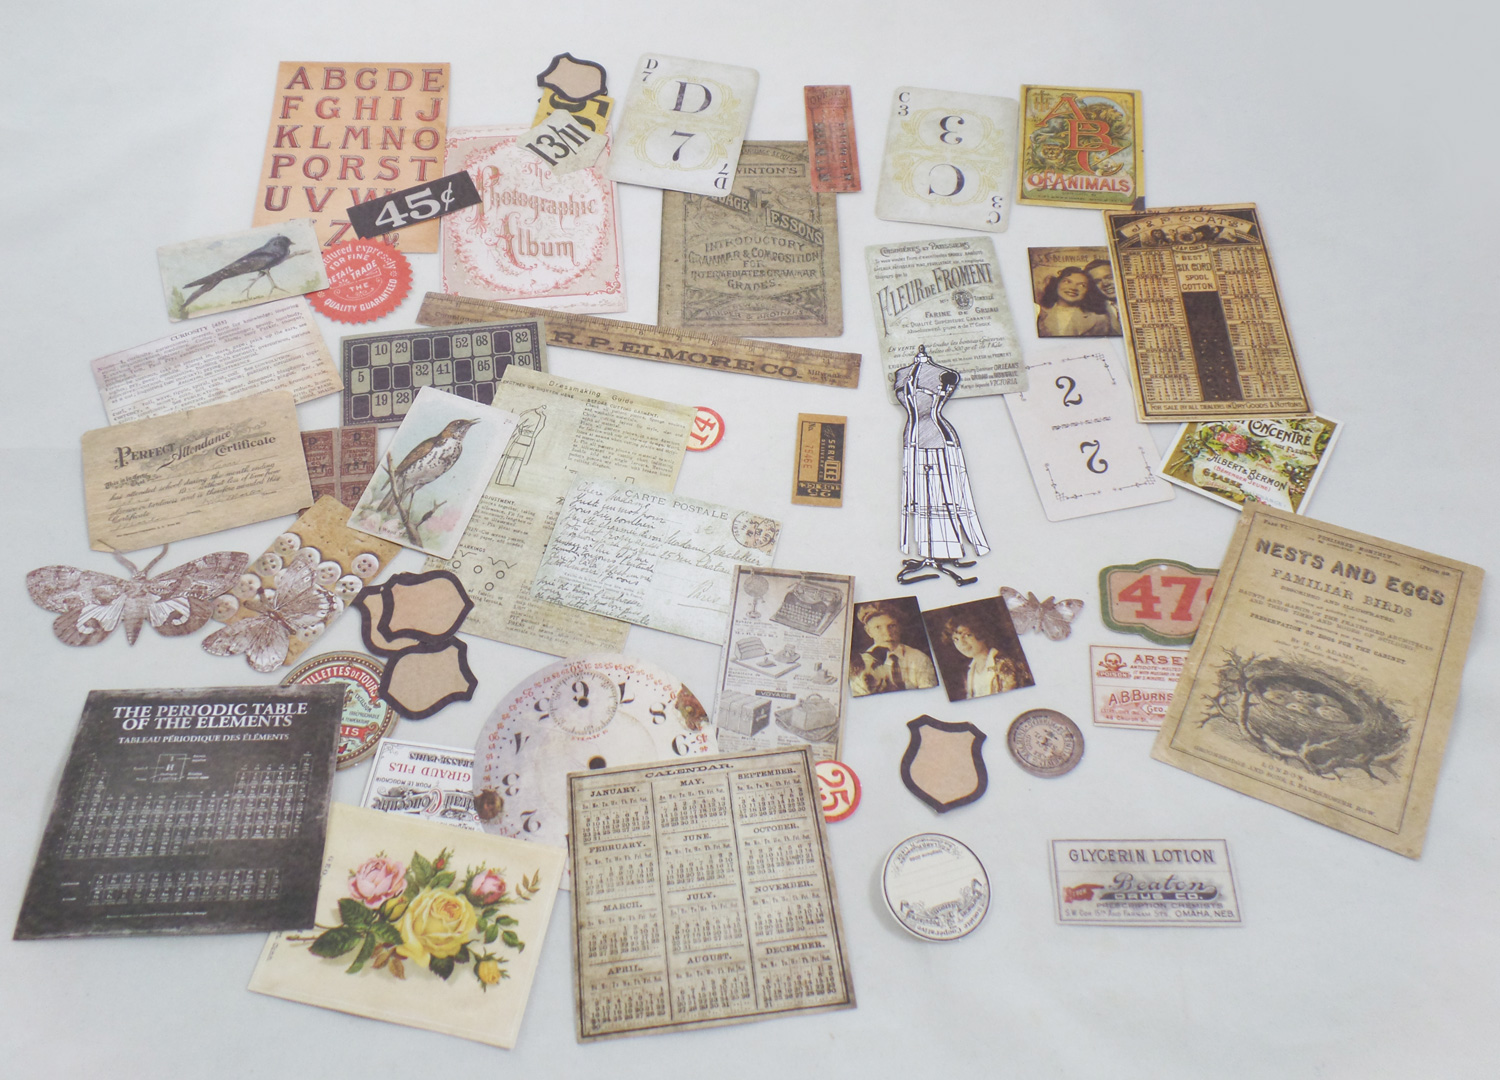
Even though Thrift Shop Ephemera Pack by Tim Holtz Idea-ology® paper embellishments has been out for several years, and easily found at most craft shops, I had thought it wouldn’t be of much use to me. Once I finally got a good look at the pack I broke down and bought one. I saw some of the mini photos and insect prints, once opened I found some really wonderful miniature advertisements and bottle labels perfect for Playscale (1/6th)and 1/12th scale miniatures. I would say only about 1/4th of the pack is good for miniature scenes but since I do a lot of mixed media work I thought it was a great buy.
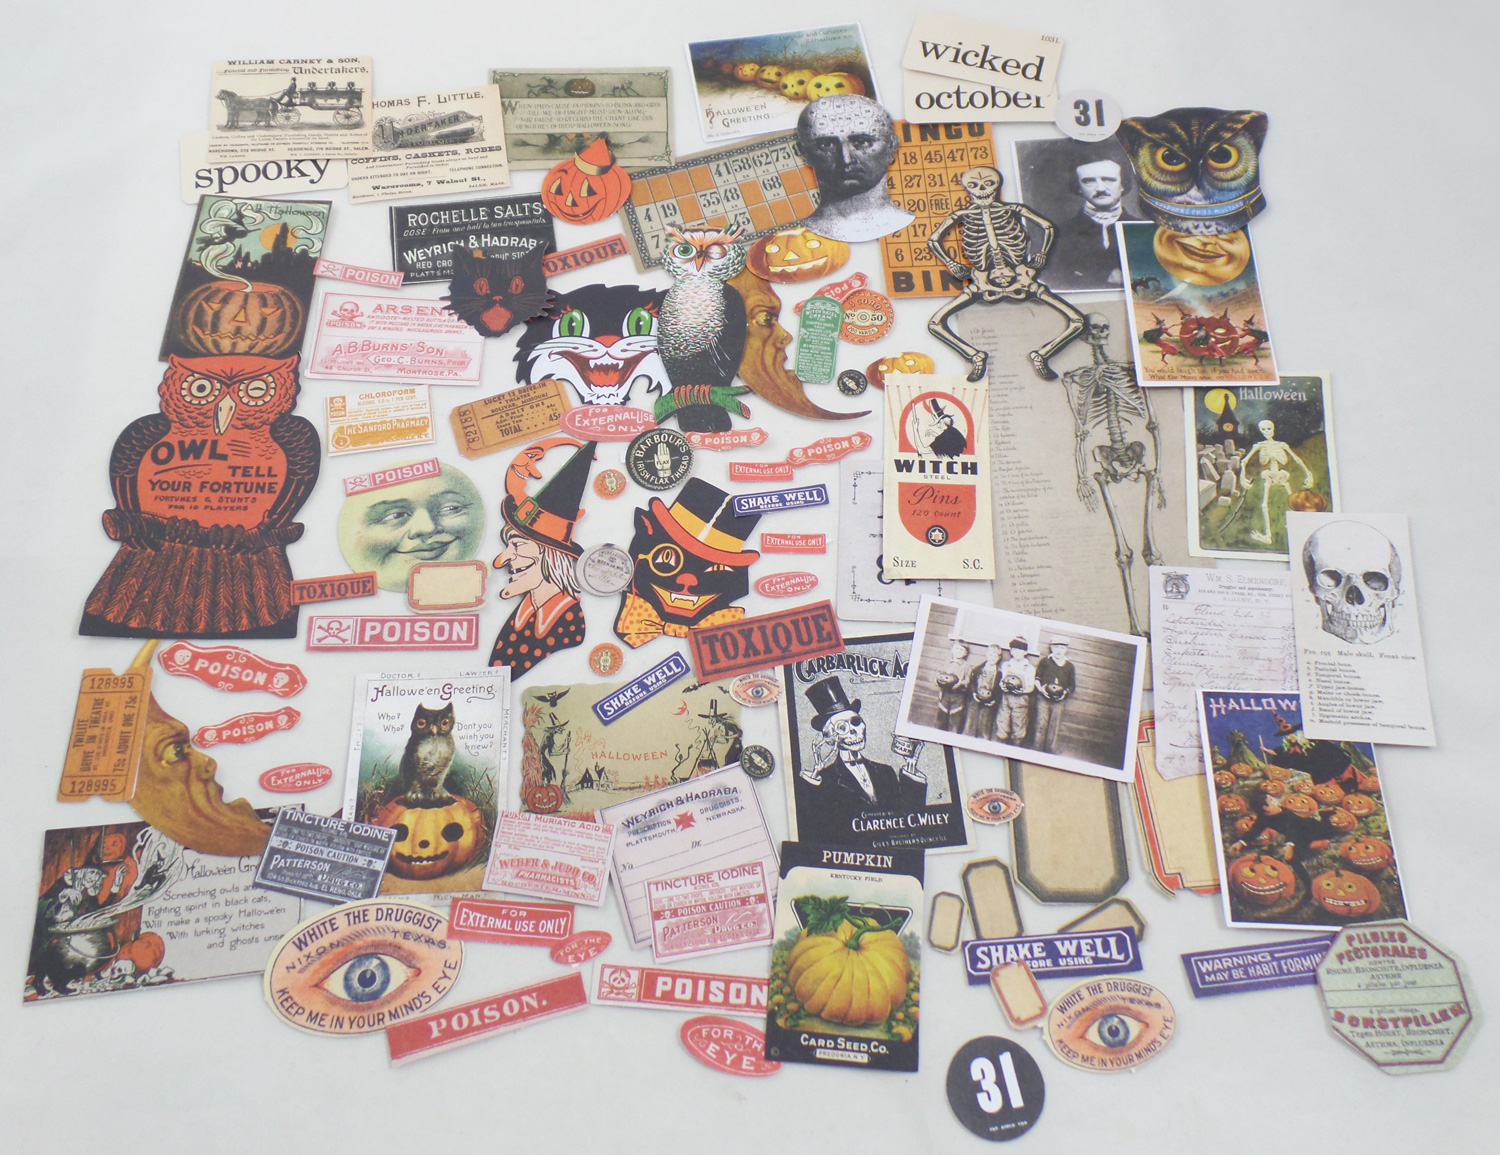
The previous pack encouraged me to go ahead and buy the Curiosities Ephemera Pack by Tim Holtz Idea-ology® in the Halloween crafting section of Michaels. It is mostly Halloween with a tiny bit of Fall themed paper embellishments. I would say almost the entire pack is perfect for Playscale (1/6th)and 1/12th scale miniatures along with mixed media art. Just full of reproduction prints, in miniature, of postcards, decorations, bottle labels, advertisements and science lab posters, this is a must have for any fan of Halloween and vintage prints.
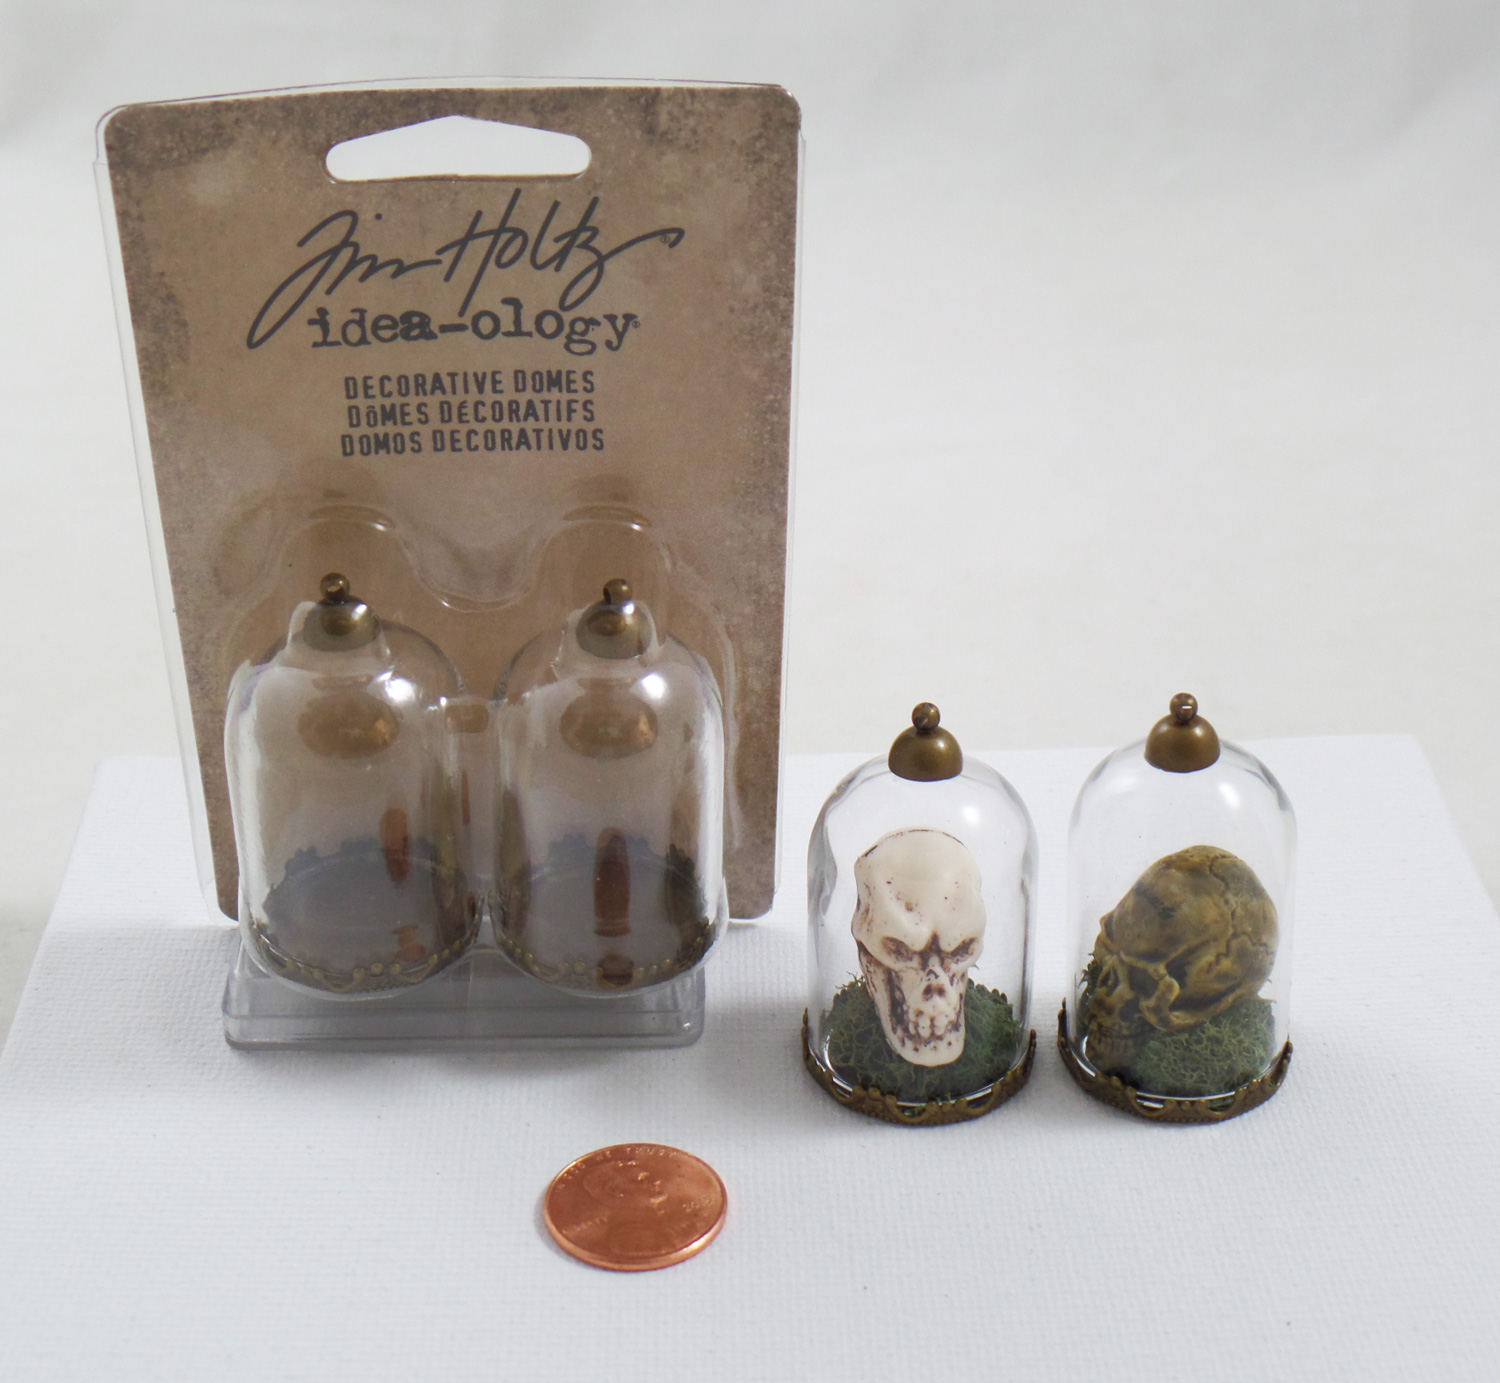
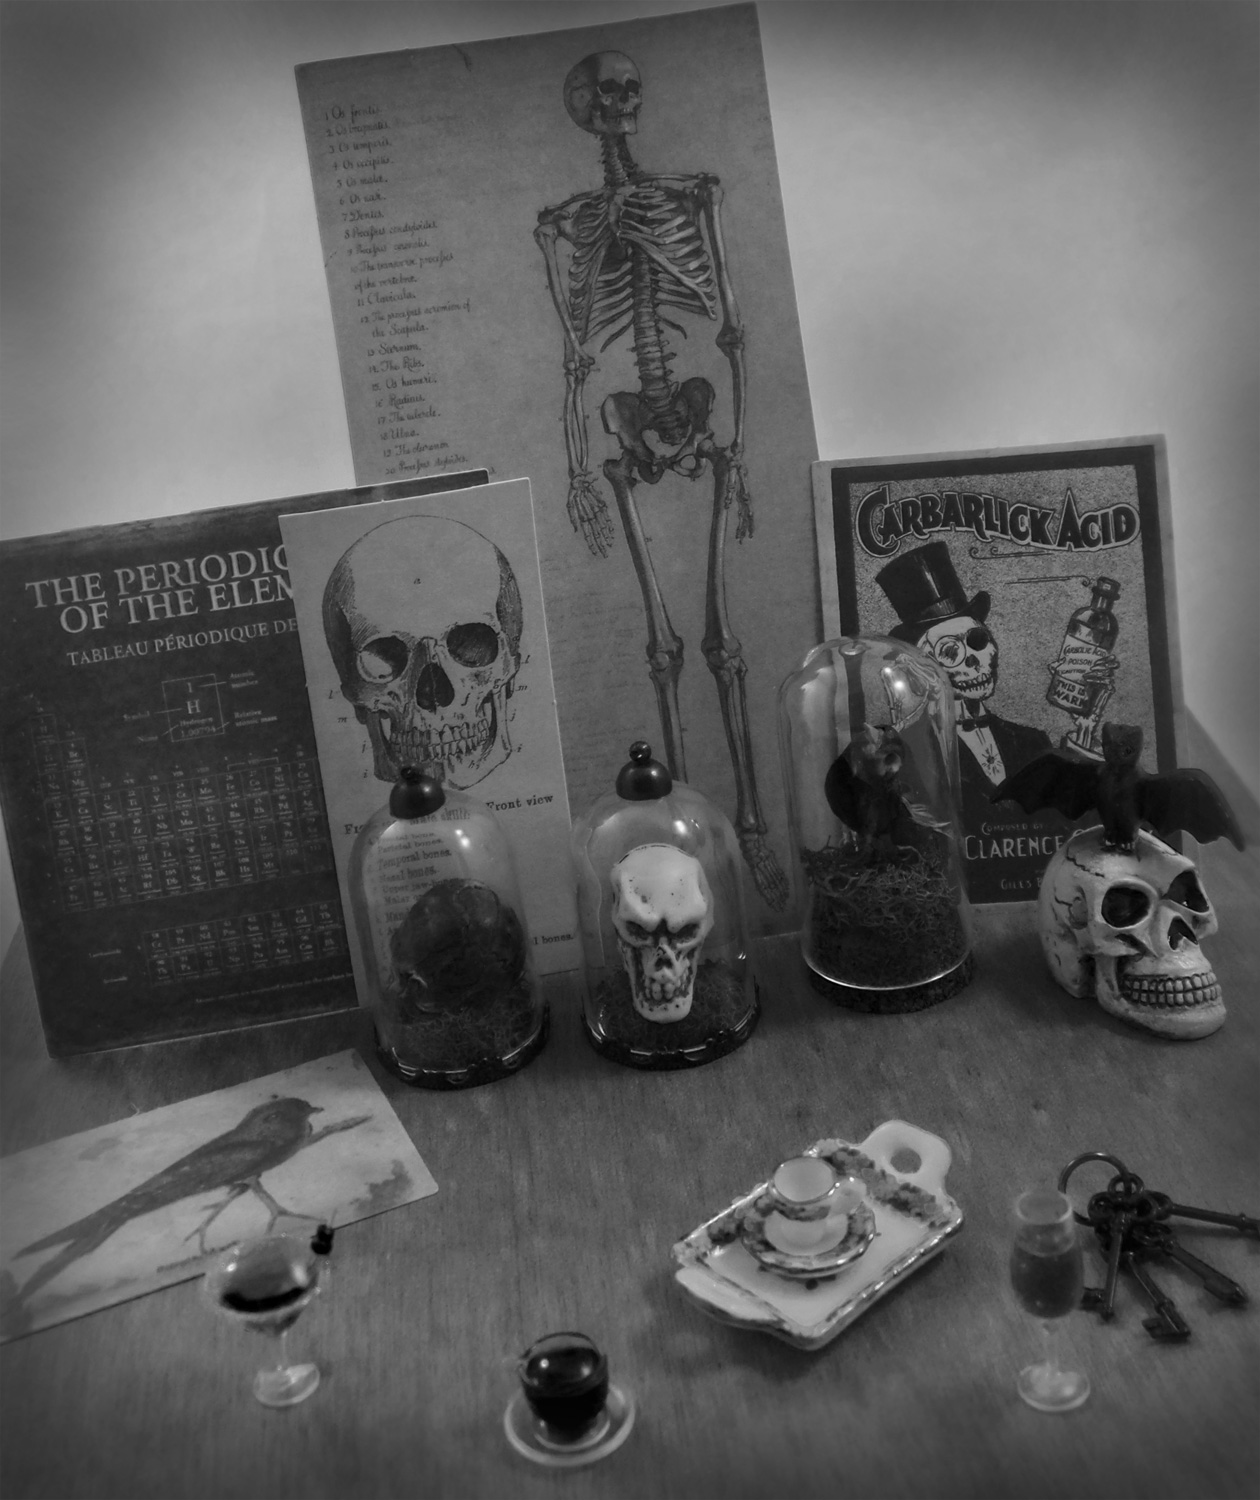
Another product that has been out for awhile but normally shoved into the scrapbooking sections of most stores is the Tim Holtz Idea-ology® Decorative Domes. I would honestly call these domes mixed media and jewelry findings with a nice overlap into scale miniature. The glass domes are rather thick glass with a sturdy brass loop on top (which with the addition of a jumpring would make a cute pendant). I found most 1/12th scale skulls, or in this case beads, fit inside the domes. Glued down with a little moss, they look perfect as specimens in a science lab!
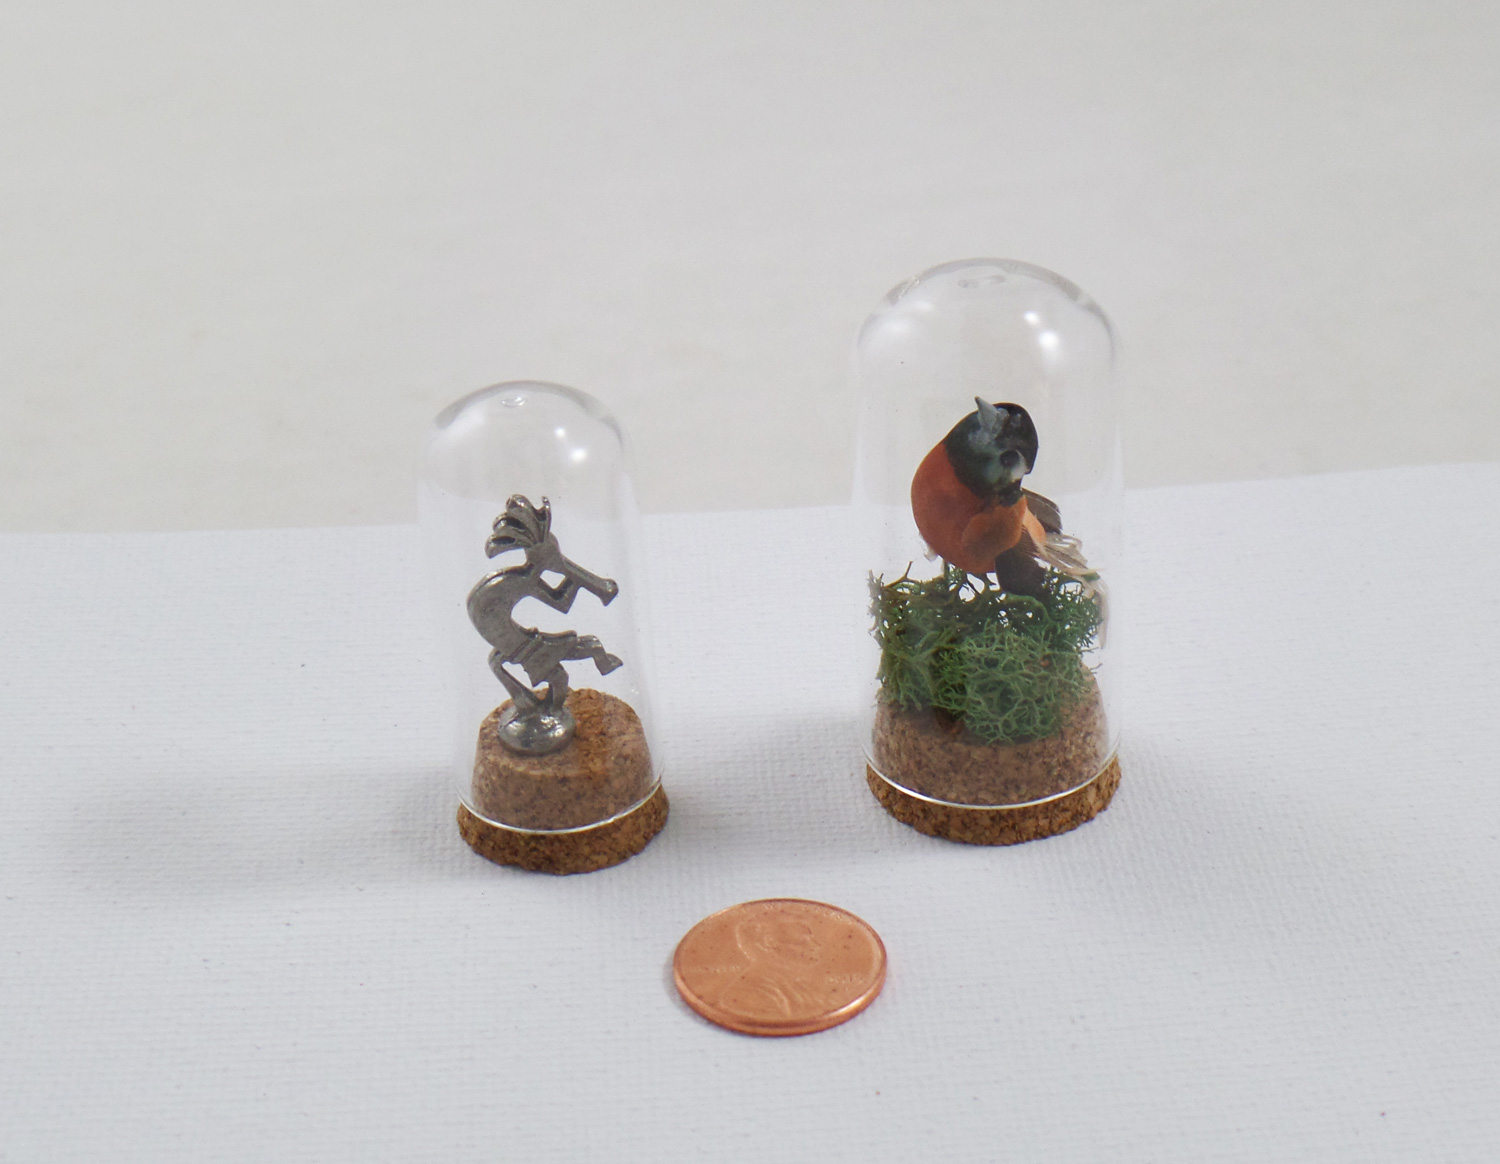
Another scrapbook section sequestered collection is the Tim Holtz Idea-ology® Corked Domes. Taller, and thinner glass than the Decorative Domes, without a brass ring on top, these are more mixed media and miniature use. With the cord base it is very easy to push metal wire, pins and bases in and put the dome on top to create still life and museum miniature replicas.
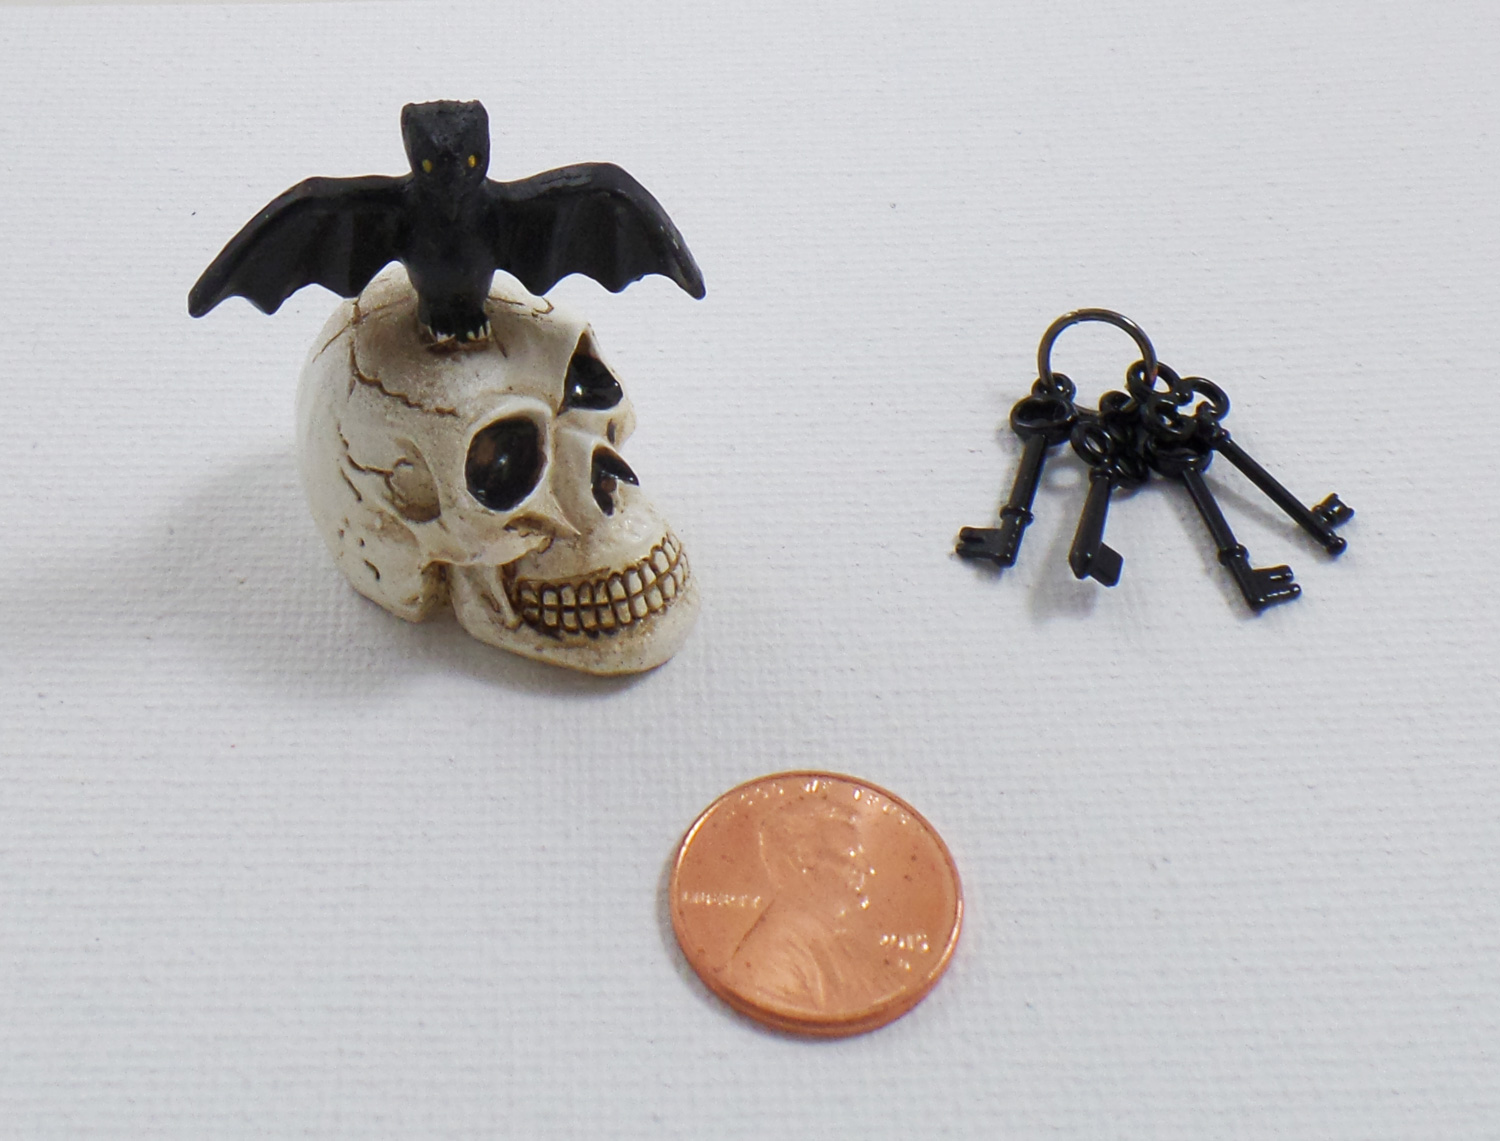
I found at my local JoAnn store Maker’s Halloween™ Littles and Art-C™ Mini Black Metal Keys. The little resin skull and bat was in the floral department as decor for miniature fairy gardens. There is quite a few resin pieces to pick from but the skull stuck out as a prefect miniature desk decoration. The keys can normally be found in the scrapbook embellishment section or jewelry charm section. I added the keys to a large black enameled jumpring to create keyring. JoAnn doesn’t seem to carry these items online, so check your local store to see what they have in stock!
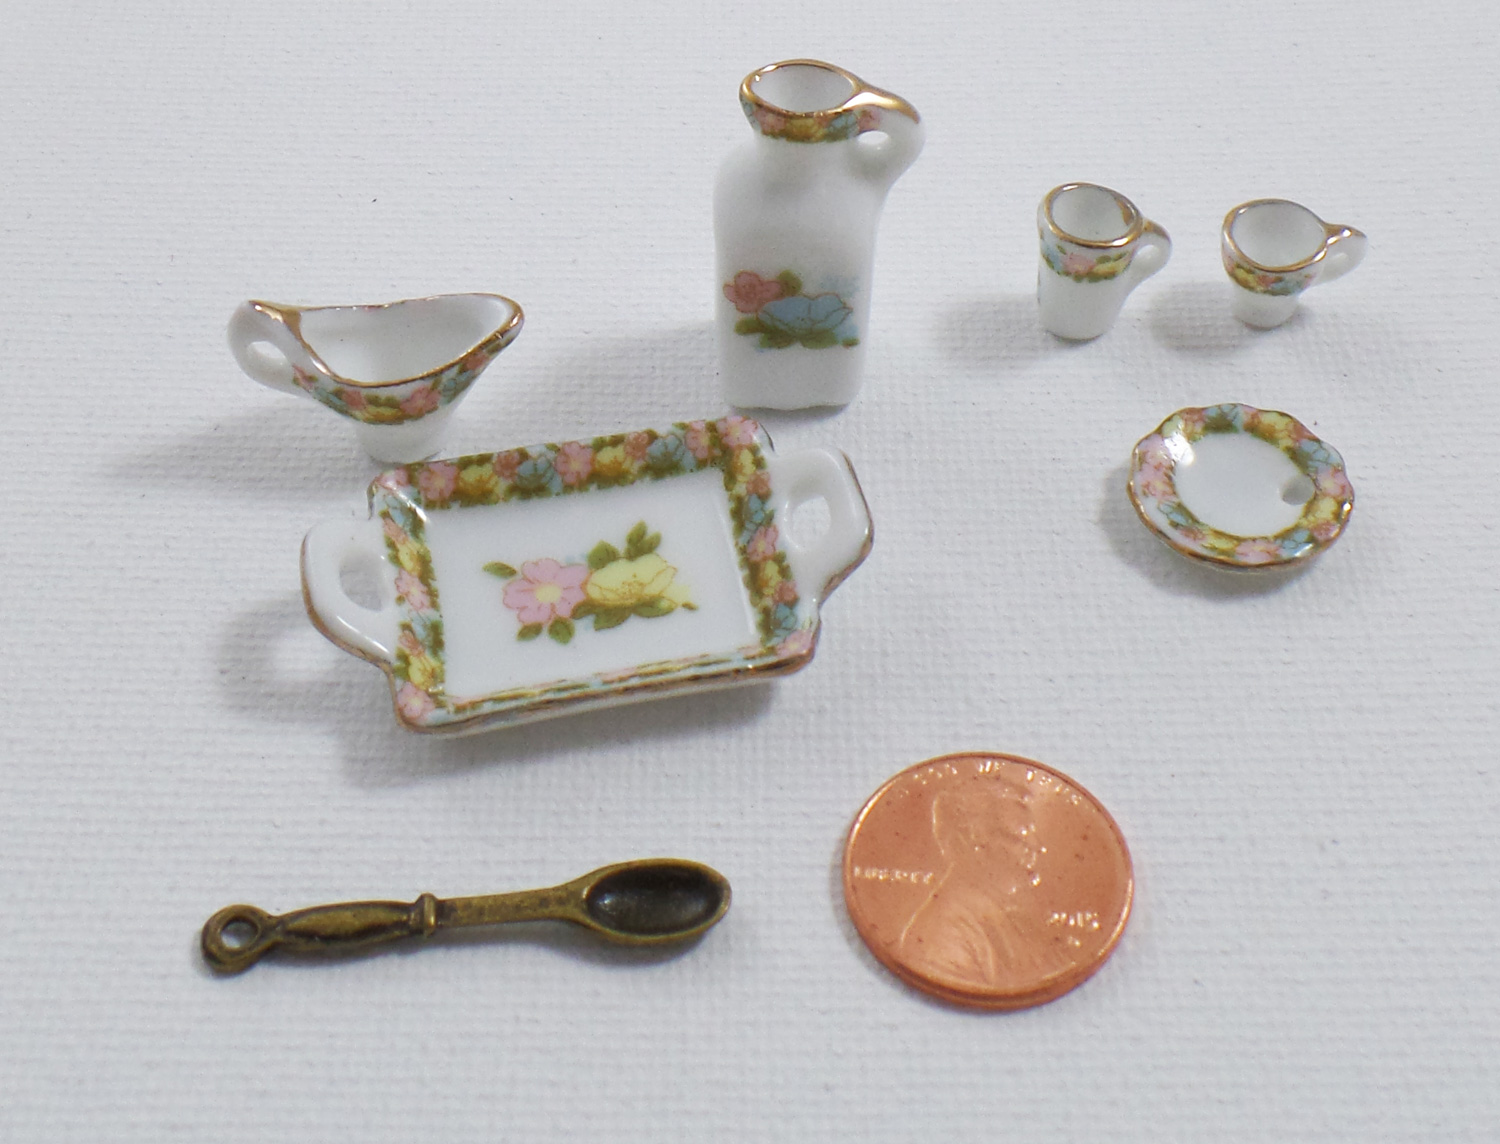
These new Pemberley Tray Charms and Multicolored Tea Set Charms By Bead Landing™ I found at a local Michaels but you can also find them at their Online Store. They have quite a few charm sets but my favorite is the matching Tray and Tea Sets. While intended as jewelry charms, and the plates have tiny holes in them, they are around 1/12th in scale. If you place a cup just right or add a tiny biscuit, to hide the holes in the plates, they are a lovely addition to miniature scene.
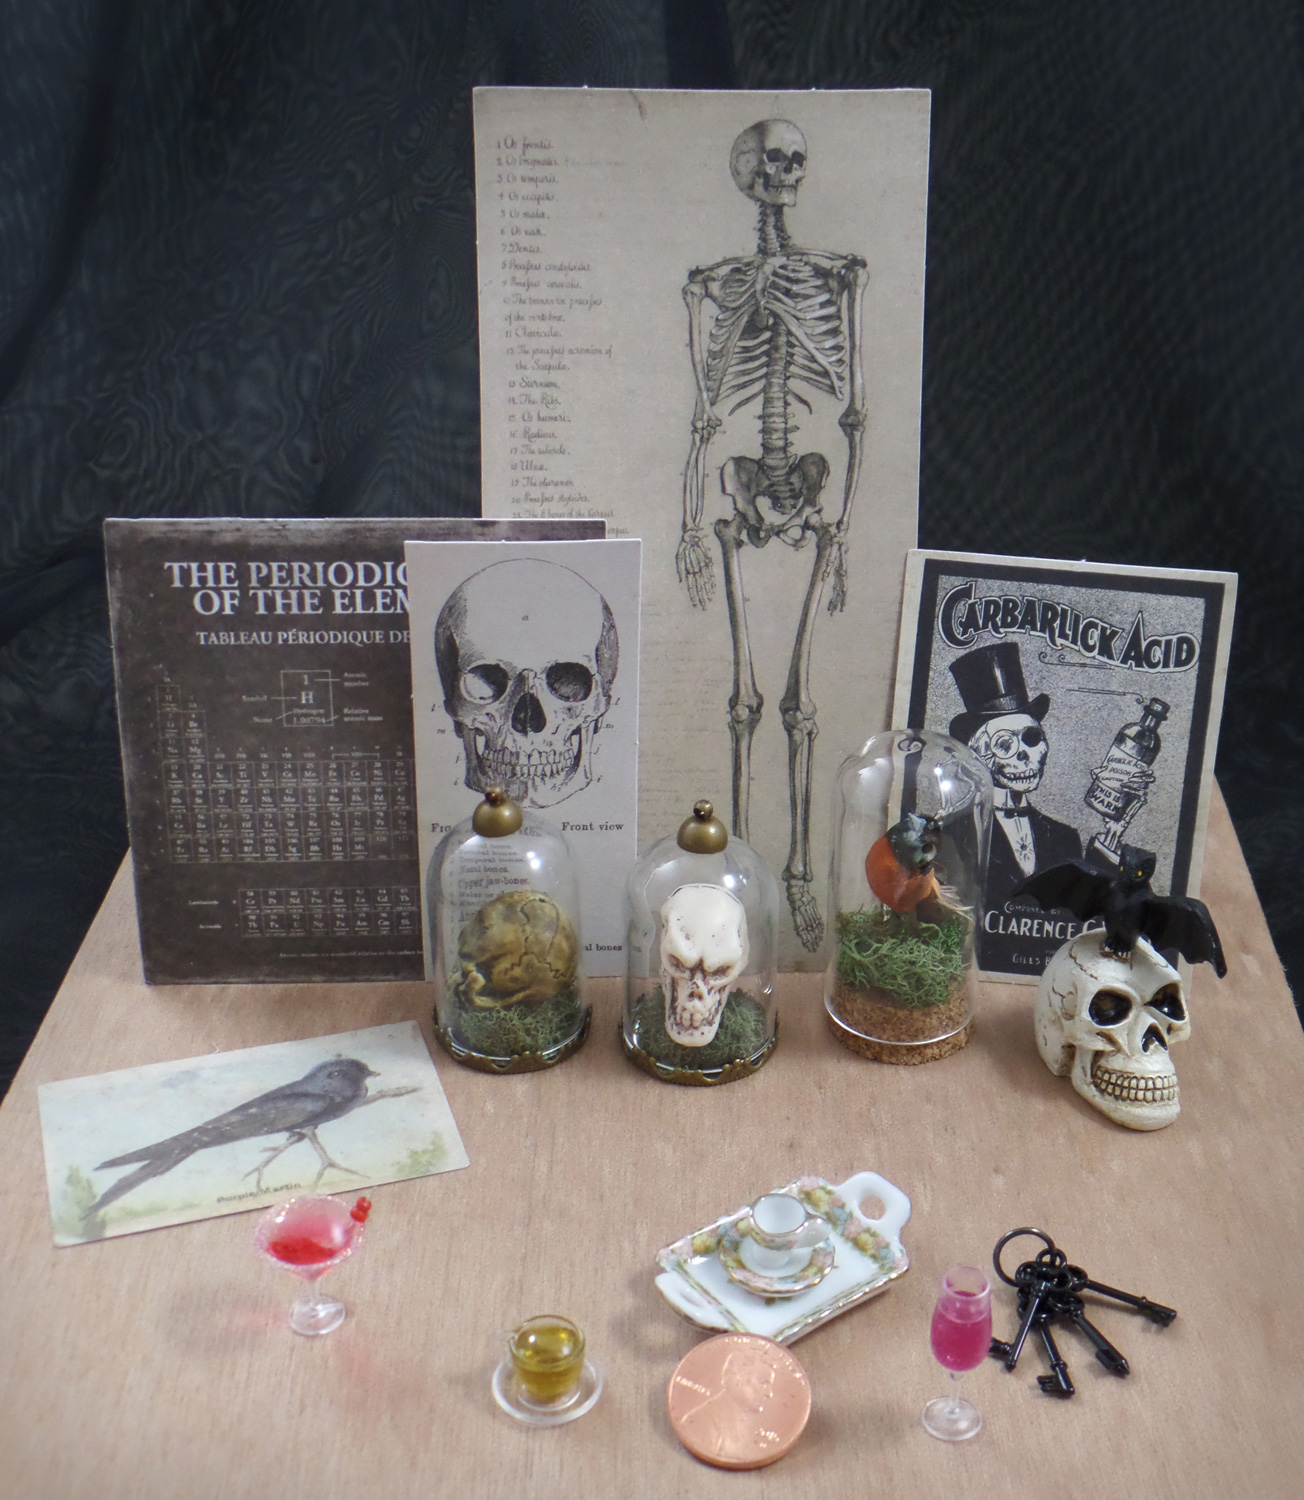
After I unpacked all my miniature finds I quickly found I had a perfect scientists’ Halloween soirée!
What lovely miniature treasures will you find in your travels?
Until Next Time, Safe Travels!
A #Cre8time voyage to find Pirate Treasure!
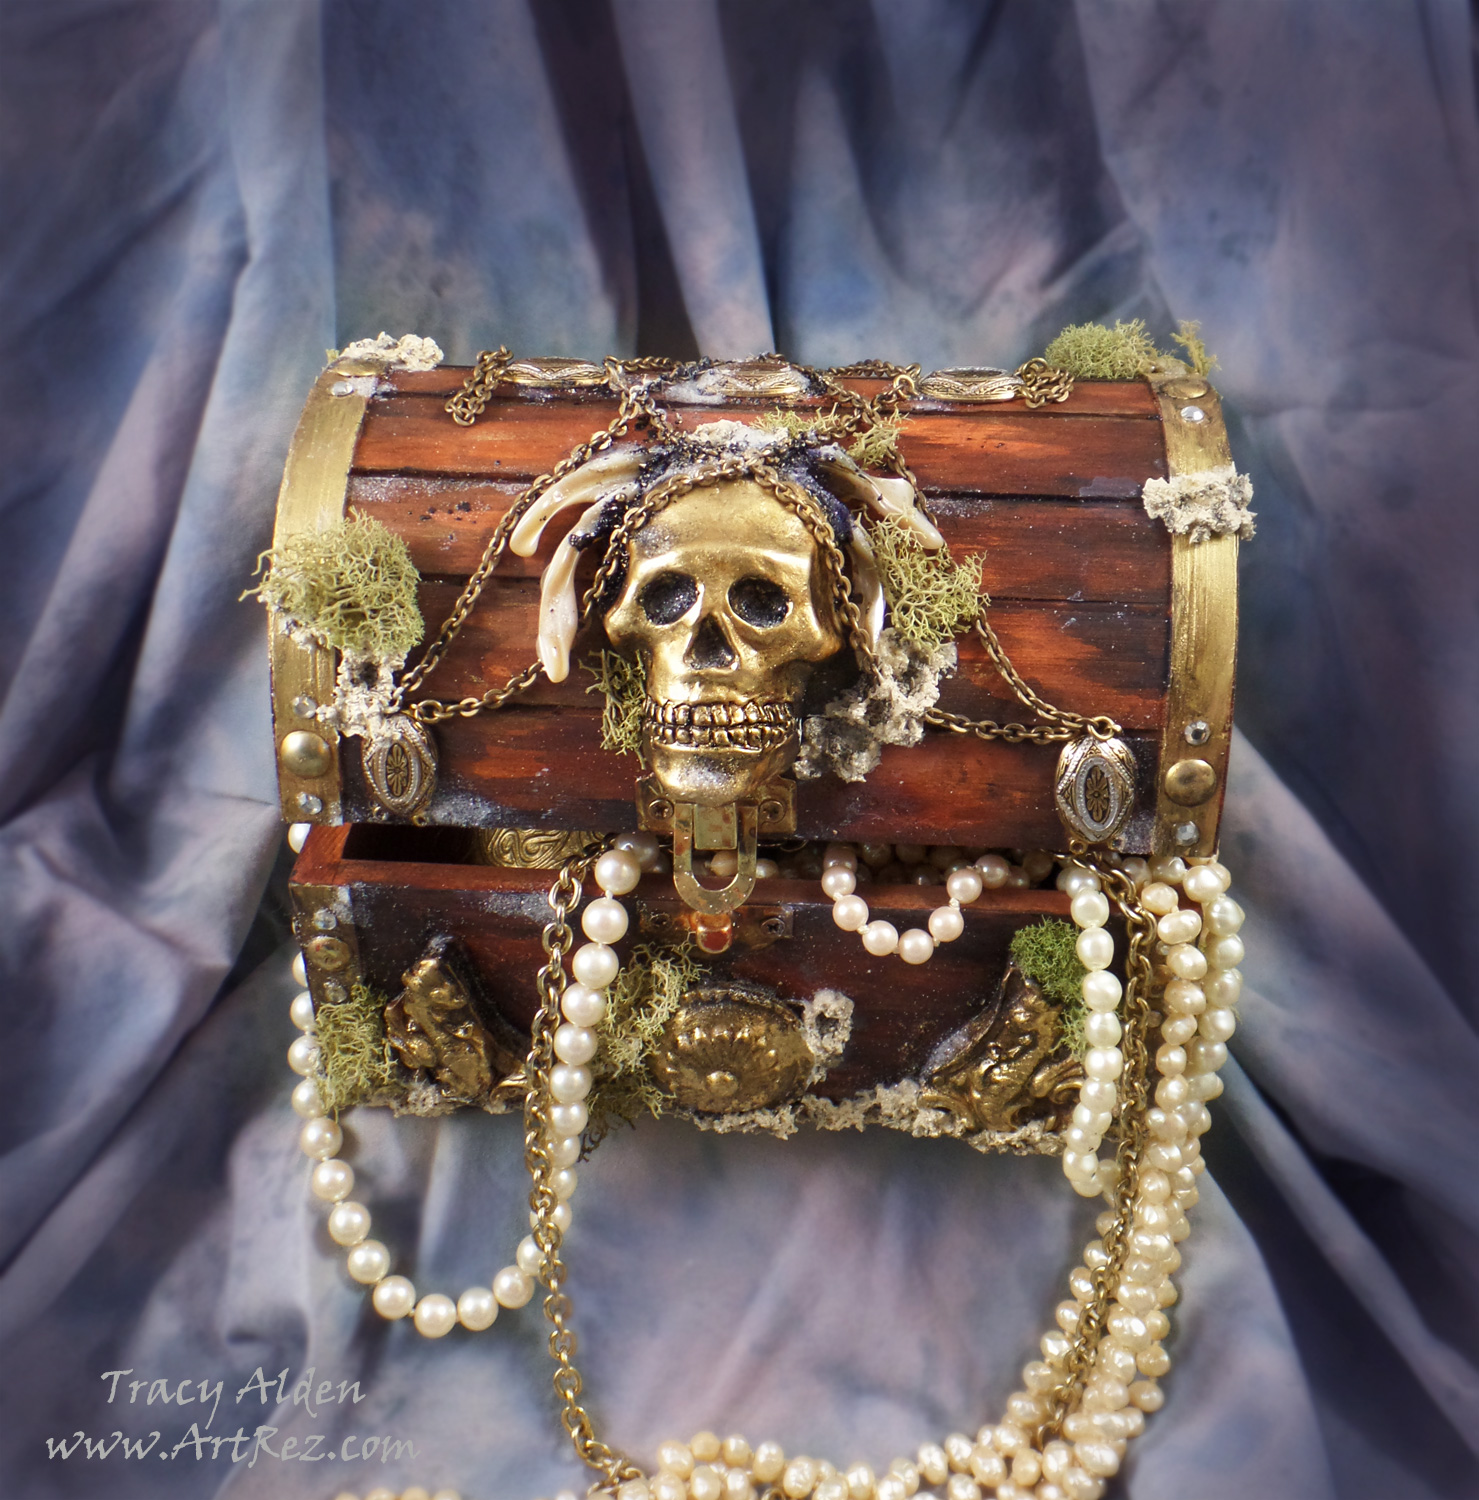
With Fall fast approaching, I am once again looking at new ways to jump start my creativity. I finally decided to order pieces from Relics & Artifacts® by Sandra Evertson to try out. The line has been catching my interest for a few years every time I see them at craft and hobby trade shows and on social media. Locally no stores currently carry their product line however it is rather easy to order the Matte Resin Craft Blanks from their website (they ship VERY quickly and package the art supplies wonderfully!). The resin blanks were larger than I expected, had a nice weight, tooth to the surface (great for paint application) and fine detail.
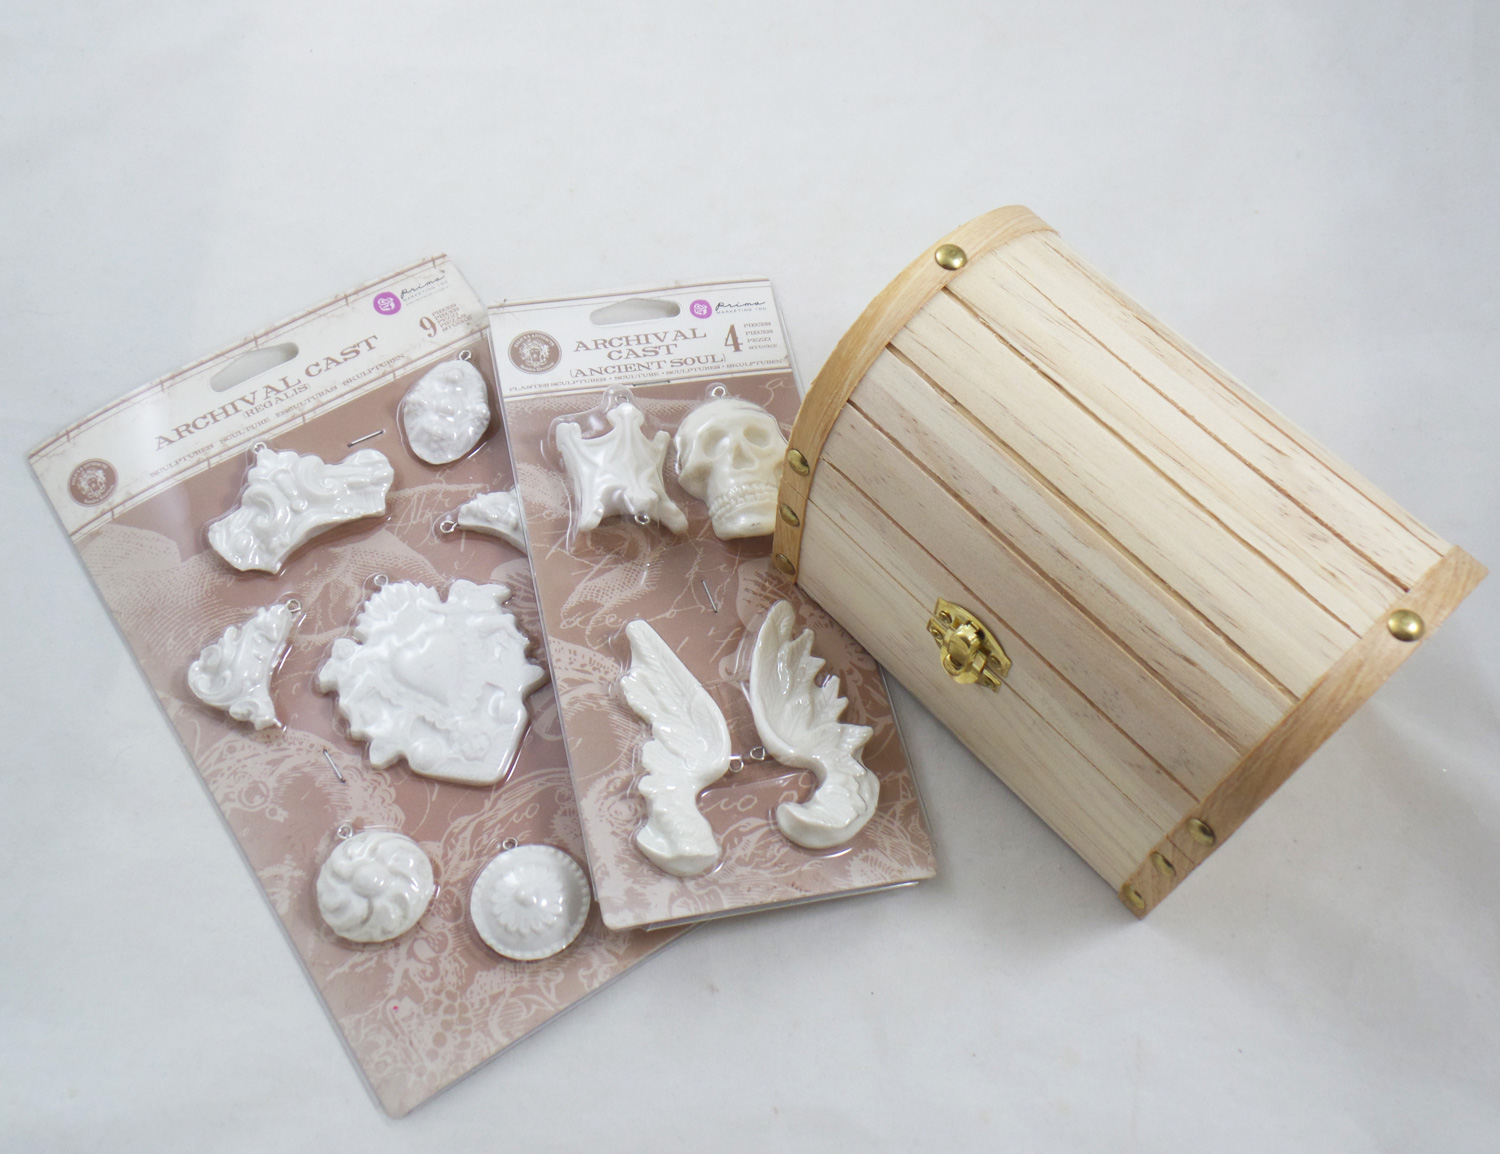
I bought 4 sets but the pieces in the Ancient Soul and Regalis sets got my mind whirling immediately. The skull focal in the Ancient Soul set had me thinking of a Jolly Roger and a sunken treasure chest. I collected some vintage jewelry supplies and started my craft voyage into uncharted seas….
Supplies:
Unfinished Wood Trinket Box (I found one at Jo-Ann)
Relics & Artifacts® Ancient Soul and Regalis Matte Resin Craft Blanks
Alumilite Metallic Powder Gold
Liquitex Gloss Varnish
Beacon Gem-Tac Adhesive
Stampendous Crystal Snow White Glitter, Ultra Fine
Paint Brushes
Acrylic Paint in Metallic Light Gold, Black, Burnt Umber, Terra Cotta, White and Yellow Ocher
Baking Parchment Paper (as a work surface)
2 Flat head jewelry pliers
1 Broken bracelet, chain necklace, shell beads and flat backed rhinestones 4mm, jumprings
4 used and dried tea bags
Dried Green Moss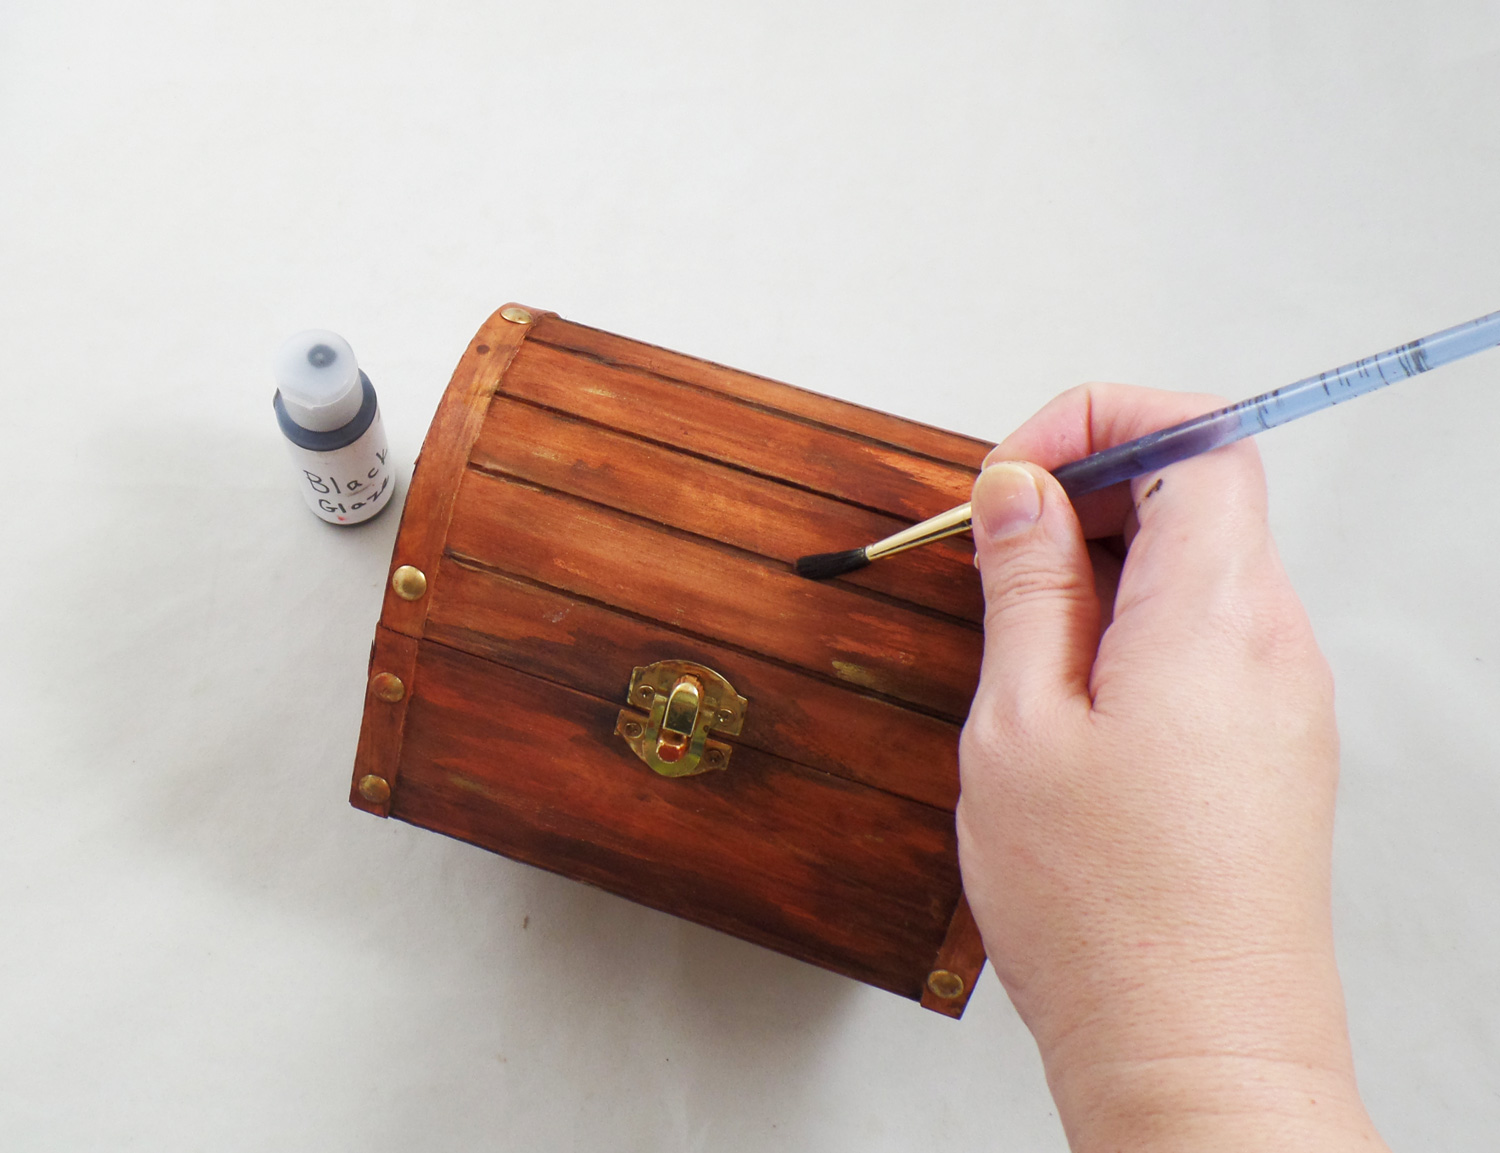
I started by painting the inside and outside of the unfinished wood box. I diluted the paint with water to create a color wash that would stain the wood but still leave the wood grain visible. First coat of diluted paints was the Terra Cotta, then the Burnt Umber and finally the Black in the nooks and crannies.
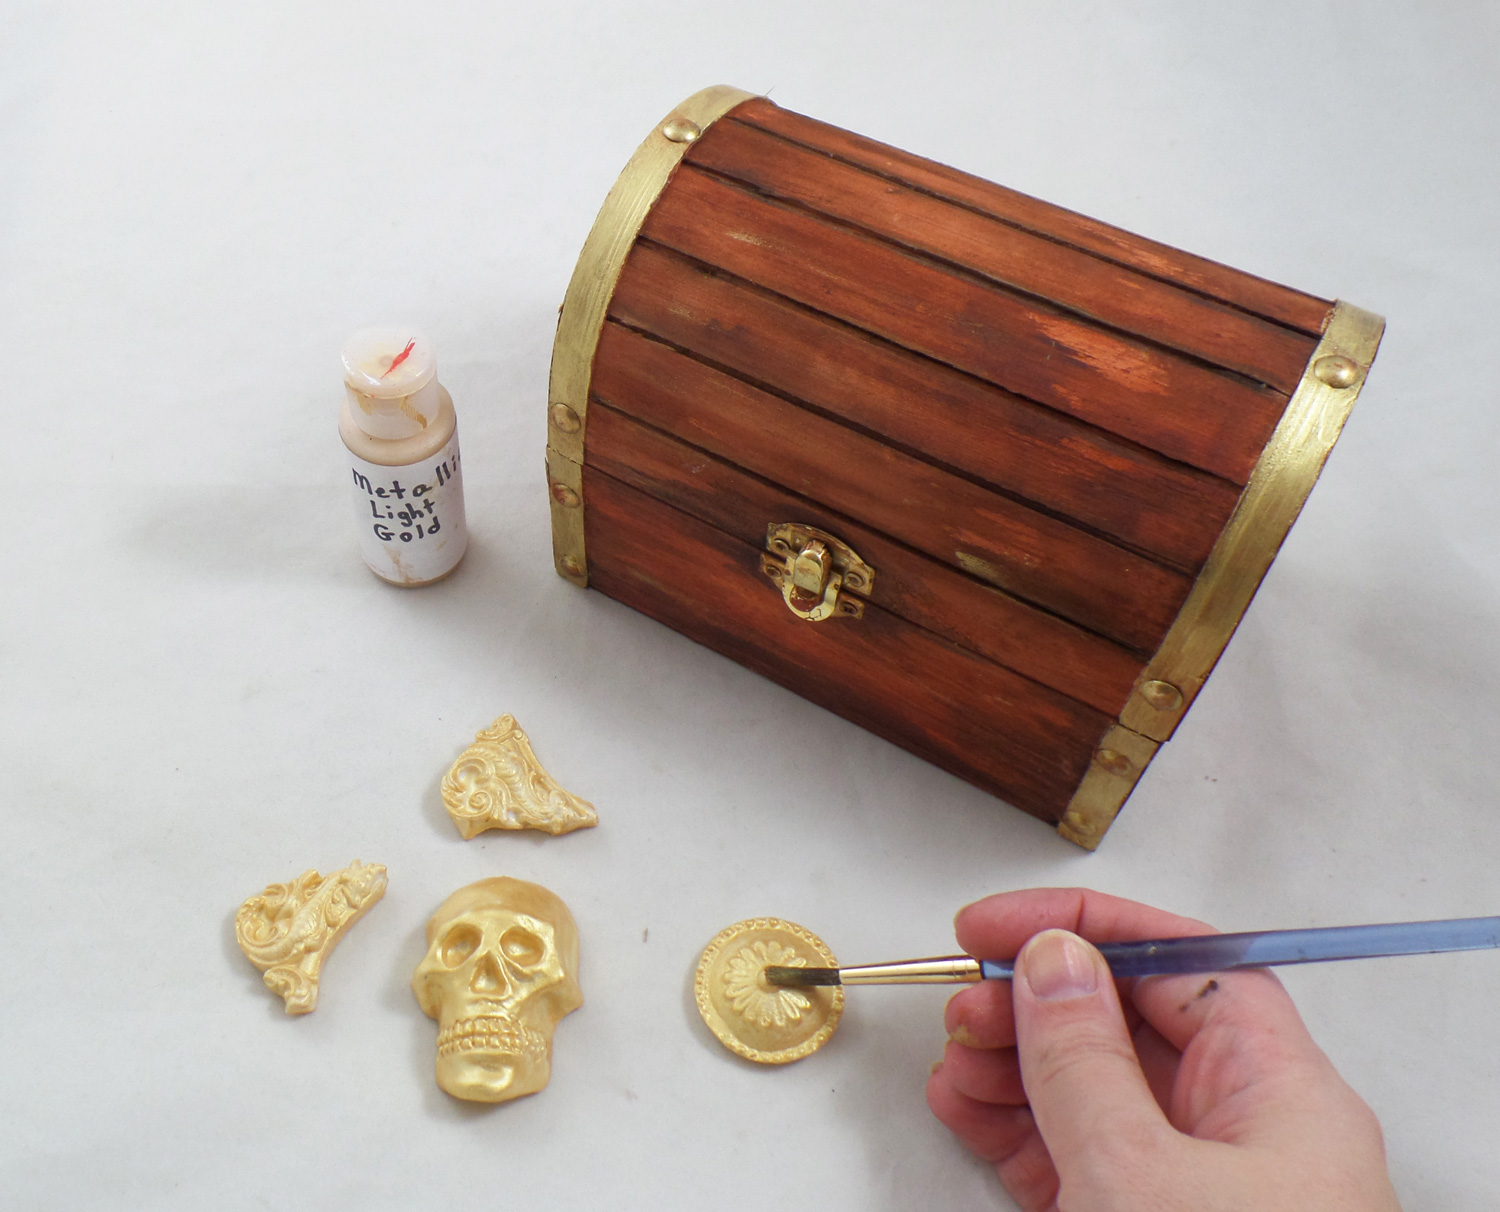
While I let the wooden box dry I removed the eye pins carefully with pliers that are put into Relics & Artifacts® pieces by the manufacturer, since I wasn’t going to make them into jewelry. I painted the pieces and the trim on the box with Metallic Light Gold paint. They needed two coats because most metallic paints need several coats for full coverage. The resin pieces were easy to paint and I didn’t have a single issues with the paint beading up or sliding off like with other resin blanks on the market!
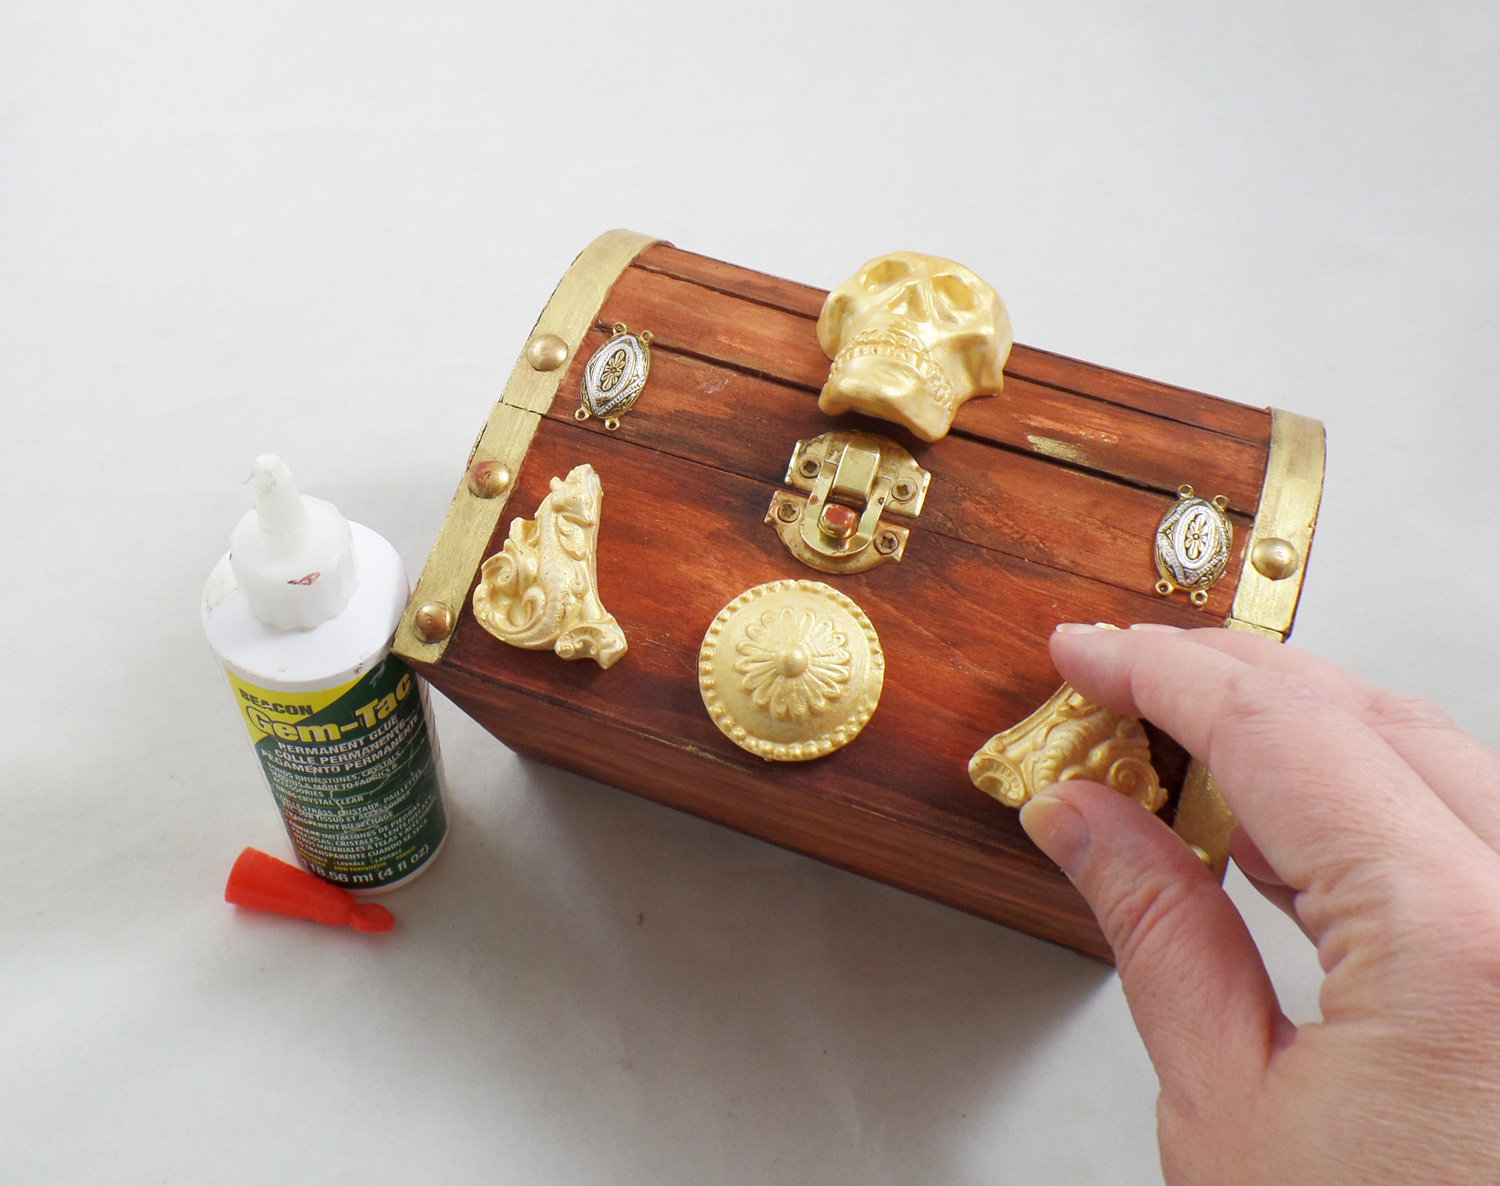
Once all the pieces were dry I applied them to the wood box with Beacon Gem-Tac Adhesive. A broken bracelet with beautiful metal spacers I took apart and glued the spacers to the box to give the illusion of metal brackets bolted to the box. Once the glue was dry I did another color wash of the Burnt Umber and Black acrylic paints all over the box and glued on embellishments to give them an aged appearance. I attached broken chain from an old necklace to the bracelet spacers, glued onto the box, with jumprings.
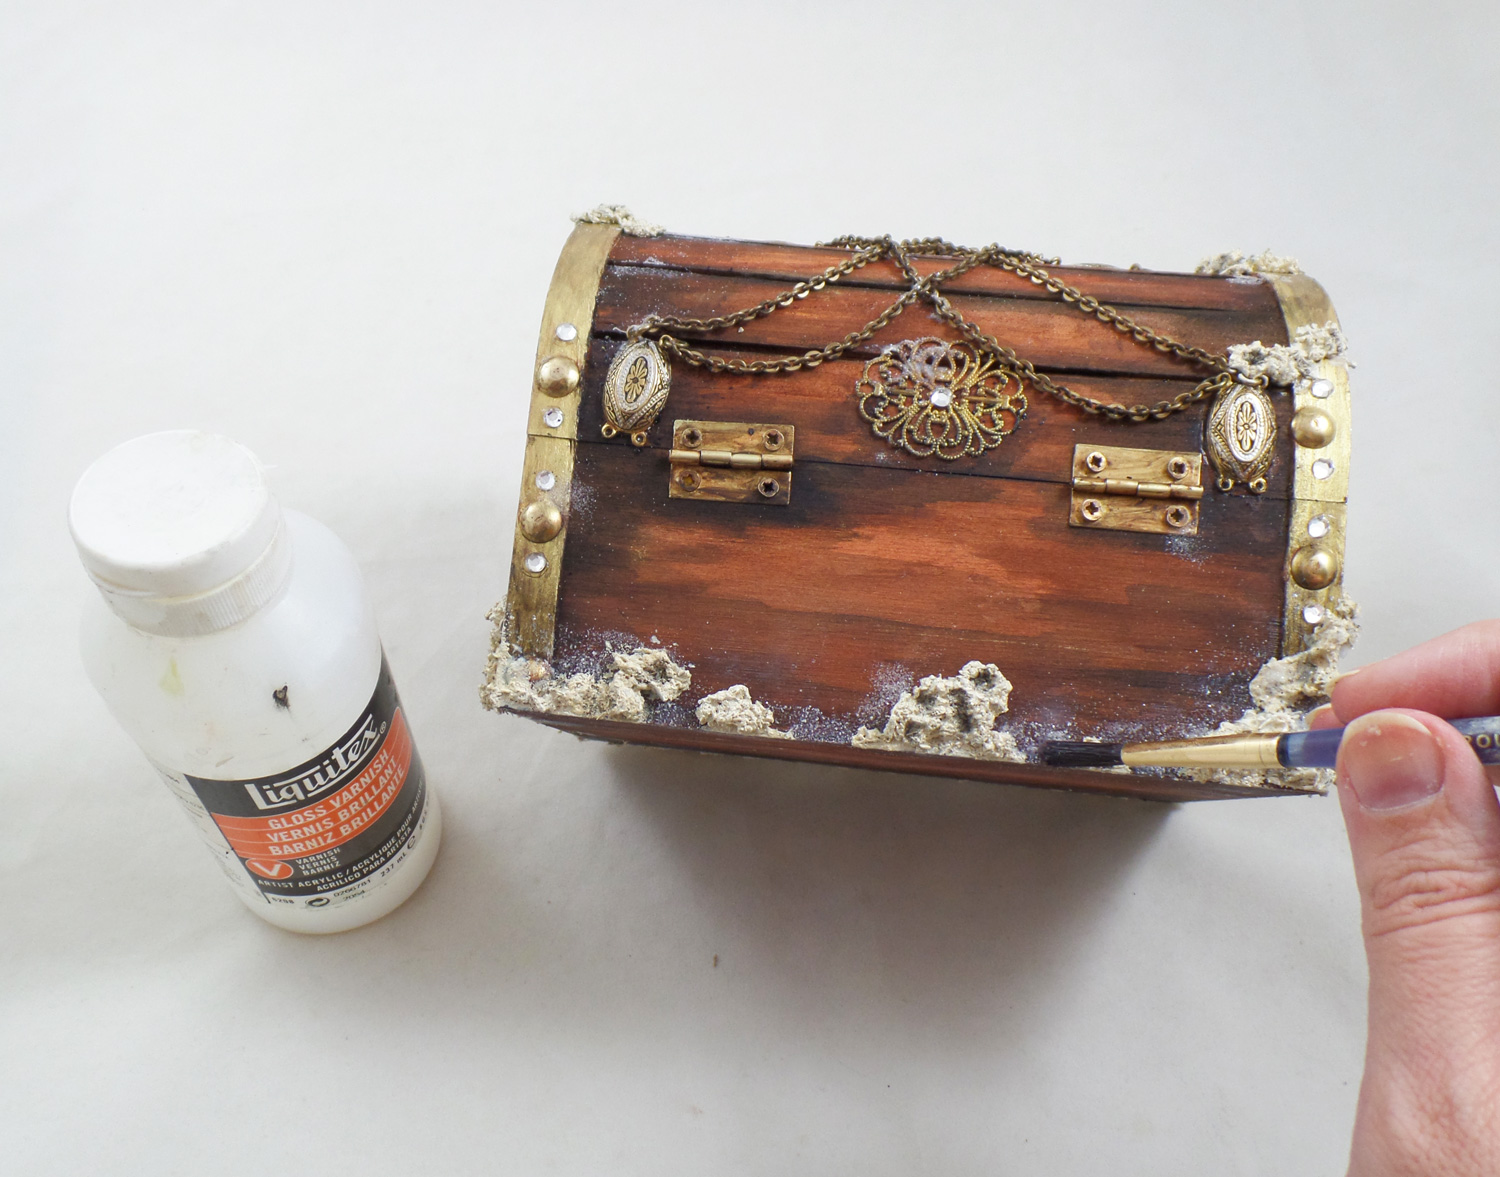
In a small cup I mixed up some White and Yellow Ocher acrylic paint with dried tea leaves and a little Beacon Gem-Tac Adhesive. I applied it around the bottom and sides of the box in small clumps to give the illusion that barnacles had started to grow around this long forgotten treasure. Once the faux barnacles were dry I did a Black acrylic paint wash to give them detail. I added some Liquitex Gloss Varnish over and around the edges of the barnacles and sprinkled on Stampendous Crystal Snow White Glitter. Once dry it looked like salt deposits from sea water.
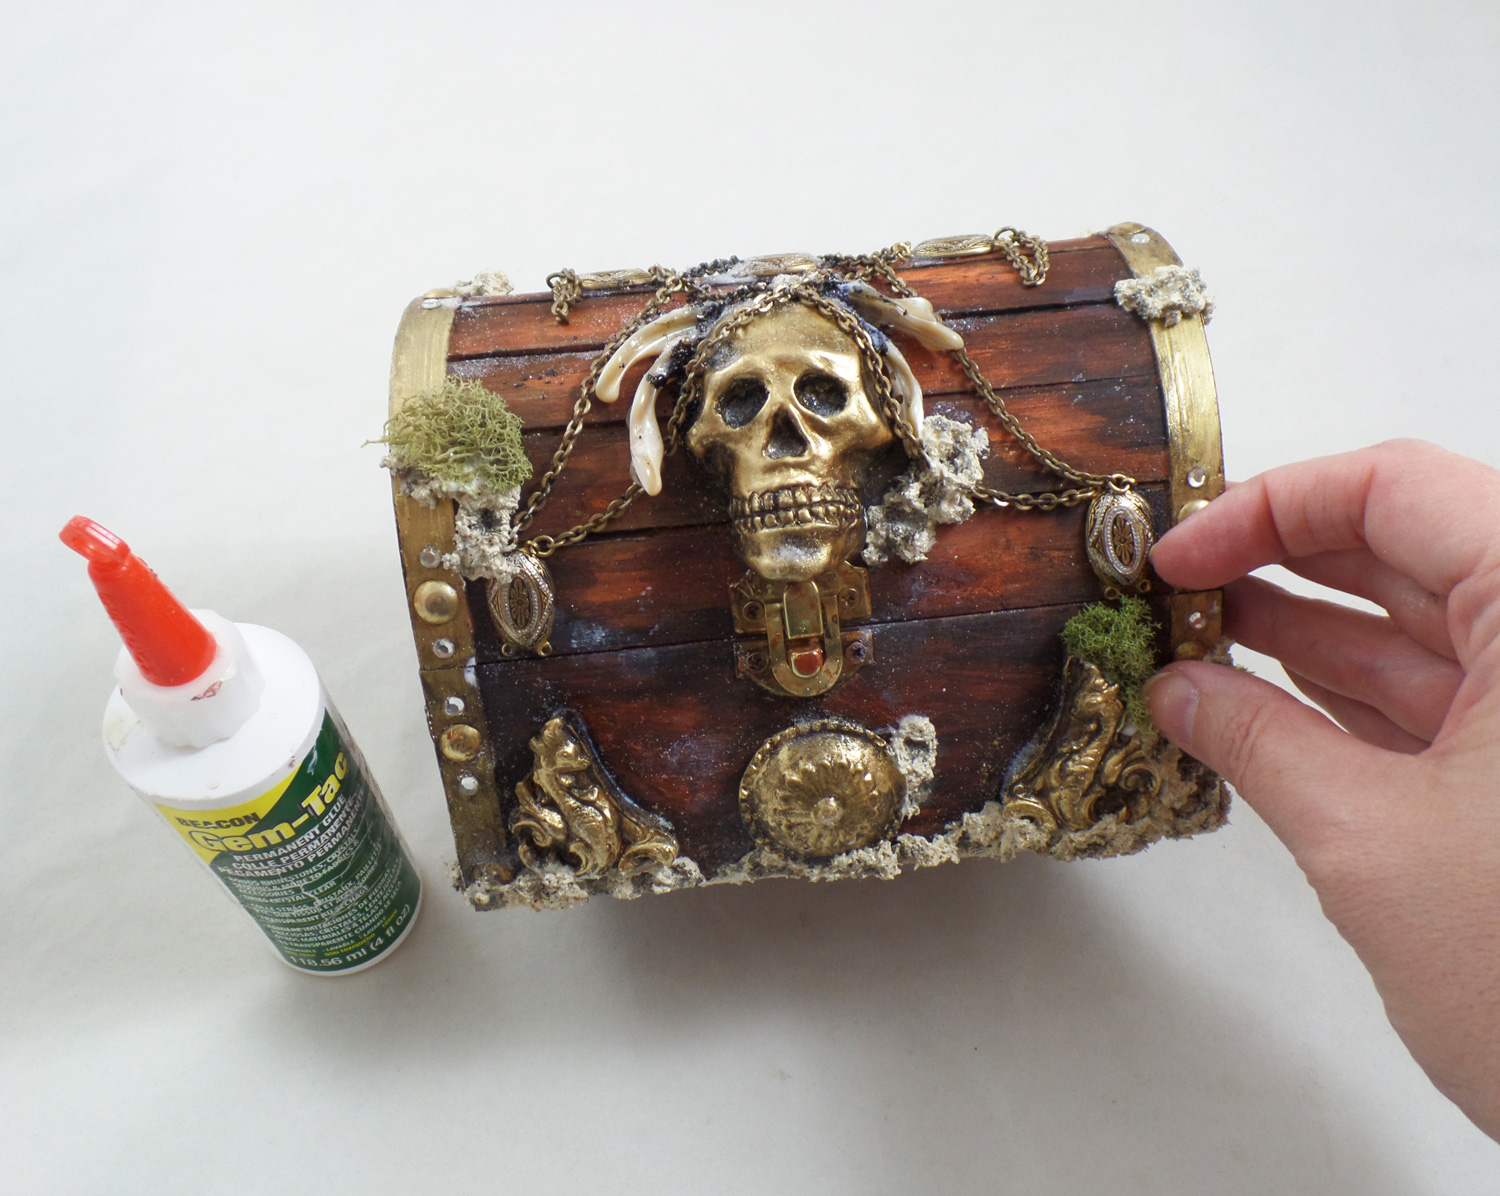
I randomly applied more spots of varnish and glitter to give a grungy, salty appearance to the treasure chest. I glued on tiny bits of moss on the box along the edges and embellishments.
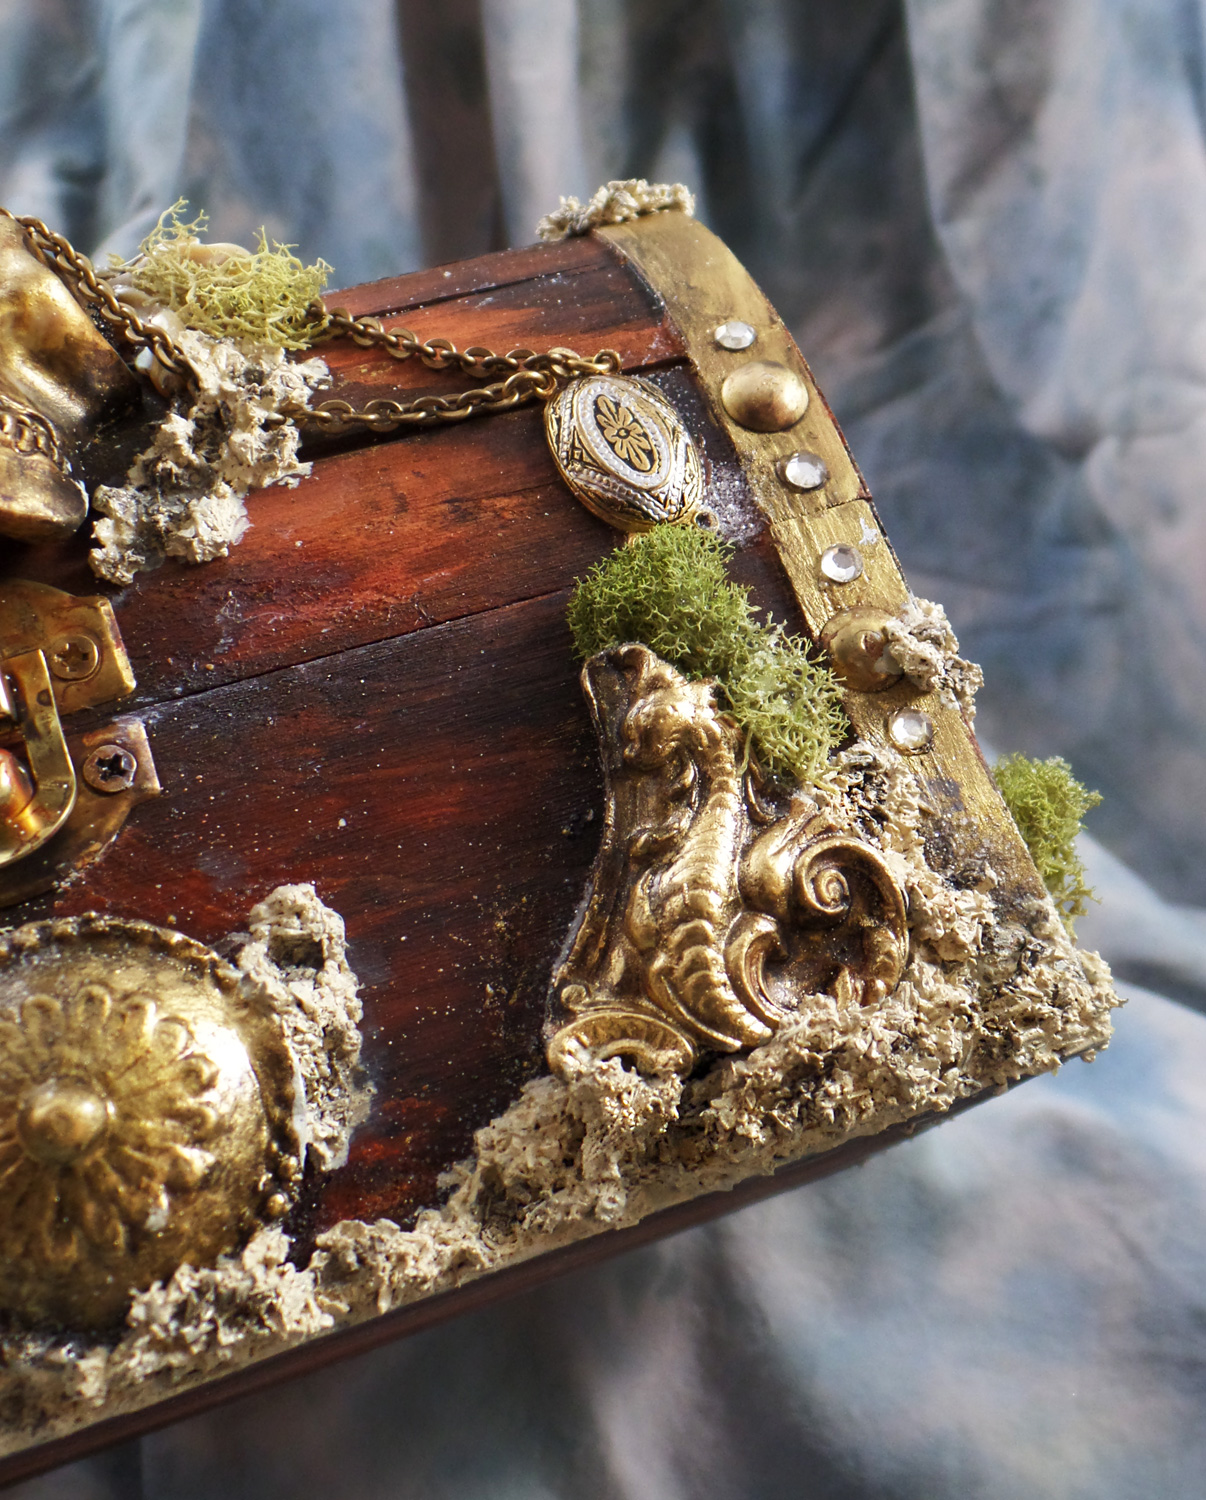
When applying the faux barnacle mixture to the box I was sure to press it against the resin pieces and edges of the box for a good bond. To make it look like the barnacles had grown haphazardly I pushed the back end of a paint brush here and there into the tea leaves and paint mixture.
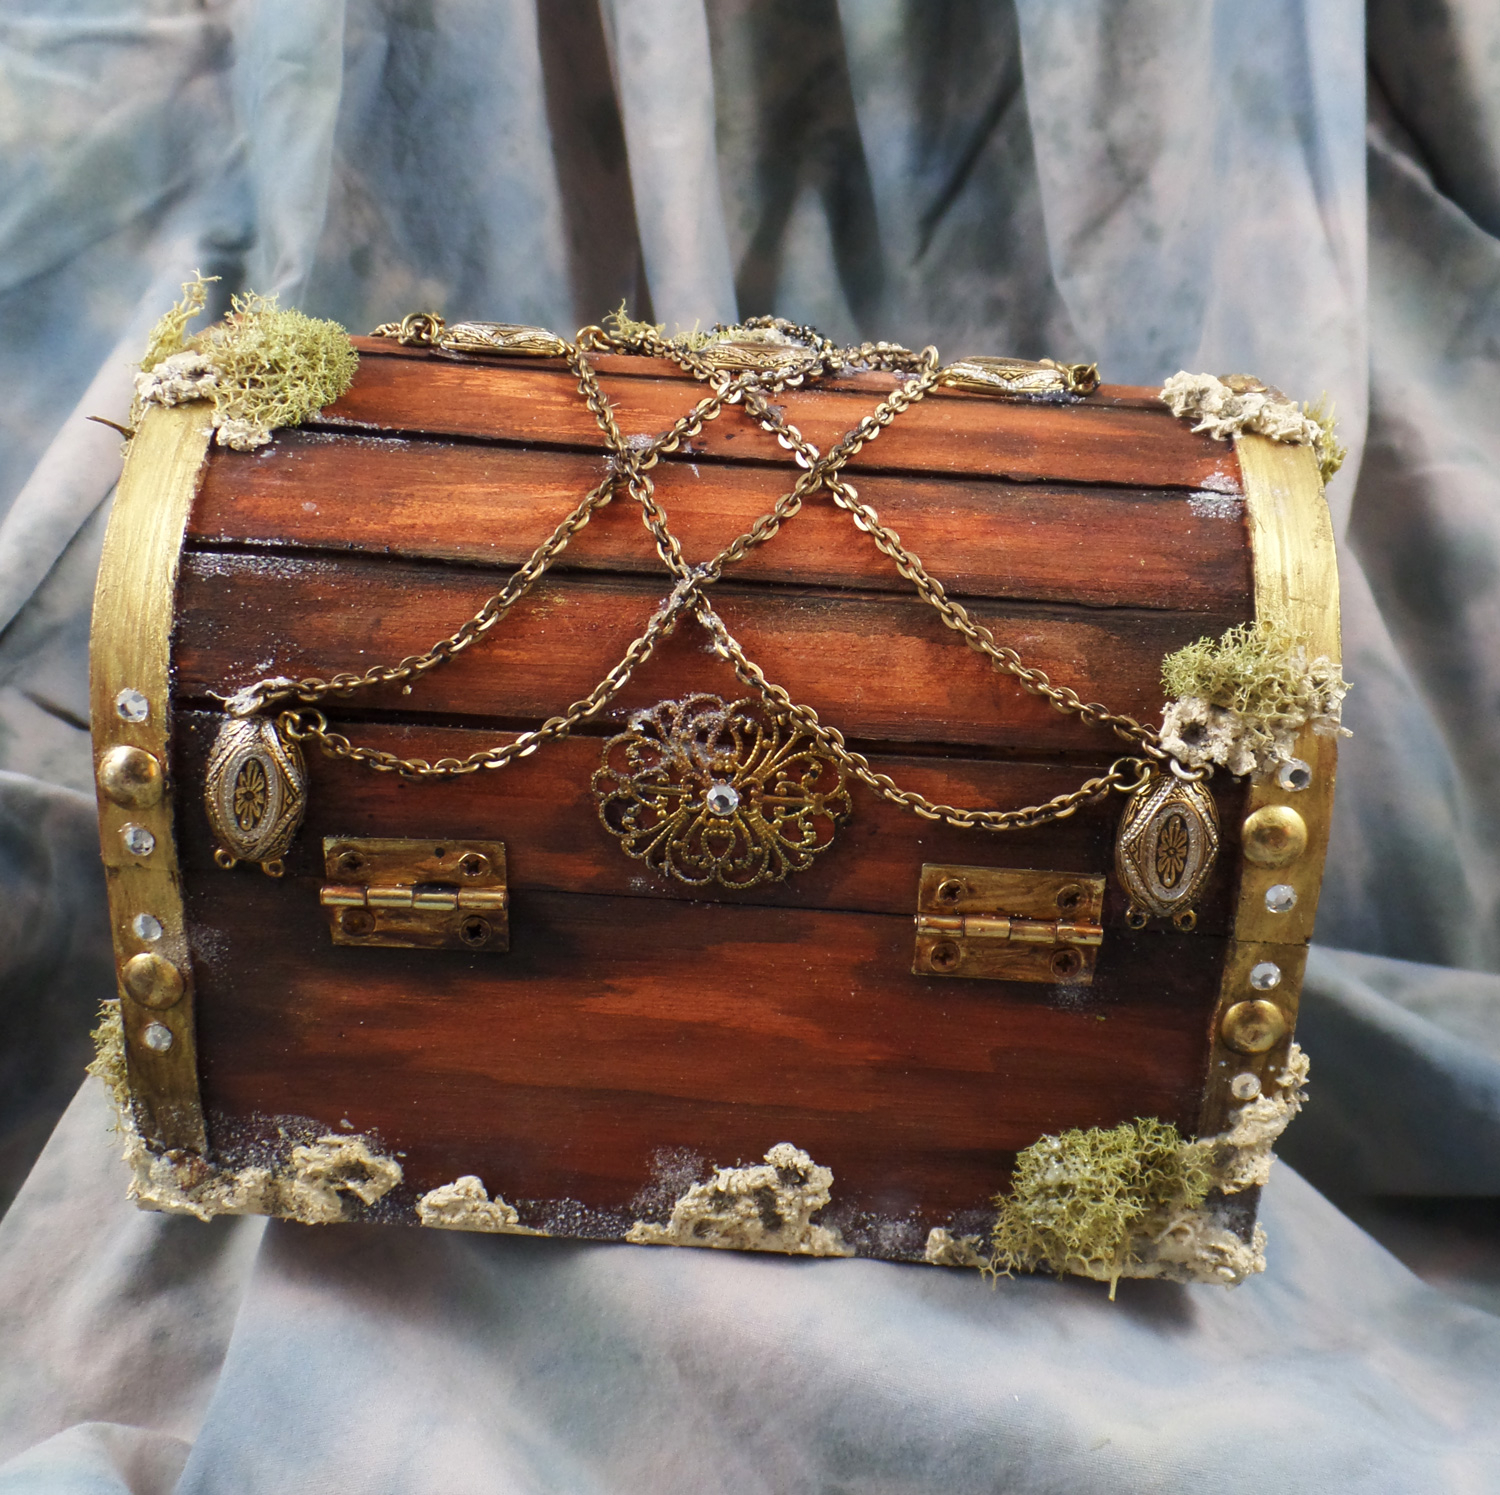
Not forgetting the back of the treasure chest, I had glued on more bracelet pieces, metal embellishments and tiny vintage glass rhinestones. With the chain linked into the bracelet spacers, draped back to front on the chest, my Pirate Treasure Chest was complete!
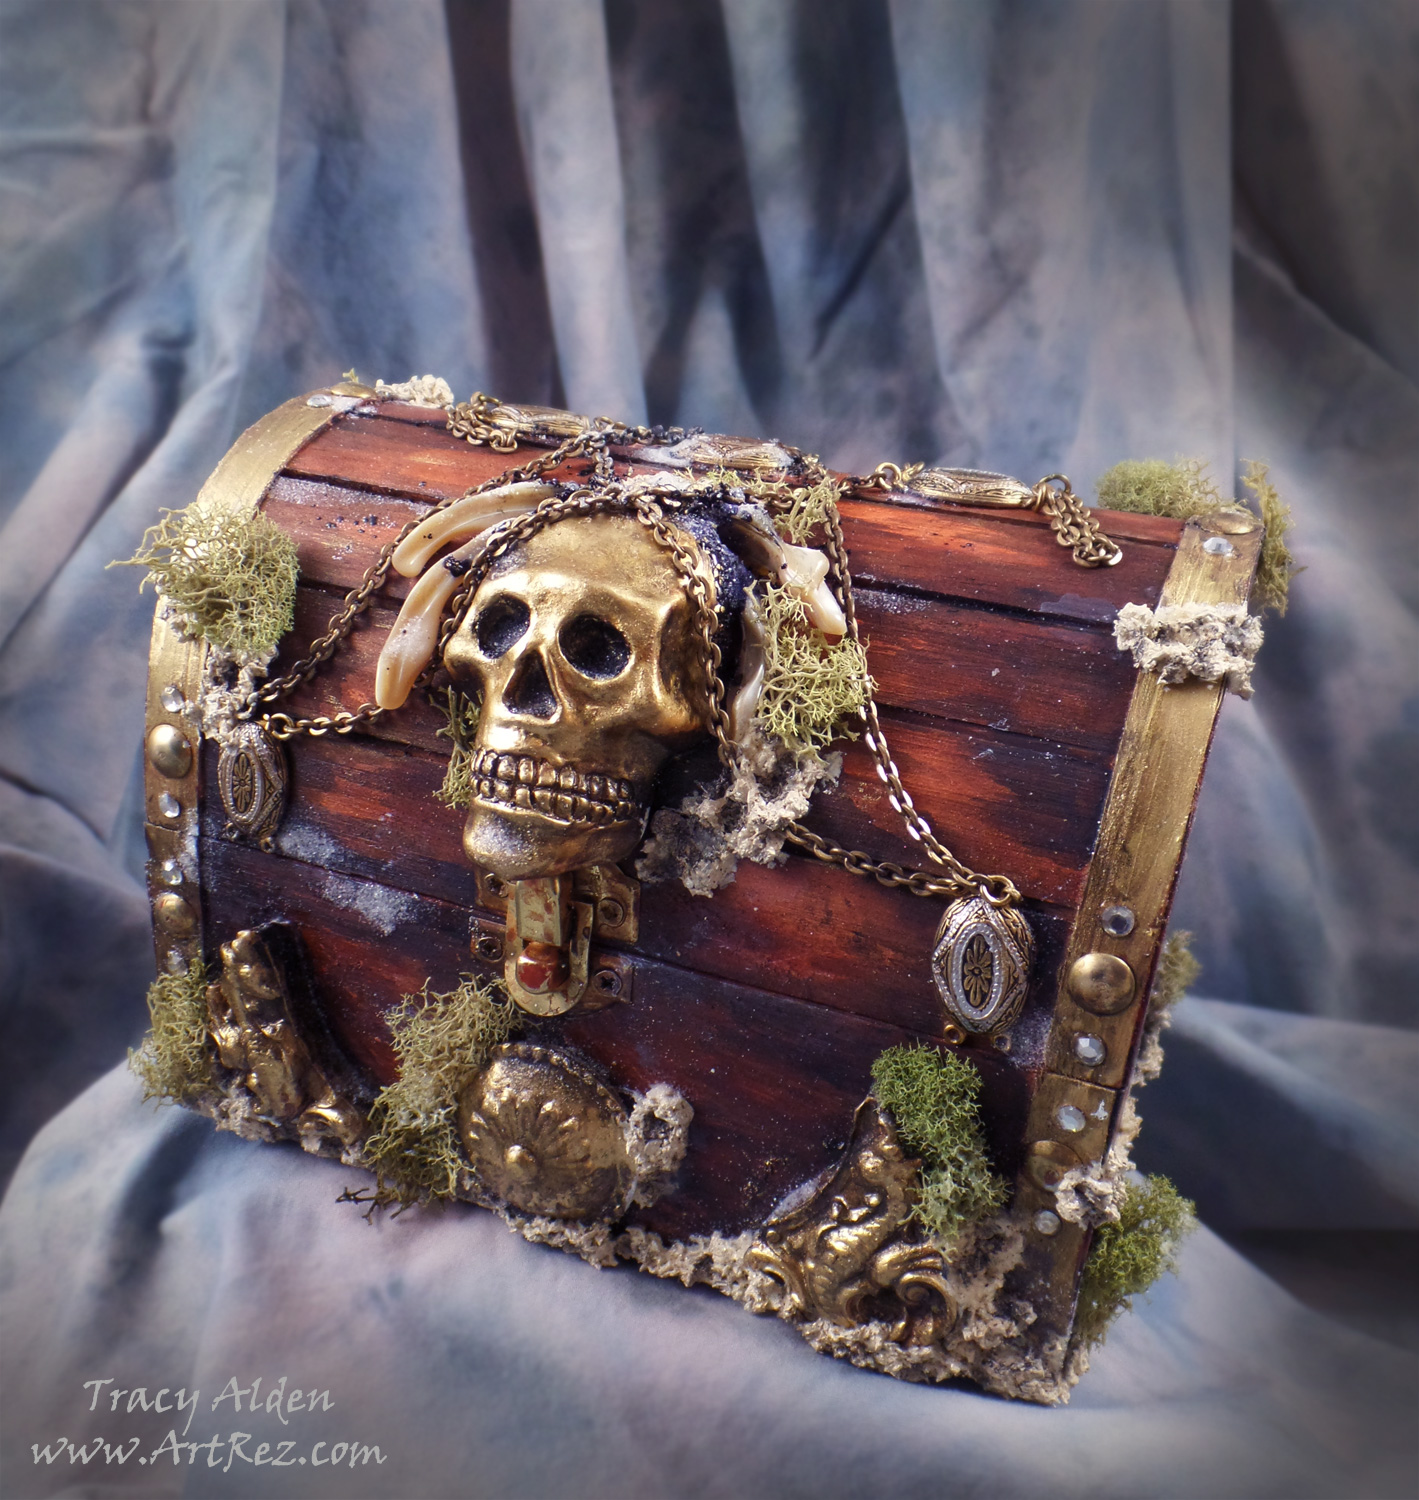
I really love how this piece came out and can’t wait to try out more of the Relics & Artifacts® line with future art projects.
What lovely mixed media treasures will you create?
Until Next Time, Safe Travels!

Ancient and Contemporary Inspired Artistry