Reindeer Romp at the LA Zoo with the SoCal Chapter of CHA!

Hello and Happy Holidays! So many things have been going on lately; with events, family, arts and crafts December already is zooming by! One of the wonderful events this month is thanks to the Southern California Chapter of the Craft and Hobby Association and the Los Angeles Zoo and Botanical Gardens.
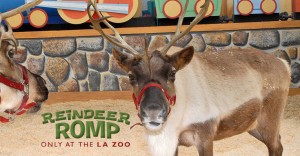
This year the LA Zoo is holding a special seasonal event called Reindeer Romp. From November 28 to January 4 real reindeer have made the L.A. Zoo their home for the holidays! To add to this wonderful experience this weekend of December 13th and 14th, at the Reindeer Romp event there is a special craft area for children to create animal themed ornaments with papercrafting supplies, from 10-4 (or until supplies last)! This special craft area is made possible by the many awesome craft businesses, companies, designers and crafters that make up the SoCal Chapter of the Craft and Hobby Association!
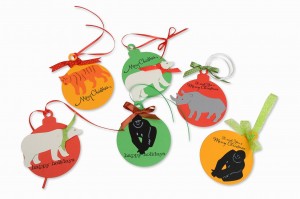
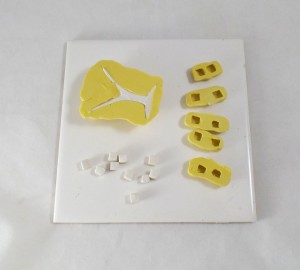
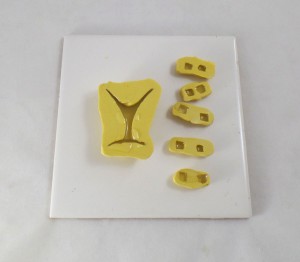
Here is some of the Zoo-rific Ornaments, featuring Ellison’s SureCut Endangered Animals Dies and Sizzix Bigz Ornament Die. With generous donations from Ellison, Stampendous, Cool2Craft, Faber Castell, Aleene’s and Curacao there was enough supplies to create ornaments for 600 children for the two day crafting event!
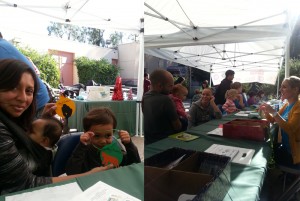
With only the first day of crafting done, already there was so many happy children and familes!
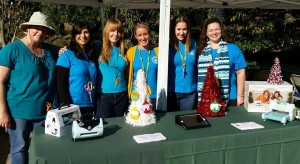
As a proud Steering Committee Member of the Southern California Chapter of the CHA I was happy to volunteer for both days of crafting with other talented and generous members of the Chapter!
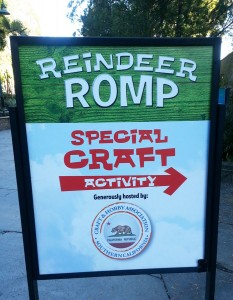
There is still time to bring your wee ones to see the wonderful animals and make holiday crafts on December 14th! Help us promote awareness of endangered animals and have festive fun with cute holiday ornaments!
Until Next Time, Safe Travels!
Happy Halloween and Crafting!

Happy Halloween!
This October has been so busy the days seem a blur. It is now Halloween and I wanted to share some of my holiday crafts I have been working on. Halloween and Fall is my favorite time of the year; the changing foliage, the seasonal crops, the food and fun of this time of year always makes me happy. What I also love is the plethora of craft supplies and home decor that become available! I am always on the hunt for new home decor and interesting crafts to create. I started slowly a few months ago. I bought the life size skeleton, a bag of bones, some pictures, stamps and laser cut wood frame saying “Witch Way”.
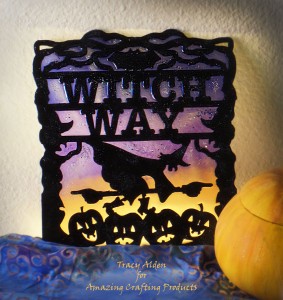
The Witch Way sign became a wonderful Faux Glass Project I created for the Amazing Crafting Products Blog and ended up giving to my mother to hang in her kitchen.
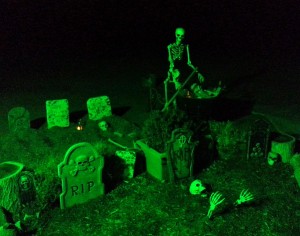
The fine fellow in the above photo, the life size skeleton digging up his cohorts, is one of my favorite finds this year. The tombstones are a mix of both store bought from years ago and upcycled foam packing covered in paint. With a few tea lights in old spaghetti jars for lighting we created a new spooky corner to our yard haunt.
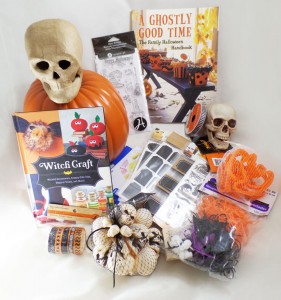
Then I found even more things on sale and in some cases early clearance. Books, more stamps, cookie cutters, ribbons, chalkboard labels, skulls of all sizes, plastic Halloween favors and even a foam pumpkin. I think I have a bit of a Halloween addiction!
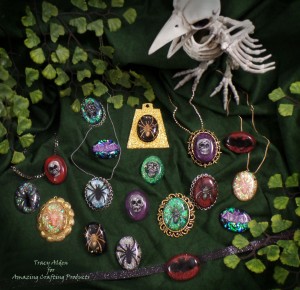
With the little plastic Halloween favors I created Glam Halloween Cabochons to give to friends. I really love how the glitter really accented the little spiders!
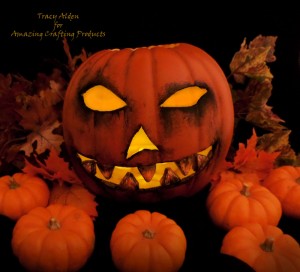
Last but not least, with the foam pumpkin I created a ever so wicked Grinning Jack O Lantern for our ever growing pumpkin patch in our yard haunt.
Wishing you all a fun and festive Halloween!
Until Next Time, Safe Travels!
De-Stress Doodles and a Creative Blog Hop
 Hello and happy new start to the week! I have been invited to join the Creative Blog Hop. I am honored to have been invited by my creative friend and design team leader from Amazing Crafting Products blog, Susan M. Brown. Thank you kindly Susan for the wonderful comments and support of my crazy crafty ideas! 🙂
I met Susan some years ago when she had an online class making a beautiful Asian style lamp from an upcycled box, that was displayed at Craft and Hobby Association show that year. We would talk a bit later when she asked me to join the Amazing Crafting Products blog and finally meet in person at the Craft and Hobby Association Mega Show of 2014! Susan has an amazing talent for all kinds of mixed media work, textures and keen eye for the perfect accent to cast for any project. Her sense of humor and interest in sci-fi/fantasy always keeps one guessing what beautiful new piece she will create. One of my favorite pieces of her artwork is this lovely Lime Slice Earring set she created.
The purpose of the Blog Hop is to introduce fellow crafters to each other and share our passion for anything crafty by answering four simple questions. So here we go!
 The project I am sharing today is not one of my Halloween or Fall projects I am normally working this time of year but instead something of a de-stress exercise. While I have never taken a Zentangle® class and only own one sadly neglected book from the series, I honestly don’t know how to create the stunning Zentangle works many other artists do. However I have always been a doodler; I doodle on my sketch books, notepads, napkins, scrap paper and the backs of receipts. I had gotten to doodling on a piece of cardstock and had randomly glued on pieces of tissue paper to test out an adhesive. I liked the random pattern and started to draw between the tissue paper. I glued on a couple of glitter scrap paper and kept going. I honestly don’t know how much time I took to make this piece but every time I worked on it I felt better, relaxed and just happy to be mucking around with paper with no rhyme or reason.
 Here is the start of the next one, still not sure what direction it will go but I know it will be fun!Now for the questions…1. What are you working on at the moment?
Besides my exercises in de-stress art I am trying to get ready for Halloween and making several Home decor projects with that theme. In the process of major home improvement of our house I am finding some of my fabric and ribbon stashes, getting me thinking about some sort of fabric craft. I also got in a new supply of hand painted beads that I can’t wait to start using. I think I start more projects than I finish!2. How does your work differ from others in your genre?
While at heart I am a mixed media artist and use everything including the kitchen sink, I find myself gravitating towards wearable art and sculpture. True one-of-a-kind art that you can wear or place around for others to see is such a personal expression of who one really is, your interests and inspiration. Art is for me an emotional experience and I feel it reflects my moods and emotions of the time I create it.3. Why do you create?I was raised to create art by my parents, who also were artists. Life without are doesn’t seem right. I can’t imagine not doing something creative! I come up with all kinds of ideas all the time for artwork and if I can’t make at least a few a physical reality I feel lost and regretful I could not create. I feel doing something artistic keeps one healthy and truly happy.4. How does your creative process work?
I wish I knew! Sometimes I get an idea like a flash of light, complete and raring to go, but then other times it is a slow, churning creature that might only come to be when I find the right clay, paper, fabric or stone. Many ideas come to me when I am drifting off to sleep or relaxing in my garden, those moments when I can clear my mind and let it wander.Now I will pass the creative pen and introduce a creative friend of mine to you!

Please give a warm welcome to Linda Root Neff, who blogs at Linda Neff the scraps of life. I had been on a trip to Michigan and was shown her beautiful Framed Piece “Beauty”. No photo can do this piece justice; the detail, texture and colors were just stunning! The fairy tale aura to her pieces seem so natural, no matter how big or small, such as in her lovely “Celebrate every day” ornament. Those wonderful pieces along with other pieces of her artwork would end up being displayed at Craft and Hobby Association shows and quite a few magazines. Linda has the amazing talent to take the most ordinary paper, wire, frames and old objects and turn them into heirlooms to be treasured for years. Do take the time to go through her blog posts and see what wonderful new treasures she is creating. 🙂
Linda, please continue “The Creative Bloghop” by answering the above questions in a blog post published next Monday (October 20th) and inviting a couple of other artists/crafters to continue the following week.Susan’s post you can find at the following link, and you can follow her links in her post to see how far this Creative blog has gone!
Until Next Time, Safe Travels!
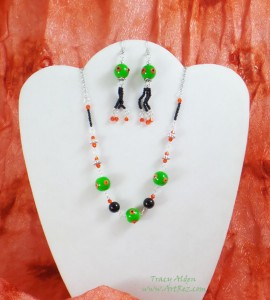
Got a Monster Eye on You! Halloween Jewelry DIY
 Oh my goodness, it is already October! Things are flying by so quick with all of the work we are doing on our house! With most of the house packed up it was hard to do any arts and crafts. I was going stir crazy with everything I needed being packed up. Finally with more rooms being finished I could start unpacking and I was able to sneak out some beads and supplies to make a few Halloween inspired projects.
My first one is a simple and ghoulish Halloween jewelry project using a bracelet and earrings set from Fiona Accessories. I rather love their line of Halloween Jewelry Fiona Accessories carries, full of the classic colors and themes, with hand painted elements.
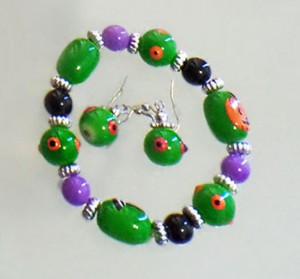
One of the pieces they carry is BR-2027 Painted Halloween Bracelet, with fun little green monster eye beads that got me thinking of turning it into a new jewelry set. Now not only does it have the awesome eyeball beads it also has very delicate hand painted beads of a pumpkin, witch’s hat and a ghost. I cut apart the bracelet and was careful to keep those beads for another project, they are just too cute.
Supplies:
Fiona Accessories BR-2027 Painted Halloween Bracelet
Needle and Flat head Nose Pliers
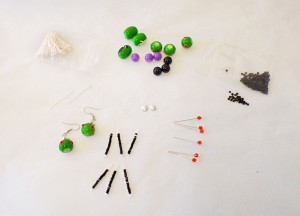
Silver tone jewelry eyepins and nailpins(21 gauge), chain, jewelry clasp and jumprings
Orange crystal beads
Black Seed Beads
Spreading out my supplies on the table I separated the beads by shape and color. Using six eye pins I threaded on black seed beads, six nail pins I threaded on orange crystal beads and on two eyepins the eyeball beads.
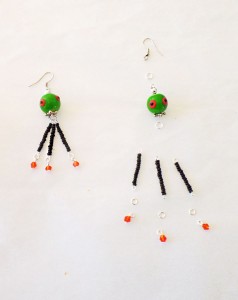
Carefully I snipped off the excess wire, and using round nose pliers I rolled the end of the wire into a loop. I repeated this with all of the jewelry wire with crystal, seed and eyeball beads on them. I opened up a jumpring with the flat nose pliers and put the jumpring through one of the crystal beads, now on a wire and the seed beads, on a wire. When I closed the jumpring with the pliers the bead became a beautiful dangle on the black seed bead length of wire. I repeated this for two more and attached them to one of the eyeball beads, creating little black “tentacles” growing out of the eyeball bead. I repeated this for the second earring.
Once I assembled both earrings I slightly bent the jewelry wire the seed beads were on to give them to look of moving tentacles. As cute as they were I wanted to make a matching necklace.
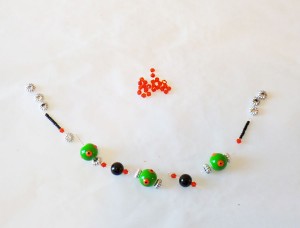
I placed the rest of the eyeball, black glass, seed, crystal and silver beads down to get an idea for the necklace layout. Using more silver eye pins I threaded on the beads, snipped off the excess wire, and using round nose pliers I rolled the end of the wire into a loop. I connected each piece to the next with more jumprings, linking all of the pieces together and added a jewelry clasp at the end to finish off the necklace.
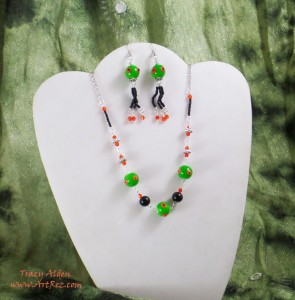
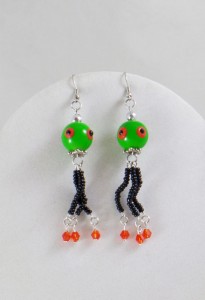
Now I have a fun and freaky monster jewelry set! What might you make with your favorite Halloween themed beads? 🙂
Until next time, safe travels!Drinks on me! Anything But a Card Challenge #36
Good morning! Today’s project tutorial is thanks to a challenge! The talented Susan M. Brown of SBartist: Painting In The Dark Blog asked me if I would be willing to be a guest designer for the Anything But a Card Challenge blog and of course I had to say yes!
Anything But a Card Challenge Challenge #36 : Summer Lovin’ – A celebration of all things summer! Think summer weather, vacations, sunflowers, beach parties, cold drinks and barbecues… bright colors and wide open sky. Pool parties all day, then sitting in lawn chairs sipping drinks and watching the night sky. The warm summer months have me thinking of cold drinks, sunny days and BBQs with family and friends. My project for the Anything But a Card Challenge for this month played perfectly into that inspiration!
One of the aspects of having a party or BBQ is that someone is bound to spill a drink. While many find it an annoyance I decided to use it as a inspiration!
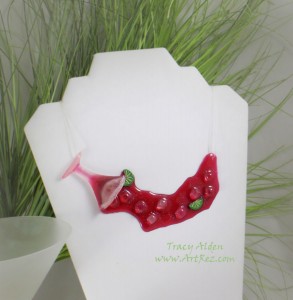
Starting with the idea of a spilled Pomegranate Martini or Cosmo, I came up with a wearable art piece called “Drinks on me!”
Supplies:
Amazing Mold Putty
Amazing Clear Cast Resin
Stampendous Multi Ultra Fine Crystal Glitter
Craft Knife
Polymer Clay
Stylus
Elastic jewelry cord
Small drill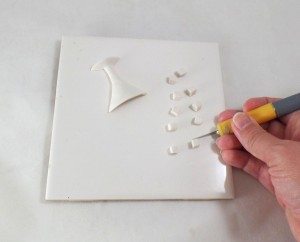
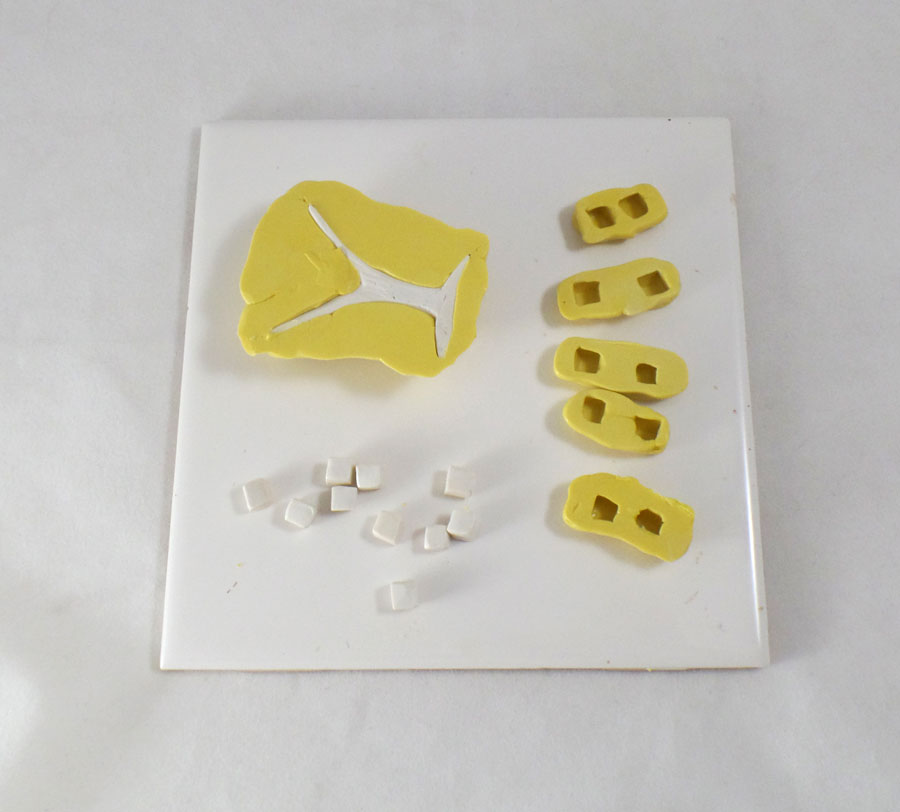
Using a stylus and a craft knife, I shaped and carved half a martini glass and ice cubes out of polymer clay. I then baked the clay pieces on the tile to manufacturer’s instructions.
After I baked the polymer clay, I lightly sanded and trimmed the edges of the pieces with a craft knife and an emery board. Once the polymer pieces are cleaned of dust, I used Amazing Mold Putty to make molds of the pieces.
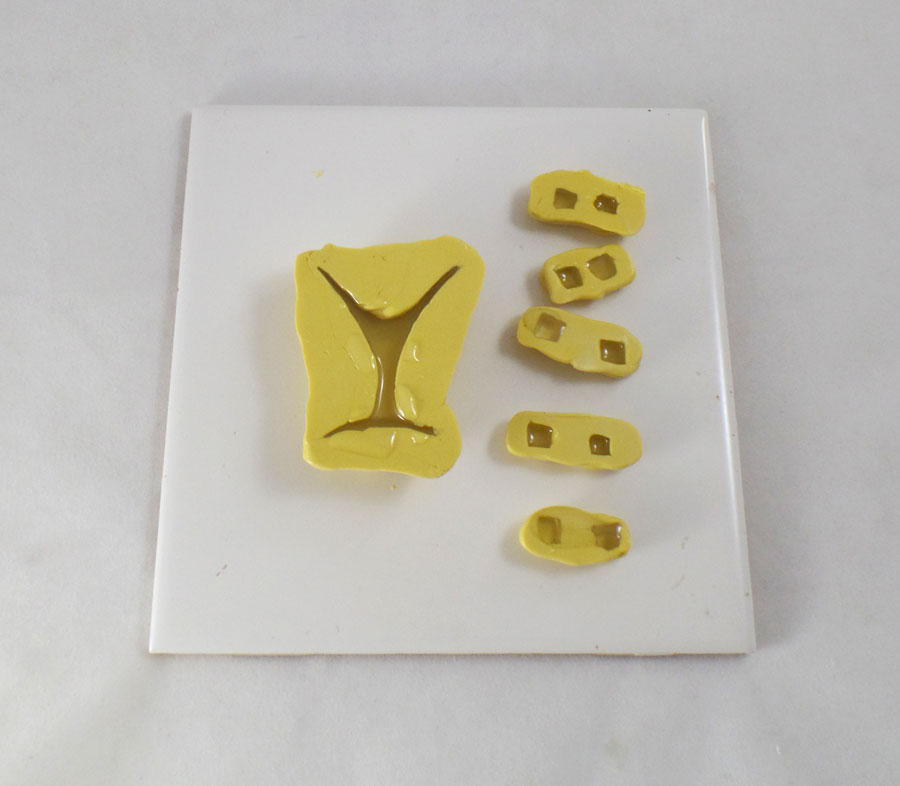
Once the molds were cured I poured Amazing Clear Cast Resin into the molds and let it set for about five hours. The pieces came out frosted by using the Mold Putty and that was the perfect look for the glass and ice cubes.
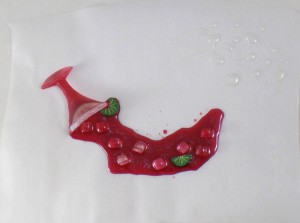
I then placed the glass upside down on *parchment paper and poured Amazing Clear Cast Resin tinted with Alumilite Red Dye in a controlled U shape. I coated the ice cube resin pieces with untinted Clear Cast and placed them gently into the tinted resin to give the illusion of melting ice. I added a few polymer clay lime cane slices, sprinkled a touch of Stampendous Multi Ultra Fine Crystal Glitter on the tinted resin to finish off the look and let it all cure.
*The resin has to be poured on parchment paper otherwise the resin will soak into any other paper.
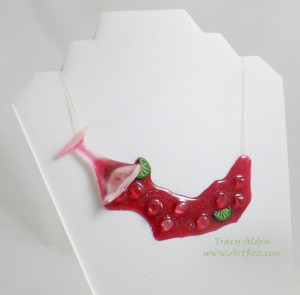
I drilled a hole on each side of the pendant and threaded clear elastic jewelry cord on for easy wear.
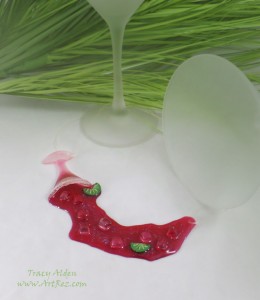
One of the really fun aspects of this project is with a simple change of dye used with the resin you can create any spilled drink you would like!
What might YOU make for the Anything But a Card Challenge? CLICK HERE to link up your projects! 🙂
Until next time, safe travels!

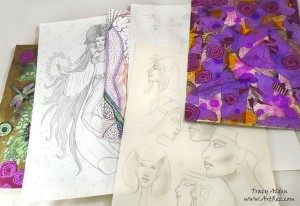
Ancient and Contemporary Inspired Artistry